1
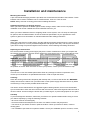
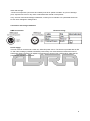
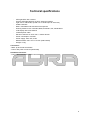
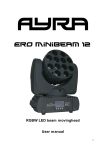
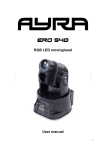
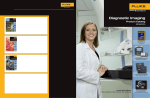
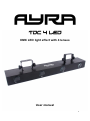
DMX LED light effect with 4 lenses
User manual
1
Safety precautions
WARNING: This unit may cause serious injury to the eyes when used incorrectly. It is therefore
strongly advised to read this user manual carefully, to get familiance yourself with the functions of this
device.
WARNING: This unit must be operated by, or under the supervision of an adult. This device is not
suitable for children.
WARNING: Do not look directly into the beam from a short distance. This may cause serious injury to
the eyes. Ayra is not responsible for any injuries caused by incorrect use of this device.
Installation requirements:
- Always check the power supply to which you want to connect the device. If the voltage requirements
do not meet, do not connect the device as this may cause serious damage.
- This device must be installed by a professional technician, in a standing or hanging position. Only
use the included mounting brackets if you want to position the unit against a ceiling or truss system.
- When installed in a hanging position above your audience, this unit MUST be secured by using a
safety cable, capable of holding 10x the weight of this device.
- The unit is designed to be installed with a halfcoupler or G-clamp, by using the included mounting
bracket. Direct installation with proper bolts is also possible.
- Make sure there are no flammable objects in the direct environment of the device.
- Do not block the beam-exit.
- Keep a minimum distance of 0.25 meter from any walls to provide sufficient cooling.
- Make sure the beam-exit is not blocked by any objects in the near environment.
- Always use the included power supply. Contact your local dealer for a replacement unit if necessary.
Maintenance and protection
- Keep the unit away from dusty environments, as this may have negative effects on the optics. Clean
the optics with a small, soft brush and vacuum cleaner when needed. Clean the housing of the unit
with a damp cloth. WARNING: Always disconnect the unit from the power supply when cleaning the
unit. Reconnect the unit only when any moist on the fixture has evaporated completely.
- Do not switch the power on and off frequently, as this may cause serious damage to the unit.
- Avoid heavy shocks and collision during transport and use, as this may cause damage to the LED
light source, electronic circuit, optics and housing.
- Keep the device away from moisture, rain, water or any liquids as this may cause a short circuit
and/or electric shocks. If any liquid enters the unit, power supply or housing of the unit, disconnect the
unit immediately and do not reconnect the power supply. Contact your local dealer or technician to
inspect the unit for any damage.
2
Box contents
Box contents
1x TDC 4 LED fixture
1x power cable
Unit and accessory inspection
- Always use the supplied power cable to connect the unit to a power supply. If the cable appears
broken or has visible damage, do not use it.
- If the unit is not going to be used for a longer period of time, disconnect it from the power supply and
store it in a dust-free environment.
- Always check the unit for possible damage before use. If you suspect that something is wrong with
the unit, do not connect it to a power source! When you suspect that your unit is broken or damaged,
contact your local dealer or a certified technician to inspect the unit.
- When your device does not generate any light, do not look directly into the lens. When the fixture
suddenly produces a beam, it may cause injury to your eyes.
3
Device overview
1. Beam output
2. Adjustable bracket
3. IEC Power inlet-outlet
4. Control panel display with MENU, UP and DOWN buttons
5. Built-in microphone for sound active mode
6. DMX input (3P XLR)
7. DMX output (3P XLR)
8. Fuse holder
4
Setting up the unit
To activate the unit, connect the included power supply with the unit and a suitable 230V, 50 Hz power
outlet. The unit will activate directly after it is plugged in to a wall outlet or other power source.
The status of the fixture is shown on the display. Certain values determine the current status and will
change when you push buttons on the control panel. The buttons each have their own function, for
easy navigation in the control panel. When connecting the unit for the first time,
Press the ‘MENU’ button to switch modes, so you can easily select the built-in master/slave, music
controlled or DMX mode. Press ‘Enter’ to confirm a setting.
Display codes:
AUTO = Gobo effect set (automatic program with one of the preset figures on a standard speed)
AUT1 = Gobo effect 1
AUT2 = Gobo effect 2
AUT3 = Gobo effect 3
AUT4 = Gobo effect 4
AUT5 = Gobo effect 5
AUT6 = Gobo effect 6
AUT7 = Gobo effect 7
AUT8 = Gobo effect 8
AUT9 = Gobo effect 9
AUTA = Gobo effect 10
AUTB = Gobo effect 11
SOU1 = Master fixture sound active (displayed through ON/OFF status)
SLAD = Slave function
SLA1 = Slave function 1
SLA2 = Slave function 2
ADDR = DMX address function, to set the DMX starting address
A001 – A512 = DMX address setting
TEST = Auto color check, all LEDs of each color will light up.
Music controlled mode:
The music controlled mode is used to play a series of programs on the beat of the music. For optimal
results, place the TDC 4 LED fixture close to a speaker or subwoofer. Too much distance or a lack of
bass will cause the unit to freeze as it will not detect a music source.
Auto mode:
The unit will play one of the selected auto programs continuously, until you desire to change the
program or user mode.
5
DMX control mode:
This fixture can be controlled using a DMX-controller and standard XLR male to XLR female cable.
When doing so, make sure your DMX-controller is capable of controlling your fixture. When in doubt,
contact your local dealer for advice.
Set the correct address on the digital display, you are able to choose a value between 001 and 512.
DMX channel control:
Channel 1: 0 - 100% dimmer (value 0 – 255)
Channel 2: 0 – 100% dimmer (value 0 – 255)
Channel 3: 0 – 100% dimmer (value 0 – 255)
Channel 4: 0 – 100% master dimmer (value 0 – 255)
Channel 5: Strobe speed, slow to fast (value 0 – 255)
Channel 6: Auto-select pattern (value 0 – 255)
6
Installation and maintenance
Mounting the bracket
A pre-mounted dual hanging bracket is provided, with screwknobs at both side of the brackets. These
brackets can be used to install the unit to a fixed structure, such as a T-bar or truss.
NOTE: Always use both mounting points when installing this fixture!
Installing the fixture in a hanging position
When you wish to position the fixture against a wall, ceiling or beam, make sure to use proper
installation tools and let a skilled technician install the fixture for you.
When you wish to install the fixture to a lighting stand or truss system, use a G-clamp or halfcoupler
for optimal, safe and stable fixation. Check the technical specifications of your light stand or truss
system to gather more information on maximal loads and other safety precautions.
Transport
When using this fixture in mobile setups, provide sufficient protection during transport. Use the original
packaging of this unit, or use a professional flightcase with proper foam inlay. This way the electronics,
optics and housing are protected against severe shocks, exterior damage and failing electronics.
Replacing the internal fuse
First check whether a failing power supply may be the cause of malfunction. When you suspect that
the internal fuse is broken, the fuse can be replaced by removing the fuse cover, located directly next
to the power in/outlet.
WARNING: Before changing the fuse, always disconnect the fixture from your wall outlet or any other
power supply to prevent electric shocks.
Always replace a broken fuse with a fuse that has the same type and rating. After the fuse has been
replaced, always close the fuse-cover. Reconnect the fixture to your power supply and check whether
the problem is solved. When this does not solve your problem, contact your local dealer for help.
Spare parts
This unit has no user serviceable parts inside. When any damage to internal components occur,
contact your local dealer or a specialized technician in order to repair the fixture.
Cleaning:
Clean the housing of the fixture frequently with a damp cloth, to remove dust and/or dirt. WARNING:
Always disconnect the fixture from your wall outlet or other power supply and let the fixture dry before
reconnecting it. This prevents possible electrical shocks.
The lenses can be cleaned with a non-aggressive glass cleaning solution, but is not recommended.
Ayra recommends to clean the mirror and lens with a fine brush, while removing dust and/or dirt with a
vacuum cleaner. Avoid touching the lenses with your bare fingers, to prevent fingerprints on the optics.
Checkup
To prevent dangerous situations, make sure your fixture is in optimal condition before using it. Check
your fixture frequently by using the following checklist:
- All screws must be mounted tightly.
- Check all screws and metal parts for corrosion. No visible corrosion may be present.
- The exterior of your fixture must be in optimal condition. Check your fixture for dents, cracks or
missing parts.
- Your installation spot must be in optimal condition. Check your installation spot for corrosion, cracks,
7
dents and strength.
- Electrical components (connectors and cables) must be in optimal condition. Any form of damage
(cuts, exposed wire cores or any other visual deformities should not be present.
If any visual or mechanical damage is detected, contact your local dealer or a specialized technician.
Do not use a damaged or failing fixture.
Connectors and wiring schematics:
DMX-connections:
Electrical wiring:
Power supply:
This unit must be connected to a 230V AC, 50/60 Hz power source. The fixture is provided with an IEC
in- and outlet, making it possible to distribute power easily over several fixtures without the need of
extra power strips. The fixture is capable of powering up to 8 other TDC 4 LED fixtures, after that the
power supply needs to be renewed.
8
Technical specifications
-
LED light effect with 4 lenses
Projects LED light-patterns on floors, walls and ceilings
Light source: 256 LEDs, spread over 4 clusters (64 for each lens)
6 DMX-channels
Music controlled mode with internal microphone
Working modes: music controlled, DMX, automatic, test, master/slave
LCD-display with menu-buttons
Included power cable
Electronic dimmer for each color + master dimmer
Power consumption: 30 Watt
Power supply: 230V AC, 50 Hz
Measurements: 990 x 210 x 170 mm (with bracket)
Weight: 4.5 kg
Connectors:
- DMX: 3p XLR male and female
- Power: IEC power connector (inlet/outlet)
Included accessories:
- Power cable with Shucko & IEC connectors
9