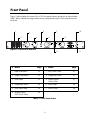
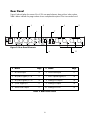
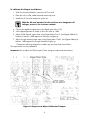
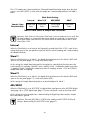
1
Model 2192
Master Digital Audio Interface
Manual Part Number: 65-0701
Revision 1.02
Universal Audio, Inc.
1700 Green Hills Road
Scotts Valley, CA 95066-4926
831-440-1176 voice
831-461-1550 fax
877-698-2834 technical support
[email protected]
www.uaudio.com
Notice
Important Safety Instructions
Before using this unit, be sure to carefully read the applicable items of these operating instructions
and the safety suggestions. Afterwards keep them handy for future reference. Take special care to
follow the warnings indicated on the unit, as well as in the operating instructions.
Water and Moisture – Do not use the
unit near any source of water or in
excessively moist environments.
Object and Liquid Entry – Care should
be taken so that objects do not fall, and
liquids are not spilled, into the enclosure
through openings.
Ventilation – When installing the unit in a
rack or any other location, be sure there is
adequate ventilation. Improper ventilation
will cause overheating, and can damage the
unit.
Heat – The unit should be situated away
from heat sources, or other equipment that
produces heat.
Power Sources – The unit should be
connected to a power supply only of the type
described in the operating instructions, or as
marked on the unit.
Power Cord Protection – AC power
supply cords should be routed so that they
are not likely to be walked on or pinched by
items placed upon or against them. Pay
particular attention to cords at plugs,
convenience receptacles, and the point
where they exit from the unit. Never take
hold of the plug or cord if your hand is wet.
Always grasp the plug body when
connecting or disconnecting AC.
Grounding of the Plug – This unit is
equipped with a 3-wire grounding type
plug, a plug having a third (grounding) pin.
This plug will only fit into a grounding-type
power outlet. This is a safety feature. If you
are unable to insert the plug into the outlet,
contact your electrician to replace your
obsolete outlet. Do not defeat the purpose of
the grounding-type plug.
Carts and Stands – The unit should be
used only with a cart or stand that is
recommended by the manufacturer. The unit
and cart combination should be moved with
care. Quick stops, excessive force and
uneven surfaces may cause the unit and cart
combination to overturn.
Wall Or Ceiling Mount – The unit should
be mounted to a wall or ceiling using only
equipment designed for that purpose.
Cleaning – The unit should be cleaned only
with a damp cloth and mild soap if
necessary. Chemical cleaners may damage
the silkscreen and/or finish.
Nonuse Periods – The AC power supply
cord of the unit should be unplugged from
the AC outlet when left unused for a long
period of time.
Damage Requiring Service – The unit
should be serviced by qualified service
personnel when:
•
The AC power supply cord or the
plug has been damaged;
•
Objects have fallen or liquid has
been spilled into the unit;
•
The unit has been exposed to rain;
•
The unit does not operate normally
or exhibits a marked change in
performance;
•
The unit has been dropped, or the
enclosure damaged.
Servicing – The user should not attempt to
service the unit beyond that described in the
operating instructions. All other servicing
should be referred to qualified service
personnel.
2
FCC Compliance
This equipment has been tested and found to comply with the limits for a Class B digital device,
pursuant to part 15 of the FCC Rules. These limits are designed to provide reasonable protection
against harmful interference in a residential installation.
This equipment generates, uses and can radiate radio frequency energy and, if not installed and
used in accordance with the instructions, may cause harmful interference to radio communications.
However, there is no guarantee that interference will not occur in a particular installation.
If this equipment does cause harmful interference to radio or television reception, which can be
determined by turning the equipment off and on, the user is encouraged to try to correct the
interference by one or more of the following measures:
•
Reorient or relocate the receiving antenna.
•
Increase the separation between the equipment and receiver.
•
Connect the equipment into an outlet on a circuit different from that to which the receiver
is connected.
•
Consult the dealer or an experienced radio/TV technician for help.
Caution: Changes or modifications not expressly approved by Universal Audio could void the
user's authority to operate the equipment.
Disclaimer
This manual provides general information, preparation for use, installation and operating
instructions for the Universal Audio 2192 Master Digital Audio Interface. The information
contained in this manual is subject to change without notice.
Universal Audio, Inc. makes no warranties of any kind with regard to this manual, or the product(s)
it refers to, including, but not limited to, the implied warranties of merchantability and fitness for a
particular purpose. Universal Audio, Inc. shall not be liable for errors contained herein or direct,
indirect, special, incidental, or consequential damages in connection with the furnishing,
performance, or use of this material or the product(s).
Copyright
© 2004 Universal Audio, Incorporated. All rights reserved.
This manual and any associated software, artwork, product designs, and design concepts are
subject to copyright protection. No part of this document may be reproduced, in any form, without
prior written permission of Universal Audio, Inc.
Trademarks
LA-2A, 1176, 2-610, M610, 2108, 6176, 2192, UAD-1, and the Universal Audio, Inc. logo are
trademarks of Universal Audio, Inc. ADAT® is a registered trademark of Alesis Corporation. Other
company and product names mentioned herein are trademarks of their respective companies.
3
Contents
Notice ....................................................................................2
Important Safety Instructions .................................................................................... 2
FCC Compliance .................................................................................................... 3
Disclaimer.............................................................................................................. 3
Copyright .............................................................................................................. 3
Trademarks............................................................................................................ 3
Contents .................................................................................4
Introduction ............................................................................7
Analog Ears, Digital Minds....................................................................................... 7
Features ................................................................................................................ 9
Specifications....................................................................................................... 10
Front Panel...........................................................................13
Rear Panel........................................................................................................... 14
Block Diagram ...................................................................................................... 15
Connections ..........................................................................16
AC Power Input ................................................................................................... 16
AES/EBU Digital I/O ............................................................................................ 16
S/PDIF Digital I/O ................................................................................................ 17
Word Clock I/O................................................................................................... 17
ADAT Optical Digital I/O....................................................................................... 18
Analog I/O.......................................................................................................... 18
Analog Line Trims ................................................................................................. 19
Line Trim Procedure .............................................................................................. 19
Output Level Meter Calibration .............................................................................. 20
Ground Isolation Jumpers....................................................................................... 22
4
Controls ................................................................................23
LED Level Meters .................................................................................................. 23
Clock Source........................................................................................................ 23
Sample Rate Select ............................................................................................... 25
Clock Status Lamp................................................................................................. 26
Analog Outputs DAC Source Select ........................................................................ 26
AES/SPDIF Controls.............................................................................................. 27
Digital Outputs Source Select ................................................................................. 27
Power Lamp ......................................................................................................... 28
Power Switch ....................................................................................................... 28
Clocking ...............................................................................29
Flexibility ............................................................................................................. 29
Subclocking/Overclocking ..................................................................................... 29
Reclocking ........................................................................................................... 29
Analog to Digital Conversion.................................................30
A/D Using Internal Clock....................................................................................... 30
A/D Using External Clock ...................................................................................... 31
Digital to Analog Conversion.................................................32
D/A Using Internal Clock....................................................................................... 32
D/A Using Digital Audio Source Clock .................................................................... 33
D/A Using External BNC Word Clock ..................................................................... 34
D/A Using ADAT Clock with AES/SPDIF Audio ........................................................ 35
D/A Using AES/SPDIF Clock with ADAT Audio ........................................................ 36
Transcoding..........................................................................37
Transcoding Using Internal Clock............................................................................ 37
Transcoding Using Digital Audio Clock .................................................................... 38
Transcoding Using Alternate Clock ......................................................................... 39
5
Diagrams .............................................................................40
Frequency Response ............................................................................................. 40
Dynamic Range: A/D ............................................................................................ 41
Dynamic Range: D/A ............................................................................................ 41
Mastering Setup................................................................................................... 42
Digital Audio Workstation Setup ............................................................................ 42
8-Channel Pro Tools Setup ..................................................................................... 43
Index ...................................................................................44
List of Figures
Figure 1: Front Panel Elements .......................................................................................... 13
Figure 2: Rear Panel Elements........................................................................................... 14
Figure 3: Block Diagram ................................................................................................... 15
Figure 4: Output Level Meter Calibration Trimpots............................................................... 21
Figure 5: Frequency Response .......................................................................................... 40
Figure 6: A/D Dynamic Range .......................................................................................... 41
Figure 7: D/A Dynamic Range .......................................................................................... 41
Figure 8: Typical Mastering Setup ..................................................................................... 42
Figure 9: Typical DAW Setup............................................................................................ 42
Figure 10: Typical Pro Tools HD Setup................................................................................ 43
List of Tables
Table 1: Front Panel Index ................................................................................................ 13
Table 2: Rear Panel Index................................................................................................. 14
Table 3: Internal Ground Isolation Jumpers ......................................................................... 22
Table 4: Clock Source & Sample Rate Interaction................................................................. 24
Table 5: Available Sample Rates ........................................................................................ 25
Table 6: Sample Rates with External Clocking...................................................................... 26
6
Introduction
Analog Ears, Digital Minds
Thank you for using the 2192 Master Digital Audio Interface, the first product to combine
Universal Audio’s long history of creating high-quality vintage analog gear with its advanced
digital technology.
Conversion
The soul of the 2192 is the analog circuitry used in the A/D and D/A converters.
The analog signal path uses DC-coupled, fully dual-differential, matched-FET, all discrete Class-A
circuitry, resulting in ultra-low noise, excellent transient response and unmatched sound. No
capacitors or DC servos are used in the signal path since these degrade audio quality and image
stability, and introduce phase distortion.
Our no-compromises design approach and extensive history in analog and digital circuit design
ensure your converted signals are totally accurate and of the highest possible fidelity.
Analog to Digital
Analog signals can be converted to digital at sampling rates of 44.1, 48, 88.2, 96, 176.4, and
192kHz. The digital output signal is always 24-bit format.
During A/D conversion, the digital signal is output to all digital outputs (AES/EBU, S/PDIF, and
ADAT S-MUX) simultaneously. Audio digitized at rates above 96kHz is carried over AES/EBU in
single- or dual-wire mode, and ADAT optical I/O with S-MUX interleaving. The S/PDIF
specification, which includes 192kHz 24-bit audio, is fully implemented.
The 2192 analog outputs can be set to monitor the converted analog inputs. In this scenario the
D/A converters output the signals from the A/D converters, enabling “true confidence” analog
monitoring of the digitized signal.
Digital to Analog
Any of the digital input sources (AES/EBU, S/PDIF, or ADAT S-MUX) can be converted to analog.
The clock source used during the D/A conversion can come from the internal clock, the digital
audio source signal, or from an external clock source that is separate from the digital audio.
D/A conversion is accomplished at the sample rate of the digital audio source signal, even if the
2192 is synchronized to an external clock source that is running at a multiple or submutiple of the
digital audio sample rate (subclock/overclock).
7
Clocking
The internal digital clock of the 2192 was designed for extreme stability and jitter-free operation.
The internal clock conditioner removes jitter from external sources, so conversion quality is
unaffected by clock source.
Combined with its extensive digital I/O, flexible front-panel routing controls, and phase aligned
clock conditioner, the 2192 provides high-quality master clock source and clock distribution for
your entire studio.
Two separate word clock inputs as well as AES/EBU, S/PDIF, and ADAT S-MUX can be used as
external clock sources in addition to the internal clock. Four word clock outputs are provided so the
2192 can be used as a master clock source without daisy-chaining or cascading the clock through
external devices, which can degrade the clock signal.
A prominent lamp indicates when the 2192 is successfully synchronized to an external clock
source.
Subclock and Overclock
A/D and D/A conversion is accomplished at any available 2192 sample rate, even if the 2192 is
synchronized (slaved) to an external clock source that is running at a multiple or submultiple of the
2192 sample rate.
Subclocking occurs if the 2192 is synchronized to an external clock that is running at 2x or 4x the
2192 sample rate. Overclocking occurs if the 2192 is synchronized to an external clock that is
running at 1/2 or 1/4 of the 2192 sample rate.
See the clocking section on page 29 for more details.
Transcoding
The 2192 can transcode (convert) digital audio between AES/EBU, S/PDIF, and ADAT S-MUX in
realtime. For example, you can transfer 192kHz audio from S/PDIF to dual-wire 192kHz
AES/EBU or ADAT S-MUX. Transcoding can be performed using any of the available clock
sources.
8
Features
•
Ultra-low noise 44.1kHz – 192kHz A/D and D/A converters
•
Low jitter internal clock source provides 44.1, 48, 88.2, 96, 176.4 and 192kHz sampling
rates
•
DC-coupled, fully dual-differential, matched-FET, all discrete Class-A, no-compromises analog
signal path
•
No capacitors in the signal path to degrade sound quality or introduce phase distortion
•
2 channel ADAT S-MUX I/O for 44.1kHz to 48kHz transmission of 44.1kHz to 192kHz
audio
•
2 Channel transformer coupled AES/EBU I/O (44.1kHz – 192kHz)
•
Support for single and dual wire AES/EBU at 176.4kHz and 192kHz rates
•
2 Channel transformer coupled S/PDIF I/O (44.1kHz – 192kHz)
•
Realtime transcoding between digital formats
•
Independent digital and analog output routing
•
4 parallel 75 ohm BNC Word Clock outputs for jitter-free and reflection-free clock distribution
•
2 separate 75 ohm BNC Word Clock inputs capable of synchronizing to 1x house clocks while
running at higher 2x and 4x sample rates
•
Front panel Sync-Lock indicator
•
Sturdy front panel rotary switches provide Clock, Sample Rate, Analog Output and Digital
Output source selection
•
Full 24-bit digital signal path throughout
•
No digital processing of the audio signal
•
Multi-segment LED bargraph metering on all analog inputs and outputs, with timed peak-hold
digital overload (input) and digital peak (output) indicators
•
Internal universal auto-sensing, filtered, multi-stage regulated power supply supports 100240VAC and 50-60Hz power for trouble-free operation world-wide
•
Rugged 1U rack mount steel chassis
9
Specifications
Analog
•
Inputs:
•
Outputs:
•
2x balanced XLR female connectors
DC coupled, dual-differential
Common-mode rejection ratio (CMRR): >90dB
Impedance: ~1.5k ohms
Maximum input level: +31dBu
2x balanced XLR male connectors
DC coupled, dual-differential
Impedance: ~95ohms
Maximum output level: +23dBu
Frequency Response (analog input to ADC to DAC to analog output,
referenced to 1kHz, Fs = 192kHz):
+- 0.1dB, 10Hz to 40kHz, -1dB at 74kHz
(See Figure 5: Frequency Response on page 40)
•
Analog Level Trim:
o
ADC input (Lo-Z source):
Max input for 0dBFS: +30dBu
Min input for 0dBFS: +5.5dBu (3dBV)
o
DAC output (Hi-Z load):
Max output at 0dBFS: +23dBu
Min output at 0dBFS: +4dBu (+1.8dBV)
o
Factory trim:
Headroom: +18dB
Reference level: +4dBu = -18dBFS
Max input/output at 0dBFS: +22dBu
Trim accessed via 15-turn, rear-panel mounted potentiometer
Conversion
•
A/D:
o
Dynamic range (measured using -38dBu = -60dBFS input at 1kHz
(See Figure 6: A/D Dynamic Range on page 41)
118dB (A-weighted), 115dB (unweighted)
o
Frequency response (relative to 1kHz):
+- 0.02dB, 10Hz to 20kHz @ Fs = 44.1kHz
+- 0.04dB, 10Hz to 40kHz @ Fs = 96kHz
o
Phase response:
<0.1˚, 10Hz to 1kHz
-1.0˚ at 20kHz
10
o
Residual noise (200Hz-20kHz):
< -145dBFS (-123dBu)
o
Total Harmonic Distortion + Noise (measured at 1kHz):
-110dB, with +4dBu input
-114dB, with -10dBu input
•
D/A:
o
Dynamic range (measured with -60dBFS = -38dBu output at 1kHz
(See Figure 7: D/A Dynamic Range on page 41)
122dB (A-weighted), 119dB (unweighted)
o
Frequency response (relative to 1kHz):
+- 0.03dB, 10Hz to 20kHz @ Fs = 44.1kHz
+- 0.04dB, 10Hz to 20kHz @ Fs = 96kHz
o
Phase response:
<0.5˚, 10Hz to 1kHz
-10˚ at 20kHz
o
Residual noise (200Hz-20kHz):
< -145dBFS (-123dBu)
o
THD+N (measured at 1kHz):
-98dB, with +4dBu output
-103dB, with -10dBu output
Clock
•
Sample Rate (internal):
44.1, 48, 88.2, 96, 176.4, 192 kHz
•
Sample rate (external):
+- 12.5% vari-speed lock at all rates
•
4x BNC Clock Outputs:
75 ohm
5V CMOS drive
•
2x BNC Clock Inputs:
•
75 ohm internal termination
AC coupled
1.2V(p-p) minimum
5V(p-p) maximum, 50mA maximum over-voltage current (20 ohms/volt)
BNC Clock In to Clock Out Delay:
50ns maximum
Negative edge aligned when synchronized at multiple or submultiple rate
11
Digital
•
2-Channel S/PDIF:
Dual stacked RCA
Unbalanced, transformer driven output
AC coupled input
•
2-Channel AES/EBU:
Transformer isolated, balanced XLR (x4)
Single wire and dual-wire modes (for sample rates above 96kHz)
o
AES/SPDIF input bits:
SCMS: Ignored
Preempahsis: Ignored
Professional/consumer: Ignored
o
AES/SPDIF output bits:
SCMS: Not set
Preempahsis: Not Set
Professional/consumer: Set to Professional
•
2-Channel ADAT Optical:
Dual in-line optical TX/RX (reinforced)
Physical
•
Physical dimensions:
•
1RU standard 19” rack-mount chassis
11.5” depth behind front panel
1” front panel clearance
17” chassis width
Total dimension: 1.75” H, 19” W, 12.5” D
Thermal:
0˚ C to 50˚ C
•
AC Line:
IEC 3-pin power (safety ground ties to chassis at entry point)
100-240VAC, 50-60Hz, auto-sensing
40 Watts
~ All specifications are subject to change without notice ~
12
Front Panel
Figure 1 below displays the names of the 2192 front panel elements along with an index number.
Table 1 below indicates the page number where a complete description of the indexed item can
be found.
1
5
3
2
7
4
6
Figure 1: Front Panel Elements
#
Name
1
10
9
8
11
Page
#
Name
Input Level Meters
23
7
AES/SPDIF Switch
27
2
Output Level Meters
23
8
Single/Dual Switch
27
3
Clock Select
23
9
Digital Outputs
Source Select
27
4
Sample Rate Select
25
10
Power Lamp
28
5
Clock Status Lamp
26
11
Power Switch
28
6
Analog Outputs
DAC Source Select
26
Table 1: Front Panel Index
13
Page
Rear Panel
Figure 2 below displays the names of the 2192 rear panel elements along with an index number.
Table 2 below indicates the page number where a complete description of the item can be found.
1
3
5
2
8
4
9
7
Figure 2: Rear Panel Elements
6
#
Name
1
10
Page
#
Name
AC Power Input
16
6
Word Clock Inputs
17
2
AES/EBU Digital I/O – B
17
7
ADAT Optical Digital I/O
18
3
AES/EBU Digital I/O – A
16
8
Analog Line Outputs
18
4
S/PDIF Digital I/O
17
9
Analog Line Inputs
18
5
Word Clock Outputs
17
10
Analog Line Trims
19
Table 2: Rear Panel Index
14
Page
Block Diagram
Figure 3: Block Diagram
15
Connections
All 2192 connectors are on the rear panel of the unit. The only adjustable controls on the rear
panel are the analog level trims (page 19). Each connector and its function are detailed below.
AC Power Input
AC power is input to the 2192 via a standard, detachable IEC power cable such as the one
supplied with the unit. The auto-sensing, multi-stage filtered, universal power supply accepts input
power from 100VAC to 240VAC, at 50Hz to 60Hz. The third grounding pin is connected to the
chassis internally.
AES/EBU Digital I/O
The AES/EBU digital interfaces of the 2192 use transformer coupled, balanced differential inputs
and outputs for maximum digital signal integrity and jitter immunity. Only the highest-grade
components are used throughout.
Each balanced AES/EBU connector can individually isolate pin 1 from ground if desired via an
internal jumper block. See Ground Isolation Jumpers on page 22.
Both channels of a stereo pair at all supported sample rates can be transferred on a single cable
between compatible hardware units. For compatibility with legacy equipment, dual wire mode is
supported at sample rates of 176.4 and 192kHz.
AES/EBU “A” is used to transfer up to 192kHz stereo audio on single cables, or one channel of
the stereo pair when in dual wire mode. AES/EBU input “B” is used only in dual wire mode.
AES/EBU output “B” is used for one channel in dual wire mode, and replicates AES/EBU output
“A” in single wire mode.
AES/EBU Dual Wire Mode
The 2192 can accommodate sample rates of 176.4kHz and 192kHz in AES/EBU dual wire
mode, transferring one channel of the stereo pair on each of two separate AES/EBU digital I/O’s.
Dual wire mode is controlled by the Single/Dual front panel selector switch (page 27). When this
switch is depressed, the 2192 is in dual wire mode.
AES/EBU Digital Input A
This female XLR jack receives incoming 24-bit stereo AES/EBU digital audio signals up to 192kHz
from compatible hardware. When in dual wire mode, the left channel of audio is received here.
Pin 2 is hot.
This input can be used for either digital audio with clock or for digital clock only. When the Clock
knob (page 23) is set to AES/SPDIF and the Digital Outputs knob (page 27) is NOT set to
AES/SPDIF, the audio portion of the signal is ignored.
AES/EBU Digital Output A
This male XLR plug transmits 24-bit stereo AES/EBU digital audio signals up to 192kHz to
compatible hardware. When in dual wire mode, the left channel of audio is transmitted here. Pin
2 is hot.
16
AES/EBU Digital Input B
This female XLR jack receives the right channel of incoming 24 bit 176.4 or 192kHz AES/EBU
digital audio signals at 88.2 or 96kHz when in dual wire mode. In single wire mode, this input is
ignored. Pin 2 is hot.
AES/EBU Digital Output B
In dual wire mode, this male XLR plug transmits one channel of 24 bit 176.4 or 192kHz AES/EBU
digital audio signals at 88.2 and 96kHz. In single wire mode, this output duplicates the signal on
AES/EBU Digital Output A (but is electrically independent). Pin 2 is hot.
S/PDIF Digital I/O
S/PDIF Digital Input
This phono (RCA) connector accepts incoming 24-bit S/PDIF digital audio signals up to 192kHz
from compatible hardware. The copy-protection, pre-emphasis, and consumer/professional bits are
ignored.
This input can be used for either digital audio with clock or for digital clock only. When the Clock
knob (page 23) is set to AES/SPDIF and the Digital Outputs knob (page 27) is NOT set to
AES/SPDIF, the audio portion of the signal is ignored.
S/PDIF Digital Output
This phono (RCA) connector transmits 24-bit S/PDIF digital audio signals up to 192kHz to
compatible hardware. The copy protection bit and pre-emphasis bits are cleared, and the
professional bit is set.
Word Clock I/O
Two separate word clock inputs and four parallel word clock outputs are provided for
synchronizing with external hardware. Connections are via standard 75-ohm BNC connectors. All
input and output signal levels are TTL and CMOS compatible.
Word Clock Outputs 1-4
These outputs transmit independent high-quality word clock at the frequency specified by the
Sample Rate Select (page 25). Four outputs are provided so you can use the 2192 as the master
clock source for multiple devices simultaneously without cascading the clock through external
devices, which can degrade the clock signal.
The word clock signal on each of the four outputs is identical, electrically independent, and phase
aligned to the clock source to allow cascading multiple units without sample skew.
Word Clock Inputs
The Word Clock Inputs receive a standard digital word clock signal for synchronization (slaving) to
external hardware devices. To sync to an external word clock, set the 2192 Clock knob (page 23)
to Word 1 or Word 2.
The 2192 supports subclock (1/2x or 1/4x) and overclock (2x and 4x) synchronization to allow
converting signals at multiples or submultiples of the sample rate. For example, a 48kHz house sync
can be used while converting at 96kHz or 192kHz.
17
Superclock (256x) is not supported. Vari-speed sync is supported.
The 2192 BNC word clock inputs each provide an internal 75-ohm terminator.
Word Clock Input 1
This word clock input is used for external synchronization when the Clock knob (page 23) set to
Word 1.
Word Clock Input 2
This word clock input is used for external synchronization when the Clock knob (page 23) set to
Word 2.
ADAT Optical Digital I/O
The 2192 provides standard ADAT digital I/O via this optical interface.
At sample rates of 44.1kHz and 48kHz, only channels 1 and 2 are used. At higher sample rates,
industry standard S-MUX multiplexing is used to maintain high resolution transfers at higher
sampling rates. At 88.2kHz and 96kHz, channels 1-4 are used to achieve the stereo transfer. At
176.4kHz and 192kHz, all 8 channels are used for high resolution stereo audio.
ADAT Optical Input
This optical connector receives digital ADAT optical data from external hardware devices.
ADAT input can be used for either digital audio with clock or for digital clock only. When the
Clock knob (page 23) is set to ADAT and the Digital Outputs knob (page 27) is NOT set to ADAT,
the audio portion of the signal is ignored.
ADAT Optical Output
This optical connector transmits digital ADAT optical data to external hardware devices.
Analog I/O
Each balanced analog connector can individually isolate pin 1 from ground if desired via an
internal jumper block. See Ground Isolation Jumpers on page 22.
The analog inputs and outputs can be adjusted to calibrate signals for different levels as desired.
See Analog Line Trims on page 19.
Analog Line Inputs
Analog signals are input to the left and right channels via these balanced line-level female XLR
connectors. Pin 2 is hot. For unbalanced operation, Pin 3 can be grounded.
The analog inputs are calibrated at the factory so that an analog input level of +4dBu will output a
–18dBFS digital signal, for 18dB of headroom before digital clipping occurs.
Analog Line Outputs
Analog signals are output from the left and right channels via these balanced line-level male XLR
connectors. Pin 2 is hot. For unbalanced operation, Pin 3 can be grounded, and the output level
will be attenuated by 6db.
18
The analog outputs are calibrated at the factory so that a digital signal level of –18dBFS will output
an analog level of +4dBu, for 18dB of headroom. The line outputs can drive high or low (600ohm)
impedance inputs with no changes in level.
Analog Line Trims
The analog line trims are used to calibrate analog I/O signal levels to match external analog
hardware.
The analog I/O are calibrated at the factory so that analog levels of +4dBu correspond to –
18dBFS digital levels, for 18dB of headroom and maximum analog input and output levels of
+22dB. The trims can be adjusted to accommodate maximum levels over a wide range using the
rear panel 15-turn trim potentiometer.
Line Input Trims
These trims are used to calibrate the left and right analog line inputs. Differential shunt attenuation
is used to maintain maximum signal and conversion integrity.
Line Output Trims
These trims are used to calibrate the left and right analog line outputs. Differential shunt
attenuation is used to maintain maximum signal integrity.
Line Trim Procedure
To calibrate the analog inputs, a digital signal meter, and an accurate analog reference generator
with low impedance outputs are required. To calibrate the analog outputs, a digital signal
generator and an accurate analog dB level meter with balanced inputs are required.
Note: Before adjusting the factory calibration levels, make sure your equipment reads the current
calibration values correctly! If your equipment does not match the factory settings, you will need to
find out why before you proceed with recalibration.
19
To calibrate the analog line inputs:
1. Connect the analog reference generator to the analog input channel of the 2192.
2. Connect the digital output of the 2192 to the digital signal meter.
3. Set the reference generator to output a 1kHz sine wave at the desired nominal signal
level. The factory setting is +4dBu.
4. Adjust the input trim until the desired RMS digital level is obtained. The factory setting is 18dBFS.
5. Repeat these steps for the other channel.
To calibrate the analog line outputs:
1. Connect the digital tone generator to a digital input of the 2192.
2. Connect the analog output channel to the analog level meter.
3. Set the digital signal generator to output a 1kHz sine wave at the desired nominal RMS
signal level. The factory setting is -18dBFS.
4. Adjust the output trim until the desired analog output level is obtained. The factory setting
is +4dBu.
Output Level Meter Calibration
If the rear panel output trims are changed from the factory defaults, the (+22dB equals 0dBFS)
output meters will no longer be correctly calibrated. The input trims have no effect on the meters,
and no calibration is needed after input trims are adjusted.
The clip indicator (top LED) is not part of metering circuit. It is controlled by the processor, and is
illuminated when a digital clip occurs. It is hard wired in the unit and cannot be adjusted.
Important: Because there are potentially dangerous voltages present inside the unit, as
well as sensitive electronic components, meter calibration should be performed by
qualified service personnel only!
Output Meter Calibration Procedure
Having completed the input and out trim procedure (see top of this page), the output meters will
need to be recalibrated. The factory default has the unit set so the a 0dBFS digital level equals an
analog level of +22dB.
Required tools:
In addition to the gear listed for the analog output trim procedure, a small non-conductive plastic or
nylon Phillips screwdriver is required.
20
To calibrate the Output Level Meters:
1. With the unit powered down, remove the AC line cord.
2. Place the unit on a flat, stable area and remove top cover.
3. Attach the AC line cord and power up the unit.
With the AC cord attached to the unit there are dangerous AC
voltages present. Use extreme caution!
4. Connect the digital tone generator to the digital input of the 2192.
5. Set the digital generator to output a 1kHz sine wave at -18dB.
6. Adjust the left channel output meter using Output Meter Trim A* (see Figure 4 below for
location) so that the -18dB segment on the meter just lights up.
7. Adjust the right channel output meter using Output Meter Trim B* (see Figure 4 below) so
that the -18dB segment for the right channel just lights up.
*Component reference designation numbers may vary from those shown below.
The output meters are now calibrated.
Important: Do not adjust the Offset trimpots! These settings are optimized at the factory.
Figure 4: Output Level Meter Calibration Trimpots
21
Ground Isolation Jumpers
Each of the eight balanced connectors (the analog and AES/EBU digital I/O) can individually
isolate pin 1 from ground if desired via an internal jumper block.
Table 3 below indicates which internal jumper is used for each balanced connector. Pin 1 is tied to
ground for the connector when the indicated pair of pins is jumpered.
The 2192 is shipped from the factory with pin 1 connected to ground on all eight connectors.
Important: Changes to internal jumpers should only be made by qualified personnel.
Disconnect AC Power before opening the unit!
Connector
Jumper
Connector
Jumper
Analog Input Left
JP1
AES/EBU Input A
JP9
Analog Input Right
JP4
AES/EBU Output A
JP10
Analog Output Left
JP5
AES/EBU Input B
JP11
Analog Output Right
JP6
AES/EBU Output B
JP12
Pin 1 is tied to ground when a jumper is across the pair of pins.
Table 3: Internal Ground Isolation Jumpers
22
Controls
The front panel contains most of the user adjustable controls and indicators for the 2192. The only
controls located on the rear panel are the analog input and output line level trim controls (see
Analog Line Trims on page 19).
Important: Do not change any front panel knob or switch settings while audio conversion
or transcoding is in process. The signal is briefly interrupted when new settings are
applied.
LED Level Meters
Level metering for each of the stereo input and output channels is provided by its own 10-segment
LED display. Each channel has timed peak/hold digital clip/maximum output indicators.
All LED segments except CLIP are driven by the analog metering circuitry (the meters are tied to
the converters, not the analog trims). The red CLIP indicators are driven by the digital circuitry.
Analog Metering
The nine analog LED segments are calibrated to reflect digital signal levels. A value of 0dB on the
analog meter is equal to digital full scale code (0dBFS), which reflects an analog signal level of
+22dB (adjustable using the rear panel Analog Line Trims for each channel).
An analog signal level of +4dBu at 1kHz will illuminate the –18dB segment on the 2192 meters.
Please note that frequencies below 50Hz will flicker, and may not be reported correctly.
Digital Clip Indicators
When the red CLIP indicator illuminates, a full-scale digital signal has occurred.
CLIP uses a timed peak/hold-style indicator. When a signal at or over 0dBFS occurs, the CLIP
indicator will remain illuminated momentarily before being auto reset once the signal drops below
0dBFS.
Input Level Meters
This pair of LED level meters indicates the signal strength at the stereo analog inputs relative to the
calibrated 0dBFS level.
Output Level Meters
This pair of LED level meters indicates the signal strength at the stereo analog outputs relative to
the calibrated 0dBFS level. See also Output Level Meter Calibration on page 20.
Clock Source
The Clock knob specifies the 2192 master clock source. Note that the clock source can be
independent of the signal used for digital to analog conversions. For example, you could select
AES/SPDIF as the clock source but perform D/A conversion on the incoming ADAT optical signal
by setting the Digital Outputs Source (page 27) to ADAT.
The 2192 can be used for word clock distribution by connecting multiple clock sources to
the rear panel, then using the Clock knob to switch between them.
23
The 2192 sample rate is determined by the Clock and Sample Rate knobs except when the clock
source is set to AES/SPDIF, in which case the sample rate is automatically detected. See Table 4
below.
Clock Knob Setting:
Sample Rate
Determined By:
Internal
Word 1/2
AES/SPDIF
ADAT
Sample Rate
knob
Sample Rate
knob
Source signal
(automatic)
Sample Rate
knob
Table 4: Clock Source & Sample Rate Interaction
Important: If the clock won’t lock when Clock knob is set to an external source, verify that
the external device is connected to the proper digital input and that it is transmitting a
clock signal. Please note that the 2192 cannot lock to an external device that is set to
slave to the 2192!
Internal
When the Clock knob is set to Internal, the high-quality internal clock of the 2192 is used. At this
setting clock inputs on the rear panel are ignored, and the internal sampling rate is determined by
the Sample Rate knob.
Word 1
When the Clock knob is set to Word 1, the digital clock signal present at the Word 1 BNC clock
input on the rear panel (page 17) is used as the master clock.
At this setting, the Sample Rate knob specifies the multiple or submultiple of the clock rate to be
used internally. For example, if the BNC input is 48kHz, the 44.1 and 48kHz sample rates select
1x sampling, the 88.2 and 96kHz sample rates select 2x sampling, and the 176.4 and 192kHz
sample rates select 4x sampling.
Word 2
When the Clock knob is set to Word 2, the digital clock signal present at the Word 2 BNC clock
input on the rear panel (page 17) is used as the master clock.
At this setting, the Sample Rate knob performs as described above for Word 1.
AES/SPDIF
When the Clock knob is set to AES/SPDIF, the digital clock signal present at the AES/EBU digital
input (page 16) or S/PDIF digital input (page 17) on the rear panel is used as the master clock.
At this setting, the internal sample rate is determined by the digital input alone and the Sample
Rate select knob is ignored.
Important: The clock (AES/EBU or S/PDIF) to be used by the AES/SPDIF Clock knob
setting is determined by the AES/SPDIF switch (page 27).
24
ADAT
When the Clock knob is set to ADAT, the digital clock signal present at the ADAT optical digital
input (page 18) on the rear panel is used as the master clock.
At this setting, the Sample Rate knob now selects the multiple of the ADAT clock rate to be used
internally. For example, if the ADAT input is 48kHz, the 44.1 and 48kHz sample rates select 1x
sampling, the 88.2 and 96kHz sample rates select 2x sampling, and the 176.4 and 192kHz
sample rates select 4x sampling.
Sample Rate Select
The Sample Rate knob selects the sample rate used for A/D and D/A conversions. The sample rates
supported by the 2192 are listed in Table 5 below.
44.1kHz
88.2kHz
176.4kHz
48kHz
96kHz
192kHz
Table 5: Available Sample Rates
Note: The 2192 does not perform sample rate conversion.
Sample Rate with External Clock
If the 2192 is performing conversions while synchronized to an external clock, the Sample Rate is
defined by a combination of the external clock rate and the Sample Rate knob.
When the Clock knob (page 23) is set to Internal, the Sample Rate knob determines the master
clock frequency. However, when the Clock knob is set to Word 1, Word 2, or ADAT, the Sample
Rate knob selects the multiple or submultiple of the clock rate to be used internally. When the Clock
knob is set to AES/SPDIF, the Sample Rate knob has no effect.
Table 6 on page 26 summarizes the resulting sample rates when the 2192 is performing
conversions while synchronized to an external clock.
25
Sample Rate Knob Setting
44.1
Incoming
Clock Rate
48
88.2
96
176.4
192
44.1
48
88.2
96
176.4
192
44.1
44.1
88.2
88.2
176.4
176.4
48
48
96
96
192
192
44.1
44.1
88.2
88.2
176.4
176.4
48
48
96
96
192
192
44.1
44.1
88.2
88.2
176.4
176.4
48
48
96
96
192
192
Table 6: Sample Rates with External Clocking
Important: When AES/SPDIF is selected as the clock source, the Sample Rate knob is
ignored and the internal sampling rate is determined by the AES/EBU or S/PDIF digital
input (see Table 4 on page 24).
Clock Status Lamp
When the 2192 is locked (synchronized) to a clock source, the Clock Status lamp glows green. The
lamp glows red when the clock is not locked. The clock must be locked for proper A/D and D/A
conversions and transcoding.
The clock is always locked when the Clock knob (page 23) is set to Internal. For the clock to be
locked when the clock source is external, a clock signal must be present at the input selected by the
Clock knob.
Note: After the Power Switch is turned on, the Clock Status lamp stays off for about 12 seconds
while the 2192 power conditioner and analog conversion circuits perform their initial calibrations.
Important: If the clock won’t lock when Clock is set to an external source, verify that the
external device is connected to the proper digital input and that it is transmitting a clock
signal.
Analog Outputs DAC Source Select
The Analog Outputs knob specifies the digital source for the D/A converters and the analog
outputs.
AES/SPDIF In
When the Analog Outputs knob is set to AES/SPDIF In, either the AES/EBU or the S/PDIF digital
input signal is routed to the D/A converters and analog outputs, depending on the position of the
AES/SPDIF switch (page 27).
Important: At this setting, the digital signal (AES or S/PDIF) routed to the analog outputs
is determined by the AES/SPDIF switch.
26
ADAT In
When the Analog Outputs knob is set to ADAT In, the digital signal from the ADAT optical input
(page 18) is routed to the D/A converters and analog outputs. The S–MUX mode is determined by
the Sample Rate knob.
ADC
When the Analog Outputs knob is set to ADC, the digitally converted signal at the analog inputs
(see page 18) is routed to the D/A converters and analog outputs.
The incoming analog signal is routed through the A/D and D/A converters for “true confidence”
monitoring via the analog outputs.
AES/SPDIF Controls
These two pushbutton switches are used in conjunction with the Clock knob (page 24), Digital
Outputs (page 27), and Analog Outputs (page 26) when these controls are set to AES/SPDIF.
These switches have no effect when none of the dependent controls (Clock Select, Digital
Outputs Source Select, and Analog Outputs Source Select) are set to AES/SPDIF.
AES/SPDIF Switch
The AES/SPDIF switch specifies whether the AES/EBU or S/PDIF digital inputs are used when
Clock, Analog Outputs Source Select, or Digital Outputs Source Select is set to AES/SPDIF.
When the button is depressed, the S/PDIF input signal is used. When the button is out, the
AES/EBU input signal is used.
The AES/EBU and S/PDIF digital outputs are always active.
Single/Dual Switch
The Single/Dual switch specifies whether AES/EBU single wire or dual wire mode is used.
When the button is depressed, AES/EBU dual wire mode is used. When the button is out,
AES/EBU single wire mode is used.
Note: This switch has no effect on the S/PDIF input. However, the S/PDIF output will transmit the
same signal as the AES/EBU “A” output.
Digital Outputs Source Select
The Digital Outputs knob specifies the signal that is routed to the digital outputs. The signal source
selected here will be routed to all digital outputs (AES/EBU, S/PDIF, and ADAT optical)
simultaneously.
This knob is normally set to ADC during all operations except transcoding (see page 37).
AES/SPDIF In
When the Digital Outputs knob is set to AES/SPDIF In, the digital signal from the AES/EBU or
S/PDIF digital inputs is routed to all digital outputs.
27
Important: At this setting, the digital signal (AES or S/PDIF) routed to the digital outputs is
determined by the AES/SPDIF switch.
ADAT In
When the Digital Outputs knob is set to ADAT In, the digital signal from the ADAT optical digital
input (page 18) is routed to all digital outputs.
ADC
When the Digital Outputs knob is set to ADC, the signals at the analog inputs (page 18) are
converted and delivered to the digital outputs.
Power Lamp
The Power Lamp glows blue when the proper AC voltage is connected and the power switch is in
the up (I) position.
Note: After the Power Switch is turned on, the Power Lamp stays off for about 2 seconds while the
2192 power conditioner circuits perform their initial calibrations.
Important: If the Power Lamp does not come on after the initial 2 second delay, please
check that the AC line is plugged into a 100-240VAC 50-60Hz AC power source. If
the power still does not come on, it is possible that the internal protection fuse has blown,
and the 2192 needs to be serviced by a qualified service technician.
Power Switch
The Power Switch activates the 2192. Power is on when the switch is in the up (I) position. When
the switch is down (O), AC power is completely disconnected from the internal power supply, and
only the safety ground remains connected to the chassis.
Important: Do not apply power to the 2192 unless the audio monitoring system volume
is reduced to minimum.
Important: Like all quality audio equipment, please allow the 2192 to warm up for 20
minutes after powering on for optimum performance.
28
Clocking
The internal digital clock of the 2192 was designed for extreme stability and jitter-free operation.
The internal clock conditioner removes jitter from external sources, so conversion quality is
unaffected by clock source.
Flexibility
Combined with its extensive digital I/O, flexible front-panel routing controls, and phase aligned
clock conditioner, the 2192 provides high-quality master clock source and clock distribution for
your entire studio.
Two separate word clock inputs as well as AES/EBU, S/PDIF, and ADAT S-MUX can be used as
external clock sources in addition to the internal clock. Four word clock outputs are provided so the
2192 can be used as a master clock source without cascading the clock through external devices,
which can degrade the clock signal. A prominent lamp indicates when the 2192 is successfully
synchronized to an external clock source.
A/D and D/A conversion is accomplished at any available 2192 sample rate, even if the 2192 is
synchronized (slaved) to an external clock source that is running at a multiple (subclock) or
submultiple (overclock) of the 2192 sample rate.
Subclocking/Overclocking
Subclocking occurs if the 2192 is synchronized to an external clock that is running at 2x or 4x the
2192 sample rate. Overclocking occurs if the 2192 is synchronized to an external clock that is
running at 1/2 or 1/4 of the 2192 sample rate.
The 2192 clock source can be set to internal, and the digital source device set to synchronize to
the 2192 (recommended), or the clock source can be set to an external source that is generated
either by the digital source device, or an external clock master. When an external clock master is
used, both the digital source device and the 2192 must be set to synchronize to the external clock
master.
Reclocking
When an external clock master is used that provides a multiple or submultiple of the digital source
sample rate (e.g. a 48kHz clock master with 96kHz audio), the 2192 can slave to the clock
master, and generate the required word clock output for the digital source device at the higher or
lower sample rate.
Because the 2192 performs clock conditioning and jitter removal on all external clock sources,
there is no degradation in sound quality caused by inferior clock sources. All BNC clock and digital
output signals are generated from the conditioned internal clock, so the 2192 can be used for
reclocking poor quality external source clocks.
Synchronizing to unrelated clock rates (e.g. 44.1kHz clock with 48kHz digital audio) and sample
rate conversion are not supported.
The 2192 does not perform sample rate conversion.
29
Analog to Digital Conversion
Analog signals can be converted to digital at sampling rates of 44.1, 48, 88.2, 96, 176.4, and
192kHz. The digital output signal is in 24-bit format.
The digitized signal is sent to all digital outputs (AES/EBU, S/PDIF, and ADAT S–MUX)
simultaneously.
Audio digitized at rates above 48kHz is transmitted over AES/EBU in single or dual-wire mode, as
specified by the Single/Dual switch (page 27).
Audio digitized at rates above 48kHz is transmitted over ADAT optical with S–MUX interleaving.
At 88.2kHz and 96kHz, channels 1-4 are used to achieve the stereo transfer. At 176.4kHz and
192kHz, all 8 channels are used for stereo audio. At 44.1kHz and 48kHz, only channels 1 and 2
are used.
The S/PDIF interface transmits 24-bit audio at rates up to 192kHz.
When the Analog Outputs knob (page 26) is set to ADC, the signals at the analog outs are the
analog input signals after they have passed through both the A/D and D/A converters, enabling
“true confidence” analog monitoring of the digitized signal.
Important: Do not change any front panel knob or switch settings while A/D
conversion is in process. The signal is briefly interrupted when new settings are
applied.
Important: Set the Digital Outputs knob to ADC when performing A/D conversion.
A/D conversion can be performed in either of two configurations: using the internal clock, or
when the 2192 is slaved to an external clock. Each operation is detailed below.
A/D Using Internal Clock
This is the simplest use of the 2192. In this configuration, the 2192 is the master system clock.
Four word clock outputs are provided so the 2192 can be used as the master system clock without
cascading the clock through external devices, which can degrade the clock signal.
To perform A/D conversion using the internal clock:
1. Connect the analog source signals to the 2192 line inputs.
2. Connect the 2192 digital output(s) to the external device digital input(s) that will receive the
digitized audio signal using an appropriate digital cable(s).
3. Set the 2192 Clock knob to Internal.
4. Set the 2192 Sample Rate knob to the desired frequency.
5. Set the 2192 Digital Outputs knob to ADC.
6. Set the external digital device to synchronize to the 2192 and receive the digitized audio
signal.
A/D conversion is continuous in internal clock mode.
30
A/D Using External Clock
In this configuration, the 2192 is synchronized (slaved) to an external master digital source clock.
Two separate word clock inputs as well as AES/EBU, S/PDIF, and ADAT S-MUX can be used as
clock sources for external synchronization.
In this mode, A/D conversion is accomplished at any available 2192 sample rate even if the
external clock is running at a multiple or submultiple of the 2192 sample rate.
To perform A/D conversion using external clock:
1. Connect the analog source signals to the 2192 line inputs.
2. Connect the 2192 digital output(s) to the external device digital input(s) that will receive the
digitized audio signal using an appropriate digital cable(s).
3. Connect the master clock source from the external device to the 2192 digital audio or BNC
clock input that will receive the clock signal using an appropriate digital cable.
4. Set the 2192 Clock knob to specify the digital input that the external clock is connected to. If
the Clock knob is set to AES/SPDIF, use the AES/SPDIF switch to specify AES/EBU or S/PDIF.
5. Set the 2192 Sample Rate knob to the desired frequency. See page 25 for important
information on sample rate selection.
6. Set the 2192 Digital Outputs knob to ADC.
7. Set the external digital device that is the destination for the digitized audio to receive the
digital audio input signal.
8. Set the external master clock device to transmit digital clock.
A/D conversion is performed only when the 2192 is locked (the external clock must be running).
The Locked lamp glows green when the 2192 is successfully synchronized to an external clock
source.
31
Digital to Analog Conversion
Digital signals can be converted to analog at sampling rates between 44.1 and 192kHz. All 24bits of the digital input signal are converted. If the digital source has less than 24-bit resolution, it’s
recommended that high quality dither be applied before conversion.
Any of the digital audio input sources (AES/EBU, S/PDIF, or ADAT S-MUX), or the digitized
analog inputs can be converted to analog audio.
When performing D/A conversion, the 2192 sample rate must match the sample rate of the digital
audio source signal.
Important: Do not change any front panel knob or switch settings while D/A conversion
is in process. The signal is briefly interrupted when new settings are applied.
D/A Using Internal Clock
This is the simplest use of the 2192. In this configuration, the 2192 is the master system clock.
Four word clock outputs are provided so the 2192 can be used as a master system clock source
without cascading the clock through external devices, which can degrade the clock signal.
To perform D/A conversion using the internal clock:
1. Connect the 2192 analog outputs to the analog inputs of the destination device (mixer,
recorder, etc).
2. Connect the digital output of the external digital audio source device to the desired 2192
digital input using an appropriate digital cable.
3. Set the 2192 Clock knob to Internal.
4. Set the 2192 Sample Rate knob to match the sample rate of the digital audio source signal.
5. Set the 2192 Analog Outputs knob to select the digital audio source (AES/SPDIF or ADAT). If
the source is set to AES/SPDIF, use the AES/SPDIF switch to specify AES/EBU or S/PDIF.
6. Set the digital audio source device to synchronize to the 2192 and transmit the digital audio
signal.
D/A conversion is continuous in internal clock mode.
32
D/A Using Digital Audio Source Clock
In this configuration, the 2192 is synchronized to the clock signal that is imbedded within the
digital audio signal that is being converted to analog.
To perform D/A conversion using the digital audio source clock:
1. Connect the 2192 analog outputs to the analog inputs of the destination device (mixer,
recorder, etc).
2. Connect the digital output of the external digital audio source device to the desired 2192
digital input using an appropriate digital cable.
3. Set the 2192 Clock knob to specify the digital input that the digital audio source signal is
connected to (AES/SPDIF or ADAT). If the Clock knob is set to AES/SPDIF, use the AES/SPDIF
switch to specify AES/EBU or S/PDIF.
4. If the digital source is ADAT, use the Sample Rate Select knob to select the appropriate S-MUX
format: 44.1 and 48 select standard 1x mode, 88.2 and 96 select 2x mode, and 176.4 and
192 select 4x mode. If the digital source is AES/SPDIF, the Sample Rate Select knob has no
effect.
5. Set the 2192 Analog Outputs knob to the same digital setting as in step 3.
6. Set the digital audio source device to transmit digital audio. The source device must be set to
use its internal clock, or set to synchronize to an external clock master.
D/A conversion is performed only when the 2192 is locked (the external clock must be running).
The Locked lamp glows green when the 2192 is successfully synchronized to an external clock
source.
33
D/A Using External BNC Word Clock
In this configuration, D/A conversion is accomplished while the 2192 is synchronized to one of
the two independent BNC Word Clock inputs.
To perform D/A conversion while synchronized to Word Clock:
1. Connect the 2192 analog outputs to the analog inputs of the destination device (mixer,
recorder, etc).
2. Connect the digital output of the external digital audio source device to the desired 2192
digital input using an appropriate digital cable.
3. Connect the Word Clock output of the external master clock source to the 2192 Word Clock
input 1 (or Word Clock input 2) using an appropriate digital BNC cable.
4. Set the 2192 Clock knob to Word 1 (or Word 2).
5. Set the 2192 Sample Rate knob to the appropriate range to match the digital audio source
sample rate. The selected clock rate is now available on the BNC Word Clock outputs for
synchronizing external devices.
6. Set the 2192 Analog Outputs knob to specify the digital input that the digital audio source
signal is connected to (AES/SPDIF or ADAT). If the Analog Outputs Source Select knob is set to
AES/SPDIF, use the AES/SPDIF switch to specify AES/EBU or S/PDIF.
7. Set the external word clock device to transmit word clock. It can be set to transmit a multiple or
submultiple of the sample rate if necessary. For example, a 48kHz clock can be used with
96kHz digital audio and vice versa.
8. Set the digital audio source device to transmit digital audio.
9. Set the digital audio source device to synchronize to either the external clock master, or to the
clock output of the 2192. If the digital audio sample rate is a multiple/submultiple of the
external clock rate, use the clock outputs from 2192 for the digital audio source device.
D/A conversion is performed only when the 2192 is locked (the word clock must be running) and
digital audio is present at the digital input. The Locked lamp glows green when the 2192 is
successfully synchronized to an external clock source.
34
D/A Using ADAT Clock with AES/SPDIF Audio
In this configuration, D/A conversion is accomplished on an AES/EBU or S/PDIF digital audio
signal while the 2192 is synchronized to the clock at the ADAT input. The audio portion (if any) of
the ADAT signal used as the clock source is ignored.
To perform AES or SPDIF D/A while synchronized to ADAT clock:
1. Connect the 2192 analog outputs to the analog inputs of the destination device (mixer,
recorder, etc).
2. Connect the digital output of the external digital audio source device to the desired 2192
digital input using an appropriate digital cable.
3. Connect the digital output of the external ADAT device that contains the digital clock signal to
the 2192 ADAT input using an appropriate optical cable.
4. Set the 2192 Clock knob to ADAT.
5. Set the Sample Rate Select knob to the appropriate rate to match the AES/SPDIF digital audio
sample rate. The selected clock rate is now available on the BNC Word Clock outputs for
synchronizing external devices.
6. Set the 2192 Analog Outputs knob to AES/SPDIF. Use the AES/SPDIF switch to specify
AES/EBU or S/PDIF.
7. Set the external ADAT device to transmit digital clock.
8. Set the AES/SPDIF source device to transmit digital audio.
9. Set the AES/SPDIF audio source device to synchronize to either the external ADAT clock
master, or to the clock output of the 2192. If the digital audio sample rate is a
multiple/submultiple of the external clock rate, use the clock outputs from 2192 for the digital
audio source device.
D/A conversion is performed only when the 2192 is locked (the external clock must be running)
and digital audio is present at the digital input. The Locked lamp glows green when the 2192 is
successfully synchronized to an external clock source.
35
D/A Using AES/SPDIF Clock with ADAT Audio
In this configuration, D/A conversion is accomplished on an ADAT digital audio signal while the
2192 is synchronized to the clock of an AES/EBU or S/PDIF signal. The audio portion (if any) of
the external AES/SPDIF signal used as the clock source is ignored.
To perform ADAT D/A while synchronized to AES or SPDIF clock:
1. Connect the 2192 analog outputs to the analog inputs of the destination device (mixer,
recorder, etc).
2. Connect the optical output of the external ADAT digital audio source device to the 2192
ADAT input using an appropriate optical cable.
3. Connect the digital output of the external AES/SPDIF device that contains the digital clock
signal to the desired 2192 digital input using an appropriate digital cable.
4. Set the 2192 Clock knob to AES/SPDIF. Use the AES/SPDIF switch to specify AES/EBU or
S/PDIF.
5. The 2192 Sample Rate is defined by the AES/SPDIF digital input (the Sample Rate knob is
ignored). This rate is now available on the BNC Word Clock outputs for synchronizing external
devices.
6. Set the 2192 Analog Outputs knob to ADAT.
7. Set the external AES/SPDIF device to transmit digital clock.
8. Set the ADAT digital audio source device to transmit digital audio.
9. Set the ADAT audio source device to synchronize to either the external clock master, or to the
clock output of the 2192.
D/A conversion is performed only when the 2192 is locked (the external clock must be running)
and digital audio is present at the digital input. The Locked lamp glows green when the 2192 is
successfully synchronized to an external clock source.
36
Transcoding
The 2192 can transcode (convert) digital audio data between AES/EBU, S/PDIF, and ADAT
S-MUX formats in realtime. The transcoded digital audio input signal is output to all of the other
digital audio outputs simultaneously.
Transcoding can be performed using any of the available clock sources. The 2192 does not
perform sample rate conversion.
Note: You cannot clock to S/PDIF while listening to AES/EBU or vice versa.
To hear analog audio during transcoding, set the Analog Outputs knob to the digital audio source.
Transcoding can be performed using either the internal clock, the digital audio source clock, or an
external clock master. Each operation is detailed below.
Important: Do not change any front panel knob or switch settings while transcoding is in
process. The signal is briefly interrupted when new settings are applied.
Transcoding Using Internal Clock
In this configuration, the 2192 is the master system clock.
To perform transcoding using the internal clock:
1. Connect the digital output from the external digital audio source device to the desired 2192
digital input using the appropriate digital cable.
2. Connect the 2192 digital output(s) to the digital input(s) on any external device(s) that will
receive the transcoded digital audio signal using the appropriate digital cable(s).
3. Set the 2192 Clock knob to Internal.
4. Set the 2192 Sample Rate knob to match the sample rate of the digital audio source signal.
5. Set the 2192 Digital Outputs knob to the digital audio source input (AES/SPDIF or ADAT). If
the Digital Outputs knob is set to AES/SPDIF, use the AES/SPDIF switch to specify AES/EBU or
S/PDIF.
6. Set the digital audio source device to transmit digital audio and to synchronize to either the
external master clock or to the 2192.
Transcoding is continuous as long as the digital audio source is transmitting.
37
Transcoding Using Digital Audio Clock
In this configuration, the 2192 is synchronized to the clock signal that is imbedded within the
digital audio source signal that is being transcoded.
To perform transcoding using the digital audio source clock:
1. Connect the digital output from the external digital audio source device to the desired 2192
digital input using the appropriate digital cable.
2. Connect the 2192 digital output(s) to the digital input(s) on any external device(s) that will
receive the transcoded digital audio signal using the appropriate digital cable(s).
3. Set the 2192 Clock knob to specify the digital audio source input (AES/SPDIF or ADAT). If the
Clock knob is set to AES/SPDIF, use the AES/SPDIF switch to specify AES/EBU or S/PDIF.
4. Set the 2192 Digital Outputs knob to the same digital source selected in step 3.
5. Set the digital audio source device to transmit digital audio. The source device must be set to
use its internal clock, or set to synchronize to an external clock master.
Transcoding is continuous as long as the digital audio source is transmitting.
38
Transcoding Using Alternate Clock
In this configuration, the 2192 is synchronized to an external clock master. The digital audio
source device can be synchronized to the same clock, or to the 2192.
To perform transcoding while using an alternate source clock:
1. Connect the digital output from the external digital audio source device to the desired 2192
digital input using the appropriate digital cable.
2. Connect the 2192 digital output(s) to the digital input(s) on any external device(s) that will
receive the transcoded digital audio signal using the appropriate digital cable(s).
3. Connect the digital output from the external device that is generating the digital clock signal to
the desired 2192 digital input using the appropriate digital cable.
4. Set the 2192 Clock knob to specify the digital input connected to the digital clock source
(Word 1, Word 2, AES/SPDIF or ADAT). If the Clock knob is set to AES/SPDIF, use the
AES/SPDIF switch to specify AES/EBU or S/PDIF.
5. Set the 2192 Digital Outputs knob to control to specify the digital input that the digital audio
source signal is connected to (AES/SPDIF or ADAT). If the Digital Outputs knob is set to
AES/SPDIF, use the AES/SPDIF switch to specify AES/EBU or S/PDIF. Note: You cannot clock
to S/PDIF while listening to AES/EBU or vice versa.
6. Set the external master clock device to transmit digital clock.
7. Set the digital audio source device to transmit digital audio and to synchronize to either the
external master clock or to the 2192.
Transcoding is performed only when the 2192 is locked (the external clock must be running) and
digital audio is present at the digital input. The Locked lamp glows green when the 2192 is
successfully synchronized to an external clock source.
39
Diagrams
Frequency Response
Figure 5: Frequency Response
40
Dynamic Range: A/D
Figure 6: A/D Dynamic Range
Dynamic Range: D/A
Figure 7: D/A Dynamic Range
41
Mastering Setup
Figure 8: Typical Mastering Setup
Digital Audio Workstation Setup
Figure 9: Typical DAW Setup
42
8-Channel Pro Tools Setup
Figure 10: Typical Pro Tools HD Setup
43
Index
A
A/D Using External Clock, 31
A/D Using Internal Clock, 30, 32
AC Line, 12
AC Power Input, 16
AC voltage, 28
AD Converters, 27, 28
ADAT, 9, 14, 18, 23, 25, 27,
28
ADAT Audio, 36
ADAT Clock, 35
ADAT In, 28
ADAT Optical, 12
ADAT Optical Digital I/O, 14, 18
ADC input, 10
AES/EBU, 9, 12, 14, 16, 17,
24, 26, 27, 28
AES/EBU Digital I/O, 16–17
AES/SPDIF, 13, 24, 26, 27, 28
AES/SPDIF Switch, 27
Alternate Clock, 39
Analog, 10
Analog I/O, 18–19
Analog In, 27, 28
Analog Line Inputs, 14, 18
Analog Line Outputs, 14, 18
Analog Line Trims, 14, 18, 19
Analog Metering, 23
Analog Outputs DAC Source
Select, 26
Analog Outputs knob, 26
Analog Outputs Source Select, 27
Analog to Digital, 7
Analog to Digital Conversion, 30
B
balanced analog connector, 18
Block Diagram, 15
BNC clock, 24, 29
BNC Clock Inputs, 11
BNC Clock Outputs, 11
BNC Word Clock, 9, 34
C
calibrate, 18
calibrated, 18
calibration, 19, 20
cascading, 8, 17, 29, 30, 32
chassis, 12, 16
Class-A, 7
Clip Indicators, 23
clipping, 18
clock distribution, 8, 29
Clock knob, 23
Clock Source Select, 13, 23
Clock Status, 13, 26
Clocking, 8, 29
CMOS, 17
confidence monitoring, 27
Connections, 16, 17
consumer/professional bits, 17
Contents, 4
Controls, 19–28
Conversion, 7, 10
copy-protection, 17
Copyright, 3
D
D/A Using ADAT Clock with
AES/SPDIF Audio, 35
D/A Using AES/SPDIF Clock with
ADAT Audio, 36
D/A Using Digital Audio Source
Clock, 33
D/A Using External BNC Word
Clock, 34
DAC output, 10
daisy-chaining, 8
DC-coupled, 7
Diagrams, 40
Differential shunt attenuation, 19
Digital, 12
Digital Audio Clock, 38
Digital Audio Workstation, 42
digital clipping, 18
Digital I/O, 16–18
Digital Outputs Source Select, 27
Digital to Analog, 7
Digital to Analog Conversion, 32
dimensions, 12
Dual Wire Mode, 16
dual-differential, 7, 9
Dynamic range, 10
Dynamic Range: A/D, 41
Dynamic Range: D/A, 41
E
external clock, 7, 25
external clock master, 39
F
factory calibration, 19
FCC Compliance, 3
Features, 9
Frequency Response, 10, 40
Front Panel, 13
full scale code, 23
G
Ground Isolation Jumpers, 22
H
Headroom, 10, 18, 19
high resolution, 18
44
I
IEC power cable, 16
imbedded, 33
impedance, 19
Index, 44
Input Level Meters, 13, 23
Inputs, 10
Internal, 24, 26
internal clock, 29, 37
Introduction, 7
isolate, 18
J
jitter, 8, 9
jumper block, 18, 22
L
LED display, 23
Level Meters, 23
Level Trim, 10
Line Input Trims, 19
Line Output Trims, 19
Line Trim Procedure, 19
List of Figures, 6
List of Tables, 6
Lo-Z, 10
M
master clock frequency, 25
master clock source, 8
Mastering Setup, 42
matched-FET, 7
Max input, 10
Max output, 10
maximum levels, 19
Metering, 23
Min input, 10
Min output, 10
multiplexing, 18
N
Notice, 3
O
Optical Digital I/O, 18
Output Level Meter Calibration,
20
Output Level Meters, 13, 23
Outputs, 10
overclock, 7, 17
Overclocking, 29
Overview, 7
P
phase, 17
phase aligned, 8
Phase response, 10
power, 16
Power Indicator, 13
Power Lamp, 28
power supply, 9, 16
Power Switch, 13, 28
pre-emphasis, 17
Pro Tools Setup, 43
pushbutton switches, 27
R
Rear Panel, 14
Reference level, 10
Residual noise, 11
S
S/PDIF, 12
S/PDIF Digital I/O, 14, 17
Safety, 2
Sample Rate, 11
sample rate conversion, 25
Sample Rate Select, 13, 17, 25
Setup, 42, 43
Single/Dual, 16
Single/Dual Selector, 13
Single/Dual Switch, 27, 30
slaving, 17
S-MUX, 18, 33
S–MUX, 27, 30
S-MUX I/O, 9
S-MUX interleaving, 7
soul, 7
Source Select, 27
Specifications, 10
subclock, 7, 17
Subclocking, 29
Superclock, 18
synchronized, 29
synchronizing, 17
T
terminator, 18
Thermal, 12
Total Harmonic Distortion, 11
Trademarks, 3
45
Transcoding, 8, 27, 37
Transcoding Using Alternate
Clock, 39
Transcoding Using Digital Audio
Clock, 37, 38
transformer coupled, 9
Trim Procedure. See Line Trim
Procedure
TTL, 17
U
unbalanced, 18
V
Vari-speed sync, 18
W
Word 1, 17, 18, 24
Word 2, 17, 18, 24
Word Clock I/O, 17
Word Clock Inputs, 17, 29
word clock outputs, 8, 17