1
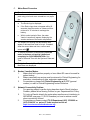
Director Signature__________________________________ Date___________________ Point of Care Testing Clinical Laboratories ACCU-CHEK INFORM II BLOOD GLUCOSE DETERMINATION I. PURPOSE AND PRINCIPLE The Accu-Chek Inform II meter is used for Quantitative determination of glucose in whole blood specimens. The enzyme on the test strip, mutant variant of quinoprotein glucose dehydrogenase converts the glucose in the blood sample to gluconolactone. This reaction creates a harmless electrical current that the meter interprets as a glucose concentration in mg/dL. The system is calibrated with venous blood containing various glucose concentrations and is calibrated to deliver plasma-like results. The reference values are obtained using a validated test method. This test method is referenced to the hexokinase method and is traceable to an NIST standard. II. SCOPE The Accu-Chek Inform II meter is used for monitoring blood glucose levels in hospitals, ambulatory practices, and home care settings. It is used in both adult, pediatric, neonate patient populations, however, it’s accuracy and precision in critically ill patients has not been evaulated. The test is to be used for monitoring glucose levels and should not be used for diagnosis. III. PERSONNEL Intended for use by clinical personnel who have received training and demonstrated competency in this procedure. In the hospital setting, this includes Clinical Laboratory Scientists, Registered Nurses, Nurse Practitioners, Physician Assistants, Physicians, Respiratory Tech. In the ambulatory setting, this includes the aforementioned personnel as well as Medical Assistants, Licensed Vocational Nurses and other licensed Technologists. IV. SPECIMEN REQUIREMENTS AND INTERFERENCES A. Use capillary whole blood samples obtained from fingerstick. For children under 12 months of age, sample is obtained from heel stick. Fingerstick and heel stick samples must be tested immediately. Do not use plasma, serum or Cord Blood samples. B. Wipe away the first drop of blood with gauze and use the second free-flowing drop of blood from the fingerstick site for testing. C. Venous, arterial or neonatal blood sample collected in lithium heparin are also acceptable. Sample must be tested within 30 minutes of drawing to minimize the effects of glycolysis. Rev 1, Ver 2, 9/9/2013 1 of 16 D. E. V. CALIBRATION VERIFICATION / LINEARITY A. B. VI. Alternate site capillary testing is unacceptable in a hospital setting. Due to the potential for less vascular circulation in alternate sites, a 30 minute lag time may occur in detecting hypoglycemia from alternate site capillary samples. Patients who have peeled fresh fruit or handled other foods that contain glucose may have falsely high glucose levels. Patients should wash their hands with water and soap prior to having fingerstick glucose performed. Linearity solution (L1 – L6) and QC (L1 & L2) are performed on brand new, replacement and Roche repaired meter by Clinical Labs POCT. Linearity testing is performed to validate the reportable range. Level 1 to 6 linearity solutions are run in duplicate and results are plotted against reference values. The ideal linearity would be a straight line. EQUIPMENT, REAGENTS, MATERIALS AND STORAGE A. B. C. D. E. F. G. H. I. J. K. L. Accu-Chek Inform II Glucose Meter Accu-Chek Inform II Meter base unit (docking and charging station) Accu-Chek Inform II Test Strips (PMM# 1022), 50 strips per vial. Accu-Chek Inform II Glucose Controls- High and Low control (PMM# 1026), each bottle comes in 2.5mL volume. Accu-Chek Inform II Linearity Kit, Level1 – Level 6 (PMM# 1023), each bottle comes in 2.5mL volume. Accu-Chek Inform II Carrying Case (call Roche Diagnostics Customer Service 1800-440-3638 for replacement of broken carrying case) Safe T-Pro Lancets Disposable Gloves Alcohol Wipes Gauze Sani-Cloth Plus Germicidal Disposable Cloth (PMM# 60948) for cleaning meters, base units, and base unit hubs. Storage and Handling of Testing Materials and meters 1. Test Strip a. Store the strips at room temperature 15-30°C (59 - 86°F). b. Do not refrigerate or freeze. Strips stored at room temperature remain stable, and once validated by performing Quality Control testings, are good until the expiration date printed on the vial. c. Do not use test strips beyond their expiration date. d. Quality Control (QC) must be performed on all new vials of test strips when first opened. The vial must be dated with Month/Day/Year and initialed to indicate QC has been done. e. Keep the test strips in the original container, immediately replacing the vial cap after removing a test strip. Exposure to moisture may cause the meter to give an error message or give an incorrect result. 2. Code Key Note: New test strip codes are uploaded into all meters by Clinical Labs POCT when the new lot of strips is validated for use. Each box of test strips contains a code key. Each code key belongs to a single lot number and provides important information about the lot specific properties of the test strip. The properties of the test strips are downloaded (as a code file) from the code key using the code key reader and sent to all meters. The code file is stored in the meter. Rev 1, Ver 2, 9/9/2013 2 of 16 3. 4. 5. Quality Control Solutions a. Store the controls at room temperature at 15-30°C (59 - 86°F). b. Do not refrigerate or freeze. Unopened control solutions remain stable up to their expiration date when stored at room temperature. c. Control vials must be documented with opened date (Month/Day/Year) and initialed when first opened. d. Controls are good for 90 days after opening or until the expiration date printed on the label, whichever comes first. Aside from the Opened Date (Month/Day/Year), also write the new expiration date (Month/Day/Year) on the control vials. Glucose Meter Touchscreen a. Use only your finger to touch the screen elements. b. Using a sharp-edged object (e.g., tip of a pen) can damage the touchscreen. c. Do not use the system in direct sunlight. d. Direct sunlight may reduce the life expectancy and functionality of the display, as well as the integrity of test strips. e. Handle the meter and its system components carefully. Avoid dropping it or banging it. f. Protect the base unit from dripping liquid. g. Do not immerse the meter and base unit in any liquid. h. Do not expose the meter to excessive sources of heat for prolonged periods of time when performing a test. Potential sources of heat include but are not limited to: 1. Leaving the meter under a bilirubin light or photo therapy light. 2. Leaving the meter on a bed warmer. 3. Leaving the meter in an isolette. Data Management System a. COBAS IT 1000 b. Telcor QML VII. SAFETY PRECAUTIONS A. As part of our Blood Borne Pathogen Exposure Control Plan, standard precautions must be practiced during this procedure. Follow all procedures and precautions described in the UCSF’s Infection Control Policy. B. When working with control solutions and/or patient specimens, WASH HANDS with soap and water or disinfect hands with hand sanitizer gel before putting on new pair of clean disposable gloves and after removing gloves. VIII. QUALITY CONTROL POLICY A. QC testing must be performed: 1. Each day of use. 2. When a new vial of test strips is opened. 3. If a test strip vial was left open 4. If the previous control result is out of range. 5. If there’s a question about a patient’s glucose result. 6. When the test strips and/or control solutions have been exposed to extreme heat, humidity or cold (when room temperature thermometer reading is out of range). 7. If you drop the meter. Rev 1, Ver 2, 9/9/2013 3 of 16 B. C. D. 8. When you want to check the performance of the system. Results for Test Strip, Level 1 Low Control and Level 2 High Control Solutions should fall within the acceptable QC ranges. The meter cannot be used for patient testing if it fails any quality control test. The meter will lock out and not permit patient testing. List of Corrective Actions for Failed QC: Note: If QC fails either level 1 or level 2 or both levels, perform Corrective Actions as follow: 1. Select Will Repeat Test in the pre-programmed comments on the meter. 2. Check expiration date of the control solutions and test strips. 3. Check the test strip lot number on the meter display and make sure it matches the lot number on the test strip vial you are using. 4. Repeat QC using the same control solution and test strip vials. 5. If QC still fails, discard controls and open new control vials or use a different lot number. 6. Select Will Use New Control Vial in the pre-programmed comments on the meter. 7. If QC still fails, discard the test strips and open a new vial of test strips or use a different lot number. 8. Select Will Use New Test Strip Vial in the pre-programmed comments on the meter. 9. If QC still fails after changing the control solution and test strip vials, remove the meter from service. 10. Select Notified BioMed in the pre-programmed comments on the meter. 11. Put a red tag on the meter, and return it to Clinical Engineering for further evaluation, replacement, and downloading of data. QC Lockout 1. At 12:01 AM every day the meter will prompt the user to run QC before any testing is allowed. This message will appear. QC Lockout D-513. Warning! Quality Control is due. Required Controls must be run in order to proceed. 2 STAT test(s) available.” 2. 3. IX. The QC lockout feature may be overridden to allow the operator to run up to (2) STATS if necessary prior to performing the QC tests. Level 1 and level 2 quality control tests must be performed IMMEDIATELY once a STAT test is run and results must be within Acceptable Range in order for the patient’s result to be valid. QUALITY CONTROL TESTING PROCEDURE Note: For efficiency, daily cleaning should be done and recorded when QC is performed by selecting Cleaned Meter from the pre-program comments. (Refer to page 9 Maintenance Policy and Procedure) A. Press the power ON/OFF button to turn on the meter. The meter will perform Self-Checks. B. Touch the forward icon [ ] or wait 5 seconds to automatically proceed to the Operator ID screen. Rev 1, Ver 2, 9/9/2013 4 of 16 C. D. E. F. Press and release the “barcode” button. The button now appears with a black background during the scan. Hold the meter so that the window of the barcode scanner is approximately 4 – 8 inches above the barcode you wish to read. The meter beeps once the barcode has been read successfully. Operator ID may also be entered manually by handentering your own Employee ID number. From the Main Menu screen, touch Control Test. Scan in the lot number barcode on the control vial Level 1 (Lo) or Level 2 (Hi). If the lot number is incorrect, this message appears: “Control lot not found. Please enter an existing Control lot or see your System Administrator” 1. 2. G. H. I. J. K. L. M. N. O. P. Q. Make sure you are scanning the Control vial and not the Test Strip. Check both Control manufacturer’s expiration date and 90 days new expiration date (Month/Day/Year). 3. If the control vial is not expired, contact the POCT Laboratory (3-1977). Glucose control solution lot information need to be entered and stored in the data management system, from where it can be sent to all the meters. Touch [√] to confirm the selected control solution lot number. Scan in the lot number barcode on Test Strip vial when prompted to verify test strip lot number. The meter will perform the code key checks (I-304). Make sure the code file displayed in the meter match the lot number of the test strips used. Touch [√] to confirm the selected test strip lot number. Remove the test strip from the test strip vial and close the vial with the cap immediately. Hold the test strip so the lettering “ACCU-CHEK” is facing upward. Slide the test strip into the test strip port as far as it goes in the direction indicated by the arrows on the test strip. The meter beeps indicating the strip has been detected. Wipe the tip of the control solution bottle with gauze before and after use. When the flashing drop appears in the display, apply a drop of glucose control solution to the front edge of the test strip. (Do not apply the control solution to the top of the strip). The control solution is pulled into the test strip by capillary action. Tightly close the cap of the control solution after use. The meter beeps when an adequate sample is applied and an hourglass is displayed while the test is running. The test takes 5 seconds to complete, an audible beep is heard and the result “PASS” or “FAILED” is displayed. Enter the appropriate comment(s) regarding cleaning or failure of the QC: Touch icon to display the Pre-Programmed and Custom Comment Options. Up to three Comments can be entered. 1. Will Repeat QC 2. Wrong Control Level 3. Will Use New Control Vial 4. Will Use New Test Strip Vial 5. Cleaned Meter 6. Notified BioMed Rev 1, Ver 2, 9/9/2013 5 of 16 R. S. T. U. V. W. X. X. ----------- For custom comment, press icon to enter other or additional pertinent customized comment(s), not listed in the pre-programmed comments. Once you have selected and/or entered the desired comment(s), Press [√] to return to the Results Screen. Press [√] again to confirm the result and send the result from the meter wirelessly. Remove the strip and discard in a biohazard waste container. Repeat steps E through U to run the second level of control. Proceed with patient testing, or press the Power OFF button to turn the meter off. Placing the meter in the docking station ensures downloading of QC information to the POCT Lab (back-up for the wireless data transfer) and charges the battery at the same time. PATIENT TESTING PROCEDURE A. Patient Preparation 1. For Fingerstick and Routine Venipuncture Sample Procedure, see online Specimen Collection Manual at: http://labmed.ucsf.edu/labmanual/mftlngmtzn/dnld/speccolPhleboto my_Venipuncture.pdf 2. For capillary glucose tesing: a. Only fingerstick and heelstick for infants are approved sites. The site will be cleaned, dried, punctured with the Safe T-Pro Lancets. Wipe the first drop of blood with gauze and use the second free flowing drop of blood for testing. b. Do not squeeze the puncture site too hard as it may result in tissue fluid contamination c. Alcohol used to cleanse the puncture site for capillary samples must be thoroughly dry or an error code/inaccurate result may occur. 3. For Venous, arterial or neonatal blood sample collected in lithium heparin: a. Use only the blood drawing device assigned to the patient. Do not share blood drawing devices between patients. b. Discard blood drawing device appropriately. B. Patient Testing 1. Using two patient identifiers, verify patient identification, and explain procedure to patient and/or family. 2. Press the power ON/OFF button to turn on the meter. The meter will perform Self-Checks. 3. Touch the forward icon [ ] or wait 5 seconds to automatically proceed to the Operator ID screen. 4. Press and release the “barcode” button. The button now appears with a black background during the scan. 5. Hold the meter so that the window of the barcode scanner is approximately 4 – 8 inches above the barcode you wish to read. The meter beeps once the barcode has been read successfully. Operator ID may also be entered manually by hand-entering your own Employee ID number. 6. From the Main Menu screen, touch Patient Test. 7. For those sites utilizing patient identification, you must SCAN THE PATIENT’S BARCODE. Rev 1, Ver 2, 9/9/2013 6 of 16 8. 9. 10. 11. 12. 13. 14. 15. 16. 17. 18. 19. Hold the meter so that the window of the barcode scanner is approximately 4 – 8 inches above the barcode on the patient’s ID band. The meter beeps once the barcode has been read successfully. Make sure to scan the whole barcode length and not cut-off. Patient ID may also be entered manually, by hand-entering the patient’s medical record number using the touch keypad on the display screen. Confirm patient’s ID and/or Name is correct. If correct, touch [√] to confirm the selection. Scan in the lot number barcode on Test Strip vial when prompted to verify test strip lot number. The meter will perform the code key checks (I-304). Make sure the code file displayed in the meter match the lot number of the test strips used. Touch [√] to confirm the selected test strip lot number. Remove the test strip from the test strip vial and close the vial with the cap immediately. Hold the test strip so the lettering “ACCU-CHEK” is facing upward. Slide the test strip into the test strip port as far as it goes in the direction indicated by the arrows on the test strip. The meter beeps indicating the strip has been detected. Wait until the flashing drop appears in the display before applying the blood sample. Apply a free flowing drop of blood to the front edge of the test strip. Do not apply the blood to the top of the strip. Blood is pulled into the test strip by capillary action. Blood on top of the test strip is not available for testing. The meter beeps when an adequate sample is applied and an hourglass is displayed while the test is running. Once the test is completed, an audible beep is heard and the result is displayed. Note result. If result is in the critical range, the following message will appear: Repeat Test. If Result Still In Critical Range. Order Lab Draw And Notify MD/NP. a. 20. Notify MD/provider for blood glucose results less than or greater than physician-ordered parameters or when blood glucose is: 1. <60 or >400 mg/dL in Adults/Pediatric patients 2. <40 or >150 mg/dL in Neonates b. In addition, if this is a new finding, immediately draw and send a sample to the Clinical Lab (in green top lithium heparin tube) for confirmation. If a result is in the critical range, a comment must be entered to continue meter use. Touch icon to display the Pre-Programmed and Custom Comment Options. Up to three Comments can be entered. a. b. Will Repeat Test Order/Protocol Used Rev 1, Ver 2, 9/9/2013 7 of 16 c. d. Notified MD/NP Lab Draw e. 21. For custom comment, press icon to enter other or additional pertinent customized comment(s), not listed in the preprogrammed comments. If a test strip is bad or if the patient result is between 0-10 mg/dL, an error code will be displayed. Repeat test and follow POCT and Unit policy. Strip Defect Error Extremely Low Blood Glucose Sample Below the meter’s reading range Or a Bad Strip a. b. 22. Important: “Strip Defect Error” can be caused by a: 1. Low glucose result (<10mg/dL) 2. or Defective Test Strip 3. or you added the sample to the test strip first before the flashing drop icon appears on the meter display. – Follow steps exactly as shown on meter display. Perform QC on new vial of test strips and repeat patient test with this new vial of test strip. Make sure to follow the procedure sequence and prompt displayed on meter screen. If repeat test, still give “Strip Defect Error”, Immediately send STAT glucose specimen to the Clinical Labs (in green top lithium heparin tube) to determine if error message is due to an extremely low glucose result (<10 mg/dL). a. Do not use the meter and call POCT at 415-353-1977 and/or email to: [email protected] with the following information: 1. Meter name and serial number (starts with UU located at the back of the meter). 2. 23. 24. 25. 26. XI. Patient Name, MRN, DOB, POC glucose results, and other details. Remove the test strip from the meter and discard in biohazard container. Press the power OFF button to turn the meter off. Clean machine, then discard gloves and wash hands / use hand sanitizer gel. Placing the meter in the docking station ensures downloading of QC information to the POCT Lab (back-up for the wireless data transfer) and charges the battery at the same time. RESULT AND REPORTING A. Patient results that exceed the reportable and critical range of the system require follow up as described in the Patient Testing section of this manual. B. At the completion of the patient test the results will be sent wirelessly to the lab Cobas IT 1000 and Telcor QML data management system which then sends the result to Sunquest and APEX (EMR). Rev 1, Ver 2, 9/9/2013 8 of 16 C. D. E. F. G. In case of a malfunction of the wireless transmission, there is a base unit wired to the network to download the meters on each nursing unit and clinic. When the meter is docked in its downloader, it will get charged at the same time. Record blood glucose results in the patient’s medical record chart, per protocol in your department. Sites utilizing the patient identification function will download patient results to Electronic Medical Record (EMR) after patient testing. Note: Whenever a user identifies that an incorrect result has been reported, they are responsible for correcting/commenting the incorrect result in APEX/the electronic medical record-EMR (if possible), contacting the ordering provider, notifying them of the error, and documenting this notification, including the time and date, in the patient record. Also notify POCT to append comments on the results in Sunquest and Cobas IT 1000 and Telcor QML data management system. The POCT Clinical Laboratory will be responsible for monitoring and follow-up on QC reporting based on COBAS IT 1000 and Telcor QC Reports, Guidelines, and Standards. XII. NORMAL VALUES, PANIC VALUES, REPORTING POLICY A. REFERENCE RANGE: 1. Normal Adult/Pediatric: 70 - 199 mg/dL 2. Normal Neonate: 55 - 115 mg/dL B. CRITICAL RANGE: 1. Critical Adult/Pediatric: <60 or >400 mg/dL 2. Critical Neonate: <40 or >150 mg/dL 3. Test results outside the meter’s established reference range will be displayed in numeric result, an Alert Prompt will be Displayed on meter screen and the Comments C. REPORTABLE RANGE 1. System Measurement Range (Reportable range): 10-600 mg/dL 2. Results outside this range must be followed-up immediately with Lab Draw and send sample to the Clinical Lab for STAT glucose testing for confirmation. 3. Test results outside the meter’s measurement range will be displayed as: a. “RR LO / LO” if <10 mg/dL or b. “RR HI / HI” if >600 mg/dL. c. LO or HI are critical results, follow Critical Results Reporting Policy. Refer to Patient Testing on page 7 steps 19 – 20.. XIII. MAINTENANCE POLICY AND PROCEDURE A. For efficiency, daily cleaning and disinfecting are companion procedures and should be done and recorded when QC is performed by selecting “Cleaned Meter” from the pre-program comments. 1. Cleaning removes visible soil and organic material prior to disinfecting. 2. Disinfecting destroys most pathogenic organisms. B. Do not clean or disinfect meter while performing any type of test. C. Remove the meter from the base unit and turn it off prior to cleaning and disinfection. At minimum, clean and disinfect the meter between each new patient use and when soiled with Sani-Cloth Plus Germicidal Disposable Cloth. The towelette should be slightly damp, NOT wet. Rev 1, Ver 2, 9/9/2013 9 of 16 D. E. F. G. Do not allow excess moisture to seep into the meter by squeezing off excess cleaning solution from the pre-moistened cleaning cloth before cleaning the surface of the meter and the base unit. If you suspect that moisture may have entered the strip port, perform glucose testing. (If solution is allowed to collect in any meter opening including test strip port, severe damage to the system can occur). The accessory box, docking station and base unit hub can also be cleaned with a Sani-Cloth Plus Germicidal Disposable Cloth. 1. Place the base unit and/or hub on a level surface and unplug prior to cleaning. 2. Do not pour or spray solutions directly on the meter, docking station and hub since this could cause the solution to enter the case and damage the electronic components. 3. Do not immerse the meter or base unit in liquid. 4. Do not wipe the electrical connectors on the back of the base unit. After cleaning, dry the Meter, Base Unit, and Hub (including connectors) thoroughly with a dry, soft cloth or gauze before docking the meter to the base XIV. LIMITATIONS A. The Accu-Chek Inform II test strips are for testing fresh capillary, venous, arterial, or neonatal whole blood. Cord blood samples cannot be used. B. Hematocrit should be between 10–65 %. C. Lipemic samples (triglycerides) in excess of 1800 mg/dL may produce elevated results. D. Blood concentrations of galactose >15 mg/dL will cause overestimation of blood glucose results. E. Intravenous administration of ascorbic acid which results in blood concentrations of ascorbic acid >3 mg/dL will cause overestimation of blood glucose results. F. If peripheral circulation is impaired, collection of capillary blood from the approved sample sites is not advised as the results might not be a true reflection of the physiological blood glucose level. This may apply in the following circumstances: severe dehydration as a result of diabetic ketoacidosis or due to hyperglycemic hyperosmolar non-ketotic syndrome, hypotension, shock, decompensated heart failure NYHA Class IV, or peripheral arterial occlusive disease. G. This system has been tested at altitudes up to 10,000 feet. XV. ALTERNATIVE TEST METHODS A. Blood Plasma Glucose testing is performed in the Clinical Laboratories. B. Point of care glucose testing may not be performed by the patient or by using patient’s own glucose monitoring device. C. Alternate site capillary testing is unacceptable in a hospital setting. Due to the potential for less vascular circulation in alternate sites, a 30 minute lag time may occur in detecting hypoglycemia from alternate site capillary samples. XVI. STAFF EDUCATION AND COMPETENCY A. Each operator, using the Accu-Chek Inform II wireless glucose meter, becomes competent through training provided by the Nurse Educators or Unit managers in either the Department of Nursing or Ambulatory Services. B. Super users and O.R. Anesthesia staff are trained by POCT CLS staff. Rev 1, Ver 2, 9/9/2013 10 of 16 XVII. RECORDS MAINTENANCE A. Individual patient results are documented in the patient’s medical record, and also downloaded to the Electronic Medical Record (EMR). B. Quality Control monthly reports are maintained and kept in the POCT Clinical Laboratory for at least 3 years. C. Documentation of training and competency are kept in each staff member’s personnel file. XVIII. RETRIEVAL OF STORED RESULT DURING NETWORK DOWNTIME A. From the Main Menu, press Review Results. B. The Review Results screen displays the most recent stored result(s) on top. (The meter memory stores up to 2,000 results). C. Select any result to VIEW RESULT DETAILS. D. The following information will be displayed: 1. Patient ID, 2. QC level or sample ID, 3. The lot number of the reagent(s) used to perform the test, the test result, the date and time the test was performed, and comments that were entered at the time the test was performed. E. Press the Up arrow to view MOST RECENT tests. F. Press the Down arrow to view PREVIOUS tests. G. Select PATIENT to view specific Patient’s result: H. Barcode scan or manually enter the patient’s (9) digits MRN. I. Press the arrow buttons to scroll through the patient results. J. Select any result to view patient result details. K. Press the back arrow to return to the previous screen. L. Select ALL to return to viewing ALL RESULTS. M. Select QC to review QC results only: N. Use the arrow buttons to scroll through the QC results. O. Touch any QC result to view result details. P. Touch the back arrow to return to the previous screen. Q. Press the Main Menu Icon to return to the Main Menu. XIX. METER STORAGE / DOCKING for Recharging Meter Battery: A. The Accu-Chek Inform meter contains a rechargeable battery pack that is recharged when connected with the base unit (docking station). B. In order to maintain the battery charge, the Accu-Chek Inform meter should be stored in the docking station when not in use. C. At a minimum, each meter must be docked once every 24 hours, for five minutes, for minimal battery recharging. D. The battery must be fully recharged at least once a week, which requires at least continuous one hour in the docking station. E. When shipped, the battery pack is not installed in the ACCU-CHEK Inform II meter. After Clinical Engineering installs a new battery pack, the meter should be charged for three hours in the base unit before POCT can do any pre-requisite testing (prior to patient use). F. Whenever the meter is in the base unit, the (battery with lightning icon) is displayed. This icon shows that power is available and the meter can charge. Rev 1, Ver 2, 9/9/2013 11 of 16 XX. TROUBLESHOOTING A. On Screen Messages All error messages displayed by the system have a letter identifying the message type, a number and a description of the error to help the operator take action to resolve the problem. The different message types are in the table below. E Identifies the notification as an Error. The information notifies the operator that an error has occurred. W Identifies the notification as a Warning. The information does not block the operator from continuing, but rather gives the operator information that may suggest an alternate workflow is required. I Identifies the notification as Informational only. Informational notifications present the operator with contextual information, and allow the operator to proceed after confirming the notification. D Identifies a Decision point. Decision notifications provide the operator with a choice based on contextual information. B. Error Codes Display/Sympto m/ERROR CODE The meter Does Not POWER ON. POSSIBLE SOLUTION Battery pack might be dead. 1. Place meter in the base unit for at least an hour to re-charge 2. Meter displays “Type Bad Dose” Meter displays “Glucose Error" Meter displays “Unexpected SW Error” battery pack. If error persists, put a red tag and take the meter to Clinical Engineering. Insufficient amount of blood on the test strip. 1. Repeat the test using a new test strip, ensuring proper sample dosing application (review proper testing procedure). 2. If error persists, put a red tag and take the meter to Clinical Engineering. Detection of an unexpected HARDWARE ERROR 1. Perform QC on new vial of test strips and repeat patient test with this new vial of test strip. 2. Refresh the meter by turning ON and OFF the power button. 3. Reset the meter by pressing the reset button (see Meter Reset Procedure on page 14). 4. If error persists, put a red tag and take the meter to Clinical Engineering. Detection of an unexpected SOFTWARE ERROR 1. Perform QC on new vial of test strips and repeat patient test with this new vial of test strip. 2. Place meter into a connected base unit and let it download completely to synchronize configurations with the data management system. 3. Reset the meter by pressing the reset button (see Meter Reset Procedure on page 14). 4. If error persists, put a red tag and take the meter to Clinical Engineering. Rev 1, Ver 2, 9/9/2013 12 of 16 Display/Sympto m/ERROR CODE Meter displays “QC Due: Immediately” Test Result: “LO/HI” or “RR LO/RR HI” POSSIBLE SOLUTION Meter displays (QC) “FAIL” or “Out of Range” 1. QC result is Outside QC Range or previous QC result failed. 2. Refer to List of Corrective Action(s) for Failed QC on page 4 Battery Low Battery Critically Low Charge the battery by placing the meter in the base unit. 1. Charge the battery by placing the meter in the base unit. 2. If meter battery doesn’t seem to re-charge, put a red tag and Run controls immediately. Patient testing cannot proceed until control tests are successfully run. Patient’s result is Critical. 1. Refer to (Page 7 steps 18-20 Critical Results). 2. In addition, follow your Unit/Clinic protocol. and QC testing - Pre-programmed/Custom Comments on page 5. 3. take the meter to Clinical Engineering. CE will check if the battery pack is correctly Installed and Connected and Replace it if defective. The ACCU-CHEK Inform II Meter is unable to communicate with the Data Management System. 1. Results Not showing up in APEX / EMR. 2. Reset the meter by pressing the reset button 3. If problem persists, Call IT at (415) 353-9000 or Automatic shutdown (power off). The meter is configured to automatically powers off when there’s no activity to conserve energy. Base Unit LED is not illuminated Base Unit is Not connected to power supply unit or power supply unit is defective, or power outlet is not active. 1. Disconnect the base unit power supply cord from the base unit and electrical outlet and then, re-connect it again. Make sure all the cords are tightly connected to the base unit. 2. If error persists, put a red tag and take the base unit to Clinical Engineering. LED flashes red Communication or configuration error. Call IT at (415) 3539000 or (415) 514-4100 or (415) 514-4100 or place an IT ticket request on-line at https://servicenow.ucsfmedicalcenter.org or place an IT ticket request on-line at https://servicenow.ucsfmedicalcenter.org Rev 1, Ver 2, 9/9/2013 13 of 16 C. Meter Reset Procedure 1. Place the meter face down on a level surface. 2. Press the reset button in the middle of the battery 3. 4. pack using a tool such as a screwdriver or a paper clip. Turn over the meter. a. The Roche logo is displayed. b. If the Roche logo does not appear within 60 seconds, place the meter on a base unit for a minimum of 15 minutes to recharge the battery. c. Within a short period of time, the meter Version’s screen will appear, displaying the version numbers of the meter components. The screens for entering the date and the time appear if date and time need to be set. If needed, enter the correct date and time, confirm each screen with . 5. To ensure successful troubleshooting, Dock the 6. meter in the base unit and let it download completely for SYNCHRONIZATION of the meter’s Date and Time with the System’s Date and Time. Finally, the Power Up/Stand By Screen and the Main Menu are displayed. D. Broken / Inactive Meters 1. Meters that fail to perform properly or have failed QC cannot be used for patient testing. 2. Meters removed from service must be returned to Clinical Engineering for evaluation, downloading of data, and meter replacement. 3. For assistance, please call Clinical Engineering at 3-1727 (general number) or refer to Clinical Engineering contact list below. E. Network Connectivity Problem 1. For reporting patient’s results during downtime due to Result Interface Problem, please follow Nursing Protocol or your Department/Unit Policy. 2. To Look-up Results directly the meter when results are not interfacing to APEX/EMR, see page 11 (XVIII Downtime) on how to retrieve results when connectivity is down. 3. For assistance, please contact IT/LIS Department (415) 353-9000 or (415) 514-4100 or put an IT ticket request on-line at https://servicenow.ucsfmedicalcenter.org Rev 1, Ver 2, 9/9/2013 14 of 16 F. Troubleshooting Contact Information: 1. For BROKEN METER, LOANERS, Base Unit, & Meter Battery: a. Contact CLINICAL ENGINEERING: 1. 2. 3. Parnassus campus & General Number: Room M-60 (415-3531727) Mt. Zion campus: Room MTZ B007 (415-885-7642 / 415-3531727) Mission Bay campus: Room 170 MB Ortho Institute (415-514-6085) 2. 3. 4. For Broken or Replacement of Carrying Case, contact Roche Customer Service at 1-800-440-3638 For RESULT TRANSMISSION ISSUES / NETWORK CONNECTIVITY PROBLEM: a. Contact IT or LIS Department at (415) 353-9000 or (415) 514-4100 or b. put an IT ticket request on-line at https://servicenow.ucsfmedicalcenter.org For TECHNICAL ASSISTANCE on WEEKENDS & HOLIDAYS: a. Contact Roche ACCU-CHEK Customer Care: 1-800-440-3638 b. To contact POCT Lab: call (415) 353-1977 or e-mail to [email protected] Rev 1, Ver 2, 9/9/2013 15 of 16 XXI. REFERENCES A. B. C. D. E. F. G. H. I. J. K. L. Internal Policy Accu-Chek Inform II Blood Glucose Monitoring System Operator’s Manual 2013 ACCU-CHEK Inform II Blood Glucose Monitoring System Operator’s Manual for Healthcare Professionals 2012 Accu-Chek Inform II Quick Reference Guide for Healthcare Professionals Accu-Chek Inform II Glucose Control Solutions Product Insert 2012 Accu-Chek Inform II Test Strips Product Insert 2013 at http://www.accu-chek.com Accu-Chek Inform II Linearity Kit Product Insert 2013 Comprehensive Policies, Processes and Procedures Manual for Use with the ACCU-CHEK® Inform II Glucose Monitoring System Evaluation Report: ACCU-CHEK Inform II Test Strips ACCU-CHEK and AccuData Systems Evaluation Protocols ACCU-CHEK Inform II System MSDS Data Sheet Rev 1, Ver 2, 9/9/2013 16 of 16 Signature Manifest Document Number: SOP-0478 Title: Accu-Chek Inform II Procedure Revision: 1 All dates and times are in Pacific Standard Time. Accu-Chek Inform II SOP for Review SR Sup Review Name/Signature Title Date Meaning/Reason Kim Lee (029124187 ) for Cynthia Ishizaki (024044224) POC CLS SPEC SUP 7 Sep 2013, 05:26:28 PM Reviewed Med Dir Apprvl Name/Signature Tim Hamill (023335003) Title Rev 1, Ver 2,Date 9/9/2013 PA CB MED DIRECTOR 9 Sep 2013, 09:28:03 AM Meaning/Reason Approved