1
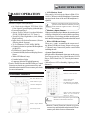
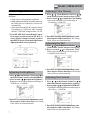
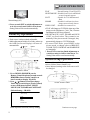
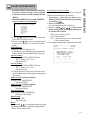
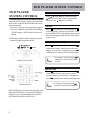
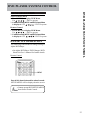
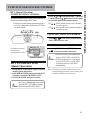
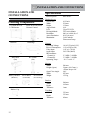
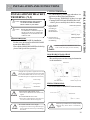
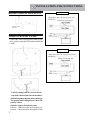
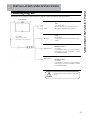
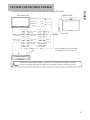
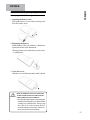
User’s Manual
Rear Seat Entertainment
TMX-R1100E
Please read before using the equipment.
www.alpine-asia.com
Designed by Alpine Electronics of Asia Pacific Co., Ltd.
Printed in China
Contents
WARNING
Warning.................................................... 3
Cautions.................................................... 3
Cautions on Usage................................ 4
BASIC OPERATION
Specification.................................................
Overhead Monitor........................................
Remote Control............................................
Turning Power ON/OFF...............................
Sound Mute Function....................................
Sound Volume Adjustment............................
Sources Selection........................................
Brightness Setting for Blacklight.....................
Variable Indirect Lamp Brightness Setting......
Picture Adjustment........................................
Adjusting the Brightness....................
Adjusting Color Density....................
Adjusting the Tint..............................
Adjusting the Contrast.......................
Adjusting the Sharpness....................
Resetting the Picture Adjustment........
Switching the Screen Mode...........................
Visual EQ Operation.....................................
System Setup Operation...............................
DVD PLAYER
SYSTEM CONTROL
5
5
5
6
6
6
6
6
6
7
7
7
7
7
8
8
8
9
9
TV TUNER (ANALOG)
SYSTEM CONTROL
Saving to Channel memory............................. 13
Preset Channel Selection............................... 13
TV/DVD TELEVISION
TUNER SYSTEM CONTROL
DTV (Digital Television) Tuner System Control.................. 14
DTV Tuner Setting (Quick Operation)...................... 14
Preset Channel Selection............................................ 14
Channel Manual Search.............................................. 14
Full SEG / One SEG Manual Switching..................... 14
INSTALLATION AND
CONNECTIONS
Checking Components.................................. 15
Specifications................................................ 15
Installation by Bracket, Trim Ring
Fixing Bracket.................................... 16
Cutting Trim Ring............................... 16
Monitor Installation............................ 16
Fixing Trim Ring................................. 16
Room Lamp Installation.................................. 17
Wire of Room Lamp...................................... 17
Connecting Diagram....................................... 18
System Connection Sample............................ 19
OTHER
Play and Pause.............................................. 11
Stop.............................................................. 11 Troubleshooting............................................. 20
Fast Forward................................................ 11 Remote Control Battery Replacement............. 21
Rewind.......................................................... 11
Menu Selection.............................................. 12
DVD Setup Operation.................................... 12
Warning
WARNING
• Please read this manual carefully for correct usage
and keep it for later use when needed. The company
shall not be responsible for any damages from misuse
of the product.
• This manual has been prepared for you to be able to
use the product correctly and safely with various
illustrations to keep from any harm to the other persons
or others’ property. Below are the definitions of symbols
used. Please carefully understand the meanings before
reading the manual.
WARNING
This shows the detail that could lead to
death or hard injury if ignored and misuse
the product.
Do not disassembly or modify the product.
It could cause accident, fire or electric shock.
Keep small objects such as batteries,
screws out of the reach of children.
If swallowed, consult a doctor immediately.
Use the correct ampere rating when
replacing fuses. Failure to do so may
result in fire or electric shock.
In case of error, such as no sound or
picture, alien object inside, smoked or
strange smell, stop using the product
immediately and contact your dealer.
This could cause accident, fire and
electric shock.
Do not operate or watch while driving.
Always stop the vehicle in a safe location
before operation. Failure to do so may
result in an accident
Keep all cords and wires from interference
with driving operation. Binding with Handle,
Transmission Lever or Break Paddle could
cause accident or system breakdown.
Rear seat passenger should fasten the seat
belt to prevent from accident due to quick
take off or urgent breaking. This could
cause accident or injury.
Please do not connect the electric from
other source by peeling the wire insulator.
This could cause fire or electric shock.
Do not install in the position where
obstruct driving operation such as
front view, handle, gear level or place
that could harm passenger. This could
cause accident and injury.
Do not use bolt of the Handle, Break,
and Fuel Tank to connect the negative
ground. This could cause malfunction
and fire.
3
Prohibit
Warning
Prohibit
Strictly
Prohibit
Strictly
Before installation, disconnect the battery
from negative ground first to prevent injury
from electric shock and injury.
Strictly
Warning
WARNING
Use only in cars with a 12 volt negative ground.
(Check with your dealer, if you are not sure.)
Failure to do so may result in fire.
Prohibit
Strictly
Warning
This shows the detail that could lead to
injury or damage to the property if ignored
and misuse the product.
Please correctly install as described in this
manual. Failure to do so may result in fire
or an accident
Please avoid the line to be in between
objects or edges. It could cause electric
shock or fire due to cut or short circuit.
Prohibit
Warning
Do not close or block the ventilating grill.
This could cause fire or system breakdown.
Prohibit
Prohibit
Prohibit
Use only specified options and install firmly.
Failure to do so may result in fire or an
accident
Do not install in place where wet, high
humidity or dusty. Failure to do so may
result in electric shock.
Prohibit
Prohibit
Note : Due to continuous product improvement,
Prohibit
specifications are subject to change without notice.
Do not mix new batteries with old batteries.
Insert with the correct battery polarity.
When inserting the batteries, be sure to
observe proper polarity (+ and -) as instructed.
Rupture and chemical leakage from the battery
may cause fire or personal injury.
Specific knowledge and experience are needed
for installation and wiring. Please contact
to your dealer.
Keep the volume at a level where you can
still hear outside noise while driving.
Failure to do so may result in accident.
Please use only within the vehicle. Failure
to do so may result in electric shock or injury.
Do not place hands, fingers or foreign objects
in gaps. Doing so may result in personal injury
or damage to the product.
Prohibit
Prohibit
Cautions on usage. (All)
Do not use mobile phone or other wireless device close
to this unit.
This could cause noise or system malfunction. It is
recommended to use the mobile phone or wireless devices
with distance from the unit.
Hence, Remote Starter and Car Security could also cause
system malfunction.
Do not use excessive force.
This product is assembled precisely with high precision
parts. Please gently install the device to maintain original
performance from the first use.
Do not use at extreme temperature.
In case that the temperature in the cabin is extremely high
(parking below sunlight) or extremely cold (parking in winter),
please wait until the temperature become normal level then
use the device.
Monitor Care.
• Use soft fabric to clean the monitor when dirty.
• In case of severe dirt, use soft cloth and moist
with neutral base detergent to clean the monitor.
• Never place the cloths that moisten with water
or neutral base detergent on the unit. This could
cause the unit breakdown due to humidity emerging
inside the unit.
• Since the back of the monitor is made with soft
material, do not wipe or rub with hard materials.
Customer using IR Wireless Headphone.
Since IR Wireless Headphone could only be used in limited
range, please use under the degree with low noise and
distance.
*IR Wireless Headphone (Option SHS-N100)
Note : Due to continuous product improvement,
specifications are subject to change without notice.
4
BASIC OPERATION
BASIC OPERATION
Specification
Structure of Alpine TMX (Monitor)
• 10.2 Inch Active Matrix TFT Wide VGA
Color Liquid Crystal Display (800x480 dpi).
• External Input Plug 2.
• Sensor Touch Control (Overhead Monitor
/ DVD / DVD Head Unit / TV Tuner*)
• Visual EQ (Flat, Night Movie, Soft, Sharp,
High Contrast).
• Input Source Selection Parameter (Picture
/ Display Mode/ System).
• 3 Level Dimmer (LOW / MID / HIGH).
• Channel selection to optional IR Headphone
(A/B/OFF).
• DVD Player Control Function.*
• Customized OSD (On Screen Display) Source
Name.
• White LED Room Lamp.
• Variable Indirect Light.
• Language Selection (English/Japanese)
*Touch Control Function and DVD Player Control
Function are based on system connectivity and
limited head unit model. Please contact your dealer
for more information.
Overhead Monitor
• LCD Monitor Panel
This panel is 10.2 inch Active Matrix Wide VGA
Color LCD Panel with IR Headphone Transmitter
equipped at the front of the unit. IR headphone is
optional.
• Monitor will memorize the status when turn
ignition to OFF and will resume the previous
status when turn ignition to ON. <It will be
ON or OFF>
• Monitor <Open> Button
When press Monitor Open Button, the monitor panel
will drop a little bit for use and could be opened up
to 180 degree. For closing, push the monitor panel
back into the housing until you can hear the click sound.
• White LED Room Lamp.
There are (+) and (-) terminal at the connector of
the White LED Room Lamp. Please refer to page
17 [Room Lamp Connection] and be careful when
installing the unit.
• Sensor Touch Control
All light will be illuminated when turn on the power.
You can operate the Over Head Monitor, DVD
Player, DVD Head Unit, TV Tuner by the buttons
below
(When Power OFF or Standby, lighting will be
dimmed.)
Remote Control
Monitor Control Section
Sensor Touch Control
White LED Room Lamp
Variable Indirect Light
IR Wireless Headphone
Alpine DVD Player
Control Section
(See detail from User’s Manual
of the connecting DVD Player)
LCD Monitor Panel
Alpine TV Tuner Control Section.
(Please see User’s Manual of
Alpine TV Tuner.)
• Please remove the plastic tape from the
Remote Control before first use.
Monitor <Open> Button
Room Lamp Switch
5
*Remote Control Function is based on system
connectivity and limited head unit model. Please
contact your dealer for more information.
BASIC OPERATION
Sound Volume Adjustment.
Sensor Touch Control
Sound Volume can be adjusted through optional
IR Headphone or Radio Head Unit.
1. Touch the POWER to turn on the system.
2. Touch the POWER for at least 2 seconds
to turn off. If touch the POWER while
operating, the sound level will be muted.
POWER SELECT
DIM.
(DIMMER)
1. Turn on the POWER of the optional IR Headphone Unit.
2. Turn clockwise to increase the volume and
counter clockwise to decrease.
Adjust by DIAL adjust at IR Headphone.
Sources Selection.
1. Press SEL button at the Remote Control or touch
SELECT at the Sensor Touch Control.
2. Input Sources will be switched when press SEL
(SELECT) or touch SELECT as below.
Remote Control
1. Press POWER to turn on.
2. Press POWER for at least 2 seconds to turn
off the power.
Input 1
Input 2
(DTV)
(DVD)
• The default setting will be as shown in ( ____ ).
• The OSD (On Screen Display) will be automatically
turned off if there is no operation within 10 seconds.
Brightness Setting for
Blacklight.
Remote Control Unit
Sound Mute Function
Sensor Touch Control
1. Operate MUTE function by touching at POWER
button while the power is on.
2. Touch POWER again to turn off the MUTE
function.
Remote Control
Press POWER button to switch between ON
and OFF.
LCD Panel Backlight can be adjusted to be as close
as Cabin Light level. By doing this, the screen will
be even more eye-friendly.
1. Press DIMM (DIMMER) on the Remote Control
or touch at DIMMER of Sensor Touch Control.
2. Every successive press at DIMM (DIMMER)
or touch at DIMMER will adjust the OSD level
from LOW, MIDDLE, HIGH - - - consecutively.
(Default value is HIGH).
LOW
Low
MID
Mid
High
HIGH
Variable Indirect Lamp Brightness Setting
The brightness of Variable Indirect Lamp can be
adjusted.
1.Close the LCD Panel or turn the POWER OFF
(STANDBY).
2.Touch on the / button of the Sensor Touch
Control to adjust the brightness.
: Brightness will be increased when touch.
: Brightness will be decreased when touch.
The faintest brightness will be turning the light off and
the brightest level will be noticed by a beep sound.
6
BASIC OPERATION
Turning Power ON/OFF
BASIC OPERATION
Picture Adjustment
Adjusting Color Density.
Brightness, color, tint, contrast and sharpness are
adjustable.
• Each source is independently adjustable.
• Make adjustments within 10 seconds, otherwise
the OSD (On Screen Display) will turn off
automatically.
• After adjustment, the “FLAT” setting in Visual
EQ changes to “CUSTOM”. After resetting
the unit, “CUSTOM” changes back to “FLAT”
2. Press / on the Remote Control or /
on the Sensor Touch Control to select [Color]
3. Press or touch / to adjust the Color Density.
Color can be adjusted between the range of
-15(MIN) to +15(MAX).
1. Press SEL (SELECT) on the Remote Control
for at least 2 seconds or touch at SELECT on
Sensor Touch Control for at least 2 seconds to
open SETUP Screen. Then check if the Picture
Adjustment Mode is being selected.
Sensor Touch Control
4. Press ENT or touch to finish adjustment or wait
10 seconds for OSD to shut down. The Setting
Value will be saved automatically.
Adjusting the Tint
2. Press / on the Remote Control or /
on the Sensor Touch Control to select [TINT]
3. Press or touch / to adjust the TINT.
TINT can be adjusted between the range of
G15(MIN) to R15(MAX).
Remote Control Unit
Adjusting the Brightness
2. Press / on the Remote Control or / on
the Sensor Touch Control to select [Brightness]
3. Press or touch / to adjust the brightness.
Brightness can be adjusted between the range of
-15(MIN) to +15(MAX).
4. Press ENT or touch to finish adjustment or wait
10 seconds for OSD to shut down. The Setting
Value will be saved automatically.
Adjusting the Contrast
2. Press / on the Remote Control or /
on the Sensor Touch Control to select [CONTRAST]
3. Press or touch / to adjust the CONTRAST.
CONTRAST can be adjusted between the range of
-15(LOW) to +15(HIGH).
4. Press ENT or touch to finish adjustment or wait
10 seconds for OSD to shut down. The Setting
Value will be saved automatically.
4. Press ENT or touch to finish adjustment or wait
10 seconds for OSD to shut down. The Setting
Value will be saved automatically.
7
BASIC OPERATION
2. Press / on the Remote Control or /
on the Sensor Touch Control to select [SHARPNESS]
3. Press or touch / to adjust the SHARPNESS.
SHARPNESS can be adjusted between the range
Remote Control Unit
of -15(SOFT) to +15(HARD).
1. Press SEL (SELECT) on the Remote Control for
at least 2 seconds or touch at SELECT on Sensor
Touch Control for at least 2 seconds to open
SETUP Screen.
2. Press SEL (SELECT) or touch SELECT to switch
from Picture Setting to Screen Mode.
3. Press or touch /
to change the Mode.
4. Press ENT or touch to finish adjustment or wait
DVD
NTSC
PICTURE
10 seconds for OSD to shut down. The Setting
Value will be saved automatically.
Screen Mode will be switched at every consecutive
press as below.
WIDE
3. Press or touch
/ to reset the
Picture Adjustment.
• Please press / within 10 seconds after
selection otherwise the OSD will be shut down
and left un-reset.
SYSTEM
WIDE
ZOOM
CINEMA
NORMAL
Resetting the Picture Adjustment.
2. Press / on the Remote Control or /
on the Sensor Touch Control to select [RESET].
NTSC
SCREEN
ZOOM
CINEMA
NORMAL
WIDE
Normal images are expanded uniformly in the
horizontal direction and are displayed over the
entire screen.
Switching the Screen Mode
Screen Mode can be adjusted to WIDE, ZOOM,
CINEMA and NORMAL modes.
• Each source is independently adjustable.
• Make adjustments within 10 seconds, otherwise
the OSD (On Screen Display) will turn off
automatically.
ZOOM
Normal images are expanded uniformly in the
horizontal direction and are displayed over the
entire screen. The expansion ratio will be pulled to
the left and right side of the screen.
CINEMA
Sensor Touch Control
Normal images are expanded in the horizontal and
vertical directions. The top and bottom of the image
are cut off. This mode is suited for 16:9 cinema size
8
BASIC OPERATION
Adjusting the Sharpness.
BASIC OPERATION
NORMAL
Normal image (4:3)
4. Press or touch ENT to end the adjustment or
wait 10 seconds until OSD is shut down.
Setting Value will be saved automatically.
Visual EQ Operation
You can select a mode suitable for the subject image
• Each source is independently adjustable.
• Make adjustments within 6 seconds, otherwise
the OSD (On Screen Display) will turn off
automatically.
Sensor Touch Control
: Normal Setting (Visual EQ OFF)
FLAT
NIGHT MOVIE : Suitable for movies in which dark
scenes frequently appear.
: Suitable for CGs and animated
SOFT
films.
: Suitable for rold movies where
SHARP
images are not clearly shown.
HIGH CONT. : Suitable for recent movies.
• FLAT will change to CUSTOM, when any of the
picture mode (Brightness, Color, Tint, Contrast
and Sharpness) has been adjusted
• NIGHT MOVIE, SOFT, SHARP and HIGH
CONT. are fixed values. They cannot be set
manually. If the picture mode is changed, they
automatically change to CUSTOM mode.
• To return FLAT mode, press RESET on the
picture mode, or change values of BRIGHT,
COLOR, TINT, CONTRAST and SHARPNESS
to 0 manually.
3. Press ENT or touch to finish adjustment or
wait10 seconds for OSD to shut down. The
Setting Value will be saved automatically.
System Setup Operation
You can adjust each IR Transmitter of available
sources, Source Name, Sound Level.
• Once adjusted, setting value of all sources will
be changed.
Remote Control
1. Press DIMM (DIMMER) on the
Remote Control for at least 2 seconds or touch
DIMMER at Sensor Touch Control for at
least 2 seconds to display EQ OSD.
2. Press / (Remote Control) to change
Visual EQ or touch (Sensor Touch Control)
to move OSD between FLAT, NIGHT
MOVIE, SOFT, SHARP and CONTRAST.
(Default Setting : SHARP)
INPUT1
Sensor Touch Control
NTSC
VISUAL EQ
FLAT
NIGHT MOVIE
SOFT
SHARP
CONTRAST
Visual EQ Mode Selection (Factory Setting).
9
Remote Control
Continue to next page
BASIC OPERATION
10
BASIC OPERATION
Customization of Source Name.
You can define the source name for your favorite
OSD (On Screen Display) for 6 letters.
1. From Step 3, select [Source Name 1] or
[Source Name 2], then select [User] by pressing
or touching /
Input1
NTSC
2. Press or touch ENT.
Picture Setting Screen Mode
System Setting
Letter Setting Menu will be shown up.
IR Headphone
Source Name 1
3.
Press or touch / , / to select letters
Source Name 2
Audio Level 1
[from A to Z] [0 to 9] [-] and [Space] then press
Audio Level 2
Screen Language
or
touch ENT to finish.
Beep Sound
Reset
DEL: Once to delete 1 letter.
CLR: Clear all letters.
3. Press / or touch to select each mode and
OK : Confirm the source name and exit from
press or touch ENT to select.
Letter Setting Menu.
4. Press or touch / to select the Setting Detail
in each mode and press or touch ENT to finish • This setting will not disappear until selection at OK.
setting.
IR Headphone
Picture Setting IR Headphone System Setting
Setting: A / B / OFF (Default : A*)
*Select B when use Headphone that is equipped
with B Channel Selection (SHS-N100 Series, e.g.)
Source Name 1:
Setting: Input 1 / DVD / DVD Head Unit /
DTV / Game / TV / User
(Default: DTV)
Source Name 2:
Setting: Input 2 / DVD / DVD Head Unit /
DTV / Game / TV / User
(Default: DVD)
*It will not function if the Source Name does not
match with the name of the product connecting to
the system.
Audio Level 1 (Setting of Input 1)
Setting: LOW / MID / HIGH
(Default: HIGH)
Audio Level 2 (Setting of Input 2)
Setting: LOW / MID / HIGH
(Default: HIGH)
Screen Language:
Setting: ENGLISH / JAPANESE
(Default: ENGLISH)
Beep Sound:
Setting: ON / OFF
(Default: ON)
Reset:
Press or touch / to reset the unit to factory setting.
All setting such as Picture, Visual EQ, Display Mode
will be reset to default value.
1. Press SEL (SELECT) of the Remote Control for
at least 2 seconds or touch at Sensor Touch
Control for at least 2 seconds to display SETUP
MENU.
2. Press SEL (SELECT) twice or touch at SELECT
twice to switch to System Setting.
DVD PLAYER SYSTEM CONTROL
DVD PLAYER
SYSTEM CONTROL
To operate Alpine DVD Player and DVD Head
Unit from Sensor Touch Control, you must set the
source name of the DVD and DVD Head Unit at
System Setup first.
• Please see System Setup Operation at page 9.
• See User’s Manual of your Alpine DVD Player
/ DVD Changer / DVD Head Unit for more
details.
*DVD Player System control is based on system
connectivity and limited unit model.
PLAY AND PAUSE
Press / II of the Remote Control or touch
/ II at of the Sensor Touch Control to play.
Press or touch / II again to PAUSE.
STOP
Press of the Remote Control or touch at
of Sensor Touch Control to stop the DISC. Press
once and PRE-STOP will be shown on the screen.
Press or touch again and the STOP will be shown
on the screen.
FAST FORWARD
I
/ / / /ENT/
/ I/ / II / MENU
Sensor Touch Control
Press
I of the Remote Control or touch I
of the Sensor Touch Control to move to the next
chapter or next disc. Continuously press I
of the Remote Control to Fast Forward the disc.
• For Sensor Touch Control, I
cannot be used to Fast Forward
the disc
REWIND
Press I of the Remote Control or touch I
of the Sensor Touch Control to move to the
previous chapter or previous disc. Continuously
press I of the Remote Control to Rewind the disc.
Remote Control
RUE-4155J Remote Control cannot be used with
Alpine DVD Head Unit. To operate DVD Head
Unit, please use compatible Remote Control for
DVD Head Unit (Such as RUE-4191).
11
• For Sensor Touch Control, I
cannot be used to Rewind the disc.
DVD PLAYER SYSTEM CONTROL
DVD PLAYER SYSTEM CONTROL
MENU SELECTION
Sensor Touch Control
1. Touch MENU to display DVD Menu.
Use /
/
/ ENT to operate.
2. Continue touching MENU until DVD Setup Menu
is displayed. Use /
/ / ENT to operate.
Remote Control
1. Touch MENU to display DVD Menu.
Use /
/
/ ENT to operate.
2. Continue touching MENU until DVD Setup Menu
is displayed. Use /
/ / ENT to operate.
DVD SETUP OPERATION
The following is the method to change setting of
Alpine DVD Player.
• See Alpine DVD Player / DVD Changer / DVD
Head Unit User’s Manual for further details.
Remote Control
Press SETUP from STOP mode for at least 2 seconds.
SETUP MENU will be displayed on the screen.
• Cannot operate DVD SETUP MENU
from Sensor Touch Control.
12
TV/DVD TUNER SYSTEM CONTROL
TV TUNER (ANALOG)
SYSTEM CONTROL
Setup Source Name as TV from SYSTEM SETUP
to operation optional Alpine TV Tuner.
• Please see System Setup Operation at page 9.
• See User’s Manual of your Alpine TV Tuner
for more details
/
Sensor Touch Control
TV TUNER
Remote Control
Remote Control
SAVING TO CHANNEL MEMORY
Press SCAN button of the Remote Control that
comes with optional TV TUNER then record
the channel that is viewable into the memory.
PRESET CHANNEL SELECTION
Press CH /CH of the Remote Control or press
at / of Sensor Touch Control to recall the
memorized channel preset.
CH ,
CH ,
13
: Press (touch) to move up 1 channel
from the preset.
: Press (touch) to move down 1 channel
from the preset.
TV/DVD TUNER SYSTEM CONTROL
Setup Source Name as DTV from SYSTEM SETUP
to operate optional Alpine DTV Tuner.
• Please see System Setup Operation at page 9.
• See User’s Manual of your Alpine TV Tuner
for more details
PRESET CHANNEL SELECTION
Press CH /CH of the optional DTV’s Remote
Control or press at / of Sensor Touch Control
to recall the memorized channel preset.
CH ,
CH ,
: Press (touch) to move up 1 channel
from the preset.
: Press (touch) to move down 1 channel
from the preset.
CHANNEL MANUAL SEARCH
Touch I /
I of the Sensor Touch Control
once to move one by one.
Sensor Touch Control
FULL SEG / ONE SEG MANUAL SWITCHING
DTV(Digital Terrestrial
Broadcasting)
TUNER Remote Control
Switching FULL SEG and ONE SEG by pressing
/ II of Sensor Touch Control once.
Remote Control
DTV TUNER SETTING
(Quick Operation)
1. Touch MENU at the Sensor Touch Control to
display Quick Operation
2. Select [PRESET LIST] and press (touch) ENT
to display recorded CHANNEL LIST.
3. Select CHANNEL and press (touch).
• Can be used only with models that
support FULL SEG / ONE SEG.
• In some Signal Area, even switch
from FULL SEG to ONE SEG,
it might return to ONE SEG
automatically.
Note : DTV Tuner System Control is based on
broadcasting system for each country and
limitation of tuner specification.
• See User’s Manual that comes with
optional DTV TUNER for further
detail about AREA SETTING.
14
TV/DVD TUNER SYSTEM CONTROL
DTV (Digital Television)
TUNER SYSTEM CONTROL
INSTALLATION AND CONNECTIONS
INSTALLATION AND
CONNECTIONS
Specifications
Picture System
Checking Components.
10.2 Inch WVGA
LCD Monitor
RUE-4155J Universal
Remote Control
x1
Bracket*1
x1
Trim Ring*2
x1
x1
DIN cable
(5m)
RCA cable
(3m)
Display Screen
Screen Size:
Width:
Height:
Aspect Ratio:
LCD:
Driving Method:
Resolution:
Active Resolution:
Illumination:
General
Operating Voltage:
Power Consumption:
Video Input:
Audio Input:
IR Transmitter:
Channel A:
Channel B:
Operating Temp.:
Monitor
Width:
Height: (Open)
x1
Battery CR2025
(Remote)
x1
Rubber Cap
x6
15
x1
Screw M4x6
Screw M3x6
(for Bracket)
(For Trim Ring)
x6
x9
Open/Close Angle:
Width:
Weight:
PAL/NTSC
10.2 Inch
221 mm
132 mm
16:9
Clear TN LCD
TFT Active Matrix
800 (w) x 480 (h) x 3
99.9% or more.
Cold Cathode
Fluorescent Lamp
10-16V (Typical: 12V)
1.12A (Power ON)
1.0V p-p 750 Ω
2.0V rms (MAX)
2.3 MHz / 2.8 MHz
3.2 MHz / 3.8 MHz
-10 °C to 60 °C
286 mm
34 mm (190.5 mm*3)
*3
When drop to 90°
180°
287 mm
1.52 kg
Bracket
Width:
Depth:
Thickness:
240 mm
185 mm
1 mm
Trim Ring
Width:
Depth:
Thickness:
335 mm
335 mm
62 mm
INSTALLATION AND CONNECTIONS
INSTALLATION BYBRACKET,
TRIM RING (*1,2)
Caution Specific knowledge and experience
are needed for this installation.
Please contact to your dealer.
Caution
Do not use electric driver.
It is difficult to control the torque of
electric screw driver; it will not only
damage the screw head but also the
vehicle as well.
FIXING BRACKET
When remove ROOM LAMP for installation.
Use the screw hole that fixed ROOM LAMP
to attach the BRACKET.
*For vehicle with ROOM LAMP fixed with clip,
please find Speed Nut separately.
Use TRIM RING to fill the gap when there is a
gap between Roof Panel and Monitor.
*No need to use TRIM RING if there is no gap.
*Cutting POSITION and SHAPE differ from
vehicle, please carefully check before cutting.
Vehicle Roof Panel
1. Using Masking
Tape to mark
according to
the shape of
the Roof Panel.
Masking Tape
Cutting Position
2. Use Air Saw or
Cutter to cut along
the Marking
Please firmly fix the TRIM RING then cut.
• This could cause injury if not fixed firmly.
WARNING
MONITOR INSTALLATION
Fix to the BRACKET.
*Be careful not to route the wiring in obstruction
to the installation.
BRACKET
*It might not be possible to tighten the screw for
vehicle with a gap that the Roof Inner Panel that
fixed with ROOM LAMP. In such case, please
CAUTION use additional spacer to tighten the screw firmly.
Spacer
Room Lamp
Fixing Panel
BRACKET
Fixing Screw
WARNING
CAUTION
Please firmly tighten fixing screw.
• The monitor could fall down if insufficiently
tighten
Be careful with the screw size.
• The monitor could fall down if use the screw
size that is smaller than the fixing hole.
Be careful with the screw length.
•Using the screw that is longer than the space
between the hole and roof top could damage
the vehicle.
Screw (M4 x 6)
M4 x 6 (5 PCS)
Rubber Cap
Rubber Cap (5 PCS)
FIXING TRIM RING.
*No need to install if TRIM RING is not necessary.
Screw (M3 x 6)
TRIM RING
M3 x 6 (9 PCS)
WARNING
Please use provided screw to firmly install.
•Monitor may fallen down if insuffiently
tighten.
16
INSTALLATION AND CONNECTION
CUTTING TRIM RING.
INSTALLATION AND CONNECTIONS
Door Switch (+)
ROOM LAMP INSTALLATION
When door open. the wire provide 12V.
VEHICLE
VEHICLE DOOR SW
ROOM LAMP
WIRING
(GREEN)
(RED)
WIRE of ROOM LAMP.
DOOR
(BLACK)
Connect the cable from ROOM LAMP switch
of the vehicle to the MONITOR internal ROOM
LAMP.
Door Switch (-)
When door open. the wire provide GND
VEHICLE
VEHICLE DOOR SW
(RED)
(BLACK)
Polarity change switch is located on the
top surface that mounts into the headliner.
Vehicle Door polarity depends on the vehicle type.
The polarity can be changed by the “Door SW
polarity” switch.
(Default: Negative Switched System)
Polarity +: When door open, door signal is 12V
Polarity - : When door open, door signal is GND
17
(GREEN)
DOOR
INSTALLATION AND CONNECTIONS
The below power sources are necessary for Alpine TMX-R1100E to operate properly.
TMX-R1100E
(RED)
DIN CABLE
Align the arrow when
connecting to the connector.
(BLACK)
(White/Brown)
(White/Brown)
ACC
ACC Power Line.
Connect this line to ACC Power Line of
the vehicle. (Switching 12V, Ignition)
GND
Ground Line.
Connect this line to the Ground Line of the
vehicle.
REMOTE OUT 1.
For AUX 1.
Corresponds to AUX 1. To control ALPINE
DVD player, TV tuner or DVD-HU, connect
to each REMOTE IN.
REMOTE OUT 2.
For AUX 2
Corresponds to AUX 2. To control ALPINE
DVD player, TV tuner or DVD-HU, connect
to each REMOTE IN.
Use crimping terminals to firmly connect the
wiring.
CAUTION
18
INSTALLATION AND CONNECTION
Connecting Diagram
SYSTEM CONNECTION SAMPLE
Navigation Unit
OTHER
• Connection with OEM Navigation and Other Brand Navigation, DVE-5207
TMX-R1100E
• ACC POWER LINE
• GND LINE
• REMOTE
RED
BLACK
WHITE
OUT 2
Not connect with this connection.
YELLOW YELLOW
YELLOW YELLOW
PIN CONNECT
RED CORD
RED
•
VIDEO OUTPUT WHITE WHITE (PKG-1100E
OPTION)
(AUX OUTPUT)
• VIDEO OUTPUT
(AUX OUTPUT)
YELLOW YELLOW
PIN CONNECT
RED CORD
WHITE WHITE (DVE-5207
OPTION)
• REMOTE IN
• AUX
IN 1
DIN CABLE
RED
RED
• AUX
IN 2
WHITE WHITE
• REMOTE OUT 2
WH/BR
ACC
RED
WHITE WHITE
YELLOW YELLOW
RED
RED
WH/BR
BATT.
GND
*This combination does not use RED
and WHITE PIN connectting Line.
DHA-5690
• Please specify SOURCE NAME 1 as INPUT 1 and SOURCE NAME 2 as DVD.
• It will not function if SOURCE NAME does not match with the connecting system.
19
OTHER
Troubleshooting
Are you misunderstanding, miss-usage
as system malfunction?
Are installation and
wiring correctly
completed?
Please check the
list below again.
If the problem is still
exists,please contact your
nearest dealer.
• If you encounter a problem such as sudden
system shut down or the screen becomes
dimmed, please turn the power off, then on
again. If the unit is still not functioning normally,
please review the items in the following
checklist. This guide will help you isolate
the problem.
Not functioning.
• Vehicle ignition is off or the key position is not
at ACC position.
· Start the engine or turn the key to ACC position.
• No fuse or blown fuse.
· Install fuse or check the cause of the blown fuse
before replacing.
• Improper connection.
· Please recheck the connection.
• Vehicle’s battery is weak.
· Please check the voltage of the battery.
No picture or unclear picture.
• Brightness control is set for minimum brightness
control.
· Adjust the brightness.
• Incorrect setting of the mode.
· Switch to the correct mode.
· Check the connection to the source unit.
· Check the power of the source unit.
• Incorrect or open connection with the Monitor,
AV interface unit.
· Check the connection and remedy.
Picture color is poor.
• Brightness/Color/Tint/Contrast/Sharpness
control are not set to the proper positions.
· Check each control.
Picture’s movement is bad.
• Temperature in the cabin is too high.
· Please allow some time for the temperature
becomes normal operating temperature.
Spots or dotted lines/stripes appear.
• Caused by neon signs, high-voltage power lines,
CB transmitter, other vehicle’s ignition plugs, etc.
· Change the location of your vehicle.
Optional Wireless Remote Control does
not work.
• There are something obstruct communication
between the Remote Control and the Receiver.
· Please remove the object.
• The polarities of the battery in the Remote
Control are wrong.
· Please re-insert the battery.
• The battery’s life.
· Please replace with new battery.
• The LCD panel is manufactured
using an extremely high precision
manufacturing technology. Its effective
pixel ratio is over 99.99%. This
means that 0.01% of the pixels
could be either always ON or OFF
20
OTHER
OTHER
Remote Control Battery Replacement
Battery type: CR2025 or equivalent.
1. Opening the battery case.
Pull up the battery cover while pressing in the
direction of the arrow.
2. Replacing the battery.
Put the battery in the case with the (+) indication
upward as shown in the illustration.
• Placing a battery in backwards way may cause
a malfunction.
3. Close the cover.
Slide the cover as illustrated until a click is heard.
WARNING
DO NOT OPERATE ANY FUNCTION THAT
TAKES YOUR ATTENTION AWAY FROM
SAFELY DRIVINGYOUR VEHICLE.
• Any function that requires your prolonged
attention should only be performed after
coming to a complete stop. Always stop
the vehicle in a safe location before
performing these functions. Failure to
do so may result in an accident.
21