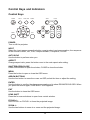
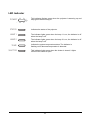
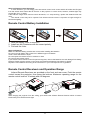
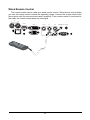
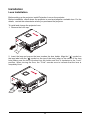
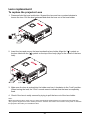
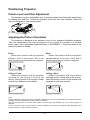
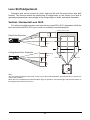
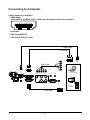
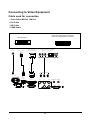
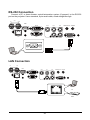
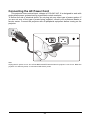
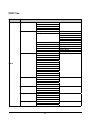
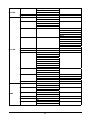
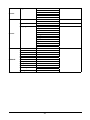
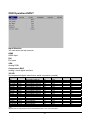
1
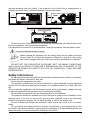
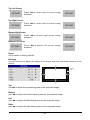
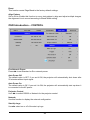
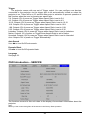
Owner's Manual R WE PO TUS STA LAMP 1 LAMP 2 . TEMP SHUT TER Multimedia Projector Model EIP-UHS100 EIP-XHS100 (Projection lens is optional.) Feature and Design DLP™ Projector with High Resolution The Projector with the high performance Digital Micromirror Device (DMD) in conjunction with the advanced Liquid Cooling technology to provide the excellent projecting performance and reliability. Motor-driven Lens Control Projection lens can be moved up, down, right and left with the motordriven lens shift function. This function makes it easy to provide projected image where you want. Zoom and focus can also be adjusted with a motor-driven operation. Complete projection lens options Seven types of motorized projection lens can be an option for EIP-UHS100/ EIP-XHS100, the projection lenses can cover the throw ratio range from 0.75:1 to 8.56:1 and is suitable to be used in most of applications. Quick Lens Change design The interchangeable lens design allows the user to easily and quickly change the suitable lens by pressing the Lens Release button on front cover. Built-in Lens Memory functions Lens memory function allows you to store and recall the lens control setting up to 10 sets. The lens position, focus and zoom settings can be saved in the projector and recall for quick projector setup. User Changeable Color Wheel The projector is equipped with smart color wheel detection and modulized color wheel. Plug in the color wheel, the projector can automatically detect and switch the parameter of corresponding color wheel for high brightness or rich color reproduction projection. Built-in e-Warping Engine The projector is equipped with built-in e-warping engine to support to geometry correction like keystone, four corners, pincushion/barrel correction and image rotation. Built-in Edge Blending and Blanding Function The projector has built in edge blending and blank function. Using edge blending function of the projector can create seamless displays by overlapping projector images and blending the edges. Various Lamp Power Options The advanced dual-lamp optical engine as well as the single-lamp, duallamp, Normal, Eco (energy-saving) and Custom Power Level mode offer the convenience for installation and maintenance. Custom Power Level option allows you to adjust the lamp power from 100% to 80.4% to fine-tune the brightness of projectors. Shutter Function The projector is equipped with the shutter that provides complete blackness for a while the projected image is not needed with keeping the projector on. Wired LAN Function This projector is loaded with a wired LAN function to control and set-up the projector remotely via network including general projector setup, lens control… etc. High-Density Filter The projector is designed with a higher density filter to limit the amount of dust that can settle on the internal components and reduce the lamp life or dull the image. It’s easy to vacuum the dust off or replace the filter when the time comes to clean or replace the filter. Picture-In-Picture This projector is capable of projecting two images simultaneously by using Picture In Picture function. The function offers various options to select main/ submenu position and input source. For details, refer to the section. Index Feature and Design...................................................................................................2 To the Owner..............................................................................................................5 Safety Instructions....................................................................................................6 Installing the Projector in Proper Directions..........................................................7 Positioning Precautions...........................................................................................7 Compliance.....................................................................................................................................8 Standard Accessories...............................................................................................9 Optional Accessories................................................................................................10 Optional Lenses and Projection Size...........................................................................................10 Complete projection lens series as below table.........................................................................10 Projection Size v.s Distance..........................................................................................................11 Overview......................................................................................12 Projector contents....................................................................................................12 Part Names and Functions............................................................................................................12 Terminals and Connectors.......................................................................................13 Control Keys and Indicators....................................................................................14 Control Keys...................................................................................................................................14 LED Indicator..................................................................................................................................15 Remote Control..............................................................................................................................16 Remote Control Battery Installation.............................................................................................17 Remote Control Receivers and Operation Range.......................................................................17 Wired Remote Control...................................................................................................................18 Installation.................................................................................................................19 Lens Installation.............................................................................................................................19 Lens replacement......................................................................................................20 To replace the projector Lens.......................................................................................................20 Positioning Projector................................................................................................21 Picture Level and Pitch Adjustment.............................................................................................21 Adjusting the Picture Orientation.................................................................................................21 Lens Shift Adjustment..............................................................................................22 Vertical / Horizontal Lens Shift.....................................................................................................22 Connecting to Computer..........................................................................................23 Connecting to Video Equipment..............................................................................24 Cable used for connection............................................................................................................24 Trigger connection....................................................................................................25 RS-232 Connection...................................................................................................26 LAN Connection........................................................................................................26 Connecting to wired remote controller...................................................................27 Connecting the AC Power Cord...............................................................................28 Basic Operation...........................................................................29 Turning On the Projector..........................................................................................29 Turn Off the Projector...............................................................................................29 Selecting an Input Source........................................................................................30 Selecting a Aspect Ratio..........................................................................................30 How to Operate the On-Screen Menu......................................................................31 OSD Operation...............................................................................................................................31 Changing the OSD Language........................................................................................................32 OSD Tree.........................................................................................................................................33 OSD Operation-INPUT....................................................................................................................37 OSD Introduction – PICTURE........................................................................................................40 OSD Introduction – LAMPS...........................................................................................................43 OSD Introduction - ALIGNMENT...................................................................................................44 OSD Introduction – CONTROL......................................................................................................48 OSD Introduction – SERVICE........................................................................................................49 Maintenance and Care .............................................................................................51 Lamp Replacement........................................................................................................................51 Maintenance and Care .............................................................................................53 Change Filters................................................................................................................................53 Change the color wheel.................................................................................................................55 Warning Indicators.........................................................................................................................57 Apendix......................................................................................................................58 Technical Specification..................................................................................................................58 Product Outline Dimension......................................................................................59 Support Timing List..................................................................................................60 Serial Control Interface..................................................................................................................61 Projector Control via LAN.............................................................................................................62 Configurations of Terminals..........................................................................................................68 To the Owner Before installing and operating the projector, read this manual thoroughly. The projector provides many convenient features and functions. Operating the projector properly enables you to manage those features and maintains it in good condition for many years to come. Improper operation may result in not only shortening the product life, but also malfunctions, fire hazard, or other accidents. If the projector seems to operate improperly, read this manual again, check operations and cable connections and go to “Troubleshooting” section in the later part of this manual. If the problem still persists, contact the dealer where you purchased the projector or the service center. WARNING: ● THIS APPARATUS MUST BE EARTHED. ● TO REDUCE THE RISK OF FIRE OR ELECTRIC SHOCK, DO NOT EXPOSE THIS APPLIANCE TO RAIN OR MOISTURE. This projector produces intense light from the projection lens. Do not stare directly into the lens, otherwise eye damage could result. Be especially careful that children do not stare directly into the beam. Install the projector in a proper position. Otherwise it may result in a fire hazard. Allowing the proper amount of space on the top, sides, and rear of the projector cabinet is critical for proper air circulation and cooling of the unit. The illustrations indicates the 5 required distance from the ceiling. If the projector is to be built into a compartment or similarly enclosed, these minimum distances must be maintained. 70cm 50cm 50cm 30cm Do not cover the ventilation slots on the projector. Heat buildup can reduce the service life of your projector, and can also be dangerous. If the projector is unused for an extended time, unplug the projector from the power outlet. When hanging the projector from the ceiling, keep the air intake vents and the top clean. If you leave the projector unclean for a long time, the cooling fans can be clogged with dust, and it may cause a breakdown or a disaster. DO NOT SET THE PROJECTOR IN GREASE, WET, OR SMOKY CONDITIONS SUCH AS IN A KITCHEN TO PREVENT A BREAKDOWN OR A DISASTER. IF THE PROJECTOR COMES IN CONTACT WITH OIL OR CHEMICALS, IT MAY BECOME DETERIORATED. Safety Instructions All the safety and operating instructions should be read before the product is operated, and retain the owner’s manual for later use. Do not use the equipment near water. The projector should never be covered with cloth or other materials, and the openings should not be blocked by placing the projector on unstable surface like a bed, sofa and rug. Do not install the equipment near the thermal source, such as the heater, radiator, furnace or other equipment that will generate heat (including the amplifier). Do not install the projector near the ventilation duct of air conditioner. This projector should be operated only from the type of power source indicated on the marking label. If you are not sure of the type of power supplied, consult an authorized dealer or local power company. Do not allow anything to rest on the power cord. Do not overload wall outlets and extension cords as this can result in fire or electric shock. Do not destroy the safety protection function of polarized or grounding plugs as this can result in fire electric shock or causing projector damaged. If the provided plug does not match the outlet, contact an electrician to change the old one. 6 Prevent the power cord from being treaded or pressed, especially the power cord near the plug, outlet and the connection between the power cord and the equipment. Unplug the power cord during a lighting or when the equipment is not used for long periods. Do not stare directly at the lens when the projector is running. Do not attempt to service this projector yourself as opening or removing covers may expose you to dangerous voltage or other hazards. Refer all servicing to qualified service personnel. When replacement parts are required, be sure the service technician has used replacement parts specified by the manufacturer that have the same characteristics as the original part. Unauthorized substitutions may result in fire, electric shock, injury to persons or projector damaged. The +12V trigger only outputs 12V DC trigger signal. Do not connect to other power input or output. Otherwise, the equipment may be damaged. Blocking the air vents by dust and leaving the projector uncleaned for a long time may cause a breakdown, damage the projector or accidents. Please clean or change the filters regularly. The packaging materials should be kept properly for the use of transportation. Installing the Projector in Proper Directions Use the projector properly in specified positions. Improper positioning may shorten the lamp life and result in severe accident or fire hazard. This projector can project the picture in upward, downward, or inclined position in perpendicular direction to the horizontal plane. Positioning Precautions Avoid positioning the projector as described below. 15° Do not tilt the projector more than 15 degree from side to side. Do not put the projector on either side to project an image. In upward projection, do not tilt the projector over 10 degree right and left. In downward projection, do not tilt the projector over 10 degree right and left. 15° 10° 10° 10° 10° CAUTION ON CEILING MOUNTING For Ceiling mounting, you need the ceiling mount kit designed for the projector. When the projector is not mounted properly, it may fail, causing hazards or injury. For details, please consult you dealer. The warranty dose not cover any damage caused by use of any non-recommended ceiling mount kit or installation of the ceiling mount kit in an improper location. 7 Compliance Federal Communications Commission Notice This equipment has been tested and found to comply with the limits for a Class A digital device, pursuant to Part 15 of FCC Rules. These limits are designed to provide reasonable protection against harmful interference when the equipment is operated in a commercial environment. This equipment generates, uses, and can radiate radio frequency energy and, if not installed and used in accordance with the instruction manual, may cause harmful interference to radio communications. Operation of this equipment in a residential area is likely to cause harmful interference in which case the user will be required to correct the interference at his own expense. Do not make any changes or modifications to the equipment unless otherwise specified in the instructions. If such changes or modifications should be made, you could be required to stop operation of the equipment. Canadian Radio Interference Regulations This Class A digital apparatus meets all requirements of the Canadian ICES-003 WARNING This is a Class A product. In a domestic environment this product may cause radio interference in which case the user may be required to take adequate measures. 8 Standard Accessories Owner's Manual (CD) AC Power cord US Type*1 ; Euro Type*1 Remote control with batteries (AA or LR6) EIP-UHS100 EIP-XHS100 + + - - VGA cable Quick start guide Lens cap Wired remote Cable Lens lock screw (M4*1) Color type Color Wheel Module 9 Optional Accessories Optional Lenses and Projection Size Seven types of motor-powered projection lens can be an option for EIP-UHS100/EIPXHS100, the projection lenses can cover the throw ratio range from 0.75:1 to 8.56:1. These lenses support to Lens Memory features to EIP-UHS100/EIP-XHS100, lens memory function offers ten memory set for storing. For accurate lens memory and recall functions, make sure to calibrate the projection lens by Center Lens function when you install the projection lens in EIP-UHS100/EIP-XHS100 each time. Complete projection lens series as below table Lens Type Zoom F# Focus Length Lens Shift Range Throw Ratio Vertical Horizontal EIP-XHS100 EIP-UHS100 f (mm) Ratio AH-CD20203 1.25 1.96-2.3 11.3-14.1 40% ±10% 0.77-0.97:1 0.75-0.93:1 AH-CD20201 1.85 11.6 0% 0% 0.79:1 0.76:1 AH-CD20202 1.41 1.85–2.5 18.7-26.5 50% ±10% 1.3-1.85:1 1.25-1.79:1 AH-CD20101 1.3 1.7 - 1.9 26.0 - 34.0 50% ±10% 1.79-2.35:1 1.73-2.27:1 AH-CD20401 1.65 1.86-2.48 32.9 - 54.2 50% ±10% 2.3-3.81:1 2.22-3.67:1 AH-CD20301 1.5 1.85-2.41 52.8 - 79.1 50% ±10% 3.71-5.57:1 3.58-5.38:1 AH-CD20302 1.55 1.85-2.48 78.5 - 121.9 50% ±10% 5.5-8.56:1 5.31-8.26:1 AH-CD20201 is a fixed focus lens and support to limited lens memory function. The vertical and horizontal shift range is 0%, the corners of the projected image may appear shadows or distortion if lens is shifted horizontally or vertically. Please consult EIKI service center for more details. To ensure that the projector can recall the lens memory setting precisely, make sure to perform the Center Lens function whenever a lens is mounted. 10 Projection Size v.s Distance EIP-UHS100 Lens Type Model Name W x H (mm) Inch 40 861 x 538 80 1723 x 1077 100 2154 x 1346 120 2584 x 1615 150 3231 x 2019 200 4307 x 2692 250 5384 x 3365 300 6461 x 4038 350 7538 x 4711 400 8615 x 5384 450 9692 x 6057 500 10768 x 6730 Distance unit : m Short Throw AH-CD20203 Wide Tele 0.62 0.79 1.29 1.63 1.62 2.05 1.96 2.46 2.46 3.09 3.29 4.14 4.13 5.18 4.96 6.23 5.80 7.27 6.63 8.32 7.47 9.36 8.30 10.41 EIP-XHS100 Lens Type Short Throw Model Name AH-CD20203 W x H (mm) Inch Wide Tele 40 813 x 610 0.61 0.77 80 1626 x 1219 1.26 1.59 100 2032 x 1524 1.58 2.00 120 2438 x 1829 1.91 2.40 150 3048 x 2286 2.40 3.02 200 4064 x 3048 3.21 4.04 250 5080 x 3810 4.03 5.06 300 6096 x 4572 4.84 6.08 350 7112 x 5334 5.66 7.10 400 8128 x 6096 6.47 8.12 450 9144 x 6858 7.29 9.14 10160 x 7620 8.10 500 10.16 Fixed Short Throw AH-CD20201 Fixed 0.64 1.32 1.66 2.01 2.52 3.37 4.23 5.08 5.94 6.79 7.65 8.50 Short Throw Standard Long Throw Long Throw Long Throw AH-CD20202 Wide Tele 1.05 1.52 2.16 3.09 2.71 3.88 3.26 4.66 4.09 5.84 5.47 7.81 6.85 9.77 8.23 11.73 9.61 13.70 10.99 15.66 12.37 17.62 13.75 19.59 AH-CD20101 Wide Tele 1.45 1.93 2.97 3.92 3.73 4.92 4.49 5.91 5.63 7.41 7.53 9.90 9.43 12.39 11.34 14.88 13.24 17.37 15.14 19.86 17.04 22.36 18.94 24.85 AH-CD20401 Wide Tele 1.87 3.15 3.82 6.39 4.80 8.00 5.77 9.62 7.24 12.04 9.68 16.08 12.12 20.12 14.56 24.16 17.00 28.20 19.44 32.24 21.88 36.28 24.32 40.32 AH-CD20301 Wide Tele 3.01 4.60 6.16 9.33 7.74 11.70 9.31 14.06 11.68 17.61 15.61 23.52 19.55 29.44 23.49 35.35 27.42 41.27 31.36 47.18 35.30 53.10 39.24 59.01 AH-CD20302 Wide Tele 4.42 7.05 9.13 14.40 11.48 18.07 13.84 21.75 17.37 27.26 23.26 36.44 29.15 45.62 35.04 54.81 40.93 63.99 46.82 73.18 52.71 82.36 58.60 91.54 Fixed Short Throw Short Throw AH-CD20202 AH-CD20201 Fixed Wide Tele 0.62 1.03 1.49 1.29 2.11 3.02 1.62 2.65 3.79 1.96 3.18 4.56 2.46 3.99 5.71 3.29 5.34 7.63 4.13 6.69 9.55 4.96 8.04 11.47 5.80 3.39 13.39 6.63 10.74 15.31 7.47 12.09 17.23 8.30 13.44 19.14 Standard Long Throw Long Throw Long Throw AH-CD20101 Wide Tele 1.42 1.88 2.90 3.83 3.65 4.80 4.39 5.78 5.50 7.24 7.36 9.67 9.22 12.11 11.07 14.54 12.93 16.98 14.79 19.41 16.64 21.85 18.50 24.28 AH-CD20401 Wide Tele 1.83 3.08 3.73 6.24 4.69 7.82 5.64 9.40 7.07 11.77 9.46 15.72 11.84 19.67 14.23 23.62 16.61 27.57 19.00 31.52 21.38 35.47 23.77 39.42 AH-CD20301 Wide Tele 2.94 4.49 6.02 6.12 7.56 11.43 9.10 13.74 11.41 17.21 15.25 22.99 19.10 28.78 22.95 34.56 26.80 40.34 30.64 46.12 34.49 51.90 38.34 57.69 AH-CD20302 Wide Tele 4.31 6.89 8.91 14.07 11.22 17.66 13.52 21.25 16.97 26.64 22.73 35.62 28.48 44.59 34.24 53.57 39.99 62.55 45.75 71.53 51.50 80.50 57.26 89.48 Note: The values in the tables are approximate and may be slightly different from the actual measurements. 11 Overview Projector contents Part Names and Functions 1 10 R WE PO TUS STA LAMP 1 LAMP 2 . TEMP SHUT 2 TER ① Color Wheel Cover ② Infrared Remote Receiver(Front) ③ Lens Release Button ④ Air Intake Vent and Filter Cover ⑤ Adjustable Foot ⑥ AC Power Switch ⑦ Power Cord Connector ⑧ Terminals and Connectors ⑨ Control Panel ⑩ LED Indication ⑪ Exhaust Vent ⑫ Infrared Remote Receiver(Rear) ⑬ Exhaust Vent and Lamp 1 Cover ⑭ Exhaust Vent and Lamp 2 Cover 9 3 4 5 6 7 8 Rear side ⑮ Air Intake Vent and Filter Cover ⑯ Adjustable Foot 11 12 15 13 16 14 12 Terminals and Connectors IN TEJ OUT HDMI LAN DVI-D B/Pb G/Y R/Pr V H WIRED REMOTE TRIGGER RGB RS-232 SDI Input SDI signals to IN and outputs the SDI signals from OUT. HDMI Connect the HDMI signal from the video device to this terminal. DVI-D Connect the DVI-D output on the computer to the terminal, the terminal can support to HDCP compatible signal. 5 BNC INPUT JACKS Connect the RGB signals or YPbPr singals. WIRED REMOTE Connect the wired remote control to this jack with a remote control cable (supplied). TRIGGER The TRIGGER terminal provides 12V (+/-1.5) output for screen control. LAN Connect the Ethernet cable to the terminals for controlling the projector. (page 62) RGB Connect a computer output (Analog D-sub 15-pin type) to this terminal. RS-232 Connect a RS-232(Not supplied) from the computer to the terminal for controlling the projector. 13 Control Keys and Indicators Control Keys POWER INPUT AUTO SYNC ASPECT OPEN CLOSE SHUTTER MENU ENTER EXIT LENS SHIFT + + FOCUS ZOOM - - POWER Turn on/off the projector. INPUT Select the input source, press the button once to select next source option, the sequence of the source is HDMI, DVI, VGA, Component/BNC, Composite, 3G-SDI. AUTO SYNC Use the button to perform auto sync. ASPECT Change aspect ratio, press the button once to the next aspect ratio setting. SHUTTER OPEN/CLOSE Press OPEN button to open the shutter, CLOSE to close the shutter. MENU Press the button to open or close the OSD menu. ARROW BUTTONS Use the four button to move the cursor on OSD, select the item or adjust the setting. ENTER Use the button to confirm the changes you made and to show ZOOM/FOCUS OSD. When you press the button again, LENS SHIFT OSD appears. EXIT Use the button to close the OSD menu. LENS SHIFT Press the four arrow buttons to open Lens control window. FOCUS +/Use FOCUS+ or FOCUS- to focus the projected image. ZOOM +/Use the two buttons to zoom in or zoom out the projected image. 14 LED Indicator POWER This indicator flashes green when the projector is warming up and keep green when turning on. STATUS Indicates the status of the projector. LAMP 1 The indicator lights green when the lamp 1 is on, the indicator is off when the lamp is off. LAMP 2 The indicator lights green when the lamp 2 is on, the indicator is off when the lamp is off. TEMP. SHUTTER Indicate the system temperature status. The indicator is flashing red if abnormal temperature is detected. This indicator lights green when the shutter is closed, it lights off when the shutter is open. 15 Remote Control 1ON Turn the projector on. 2 2.OFF Turn the projector off. 1 3 4 8 11 5 3.FOCUS Focuses the projected images. 6 4.ZOOM Zoom in/out the projected image. 7 6. LENS SHIFT Shift the lens, up/down or left/right. 9 5. TEST PATTERN Display test pattern. 7.ENTER Confirm the change. Open ZOOM/FOCUS OSD. Press again to open LENS SHIFT. 8.MENU Open and close the OSD menu. 10 12 13 14 16 19 15 17 18 20 10.INPUT Select a input source. 21 23 11.PICTURE Starts the PICTURE function. 22 9.EXIT Close the OSD menu. 12.NETWORK Enter the Network (LAN) menu. 13.AUTO SYNC Automatically adjust the computer image to its optimum setting. 14.ASPECT Select the aspect ratio settings. 15.PIP Display the picture-in-picture screen. 16.OVERSCAN Select an overscan mode. 17.FREEZE Freeze/unfreezes the on-screen picture. 18.LAMP MODE Select a higher or lower brightness setting. 19.INFO. Display projector information. 20.LIGHT Turn on the remote control backlight. 21.CLEAR Not available 22.SHUTTER Open/close the shutter. 23.ID SET Not available 16 Notes on Remote Control Operation In most situations, you can simply point the remote control at the screen which will reflect the IR signal from the remote back toward the IR receiver on the projector. In some cases, however, ambient light may prevent this. If so, try again. If the effective range of the remote control decreases, or it stops working, replace the batteries with new ones. The remote control may fail to operate if the infrared remote sensor is exposed to bright sunlight or fluorescent lighting. Remote Control Battery Installation 1. Slide the battery cover to remove it. 2. Install two AA(2) batteries with the correct polarity. 3. Put back the cover. Notes on Batteries Make sure that the battery polarities are correct when installing the batteries. Do not mix an old battery with a new one or different types of batteries. Avoid contact with water or liquid. Do not expose the remote control to moisture or heat. Do not drop the remote control. If you will not use the remote control for periods long time, remove the batteries to avoid damage from battery leakage. Please wipe the remote control clean and install new batteries if the battery is leaked. Dispose of used batteries according to the instructions or your local disposal rule or guideline. Remote Control Receivers and Operation Range Infrared Remote Receivers are provided on the front and rear cover. Point the remote control toward the projector, than press the buttons. Maximum operating range for the remote control is about 10 meters and ±30 degrees. R POWE STATU S LAMP 1 LAMP 2 TEMP. ER 10m SHUTT 10m ±30° ±30° Note: When hanging the projector from the ceiling, point toward the Infrared Remote Receiver which is located farther away from the fluorescent light. 17 Wired Remote Control The remote control can be used as a wired remote control. Wired remote control helps you use the remote control outside the operating range. Connect the remote control and the projector with the remote control cable (supplied). If the remote control is connected to the cable, the remote control does not emit signal. IN TEJ OUT HDMI LAN DVI-D B/Pb G/Y R/Pr V H WIRED REMOTE TRIGGER RGB 18 RS-232 Installation Lens Installation Before setting up the projector, install Projection Lens on the projector. Before installation, check where the projector is used and prepare a suitable lens. For the details, contact the sales dealer where you purchased the projector. To install and change the projector Lens: 1. Remove the Lens cap. 2. Insert the lens and ensure the lens touches the lens holder. Align the " " symbol on the lens label with the " " symbol on the top of the body (align to the center of the lens hole).Make sure the lens is pushed into the holder and turn it clockwise to the "Lock" position. When turning the lens, the "Click" sounds once to indicate that the lens is completely fixed. Align symbol 19 Lens replacement To replace the projector Lens 1. Press and hold the lens lock button. Support the lens and turn counterclockwise to loosen the lens. Pull the lens backward and slide the lens out of the lens holder. 2. Insert the lens and ensure the lens touches the lens holder. Align the " " symbol on the lens label with the " " symbol on the top of the body (align to the center of the lens hole). Align symbol 3. Make sure the lens is pushed into the holder and turn it clockwise to the "Lock" position. When turning the lens, the "Click" sounds once to indicate that the lens is completely fixed. 4. Check if the lens is really secured by trying to pull the lens out of the lens holder. Note: When removing the lens, make sure you press and hold the release button to loosen and unlock the lens The projector supports the lens memory function. Perform the Center Lens function every time to calibrate the projection lens after you installed the lens. 20 Positioning Projector Picture Level and Pitch Adjustment The projection angle is adjustable up to 5 degrees upward and downward respectively by rotating front and rear. To raise the projector, rotate the front feet clockwise, rotate the rear foot clockwise to lower the projector. Adjusting the Picture Orientation This projector is designed to be installed in one of four possible installation locations. Take into consideration the size and position of the screen, the location of a suitable power outlet, rest of equipment. Open the Menu -> ALIGNMENT -> Projection Mode to the preferred projection setting. Front : Select this location with the projector placed in front of the screen. This is the most common way to position the projector. Rear : Select this location with the projector placed behind the screen. Note that a special rear projection screen is required. Ceiling + Front : Select this location with the projector mounted on the ceiling in front of the screen. Ceiling mount kit is required. Please consult your dealer for more details. Ceiling + Rear : Select this location with the projector mounted on the ceiling behind the screen. Note that Ceiling mount kit and special rear projection screen are required. Note: Ceiling installation must be done by a qualified professional, It is not recommended you install the projector yourself. For more information, please contact your dealer. Only use the projector on a solid, level surface. Serious injury and damage can occur if the projector is dropped. Do not cover the vents on the projector. Proper ventilation is required to dissipate heat. Damage to the projector will occur if the vents are covered. 21 Lens Shift Adjustment Projection lens can be moved up, down, right and left with the motor-driven lens shift function. This function makes the positioning of images easy on the screen. Lens shift is generally expressed as a percentage of the image height or width, see below illustration. Vertical / Horizontal Lens Shift For ceiling mounted projectors, the lens can be moved 50% (0.5V) downward, while the lens can be moved 50% (0.5V) up or down on a desktop mounted projector. Normal projection position Desk-Front Projection Max 0.5V Vertical Shift Max 0.5V Height of projected image Projected image height V 0.1H Ceiling Mount-Front Projection 1H 0.1H Width of projected image Projected image height V Height of projected image Shift to Left Max 0.5V Shift to Right HD CONNECT/LAN Vertical Shift Max 0.5V Note: This is a general example of lens shift. Lenses vary in their shift capabilities. No particular lens or projector is used in this example. When the lens is shifted beyond the described range of operation, the screen edges may become darker or the images may become out of focus. 22 Connecting to Computer Cables used for connection •HDMI Cable (One cable is supplied, Other cables are not supplied with this projector) 1 3 5 7 9 11 13 15 17 19 2 4 6 8 10 12 14 16 18 •DVI Cable •BNC Cable(BNCx5) •VGA Cable (D-Sub 15 pin) HDMI Cable DVI Cable Signal Output BNC Cable Signal Output Signal Output IN SDI OUT HDMI HDMI LAN Digital DVI-D B/Pb G/Y B/Pb R/Pr G/Y V H R/Pr Laptop computer WIRED REMOTE TRIGGER RGB Analog V H RS-232 24X DVD RW Desktop Computer VGA Cable 23 Signal Output Connecting to Video Equipment Cable used for connection •Video Cable (BNCx3, BNCx1) •DVI Cable •SDI Cable •HDMI Cable Component Video output equipment (Such as high-definition TV source) Blu-ray Player SDI Out SDI in IN SDI HDMI Output OUT HDMI HDMI LAN Digital Output (HDCP compatible) Digital DVI-D Component Video Output (B/Pb G/Y R/Pr) B/Pb B/Pb G/Y R/Pr G/Y R/Pr V H WIRED REMOTE TRIGGER RGB 24 RS-232 Trigger connection If your projection system includes a projector screen, screen cover or other 12V Trigger equipment, please connect such device/equipment to the projector’s 12V Trigger output as illustrated. After you have done so, your screen will lower automatically whenever you turn on your projector for your convenience. IN SDI OUT HDMI LAN DVI-D B/Pb G/Y R/Pr V H WIRED REMOTE TRIGGER RGB en Scre 25 RS-232 RS-232 Connection Connect a PC or home theater control/automation system (if present) to the RS-232 port on the projector. Use a standard, 9-pin serial cable, wired straight-through. IN TEJ OUT HDMI DVI-D LAN B/Pb G/Y R/Pr V H WIRED REMOTE TRIGGER RGB RS-232 LAN Connection IN TEJ OUT HDMI LAN DVI-D B/Pb G/Y R/Pr V H WIRED REMOTE TRIGGER RGB RS-232 PC Router 26 Connecting to wired remote controller If infrared remote signals cannot reach the projector due to obstructions, you can use the remote control as a wired remote control. IN TEJ OUT HDMI LAN DVI-D B/Pb G/Y R/Pr V H WIRED REMOTE TRIGGER RGB 27 RS-232 Connecting the AC Power Cord This projector uses nominal input voltages of 100-240 VAC. It is designed to work with single-phase power systems having a grounded neutral conductor. To reduce the risk of electrical shock, do not plug into any other type of power system. If you are not sure of the type of power being supplied, consult your authorized dealer or service center. Connect the projector with all peripheral equipment before turning on the projector. Note Unplug the AC power cord or turn off the MAIN ON/OFF Switch when the projector is not in use. When the projector is in stand-by mode, it consumes a little electric power. 28 Basic Operation Turning On the Projector ① Complete peripheral connections (with a computer, VCR, etc.) before turning on the projector. ② Connect the projector’s AC power cord into an AC outlet and turn on the MAIN ON/OFF Switch. ③ Press the "POWER" button on the side controller or On button on the remote control. The LAMP indicator flashes green and the cooling fans start to operate, it will take a few seconds to display the projected image on the screen. POWER INPUT AUTO SYNC ASPECT POWER STATUS LAMP 1 ENTER MENU LAMP 2 EXIT TEMP. SHUTTER Turn Off the Projector 1. Press the POWER button on the side control or OFF button the remote control, and “Enter Standby mode?” message appears on the screen. Enter STANDBY mode? Yes : Press Again No : Please Wait 2. Press the POWER button or OFF button again to confirm, or wait a few seconds to cancel. 3. If the LAMP indicator lights bright and the POWER indicator turns off. After the projector is turned off, the cooling fans operate. You cannot turn on the projector during this cooling down period. 4. When the projector has cooled down enough, the POWER indicator lights green and then you can turn off the MAIN ON/OFF Switch, wait until the projector is completely cooled. Unplug the AC power cord from the AC outlet. POWER INPUT AUTO SYNC ASPECT POWER STATUS LAMP 1 MENU ENTER LAMP 2 EXIT TEMP. SHUTTER 29 Selecting an Input Source When you turn on the projector, it switches to the last selected input and waits for a valid signal. Press INPUT on the remote control or control panel to switch an input source directly. POWER MENU INPUT AUTO SYNC ENTER ASPECT EXIT Selecting a Aspect Ratio Press ASPECT to adjust the aspect ratio of projected image. POWER MENU INPUT AUTO SYNC ENTER ASPECT EXIT 30 How to Operate the On-Screen Menu The projector has an On-Screen Display (OSD) that allows you to adjust image and change settings. OSD Operation Following steps are a basic way for operating the OSD. 1. Press the MENU button to open the OSD. 2. Press ◄ or ► to select a title menu. 3. Press ▲ or ▼ to select an item. The selected item will be highlighted. 4. Press the Enter, and ▲ or ▼ to change or adjust the selected item. 5. Press the MENU again or press the EXIT to close the OSD . 31 Changing the OSD Language The product can display the menus in English, French, Spanish, German, Portuguese, Simplify Chinese, Traditional Chinese, Japanese, Korean, Italian, Arabic or Russian. Press MENU to open the OSD. Go to CONTROL and select Language then press the Enter. You can select a language there. 32 OSD Tree Main Menu Submenu Input Selection PIP HDMI DVI VGA Component / BNC 3G-SDI PIP Option PIP Input PIP Swap Position Test Pattern INPUT Color Space Input Lock Background Auto Sync Adjust Color Bar Crosshatch Burst Red Green Blue White Black Uncorrected Red Uncorrected Green Uncorrected Blue H Ramp Off Auto YCbCr YPbPr RGB-PC RGB-Video Auto 48Hz 50Hz 60H Logo Blue Black White Off Auto Always 33 Off/On HDMI DVI VGA Component / BNC 3G-SDI Execute Top Left Top Right Bottom Left Bottom Right Split L-R Picture Mode PICTURE Contrast Brightness Adaptive Contrast Gamma Color High Bright Presentation Video 0-200 0-200 On Off Film Graphics Video Linear Color Temperature Trim PICTURE Sharpness Noise Reduction Aspect Ratio Overscan VGA Setup Auto Sync Mode Power LAMP High Altitude Custom Power Level Lamp 1 Status Lamp 1 Status 0-200 0-200 5:4 4:3 16:10 16:9 1.88 2.35 Letterbox Native Unscaled Off Crop Zoom H Total H Start H Phase V Start Execute Single Dual Eco Normal Custom Power Level On Off 80.4%-100% (26 steps) On Off On Off 34 5000K 6500K 7800K 9300K Native Red Lift Green Lift Blue Lift Red Gain Green Gain Blue Gain 0-200 0-200 0-200 0-200 Projection Mode ALIGMENT Fan Mode Lens Control Lens Memory Center Lens Warp Blanking ALIGMENT Edge Blend Front Rear Ceiling + Front Ceiling + Rear Normal Up Down Load Memory Save Memory Clear Memory Execute Keystone Rotation Pincushion Barrel Top Left Corner Top Right Corner Bottom Left Corner Bottom Right Corner Reset Top Bottom Left Right Reset Edge Blend Blend Width Black Level Uplift Reset Align Pattern Eco Network Power Auto Power Off Auto Power On Projector Control Control Network Start Up Logo Trigger Standard Eco On Off On Off RS232 Network IP Address Subnet mask Gateway DHCP On Off 5:4 4:3 16:10 16:9 35 Memory set 1-10 Memory set 1-10 Memory set 1-10 On Off Top Bottom Left Right All Red Green Blue On Off Trigger Control Auto Search Dynamic Black Language Control SERVICE Model Serial Number Software Version Active/PIP Source Pixel Clock Signal Format H/V Refresh Rate Lamp 1 Time Lamp 2 Time Power On Time Blue Only Factory Reset 1.88 2.35 Letterbox Native Unscaled Auto On Off On Off English Français Español Deutsch Português 简体中文 繁體中文 日本語 한국어 Italiano ةيزيلجنإلا русский x HRS x HRS x HRS On Off 36 OSD Operation-INPUT Input Selection You can select the input source. HDMI HDMI input. DVI DVI input. VGA Analog RGB. Component / BNC Analog / serial digital interface. 3G-SDI Uncompressed digital video from a serial connection (coaxial) Timing SDI Link mode Signal Standards Color Encode Sampling Structure Bit depth Cable Length Tested NTSC PAL 1035i 60Hz 1080i 59.94Hz 1080i 60Hz 1080P 30Hz 1080P 25Hz 1080P 50Hz 1080P 24Hz 720P 60Hz 720P 50Hz 1080Sf 25Hz 1080Sf 30Hz 1080P 50Hz 1080P 59.94Hz 1080P 60Hz 1080P 50Hz 1080P 59.94Hz 1080P 60Hz SD SD HD-Single HD-Single HD-Single HD-Single HD-Single HD-Single HD-Single HD-Single HD-Single HD-Single HD-Single 3G Level A 3G Level A 3G Level A 3G Level B 3G Level B 3G Level B SMPTE 259M-C 270Mbps SD SMPTE 259M-C 270Mbps SD SMPTE 292M292M 1.5Gbps HD SMPTE 292M292M 1.5Gbps HD SMPTE 292M292M 1.5Gbps HD SMPTE 292M292M 1.5Gbps HD SMPTE 292M292M 1.5Gbps HD SMPTE 292M292M 1.5Gbps HD SMPTE 292M292M 1.5Gbps HD SMPTE 292M292M 1.5Gbps HD SMPTE 292M292M 1.5Gbps HD SMPTE 292M292M 1.5Gbps HD SMPTE 292M292M 1.5Gbps HD SMPTE 424M 3Gbps SMPTE 424M 3Gbps SMPTE 424M 3Gbps SMPTE 424M 3Gbps SMPTE 424M 3Gbps SMPTE 424M 3Gbps YCbCr YCbCr YCbCr YCbCr YCbCr YCbCr YCbCr YCbCr YCbCr YCbCr YCbCr YCbCr YCbCr YCbCr YCbCr YCbCr YCbCr YCbCr YCbCr 4:02:02 4:02:02 4:02:02 4:02:02 4:02:02 4:02:02 4:02:02 4:02:02 4:02:02 4:02:02 4:02:02 4:02:02 4:02:02 4:02:02 4:02:02 4:02:02 4:02:02 4:02:02 4:02:02 10 10 10 10 10 10 10 10 10 10 10 10 10 10 10 10 10 10 10 128m 128m 128m 128m 128m 128m 128m 128m 128m 128m 128m 128m 128m 128m 128m 128m 128m 128m 128m note: Signals are not supported for EIP-UHS100/XHS100, if it is not in the table. 37 PIP Use this function to display multiple windows each containing an image. PIP Option Use this to enable or disable the Picture In Picture function. PIP Input Press ENTER to display available sources for the sub picture then select a source.Note that unavailable input source of submenu are gray out and can not be selected. The available input source of sub picture is as below combination list. Source HDMI DVI VGA BNC 3G-SDI HDMI X X O O X DVI X X O O X VGA O O X X O Component/BNC O O X X O 3G-SDI X X O O X PIP Swap Use the function to swap between the main screen and sub screen, below shows the illustration of PIP SWAP. 1 2 2 1 2 1 1 2 38 Position Use this function to select the location of the PIP window to Top left, Top Right, Bottom Left, Bottom Right, or Split L-R. Top Left 2 Top Right 1 Bottom Left 2 1 2 Bottom Right 1 Split L-R 1 2 2 1 Test Pattern Select this function to display test pattern, press ◄ or ► once to display the last or next pattern, press EXIT to exit test pattern. Color Space This function allows you to change component and RGB input sources. You can select different color space for different color performance. Auto: The default setting is Auto. HDMI:If the Auxiliary Video Information (AVI) contains color space and/or range data, the EIP-UHS100/XHS100 uses that information to switch to corresponding color space. RGB: If Hsync or Vsync signals are present, the projector will switch to RGB-PC color space. Component: For SDTV and EDTV resolutions, the EIP-UHS100/XHS100 uses the REC601 color space. For all other resolutions REC709 is used. In most cases, the Auto setting determines the correct color space. If it does not, you can use a specific color space. Choose one of the following: YCbCr: uses component color space and sets black at 0,0,0 and white at 255,255,255. YPbPr: uses composite color space and sets black at 0,0,0 and white at 255,255,255. RGB-PC: uses RGB color space and sets black at 0,0,0 RGB and white at 255,255,255 RGB, assuming an 8-bit image. RGB-Video: uses RGB color space and sets black at 16,16,16 RGB and white at 235,235,235, assuming an 8-bit image, to correspond to the luminance values defined in digital component standards. Input Lock Use this function to lock a source to an internal sync signal (Auto, 48Hz, 50Hz, or 60Hz). Auto setting locks the sync signal to the current source. Background Use this function to set the background screen with no signal. You can select from Logo, Blue, Black and White. The default setting is Logo. Auto Sync Adjust Use the function to adjust the setting automatically for the incoming signal by the black level, gain, and reference (Always, Off, Auto). 39 OSD Introduction – PICTURE Picture Mode Use ◄ or ►to select the High Bright, Presentation and Video mode. Contrast Use ◄ or ► to adjust the contrast of the projected image. Note: Brightness and Contrast controls are interactive. The screen change to one may require a subtle change to the other in order to achieve the optimum setting Brightness Use ◄ or ►to adjust the level of black in the image to increase or decrease image brightness. Adaptive Contrast Use ◄ or ►to adjust the light and dark aspects of the contrast curve. Gamma Use ◄ or ► to selerct Video, Film or Graphics. Color Use ◄ or ► to adjust the color temperature of the projected image. This refers to the control of color imbalance in the darker areas of the projected image. It is recommended that you use an external test image with many areas of dark and gray colors (i.e. an image of 30IRE-window). If you notice minimal amount of red, green or blue in the gray areas, adjust the offset of the corresponding color accordingly. This function will shift the entire color spectrum for the whole image and change its brightness. 40 Sharpness The adjustment of sharpness primarily changes the value of high frequency detail. Use ◄ or ►to adjust it. Noise Reduction Use◄ or ►to adjust the noise of the projected image. This function is suitable for the elimination of image noise from interleaving SD input. Generally speaking, reducing image noise will lower the value of high frequency detail and make the image appear more mellow. Aspect Ratio This function allows user to adjust the picture’s Aspect ratio. When Native input is 16:10, the images as following is the result of picture’s aspect ratio for your preference. Normal output 16:10 Normal output 4:3 Aspect ratio of output screen 5:4 Aspect ratio of output screen 4:3 Aspect ratio of output screen 16:9 Aspect ratio of output screen 1.88 Aspect ratio of output screen 2.35:1 Aspect ratio of output screen Letter Box Aspect ratio of output screen Auto Aspect ratio of output screen Real Aspect ratio of output screen 5:4 Aspect ratio of output screen 4:3 Aspect ratio of output screen 16:9 Aspect ratio of output screen 1.88 Aspect ratio of output screen 2.35:1 Aspect ratio of output screen Letter Box Aspect ratio of output screen Auto Aspect ratio of output screen Real 41 Overscan Some programs may display the edges of the image. Use this function to hide the edge by choosing one of the following three options. Off Crop Zoom 4:3 16:10 4:3 Narrow Source image area Normal (720p) Noise edge Screen (16:10) VGA Setup Use this function to set up H-Total, H-Start, V-Phase and V-Start of VGA input. Auto Sync Use this function to EXCUTE the automatic adjust setting of black level, gain for the incoming signal. 42 OSD Introduction – LAMPS Mode Use ◄ or ►function to select single or dual lamp mode. Power Use ◄ or ►function to select Eco, Normal, or Custom Power Level. High Altitude Use this function to switch the projector’s cooling fan for high-altitude circumstances. You can set it to Off or On. The default setting is Off. Under normal circumstances, the projector will operate normally with this function set to Off. If you were to operate the projector in environment of excessive heat or in areas of high altitude, the projector may automatically shut down due to overheat. When this happens, you can enable this function by setting it to On to force the cooling fan to work at a higher speed to regulate the temperature inside the projector. Note: High altitude region refers to area with elevation over 5000 feet Custom Power Level Use this function to fine-tune the brightness. You can set power range from 80.4% to 100%. Lamp 1 Status Displays the Lamp 1 status. Lamp 2 Status Displays the Lamp 2 status. 43 OSD Introduction - ALIGNMENT Projection Mode Use◄ or ►function to select the projection mode (Front, Rear, Ceiling + Front, Ceiling + Rear). Fan Mode Use◄ or ► to set the fan mode to Normal, Up or Down. Normal: Normal fan speed. Up : Increase the fan speed. Down : Decrease the fan speed. Lens Control Use this function to display Lens Control window, press ◄, ►, ▲ or ▼ to adjust lens shift, Zoom or Focus. Press Enter button to switch window for Zoom & Focus adjustment or Lens Shift adjustment. Lens Memory Load Memory: Select this item to load the lens settings. Save setting: You can save the lens settings. Clear Memory: Select this item to clear the lens settings. 44 Center Lens Execute to center the lens. Warp Use this function to correct image distortion. Keystone Use ◄ or ► to correct horizontal distortion. Press▲ or ▼to correct vertical distortion. Rotation Press◄ or ►to rotate the projected image. The adjustable value is from -20 to 20 steps. -20 0 P P P 20 Pincushion / Barrel Use this function to correct pincushion or barrel distortion. The adjustable range is from -100 to 100 steps. Press ◄ to correct pincushion distortion, ► to correct barrel distortion. -100 0 P 100 P P 45 Top Left Corner PICTURE Press ◄►to correct top left corner image distortion. PICTURE Top Right Corner PICTURE Press ◄►to correct top left corner image distortion. PICTURE Bottom RightCorner PICTURE Press ◄►to bottom right corner image distortion. PICTURE Bottom Left Corner PICTURE Press ◄►to bottom left corner image distortion. PICTURE Reset Set all values to factory defaults. Blanking Use this function to adjust the edges of the image and hide unwanted sections of the screen. %ODQNLQJ $UHD Top Use◄► to adjust the top blanking area on the projected image. Bottom Use ◄► to adjust the bottom blanking area on the projected image. Left Use ◄► to adjust the left blanking area on the projected image. Right Use ◄► to adjust the right blanking area on the projected image. 46 Reset Reset all the blanking functions to the default settings. Edge Blend Edge blend function allows multiple projector images to be seamlessly overlapped. To use this function, Edge Blend must be enabled on both projectors. Blend Width Press Enter to display Blend Width window, use◄► to adjust white level for, bottom, left and right blending zone. If the Alignment Pattern is enabled, the green alignment line is moved according the setting value you made. Below is an example of setting blend width. Top Bottom Left Right Note: Notice the green lines appear to indicate the edge of the screen and the start/end of the blend zone. Black Level Uplift Black Level Uplift is used to compensate for the lack of pure black output from projectors, due to light leaking to the projection screen. When projecting black, the overlapping area where the two images overlap project twice the projectors’ black output levels. The solution is to adjust the Black Level Uplift. Input signal is black, then increase the Black Level Uplift (Top, Bottom, Left, Right) until the non-overlap area’s brightness matches the overlap area. Adjust the black level by setting the Selected Area (Top, Bottom, Left, Right) to match the black levels. You can adjust all colors at the same time or adjust Red, Green or Blue respectively. Note: Four corners, black level uplift adjustment function is not available. Corner blending, black level uplift adjustment function is not available. Black balance Up Select 0 Down 0 Left 0 Right 0 All Adjustment 0 Red 0 Green 0 Blue 0 0 Red 47 Reset This function resets Edge Blend to the factory default settings. Align Pattern Set to ON to Enable this function to use a test pattern to align and adjust multiple images, the alignment line is moved according to Blend Width setting. OSD Introduction – CONTROL Eco Network Power Press◄► to set Standard or Eco network power. Auto Power Off The default value is OFF. If you set it ON, the projector will automatically shut down after 20 minutes without input signal. Auto Power On The default value is Off. If you set it to ON, the projector will automatically start up when it is connected to the AC power. Projector Control Use ◄► to select RS232 or Network for the projector control. Network Use this function to display the network configuration. Start Up Logo Use◄► select on or off of the start up logo. 48 Trigger The projector comes with one set of Trigger output. You can configure one devices connected to the projector via the trigger port to be automatically turned on when the projector is on. There will be a 2-3 second delay prior to activation to prevent operation of this function when the user is choosing an aspect ratio. 5:4: Outputs 12V of power on Trigger when Aspect Ratio is set to 5:4. 4:3: Outputs 12V of power on Trigger when Aspect Ratio is set to 4:3. 16:10: Outputs 12V of power on Trigger when Aspect Ratio is set to 16:10. 16:9: Outputs 12V of power on Trigger when Aspect Ratio is set to 16:9. 1.88: Outputs 12V of power on Trigger when Aspect Ratio is set to 1.88. 2.35: Outputs 12V of power on Trigger when Aspect Ratio is set to 2.35. Letterbox: Outputs 12V of power on Trigger when Aspect Ratio is set to Letterbox. Native: Outputs 12V of power on Trigger when Aspect Ratio is set to Native. Unscaled: Outputs 12V of power on Trigger when Aspect Ratio is set to Unscaled. Auto: Outputs 12V of power on Trigger automatically. Auto Search Use ◄►to turn On/Off auto search. Dynamic Black Use◄► to turn On/Off dynamic black. Language See page 32. OSD Introduction – SERVICE The functions covered in this unit relate to the display of some basic information about the projector. Note: Memory of the custom timing files will be erased in the Factory Reset operation. 49 Model The designated model number of the projector. Serial Number The designated serial number of the projector. Software Version The version of software installed on the projector. Active/PIP Source Displays the current Active/PIP sources. Pixel Clock Displays the pixel clock of the current input signal. Signal Format Displays the format of the current input signal. H/V Refresh Rate Displays the horizontal and vertical refresh rates for the current image. Lamp 1 Time Display the lamp 1 usage time. When you change the new lamp. Lamp 2 Time Display the lamp 2 usage time. When you change the new lamp. Power On Time Display the total On time for the projector. Blue Only This function displays only blue color to facilitate the process of image inspection for a service personnel. Factory Reset Restore the configurations in the OSD Menu back to the factory default. Note that this function will not apply to items including no signal, network, Projector control, startup Logo, language, High Altitude mode and lamp hours. Note: When Factory Reset is executed, all source memories created by the projector (i.e. timings files) will be erased. 50 Maintenance and Care Lamp Replacement The lifecycle of ordinary projection lamp typically lasts for 2000 hours before requiring replacement (different lamp configurations will affect lamp life). From the OSD Menu, you can check how long the lamp has been used. You should also replace the lamp when the projected image gets noticeably darker. Contact your local dealer to purchase new certified lamps. To replace the projector lamp 1. Turn off the projector and unplug the power cord. Leave the projector for approximately 60 minutes to cool enough before removing the lamp module for replacement. Note: When you turn off the projector, the lamp inside the projector will still be very hot (200 - 300°C). If you attempt to replace the lamp without allowing the projector to cool, you could risk scalding yourself. That is why you should wait for the lamp to cool down in order to perform the replacement safely. 2. Loosen the screws and remove the fan unit. 3. Loosen the screws and pull the lamp module out. Lamp 1 Lamp 2 51 Lamp 2 4. Insert the lamp, tighten the three screws and make sure the lamp is firmly secured to prevent the lamp from shaking or poor contact. 5. Install the fan unit and tighten the two screws on it. ORDER REPLACEMENT LAMP Replacement lamp can be ordered through your dealer. When ordering a projection lamp, give the following information and ask an advice to the dealer. Replacement Lamp P/N: 3797772800-SEK 52 Maintenance and Care Change Filters The interval of the filter replacement is affected by the dustiness. Check the filters periodically for better performance. Note: Dirty filter may reduce the air flowing into the projector and the temperature in the projector may rise as a result. This may activate the protection mechanism or damage the components. •Check, clean and replace the filter periodically. To replace the filter on the left side of the projector 1. Loosen the two screws on the filter cover and remove the filter from it. 2. Place a new filter and install the filter cover. Tighten the two screws on the filter cover. 53 To replace the filter on the right side of the projector 1. Loosen the two screws on the filter cover and remove the filter. 2. Place a new filter and install the filter cover. Tighten the two screws on the filter cover. ORDER REPLACEMENT Filter Replacement filter can be ordered through your dealer. When ordering a filter, give following information to the dealer. Replacement Filter P/N: 3534221300-SEK 54 Change the color wheel 1. Loosen the screw on the color wheel cover, and remove the color wheel cover. 2. Loosen the four screws on the color wheel, and remove the color wheel. 3. Place the color wheel and tighten the four screws. 55 4. Place the color wheel cover and tighten the screw. 56 Warning Indicators Projector status Power is off Prepare to turn of projector Projector cooling Standby mode Projector is on Status LED LED Display Off Flashing Red (Cycles of 1) Red (Cycles of 4) On Red Lamp 1 / Lamp 2 LED LED Display Off Flashing Green Red (Cycles of 6) On Red Green Temp LED LED Display Off Flashing Red Shutter LED LED Display Off On Green POWER STATUS LAMP 1 LAMP 2 TEMP. SHUTTER Power LED LED Off Flashing Green Orange On Red Green Projector status No Problem Cover Problem Fan Problem System Error Procedure Wait till projector start displaying Wait until cooling finish (90 sec) Procedure Contact local EIKI Service Center Contact local EIKI Service Center Contact local EIKI Service Center Projector status Lamp off Prepare to light lamp Lamp lit fail Lamp is end-of-life Lamp lit Projector status No Problem Temperature problem Projector status Shutter is open Shutter is closed 57 Procedure It is recommended to change the Lamp. Contact local EIKI Service Center and ask an advice. Procedure Contact local EIKI Service Center Procedure Apendix Technical Specification Model Display Type Brightness Native Resolution Maximum Resolution Contrast Ratio Lamp Life and Type Aspect Ratio Offset Keystone Correction Synchronization EIP-UHS100 EIP-XHS100 DLP 8500 ANS Lumens XGA (1024 x 768) WUXGA (1920 x 1200)@60Hz 2400:1 (Dynamic Black:On) 2000/2500 Hours (Std. / Eco Mode), 400W x 2 16:10 Native, 4:3 and 16:9 Compatible 0 - 50% Vertical: +/-20° Horizontal:+/-35° Vertical: 48 - 120 Hz Horizontal: 15 - 108kHz Edge Blending Yes (built-in) Video Compatibility SDTV(480i/576i), EDTV (480p/576p), HDTV (720p, 1080i/p), NTSC/NTSC 4.43, PAL B/G/H/I/ M/N 60, SECAM I/O Connection Ports HDMI v1.3, DVI-D, Component (YPbPr), RGB-In, 3G HDSDI-In, 3G HDSDI-Out, RJ45, 12V Trigger, RS-232C, Wired Remote Projection Method Table Top, Ceiling Mount (Front or Rear) Dimensions (W x D x W) 508 x 552.6 x 229mm (20” x 21.8” x 9”) Weight (Without Lens) 24kg (52.9lbs) Noise Level 39 dB/43 dB (Eco./Std Mode) Power Supply AC 100-240V, 50/60Hz Power Consumption Input Voltage Dual Lamp Single Lamp 220V 960W 450W 110V 995W 440W Standby: 0.5W (Without RJ-45, RS-232 Enabled) Standard Accessories AC Power Cord(US) x1, AC Power Cord(EU)x1, Wired Remote Cable x1, VGA Cable x1, Remote Control x1, Lens Lock Screw(M4) x1, Owner's Manual (CD) x1, Color Wheel Module x1, Lens Cap x1, Quick Start Guide, Battery AA x2. Optional Accessories Interchangeable Lens Options (x7) Replacement Lamp Replacement Filter 8000 ANS Lumens WUXGA (1920 x 1200) 58 Product Outline Dimension 523mm 503.6mm 150mm 519mm 110mm 150mm 6-CELING MOUNT HOLE USE SCREW: M4*0.7 L=18mm (MAX.) 300mm 100mm 59 Support Timing List Signal Type Resolution Frame Rate 640x480 640x480 640x480 800x600 800x600 800x600 848x480 848x480 1024x768 1280x1024 1280x1024 1280x1024 1600x1200 1680x1050 1920x1080 Apple Mac 640x480 RGBs 1440x480i SDTV 1440x576i 480i 576i EDTV 480p 576p 1035i 1080i 1080i (Aus) 1080i 1080i 720p 720p 720p 1080p 1080p HDTV 1080p 1080p 1080p 1080p 1080p 1080p NTSC NTSC(M4.43) 59.94 74.99 85 60.32 75 85.06 47.95 59.94 60 60.02 75.02 85.02 60 59.954 47.95 66.59 50 60 50 59.94 50 59.94 50 60 50 50 59.94 60 50 59.94 60 23.98 24 25 29.97 30 50 59.94 60 59.94 PAL PAL 50 SECAM (B / G / H / I) PAL (N) PAL (M) SECAM (M) 50 59.94 50 PC DVI Y-Pb-Pr HD15-YUV X X X X X X X X X X X X X X X X HD15-RGB X X X X X X X X X X X X X X X X X X X X X X X X X X X X X X X X X X X X X X X X X X X X X X X X X X X X X X X X 60 X X X X X X X X X X X X X X X X X X X X X X X X X X X X X X X X X X X X Serial Control Interface This projector provides a function to control and monitor the projector's operations by using the RS-232C serial terminal. Setup the Communication Condition You can use the serial control command to input commands for projector control or retrieve its operational data through Windows client terminal software, e.g. Hyper Terminal. Before using the software to control the projector, please set up below communication conditions in the software. Item Parameter Baud Rate 115200 (default), 57600, 38400, 19200, 14400, 9600, 4800, 2400, 1200bps Data Bit 8 Parity Check None Stop Bit 1 Flow Control None Note: The default of the baud rate is 115200 bps. If an error occurs in the communication, change the serial port and the communication speed (baud rate). The serial control is not available if Eco Network Power is set to Eco or Projector Control is set to Network, please mark sure ECO Network Power is set to Standard, and Projector control is set to RS-232. 61 Projector Control via LAN The projector supports to control the projector through the network. Before using this function, please set up the network configuration of your personal computer. 1. Set up network configuration. The default IP address of the projector is 192.168.0.100, please follow below steps to set the network configuration. Connect RJ-45 cable from PC to the LAN connector on the projector. IN TEJ OUT HDMI LAN DVI-D B/Pb G/Y R/Pr V H WIRED REMOTE TRIGGER RGB RS-232 2. Set up Internet Protocol (TCP/IP) Properties in your PC as below: Recommended PC setting IP Address : 192.168.0. 99. Subnet : 255.255.255.0 Default settings for the projector IP Address : 192.168.0.100 Subnet : 255.255.255.0 62 Open a web browser on your PC and type the IP address of the projector (192.168.0.100), IP configuration will be shown on the web page. Set the IP address and subnet mask and click SAVE to confirm the configuration. Projector Web Control will show below message for confirmation. “The projector IP will be changed and the connection to the projector will be lost, do you want to continue ? Select "Yes" to confirm the changes, "No" to cancel. Note: Mark sure the IP address of the projector and PC are in the same network group. Using Projector Web Control Control Source/General Use this page to control the general settings of the projector such as power on/off, source….etc. Note that if projector control option is selected to RS232, the web control will be interrupt. Network control has to be enabled from the projector’s OSD menu before connecting to projector web control. 63 Image Setting Click arrows to adjust the image settings such as Brightness, Sharpness…etc. on the web page. Lens Adjustments This page allows you to adjust Zoom, Focus and Lens shift. The operation is similar to control the projector by the remote control or control panel on the projector, click arrows to adjust the settings. 64 Geometry Adjust Click the arrow buttons to adjust Blanking, Warp, Four Corner, and click the option to select the aspect ratio setting. Click Reset option to reset Blanking or Warp to the default setting. Edge Blend Click Status option to enable or disable Edge Blend function. When Edge Blend is disabled, the other options are unavailable and N/A is shown on the column. The other options are available only when Edge Blend is enabled. \ 65 Advance Control This page allows you to select color temperature or adjust black balance or white balance. Click the option to select Color Temp. or arrow button to adjust the setting. Configuration Use this page to modify the networking setting such as IP address, Subnet, Gateway and DHCP. Make sure the IP address of the projector and PC are in the same network group. For example, 192.168.0.X. Whereas X must contain a different value. If the network provides DHCP service, you can enable DHCP client. IP Address, Subnet, and Gateway will be assigned by DHCP service. Please contact with your network administration for more details. 66 Diagnostics Advance Diagnostics This page is to diagnose the projector. Okay is displayed under normal condition. Error code is displayed if there is an error in the projector. If any abnormal code, please contact with the service center. Information This page shows the product, input source, lamp, installation information…etc 67 DVI-D Configurations of Terminals 1 2 3 4 5 6 7 8 9 10 11 12 13 14 15 16 17 18 19 20 21 22 23 24 Analog (Mini D-sub 15 pin) 5 4 10 15 3 2 9 14 8 13 1 7 12 6 1 2 3 4 5 6 7 8 9 10 11 12 11 Input 1 2 3 4 5 6 7 8 Red Input Green Input Blue Input N.C N.C GND GND GND 9 10 11 12 13 14 15 16 P5V GND GND VGA_SDA H-Sync V-Sync VGA_SCL GND T.M.D.S. Data 2- Input T.M.D.S. Data 2+ Input Ground N.C N.C SCL SDA N.C T.M.D.S. Data 1- Input T.M.D.S. Data 1+ Input Ground N.C 1 3 5 7 9 11 13 15 17 19 2 4 6 8 10 12 14 16 18 T.M.D.S. Data 2+ Input Ground T.M.D.S. Data 2- Input T.M.D.S. Data 1+ Input Ground T.M.D.S. Data 1- Input T.M.D.S. Data 0+ Input Ground T.M.D.S. Data 0- Input T. M . D . S . C l o c k C + Input N.C P5V Ground HPD T.M.D.S. Data 0- Input T.M.D.S. Data 0+ Input Ground N.C N.C Ground T.M.D.S. Clock+ Input T.M.D.S. Clock- Input CONTROL PORT – RS232 (D-sub 9 pin) HDMI(19 pin Type A) 1 2 3 4 5 6 7 8 9 10 13 14 15 16 17 18 19 20 21 22 23 24 11 12 13 14 15 16 17 18 19 1 2 6 Ground T.M.D.S. Clock C- Input CEC N.C SCL SDA Ground P5V HPD 1 N.C 2 RXD 3 TXD 4 5 6 7 8 9 68 N.C Ground N.C Short with pin8 Short with pin7 N.C 3 7 4 8 5 9 Wired Remote Tip LAN TERMINAL (RJ-45) Sleeve Ring 1 2 3 87654321 1 2 3 4 5 6 7 8 TX+ TXTXC Ground Ground RXC RX+ RX- Screen Trigger Tip Sleeve Ring 1 Tip 2 Sleeve3 Ring VCC(12V) Ground Signal 69 Tip SleeveRing VCC(3.3V) Ground Signal U.S.A. Canada Deutschland & Österreich Eastern Europe South East Asia Oceania China Japan & Worldwide EIKI International, Inc. 30251 Esperanza Rancho Santa Margarita CA 92688-2132 U.S.A. Tel: 800-242-3454 (949)-457-0200 Fax: 800-457-3454 (949)-457-7878 E-Mail: [email protected] EIKI Deutschland GmbH Am Frauwald 12 65510 Idstein Deutschland Tel: +49-6126-9371-0 Fax: +49-6126-9371-14 E-Mail: [email protected] EIKI Industrial (M) Sdn Bhd No. 11, Nouvelle Industrial Park, Lorong Teknologi B, Taman Sains Selangor 1, Kota Damansara PJU5, 47810 Petaling Jaya, Selangor Darul Ehsan, Malaysia Tel: +603-6157-9330 Fax: +603-6157-1320 E-Mail: [email protected] EIKI (Shanghai) Co., Ltd. LAKESIDE OASIS MIDDLE RING BUSINESS CENTRE Block 1,Room 606, 1628, Jin Sha Jiang Road Shanghai, 200333 CHINA Tel: 86-21-3251-3993 Service Hot line: 86-21-3251-3995 Fax: 86-21-3251-3997 E-mail: [email protected] EIKI CANADA - Eiki International, Inc. P.O. Box 156, 310 First St. - Unit 2, Midland, ON, L4R 4K8, Canada Tel: 800-563-3454 (705)-527-4084 Fax: 800-567-4069 (705)-527-4087 E-Mail: [email protected] EIKI CZECH SPOL. s.r.o. Nad Cementárnou 1163/4a Praha 4, Podolí 147 00 Czech Republic Tel: +420 241 410 928 +420 241 403 095 Fax: +420 241 409 435 E-Mail: [email protected] EIKI AUSTRALIA PTY LTD Level 5, 11 Queens Road, Melbourne, Victoria 3004 Tel: +61 (03) 8530 7048 Fax: +61(03) 9820 5834 E-Mail: [email protected] EIKI Industrial Company Limited. 6-23 Teramoto, Itami-shi, Hyogo, 664-0026 JAPAN Tel: +81-72-782-7492 Fax: +81-72-781-5435 WorldWide Website http://www.eiki.com