1
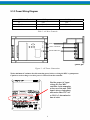
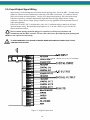
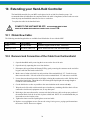
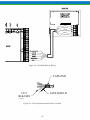
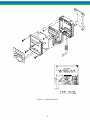
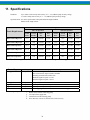
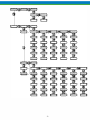
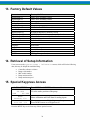
Installation, Operation & Maintenance Manual BULLETIN No. IOM-MPC-0104-J MPC™ FACTORY SERVICE POLICY Your MPC is a state of the art microprocessor based motor speed control for use with Pulsafeeder Diaphragm Metering Pumps. It includes extensive on-board diagnostics. If you are experiencing a problem with your MPC, first review the on-screen information, then consult the troubleshooting guide. If the problem is not covered or cannot be solved, please contact your local authorized Sales Representative or our Technical Service Department at (585) 292-8000 for further assistance. Trained individuals are available to diagnose your problem and arrange a solution. Solutions may include purchasing a replacement unit or returning the MPC to the factory for inspection and repair. All returns require a Return Material Authorization (R.M.A.) number to be issued by Pulsafeeder. Replacements purchased under a possible warranty situation may be credited after an examination of the original MPC by Pulsafeeder personnel. Certain components may be purchased for replacement. Refer to Section 17 – Spare Parts for more information and part numbers. Parts purchased to correct a warranty issue may be credited after examination of the original parts by Pulsafeeder personnel. Parts returned for warranty consideration that test satisfactorily, will be sent back to the originator via freight collect. Any field modifications will void the Pulsafeeder MPC warranty. Out-of-warranty repairs will be subject to Pulsafeeder's standard bench fees and testing costs associated with replacement components. FCC Warning This equipment generates and uses radio frequency energy. If not installed and used properly, in strict accordance with the manufacturer’s instructions, it may cause interference to radio communications. Operation of this equipment in a residential area is likely to cause interference in which case the user, at his own expense, will be required to take whatever measures necessary to correct the interference. Copyright Copyright © 2005-2007 Pulsafeeder, Inc. All rights reserved. Information in this document is subject to change without notice. No part of this publication may be reproduced, stored in a retrieval system or transmitted in any form or any means electronic or mechanical, including photocopying and recording for any purpose other than the purchaser’s personal use without the written permission of Pulsafeeder. ii Table of Contents 1. INTRODUCTION ..................................................................................................................................... 1 1.1 Description ............................................................................................................................... 1 1.2 MPC Standard Features .......................................................................................................... 2 1.3 Options ..................................................................................................................................... 2 2. SAFETY CONSIDERATIONS .................................................................................................................... 3 2.1 General Safety ......................................................................................................................... 3 2.2 Electrical Safety ....................................................................................................................... 3 2.3 Mechanical Safety ................................................................................................................... 3 2.4 Hydraulic Safety ...................................................................................................................... 3 3. EQUIPMENT INSPECTION ....................................................................................................................... 4 4. STORAGE INSTRUCTIONS ...................................................................................................................... 4 4.1 Short Term (0 - 12 months) ..................................................................................................... 4 4.2 Long Term (12 months or more) ............................................................................................ 4 5. INSTALLATION AND WIRING ................................................................................................................... 5 5.1 Location .................................................................................................................................... 5 5.2 Installation Notes..................................................................................................................... 6 5.3 Electrical Wiring ...................................................................................................................... 6 5.3.2 Power Wiring Information ............................................................................................... 8 5.3.4 Input/Output Signal Wiring ............................................................................................. 10 5.4 Check Wiring and Close Access Cover ................................................................................ 11 5.5 Confirm Correct Incoming Power .......................................................................................... 11 6. START UP AND OPERATION ................................................................................................................... 12 6.1 Overview ................................................................................................................................... 12 6.2 Keypad/Lamp Operation .........................................................................................................12 6.3 Confirm Display and Keypad Functionality .......................................................................... 13 6.4 Flow Display............................................................................................................................. 13 6.5 Wrapping up ............................................................................................................................. 13 6.6 Factory Re-Initialization .......................................................................................................... 14 7. INPUT/OUTPUT SETUP........................................................................................................................... 15 7.1 Analog Input Setup.................................................................................................................. 15 7.2 Digital Input Setup ................................................................................................................... 15 7.3 Analog Output Setup............................................................................................................... 15 7.4 Digital Output Setup ................................................................................................................ 15 8. CALIBRATIONS ..................................................................................................................................... 16 8.1 Pump Flow Calibration............................................................................................................ 16 8.2 Analog Input Calibration ......................................................................................................... 20 8.3 Analog Output Calibration ...................................................................................................... 22 8.4 Display Contrast Adjustment ................................................................................................. 23 8.5 Changing the Motor Base Frequency.................................................................................... 23 9. ALARM AND ERROR MESSAGES ............................................................................................................ 24 10. EXTENDING YOUR HAND-HELD CONTROLLER......................................................................................... 26 10.2 Removal and Connection of the Cable from the Handheld: ............................................... 26 10.3 Removal and Connection of the Cable from the Base Unit: ............................................... 27 11. SPECIFICATIONS ................................................................................................................................... 30 12. MENU MAPS ......................................................................................................................................... 32 13. FACTORY DEFAULT VALUES.................................................................................................................. 34 14. RETRIEVAL OF SETUP INFORMATION ...................................................................................................... 34 15. SPECIAL KEYPRESS ACCESS ................................................................................................................ 34 16. TROUBLESHOOTING GUIDE ................................................................................................................... 35 17. SPARE PARTS ...................................................................................................................................... 36 iii Conventions For the remainder of this bulletin, the following Conventions are in effect. A WARNING DEFINES A CONDITION THAT COULD CAUSE DAMAGE TO BOTH THE EQUIPMENT AND THE PERSONNEL OPERATING IT. PAY CLOSE ATTENTION TO ANY WARNING. Notes are general information meant to make operating the equipment easier. Tips have been included within this bulletin to help the operator run the equipment in the most efficient manner possible. These “Tips” are drawn from the knowledge and experience of our staff engineers, and input from the field. Revision History: Rev E (3-25-05) - Section 1.1 Description, added 3-phase vs. single-phase info - Change description of digital output specification - New figure 2 (pump mounting) - Updated analog in, analog out, and flow calibration instructions - Update error handling text, Section 9 - Add specifications for voltage range and ELCB’s - Add safety warnings about inrush current and capacitor discharge throughout Rev F (7-25-06) - Added nametag diagram and note on proper input voltage selection on page 9 - Added section 8.5 on adjusting motor base frequency - Added sample digital output diagram in section 5.3.4 Rev G (11-15-06) - Changed address information to SPO Punta Gorda front and back covers - Identified analog input #2 as not yet available, Sections 5.3.4 and 7.1 Rev J (9-26-07) - Added clarification on digital output capability, sections 1.2, 5.3.4, and 7.4 - Motor information added, sections 1.2, 1.3, and 11 - Added missing step in calibration instructions, section 8.1.1 iv 1. Introduction The Metering Pump Controller (MPC) is a microprocessor based motor speed control device, for use with Pulsafeeder mechanical and hydraulic diaphragm metering pumps. It has been designed for simplicity, yet still has many advanced features that allow the MPC to operate in a wide variety of environments and applications. This instruction manual covers the MPC only. All standard features are covered in this manual and most options have instructions where applicable. For information specific to the metering pump or any other accessories, please refer to the appropriate IOM. 1.1 Description The MPC is an advanced pump controller that is physically attached and integrated into the pump's enclosure. Its purpose is to precisely adjust output flow of a process media by means of pump motor speed control. The MPC is designed for a wide variety of control applications. The device is factory configured and calibrated for the attached pump. The human/machine interface is user friendly. Local setup and control is achieved through the keypad and a backlit two-line liquid crystal display. Basic operation is simple with dedicated function keys eliminating the need for a sophisticated menu system. The MPC responds immediately to user commands. Pump output is displayed as Gallons per Hour (GPH), Liters per Hour (LPH), Strokes per Minute (SPM), Percent Speed, or Percent Flow (% of total pump capacity). Digital and analog inputs will support a variety of industry standard signals to offer flexible remote control. The MPC is designed to simplify and automate the calibration of pump flow and analog signals. Flow calibration uses on-screen prompting and automated pump operation to eliminate stopwatches, calculators and human inaccuracies. Analog signal calibration is also accomplished by simple keypad entry. It includes a real-time display of signal level. This eliminates the need for external meters. The MPC readily accepts PULSAlarm® leak detection and tank level inputs. These may be configured to stop the pump and/or activate an alarm relay. The MPC will accept, and automatically adjust to, either 60 Hz or 50 Hz input. No special modifications, settings, or adjustments are required. All MPC controllers are supplied with a motor rated at 60 Hz, regardless of the supply frequency. The controller/motor combination allows for full pump speed and flow even when operating from a 50 Hz input. Users in locations with 50 Hz AC supply do not have to de-rate pump flow with this controller. The motor used with the MPC is a three-phase motor, however the three-phase power is generated internally by the MPC itself. Do not be confused by the motor nameplate. Input power to the MPC is single-phase AC only, either 115 or 230 volts (see Section 11, Specifications for acceptable voltage range). The nameplate on the rear of your MPC controller will list the appropriate supply requirements for your controller. At lower stroke frequencies (below 3:1 turndown), the MPC employs intermittent motor actuation technology. This allows the user to achieve reliable low-end performance not usually associated with variable speed controllers. By completing a full pump stroke at constant speed, and varying the interval between strokes, hydraulic stability and process consistency is maintained. The AC drive used in the MPC maintains tight control over voltage and current supplied to the pump motor. This results in lower motor operating temperatures and less stress on motor windings, resulting in longer motor life and more reliable overall operation. This holds true even when metering in the lower flow ranges where the MPC uses intermittent operation. 1 1.2 1.3 MPC Standard Features Remote keypad and display for ease of operation Display pump flow in GPH, LPH, Strokes per Minute, or % of full pump flow One 4-20 mA analog input signal for flow control One 4-20 mA analog output signal for flow feedback Two configurable digital inputs Three configurable digital outputs (transistor based) Advanced turndown capability NEMA 4X and IP56 ratings Available for 115 or 230 Volts, 50 or 60 Hz, single phase AC power Security code lockout of menus Commercial duty motor as standard for indoor, dry locations only Options Variable hand-held controller cable length, up to 1,000 feet from pump Alternate motor selections available for outdoor, washdown, chemical duty, and other special applications 2 2. Safety Considerations 2.1 Read and understand all related instructions and documentation before attempting to install or maintain this equipment Observe all special instructions, notes, and cautions. Act with care and exercise good common sense and judgment during all installation, adjustment, and maintenance procedures. Ensure that all safety rules, work procedures, and standards that are applicable to your company and facility are followed during the installation, maintenance, and operation of this equipment. General Safety The MPC was designed as a controller for operation solely with Pulsafeeder metering pumps. Use for any other application is considered un-safe and voids all certification markings and warranties. 2.2 Electrical Safety The MPC can be considered an industrial process controller. Improper application and use can be hazardous. You are solely responsible for its use. The MPC's electrical installation must conform to all relevant electrical codes. Installation and electrical maintenance must be performed by a qualified electrician. Before installing or servicing this device, all power must be disconnected from the source at the main distribution panel. The MPC emits electro-magnetic energy and may generate radio frequency interference. Its use is restricted to industrial applications. You are responsible for shielding this energy/interference. Certain wiring procedures may require that the user wear a wrist strap to dissipate static charges. Wait a minimum of 3 minutes after disconnecting power before servicing the MPC or pump motor. Capacitors retain a charge even after power is removed from the controller. 2.3 Mechanical Safety Users should note that the pump motor is always under the control of the MPC, and as such may actuate without warning. Care should be taken to keep loose clothing and other objects away from the pump motor. The MPC was designed to be service free. It contains no user-maintainable components. Disassemble the MPC enclosure only for initial field wiring, or as instructed to do so within this manual. Evidence of unauthorized disassembly shall void the warranty. 2.4 Hydraulic Safety Thoroughly review and adhere to the contents of the your pump Installation, Operation, Maintenance and Instruction manual for installation of your Pulsafeeder metering pump. As a microprocessor controlled device, the MPC may activate the pump motor without warning – generating hydraulic pressure and fluid flow. Care should be taken to protect both users and systems should the pump activate. 3 3. Equipment Inspection When you receive your order, check all equipment for: Completeness against the shipping document / purchase order For any evidence of shipping damage. Shortages or damage should be reported immediately to the carrier and your Pulsafeeder Representative. 4. Storage Instructions The MPC can be successfully stored for extended periods. The key to this success is temperature and humidity control. 4.1 Short Term (0 - 12 months) The MPC should be stored in a temperature and humidity controlled environment. It is preferable to keep the temperature constant in the range of -18 to 60 Celsius (0 to 140 Fahrenheit). The relative humidity should be 0 to 90% non-condensing. 4.2 Long Term (12 months or more) Storage of the MPC for periods of longer than twelve months is not recommended. If extended storage is unavoidable the MPC should be stored in accordance with those conditions stipulated for Short Term Storage. In addition, a porous bag of 85g (3 oz) silica gel or similar dessicant should be placed inside the enclosure. The cover should be re-installed to seal the desiccant within the enclosure. The conduit connections must be tightly capped. Special note for long-term storage: If AC input power has not been applied to the MPC for a period greater than 12 months, the controller must be prepared for operation. The MPC should have AC power applied at the input for a period of 8 hours before placing pump into normal operation. Refer to Installation and Wiring section for AC power connection instructions. 4 5. Installation and Wiring 5.1 Location Review the Safety section (pg 3) prior to installing the MPC. It contains information required to properly install and operate the MPC in an industrial environment. The site selected for the installation of your MPC is largely dependent on that of the metering pump. Review the Installation, Operation, and Maintenance manual provided with your metering pump. It details system related issues that are important to proper operation of the pump. Consider the following MPC related issues when selecting a site. Avoid locations where the MPC would be subjected to extreme cold or heat. Note the warning statement on the next page. The installation of this device must comply with national, state and local codes. The MPC controller must be secured to an appropriate support before use. Use four 3/8” bolts or anchors to secure the MPC controller and pump to a fixed base. No assembly is required for the MPC controller itself. Figure 1 – Typical Installation. 5 AVOID LOCATIONS WHERE THE MPC WOULD BE SUBJECTED TO EXTREME COLD OR HEAT [LESS THAN 0 CELSIUS (32 FAHRENHEIT) OR GREATER THAN 40 CELSIUS (104 FAHRENHEIT)] OR DIRECT SUNLIGHT. FAILURE TO OBSERVE THIS WARNING COULD DAMAGE THE MPC AND VOID ITS WARRANTY. 5.2 Installation Notes The MPC is a microprocessor-based controller that uses electro-static sensitive CMOS components. Do not make any (high or low voltage) electrical connections without adequately grounding the MPC and the worker to eliminate an electro-static charge between the two. A conductive wrist strap worn by the worker and attached to the MPC enclosure is adequate to satisfy this requirement. Calibration is an important element of successful MPC operation. Permanent installation of a calibration column as depicted in Figure 1 is strongly recommended. Conduit connections can carry fluids and vapors into the MPC causing damage and void the warranty. Care should be taken when installing conduit to protect against fluid/vapor entry. If necessary, provide sealed entries or conduit drains near the point of entry. The controller comes equipped with liquid-tight connectors for signal cable entry points. The user must supply the correct connection for the power entry, as per the local codes and requirements. Any cable entrances that are not used should be appropriately sealed against moisture and vapors. 5.3 Electrical Wiring The MPC has many advanced features that may make wiring the unit appear complicated. Wiring is actually very simple – one high voltage connection is all that is required to take advantage of the majority of the MPC's features. If you will be mounting your handheld controller in a remote location, refer to Section 10 at this time. Wait a minimum of 3 minutes after disconnecting power before servicing the MPC or pump motor. Capacitors retain a charge even after power is removed from the controller. It is highly recommended that you take a step-by-step approach to wiring and confirming proper MPC operation: 1. Make the high voltage connections (ref. Section 5.3.2). These will allow you to operate the MPC and attached Pulsafeeder pump. 2. Decide which low voltage Inputs and Outputs (e.g., 4-20mA in) will be used and make those connections (ref. Section 5.3.3). 3. Power-up and test the MPC to confirm the connections and check for proper operation. 4. Configure the software via the menu system for the desired operational conditions. Depending on the anticipated function, users may need to enter settings for the following: a. Analog input signals, so the MPC can accept a process input signal b. Analog output settings, so the MPC can provide a process feedback signal c. Digital input settings, for example start/stop and/or leak detection inputs d. Digital output settings, for example status and/or alarm outputs 5. Conduct a final power-up and test the MPC to confirm the connections and check for proper operation. 6. Go to the Section 6 – Start Up Instructions for details on how to perform the power-up tests. 6 5.3.1 Controller Layout The design of the MPC incorporates all control circuitry onto one easily accessed circuit board. This board is located on the inside of the main controller cover. Gain access to this board by removing the 10 bolts and gently allowing the cover to hinge downwards. USE CARE NOT TO PULL ON OR ATTEMPT TO COMPLETELY SEPARATE THE COVER FROM THE MPC UNIT, AS THE ELECTRICAL CONNECTIONS CAN BE DAMAGED. Figure 2 – Conduit Connection Layout 7 5.3.2 Power Wiring Information Verify the correct supply voltage (115VAC or 230VAC) with the nameplate affixed to your MPC. Ensure that your supply voltage matches the MPC configuration. Wires should be routed within the enclosure in a manner that maintains separation between high voltage and low voltage conductors. Incoming power wiring should adhere to all applicable local and national electrical codes and regulations. A circuit breaker or fuse must be provided as noted below. Upon initial application of AC power, a current inrush will occur to charge the DC bus capacitors. This is normal operation, and breakers and other circuit protection devices should be sized accordingly. The MPC requires one connection to an external power source. It uses this same connection to power it’s own supply as well as the AC pump motor. You must take all of these loads into consideration when sizing the branch circuit (see Table 1). A circuit breaker or disconnect switch with fuses must be wired in series with terminals L1 and L2/N in accordance with all applicable local and national electrical codes and regulations. The circuit breaker or disconnect switch shall be located in close proximity to the MPC controller installation, and must be marked or labeled to identify it as the power disconnect for the MPC. Recommended Minimum Wiring and Circuit Breaker 120 VAC Operation Power Requirements 240 VAC Operation Actual Draw Circuit Breaker Wire Size Wire Size Actual Draw Circuit Breaker Wire Size Wire Size MPC and 0.25 Hp motor 6.9 A 10 A 14 AWG 1.5 mm2 3.5 A 10 A 14 AWG 1.5 mm2 MPC and 0.33 Hp motor 6.9 A 10 A 14 AWG 2.5 mm2 3.5 A 10 A 14 AWG 1.5 mm2 MPC and 0.5 Hp motor 9.3 A 15 A 14 AWG 2.5 mm2 5.1 A 10 A 14 AWG 1.5 mm2 MPC and 0.75 Hp motor 16.7 A 25 A 12 AWG 4.0 mm2 9.3 A 15 A 14 AWG 2.5 mm2 MPC and 1.0 Hp motor 16.7 A 25 A 12 AWG 4.0 mm2 9.3 A 15 A 14 AWG 2.5 mm2 MPC and 1.5 Hp motor 24.1 A 35 A 10 AWG 4.0 mm2 12.1 A 20 A 14 AWG 2.5 mm2 Table 1 – Sizing Branch Circuits The MPC controller is provided with a ¾” NPT inlet for incoming AC power wiring at the rear (pump gearbox end) of the enclosure. Utilize the appropriate conduit fittings to route and seal the supply wires into the MPC enclosure. These wires are secured to the terminal strip at the right-hand end of the AC drive as per Table 2. Remove approximately 0.20 – 0.25” of insulation from the end of each conductor. Loosen the terminal strip screw, and insert the stripped wire end fully into the terminal. Tighten the screw to secure the conductor, making certain that the terminal grips the wire, not the insulation. Ensure that all wiring meets applicable local and national codes and requirements. 8 5.3.3 Power Wiring Diagram MPC Drive Terminal L1 L2 / N Earth 120 V operation Line Neutral Ground 240 V operation Line Line Ground Table 2 – AC Drive Terminals L1 L2/N LINE1 LINE2 / NEUTRAL PE EARTH GROUND Figure 3 – AC Power Connections Wait a minimum of 3 minutes after disconnecting power before servicing the MPC or pump motor. Capacitors retain a charge even after power is removed from the controller. Find the proper AC input voltage for your MPC controller on the nameplate at the rear of the unit. MPC input is always single phase, and can be either 115 VAC or 230 VAC, determined at time of order. 9 5.3.4 Input/Output Signal Wiring Signal wiring is routed through the two unused conduit openings at the side of the MPC. All input/output signals are connected to the terminal strips at the edge of the MPC circuit board. Use caution to observe proper wire location and signal polarity. Always cap or plug unused openings. Wires should be routed with in the enclosure in a manner that maintains separation between high voltage and low voltage conductors. Ensure all low voltage wiring is installed as per any applicable local and national electrical codes and regulations. Utilize 20 or 22 AWG, 250 V, shielded cable, with a 105o C insulation rating (or better) for all signal input and output wiring. Recommended strip length is 0.39” or 10 mm. Refer to Figure 4 below for signal connection locations. Unused conduit openings should be plugged as required to avoid ingress of moisture and contaminants into the MPC enclosure. Do not remove the factory provided plug from openings that are not required for field wiring. IT IS RECOMMENDED THAT A WRIST STRAP BE WORN WHEN MAKING CONNECTIONS TO ANY PRINTED CIRCUIT BOARD. (note analog in 2 is not yet available AN00446-000 Figure 4 – Signal Connections 10 Digital output signals can drive devices such as relays or indicator lamps. 24 VDC power must be supplied from an external source. Each output has a maximum current capability of 500 mA. Maximum voltage capability of these circuits is 40 VDC (see Section 11, Specifications, for more information). Figure 5 – Sample Digital Output Connections 5.4 Check Wiring and Close Access Cover Double-check all of your electrical connections. Pay attention to polarity of all inputs and outputs – both low and high voltage. Additionally, insure that all terminals are clamping onto the bare conductor, not on its insulation. Ensure that wires will not be trapped or pinched when front cover is replaced and secured. Ensure that excess insulation is not removed from the wires, as this can lead to poor connections or faulty operation. Replace the main access cover and secure the 10 bolts. Use a nut driver to tighten the retaining bolts evenly. Failure to do so may cause the cover to leak and void the warranty. 5.5 Confirm Correct Incoming Power WITHOUT PRIOR OPERATING KNOWLEDGE, IT IS IMPOSSIBLE TO TELL IF THE PUMP MOTOR WILL RUN WHEN POWER IS APPLIED TO THE MPC. YOU ARE RESPONSIBLE FOR TAKING THE NECESSARY STEPS TO ENSURE THAT ALL ASPECTS OF SAFETY HAVE BEEN CONSIDERED (E.G., ELECTRICAL, HYDRAULIC, ETC.). Turn on power at the mains or distribution panel. If the MPC's incoming power is connected correctly, the backlighting on the MPC's display will illuminate (depending on lighting conditions, it may be necessary to shade the display to confirm illumination). If the display is not illuminated, first check the line voltage with a voltmeter. If the voltage is not correct, return to Section 5.3.2 – Installation: High Voltage Connections. Otherwise, proceed with the next step. 11 6. Start Up and Operation 6.1 Overview Once all electrical connections have been made, your MPC is ready for Start-up. The following sections detail the procedures required to complete the MPC start up. WHEN POWER IS SUPPLIED TO THE UNIT, LINE VOLTAGE IS PRESENT WITHIN THE MPC ENCLOSURE EVEN WHEN THE MOTOR IS OFF. DURING START-UP, IT IS NECESSARY TO RUN THE PUMP MOTOR. THIS WILL CAUSE FLUID TO DISCHARGE FROM THE PUMP. YOU ARE RESPONSIBLE FOR SAFELY DIVERTING FLOW FROM THE PUMP DURING START-UP AND CALIBRATION. 6.2 Keypad/Lamp Operation Key Function Motor On/Off Press to start pump, press again to stop pump Auto/Manual Press to toggle between automatic operation and manual control of the pump Menu Press to adjust controller settings, to exit the menu system, to move cursor back when entering values, or to step back to higher level menus Enter Press to accept changes in menus, to move cursor forwards when entering values, and to access lower level menus. Also used to toggle between pump output display options while in operating mode (% flow, spm, gph, etc) Arrow Up Press to adjust values upwards, and to scroll through menu options Arrow Down Lamp ON MANUAL Description Press to adjust values downwards, and to scroll through menu options Color Description Green, Amber, Off = Motor off Green = Motor on Red, Off Amber = Remote standby Red (blinking) = Error Green, Off Green = Manual Control Table 3 – Keypad and Lamp Operation 12 Off = Automatic Control 6.3 Confirm Display and Keypad Functionality The example display messages are shown in English for demonstration purposes. If an alternate language has been set, the text is displayed as a translation of the English version. Now that you have confirmed that the MPC is receiving power, it is necessary to confirm that the display and keypad are functioning properly. On normal power-up, the display appears for approximately 2 seconds. PULSAFEEDER INC. FW: 00.00/00.00 The first four digits displayed are the software revision for the MPC base unit, and the second four indicate the software revision for the handheld display/keypad module. The keypad can be tested by depressing each key separately. Most, but not all keys will cause the text on the display to change. Do not be alarmed if a single key does not invoke a change to the display. This is normal. Different keys become active/inactive depending on the current operating mode. Please note that it may be necessary to adjust the display contrast, please refer to Section 8.4 if this is required. 6.4 Flow Display The MPC will display calibrated pump flow in GPH or LPH on the digital display. The MPC is capable of very high turndown ratios, limited only by pump configuration and system design. In some cases, the MPC display will be unable to display very low flow rates, in these situations the display may indicate 0.0 for flow, even though the pump is producing measurable flow. If the pump is being operated under these conditions, users may wish to perform extra flow calibrations to verify actual flow rates at certain setpoints. Note that even after the additional calibrations are done, the MPC will still not display the low flow that the pump is producing. In situations where the pump stroke length is set to 0 (zero) %, the pump will also display 0 (zero) GPH or 0 (zero) LPH, regardless of motor speed setting. If the display registers no flow in this manner, check the setting of the stroke length mechanism on your pump. 6.5 Wrapping up Your MPC is now commissioned for use. Note that you cannot configure the software in a way that would damage the MPC. Typically, whenever you are about to set a critical value (e.g., Calibrate Flow), you are always prompted to confirm your change before it takes effect. If you are ever dissatisfied with the configuration of your MPC, you can always return to the Factory Defaults by referring to Section 6.6. 13 6.6 Factory Re-Initialization Factory Re-initialization is typically not required. When re-initializing your MPC, all of the system settings and calibration information will be overwritten by the original factory default settings. The controller must be re-configured and re-calibrated to your specifications. A Factory Re-initialization should be performed only if there is reason to believe that the internal MPC memory has become corrupted. The condition usually manifests itself with inconsistent or erratic operation – often associated with meaningless characters on the display, or exaggerated numerical values. Factory Re-Initialization: 1. Press the MENU key to access the System Setup Menu -MENUCALIBRATION 2. Press the UP arrow key to display -MENUSYSTEM SETUP 3. Press the ENTER key SYSTEM SETUP SECURITY 4. Press the UP arrow key twice to display SYSTEM SETUP FACTORY INIT 5. Press the ENTER key PRESS ENTER TO FACTORY INIT 6. Press the ENTER key ARE YOU SURE? YES=ENTER NO=MENU 7. Pres the ENTER key RESETTING PUMP TO FACTORY INIT 14 7. Input/Output Setup Use the “DIGITAL I/O” menu to activate the functions required for the intended application. Users may also reference Section 12 – Menu Maps for additional configuration assistance 7.1 Analog Input Setup Use the “ANALOG I/O” menu to activate the analog input signal function. The menu can be used to set the analog input to either ACTIVE or INACTIVE. Note that Analog Input #2 is not yet available for use, the MPC accepts only one incoming analog signal at this time. 7.2 Digital Input Setup Each of the 2 Digital INPUTS can be selected as: Inactive Leak Detection Tank Level Input Remote ON/OFF Input Flow Detection (delay time must be set) Each can be set as normally OPEN or normally CLOSED. For example, if an input is set to ON/OFF and NORMALLY CLOSED, this means a CLOSED switch will activate the pump. A NORMALLY OPEN setup will give the opposite response. 7.3 Analog Output Setup Use the “ANALOG I/O” menu to activate the analog output signal function. The menu can be used to set the analog output to either ACTIVE or INACTIVE. 7.4 Digital Output Setup Each of the 3 Digital OUTPUTS can be selected as: Inactive ON/OFF Status AUTO/MAN Status Stroke Indicator (Pulse Output) Alarm Indicator Leak Detection Status Tank Level Status Each can be set as normally OPEN or normally CLOSED. For example, if an output is set to ON/OFF INDICATION and NORMALLY CLOSED, this means that when the motor is running (indicator lamp is ON) the output will be CLOSED. A NORMALLY OPEN setup will give the opposite response. Digital output circuits are transistor based and limited to 40 VDC maximum, see Section 5.3.4, Input/Output Signal Wiring, and Section 11, Specifications, for more information). 15 8. Calibrations 8.1 Pump Flow Calibration Your MPC is factory calibrated at rated flow and pressure. Nevertheless, you should always perform a calibration with the MPC installed in your system. This will provide the most accurate flow display. The only item required to calibrate your MPC is a means to measure the flow of the pump (i.e., calibration column, graduated cylinder, etc.). The most accurate calibration will be obtained by using a measurement device installed on the suction side of the pump. Note that calibration values for liquid volume will be in the user’s chosen units, either gallons or liters. There are two methods for completing the flow calibration routine, either “Volume” or “Flow”. Volume Method Calibration The volume calibration is accomplished by running the pump at two different stroke length settings, 50% and 100%. During each run a volume of liquid will be pumped from the calibration column. This volume is then entered into the MPC for calibration. Note that for this calibration, the actual volume of liquid pumped is entered in gallons or liters. Do not enter a flow rate in gallons or liters per hour, as this will not result in a valid calibration. The MPC display will guide the user through the steps for calibration. Please note that it must be safe to run the pump and dispense liquid into the system in order to complete this calibration. The pump should be fully primed with the product in order to complete an accurate calibration. Hydraulic diaphragm pumps must have a proper hydraulic prime as well. Flow Method Calibration The flow calibration is accomplished by entering values for flow that are already known to the user. The MPC will request flow values in gallons or liters per hour for each of the two calibration points, 50% and 100% stroke length. This calibration is useful if operational circumstances do not permit the pump to run for calibration. This calibration is also faster to complete if the flow values are already known. The MPC display will guide the user through the steps for calibration. The nameplate flow rating of the pump can be used to complete the flow calibration routine, however there will always be some variance in the actual flow rate of a pump due to system conditions and product characteristics. Using the pump’s nameplate rating will establish a baseline flow rate on the MPC display, however it will not guarantee absolute accuracy. 16 8.1.1 To Start Calibration 1. The starting display will be: SETPT FLOW XX.XXX XX.XXX 2. Press the MENU key -MENUCALIBRATION 3. Press the ENTER key CALIBRATION PUMP FLOW 4. Press the ENTER key CALIBRATION “VOLUME” 5. To perform the Volume Method, press the ENTER key and go to Section 8.1.2 6. To perform the Flow Method, press the UP arrow key CALIBRATION “FLOW” 7. Press the ENTER key and go to Section 8.1.3 If you receive the following message during the Volume calibration: STROKE LENGTH OUT OF RANGE Verify that the manually set stroke length is at the correct position, either 50% or 100%. 17 8.1.2 Volume Method SET STROKE TO 50% ENTER TO START 1. Manually adjust the stroke length of the pump to 50% 2. ** Fill your calibration column to the zero or starting point 3. Press the ENTER key TIMER XX SEC ENTER TO STOP 4. Allow the pump to run for any length of time you choose, dependent on flow rate, calibration column size, process conditions, etc. The system will time out at a maximum of 300 seconds. 5. Press the ENTER key to stop the pump ENTER VOLUME VOL = XX.XXX 6. Use the UP and DOWN arrow keys and the ENTER key to input the volume pumped from the calibration column (in gallons or liters, dependent on MPC setup). 7. Press ENTER to proceed SET STROKE TO 100% ENTER TO START 8. Manually adjust the stroke length of the pump to 100% 9. ** Fill your calibration column to the zero or starting point 10. Press the ENTER key TIMER XX SEC ENTER TO STOP 11. Allow the pump to run for any length of time you choose, dependent on flow rate, calibration column size, process conditions, etc. The system will time out at a maximum of 300 seconds. 12. Press the ENTER key to stop the pump ENTER VOLUME VOL = XX.XXX 13. Use the UP and DOWN arrow keys and the ENTER key to input the volume pumped from the calibration column (in gallons or liters, dependent on MPC setup). 14. Press ENTER to proceed PUMP FLOW CALIBRATED 15. Pump flow calibration is complete 16. Press the MENU key three times to exit back to the main operating screen. 18 8.1.3 Flow Method SET STROKE 50% FLOW = 0.0000 GPH 1. You do not have to adjust the actual stroke setting of the pump 2. Use the UP and DOWN arrow keys and the ENTER key to input the desired flow rate (in gallons or liters per hour, dependent on MPC setup). This should be the flow rate expected when the pump is set to 50% stroke length setting. 3. Press ENTER to proceed SET STROKE 100% FLOW = 000.00 GPH 4. You do not have to adjust the actual stroke setting of the pump 5. Use the UP and DOWN arrow keys and the ENTER key to input the desired flow rate (in gallons or liters per hour, dependent on MPC setup). This should be the flow rate expected when the pump is set to 100% stroke length setting. 6. Press ENTER to proceed PUMP FLOW CALIBRATED 7. Pump flow calibration is complete 8. Press the MENU key three times to exit back to the main operating screen. 19 8.2 Analog Input Calibration If you are not using the 4-20mA input to the MPC for control, skip this section. To calibrate the Input Current you must first correctly wire an external signal source. Refer to Section 5 – Installation: Low Voltage Input Connections, Analog Input. To perform a calibration, the signal-generating device must be active and capable of generating the full range (low to high) of potential input signals. 1. The starting display will be: SETPT FLOW XX.XXX XX.XXX 2. Press the MENU key -MENUCALIBRATION 3. Press the ENTER key CALIBRATION PUMP FLOW 4. Press the UP arrow key twice, to access the analog input calibration CALIBRATION ANALOG INPUT 5. Press the ENTER key APPLY MIN MA ENTER TO START 6. Apply your desired minimum mA control signal to the MPC (usually 4 mA) 7. Press the ENTER key MIN SETPT SPEED X.XX MA 000.0% (The mA value will be equal to your input signal level) (The speed value is the setting the MPC will use for this signal value) 8. Press the ENTER key three times to step through the speed setting value, most users will leave this at 000.0 %, however you an change it if you wish using the UP and DOWN arrows. 9. Press the ENTER key once more to accept the calibration value APPLY MAX MA ENTER TO START 10. Apply your desired maximum mA control signal to the MPC (usually 20 mA) Procedure continues… 20 11. Press the ENTER key MAX SETPT SPEED X.XX MA 100.0% (The mA value will be equal to your input signal level) (The speed value is the setting the MPC will use for this signal value) 12. Press the ENTER key three times to step through the speed setting value, most users will leave this at 100.0 %, however you an change it if you wish using the UP and DOWN arrows. 13. Press the ENTER key once more to accept the calibration value ANALOG INPUT CALIBRATED 14. Analog input signal calibration is complete 15. Press the MENU key three times to exit back to the main operating screen. If you receive the following message: CURRENT DELTA OUT OF RANGE This indicates that there is not a wide enough range between your maximum and minimum analog signals. The minimum signal range is 3 mA. The most likely source of this error is the user did not change the value of the incoming analog signal when moving from the MIN calibration to the MAX calibration. The analog input signal calibration procedure should be performed again, ensuring that a minimum of 3 mA difference exsists between the MIN and MAX signal levels. 21 8.3 Analog Output Calibration 1. The starting display will be: SETPT FLOW XX.XXX XX.XXX 2. Press the MENU key -MENUCALIBRATION 3. Press the ENTER key CALIBRATION PUMP FLOW 4. Press the UP ARROW key to access the analog output calibration CALIBRATED ANALOG OUTPUT 5. Press the ENTER key SET 0% FLOW TO 04.0 MA 6. Use the UP and DOWN arrow keys to adjust the output signal as required. The actual output signal will vary and can be monitored with a meter or your facility control system. The value displayed on the screen may not match the actual output signal and is for visual reference only. 7. Press the ENTER key once more to accept the calibration SET 100% FLOW TO 20.0 MA 8. Use the UP and DOWN arrow keys to adjust as in step 6 above 9. Press the ENTER key once more to accept the calibration value CALBRATION ANALOG OUTPUT 10. Analog output signal calibration is complete 11. Press the MENU key three times to exit back to the main operating screen If you receive the following message: CURRENT DELTA OUT OF RANGE This indicates that the output current for 0% flow has been set greater than or equal to the output current setting for 100% flow. Repeat the process and ensure that the 0% calibrated signal is set to a value lower than the 100% calibrated signal. 22 8.4 Display Contrast Adjustment Should adjustment of the contrast level of the display become necessary, use the following procedure while in the normal operating mode. 8.5 To increase contrast, press and hold at the same time. To decrease contrast, press and hold at the same time. Changing the Motor Base Frequency This procedure will not be necessary during normal operation of the MPC controller. In the event that you need to install a different drive motor, and that motor has a different base frequency (50 Hz vs. 60 Hz) than the original unit, please refer to this procedure. These changes are made at the AC drive within the MPC enclosure and not at the hand-held unit. THIS PROCEDURE IS PERFORMED WITH POWER APPLIED TO THE MPC. TAKE ALL NECESSARY PRECAUTIONS, KEEP FINGERS AND TOOLS CLEAR OF ENERGIZED CIRCUITS, AND PERFORM THIS PROCEDURE ONLY IF YOU ARE CERTAIN IT IS REQUIRED. 1. Open the front cover of the MPC control 2. There are three buttons on the face of the drive, MODE, UP and DOWN. 3. Press the MODE button 4. Scroll UP to display the default password “001” 5. Press MODE to enter the password 6. Scroll UP to the base frequency parameter which is “27” display will show “P 27” 7. Press MODE to display the current setting (will be either 50 or 60) 8. Use the UP or DOWN keys to change the setting to the new value (either 50 or 60) 9. Press MODE to store the new value 10. Drive will exit the program mode after it stores the new value This procedure should be used only if the base frequency of the pump drive motor is changed. 23 9. Alarm and Error Messages If a fatal error has occurred while in Operational Mode, the error will flash on the screen and the Red LED lamp will also flash. The menus can still be accessed by holding down the menu key. This allows the user to try and fix the source of the error if possible. The following table gives an example of these messages and when you can expect them to be displayed. Message Displayed When: FATAL ERRORS: The pump and controller will not run while one of these error conditions exists. The Red LED will blink and the error message will flash on the screen. Users can access the menu system by pressing the MENU key. The red LED and the message will cease when the error condition has been corrected. Analog Input #X Out of Range The analog input is less than 2.4 mA or greater than 24 mA ALARM LEAK DETECT The leak detection input has triggered ALARM LOW LEVEL The level monitoring input has triggered ALARM AC DRIVE FAULT Internal fault ALARM Motor error The MPC has detected that the motor shaft is not rotating at the expected speed ALARM CAM SENSOR MPC controller is not receiving correct signals from the cam sensor in the pump eccentric box COMMUNICATION ERROR Communication error exists between the MPC controller and the handheld keypad/display module Continues next page… 24 NON-FATAL ERRORS: The pump and controller can still be run while these conditions exist. The Red LED will flash, however no message will flash on the screen. The Red LED will stop flashing once the error condition has been corrected. ALARM STROKE SENSOR MPC does not receive valid indication from the stroke position sensor, the flow display will not be accurate SOFTWARE Fault Error = #### Software related problem, record error number and consult factory Hardware fault Error = #### Hardware related problem, record error number and consult factory CONSULT factory Error = #### Unidentified error, record error number and consult factory USER NOTIFICATIONS: These are errors in setup or calibration. They will display on the screen for several seconds. They can be corrected by properly completing the procedure involved. Cannot access With motor on Stroke length Out of range User is trying to change a setting that cannot be changed while the pump is running Current delta Out of range Not enough difference between high and low signals during an analog input signal calibration (min 3 mA) Stroke delta Out of range Stroke length position is not set correctly for current operation No remote Control User is trying to activate the AUTO mode, but there is no remote input (mA signal or remote on/off) to the controller Stroke length position is not set correctly for current operation . For unlisted or numbered error codes, consult the factory for assistance. Pressing MENU will clear all non-fatal errors, provided the error condition is no longer present. 25 10. Extending your Hand-Held Controller The hand-held controller for your MPC can be placed as far as 1000 feet from the pump. It is recommended that all calibrations be completed before the cable is lengthened, as these tasks are easier when the pump and hand-held controller are close to each other. To replace the cable for the hand-held unit: POWER TO THE UNIT MUST BE OFF! A GROUNDING WRIST STRAP SHOULD BE WORN WHEN MAKING CONNECTIONS TO ANY PCB 10.1 Obtain New Cable: The following standard length cables are available from Pulsafeeder for use with the MPC: Cable Length 6 feet Part Number NP530130-000 Notes Standard, supplied with all MPC controllers Others per foot NP530147-000 (1 ft) NOTE: do not exceed 1,000 feet total length 10.2 Removal and Connection of the Cable from the Handheld: 1. Open the handheld unit by removing the 4 screws on the face of the unit. 2. Open the unit by separating the cover from the base. 3. Disconnect the keypad from the Remote PCB by gently removing the connector at the end of the keypad’s tail from the header on the PCB. 4. Make a note of what color lead is in each position of the terminal block “J5”. Cut the tie-wrap that secures the cable. Lift each of the levers on the terminal block “J5” and remove each lead. 5. Loosen the outer domed nut on the liquid tight, releasing the tension on the cable. Pull the cable through the liquid tight. Thread the new cable through the liquid tight with enough length to reconnect to the terminal block. 6. Cut the shield wire as close as possible to the outer insulation at the remote end only. 7. Wrap the end of the cable with electrical tape to insulate any remaining shield so that it will not contact the circuit board, equipment case, or any other parts. 8. Referring to the notes taken earlier, connect each lead of the new cable to the proper position of the terminal block, lock the lever back in place to hold lead. NOTE: It is recommended that you insert and secure one lead at a time. 9. Tighten the dome nut of the liquid tight to secure/seal cable. 10. Replace cover and tighten screws. Be sure the o-ring is in its groove, paying special attention to the corners. NOTE: Do not over tighten. 26 10.3 Removal and Connection of the Cable from the Base Unit: Wait a minimum of 3 minutes after disconnecting power before servicing the MPC or pump motor. Capacitors retain a charge even after power is removed from the controller. 1. Remove the 10 screws that are securing the cover to the side of the main unit. 2. CAUTION: The cover is wired and should be folded down gently being sure not to pull any of the wires that are connected to it. 3. Make a note of what color lead is in each position of the terminal block “J14”. Lift each of the levers on the terminal block “J14” and remove each lead. 4. Loosen the outer domed nut on the liquid tight, releasing the tension on the cable. Pull the cable through the liquid tight. Thread the new cable through the liquid tight with enough length to reconnect to the terminal block. 5. Prepare the end of the cable as per figure 5b on the following page. Ensure that the shield is fully insulated until the point where it enters the terminal. No part of the shield should be allowed to come in contact with the circuit board, equipment case, or any other surface. 6. Note that the black-green lead is not utilized at this end of the cable. 7. Referring to the notes taken earlier, connect each lead of the new cable to the proper position of the terminal block, and then lock the lever back in place to hold lead. NOTE: It is recommended that you insert and secure one lead at a time. 8. Tighten the dome nut of the liquid tight to secure/seal cable. 9. Replace cover carefully being sure not to crimp any of the cables/leads between cover and enclosure and tighten screws. 10. Power the unit on, if all connections were properly made the unit will power as normal and the display will show the start up screen. 27 RED BLACK/RED GREEN BLACK/GREEN WHITE BLACK/WHITE Figure 5a – Handheld Remote Wiring TAPE END CUT BLK/GRN TAPE SHIELD AN00446-006 Figure 5b – Wire Preparation Detail, Base Unit End 28 Figure 6 – Handheld Remote 29 11. Specifications Turndown: Up to 1000:1 with a steady state accuracy of +/- 2 % (added to pump accuracy rating) 3:1 with a steady state accuracy of +/- 1 % (added to pump accuracy rating) Operation mode: AC motor speed control with speed and stroke length feedback Manual stroke length control Recommended Minimum Wiring and Circuit Breaker 120 VAC Operation Power Requirements 240 VAC Operation Actual Draw Circuit Breaker Wire Size Wire Size Actual Draw Circuit Breaker Wire Size Wire Size MPC and 0.25 Hp motor 6.9 A 10 A 14 AWG 1.5 mm2 3.5 A 10 A 14 AWG 1.5 mm2 MPC and 0.33 Hp motor 6.9 A 10 A 14 AWG 2.5 mm2 3.5 A 10 A 14 AWG 1.5 mm2 MPC and 0.5 Hp motor 9.3 A 15 A 14 AWG 2.5 mm2 5.1 A 10 A 14 AWG 1.5 mm2 MPC and 0.75 Hp motor 16.7 A 25 A 12 AWG 4.0 mm2 9.3 A 15 A 14 AWG 2.5 mm2 MPC and 1.0 Hp motor 16.7 A 25 A 12 AWG 4.0 mm2 9.3 A 15 A 14 AWG 2.5 mm2 MPC and 1.5 Hp motor 24.1 A 35 A 10 AWG 4.0 mm2 12.1 A 20 A 14 AWG 2.5 mm2 NOTE: AC drive capacitors will cause in-rush current demand when power is first applied to the unit. Control Inputs Analog In #1 Wiring J11 pins 4-6 Analog In #2 Digital In #1 Digital In #2 J11 pins 5-6 J11 pins 1-3 J11 pins 2-3 Specification / Description 4-20mA control signal Max current 30mA; Input resistance 200 Ohm Internally protected with resetable fuse Minimum signal accepted = 2.4 mA Maximum signal accepted = 24 mA Not presently available – future release User to provide dry-contact input * User to provide dry-contact input * Do not apply power, maximum 2K Ohm resistance to register as “active” * Digital input functions: 1. 2. Remote on/off control of metering pump Level input from supply tank 3. Leak detection of the metering pump 4. Flow detection, with use of external flow switch accessory 30 Control Outputs Analog Out #1 Wiring J23 pins 5-6 Digital Out #1 Digital Out #2 Digital Out #3 J23 pins 1-4 J23 pins 2-4 J23 pins 3-4 Specification / Description 4-20mA output for pump flow indication Max voltage out 12 Volts; Max current out 30mA; Max load resistance 300 Ohm Internally protected with resetable fuse Transistor-based output, various functions * Transistor-based output, various functions * Transistor-based output, various functions * All digital outputs maximum 40 VDC, maximum 500 mA NOTE: requires external power source * Digital output functions: 1. 2. 3. 4. 5. 6. Triggering an external relay due to a fault condition Auto/Manual status On/Off status Pulse output – Indication each time the pump strokes Leak detection status indication Tank level status indication Calibration: Controller includes an on board program for signal and flow calibration. Input Voltage: 115 (105-125 acceptable range) or 230 (208 – 240 acceptable range) VAC Note: factory configured only for correct input voltage range (specified at time of purchase) Single phase input only 50 or 60 Hz. Tolerance: Input voltage +/- 10% maximum Input frequency range 48 Hz to 62 Hz Motor Req: Commercially available motor supplied by the manufacturer of the pump controller. Standard selection is rated for indoor, dry environment, other options available Keypad: Can be mounted on the pump or up to 1000’ away from the pump Standard cable length 6 feet Display: Backlit 2 line extended temperature 16 character LCD Enclosure: NEMA 4X and IP56 ratings Altitude: 3300 Ft (1000 M) above sea level maximum Humidity: 0-90% (non-condensing) Temperature: 0o C (32o F) Minimum operating temperature 40o C (104o F) Maximum operating temperature Earth Leakage Current: Size Earth Leakage Circuit Breakers (ELCB) to a detection level of 30 mA or greater 31 12. Menu Maps Pulsafeeder, Inc. FW XX.XX/XX.XX Pump Serial Num: SN: XXXXX MPC Part Number: MPCXXXXXXX-XXXX SETPT: 0.00GPH FLOW: 0.00GPH & -MENUCALIBRATION SETPT: FLOW: 0.0 % 0.0 % SETPT: SPEED: 0.00SPM 0.00SPM SETPT: SPEED: 0.0 % 0.0 % STROKE SET TO XXX.X% CALIBRATION PUMP FLOW CALIBRATION ANALOG OUTPUT CALIBRATION ANALOG INPUT CALIBRATION VOLUME CALIBRATION FLOW SET 0% FLOW TO 04.0 mA APPLY MIN mA ENTER TO START SET STROKE 50% ENTER TO START SET STROKE 50% FLOW: 000.00 GPH SET 100% FLOW TO 20.0 mA MIN SETPT 0.0mA SPEED 000.0% CALIBRATING..... SET STROKE 100% FLOW: 000.00 GPH ANALOG OUTPUT CALIBRATED APPLY MAX mA ENTER TO START TIMER: XXX SEC ENTER TO STOP PUMP FLOW CALIBRATED MAX SETPT 0.0mA SPEED 000.0% ENTER VOLUME VOL = 00.000 GAL ANALOG INPUT CALIBRATED SET STROKE 100% ENTER TO START CALIBRATING..... TIMER: XXX SEC ENTER TO STOP ENTER VOLUME VOL = 00.000 GAL PUMP FLOW CALIBRATED -MENUSYSTEM SETUP SYSTEM SETUP SECURITY SYSTEM SETUP LANGUAGE SYSTEM SETUP FACTORY INIT SYSTEM SETUP TOTAL STROKES SYSTEM SETUP TOTAL FLOW SYSTEM SETUP FLOW UNITS SYSTEM SETUP INFORMATION SYSTEM SETUP FLOW DETECT SECURITY CODE = 0000 LANGUAGE ENGLISH PRESS ENTER TO FACTORY INIT ENTER TO RESET TOTAL: 0 ENTER TO RESET TOTAL: 0.0 FLOW UNITS GPH Pulsafeeder, Inc. FW: XX.XX/XX.XX FLOW DETECT DELAY: 000 SEC FLOW UNITS <GPH> Pump Serial Num: SN: XXXXX ARE YOU SURE? SYSTEM SETUP SECURITY YES=ENTR NO=MENU RESETTING PUMP TO FACTORY INIT LANGUAGE <ENGLISH> LANGUAGE ENGLISH LANGUAGE <DEUTSCHE> LANGUAGE <FRANCAIS> LANGUAGE DEUTSCHE LANGUAGE FRANCAIS 32 MPC Part Number: FLOW UNITS <LPH> MPCXXXXXXX-XXXX FLOW UNITS LPH MAX FLOW XX.XGPH MAX SPEED XXXSPM LANGUAGE <ESPANOL> LANGUAGE ESPANOL -MENUANALOG I/O -MENUDIGITAL I/O ANALOG I/O ANALOG INPUT #1 ANALOG INPUT #1 INACTIVE ANALOG INPUT #1 <INACTIVE> ANALOG INPUT #1 <ACTIVE> ANALOG INPUT #1 INACTIVE ANALOG INPUT #1 ACTIVE DIGITAL I/O DIGITAL INPUT #1 SIGNAL PURPOSE INACTIVE DIGITAL I/O DIGITAL INPUT #2 SIGNAL PURPOSE <INACTIVE> SIGNAL PURPOSE SIGNAL PURPOSE SIGNAL PURPOSE SIGNAL PURPOSE <FLOW DETECT> <LEAK DETECT> <REMOTE ON/OFF> <TANK LEVEL> SWITCH STATE INACTIVE SWITCH STATE SWITCH STATE SWITCH STATE SWITCH STATE FLOW DETECT LEAK DETECT REMOTE ON/OFF <TANK LEVEL> SWITCH STATE SWITCH STATE SWITCH STATE SWITCH STATE SWITCH STATE NORMAL CLOSED NORMAL CLOSED NORMAL CLOSED NORMAL CLOSED NORMAL CLOSED DIGITAL I/O SWITCH STATE SWITCH STATE SWITCH STATE SWITCH STATE SWITCH STATE <NORMAL CLOSED> <NORMAL CLOSED> <NORMAL CLOSED> <NORMAL CLOSED> <NORMAL CLOSED> SWITCH STATE SWITCH STATE SWITCH STATE SWITCH STATE SWITCH STATE <NORMAL OPEN> <NORMAL OPEN> <NORMAL OPEN> <NORMAL OPEN> <NORMAL OPEN> SWITCH STATE SWITCH STATE SWITCH STATE SWITCH STATE SWITCH STATE NORMAL OPEN NORMAL OPEN NORMAL OPEN NORMAL OPEN NORMAL OPEN DIGITAL OUTPUT #1 SIGNAL PURPOSE AUTO/MAN STAT DIGITAL I/O SIGNAL PURPOSE SIGNAL PURPOSE SIGNAL PURPOSE SIGNAL PURPOSE SIGNAL PURPOSE SIGNAL PURPOSE DIGITAL OUTPUT #2 <AUTO/MAN STAT> <ALARM IND.> <LEAK DETECT> <ON/OFF> <TANK LEVEL> <STROKE IND.> DIGITAL I/O SIGNAL PURPOSE SIGNAL PURPOSE SIGNAL PURPOSE SIGNAL PURPOSE SIGNAL PURPOSE SIGNAL PURPOSE DIGITAL OUTPUT #3 AUTO/MAN STAT ALARM IND. LEAK DETECT ON/OFF <TANK LEVEL> STROKE IND. SWITCH STATE SWITCH STATE SWITCH STATE SWITCH STATE SWITCH STATE SWITCH STATE NORMAL CLOSED NORMAL CLOSED NORMAL CLOSED NORMAL CLOSED NORMAL CLOSED NORMAL CLOSED SWITCH STATE SWITCH STATE SWITCH STATE SWITCH STATE SWITCH STATE SWITCH STATE <NORMAL CLOSED> <NORMAL CLOSED> <NORMAL CLOSED> <NORMAL CLOSED> <NORMAL CLOSED> <NORMAL CLOSED> SWITCH STATE SWITCH STATE SWITCH STATE SWITCH STATE SWITCH STATE SWITCH STATE <NORMAL OPEN> <NORMAL OPEN> <NORMAL OPEN> <NORMAL OPEN> <NORMAL OPEN> <NORMAL OPEN> SWITCH STATE SWITCH STATE SWITCH STATE SWITCH STATE SWITCH STATE SWITCH STATE NORMAL OPEN NORMAL OPEN NORMAL OPEN NORMAL OPEN NORMAL OPEN NORMAL OPEN AN00446-003 REV B 33 13. Factory Default Values Parameter Digital Input #1 Digital Input #2 Factory Set Value INACTIVE, normally closed INACTIVE, normally closed Analog Input #1 INACTIVE Analog Input #2 NOT AVAILABLE this revision Digital Output #1 Digital Output #2 Digital Output #3 STROKE Indication, normally closed AUTO/MANUAL Indication, normally closed Alarm Indication, normally closed Security Code Default = 0000 Language ENGLISH MODE Local (Manual) UNITS GPH (gallons per hour) 14. Retrieval of Setup Information Users can access the system setup : information menu, which will list the following data, this may be helpful in troubleshooting: Controller software revisions Pump serial number MPC model number Pump maximum flow Pump maximum speed 15. Special Keypress Access In This SCREEN SETPT XX.XXX FLOW XX.XXX MENU ANALOG I/O MENU DIGITAL I/O Press MENU and ENTER at the same time to: View the stroke position of the pump Show calibration and RAW data for analog inputs Shows current status of digital inputs and outputs Press DOWN arrow to see digital out #3 Press the MENU key to exit from any of these special screens. 34 16. Troubleshooting Guide Problem Potential Cause Solution No Display Back-lighting No power supplied. Supply power wired incorrectly. Supply power outside of specification. Check power source. plug & circuit breaker Check wiring. Check voltage/frequency against specification. No Text on Display Contrast out of adjustment. Software did not initiate properly. Adjust as per section 8.4 Remove and re-apply Ac power No power Indicators No power supplied. Supply power wired incorrectly. Supply power outside of specification. DISPLAY POWER 35 Check power source. Plug & Circuit Breaker Check wiring. Check voltage/frequency against specification. 17. Spare Parts User replaceable parts for the MPC. Pulsafeeder P/N Description W770401-188 Housing cover bolt W774030-188 Housing cover washer NP460056-000 Housing cover gasket NP530091-000 ½” wiring liquidtight connector NP530137-000 ¼” wiring liquidtight connector NP530511-006 Hand-held unit (complete) NP140070-000 Hand-held unit angle-mount bracket NP140066-PVC Hand-held unit “snap-in” bracket W213946-NTR Hand-held enclosure gasket NP550113-000 Membrane keypad for hand-held NP530130-000 Cable, for hand-held, 6 foot length NP83XXXXXP-XXXX Stroke cover with position sensor NP030013-000 Bearing cap with eccentric sensor W772568-STL ½” conduit opening plug W772585-018 ¼” conduit opening plug 36 BULLETIN No. IOM-MPC-0104-J IOM-MPC-0104-J -H11