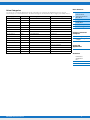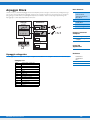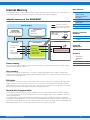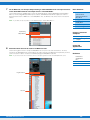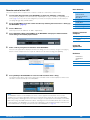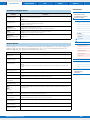
1
Reference Manual Contents Using the MX49/MX61 Manuals 2 Basic Structure 3 Using a Connected Computer 19 Connecting to a computer ........................................ 19 Creating a Song with a computer............................. 22 Structure of the MX49/MX61 .......................................3 Recording your performance on the MX49/MX61 to DAW software as MIDI data.............................................................22 Controller Block...........................................................3 Recording your performance on the MX49/MX61 to DAW software as audio data ...........................................................27 Keyboard.................................................................................. 3 Pitch Bend wheel ..................................................................... 3 Modulation wheel ..................................................................... 4 Knobs ....................................................................................... 4 Tone Generator Block .................................................5 AWM2 (Advanced Wave Memory 2) ........................................ 5 Voices....................................................................................... 5 Recording Arpeggio phrases of the MX49/MX61 to DAW software as MIDI data.............................................................28 Remote-controlling DAW software or VSTi (software instruments) from the MX49/MX61 ..............................................................31 Remote Control Assignments .................................................35 Using iOS Applications 39 Reference 40 Memory structure of the Voices ............................................... 8 Performances ........................................................................... 9 Performance memory structure.............................................. 10 Editing a Performance and the Voices................................... 10 Effect Block ................................................................11 Effect structure ....................................................................... 11 Effect connections and settings ............................................. 12 Arpeggio Block ..........................................................13 Performance............................................................... 40 Performance Play....................................................................40 Performance Select ................................................................41 Performance Part Select .........................................................41 Performance Edit ....................................................................43 Arpeggio categories .............................................................. 13 Performance Job ....................................................................54 About the Arpeggio type list .................................................. 14 Performance Store ..................................................................56 Arpeggio playback types ....................................................... 14 Supplementary Information.....................................................56 Relation between played notes and Arpeggio types ............. 15 Song/Pattern settings................................................ 58 Song/Pattern Playing Block......................................16 Song........................................................................................58 Rhythm Pattern ....................................................................... 16 Pattern.....................................................................................59 Song ....................................................................................... 16 Internal Memory .........................................................17 File............................................................................... 60 Terminology in the File operation............................................60 Internal memory of the MX49/MX61 ....................................... 17 File display..............................................................................61 MIDI/Audio Signal Flow .............................................18 Utility........................................................................... 64 Utility Job ................................................................................68 Remote mode ............................................................. 70 Remote display .......................................................................70 Switching the functions for Knobs [A] – [D]............................71 Switching the Control Template..............................................71 Utility settings..........................................................................71 Yamaha Corp. reserves the right to update or modify this manual at any time without prior notice. The most up-to-date version is freely available for download from the following website. http://www.yamaha.co.jp/manual/ or http://download.yamaha.com/ Using the MX49/MX61 Manuals Your MX49/MX61 synthesizer comes with four different reference guides—the Owner’s Manual, the Reference Manual (this document), the Synthesizer Parameter Manual, and the Data List. While the Owner’s Manual is packaged together with the synthesizer as a hardcopy booklet, this Reference Manual, Synthesizer Parameter Manual, and the Data List are provided as PDF documents on the bundled CD-ROM. Owner’s Manual (hardcopy booklet) Describes how to set up your MX49/MX61 and how to perform basic operations. It also has some useful, informative appendices for the instrument. This manual explains the following operations. • • • • • • • • • Setting up Basic operation and displays Playing the Voices Changing the tonal qualities of the Voice with the Controllers Using the Arpeggio function Keyboard Octave/Transpose settings Playing the Performances Playing the Rhythm Patterns Playing the Songs • • • • • • • • • Creating an original Performance Switching Voices during live performance without the sound cutting off Making global System settings Exchanging files with USB flash memories Connecting external MIDI instruments Shift Function list Display messages Troubleshooting Specifications Reference Manual (this PDF document) Describes the internal design of your MX49/MX61, how to use a connected computer, and all parameters that can be adjusted and set. Synthesizer Parameter Manual (PDF document) Explains the voice parameters, effect types, effect parameters, and MIDI messages that are used for synthesizers incorporating the Yamaha AWM2 sound generators. Read the Owner’s Manual and Reference Manual first and then use this parameter manual, if necessary, to learn more about parameters and terms that relate to Yamaha synthesizers. Data List (PDF document) Provides lists such as the Voice List, Performance List, Arpeggio Type List, Effect Type List, as well as reference materials such as the MIDI Implementation Chart and Remote Control Function List. Using the Reference Manual • Using the major function tabs along the upper part of each page from the Reference section, you can jump to the page for parameter explanations of the corresponding function. The list indicated at the right of each page in the selected function is equivalent to the function tree. By clicking the desired item from this list, you can jump to the page for the corresponding function’s explanations. • You can click on any page number from the Table of Contents or within descriptive text to jump to the corresponding page. Select a major function Performance Song/Pattern File Select a function Utility Remote Performance Reference Performance Play Performance Select Performance Part Select Performance Performance Edit A Performance is typically made up of multiple Voices, allowing you to sound them together in various ways. For example, you can play a richly textured sound on the keyboard by combining two Voices (of Parts 1 and 2), or play multiple Parts simultaneously by using an external sequencer or MIDI data. This section explains all the Performance parameters, divided into six categories (Performance Play, Performance Select, Performance Part Select, Performance Edit, Performance Job, and Performance Store). Common Edit Chorus Eff Reverb Eff Master EQ Arp Switch General Performance Play Name This corresponds to the top or main display of the instrument. In this display, you can select/play Part 1 or Part 2, play different Voices of Parts 1 and 2 together in a layer (Layer function), or play one Voice of Part 2 with your left hand while you play a different Voice of Part 1 with your right (Split function). Part Edit Play Mode Filter/EG • You can also click on desired items and topics you want to refer to in the “Bookmarks” index to the left of the main window, and jump to the corresponding page. (Click the “Bookmarks” tab to open the index if it is not displayed.) Operation Call up Performance Play display by pressing [EXIT] repeatedly Select Part 1/2 with Cursor [u]/[d] buttons Select Voice with [DATA] dial. Arp Select RcvSwitch Voice Edit 1 2 45 AP c001:CncrtGrand 2 n STR:081:AmbmPizza 2 n 3 Voice Insert Eff / DrumKit Insert Eff Voice LFO Voice Ctrl Set / DrumKit Ctrl Set Voice Name / DrumKit Name Voice Job Voice Store • If you want to find information on a specific topic, function or feature, select “Find” or “Search” from the Adobe Reader “Edit” menu and enter a key word to locate the related information anywhere in the document. NOTE The most-recent version of Adobe Reader can be downloaded from the following web page. http://www.adobe.com/products/reader/ NOTE The names and positions of menu items may vary according to the version of Adobe Reader being used. Performance Job Initialize Recall 1 Performance number The selected Performance number is always displayed in this three-digit display. When editing Performance parameters, a dot (.) is shown in the lower right of the screen. This provides a quick confirmation that the current Performance has been modified but not yet stored. When you want to store the current status, execute the Performance Store function (page 56). Copy Bulk Performance Store Supplementary Information 2 Voice of Part 1 3 Voice of Part 2 Indicates/determines the Voice assigned to Parts 1 and 2 of the selected Performance. The Voice category, Voice number, Voice name are displayed in order from left to right. User Voices are indicated by a “u” mark at the beginning of the Voice name. When a category contains User Voices, the User Voices are listed after the Preset Voices of the category. A cursor (>) is displayed between the Voice category and number of the selected Part. 4 2 (Edit) indicator When the Voice assigned to Part 1 or Part 2 has been modified, this indicator appears to the right of the Voice name. This gives a quick confirmation that the Voice has been modified but not yet stored. When you want to store the current status, execute the Voice Store function (page 53). 5 Keyboard icon When playing the keyboard, this icon appears to the right of the Part that is currently sounding. When the Layer function is active, this icon appears to the right of both Parts, since both Parts will sound. When the Split function is active, the icon appears at Part 1 when you play the right side of the keyboard (right of the Split Point; page 45), and appears at Part 2 when you play the left side. Information • The illustrations and LCD screens as shown in this Reference Manual are for instructional purposes only, and may appear somewhat different from those on your instrument. MX49/MX61 Reference Manual 40 • Windows is a registered trademark of Microsoft® Corporation in the United States and other countries. • Apple, Mac, iPhone, iPad, and iPod Touch are trademarks of Apple Inc., registered in the U.S. and other countries. • All other trademarks are the property of their respective holders. MX49/MX61 Reference Manual 2 Basic Structure Basic Structure Basic Structure Controller Block Structure of the MX49/MX61 Tone Generator Block The MX49/MX61 system consists of five main functional blocks: Controller, Tone Generator, Effect, Arpeggio, and Song/ Pattern Playing. Effect Block Arpeggio Block Song/Pattern Playing Block Arpeggio Block Internal Memory MIDI/Audio Signal Flow Tone Generator Effects Using a Connected Computer Controller Block Playback Connecting to a computer Creating a Song with a computer Song/Pattern Playing Block Using iOS Applications Reference Controller Block Performance This block generates/transmits note on/off, velocity (strength) and other playing information to the synthesizer’s tone generator block when you play notes. If the Arpeggio function is available, this block also transmits the playing information to the Arpeggio block. Song/Pattern File Utility Remote Keyboard The keyboard transmits note on/off messages to the Tone Generator Block (for sounding the Voices). The keyboard is also used for triggering Arpeggio playback. The default note numbers assigned to the keyboard range from C2 – C6 (MX49)/ C1- C6 (MX61). You can change the note range of the keyboard in octaves by using the OCTAVE [-]/[+] buttons, or transpose the notes by using the TRANSPOSE [-]/[+] buttons. Pitch Bend wheel Use the Pitch Bend wheel to bend the pitch of the notes up (roll the wheel up away from you) or down (roll the wheel down toward you) while playing the keyboard. This wheel is self-centering and will automatically return to normal pitch when released. Each preset Voice has its own default Pitch Bend Range setting. The Pitch Bend Range setting can be changed in the Play Mode display (page 47) of Part Edit. Functions other than Pitch Bend can be assigned to the Pitch Bend wheel in the Ctrl Set display (page 52) of Voice Edit. MX49/MX61 Reference Manual Pitch up Pitch down 3 Basic Structure Modulation wheel Even though the Modulation wheel is conventionally used to apply vibrato to the sound, many of the preset Voices (page 5) have other functions and effects assigned to the wheel. The higher up you move this wheel, the greater the effect that is applied to the sound. To avoid accidentally applying effects to the current Voice, make sure the Modulation wheel is set to minimum before you start playing. Various functions can be assigned to the Modulation wheel in the Ctrl Set display (page 52) of Voice Edit. Basic Structure Maximum Controller Block Tone Generator Block Effect Block Arpeggio Block Minimum Song/Pattern Playing Block Internal Memory Knobs The four Knobs let you change various aspects of the Voice’s sound in real time—while you play. Three functions can be assigned to each Knob, alternatively selected via the [KNOB FUNCTION] button. Also, the sound which is applied to the Knob effects is determined via the [PART 1-2 LINK] button. For details, see page 56. NOTE For instructions on using the Knobs, see the “Owner’s Manual.” MIDI/Audio Signal Flow Using a Connected Computer Connecting to a computer Creating a Song with a computer Using iOS Applications Reference Performance Song/Pattern File DAW Remote Utility Press [DAW REMOTE] to enter the Remote mode. In the Remote mode, you can operate the DAW software or VSTi (software instrument) from the panel controls. Entering the Remote mode will change the functions of some panel buttons—for example, Knobs [A] – [D], the Transport button, and Category buttons—to functions exclusive to this mode. For details, see the “Remote Control Assignments” of the “Using a Connected Computer” section on page 35. Remote MX49/MX61 Reference Manual 4 Basic Structure Tone Generator Block The Tone Generator block is what actually produces sound in response to the playing information generated by playing the keyboard and using the controllers. This section explains the AWM2 synthesis system, Voices (which are the basic sounds of the MX49/MX61), and Performances (which are Voice combinations). Basic Structure Controller Block Tone Generator Block Effect Block Arpeggio Block Song/Pattern Playing Block AWM2 (Advanced Wave Memory 2) Internal Memory This instrument is equipped with an AWM2 (Advanced Wave Memory 2) tone generator block. AWM2 is a synthesis system based on sampled waves (sound material), and is used in many Yamaha synthesizers. For extra realism, each AWM2 Voice uses multiple samples of a real instrument’s waveform. Furthermore, a wide variety of parameters—envelope generator, filter, modulation, and others—can be applied. Internal AWM2 Tone Generator MIDI/Audio Signal Flow Using a Connected Computer Connecting to a computer Creating a Song with a computer Voices A program that contains the sonic elements for generating a specific musical instrument sound is referred to as a “Voice.” Internally, there are two Voice types: Normal Voices and Drum Voices. Using iOS Applications Normal Voices Normal Voices are mainly pitched musical instrument-type sounds that can be played over the entire range of the keyboard. A Normal Voice consists of combined waves or sound samples. Reference Velocity (strength with which you press the key) A single Normal Voice Performance Song/Pattern File Utility Remote Drum Voices (Drum Kits) Drum Voices are mainly percussion/drum sounds that are assigned to individual notes on the keyboard. A collection of assigned percussion/drum waves is known as a Drum Kit. A single Drum Voice (Drum Kit) C0 C1 C6 Individual drum sounds (different for each key) NOTE The default note numbers assigned to the keyboard range from C2 – C6 (MX49)/ C1 – C6 (MX61). In order to play notes outside the keyboard range (C0 – C2 / C0 – C1), use the OCTAVE [-] button or TRANSPOSE [-] button to change the keyboard pitch. MX49/MX61 Reference Manual 5 Basic Structure Voice Components Each Voice consists of OSC (Oscillator), FILTER, AMP (Amplitude), and LFO components. Editing parameters of these components allows you to create original sounds. Basic Structure Controller Block Tone Generator Block Effect Block LFO Arpeggio Block Song/Pattern Playing Block Low Frequency Oscillator Internal Memory MIDI/Audio Signal Flow OSC FILTER AMP To Effect block Wave Changes the tonal quality of the sound. Controls the output level (amplitude) of the sound. Filter EG (Filter Envelope Generator) Amplitude EG (Amplitude Envelope Generator) Using a Connected Computer Connecting to a computer Creating a Song with a computer Using iOS Applications OSC This component determines the wave (the basic sound material) the note range for the sound, velocity range (the strength at which you play the keys). These are fixed to suitable settings for each Voice. Reference FILTER Performance This component modifies the tone of the sound output from OSC by subtracting a specific frequency range of the sound. Filter related parameters can be set in the Filter/EG display (page 48) of Performance Part Edit. Song/Pattern AMP Utility This component controls the output level (amplitude) of the sound output from FILTER. AMP related parameters can be set in the Play Mode display and the Filter/EG display (page 48). Remote File LFO This unit produces cyclic modulation for the Oscillator, Filter, and Amplitude. Modulating these aspects of the sound can create effects such as vibrato, wah and tremolo. LFO related parameters can be set in the Voice LFO display (page 51) of Voice Edit. MX49/MX61 Reference Manual 6 Basic Structure Voice Categories The Voices are conveniently divided into specific Categories. The categories are divided based on the general instrument type or sound characteristics. The different categories are listed below. Each category has multiple Voices. Category name Abbreviation Category button name Voice type Basic Structure Controller Block Tone Generator Block Effect Block Acoustic Piano AP PIANO Normal Voice Keyboard KB KEYBOARD Normal Voice Organ ORG ORGAN Normal Voice Song/Pattern Playing Block Guitar GTR GUITAR Normal Voice Internal Memory Bass BAS BASS Normal Voice Strings STR STRINGS Normal Voice Brass BRS BRASS Normal Voice Sax/Woodwind WND SAX/WOODWIND Normal Voice Synth Lead LD SYN LEAD Normal Voice Connecting to a computer Synth Pad/ Choir PAD PAD/CHOIR Normal Voice Creating a Song with a computer Synth Comping CMP SYN COMP Normal Voice Chromatic Percussion CP CHROMATIC PERCUSSION Normal Voice Drum/ Percussion DR DRUM/ PERCUSSION Drum Voice (Drum Kit) Sound Effect SFX SOUND EFX Normal Voice Musical Effect MFX MUSICAL EFX Normal Voice Ethnic ETH ETHNIC Normal Voice Arpeggio Block MIDI/Audio Signal Flow Using a Connected Computer Using iOS Applications Reference Performance Song/Pattern File Utility Remote MX49/MX61 Reference Manual 7 Basic Structure Memory structure of the Voices The MX49/MX61 features multiple Voices in Preset Memory, which cannot be overwritten (page 17). These Voices are referred to as Preset Voices. On the other hand, Voices which are created by editing the Preset Voices are referred to as User Voices. User Voices are stored in User Memory, which can be overwritten (page 17). The maximum number of User Voices which can be memorized to User Memory is 128 Normal Voices and 8 Drum Voices. Basic Structure Controller Block Tone Generator Block Effect Block Arpeggio Block User Voices Preset Voices Normal Voices 128 Song/Pattern Playing Block Internal Memory MIDI/Audio Signal Flow Piano 1 Using a Connected Computer Edit & Store operations Connecting to a computer Keyboard Creating a Song with a computer Edit & Store operations Bass Drum Voices Using iOS Applications 8 Drum/Percussion 1 Edit & Store operations Reference Performance Song/Pattern File Utility Remote MX49/MX61 Reference Manual 8 Basic Structure Performances The MX49/MX61 features 16 independent parts that allow for sounding multiple Voices simultaneously. Such a program in which multiple Voices (Parts) are combined is referred to as a Performance. One Voice is assigned to each Part, and a single Performance is the combination of 16 Voices. You can play Parts 1 and 2 normally. The MX49/MX61 also allows you to play different Voices of Part 1 and Part 2 together in a layer (Layer function), or play one Voice of Part 2 with your left hand while you play a different Voice of Part 1 with your right (Split function). Part 10 is conventionally used for playing Rhythm patterns. Therefore, the default Voice assigned to Part 10 is a Drum Voice. NOTE You can also switch among Parts 3 – 16 and play those Voices normally one by one. Controller Block Tone Generator Block Effect Block Arpeggio Block Song/Pattern Playing Block Internal Memory MIDI/Audio Signal Flow Performance Normally used Parts Basic Structure Part 3 Voice Part 1 Using a Connected Computer Connecting to a computer Creating a Song with a computer Voice Part 10 Voice Using iOS Applications Part 2 Part 16 Voice Voice Reference Different MIDI channels are assigned to Parts 1 – 16. Up to 16 Parts can be played simultaneously using an external MIDI sequencer, the DAW software on the computer, or MIDI data in USB flash memory connected to the MX49/MX61. Performance Song/Pattern File Utility Tone generator block Remote Performance USB flash memory Part 1 CH1 Part 2 CH2 Part 3 CH3 Part 4 CH4 Part 10 CH10 Part 16 CH16 MIDI data DAW (computer), etc. MIDI data MX49/MX61 Reference Manual 9 Basic Structure Performance memory structure The MX49/MX61 features 128 Performances in User Memory, which can be overwritten (page 17). To store an edited Performance, you need to overwrite one of the memory locations 1 – 128. Basic Structure Controller Block Tone Generator Block Effect Block Performances Arpeggio Block Song/Pattern Playing Block 128 Internal Memory MIDI/Audio Signal Flow Using a Connected Computer 1 Connecting to a computer Store Creating a Song with a computer Using iOS Applications Editing a Performance and the Voices You can create your own original sounds by editing the Performance and Voice parameters. In Performance Edit, you can edit both the parameters unique to each Part (Part parameters) and parameters common to all Parts (Common parameters). In Voice Edit, you can edit the parameters that are related to the entire Voice. Voice Edit is available only for Voices assigned to the Performance Parts. When editing the Voice, make sure to store it as a User Voice separate from the Performance. Keep in mind that even when you store a Performance, the Voice parameters are not stored. Reference Performance Song/Pattern File Utility Performance 128 Remote Performance 1 Part 1 Voice Part parameters Part 2 Voice 1 Voice Voice parameters Part parameters Part 3 Voice Common parameters Part parameters Part 16 Voice Part parameters Maximum Polyphony Maximum polyphony refers to the highest number of notes that can be sounded simultaneously from the internal tone generator of the instrument. The maximum polyphony of this synthesizer is 128. When the internal tone generator block receives a number of notes exceeding the maximum polyphony, previously played notes are cut off. Keep in mind this may be especially noticeable with Voices not having decay. Furthermore, when Normal Voices that include multiple waves are used, the maximum number of simultaneous notes is less than 128. MX49/MX61 Reference Manual 10 Effect Block This block applies effects to the output of the tone generator block, processing and enhancing the sound. Effects are applied in the final stages of editing, letting you change the sound as desired. Basic Structure Basic Structure Controller Block Tone Generator Block Effect structure Effect Block Arpeggio Block Song/Pattern Playing Block Insertion Effects Internal Memory Insertion Effects can be applied individually to Voices assigned to specific Parts before merging the signals of all Parts. It should be used for sounds for which you want to drastically change the character. Each Voice features one Insertion Effect. You can set different Effect types to the Insertion Effect. This setting can be set in the Voice Insert Eff/ DrumKit Insert Eff display (page 50) of Voice Edit. This instrument features four Insertion Effects, which can be applied to four Parts (maximum) of the Performance. MIDI/Audio Signal Flow Using a Connected Computer System Effects Connecting to a computer This instrument is equipped with Reverb and Chorus as System Effects. System Effects are applied to the overall sound. With System Effects, the sound of each Part is sent to the effect according to the Effect Send Level for each Part. The processed sound (referred to as “wet”) is sent back to the mixer, and output—after being mixed with the unprocessed “dry” sound. Creating a Song with a computer Master EQ Using iOS Applications Master EQ is applied to the final (post-effect), overall sound of the instrument. In this EQ, all five bands can be set to peaking, with shelving being available also for the lowest and highest bands. Reference Performance Song/Pattern File Utility Remote MX49/MX61 Reference Manual 11 Basic Structure Effect connections and settings Basic Structure Controller Block Send level Tone Generator Block Effect Block Performance Arpeggio Block Song/Pattern Playing Block 1 Parts 1 -16 Internal Memory 2 Insertion Effects (up to 4 effects) MIDI/Audio Signal Flow Part 1 Part 2 Part 3 Part 8 Part 9 Part 16 Voice Insertion Effect On Voice Insertion Effect Off Voice Insertion Effect On Voice Insertion Effect On Voice Insertion Effect Off Voice Insertion Effect On Using a Connected Computer Connecting to a computer Creating a Song with a computer System Effects 3 Chorus 3 Reverb 4 Master EQ Using iOS Applications Reference Performance Song/Pattern File 1 Selection of which Part (1 – 16) uses the Insertion Effect. Settings: Set in “InsSw” in the Performance Part Select display (page 42). Utility Remote 2 Insertion Effect related settings Settings: Set in the Voice Insert Eff/ DrumKit Insert Eff display (page 50) of Voice Edit. 3 Chorus and Reverb related settings Settings: Set in the Chorus Eff/ Reverb Eff display (page 43) of Common Edit, the General display (page 45) of Common Edit, and the Play Mode display (page 47) of Part Edit. 4 Master EQ related settings Settings: Set in the Master EQ display (page 44) of Common Edit. About Effect categories, Effect types, and Effect parameters For information regarding the Effect categories of this instrument and the Effect types contained in their categories, see the “Effect Type List” in the “Data List” PDF document. For information on the Effect parameters which can be set in the each effect type, see the “Effect Parameter List” in the “Data List” PDF document. For information on the descriptions of each Effect category, each Effect type, and each Effect parameter, see the “Synthesizer Parameters Manual” PDF documentation. About Preset settings Preset settings for parameters of each effect type are provided as templates and can be selected in the Effect Type selection display. To get a desired effect sound, try first selecting one of the Presets close to your imagined sound, then change the parameters as necessary. Preset settings can be determined by setting “Preset” in each effect parameter display. For information on each effect type, see the “Data List” PDF document. MX49/MX61 Reference Manual 12 Basic Structure Arpeggio Block This block lets you automatically trigger musical and rhythmic phrases using the current Voice by simply pressing a note or notes on the keyboard. The Arpeggio sequence also changes in response to the actual notes or chords you play, giving you a wide variety of inspiring musical phrases and ideas—both in composing and performing. Two Arpeggio types can be played back at the same time. Basic Structure Controller Block Tone Generator Block Effect Block Arpeggio Block Arpeggio Arpeggio 1 Performance Part 1 Voice Arpeggio 2 Song/Pattern Playing Block Internal Memory MIDI/Audio Signal Flow Part 2 Voice Part 3 Voice Using a Connected Computer Connecting to a computer Creating a Song with a computer Part 16 Voice Arpeggio categories The Arpeggio types are divided into multiple categories as listed below. The categories are based on instrument type. Using iOS Applications Reference Performance Song/Pattern Category List ApKb Acoustic Piano & Keyboard Org Organ Guit Guitar / Plucked Bass Bass Str Strings Brs Brass RdPp Reed / Pipe Lead Synth Lead PdMe Synth Pad / Musical Effect CrPc Chromatic Percussion DrPc Drum / Percussion Seq Synth Sequence Chd Chord Sequence Hybr Hybrid Sequence Ctrl Control MX49/MX61 Reference Manual File Utility Remote 13 Basic Structure About the Arpeggio type list Basic Structure 8 Controller Block Tone Generator Block ARP Category No. NOTE ARP Name Time Original Signature Length Tempo Accent Note/Chord Effect Block ApKb 1 70sRockB 4/4 2 130 N Arpeggio Block ApKb 2 70sRockC 4/4 1 130 N ApKb 3 70sRockD 4/4 2 130 Song/Pattern Playing Block ApKb 4 70sRockE 4/4 4 130 N ApKb 5 70sRockF 4/4 2 130 N ApKb 6 70sRockG 4/4 1 130 C ApKb 7 70sRockH 4/4 1 130 C Note that this list is for illustration purposes only. For a complete listing of the Arpeggio Types, see the “Data List” PDF document. 1 Category Indicates the Arpeggio Category. Internal Memory MIDI/Audio Signal Flow Using a Connected Computer Connecting to a computer 2 ARP No. (Arpeggio Number) Creating a Song with a computer Indicates the Arpeggio type number. 3 ARP Name (Arpeggio Name) Indicates the Arpeggio Name. Using iOS Applications 4 Time Signature Indicates the time signature or meter of the Arpeggio type. 5 Length Indicates the data length (amount of measures) of the Arpeggio type. 6 Original Tempo Indicates the appropriate tempo value of the Arpeggio type. Note that this tempo is not set automatically when selecting an Arpeggio type. 7 Accent The circle indicates that the Arpeggio uses the Accent Phrase feature (see below). 8 Note/Chord Indicates the Arpeggio playback type. “N (Note)” indicates that the playback method differs according to the number of notes or the intervals between them. “C (Chord)” indicates that chords are detected from note data played on the keyboard, and Arpeggio playback then changes with the chords. Blank cells indicate Arpeggios for Drum Voices (page 15) or Arpeggios containing mainly controller information (page 15). Reference Performance Song/Pattern File Utility Remote Arpeggio playback types Turning Arpeggio playback on/off The following two settings are available for turning Arpeggio playback on/off. To continue playing an Arpeggio only by pressing and holding a note: Set the “Hold” parameter to “off.” To continue playing an Arpeggio even when a note is released: Set the “Hold” parameter to “on.” NOTE For information on the displays including the “Hold” parameters, see Arp Select display (page 49). NOTE When “Switch (Arpeggio Switch)” is set to “on,” you can use a damper pedal switch (sending MIDI sustain messages; control change #64) to perform the same function as setting “Hold” to “on.” Accent Phrase Accent Phrases are composed of sequence data included in some Arpeggio types, sounding only when you play notes at a high (strong) velocity. For information on Arpeggio types that use this function, refer to the “Arpeggio Type List” in the “Data List” PDF document. MX49/MX61 Reference Manual 14 Relation between played notes and Arpeggio types There are three main Arpeggio playback types as described below. Basic Structure Basic Structure Controller Block Arpeggios for Normal Voices Arpeggio types (belonging to all categories except for DrPC and Cntr) created for use of Normal Voices have the following three playback types. Playback of played notes only Arpeggios are played back using only the played note(s) and octave notes. Tone Generator Block Effect Block Arpeggio Block Song/Pattern Playing Block Internal Memory MIDI/Audio Signal Flow Playback of a programmed sequence according to the played notes (Note) These Arpeggio types have several sequences each of which is suited for a certain chord type. Even if you press only one note, the Arpeggio is played back using the programmed sequence—meaning that notes other than the ones you play may be sounded. Pressing another note triggers a transposed sequence using the pressed note as the new root note. Adding notes to those already held changes the sequence accordingly. For more on this Arpeggio type, refer to the “Arpeggio Type List” in the “Data List” PDF document. Playback of a programmed sequence according to the played chord (Chord) Using a Connected Computer Connecting to a computer Creating a Song with a computer These Arpeggio types created for use with Normal Voices are played back to match the chord type that you play on the keyboard. For more on this Arpeggio type, refer to the “Arpeggio Type List” in the “Data List” PDF document. NOTE Since these types are programmed for Normal Voices, using them with Drum Voices may not produce musically appropriate results. Using iOS Applications Arpeggios for Drum Voices (Category: DrPc) These Arpeggio types are programmed specifically for use with Drum Voices, giving you instant access to various rhythm patterns. Three different playback types are available. Reference Playback of a drum pattern Performance Pressing any note(s) will trigger the same rhythm pattern. Song/Pattern File Playback of a drum pattern, plus additional played notes (assigned drum instruments) Pressing any note will trigger the same rhythm pattern. Playing additional notes to the one being held lets you add other sounds (assigned drum instruments) to the drum pattern being played. Utility Remote Playback only of the played notes (assigned drum instruments) Playing a note or notes will trigger a rhythm pattern using only the notes played (assigned drum instruments). Keep in mind that even if you play the same notes, the triggered rhythm pattern differs depending on the order of the notes played. This gives you access to different rhythm patterns using the same instruments simply by changing the order in which you play the notes, when the “KeyMode” parameter is set to “thru” or “thrudirect.” NOTE The three playback types above are not distinguished by category name or type name. You'll have to actually play the types and hear the difference. NOTE Since these types are programmed for Drum Voices, using them with Normal Voices may not produce musically appropriate results. Arpeggios containing mainly controller information (Category: Cntr) These arpeggio types are programmed primarily with Control Change and Pitch Bend data. They are used to change the tone or pitch of the sound, rather than play specific notes. In fact, some types contain no note data at all. NOTE When the Arpeggio types which belong to the “Cntr” Category and contain no note data is selected, no sound is produced, even if the MX49/MX61 receives Note On messages. Tips for Arpeggio playback Arpeggios not only provide inspiration and full rhythmic passages over which you can perform, they give you quality MIDI data you can use in creating Songs, or fully formed backing parts to be used in your live performances. For instructions on using Arpeggio, see the “Quick Guide” in the Owner’s Manual. MX49/MX61 Reference Manual 15 Basic Structure Song/Pattern Playing Block This block lets you play the internal Rhythm Patterns or MIDI/Audio data saved to USB flash memory which is connected to this instrument. The MIDI data of the Rhythm Pattern and USB flash memory is sent to the internal tone generator block, and plays back the sounds. Basic Structure Controller Block Tone Generator Block Effect Block Song/Pattern playing block Internal memory Performance Part 1 MIDI Audio Arpeggio Block Song/Pattern Playing Block Internal Memory Rhythm Pattern (MIDI) MIDI/Audio Signal Flow Part 2 USB flash memory Song (MIDI) Song (Audio) Part 3 Audio Output Part 4 Using a Connected Computer Connecting to a computer Creating a Song with a computer Part 10 Using iOS Applications Part 16 Audio Output Reference Performance Rhythm Pattern Song/Pattern File The MX49/MX61 features multiple Rhythm Patterns. The appropriate Rhythm Pattern is determined for each Performance. This Pattern is played back using the Drum Voice assigned to Part 10 of the Performance. Utility Remote Song MIDI and Audio data saved in the root directory (page 60) of the USB flash memory can be played back as a Song on this instrument. MIDI data uses the sounds of Parts 1 – 16 of the Performance for playback. Audio data is directly output to the OUTPUT [L/MONO]/[R] jacks. NOTE Only SMF (Standard MIDI File) MIDI data of format 0 can be used for playback on this instrument. NOTE Only 44.1kHz/16-bit stereo WAV file audio data can be used for playback on this instrument. MX49/MX61 Reference Manual 16 Basic Structure Internal Memory The MX49/MX61 creates a variety of different kinds of data, including Performance and Voice. This section describes how to maintain the various types of data and use the memory devices/media for storing them. Basic Structure Controller Block Tone Generator Block Effect Block Internal memory of the MX49/MX61 Arpeggio Block Song/Pattern Playing Block Internal memory Internal data communication Internal Memory Data communication between this synthesizer and an external device MIDI/Audio Signal Flow Preset memory Recall buffer Compare buffer • Preset Voice • Arpeggio • Demo Song (excluding Utility settings) MIDI instrument or computer DAW software Remote Editor Using a Connected Computer Connecting to a computer User memory • Performance • Voice Edit • User Voice • Utility • Control templates (Remote mode) Store • Performance Edit • Utility settings • Control templates (Remote mode) Load/ Save (executed in File display) Edit Buffer Bu lk Du m p Bulk Dump Creating a Song with a computer USB flash memory Using iOS Applications File extensions “.X5A” (which include all data in User memory) Reference Performance Song/Pattern File Utility Preset memory Remote Preset Voices, Arpeggios, and Demo Song are stored in this memory. It is designed specifically for reading out data, and as such data cannot be written to it. User memory Stored to this memory are 128 Performances, User Voices, Utility settings (global system settings), and 50 Control templates. It is designed for both data writing and data reading operations. The contents of this memory are maintained even when the power is turned off. Edit buffer The edit buffer is the memory location for edited data of the Performance and the Voices assigned to the Parts. Only a single Performance can be held in this memory at one time. This memory is designed both for data writing and data reading operations. The contents of this memory are lost when the power is turned off. You should always store edited data to User memory before switching the Performance or turning off the power. Recall buffer/ Compare buffer The recall buffer is the backup memory for the edit buffer. If you’ve selected another Performance without storing the one you were editing, you can use the Recall function to recover your original edits, since the edit buffer’s contents are stored to backup memory. The compare buffer is designed specifically for saving data that exists prior to editing. The data prior to editing will temporarily be reinstated, then you can switch between the just-edited data and its original, unedited condition, allowing you to hear how your edits affect the sound (Compare function). These memories are designed both for data writing and data reading operations. The contents of this memory are lost when the power is turned off. MX49/MX61 Reference Manual 17 Basic Structure MIDI/Audio Signal Flow The MIDI/audio signal flow in this instrument and the flow between this instrument and an external device are shown in the following illustration. Basic Structure Controller Block Tone Generator Block Effect Block Arpeggio Block MX49/MX61 Song/Pattern Playing Block MIDI Audio Controller block Arpeggio block Keyboard Controllers Arpeggio Playback (2) Internal Memory MIDI/Audio Signal Flow Using a Connected Computer Connecting to a computer Creating a Song with a computer Song/Pattern playing block Tone Generator Effects Performance Internal memory System Effect Insertion Effect × 4 Master EQ • Part 1: Voice • Part 2: Voice Rhythm Pattern (MIDI) Using iOS Applications • Part 16: Voice Internal memory Reference Song (MIDI) Performance *2 Song (Audio) Song/Pattern File Utility Remote *1 MIDI Output MIDI Input Audio Input USB [TO HOST] MIDI [OUT] USB [TO HOST] MIDI [IN] USB [TO HOST] [AUX IN] Computer External MIDI equipment Computer Audio player (ex.: iPod) Audio Output USB [TO HOST] OUTPUT [L/MONO]/[R] [PHONE] Computer Powered speakers, etc. *1 The audio signals input via the USB [TO HOST] terminal are output only to the OUTPUT [L/MONO]/[R] jacks and [PHONE] jack. These signals are not output to the USB [TO HOST] terminal. *2 The audio data of the USB flash memory are output only to the OUTPUT [L/MONO]/[R] jacks and [PHONE] jack. The data is not output to the USB [TO HOST] terminal. MX49/MX61 Reference Manual 18 Using a Connected Computer Connect the MX49/MX61 to your computer (via USB) and create your own original songs, using DAW software on the computer. NOTE The acronym DAW (digital audio workstation) refers to music software for recording, editing and mixing audio and MIDI data. The main DAW applications are Cubase, Logic, SONAR and Digital Performer. Though all of these can be effectively used with the MX49/MX61, we recommend using Cubase when creating songs together with the instrument. By connecting this instrument to a computer, you can take advantage of the following functions and applications. • Using as an external tone generator for the DAW software and a MIDI keyboard Basic Structure Basic Structure Controller Block Tone Generator Block Effect Block Arpeggio Block Song/Pattern Playing Block Internal Memory MIDI/Audio Signal Flow • Using as a remote controller of the DAW software and VSTi (software instrument) Using a Connected Computer Connecting to a computer A USB cable and the Yamaha Steinberg USB Driver are necessary to connect the MX49/MX61 to the computer. Note that both audio data and MIDI data can be transmitted via USB. Also, the MX49/MX61 Remote Tools and the MX Voice List are useful for using DAW software with this instrument. Follow the instructions below. 1 Creating a Song with a computer Download the latest Yamaha Steinberg USB Driver, MX49/MX61 Remote Tools, and MX Voice List from our website. Using iOS Applications After clicking the Download button, extract the compressed file. http://download.yamaha.com/ 2 Connecting to a computer NOTE Information on system requirements is also available at the above web site. NOTE The Yamaha Steinberg USB Driver and Remote Tools may be revised and updated without prior notice. Make sure to check and download the latest version from the above site. Reference Install the Yamaha Steinberg USB Driver to the computer. For instructions on installing, follow the online Installation Guide included in the downloaded file package. When connecting this instrument to a computer, connect the USB cable to the USB [TO HOST] of this instrument and the USB terminal of the computer as shown below. Performance Song/Pattern File Utility USB [TO HOST] terminal Remote USB terminal Rear panel USB cable 3 Make sure that the USB [TO HOST] terminal of this instrument is enabled. Press [UTILITY] button to call up Utility display Select “02:MIDI” from list with Cursor [u] / [d] buttons, then press [ENTER] to call up MIDI display Set “MIDI IN/OUT” parameter to “USB.” UTILITY*MIDI*******2 a***MIDI*IN/OUT=*USB 4 Press the [STORE] button to store the settings to internal memory. MX49/MX61 Reference Manual 19 5 Install the MX49/MX61 Remote Tools (downloaded in step 1) to the computer. Remote Tools consists of two components: the MX49/MX61 Remote Editor and MX49/MX61 Extension, which enables you to use the MX49/MX61 along with Cubase series. For instructions on installing, refer to the online Installation Guide included in the downloaded file package. Basic Structure Basic Structure Controller Block Tone Generator Block 6 Install the MX Voice List (downloaded in step 1) to the computer. Effect Block For instructions on installing, refer to the online Installation Guide included in the downloaded file package. Arpeggio Block Song/Pattern Playing Block Precautions when using the USB [TO HOST] terminal When connecting the computer to the USB [TO HOST] terminal, make sure to observe the following points. Failing to do so risks freezing the computer and corrupting or losing the data. If the computer or the instrument freezes, restart the application software or the computer OS, or turn the power to the instrument off then on again. NOTICE • Use an AB type USB cable of less than 3 meters. USB 3.0 cables cannot be used. • Before connecting the computer to the USB [TO HOST] terminal, exit from any power-saving mode of the computer (such as suspend, sleep or standby). • Before turning on the power to the instrument, connect the computer to the USB [TO HOST] terminal. • Execute the following before turning the power to the instrument on/off or plugging/unplugging the USB cable to/from the USB [TO HOST] terminal. Internal Memory MIDI/Audio Signal Flow Using a Connected Computer Connecting to a computer Creating a Song with a computer • Quit any open application software on the computer. • Make sure that data is not being transmitted from the instrument. (Data is transmitted by playing notes on the keyboard, playing back a song, or etc.) Using iOS Applications • While the computer is connected to the instrument, you should wait for six seconds or more between these operations: (1) when turning the power of the instrument off then on again, or (2) when alternately connecting/ disconnecting the USB cable. Reference MIDI channels and MIDI ports MIDI data is assigned to one of sixteen channels, and this synthesizer is capable of simultaneously playing up to sixteen separate Parts, via the maximum sixteen MIDI channels. However, this sixteen-channel limit can be overcome by using separate MIDI “ports”—each supporting sixteen channels—and adding another synthesizer or tone generator for even more instrument sounds. While a single MIDI cable is equipped to handle data over up to sixteen channels simultaneously, a USB connection is capable of handling far more—thanks to the use of MIDI ports. Each MIDI port can handle sixteen channels, and the USB connection allows up to eight ports, letting you use up to 128 channels (8 ports x 16 channels) on your computer. When connecting this instrument to a computer using a USB cable, the MIDI ports are defined as follows: Port 1 The tone generator block in this instrument can recognize and use only this port. When playing the MX49/MX61 as a tone generator from the external MIDI instrument or computer, you should set MIDI Port to 1 on the connected MIDI device or computer. Port 2 This port is used to control DAW software on the computer from the MX49/MX61 by using the Remote Control feature. Port 3 This port is used as the MIDI Thru Port. The MIDI data received over Port 3 via the USB [TO HOST] terminal is re-transmitted to an external MIDI device via the MIDI [OUT] terminal. Also, the MIDI data received over Port 3 via the MIDI [IN] terminal is re-transmitted to an external device (computer, etc.) via the USB [TO HOST] terminal. Port 4 This port is not used for the MX49/MX61. Port 5 This port is used only for data communication of the MX49/MX61 Remote Editor. No other software or device can use this port. Performance Song/Pattern File Utility Remote When using a USB connection, make sure to match the MIDI transmit port and the MIDI receive port as well as the MIDI transmit channel and the MIDI receive channel. Make sure to set the MIDI port of the external device connected to this instrument according to the above information. MX49/MX61 Reference Manual 20 Basic Structure Audio channels The audio signals of the MX49/MX61 can be output to the USB [TO HOST] terminal and the OUTPUT [L/MONO]/ [R] jacks. When connecting to a computer, use the USB [TO HOST] terminal. In this case, up to two audio channels (USB 1 and USB2) are available. The audio signals of the MX49/MX61 can be input from the USB [TO HOST] terminal and the [AUX IN] jack. Up to two channels of audio can be input to the USB [TO HOST] terminal. Set the output level by setting the “DAW Level” parameter (page 64) on the MX49/MX61. The signals are output to the OUTPUT [L/MONO]/[R] jack. Also, up to two audio channels can be input to the [AUX IN] jacks. The signal is sent to directly the OUTPUT [L/MONO]/[R] jack. For more details, see the “MIDI/Audio Signal Flow” section (page 18). Basic Structure Controller Block Tone Generator Block Effect Block Arpeggio Block Song/Pattern Playing Block Internal Memory MIDI/Audio Signal Flow Using a Connected Computer Connecting to a computer Creating a Song with a computer Using iOS Applications Reference Performance Song/Pattern File Utility Remote MX49/MX61 Reference Manual 21 Basic Structure Creating a Song with a computer By using the MX49/MX61 with DAW software on the connected computer, you can take advantage of the following functions and applications. Basic Structure • MIDI recording of your MX49/MX61 performance to DAW software on the computer. • Audio recording of your MX49/MX61 performance to DAW software on the computer • Remote controlling the DAW software or VSTi (software instrument) Tone Generator Block Effect Block Arpeggio Block This section contains an overview on how to use DAW software on the computer with the MX49/MX61 after connecting. NOTE Controller Block Song/Pattern Playing Block Internal Memory For information on Cubase series software that supports the MX49/MX61, see the following website. http://download.yamaha.com/ MIDI/Audio Signal Flow Important For the sake of example in the explanations below, Cubase 6 is used on a computer running Windows 7. The Cubase windows and names as shown in this section may differ according to your particular Cubase version and/or computer environment. Using a Connected Computer Connecting to a computer Creating a Song with a computer Recording your performance on the MX49/MX61 to DAW software as MIDI data In this section, you’ll learn how to record variety of instrument Voices to multiple tracks of the Cubase to create a MIDI song. Recording as MIDI data allows you to easily create a musical score from your performance, as well as easily make partial corrections to the recording—for example changing the tempo or key for the whole song. In this section, make connections and set the signal flow as shown in the following illustration. Using the Quick Setup function greatly simplifies the connection settings on the MX49/MX61. Reference DAW Powered speakers Using iOS Applications MIDI Computer MIDI Tr Audio 1 2 Performance Song/Pattern File Utility 16 Remote MIDI Thru = on Port 1 OUTPUT [L MONO] / [R] Port 1 USB [TO HOST] Direct Monitor = on Tone generator Arpeggio MIDI Out = off LocalCtrl = off Rhythm Pattern (MIDI) Controllers (keyboard, knobs, etc.) MX49/MX61 MX49/MX61 Reference Manual 22 Basic Structure Setting up the MX49/MX61 1 Basic Structure Use the Quick Setup function to specify the “DAW Rec” connection. Press [UTILITY] [JOB] Select “01:QuickSetup” [ENTER] Set “Type” to “DAW Rec” [ENTER]. The following parameters are set as shown. Local Control (page 65) is set to off. Use this setting when you want to record your performance on this instrument (excepting Arpeggio data) to DAW software. Controller Block Tone Generator Block Effect Block Arpeggio Block Song/Pattern Playing Block JOB*QuickSetup c******Type=*DAW*Rec Internal Memory MIDI/Audio Signal Flow Using a Connected Computer DAW Rec 2 Direct Monitor switch on LocalCtrl off MIDI Sync auto Clock Out off Arpeggio MIDI output switch off Connecting to a computer Creating a Song with a computer Using iOS Applications Store the settings, then return the Performance top display. Press [STORE], then press [EXIT] repeatedly to return to the top display after storing the settings. 3 Reference Make sure that the Layer and Split functions are off. If the lamps of the [LAYER] button and/or [SPLIT] button are lit, press the buttons to turn them off. Performance Song/Pattern Setting up Cubase File Utility 1 Start Cubase on your computer. Remote Important Cubase cannot recognize the MX49/MX61 if you turn the power of the MX49/MX61 on after starting Cubase. Make sure to start Cubase after turning on the power of the MX49/MX61. 2 On Cubase, open a new project. Select the “Empty” project in the “More” area of the Project Assistant window, and then click [Create]. 3 Confirm that MIDI Thru is set to “on” on Cubase. Click “File” menu “Preference” “MIDI.” Confirm that “MIDI Thru Active” is checked. Then, click [OK] to close the Preference window. When MIDI Thru is set to on, the MIDI data generated by playing the keyboard and received by the computer is returned back to the MX49/MX61. As shown in the illustration below, this allows you to play selected tracks on Cubase (each with a different MIDI channel) and have the respective Parts on the MX49/ MX61 sound. For example, if Tracks 1, 2 and 3 are set to MIDI channels 1, 2 and 3, respectively, and the MX49/ MX61 is set to play Piano, Bass and Strings on MIDI channels 1, 2 and 3, respectively—you can individually select a track for playing/recording and have that respective instrument sound on the MX49/MX61. Select Track 1 and play/record the Piano part; select Track 2 to play/record the Bass, and so on. IN CH1 USB [TO HOST] terminal Tone generator block (recognizing MIDI Channel 3 data) OUT CH3 Keyboard (output via MIDI Channel 1) Local Control = off MX49/MX61 MX49/MX61 Reference Manual Computer (Cubase, etc.) MIDI Thru = on 23 4 5 Confirm that ASIO Driver is set to “Yamaha Steinberg USB ASIO” or “Yamaha MX49/MX61” Basic Structure Click “Devices” menu “Device Setup...” “VST Audio System.” Confirm the “ASIO Driver” setting. Then, click [OK] to close the Device Setup window. Basic Structure Set up the MX Voice List installed in your computer for use on Cubase. Tone Generator Block Setting up the MX Voice List makes operation smoother, easier and more convenient when creating song data with multiple Voices of the instrument. If you don’t set the MX Voice List, you'll need to manually set the Voice assigned to each Part on the MX49/MX61. Effect Block 5-1 Click “Devices” menu “MIDI Device Manager” [Install Device]. Controller Block Arpeggio Block Song/Pattern Playing Block Internal Memory MIDI/Audio Signal Flow Using a Connected Computer Connecting to a computer Creating a Song with a computer 5-2 Select “Yamaha MX” on the Add MIDI Device window, then click [OK]. 5-3 After selecting “Yamaha MX” in the “Installed Devices” area on the MIDI Device Manager Using iOS Applications window, set Output to “Yamaha MX49/MX61-1” at the lower part of the window, then close the window. Reference Performance Song/Pattern File Utility Remote 6 Create a MIDI track. Click “Project” menu “Add Track” “MIDI” [Add Track]. MX49/MX61 Reference Manual 24 7 On the MIDI track, set the Input/ Output Routing to allow MX49/MX61 data to be input to Cubase and to allow MIDI track data to be output to Port 1 of the MX49/MX61. Set the Input Routing to “All MIDI Inputs” and set the Output Routing to “Yamaha MX49/MX61 (Yamaha MX49/ MX61–1).” All incoming MIDI data will be input to Cubase, and MIDI track data will be output to the channel determined at the track on MIDI Port 1 of the MX49/MX61. Also, the MX Voice List can be shown on the track of Cubase. NOTE If you didn’t execute Step 5 above, set the Output Routing to “Yamaha MX49/MX61–1.” Basic Structure Basic Structure Controller Block Tone Generator Block Effect Block Arpeggio Block Song/Pattern Playing Block Internal Memory MIDI/Audio Signal Flow Input Routing Output Routing Using a Connected Computer Connecting to a computer Creating a Song with a computer Using iOS Applications 8 Determine which Voice will be used for the MIDI track data. Click in the Program Selector to call up the MX49/MX61 Voice List, then select the desired Voice. The Voice assigned to the MX49/MX61 Part corresponding to the output channel for the MIDI track is replaced by the Voice you’ve selected on Cubase. Check the sound while playing the MX49/MX61 keyboard. NOTE If you don’t select the Voice on Cubase, the Voice currently assigned to the Part on the MX49/MX61 will sound. Reference Performance Song/Pattern File Utility Remote Program Selector Voice List MX49/MX61 Reference Manual 25 9 If necessary, turn the metronome on. Click on “CLICK” in the Transport Panel (or press C) to turn the metronome on. Basic Structure Basic Structure Controller Block Tone Generator Block Effect Block Arpeggio Block Song/Pattern Playing Block 10 11 Record the MX49/MX61 performance to the selected MIDI track. Internal Memory After setting the time position to zero, click (Record). When you begin playing the MX49/MX61, recording of your performance starts. When you’ve finished, click (Stop) to stop recording. MIDI/Audio Signal Flow Create other MIDI tracks as needed, and record more parts of your performance using other Voices of the MX49/MX61. Repeat steps 6 to 10 above. After finishing recording as desired, go on to step 12. Using a Connected Computer Connecting to a computer 12 Check the recorded data in all tracks. After setting the time position to zero, click (Start). If necessary, correct or edit the MIDI data on Cubase to complete the song data. For instructions on using Cubase, refer to the documentation provided with the software. Creating a Song with a computer Using iOS Applications Reference Performance Song/Pattern File Utility Remote MX49/MX61 Reference Manual 26 Basic Structure Recording your performance on the MX49/MX61 to DAW software as audio data Basic Structure Controller Block In this section, you’ll learn how to convert the MIDI data you created in the previous section to audio data using the MX49/MX61 Voices. By recording audio data, you can create audio CDs, or use the MX49/MX61 Song data as an audio file in other applications, such as sound editors or video production software. In this section, set up the connections and signal flow as shown in the following illustration. Tone Generator Block Effect Block Arpeggio Block Song/Pattern Playing Block DAW Powered speakers Computer MIDI Internal Memory Audio MIDI/Audio Signal Flow MIDI Tracks 1 2 16 Using a Connected Computer Port 1 Audio Track Connecting to a computer 1 OUTPUT [L MONO] / [R] Creating a Song with a computer USB [TO HOST] Using iOS Applications Direct Monitor = on MIDI Out = off Tone generator Arpeggio Reference Performance Song/Pattern Rhythm Pattern (MIDI) Controllers (keyboard, knobs, etc.) File Utility Remote MX49/MX61 1 Set up the MX49/MX61 according to the instructions in “Setting up the MX49/MX61” on page 23. 2 Create a new Audio track in the Project you created in the previous section (“Recording your performance on the MX49/MX61 to the DAW software as MIDI data”). Click “Project” menu “Add Track” “Audio” [Add Track]. 3 In this new Audio track, set the Input/Output destinations for the MX49/MX61. Set the Input Routing to “Stereo In,” and set the Output Routing to “Stereo Out.” NOTE 4 “Stereo In” and “Stereo Out” are the bus names set on the VST Connection window which is called up from the “Device” menu. If you’ve added other bus names on the VST Connection window, make sure to set the routings to the appropriate bus names. Using all MIDI data that was recorded to the Project, record the MX49/MX61 sound to Cubase as audio data. After setting the time position to zero, click (Record). The MIDI data of all tracks will be played back to record the data to the Audio track. When the MIDI data reaches the end, click (Stop) to stop recording. 5 After muting all tracks in the Project window on Cubase (except the new Audio track), check the recorded audio data by playing the Audio track. MX49/MX61 Reference Manual 27 Recording Arpeggio phrases of the MX49/MX61 to DAW software as MIDI data Basic Structure Basic Structure Controller Block In this section, you’ll learn how to record Arpeggio phrases to Cubase as MIDI data. Doing this allows you to simply create fully realized, comprehensive songs, without having to play difficult phrases on the keyboard. In this section, set the signal flow as shown in the following illustration and use the convenient Quick Setup function to simplify the connection settings on the MX49/MX61. Tone Generator Block Effect Block Arpeggio Block Song/Pattern Playing Block DAW Computer MIDI Internal Memory Audio MIDI/Audio Signal Flow MIDI Tracks 1 Powered speakers 2 16 Using a Connected Computer MIDI Thru = off Connecting to a computer Creating a Song with a computer MIDI clock OUTPUT [L MONO] / [R] USB [TO HOST] Using iOS Applications Direct Monitor = on Tone generator Arpeggio MIDI Out = on Reference Performance Song/Pattern Local Control = on File Utility Rhythm Pattern (MIDI) Remote Controllers (keyboard, knobs, etc.) MX49/MX61 Setting up the MX49/MX61 1 For Part 1, determine the desired Arpeggio type for recording, then set the Arpeggio switch to on. Press [EDIT] in the Performance display Select “02:Part” with the Cursor [d] button, then press [ENTER] Press [PIANO] (1) Select “03:ArpSelect” with the Cursor [u]/[d] buttons, then press [ENTER] Set “Switch” to “on,” and select desired “Category”/“Type.” 2 Set the Arpeggio switch to on. Press [ARP] so that it’s lamp lights. This functions for the entire Performance. MX49/MX61 Reference Manual 28 3 Use the Quick Setup function to specify the “Arp Rec” connection. Press [UTILITY] [JOB] Select “01:QuickSetup” [ENTER] Set “Type” to “Arp Rec” [ENTER]. The following parameters are automatically set. This setting is used for recording your performance on the instrument, including Arpeggio data, to DAW software. Basic Structure Basic Structure Controller Block Tone Generator Block JOB*QuickSetup c******Type=*Arp*Rec Effect Block Arpeggio Block Song/Pattern Playing Block Internal Memory MIDI/Audio Signal Flow Arp Rec 4 DirectMonitor (Direct Monitor switch) on LocalCtrl on MIDI Sync auto Clock Out off MIDI OUT (Arpeggio MIDI output switch) on Set the instrument so that the Sequencer Control signals—Start, Stop, etc.—are not received from Cubase. Press [EXIT] twice Select “02:MIDI” Press [ENTER] “SeqCtrl” = “out” or “off”. 5 Connecting to a computer Creating a Song with a computer Using iOS Applications Store the settings, then return to the Performance top display. Press [STORE], then press [EXIT] to return to the top display after Store is completed. 6 Using a Connected Computer Reference Make sure that the Layer and Split functions are off. Performance If the lamps of the [LAYER] button and [SPLIT] button are lit, press the buttons to turn them off. Song/Pattern File Setting up Cubase 1 Utility Remote Start Cubase on your computer. Important Cubase cannot recognize the MX49/MX61 if you turn the power of the MX49/MX61 on after starting Cubase. Make sure to start Cubase after turning on the power of the MX49/MX61. 2 On Cubase, open a new project. Select the “Empty” project in the “More” area of the Project Assistant window, and then click [Create]. 3 Create a MIDI track. Click “Project” menu “Add Track” “MIDI” [Add Track]. 4 On the MIDI track, set the Input/Output Routing to disable the MIDI thru function. Set the Input Routing to “All MIDI Input” and set the Output Routing to “Not Connected.” All MIDI data will be input to Cubase, and MIDI track data will not be output to the MX49/MX61. Disable the MIDI thru function of the MIDI track in order to prevent the to-be-recorded Arpeggio phrase from being output to the MX49/MX61, which would otherwise result in a feedback loop between the instrument and the computer. Input Routing Output Routing MX49/MX61 Reference Manual 29 5 Set the MIDI clock so that it is transmitted from Cubase to the MX49/MX61. Click the “Transport” menu “Project Synchronization Setup” In “MIDI Clock Destinations” area, check “Yamaha MX49/MX61 – 1,” “MIDI Clock Follows Project Position,” and “Always Send Start Message” Click [OK]. NOTE The “Send MIDI Clock in Stop Mode” setting determines whether the Arpeggio is played back when recording or playing is stopped on Cubase (Stop mode). If you wish to playback the Arpeggio in the Stop mode, also check the “Send MIDI Clock in Stop Mode.” Basic Structure Basic Structure Controller Block Tone Generator Block Effect Block Arpeggio Block Song/Pattern Playing Block Internal Memory MIDI/Audio Signal Flow Using a Connected Computer 6 Record Arpeggio phrases of the MX49/MX61 to the selected MIDI track. Connecting to a computer After setting the time position to zero, click (Record), then play the keyboard of the MX49/MX61 to playback the Arpeggio. The Arpeggio phrases will be output as MIDI data, allowing you to record them to a MIDI track in Cubase. When you have finished the performance, click (Stop) to finish recording. Creating a Song with a computer Using iOS Applications Playing the recorded Arpeggio phrases 1 Press [ARP] on the MX49/MX61 so that the lamp turns off. The Arpeggio switch which functions for the entire Performance is set to off. 2 Performance On the MIDI track to which the Arpeggio phrases were recorded, set the MIDI thru function to active. Set the Output Routing to “Yamaha MX49/MX61-1.” The recorded MIDI data will be output to the MX49/MX61. 3 Reference MX49/MX61 Reference Manual File Utility Remote Check the recorded Arpeggio phrases. After setting the time position to zero, click Song/Pattern (Start). 30 Remote-controlling DAW software or VSTi (software instruments) from the MX49/MX61 Basic Structure Basic Structure Controller Block The MX49/MX61 features a highly convenient Remote mode which lets you control the DAW software and VSTi (software instrument) on your computer via the panel operations of the MX49/MX61. This function enables you to control the DAW software or VSTi efficiently from the instrument, and enables even greater ease in recording and creating a song. When [DAW REMOTE] is turned on, the MX49/MX61 enters the Remote mode, and the remote control functions are assigned to specific buttons on the panel. The names are printed on the panel in black on white background. For example, the [PLAY] (R/K) button, [STOP] (J) button, and AI KNOB ([DATA] dial) can be used as transport controls for Cubase. DAW programs that can be controlled from the MX49/MX61 are Cubase, Logic Pro, SONAR and Digital Performer. Port 2 is used mainly to transfer MIDI data for remote control between the MX49/MX61 and the DAW software. Computer MX49/MX61 instrument Effect Block Arpeggio Block Song/Pattern Playing Block Internal Memory MIDI/Audio Signal Flow Using a Connected Computer Connecting to a computer DAW software (Cubase, etc.) Note On/Off, Control Change Port 1 VSTi Tone Generator Block Creating a Song with a computer Remote Control MX49/MX61 Extension Port 2 VSTi parameters (names, values) MX49/MX61 Remote Editor Using iOS Applications Port 5 MX49/MX61 parameters Reference Performance Song/Pattern Before you can use the Remote Control function, you’ll need to follow the setup instructions below. NOTE Before making the setup of DAW Remote, make sure to properly install the Yamaha Steinberg USB Driver and the MX49/MX61 Remote Tools. File Utility Remote Setting up the MX49/MX61 1 Connect the instrument to the computer via a USB cable (page 19). 2 Press the [DAW REMOTE] button to enter the Remote mode. 3 Press [UTILITY] to call up the UTILITY Remote display, then set “DAW Select” to the desired DAW software. UTILITY*Remote*****2 aDAW*Select=**Cubase 4 Press [STORE] to store the settings to internal memory. 5 Press [EXIT] to exit from the Utility display. MX49/MX61 Reference Manual 31 Setting up the DAW software on the computer Start the DAW software on the connected computer. Then, follow the setup instructions below. NOTE When the cable connecting the MX49/MX61 to the computer is disconnected or the MX49/MX61 is turned off accidentally, the DAW will not recognize the MX49/MX61 again. If this occurs, exit the DAW software, then restart it after setting up the MX49/ MX61 and making sure the connection is secure. NOTE For details on DAW software versions that are compatible with the MX49/MX61, see the “Specifications” of the “Owner’s Manual” PDF document. NOTE Not all of the following functions may be available, depending on your particular software version or your computer environment. Basic Structure Basic Structure Controller Block Tone Generator Block Effect Block Arpeggio Block Song/Pattern Playing Block Cubase Internal Memory Install MX49/MX61 Remote Tools to complete the setup. MIDI/Audio Signal Flow SONAR 1 2 3 4 Pull down the [Edit] [Preferences] menu and select [Devices] of “MIDI.” Add “Yamaha MX49/MX61-2” to the Input Device, then add “Yamaha MX49/MX61-2” to the Output Device. Pull down the [Edit] [Preferences] menu and select [Control Surfaces]. Click the [+] button, select “Mackie Control,” then set the Input Port to “Yamaha MX49/MX61-2” and set the Output Port to “Yamaha MX49/MX61-2.” Using a Connected Computer Connecting to a computer Creating a Song with a computer Digital Performer 1 In the Audio/MIDI setup of a Mac computer, connect Port 2 of the interface of the MX49/MX61 to Port 2 of the tone generator. When there is only one Port for the tone generator, add the new Port, then connect it to the interface. 2 3 4 5 Pull down the [Setup] menu and select [Control Surface Setup] to call up the Control Surface window. Using iOS Applications Click the [+] button. Select “Mackie Control” in the Driver section. In the box for setting “Unit” and “MIDI,” select “Mackie Control” in the “Unit” section and select “MX49/MX61 New Port 2” in the “MIDI” section. Reference Performance Song/Pattern File Logic Pro Utility 1 2 3 4 Remote Select the [Preferences] menu [Control Surfaces Setup] to call up the Setup window. Select the [New] menu [Install]. Select “Mackie Control” in the model list, then add it as a control surface. Set the MIDI Output Port to “Yamaha MX49/MX61 Port2.” NOTE Mackie Control is the trademark of Mackie Designs, Inc. MX49/MX61 Reference Manual 32 Remote control of the VSTi Basic Structure This section explains how to set up the VSTi on Cubase to enable use of the Remote Control function. Basic Structure 1 Controller Block Use the Quick Setup function of the MX49/MX61 to specify the “DAW Rec” connection. Press [UTILITY] [JOB] Select “01:QuickSetup” [ENTER] Set “Type” to “DAW Rec” [ENTER]. Local Control (page 65) is set to off. Use this setting when you want to record your performance on this instrument (excepting Arpeggio data) to DAW software. 2 Set up the MX49/MX61 for remote control of Cubase by following the instructions in “Setting up the MX49/MX61” (page 31). Tone Generator Block Effect Block Arpeggio Block Song/Pattern Playing Block Internal Memory MIDI/Audio Signal Flow 3 Create a MIDI track. Click “Project” menu “Add Track” “MIDI” [Add Track]. 4 Press [ADD INST TRACK] ([SYN COMP]) on the MX49/MX61 to display the “Add Instrument Track” dialog in the Cubase project window. Using a Connected Computer Connecting to a computer Creating a Song with a computer 5 Select a VSTi by using the Cursor buttons of the MX49/MX61. Using iOS Applications Press the Cursor [V] button to display the VSTi list in the dialog, then select a VSTi by using the Cursor [V]/[>] buttons—for this example we’ll select “Synth” “HALion Sonic SE.” After selecting, press [ENTER]. Reference Performance Song/Pattern File Utility Remote 6 Press [ENTER] of the MX49/MX61 to close the “Add Instrument Track” dialog. The instrument track will be created in the Cubase project window, and the Control Template for “HALion Sonic SE” will be selected automatically on the MX49/MX61. HINT The MX49/MX61 features Control Templates for remote control of popular VSTi instruments. These Control Templates let you assign the appropriate functions for your favorite VSTi to Knobs [A] – [D] on the MX49/MX61. When using Cubase, switching the VSTi on the Cubase changes to the appropriate Control Template on the MX49/ MX61. When using other DAW software than Cubase, switching the VSTi on the DAW software does not affect the Control Template on the MX49/MX61. You should set the appropriate Control Template manually to match the VSTi on the DAW software. For settings of the Remote mode on the MX49/MX61, see page 70. MX49/MX61 Reference Manual 33 7 Press [VSTi WINDOW] ([CHROMATIC PERCUSSION]) to open the VSTi window of the selected Instrument track. Basic Structure Basic Structure Controller Block Tone Generator Block Effect Block Arpeggio Block Song/Pattern Playing Block Internal Memory MIDI/Audio Signal Flow Using a Connected Computer 8 9 Select a program of the VSTi by pressing [INC/YES]/[DEC/NO] of the MX49/MX61. Play the VSTi by using the MX49/MX61 keyboard, or control the parameters of the VSTi by using Knobs [A] – [D]. If you wish to edit the Control Templates, or create a new template, use the MX49/MX61 Remote Editor. For details about how to use the Remote Editor, refer to the accompanying PDF manual. Connecting to a computer Creating a Song with a computer Using iOS Applications Additional remote-control functions are available. For details, see the following “Remote Control Assignments” section. Reference Performance Song/Pattern File Utility Remote MX49/MX61 Reference Manual 34 Basic Structure Remote Control Assignments In the Remote mode, you can control various functions of the DAW software by using the MX49/MX61 controllers. NOTE Not all of the following functions may be available, depending on your particular software version or your computer environment. Basic Structure Controller Block Tone Generator Block Transport operation Effect Block The [PLAY] ([R/K]) button and [STOP] ([J]) button function as DAW transport controls. Arpeggio Block Song/Pattern Playing Block Internal Memory Program Change function MIDI/Audio Signal Flow The [INC/YES]/[DEC/NO] buttons function as program change controls in the selected track. If the selected track is an Instrument track in which the VSTi is set, a MIDI track, or an Audio track, these buttons switch the preset program for the track. When using Cubase, the function differs depending on the “PrgChgMode” (page 68) setting. “PrgChgMode” setting Using a Connected Computer Functions remote Pressing [INC/YES] selects the next program, while pressing the [DEC/NO] button selects the previous program. PC Program change messages are sent to the DAW software by using the [INC/YES]/[DEC/NO] buttons. However, programs of VST3 instruments cannot be changed by using the [INC/YES]/[DEC/NO] buttons. auto When the selected Track is a MIDI Track, and the output destination of the MIDI Track is not VSTi, the [INC/YES]/[DEC/NO] function is same as when “PrgChgMode” is set to “PC.” In other cases, the [INC/ YES]/[DEC/NO] function is the same as when “PrgChgMode” is set to “remote.” Connecting to a computer Creating a Song with a computer Using iOS Applications When using other DAW software than Cubase, the “PrgChgMode” is always set to “PC.” NOTE When multiple tracks are selected on the DAW software, the program change function works for only the top track. Reference Operating by the Category buttons Performance The functions of the DAW software can be operated by the Category buttons. Song/Pattern File Utility Remote [ORGAN] – [SAX/WOODWIND] buttons These buttons can be assigned freely to any desired functions. No function is assigned to these buttons by default. When you wish to assign the functions to these buttons in Cubase, click “Device” menu “Device Setup” “Yamaha MX49/MX61” in “Remote Devices” area Assign functions to the buttons in “User Commands” area. User Commands MX49/MX61 Reference Manual 35 [ADD INST TRACK]([SYN COMP]) button – [DELETE]([ETHNIC]) button When using Cubase, the following fixed functions are assigned to [ADD INST TRACK]([SYN COMP]) – [DELETE]([ETHNIC]). The appropriate function of Cubase is assigned to each button. NOTE Even if you are using DAW software other than Cubase, the functions are assigned automatically to the [ADD INST TRACK]([SYN COMP]) – [DELETE]([ETHNIC]) buttons. However, the actual functions on your DAW software may not be the same. Before using these Category buttons, you should assign the desired functions to these buttons on your particular software. Please note that these buttons do not work in Digital Performer. Basic Structure Basic Structure Controller Block Tone Generator Block Effect Block Arpeggio Block Buttons Functions [ADD INST TRACK] Opens/closes the [Add Instrument Track] dialog. [VSTi WINDOW] Opens/closes the VSTi display for the selected track. [EDIT CH SET] Opens/closes the settings window for the channel of the selected track. [AUTOMATION READ] Switches Automation Read for the selected track on or off. [AUTOMATION WRITE] Switches Automation Write for the selected track on or off. [DELETE] Deletes selected data in track Song/Pattern Playing Block Internal Memory MIDI/Audio Signal Flow When selecting multiple tracks, please keep in mind the following points: Using a Connected Computer Connecting to a computer Creating a Song with a computer • [VSTi WINDOW] function applies to the top track. • [EDIT CH SET] function applies only to the top track. • [AUTOMATION READ]/[AUTOMATION WRITE]/[DELETE] functions apply to all selected tacks. Using iOS Applications Operating the Knobs [A] – [D] Knobs [A] – [D] let you control the parameters of the selected track or the selected VSTi. The appropriate functions for the current VSTi are automatically assigned by the Control Template to the Knobs. Each Control Template features three sets of the Knob [A] – [D] functions. You can switch the set by pressing the [KNOB FUNCTION] button. Reference Performance Song/Pattern File Utility Remote Moving the cursor and other functions The Cursor [<]/[u]/[d]/[>] buttons let you move the cursor up/down/left/right on the DAW software. The [EXIT] button functions the same as the [Esc] key of the computer. The [ENTER] button functions the same as the [Enter] key of the computer. MX49/MX61 Reference Manual 36 Basic Structure AI KNOB functions The AI KNOB lets you control a desired parameter specified via the mouse pointer, or move the current time position in the project. Basic Structure Controller Block Tone Generator Block Effect Block Arpeggio Block Song/Pattern Playing Block 1 Internal Memory MIDI/Audio Signal Flow 2 Using a Connected Computer 3 1 AI KNOB Here, the [DATA] dial of the MX49/MX61 works as the AI KNOB. The AI KNOB is a multi-function knob—for example, it can control a desired parameter within the principal window and plug-in software on Cubase, and it can be used for Jog/ Shuttle operation (as in freely moving the time position). The assignable parameters to the AI KNOB change according to the on/off status of the [JOG] ([SYN LEAD]) button and the [LOCK] ([PAD/CHOIRS]) button. To control a parameter specified via the mouse pointer on Cubase, make sure that the [JOG] ([SYN LEAD]) button and [LOCK] ([PAD/CHOIRS]) button are turned off. Connecting to a computer Creating a Song with a computer Using iOS Applications ? Reference Performance Song/Pattern Adjusting the parameter at which the mouse pointer is located File Utility Remote 2 [JOG] button When this button is turned on, the AI KNOB will move the time position of the current project. Rotating the AI KNOB clockwise will move the time position forward while rotating the AI KNOB counter-clockwise will move the time position backward. When turning on the [LOCK] button as well as [JOG] button, the moving time position will not stop even if you release the AI KNOB. You can stop the time position at any time by rotating the AI KNOB backward or pressing the [STOP] button. Time position MX49/MX61 Reference Manual 37 Basic Structure 3 [LOCK] button You can “lock” the parameter to be edited via the AI KNOB by turning this button on. When you locate the mouse pointer to the desired parameter then turn the [LOCK] button on, the AI KNOB will control the “locked” parameter regardless of the mouse pointer’s position. By turning the [LOCK] button off, you can unlock the parameter to be edited and the AI KNOB can then be used to edit another parameter to which the mouse pointer is located. Turning [LOCK] on also lets you “lock” the Jog wheel so that the time position continues moving until you reverse direction or stop it (by pressing [STOP]). Basic Structure Controller Block Tone Generator Block Effect Block Arpeggio Block Song/Pattern Playing Block Internal Memory MIDI/Audio Signal Flow Locking the parameter to be edited Using a Connected Computer Connecting to a computer Creating a Song with a computer Using iOS Applications Editing the “locked” parameter regardless of the mouse pointer’s location Reference Performance Song/Pattern File Utility Remote MX49/MX61 Reference Manual 38 Basic Structure Using iOS Applications Basic Structure You can use various iOS applications with this instrument by connecting to an iPad, iPhone or iPod Touch device via the optional i-MX1 MIDI interface—giving you even greater enjoyment and musical versatility. For details how to connect this instrument to the iPad/iPhone/iPod Touch, refer to the i-MX1 Owner’s Manual. Also, for information on compatible applications and details on minimum requirements for the applications, refer to the following web site. http://www.yamaha.com/kbdapps/ Controller Block Tone Generator Block Effect Block Arpeggio Block Song/Pattern Playing Block Internal Memory iPhone i-MX1 MIDI OUT MIDI IN MIDI/Audio Signal Flow Using a Connected Computer Connecting to a computer MIDI IN MIDI OUT Creating a Song with a computer Using iOS Applications Reference NOTE When you use the instrument along with the application on your iPhone/iPad, we recommend that you set “Airplane Mode” to “ON” on your iPhone/iPad in order to avoid noise caused by communication. Performance NOTE iOS applications may not be supported in your area. Please check with your Yamaha dealer. Song/Pattern File Utility Remote MX49/MX61 Reference Manual 39 Performance Song/Pattern File Utility Remote Performance Reference Performance Play Performance Select Performance Part Select Performance Performance Edit A Performance is typically made up of multiple Voices, allowing you to sound them together in various ways. For example, you can play a richly textured sound on the keyboard by combining two Voices (of Parts 1 and 2), or play multiple Parts simultaneously by using an external sequencer or MIDI data. This section explains all the Performance parameters, divided into six categories (Performance Play, Performance Select, Performance Part Select, Performance Edit, Performance Job, and Performance Store). Common Edit Chorus Eff Reverb Eff Master EQ Arp Switch General Performance Play Name This corresponds to the top or main display of the instrument. In this display, you can select/play Part 1 or Part 2, play different Voices of Parts 1 and 2 together in a layer (Layer function), or play one Voice of Part 2 with your left hand while you play a different Voice of Part 1 with your right (Split function). Part Edit Play Mode Filter/EG Operation Call up Performance Play display by pressing [EXIT] repeatedly Select Part 1/2 with Cursor [u]/[d] buttons Select Voice with [DATA] dial. Arp Select Receive Switch Voice Edit 1 2 45 AP c001:CncrtGrand 2 n STR:081:AmbmPizza 2 n 3 Voice Insert Eff / DrumKit Insert Eff Voice LFO Voice Ctrl Set / DrumKit Ctrl Set Voice Name / DrumKit Name Voice Job Voice Store Performance Job Initialize Recall 1 Performance number The selected Performance number is always displayed in this three-digit display. When editing Performance parameters, a dot (.) is shown in the lower right of the screen. This provides a quick confirmation that the current Performance has been modified but not yet stored. When you want to store the current status, execute the Performance Store function (page 56). Copy Bulk Performance Store Supplementary Information 2 Voice of Part 1 3 Voice of Part 2 Indicates/determines the Voice assigned to Parts 1 and 2 of the selected Performance. The Voice category, Voice number, Voice name are displayed in order from left to right. User Voices are indicated by a “u” mark at the beginning of the Voice name. When a category contains User Voices, the User Voices are listed after the Preset Voices of the category. A cursor (>) is displayed between the Voice category and number of the selected Part. 4 2 (Edit) indicator When the Voice assigned to Part 1 or Part 2 has been modified, this indicator appears to the right of the Voice name. This gives a quick confirmation that the Voice has been modified but not yet stored. When you want to store the current status, execute the Voice Store function (page 53). 5 Keyboard icon When playing the keyboard, this icon appears to the right of the Part that is currently sounding. When the Layer function is active, this icon appears to the right of both Parts, since both Parts will sound. When the Split function is active, the icon appears at Part 1 when you play the right side of the keyboard (right of the Split Point; page 45), and appears at Part 2 when you play the left side. MX49/MX61 Reference Manual 40 Performance Song/Pattern File Utility Remote Performance Performance Select Selects a Performance from the multiple Performances available on the instrument. Performance Play Performance Select Operation Press PERFORMANCE [SELECT] button Select Performance with [DATA] dial Performance Part Select Performance Edit PerformanceaSelect c001(A01):MXCategory Common Edit Chorus Eff Reverb Eff Master EQ 1 2 3 Arp Switch General 1 Performance number Indicates the number of the selected Performance. You can switch the Performance number by using the [DATA] dial or the [INC/YES]/[DEC/NO] buttons. Name Part Edit Play Mode 2 Performance group Filter/EG Indicates the group (A – H) of the selected Performance. You can switch the Performance group by holding down the [SHIFT] button and using the [DATA] dial or the [INC/YES]/[DEC/NO] buttons. Arp Select Receive Switch 3 Performance name Voice Edit Indicates the name of the selected Performance. Voice Insert Eff / DrumKit Insert Eff Voice LFO Performance Part Select In this display, you can select one Part from Parts 1 – 16 and play it. Also, you can change the Voice assigned to each Part, and certain Part parameters, including Volume and Pan. There are several pages in this display, which can be called up by using the Cursor [u]/[d] buttons. NOTE Parameters that can be edited in the Part Select display are same as the parameters of the Part Edit display. Voice Ctrl Set / DrumKit Ctrl Set Voice Name / DrumKit Name Voice Job Voice Store Operation Press [PART SELECT] Select Part with Cursor [<]/[>] buttons Edit the parameters Performance Job Initialize Recall First page Copy 1 Bulk APA:A001:CncrtGrand a000123456789 tyuiop@ 3 2 Performance Store Supplementary Information 3 1 Voice Indicates the category, number, and name of the Voice which is assigned to the selected Part. Using the [DATA] dial or the [INC/YES]/[DEC/NO] buttons lets you switch the Voice category in the first page. You can also switch the Voice number after moving the cursor of the display by pressing the Cursor [d] button one time. 2 Page indicator Indicates that the display has several pages. You can call up the next page by pressing the Cursor [d] button. 3 Parts 1 – 16 Select a Part by pressing the Cursor [<]/[>] buttons or the Category buttons ([1] – [16]). The underline mark indicates the selected Part number. MX49/MX61 Reference Manual 41 Performance Song/Pattern File Utility Performance Second and subsequent pages 1 2 Performance Play Part01*******Pan=C dqqqfghjkl;jjjjjjjjj 3 3 Remote 4 (Second page) Performance Select Performance Part Select Performance Edit Common Edit Chorus Eff Reverb Eff 1 Part number Master EQ Indicates the selected Part number. Arp Switch General 2 Part parameter Indicates the parameter name to be edited, and the parameter value for the selected Part. A single parameter is indicated in each page. You can change the value of the selected Part by using the [DATA] dial or the [INC/YES]/[DEC/ NO] buttons. Name Part Edit Play Mode Filter/EG Parameter Pan Description Determines the stereo pan position for each Part. Settings: L63 (far left) – C (center) – R63 (far right) Volume ChoSend (Chorus Send) RevSend (Reverb Send) Determines the volume for each part, allowing you to set the optimum level balance of all the Parts. InsSw (Insertion Effect Switch) Voice Insert Eff / DrumKit Insert Eff Voice LFO Determines the Send level of the signal sent to the Chorus effect, allowing you to set the desired amount of Chorus for each Part. Voice Ctrl Set / DrumKit Ctrl Set Settings: 0 – 127 Voice Name / DrumKit Name Determines the Send level of the signal sent to the Reverb effect, allowing you to set the desired amount of Reverb for each Part. Determines the level of the dry sound, the sound not processed with the System Effect (Chorus, Reverb)— letting you control the overall effect balance among the Parts. Voice Job Voice Store Performance Job Initialize Settings: 0 – 127 Recall Determines the Parts available for the Insertion Effect. When this switch is set to on, the Insertion Effect of the Voice assigned to the Part is enabled. The Insertion Effect can be applied to a maximum of four Parts of the Performance. Copy Settings: off, on ArpSw (Arpeggio Switch) Receive Switch Voice Edit Settings: 0 – 127 Settings: 0 – 127 DryLevel Arp Select Determines the Parts available for the Arpeggio function. Arpeggio can be applied to a maximum of two Parts of the Performance. Bulk Performance Store Supplementary Information Settings: off, on 3 Page indicator Indicates that the display has several pages. You can call up the previous/next page by using the Cursor [u]/[d] buttons. 4 Parameter values for Parts 1 – 16 For most parameters, the selected parameter value is also indicated as a graphic knob indicating the value (2) for each Part. You can change the value for the selected Part by using the [DATA] dial or the [INC/YES]/[DEC/NO] buttons. To change the Part, use the Cursor [<]/[>] buttons. MX49/MX61 Reference Manual 42 Performance Song/Pattern File Utility Remote Performance Performance Edit There are two types of Performance Edit displays: Common Edit, for editing settings common to all Parts, and Part Edit, for editing individual Parts. You can also edit the parameters of the Voice assigned to the Part (Voice Edit) in Part Edit. Performance Play Performance Select Performance Part Select Common Edit Performance Edit Common Edit Operation Press [Edit] Select “01:Common” with Cursor [u] button Press [ENTER] Select desired Chorus Eff display with Cursor [u]/[d] buttons Press [ENTER] Edit parameters in selected display Reverb Eff Master EQ 1 2 Arp Switch Common0General aKeyboardMode=single 3 4 General Name Part Edit Play Mode Filter/EG Arp Select 1 Common Receive Switch Indicates the current display is Common Edit. Voice Edit Voice Insert Eff / DrumKit Insert Eff 2 Display to be edited Indicates the display name selected for editing in Common Edit. Voice LFO 3 Page indicator Indicates that the display has several pages. You can call up the previous/next page by using the Cursor [u]/[d] buttons. 4 Parameter Voice Ctrl Set / DrumKit Ctrl Set Voice Name / DrumKit Name Voice Job Indicates and allows editing of the selected parameter. A single parameter is indicated in each page. You can change the value of the parameter by using the [DATA] dial or the [INC/YES]/[DEC/NO] buttons. Voice Store Performance Job Initialize Recall Chorus Eff (Chorus Effect) Parameter Copy Description Chorus category Determines the Chorus Effect category and type. Chorus type Settings: For details on the editable Effect categories and types, see the “Data List” PDF document. Also, for details on the description for each Effect type, see the “Synthesizer Parameter Manual” PDF document. Preset (Effect Preset) Allows you to call up pre-programmed settings for each Effect type, designed to be used for specific applications and situations. You can change how the sound is affected by the selected pre-programmed settings. Bulk Performance Store Supplementary Information NOTE For a list of all Effect Presets, see the “Data List” PDF document. Effect parameter The Effect parameter differs depending on the currently selected Effect type. For information on the editable Effect parameters in each Effect type, see the “Data List” PDF document. Also, for detailed descriptions of the each Effect parameter, see the “Synthesizer Parameter Manual” PDF document. Reverb Eff (Reverb Effect) Parameter Description Reverb category Determines the Reverb Effect category and type. Reverb type Settings: For details on the editable Effect categories and types, see the “Data List” PDF document. Also, for detailed descriptions of each Effect type, see the “Synthesizer Parameter Manual” PDF document. Preset (Effect Preset) Allows you to call up pre-programmed settings for each Effect type, designed to be used for specific applications and situations. You can change how the sound is affected by the selected pre-programmed settings. NOTE For a list of all Effect Presets, see the “Data List” PDF document. MX49/MX61 Reference Manual 43 Performance Song/Pattern File Parameter Effect parameter Utility Remote Performance Description The Effect parameter differs depending on the currently selected Effect type. For information on the editable Effect parameters in each Effect type, see the “Data List” PDF document. Also, for detailed descriptions of the each Effect parameter, see the “Synthesizer Parameter Manual” PDF document. Performance Play Performance Select Performance Part Select Performance Edit Common Edit Master EQ Chorus Eff From this display you can apply five-band equalization (LOW, LOW MID, MID, HIGH MID, HIGH) to all Parts of the selected Performance, or to all Voices. Reverb Eff Master EQ Arp Switch Gain Q (frequency bandwidth) General + Name Part Edit 0 Play Mode Frequency Filter/EG Arp Select – Receive Switch Low 5 bands Lo-Mid Mid Parameter Shape Hi-Mid High Voice Edit Voice Insert Eff / DrumKit Insert Eff Description Determines whether the equalizer type used is Shelving or Peaking. The Peaking type attenuates/boosts the signal at the specified Frequency setting, whereas the Shelving type attenuates/boosts the signal at frequencies above or below the specified Frequency setting. This parameter is available only for the LOW and HIGH frequency bands. shelv + Voice Job EQ High Gain Frequency Voice Ctrl Set / DrumKit Ctrl Set Voice Name / DrumKit Name Settings: shelv (Shelving type), peak (Peaking type) EQ Low Voice LFO + Voice Store Gain Frequency Performance Job Initialize 0 0 – – Recall Copy Frequency Frequency Bulk Performance Store peak + Gain Frequency Supplementary Information 0 Frequency – Freq (Frequency) Determines the center frequency. Frequencies around this point are attenuated/boosted by the Gain setting. Settings: LOW: Shelving 32Hz – 2.0kHz, Peaking 63Hz – 2.0kHz LOW MID, MID, HIGH MID: 100Hz – 10.0kHz HIGH: 500Hz – 16.0kHz Gain Determines the level gain for Frequency (above), or the amount the selected frequency band is attenuated or boosted. Settings: -12dB – +0dB – +12dB Q (Frequency Characteristics) Determines the bandwidth for the Frequency (above) to create various frequency curve characteristics. Larger values result in a narrower bandwidth. Settings: 0.1 – 12.0 NOTE For details on EQ structure, see the “Synthesizer Parameter Manual” PDF document. MX49/MX61 Reference Manual 44 Performance Song/Pattern File Utility Remote Performance Arp Switch (Arpeggio Switch) Performance Play Parameter Description Performance Select Performance Part Select Switch (Arpeggio Common Switch) Determines whether Arpeggio is on or off for all Parts. This setting is the same as the [ARP] button on the panel. Tempo Determines the tempo for the Arpeggio. Chorus Eff Settings: 5 – 300 Reverb Eff NOTE If you are using this instrument with an external sequencer, DAW software, or MIDI device, and you want to synchronize it with that device, set the “MIDI Sync” parameter in the MIDI display of Utility (page 66) to “external” or “auto.” When “MIDI Sync” is set to “auto” (only when MIDI clock is transmitted continuously) or “external,” the Tempo parameter here indicates “EXT” and cannot be changed. Master EQ Settings: off, on Common Edit NOTE The tempo also can be set in the Tempo display by pressing the [TEMPO] button. It can also set by “playing” or tapping the [TEMPO] button several times repeatedly at the desired tempo. This function is referred to as “Tap Tempo.” SyncQtzValue (Arpeggio Sync Quantize Value) Performance Edit Determines the actual timing at which the next Arpeggio playback starts when you trigger it, while an Arpeggio of a certain Part is playing back. This allows a more musical transition between successively played Arpeggios. When set to “off,” the next Arpeggio starts as soon as you trigger it. The number shown at right of each value indicates quarter-note resolution in clocks. Settings: off, 60 (32nd note), 80 (16th note triplet), 120 (16th note), 160 (8th note triplet), 240 (8th note), 320 (1/ 4 note triplet), 480 (1/4 note) Arp Switch General Name Part Edit Play Mode Filter/EG Arp Select Receive Switch Voice Edit Voice Insert Eff / DrumKit Insert Eff Voice LFO Voice Ctrl Set / DrumKit Ctrl Set General Voice Name / DrumKit Name The parameters of this display are applied to both Parts 1 and 2. Voice Job Parameter KeyboardMode Description Sets keyboard splits and layers for Parts 1 and 2. Settings: single, layer, split single ....Only the selected Part will be sounded. layer ......Both Parts 1 and 2 will be sounded together. They extend over the full length of the keyboard. split .......Part 1 is used for all keys higher than the “SplitPoint” setting; Part 2 is used for all keys below the “SplitPoint” setting. SplitPoint Determines the point (or key) at which the keyboard is split between the left and right parts. Settings: C -2 – G8 Voice Store Performance Job Initialize Recall Copy Bulk Performance Store Supplementary Information NOTE When “KeyboardMode” is set to “Split,” the value also can be determined by holding down the [SPLIT] button and pressing the desired key. Cutoff Determines the cutoff frequency for the Filter. This is applied to both filters assigned to Parts 1 and 2. Settings: -64 - +0 – +63 Resonance Determines the harmonic emphasis given to the Cutoff Frequency. This is applied to both filters assigned to Parts 1 and 2. Settings: -64 - +0 – +63 ChoSend (Chorus Send) Determines the Send level of the signal sent to the Chorus effect. This is applied to both Parts 1 and 2. RevSend (Reverb Send) Determines the Send level of the signal sent to the Reverb effect. This is applied to both Parts 1 and 2. Attack (Attack time) Determines how quickly the sound reaches its maximum level after a key is pressed. This is applied to both Parts 1 and 2. Settings: 0 – 127 Settings: 0 – 127 Settings: -64 - +0 – +63 Decay (Decay time) Determines how fast the volume falls from maximum attack level to the sustain level. This is applied to both Parts 1 and 2. Settings: -64 - +0 – +63 Sustain (Sustain Level) Determines the sustain level at which the volume will continue while a note is held, after the initial attack and decay. This is applied to both Parts 1 and 2. Settings: -64 - +0 – +63 MX49/MX61 Reference Manual 45 Performance Song/Pattern Parameter File Utility Description Release (Release time) Determines how quickly the sound decays to silence after the key is released. Volume Determines the output level of both Parts 1 and 2. Settings: -64 - +0 – +63 Remote Performance Performance Play Performance Select Performance Part Select Settings: 0 – 127 Performance Edit Common Edit Pan Determines the stereo pan position of both Parts 1 and 2. Settings: L63 (far left) – C (center) – R63 (far right) Assign1 Assign2 Determines the offset value by which the functions assigned to the Assign 1/2 will be shifted from their original settings. Settings: -64 - +0 – +63 NOTE The functions assigned to the ASSIGN 1/2 Knobs can be set in the Ctrl Set display (page 52) of Voice Edit. Chorus Eff Reverb Eff Master EQ Arp Switch General Name Part Edit Play Mode Name (Performance Name) Determines the name for the selected Performance. Move the cursor to the desired location by using the Cursor [<]/[>] buttons, and select the character by using the [DATA] dial. A name can contain up to 10 alphabetic and numeric characters. Filter/EG Arp Select Receive Switch Voice Edit Voice Insert Eff / DrumKit Insert Eff Voice LFO Voice Ctrl Set / DrumKit Ctrl Set Voice Name / DrumKit Name Voice Job Voice Store Performance Job Initialize Recall Copy Bulk Performance Store Supplementary Information MX49/MX61 Reference Manual 46 Performance Song/Pattern File Utility Performance Part Edit NOTE Remote Parameters that can be edited in the Part Select display are same as the parameters of the Part Edit display. Performance Play Performance Select Operation Press [EDIT] Select “02:Part” with Cursor [d] button Press [ENTER] Select Part with Performance Part Select Category buttons ([1] – [16]) Select display to be edited with Cursor [u]/[d] buttons Press [ENTER] Edit parameters in selected display Performance Edit Common Edit Chorus Eff 1 2 Reverb Eff Part01*Play*Mode a*********Volume=127 4 3 Master EQ Arp Switch General Name Part Edit Play Mode 1 Part** Filter/EG Indicates the current display is Part Edit. In the ** column, the number of the selected Part is indicated. You can change the Part in this display by using the Category buttons ([1] – [16]). Arp Select Receive Switch 2 Display to be edited Voice Edit Indicates the display name selected for editing in Part Edit. Voice Insert Eff / DrumKit Insert Eff 3 Page indicator Voice LFO Indicates that the display has several pages. You can call up the previous/next page by using the Cursor [u]/[d] buttons. Voice Ctrl Set / DrumKit Ctrl Set 4 Parameter Voice Name / DrumKit Name Indicates and allows editing of the selected parameter. A single parameter is indicated in each page. You can change the value of the parameter by using the [DATA] dial or the [INC/YES]/[DEC/NO] buttons. Voice Job Voice Store Performance Job Initialize Play Mode Recall Parameter Volume Pan Description Determines the output level of each Part. Bulk Settings: 0 – 127 Performance Store Determines the stereo pan position of each Part. Supplementary Information Settings: L63 (far left) – C (center) – R63 (far right) NoteShift Copy Determines the pitch (key transpose) setting for each Part in semitones. Settings: -24 – +0 – +24 Detune Determines the fine tuning for each Part. Settings: -12.8Hz – +0.0Hz – +12.7Hz ChoSend (Chorus Send) Determines the Send level of each Part signal sent to the Chorus effect. The higher the value, the more pronounced the Chorus effect. Settings: 0 – 127 RevSend (Reverb Send) Determines the Send level of each Part signal sent to the Reverb effect. The higher the value, the more pronounced the Reverb effect. Settings: 0 – 127 DryLevel Determines the level of the selected Part which has not been processed with the System Effect (Chorus, Reverb). Settings: 0 – 127 InsSw (Insertion Effect Switch) Determines the Parts available for the Insertion Effect. When this switch is set to on, the Insertion Effect of the Voice assigned to the Part is enabled. The Insertion Effect can be applied to a maximum of four Parts of the Performance. Settings: off, on MX49/MX61 Reference Manual 47 Performance Song/Pattern Parameter Mono/Poly File Utility Description Selects monophonic or polyphonic playback for each Part. Monophonic is for playing single notes only, while polyphonic is for playing multiple simultaneous notes. Remote Performance Performance Play Performance Select Settings: mono, poly Performance Part Select NOTE This parameter is not available for the Parts to which Drum Voices have been assigned. Performance Edit Common Edit PortaSw (Portamento Switch) Determines whether Portamento is applied to each Part or not. Chorus Eff Settings: off, on Reverb Eff PortaTime (Portamento Time) Determines the pitch transition time. Higher values result in a longer pitch change time, or a slow speed. Master EQ Settings: 0 – 127 Arp Switch PB Upper (Pitch Bend Range Upper) Determines the maximum pitch bend range for each Part in semitones. General Name Settings: -48 – +0 – +12 (semitone) PB Lower (Pitch Bend Range Lower) Part Edit Play Mode Assign1 (Assign 1 Value) Assign2 (Assign 2 Value) Determines the value of the functions assigned to the ASSIGN 1/2 knobs. Settings: -64 – +0 – +63 Filter/EG Arp Select NOTE The functions assigned to the ASSIGN 1/2 Knobs can be set in the Ctrl Set display (page 52) of Voice Edit. Receive Switch Voice Edit Voice Insert Eff / DrumKit Insert Eff Voice LFO Filter/ EG Parameter Cutoff Resonance Description Determines the cutoff frequency of the filter for each Part. Voice Name / DrumKit Name Settings: -64 – +0 – +63 Voice Job Determines the amount of filter resonance. Settings: -64 – +0 – +63 FEG Attack (FEG Attack Time) Voice Ctrl Set / DrumKit Ctrl Set Voice Store Performance Job Initialize FEG Decay (FEG Decay Time) This allows you to make all time and level settings for the Filter EG, which determine how the tonal quality of the sound changes over time. These parameters can be used to control the change in cutoff frequency from the moment a note is pressed on the keyboard to the moment the sound stops. Keep in mind that changes in the tonal quality also depend on the Resonance setting above. FEG Sustain (FEG Sustain Level) NOTE For details on FEG, see the “Synthesizer Parameter Manual” PDF document. Performance Store FEG Release (FEG Release Time) NOTE This parameter is not available for Parts to which Drum Voices have been assigned. Supplementary Information FEG Depth Settings: -64 – +0 – +63 AEG Attack (AEG Attack Time) This allows you to make all time and level settings for the Amplitude EG, which determine how the volume of the sound changes over time. Using the AEG, you can control the transition in volume from the moment the sound starts is to the moment the sound stops. AEG Decay (AEG Decay Time) AEG Sustain (AEG Sustain Level) AEG Release (AEG Release Time) Recall Copy Bulk NOTE For details on FEG, see the “Synthesizer Parameter Manual” PDF document. NOTE The “Sustain” and “Release” parameters are not available for Parts to which Drum Voices have been assigned. Settings: -64 – +0 – +63 MX49/MX61 Reference Manual 48 Performance Song/Pattern File Utility Remote Performance Arp Select (Arpeggio Select) Performance Play Parameter Switch (Arpeggio Switch) Description Determines whether Arpeggio is on or off for the selected Parts. The Arpeggio can be applied to a maximum of two Parts of the Performance. Settings: off, on Hold (Arpeggio Hold) Performance Select Performance Part Select Performance Edit Common Edit Determines whether the Arpeggio continues cycling after the keys are released. For details, see the “Synthesizer Parameter Manual” PDF document. Settings: sync-off, off, on Chorus Eff Reverb Eff Master EQ Category (Arpeggio Category) Determines the desired Arpeggio category. Type (Arpeggio Type) Determines the desired Arpeggio type by specifying the number. MIDI Out (Arpeggio MIDI Output Switch) Determines whether Arpeggio playback data is output via MIDI. Play Mode Settings: off, on Filter/EG Arp Switch Settings: Refer to “Arpeggio categories” (page 13) in “Basic Structure.” Settings: Refer to the “Data List” PDF document. General Name Part Edit Arp Select Receive Switch Voice Edit Receive Switch From this display you can set how each individual Part responds to various MIDI data, such as Control Change and Program Change messages. When the relevant parameter is set to “on,” the corresponding Part responds to the appropriate MIDI data. The setting value for all parameters is “off” or “on.” Parameter Description BankSel (Bank Select) Determines whether Bank Select MSB/LSB messages for the Voice assigned to each Part are received or not. PrgChange (Program Change) Determines whether Program Change messages for the Voice assigned to each Part are received or not. CtrlChange (Control Change) Determines whether Control Change messages are received or not. Voice Insert Eff / DrumKit Insert Eff Voice LFO Voice Ctrl Set / DrumKit Ctrl Set Voice Name / DrumKit Name Voice Job Voice Store Performance Job NOTE When this parameter is set to off, the parameters related to the Control Change will not be able to be edited. Vol/Exp (Volume/Expression) Determines whether Control Number 7 (Volume)/Control Number 11 (Expression) messages are received or not. Pan Determines whether Control Number 10 (Pan) messages are received or not. Sustain Determines whether Control Number 64 (Sustain) messages are received or not. This parameter is not available for the Parts to which Drum Voices have been assigned. PB (Pitch Bend) Determines whether MIDI messages generated by using the Pitch Bend Wheel are received or not. MW (Modulation Wheel) Determines whether MIDI messages generated by using the Modulation Wheel are received or not. AS1 (Assign 1) Determines whether MIDI messages generated by using the ASSIGN 1/ASSIGN 2 (Knob 3/Knob4) are received or not. Initialize Recall Copy Bulk Performance Store Supplementary Information AS2 (Assign 2) FS (Foot Switch) Determines whether MIDI messages generated by using the optional foot switch connected to the [SUSTAIN] jack on the rear panel are received or not. FC1 (Foot Controller 1) Determines whether MIDI messages generated by using the optional foot controller connected to the [FOOT CONTROLLER] jack on the rear panel are received or not. FC2 (Foot Controller 2) Determines whether MIDI messages for Foot Controller 2 are received or not. BC (Breath Controller) Determines whether MIDI Breath Controller messages are received or not. RB (Ribbon Controller) Determines whether MIDI Ribbon Controller messages are received or not. MX49/MX61 Reference Manual 49 Performance Song/Pattern Parameter File Utility Description A. Func1 (Assignable Function 1) Determines whether MIDI messages for the ASSIGNABLE FUNCTION 1 and 2 buttons are received or not. A. Func2 (Assignable Function 2) ChAT (Channel After Touch) Remote Performance Performance Play Performance Select Performance Part Select Performance Edit Determines whether MIDI Channel After Touch messages are received or not. Common Edit Chorus Eff Reverb Eff Master EQ Arp Switch Voice Edit General These parameters are for editing the Voice assigned to the selected Part. Press [EDIT] Select “02:Part” with Cursor [d] button Press [ENTER] Select Part with Operation Category buttons ([1] – [16]) Select desired display for editing from 05 – 08 with Cursor [u]/[d] buttons Press [ENTER] Edit parameters in selected display. Name Part Edit Play Mode Filter/EG Arp Select Receive Switch Voice Edit Voice Insert Eff (Voice Insertion Effect)/ DrumKit Insert Eff (Drum Voice Insertion Effect) Parameter Voice Insert Eff / DrumKit Insert Eff Description Voice LFO Effect category Determines the Insertion Effect category and type. Voice Ctrl Set / DrumKit Ctrl Set Effect type Settings: For details on the editable Effect categories and types, see the “Data List” PDF document. Also, for detailed descriptions of each Effect type, see the “Synthesizer Parameter Manual” PDF document. Voice Name / DrumKit Name Preset (Effect Preset) Allows you to call up pre-programmed settings for each Effect type, designed to be used for specific applications and situations. You can change how the sound is affected by the selected pre-programmed settings. NOTE For a list of all Presets, see the “Data List” PDF document. Effect parameter The Effect parameter differs depending on the currently selected effect type. For information on the editable Effect parameters in each Effect type, see the “Data List” PDF document. Also, for detailed descriptions of each Effect parameter, see the “Synthesizer Parameter Manual” PDF document. Voice Job Voice Store Performance Job Initialize Recall Copy Bulk Performance Store Supplementary Information MX49/MX61 Reference Manual 50 Performance Song/Pattern File Utility Remote Performance Voice LFO Performance Play This display appears only when a Normal Voice is assigned to the selected Part. Parameter Wave (LFO Wave) Description Selects the LFO waveform. Settings: tri (triangle), tri+ (triangle+), sawup, sawdwn, squ1/4 (square1/4), squ1/3 (square1/3), squ (square), squ2/3 (square2/3), squ3/4 (square3/4), trpzd (trapezoid), S/H 1 (sample & hold 1), S/H 2 (sample & hold 2), user NOTE The “user” wave is a special waveform which is assigned to some Preset Voices. You can create an original LFO wave by receiving MIDI messages from an external device. For details, see “MIDI Data Table” in the “Data List” PDF document. Speed Adjusts the speed (frequency) of LFO variation. Settings: 0 – 63 TempoSync Determines whether or not the LFO is synchronized to the tempo of the Arpeggio or sequencer (Song or Pattern). Settings: off (not synchronized), on (synchronized) TempoSpeed This parameter is available only when “TempoSync” above has been set to “on.” It allows you to make detailed note value settings that determine how the LFO pulses in sync with the Arpeggio. Settings: 16th, 8th/3 (eighth-note triplets), 16th. (dotted sixteenth notes), 8th, 4th/3 (quarter-note triplets), 8th. (dotted eighth notes), 4th (quarter notes), 2nd/3 (half-note triplets), 4th. (dotted quarter notes), 2nd (half notes), whole/3 (whole-note triplets), 2nd. (dotted half notes), 4th x 4 (quarter-note quadruplets; four quarter notes to the beat), 4th x 5 (quarter-note quintuplets; five quarter notes to the beat), 4th x 6 (quarter-note sextuplets; six quarter notes to the beat), 4th x 7 (quarter-note septuplets; seven quarter notes to the beat), 4th x 8 (quarter-note octuplets; eight quarter notes to the beat), 4th x 16 (sixteen quarter-notes to the beat), 4th x 32 (32 quarter notes to the beat), 4th x 64 (64 quarter notes to the beat) NOTE The actual length of the note depends on the internal or external MIDI tempo setting. PlayMode Determines whether the LFO cycles repeatedly (loop) or only once (one shot). Settings: loop, one shot Performance Select Performance Part Select Performance Edit Common Edit Chorus Eff Reverb Eff Master EQ Arp Switch General Name Part Edit Play Mode Filter/EG Arp Select Receive Switch Voice Edit Voice Insert Eff / DrumKit Insert Eff Voice LFO Voice Ctrl Set / DrumKit Ctrl Set Voice Name / DrumKit Name Voice Job Voice Store Performance Job KeyOnRest (Key On Reset) Determines whether or not the LFO is reset each time a note is pressed. Initialize Settings: off, each-on, 1st-on Recall RandomSpeed This parameter is available only when “TempoSync” above has been set to “off.” Determines the degree to which the LFO speed changes at random. Copy Settings: 0 – 127 Delay Determines the delay time between the moment you press a key on the keyboard and the moment the LFO comes into effect. Bulk Performance Store Supplementary Information Settings: 0 – 127 Fade In (Fade In Time) Determines the amount of time for the LFO effect to fade in (after the “Delay” time has elapsed). Hold (Hold Time) Determines the length of time during which the LFO is held at its maximum level. FadeOut (Fade Out Time) Determines the time over which the LFO effect is faded out (after the “Hold” time has elapsed). Dest1/2/3 (LFO Set 1/2/3 Control Destination) Determines the functions which will be controlled by the LFO Wave. Settings: 0 – 127 Settings: 0 – 126, hold Settings: 0 – 127 Settings: See the “Control List” in the “Data List” PDF document. NOTE Regarding “Insertion Effect Parameter 1 - 16” described in the Control List, the actual parameter names of the selected Effect type are shown on the display. If “P*” is shown on the display, no function is assigned to that parameter. The “*” mark indicates the parameter number. Depth1/2/3 (LFO Set 1/2/3 Control Depth) Set the LFO Wave Depth. Settings: 0 – 127 MX49/MX61 Reference Manual 51 Performance Song/Pattern File Utility Remote Performance Voice Ctrl Set (Voice Controller Set)/ DrumKit Ctrl Set (Drum Voice Controller Set) Performance Play Performance Select Up to six Controller Sets can be assigned to each Voice. Select a Set from Sets 1 – 6 by using the Cursor [u]/[d] buttons, then press [ENTER]. The Controller Set display is called up. Parameter Source Description Determines which controller is to be assigned and used for the selected Controller Set. Settings: PB (Pitch Bend wheel), MW (Modulation wheel), AS1 (ASSIGN 1), AS2 (ASSIGN 2), FS (Footswitch), FC1 (Foot controller 1), FC2 (Foot Controller 2), BC (Breath controller), RB (Ribbon Controller), AF1 (ASSIGNABLE FUNCTION [1]), AF2 (ASSIGNABLE FUNCTION [2]), AT (Aftertouch) NOTE When the foot switch is set to a Control Change number of 96 or higher in the Controller display of the Utility, the footswitch will not be available as a “Source” of the Controller Set for the selected Voice. Performance Part Select Performance Edit Common Edit Chorus Eff Reverb Eff Master EQ Arp Switch General Name Dest (Destination) Determines the function that is controlled by the controller set in “Source.” Settings: See the “Control List” in the “Data List” PDF document. Play Mode Depth Determines the degree to which the Source controller affects the Destination. Filter/EG Settings: -64 – +0 – +63 Arp Select Part Edit Receive Switch Voice Edit Voice Insert Eff / DrumKit Insert Eff Setting examples of the Destination Here are some specific useful examples on how to set the “Dest” (Destination) assignments. Voice LFO To control the volume: Volume Voice Ctrl Set / DrumKit Ctrl Set To change the speed of the Rotary Speaker: Insertion Effect Parameter 1 (INSA:EfSpCtl) *1 Voice Name / DrumKit Name To apply a wah pedal effect to the Voice: Insertion Effect Parameter 1 (INSA:EfPdCtl ) *2 Voice Job Voice Store Concerning *1 and *2 respectively, the following settings are necessary in addition to the above settings. *1 Also set Effect type = “Rotary Sp” in the Voice Insert Eff/ DrumKit Insert Eff display of Voice Edit *2 Also set Effect type = “VCM Pedal Wah” in the Voice Insert Eff/ DrumKit Insert Eff display of Voice Edit Performance Job Initialize Recall Copy Bulk Voice Name /DrumKit Name Performance Store Determines the Voice name for the User Voice. Parameter Supplementary Information Description Voice name Determines the Voice name which is assigned to the selected Part. Move the cursor to the desired location by using the Cursor [<]/[>] buttons, and select the character by using the [DATA] dial. The names can contain up to 10 alphabetic and numeric characters. Category (Voice category) Determines the category to which the Voice will be registered. The categories are keywords representing the general characteristics of the Voices. Selecting the appropriate category makes it easy to find the desired Voice from the huge variety of Voices available. Settings: For Normal Voice: AP, KB, ORG, GTR, BAS, STR, BRS, WND, LD, PAD, CMP, CP, SFX, MFX, ETH For Drum Voice: DR NOTE For details about each category, refer to “Voice Category” of “Basic Structure” (page 7). MX49/MX61 Reference Manual 52 Performance Song/Pattern File Utility Remote Performance Voice Job This display is called up by pressing [JOB] in the Voice Edit displays. The Voice Edit displays are: “Voice (DrumKit) Insert Eff,” “Voice LFO,” “Voice (DrumKit) Ctrl Set,” and “Voice (DrumKit) Name.” Performance Play Performance Select Performance Part Select Parameter Recall Bulk Description If you select a different Voice or Performance without storing your edited Voice as a User Voice, all the edits you’ve made will be erased. If this happens, you can use Recall to restore the Voice with your latest edits intact. Select “01:Recall” and press [ENTER]. When the subsequent confirmation display appears, press [INC/YES] to execute the Recall operation. Allows you to send all your edited parameter settings for the currently selected Voice to a computer or another MIDI instrument for data archiving. Select “02:Bulk” and press [ENTER]. When the subsequent confirmation display appears, press [INC/YES] to execute the Bulk Dump operation. NOTE In order to execute Bulk Dump, you will need to set the correct MIDI Device Number, with the following operation: [UTILITY] Select “02:MIDI” with Cursor [u]/[d] buttons [ENTER] Select “DeviceNo” with Cursor [u]/[d] buttons Select/set “DeviceNo” value with [DATA] dial. Performance Edit Common Edit Chorus Eff Reverb Eff Master EQ Arp Switch General Name Part Edit Play Mode Filter/EG Arp Select Voice Store Receive Switch If you press [STORE] in a Voice Edit display, you can store the edited Voice as a User Voice. After setting the following parameters, press [ENTER], then press [INC/YES] to execute. After storing is finished, operation returns to the last selected Part Edit display. Voice Edit Voice Insert Eff / DrumKit Insert Eff Voice LFO NOTICE If a “Clear edit Voice” message is called up by pressing [STORE], press [DEC/NO]. This message appears when executing Performance Store while the Voice has been modified but not yet stored. Keep in mind that the edited Voice will be erased by executing Performance Store. Voice Ctrl Set / DrumKit Ctrl Set Voice Name / DrumKit Name Voice Job STORE*Voice 2 ****U001:Initialize 1 2 Voice Store Performance Job Initialize Recall Copy 1 User Voice number Selects the User Voice number as the storing destination. Settings: For Normal Voices: 001 – 128 For Drum Voices: 001 – 008 Bulk Performance Store Supplementary Information 2 Voice name Indicates the current Voice name of the selected User Voice number. After storing, the name changes to the name you entered in the Voice Name display. MX49/MX61 Reference Manual 53 Performance Song/Pattern File Utility Remote Performance Performance Job Performance Play Operation Press [JOB] from one of the Performance displays (not a Voice Edit display) Select Job with Cursor Performance Select [u][/[d] buttons [ENTER] Operation depends on selected Job display Performance Part Select Performance Edit Common Edit Initialize Chorus Eff Reverb Eff Master EQ JOB*Initialize Current*Perf*****All Arp Switch General Data type to be initialized Name Part Edit Resets (initializes) all Performance parameters to their default settings. It also allows you to selectively initialize certain parameters, such as Common settings, settings for each Part, and so on—very useful when creating a completely new Performance from scratch. In this display, Press [ENTER], then press [INC/YES] to execute Initialize. Data type to be initialized All: All data in the Performance Common: Data in Common Edit Part 1 – 16: Data of the Part Edit parameters of the corresponding internal Part PartAll: Data of the Part Edit parameters of all Parts GM: All data in the Performance. The Voices of the GM bank will be assigned to Parts 1 – 16. NOTE This instrument features a GM bank which contains Voices allocated according to the GM standard, allowing proper playback of GM Song data. Play Mode Filter/EG Arp Select Receive Switch Voice Edit Voice Insert Eff / DrumKit Insert Eff Voice LFO Voice Ctrl Set / DrumKit Ctrl Set Voice Name / DrumKit Name Voice Job Recall If you select a different Performance without storing your edited Performance, all the edits you’ve made will be erased. If this happens, you can use Recall to restore the Voice with your latest edits intact. Select “02:Recall” and press [ENTER]. When the subsequent confirmation display appears, press [INC/YES] to execute the Recall operation. Voice Store Performance Job Initialize Recall Copy Bulk Performance Store Supplementary Information MX49/MX61 Reference Manual 54 Performance Song/Pattern File Utility Remote Performance Copy Performance Play This convenient operation lets you copy Common Edit and Part Edit settings of a specific Performance to the currently edited Performance. This is useful if you are creating a Performance and wish to use certain parameter settings of another Performance. Performance Select Performance Part Select Performance Edit Common Edit A JOB*Copy*from *001(A01):MXCategory Chorus Eff 1 Reverb Eff Master EQ Arp Switch [ENTER] General Name B JOB*Copy*from ****part01 /x*part01 2 3 Display (A), which allows you to select the source Performance to be copied, appears first. Select the desired Performance here, then press [ENTER]. Next shown is display (B), which allows you to select the data type. Select the data type for both the source and destination, then press [ENTER]. Finally, press [INC/YES] to execute the Copy. Part Edit Play Mode Filter/EG Arp Select Receive Switch Voice Edit Voice Insert Eff / DrumKit Insert Eff 1 Data type of Performance (source) Voice LFO Determines the Performance number to be copied. When “---(---): (Current)” is selected, the current Performance is specified as the source Performance. Accordingly, you can copy the parameter settings from a Part to a different Part of the same Performance. Voice Ctrl Set / DrumKit Ctrl Set Settings: Current, 001 – 128 Voice Name / DrumKit Name Voice Job 2 Data type of the source Determines the source data type including the Part number. Select the source setting field with the Cursor [<] button, then select the data type with the [DATA] dial. Settings: common, part 1 –16 Voice Store Performance Job Initialize Recall 3 Data type of the destination Copy Determines the destination data type including the Part number. Select the destination setting field with the Cursor [<] button, then select the data type with the [DATA] dial. Bulk Settings: common, part 1 – 16 NOTE If the data type of the source or destination is set to common, the other will be automatically set to common, since Common data cannot be copied to Part data, and vice versa. Also, if the type is set to Part data, the other will be automatically set to Part 1. Performance Store Supplementary Information Bulk This function lets you send all your edited parameter settings for the currently selected performance including the edited Voice data of Parts 1 – 16 to a computer or another MIDI device for data archiving. Select “04:Bulk” and press [ENTER]. When the subsequent confirmation display appears, press [INC/YES] to execute the Bulk Dump operation. NOTE In order to execute Bulk Dump, you will need to set the correct MIDI Device Number, with the following operation: [UTILITY] Select “02:MIDI” with the Cursor [u]/[d] buttons [ENTER] Select “DeviceNo” with the Cursor [u]/[d] buttons Select “DeviceNo” value with the [DATA] dial. MX49/MX61 Reference Manual 55 Performance Song/Pattern File Utility Remote Performance Performance Store Performance Play Operation Press [STORE] from one of the Performance displays (not a Voice Edit display) Select the store destination Press [ENTER] Press [INC/YES] Performance Select Performance Part Select Performance Edit This operation stores the selected Performance. However, the edited Voice is not stored with the Performance. After storing, operation returns to the top display of the destination Performance. NOTICE Common Edit Chorus Eff Reverb Eff If the Performance store operation is executed while the Voice has been modified but not yet stored, the edited Voice will be erased and the Voice edits lost. Important Voice data should be stored as a User Voice (page 53) before storing a Performance. Master EQ Arp Switch General STORE*Performance * 001(A01):MXCategory 1 Name Part Edit Play Mode 2 Filter/EG Arp Select 1 Performance number Receive Switch Selects the Performance number as the storing destination. Voice Edit Settings: 001 – 128 Voice Insert Eff / DrumKit Insert Eff 2 Performance name Indicates the current Performance name of the selected Performance number. After the store operation is complete, the name changes to the name you entered in the Performance Name display (page 46). Voice LFO Voice Ctrl Set / DrumKit Ctrl Set Voice Name / DrumKit Name Voice Job Supplementary Information Voice Store Performance Job Initialize Functions of Knobs [A] – [D] Recall When the [PART 1-2 LINK] button is set to on (lamp lights): Copy The functions of Knobs [A] – [D] are applied to both Parts 1 and 2. Bulk Performance Store When the 1st lamp is turned on: Knob Parameter Settings Reference page A CUTOFF (“Cutoff” in Common Edit) -64 – +63 page 45 B RESONANCE (“Resonance” in Common Edit) -64 – +63 page 45 C CHORUS (“ChoSend” in Common Edit) 0 – 127 page 45 D REVERB (“RevSend” in Common Edit) 0 – 127 page 45 Supplementary Information When the 2nd lamp is turned on: Knob Parameter Settings Reference page A ATTACK (“Attack” in Common Edit) -64 – +63 page 45 B DECAY (“Decay” in Common Edit) -64 – +63 page 45 C SUSTAIN (“Sustain” in Common Edit) -64 – +63 page 45 D RELEASE (“Release” in Common Edit) -64 – +63 page 46 MX49/MX61 Reference Manual 56 Performance Song/Pattern File Utility Performance When the 3rd lamp is turned on: Knob Remote Parameter Settings Reference page Performance Play Performance Select A VOLUME (“Volume” in Common Edit) 0 – 127 page 46 B PAN (“Pan” in Common Edit) L63 – C – R63 page 46 Performance Edit C ASSIGN1 (“Assign 1” in Common Edit) -64 – +63 page 46 Common Edit D ASSIGN2 (“Assign 2” in Common Edit) -64 – +63 page 46 Performance Part Select Chorus Eff Reverb Eff Master EQ When the [PART 1-2 LINK] button is set to off (lamp turns off): Arp Switch The functions of Knobs [A] – [D] are applied to only the selected Part General Name When the 1st lamp is turned on: Knob Part Edit Parameter Settings Reference page Play Mode Filter/EG A CUTOFF (“Cutoff” in Part Edit) -64 – +63 page 48 B RESONANCE (“Resonance” in Part Edit) -64 – +63 page 48 C CHORUS (“ChoSend” in Part Edit) 0 – 127 page 47 D REVERB (“RevSend” in Common Edit) 0 – 127 page 47 Arp Select Receive Switch Voice Edit Voice Insert Eff / DrumKit Insert Eff Voice LFO When the 2nd lamp is turned on: Knob Voice Ctrl Set / DrumKit Ctrl Set Parameter Settings Reference page A ATTACK (“AEG Attack” in Part Edit) -64 – +63 page 48 B DECAY (“AEG Decay” in Part Edit) -64 – +63 page 48 C SUSTAIN (“AEG Sustain” in Part Edit) -64 – +63 page 48 D RELEASE (“AEG Release” in Part Edit) -64 – +63 page 48 Voice Name / DrumKit Name Voice Job Voice Store Performance Job Initialize Recall Copy When the 3rd lamp is turned on: Bulk Knob Parameter Settings Reference page Performance Store Supplementary Information A VOLUME (“Volume” in Part Edit) 0 – 127 page 47 B PAN (“Pan” in Part Edit) L63 – C – R63 page 47 C ASSIGN1 (“Assign 1” in Part Edit) -64 – +63 page 48 D ASSIGN2 (“Assign 2” in Part Edit) -64 – +63 page 48 MX49/MX61 Reference Manual 57 Performance Song/Pattern File Utility Remote Song/Pattern setting Song/Pattern settings Song This section explains parameters related to Songs and Rhythm Patterns. You can play the Song or Pattern called up in this display by pressing the [R/K] (Play/Pause) button, and stop it by pressing the [J] (Stop) button. Pattern Song MIDI data (SMF) and audio data (WAV files) in the USB flash memory connected to this instrument can be played back as a Song on this instrument. Operation Press [EXT. SONG] Edit parameters in Song display SONG**********001:01 a**File=MYSONG01.MID SONG**********001:01 s*****WAV*Volume=100 1 2 3 1 Song playback location Indicates the playback location of the selected Song. When the selected Song is MIDI data, Measure and Beat are indicated. When the selected Song is audio data, Minutes and Seconds are indicated. 2 File Selects a desired Song from the MIDI data and audio data in the USB flash memory connected to this instrument. NOTE Only SMF format 0 MIDI data can be played back on this instrument. NOTE Only 44.1kHz/16-bit stereo WAV file audio data can be used for playback on this instrument. 3 WAV Volume Adjusts the volume of the audio data. This parameter is linked to the same parameter of the Utility General display (page 64). Settings: 0 – 127 MX49/MX61 Reference Manual 58 Performance Song/Pattern File Utility Remote Song/Pattern setting Pattern The various internal Rhythm Patterns of the instrument can be played back from this display. Song Pattern Operation Press [PATTERN] Edit parameters in Pattern display PATTERN*****01:01/04 aElct:132:Ambient 1 2 1 Pattern playback location and length 2 Pattern parameter A single parameter for editing is indicated in each page. Parameter Pattern category Pattern number Pattern name Description Selects the category and number for the desired Pattern. After moving the cursor to the category indication or number indication by using the Cursor [<]/[>] buttons, select a Pattern by changing the category or number. Settings: Category ...... Rock, R&B, Elct, Jazz, Wrld, Orch Number ........ differs depending on the category Voice category Voice number Voice name Determines which Voice will be used for the Rhythm Pattern. If the Rhythm Pattern is changed, this parameter will be automatically set to the appropriate Drum Voice for the Rhythm Pattern. This Voice is set by default as the Voice of Part 10 of the selected Performance. Settings: Refer to the “Voice List” of the “Data List” PDF document. Volume For adjusting the Pattern volume. This parameter is linked to the “Volume” parameter of Part 10. Settings: 0 – 127 Pan Determines the stereo pan position for the Pattern. This parameter is linked to the “Pan” parameter of Part 10. Settings: L63 (far left) – C (center) – R63 (far right) ChoSend (Chorus Send) Determines the Send level of the signal sent to the Chorus effect. This parameter is linked to the “ChoSend” parameter of Part 10. Settings: 0 – 127 RevSend (Reverb Send) Determines the Send level of the signal sent to the Reverb effect. This parameter is linked to the “RevSend” parameter of Part 10. Settings: 0 – 127 AutoKeyOnStart Determines whether or not the Rhythm Pattern is played back immediately when you press any note on the keyboard. When you switch to a Performance for which “AutoKeyStart” is set to on, the lamp of the [R/K] (Play/ Pause) button will start to flash slowly, and the Rhythm Pattern will play back as soon as you play the keyboard. Settings: off, on MX49/MX61 Reference Manual 59 Performance Song/Pattern File Utility File The File display provides tools for transferring data (such as Voice and Performance) between the MX49/MX61 and USB flash memory connected to the USB [TO DEVICE] terminal. To return to the Performance display from a File display, press [EXIT]. Remote File File display Save Load Rename Terminology in the File operation Delete File Memory Info Format The term “file” is used to define a collection of data stored on a USB flash memory or a hard disk drive of a computer. Just as with a computer, all data of the User memory including User Voices and Performances created on the MX49/ MX61 can be treated as a file and saved to a USB flash memory. Each file has a file name and a file extension. File Name Just as with a computer, you can assign the name to the file in the File display. The file name can contain up to eight alphabetical and numerical characters on the display of the MX49/MX61. Files having the same name cannot be saved in the same directory. Extension The three letters following the file name (after the period) such as “.mid” and “.wav” are referred to as a file “extension.” The extension indicates the type of file and cannot be changed by panel operations on the MX49/MX61. File Size This refers to the memory amount of the file. The file size is determined by the amount of data saved to the file. File sizes are indicated in conventional computer terms by B (byte), KB (kilobyte), MB (megabyte) and GB (gigabyte). 1KB is equivalent to 1024 bytes, 1MB is equivalent to 1024KB, and 1GB is equivalent to 1024MB. Directory (Dir) This is an organizational feature on a data storage device (such as USB flash memory), allowing you to group data files together according to type or application. Directories can be nested in hierarchical order for organizing data. In this regard, a “directory” is equivalent to a folder as used on a computer. Please note that the directory name does not contain an extension. Root directory The very top location for all your folders (which is called up when you first open the memory location) is called the “root directory.” Format The operation of initializing a USB flash memory is referred to as “format.” The format operation erases all data from the target memory device and is irreversible. Save/Load “Save” means that the data created on the MX49/MX61 is saved to the USB flash memory as a file, while “Store” means that the data created on the MX49/MX61 is stored to internal memory. “Load” means that the file on the USB flash memory is loaded to internal memory. MX49/MX61 Reference Manual 60 Performance Song/Pattern File Utility Remote File File display File display Operation Press [FILE] Select desired display for editing with Cursor [u]/[d] buttons Press [ENTER] Edit parameters in selected display Save Load Rename Delete Save Format All data in this synthesizer’s internal User Memory (Flash ROM) is treated as a single file (“All” file: extension is “.X5A”), and can be saved to USB flash memory in this display. Parameter Name (File name) Memory Info Description Determines the file name for saving to the USB flash memory. You can move the cursor to the desired location by using the Cursor [<]/[>] buttons, and determine the character by using the [DATA] dial. The names can contain up to eight alphabetic and numeric characters. Load Files in the USB flash memory can be loaded to internal memory. NOTE If the “All” file of the MX49/MX61 is not in the root directory of the USB flash memory, a “File not found” error message appears on the display and the Load display below is not shown. FILE*Load *******File=STAGE_01 [EXIT] 1 [ENTER] FILE*Load Type=************All 2 1 File Selects the file to be loaded. Only an “All” file of the MX49/MX61 stored in the root directory of the USB flash memory can be loaded. Press [ENTER] after selecting a file to call up the display for selecting the file type to be loaded. 2 Type Determines which specific type of data will be loaded from a single file. Press [ENTER] after selecting the type. The display which is called up differs depending on the selected type. Settings: File types which can be loaded are as follows. Parameter Description All An “All” file (extension is “.X5A”) saved to USB flash memory can be loaded and restored to the instrument. All without Sys (All without system) All data, with the exception of the system settings in the Utility display, in an “All” file (extension is “.X5A”) saved to USB flash memory, can be loaded. MX49/MX61 Reference Manual 61 Performance Song/Pattern File Parameter Performance Utility Remote File Description A specified Performance in an “All” file that is saved to USB flash memory can be individually selected and loaded to the instrument. When selecting this file and then pressing the [ENTER] button, the “Src Performance” display (for selecting the Performance to be loaded) and the “Dst Performance” display (for selecting the Performance destination) are called up. After making settings in each display as desired, press [ENTER]. File display Save Load Rename Delete NOTE The loaded data is Performance, and does not include User Voices. Format Memory Info Src*Performance 001(A01):MXCategory [EXIT] [ENTER] Dst*Performance 003(A03):Sirius [EXIT] [ENTER] q**Are*you*sure?***w e****[NO]/[YES]**** r Rename Renames the file selected here. FILE*Rename ******File=STAGE_01 [EXIT] [ENTER] FILE*Rename *****Name=[STAGE_01] [EXIT] 1 2 [ENTER] q**Are*you*sure?***w e****[NO]/[YES]**** r 1 File Selects the file to be renamed. You can only select files saved in the root directory of the USB flash memory. After selecting, press [ENTER] to call up the display for entering the file name. 2 Name Determines the name of the selected file. You can rename files using up to eight alphabetic and numeric characters. If the file name contains spaces and other characters which are not compatible with this instrument, the entire file name may be rendered unreadable. If this happens, you should rename the file with valid characters. MX49/MX61 Reference Manual 62 Performance Song/Pattern File Utility Remote File Delete Deletes a specific file saved to the root directory of the USB flash memory. After selecting the desired file, press [ENTER] to execute the Delete operation. File display Save Load Rename Format Delete Formats the USB flash memory connected to the instrument. Before you can use a new USB flash memory with the MX49/MX61, you will need to format it. Select “05:Format” in the top File display, then press [ENTER] to appear the confirmation display. Then, press [INC/YES] to execute the Format operation.. Format Memory Info NOTICE If you format the device, all previously saved data will be deleted. Make sure to check beforehand whether or not the device contains important data. Memory Info (Memory information) FILE*Memory*Info Free=867.9MB/955.0MB 1 1 Free Indicates the amount of free/total memory for the currently recognized USB flash memory. MX49/MX61 Reference Manual 63 Performance Song/Pattern File Utility Remote Utility Utility General In the Utility display, you can set parameters that apply to the entire system of the MX49/MX61. To return to the Performance display after making settings, press [EXIT]. Operation Press [UTILITY] Select desired display for editing by using the Cursor [u]/[d] buttons Press [ENTER] Edit parameters in selected display MIDI Controllers Remote Utility Job QuickSeup Factory Set Version General Parameter MasterVolume Description Determines the overall volume of the instrument. Settings: 0 – 127 Note Shift Determines the amount (in semitones) by which the pitch of all notes is shifted. Settings: -24 – +0 – +24 Tune (Master tune) Determines the fine tuning of the MX49/MX61’s overall sound (in 0.1 cent steps). Settings: -102.4 (414.7Hz) – +0.0 (440.0Hz) – +102.3 (466.8Hz) NOTE The frequency of the basic pitch (note A3) is 440 Hz. An increase of 3 or 4 cents corresponds to a frequency increase of about 1 Hz. DirectMonitor (Direct monitor switch) When using this instrument with a computer, this determines whether the audio signal of this instrument is output or not to the OUTPUT [L/MONO]/[R] jacks and [PHONES] jack (Direct Monitoring). If you wish to hear only the sound which is looped back from the computer via the USB [TO HOST] terminal, set this parameter to off. You can use this setting when you want to apply a VST plug-in effect (on the computer) to the sound of the instrument. Settings: off, on DAW Level Adjusts the volume of the audio data from the USB [TO HOST] terminal. Settings: 0 – 127 WAV Volume Adjusts the volume of the audio data of the USB flash memory. This parameter is linked to the same parameter of the Song display (page 58). Settings: 0 – 127 Octave (Octave shift) Determines the amount in octaves by which the range of the keyboard is shifted up or down. This parameter is linked with the OCTAVE [-]/[+] buttons on the panel. Settings: -3 – +0 – +3 Transpose Determines the amount in semitones by which the range of the keyboard is shifted up or down. Settings: -11 – +0 – +11 NOTE If you transpose beyond the note range limits (C -2 and G8), notes in the adjacent octaves will be used. VelCurve (Velocity Curve) Determines how the actual velocity will be generated and transmitted according to the velocity (strength) with which you play notes on the keyboard. Settings: norm, soft, hard, wide, fixed norm (normal) .. This linear “curve” produces one-to-one correspondence between the strength of your keyboard playing (velocity) and the actual sound change. soft ................... This curve provides increased response, especially for lower velocities. hard.................. This curve effectively lessens the overall response in comparison to the “norm” curve. wide ................. This curve accentuates your playing strength by producing lower velocities in response to softer playing and louder velocities in response to harder playing. As such, this setting effectively expands the dynamic range. fixed ................. This setting produces the same amount of sound change (set in “FixedVelocity” below), no matter what your playing strength. The velocity of the notes you play are fixed at the value set here. FixedVelocity Determines the velocity value for the “fixed” Velocity Curve setting above. This can be used to send a fixed velocity to the tone generator regardless of how hard or soft you play the keyboard. This parameter is only available if you set Velocity Curve above to “fixed.” Settings: 1 – 127 LCD Contrast Adjusts the LCD contrast. Settings: 1 – 8 NOTE You can also adjust the LCD contrast by holding down [UTILITY] and pressing [INC/YES]/[DEC/NO]. MX49/MX61 Reference Manual 64 Performance Song/Pattern Parameter KnobFuncDispSw (Knob Function display switch) File Utility Description Determines whether the Knob Function display (which shows the functions of Knobs [A] – [D] and their settings) is called up or not when pressing the [KNOB FUNCTION] button. Settings: Settings: off, on Remote Utility General MIDI Controllers Remote *Cut**Rez**Cho**Rev + (+34)*:00***40***12 Knob Function display appears when pressing [KNOB FUNCTION]. KnobDispTime (Knob Function display switch) Utility Job QuickSeup Factory Set Version Determines whether or not the Knob Function display appears when operating the Knobs, and how long the display will continue to be shown. Settings: off, 1 sec, 1.5 sec, 2 sec, 3 sec, 4 sec, 5 sec, keep off ..................... When this selected, the display is not called up even if you operate the Knobs. 1 sec – 5 sec.... Turning one of the Knobs will cause the display to appear after an elapsed time of between 1 – 5 seconds, and then automatically close. keep ................. Operating the Knob will cause the popup to be shown continuously until you press a button. q**Common*Cutoff***w e*******(+15)******r Knob Function display appears when operating the Knobs. StartUp Determines the default power-on Performance—letting you select which Performance is automatically called up when you turn the power on. Settings: 1 -128 AutoOff (Auto Power Off time) Determines the amount of time that elapses before the power is automatically turned off if the instrument is not operated for a specified period of time. Default setting is “30min.” Settings: off (Disables Auto Power Off), 5min, 10min, 15min, 30min, 60min, 120min (minutes) NOTE You can set this parameter to “off” by holding down the lowest key on the keyboard and turning the power on. This operation retains the “off” setting even if the power is turned off. MIDI Parameter MIDI IN/OUT Description Determines which physical output/input terminal(s) will be used for transmitting/receiving MIDI data. Settings: MIDI, USB NOTE The two types of terminals above cannot be used at the same time. Only one of them can be used to transmit/receive MIDI data at a time. LocalCtrl (Local Control switch) Determines whether or not the tone generator of the instrument responds to your keyboard playing. Normally, this should be set to “on”—since you’ll want to hear the sound of the MX49/MX61 as you play it. Even if this is set to “off,” the data will be transmitted via MIDI. Also, the internal tone generator block will respond to messages received via MIDI. Settings: off (disconnect), on (connect) BankSel (Bank Select) Determines whether or not this instrument enables Bank Select messages to be both transmitted and received. When this is set to “on,” this synthesizer responds to incoming Bank Select messages, and it also transmits appropriate Bank Select messages (when using the panel). Settings: off, on PgmChange (Program Change) Determines whether or not this instrument enables Program Change messages to be both transmitted and received. When this is set to “on,” this synthesizer responds to incoming Program Change messages, and it also transmits appropriate Program Change messages (when using the panel). Settings: off, on MX49/MX61 Reference Manual 65 Performance Song/Pattern Parameter CtrlReset (Controller Reset) File Utility Remote Utility Description Determines the status of the controllers (Modulation Wheel, Foot Controller, Knobs, etc.) when switching between Voices. When this is set to “hold,” the controllers are kept at the current setting. When this is set to “reset,” the controllers are reset to the default states (below). Settings: hold, reset If you select “reset,” the controllers will be reset to the following states/positions. As for controllers that are not actually available on the instrument itself (for example, After Touch, Ribbon Controller, and Breath Controller), these functions can be enabled by transmitting the corresponding MIDI control number from an external MIDI controller. General MIDI Controllers Remote Utility Job QuickSeup Factory Set MIDI Sync Pitch Bend Center Ribbon Controller Center Modulation Wheel Minimum Breath Controller Maximum After Touch Minimum Assignable Function off Foot Controller Maximum Expression Maximum Footswitch off Version Determines whether Song/Pattern/Arpeggio playback will be synchronized to the instrument’s internal clock or an external MIDI clock. Settings: internal, external, auto internal..... Synchronization to internal clock. You can use this setting when this tone generator is to be used alone or as the master clock source for other equipment. external.... Synchronization to a MIDI clock received from an external MIDI instrument via MIDI. Use this setting when an external sequencer is to be used as the master. auto.......... When MIDI clock is transmitted continuously from an external MIDI device or computer, the internal clock of the MX49/MX61 is automatically disabled and the MX49/MX61 is synchronized with the external clock. When MIDI clock is not transmitted from the external MIDI device or computer, the internal clock of the MX49/MX61 continues to run in sync with the latest received tempo of the external MIDI device or computer (DAW software). This setting is useful when you wish to alternate between external clock and internal clock. NOTE When setting the MX49/MX61 so that Song/Pattern/Arpeggio playback is synchronized to an external MIDI clock, make sure to set the devices so that the MIDI clock from the DAW software/ external MIDI device is properly transmitted to the MX49/MX61. ClockOut (MIDI Clock Out) Determines whether MIDI clock (F8) messages will be transmitted via the MIDI OUT/USB terminal. SeqCtrl (Sequencer Control) Determines whether or not Sequencer Control signals—start, continue and stop—will be received and/or transmitted via MIDI. Settings: off, on Settings: off, in, out, in/out off............. Not transmitted/recognized. in.............. Recognized, but not transmitted. out............ Transmitted, but not recognized. in/out........ Transmitted/recognized. BasicCh (Basic Channel) Determines the MIDI transmit/receive channel for an entire Performance. Settings: 1 – 16, off NOTE The MIDI transmit/receive channel for Part 1–16 is fixed to 1 – 16 regardless of the “BasicCh” setting. DeviceNo. (Device number) Determines the MIDI Device Number. This number must match the Device Number of the external MIDI device when transmitting/receiving bulk data, parameter changes or other System Exclusive messages. Settings: 1 – 16, all, off RcvBulk (Receive Bulk switch) Determines whether or not Bulk Dump data can be received. BulkInterval (Bulk Dump Interval) Determines the interval time of the Bulk Dump transmission when the Bulk Dump function is used or a Bulk Dump Request is received. Settings: protect (not received), on (received) Settings: 0 – 900 ms MX49/MX61 Reference Manual 66 Performance Song/Pattern File Utility Utility Controllers Determines Controller Assign settings common to the entire system of the MX49/MX61. You can assign MIDI Control Change Numbers to the Knobs on the front panel and external controllers. For example, you could use the ASSIGN 1 and 2 knobs to control effect depth for two different effects, while using the Foot Controller to control modulation. These Control Change Number assignments are known as “Controller Assign.” NOTE Remote As for controllers that are not actually available on the instrument itself, they can be controlled by transmitting the corresponding MIDI control number from an external MIDI controller. General MIDI Controllers Remote Utility Job QuickSeup Factory Set Parameter FS Pedal (Foot Switch Sustain Pedal Select) Description Version Determines which model of an optional Foot Switch connected to the [SUSTAIN] jack is recognized. When the FC3 is used: When you connect an optional FC3 (compatible with the Half Damper feature) for producing the special Half Damper effect (as on a real acoustic piano), set this parameter to “FC3 (Half on).” If you don’t need the Half Damper feature or want to disable it while still using an FC3, set this parameter to “FC3 (Half off).” When the FC4 or FC5 is used: Select “FC4/5.” The FC4 and FC5 are not compatible with the Half Damper feature. Settings: FC3 (Half on), FC3 (Half off), FC4/5 NOTE Note that this setting is not necessary when controlling the Half Damper feature via Control Change messages from an external MIDI device to the instrument. FS (Foot switch Control Number) Determines the Control Change number generated by using a Footswitch connected to the [SUSTAIN] jack. Keep in mind that if the same MIDI Control Change messages set here are received from an external device, the internal tone generator also responds to those messages as if the Footswitch of the instrument itself was used. Settings: off, 1 – 95, arp sw, play/stop, PC inc, PC dec, octave reset NOTE An FC4 or FC5 connected to the [SUSTAIN] jack can be used to start and stop the Song/Pattern by setting this parameter to “Play/Stop.” Also, an FC4 or FC5 can be used to switch Performances by setting this parameter to “PC inc”/”PC dec.” Keep in mind that the sustain function cannot be used in these cases. AS1 (Assign 1 Control number) AS2 (Assign 2 Control Number) Determines the Control Change number generated when you use the ASSIGN 1/2 knobs. Keep in mind that if the same MIDI Control Change messages set here are received from an external device, the internal tone generator also responds to those messages as if the ASSIGN 1/2 knobs of the instrument itself were used. Settings: off, 1 – 95 FC1 (Foot Controller 1 Control Number) Determines the Control Change number generated when you use the Foot Controller connected to the [FOOT CONTROLLER] jack. Keep in mind that if the same MIDI Control Change messages set here are received from an external device, the internal tone generator also responds to those messages as if the Foot Controller of the instrument itself was used. Settings: off, 1 – 95 FC2 (Foot Controller 2 Control Number) Determines the Control Change number corresponding to a Foot Controller 2 on an external device connected to the MX49/MX61. RB (Ribbon Controller Control Number) Determines the Control Change number corresponding to a Ribbon Controller on an external device connected to the MX49/MX61. BC (Breath Controller Control Number) Determines the Control Change number generated when you use a Breath Controller on an external device connected to the MX49/MX61. AF1 (Assignable Function 1 Control Number) Determines the Control Change number generated when you use Assignable Function 1/2 buttons on an external device connected to the MX49/MX61. Settings: off, 1 – 95 Settings: off, 1 – 95 Settings: off, 1 – 95 Settings: off, 1 – 95 AF2 (Assignable Function 2 Control Number) MX49/MX61 Reference Manual 67 Performance Song/Pattern File Utility Remote Utility Remote The Remote settings are made in this display. If you press [UTILITY] in the Remote mode, only this display will be called up. General MIDI Controllers Parameter Description DAW Select Remote Determines the DAW software to be controlled by the MX49/MX61. Simply selecting a DAW type calls up the appropriate Remote settings automatically. Settings: Cubase, LogicPro, DigiPerf, SONAR PrgChgMode (Program Change Mode) Utility Job QuickSeup Factory Set Determines what messages will be transmitted to the computer when you operate the [INC/YES]/[DEC/NO] buttons or [DATA] dial. When “PC” is selected, Program Change messages will be transmitted via MIDI Port 1. When “remote” is selected, Remote Control messages will be transmitted via MIDI Port 2. When “auto” is selected, this automatically switches whether Program Change messages will be transmitted via MIDI Port 1 or Remote Control messages will be transmitted via MIDI Port 2 according to the DAW software controlled in the Remote mode. The Remote Control messages can be transmitted only when the VSTi in Cubase is controlled in the Remote mode. Version Settings: remote, PC, auto NOTE This parameter is fixed to “PC” when “DAW Select” is set to something other than “Cubase.” Utility Job Operation Press [UTILITY] Press [JOB] Select desired display for editing with the Cursor [u]/[d] buttons Press [ENTER] Edit parameters in selected display Press [ENTER] QuickSetup Using Quick Setup can instantly call up appropriate sequencer-related panel settings by selecting convenient preset setups, allowing you to simultaneously and instantly set a variety of important sequencer-related parameters. Press [ENTER] after setting to execute the setup. The settings for each preset setup are listed below. Settings: St Alone (Stand Alone), DAW Rec (DAW Record), Arp Rec (Arpeggio Record) St Alone DAW Rec Arp Rec DirectMonitor (Direct Monitor Switch) on on on LocalCtrl (Local Control) on off on MIDI Sync internal auto auto Clock Out on off off MIDI Out (Arpeggio MIDI Output Switch) on off on MX49/MX61 Reference Manual 68 Performance Song/Pattern File Utility Utility Factory Set By pressing [ENTER] in this display, you can restore this synthesizer’s User memory (page 17) to the factory default settings (Factory Set). Please note that the setting of “PowerOn Auto” on this display will be stored automatically by executing FactorySet. General MIDI Controllers Remote NOTICE When the factory settings are restored, all User Voice, Performance, and system settings in the Utility will be erased. Therefore, you should be careful not to overwrite irreplaceable data. Furthermore, it is wise to regularly create backup copies of important data to a USB flash memory, computer, or other device. NOTE Remote For instructions on executing Factory Set, see the Owner’s Manual. Utility Job QuickSeup Factory Set Version JOB*Factory*Set ****PowerOn*Auto=off 1 1 PowerOn Auto (Power On Auto Factory Set) When this parameter is set to on, turning the power on will restore the User memory to the factory default settings. Normally, this should be set to off. Settings: off, on NOTICE When setting “PowerOn Auto” to “on” and executing Factory Set, the Factory Set function will automatically be executed each time you turn the power on. When setting the Auto Factory Set parameter to off and pressing the [ENTER] button, the Factory Set will not be executed when turning the power on the next time. Version Indicates the current version of this instrument and copyright. The “Firm: *.**” indication at the lower right of the 1st display shows the instrument’s version. JOB*Version a BBoot:1.00*Firm:1.00 MX49/MX61 Reference Manual 69 Performance Song/Pattern File Utility Remote mode Remote mode In the Remote mode, you can remote-control DAW software or VSTi (software instruments). The DAW software which is compatible with the MX49/MX61 is Cubase, Logic Pro, SONAR and Digital Performer. Also, the MX49/MX61 features 50 Control Templates for remote-control of many popular VSTi’s. These Control Templates let you assign the appropriate functions for your favorite VSTi to Knobs [A] – [D] on the MX49/MX61. In the Remote display, you can indicate the functions assigned to Knobs [A] – [D] for the selected Control Template, change the value of the functions, switch the Control Template, and so on. This section explains parameters shown in the Remote display and functions available for editing. Operation Remote Remote display Switching the functions for Knobs [A] – [D] Switching the Control Template Utility settings Press [DAW REMOTE] NOTE If you wish to exit the Remote mode, press [DAW REMOTE] again. NOTE The DAW software to be controlled can be set in the Utility Remote display (page 68). NOTE For information of the DAW software version which is compatible with the MX49/MX61, refer to the “Specifications” of the Owner’s Manual. Remote display Indicates the basic functions assigned to Knobs [A] – [D]. Knob [A] 1 Knob [B] 2 j QC1 Cuto*** jQC2 Reso 2 j QC3 Bit***jQC4 Sub Knob [C] Knob [D] 1 Knob indicator Indicates the current values of the parameters assigned to Knobs [A] – [D] as graphic icons. If a current value is different from a Knob indication, the Knob indicator is highlighted. When an indicator is highlighted, moving the Knob does not affect the value. Once you move the Knob past the current value, moving the Knob affects the value, and the Knob indication will correspond with the current value. 2 Parameter name Indicates the functions assigned to Knobs [A] – [D]. When moving a Knob, the value of the assigned function is shown in the display, then returns to the previous display after a specified time has elapsed. Also, by setting [PART 1-2 LINK] to on, you can have the parameter value always be shown in the display. Setting [PART 1- 2 LINK] to off allows automatic return to the previous display. The functions assigned to the Knobs differ depending on the “Remote” setting or “CC” setting. This setting can be determined in the MX49/MX61 Remote Editor. When setting the MX49/MX61 to “Remote” (only Cubase) The VSTi parameters of Cubase are assigned to Knobs [A] – [D], and the first eight characters of the parameters are shown in the display. To scroll through parameter names having more than eight characters, hold down [SHIFT] and press [DAW REMOTE]. Moving a Knob transmits the MIDI message to Port 2, then the parameter assigned to the Knob will be changed on the VSTi of Cubase. In this case, the parameter value is shown on the MX49/MX61 display for a specified time. When setting the MX49/MX61 to “CC” Indicates the Control Change number to be controlled by Knobs [A] – [D]. Moving a Knob transmits the Control Change message to Port 2, and the function of the VSTi will be controlled on the DAW software. NOTE If “DAW Select” (page 68) is set to other than “Cubase,” or “MIDI IN/OUT” (page 65) is set to “MIDI,” the MX49/MX61 is fixed to the “CC” setting. MX49/MX61 Reference Manual 70 Performance Song/Pattern File Utility Remote Remote mode Switching the functions for Knobs [A] – [D] Each Control Template has three sets of functions assigned to Knobs [A] – [D]. Press [KNOB FUNCTION] to switch the function set. Remote display Switching the functions for Knobs [A] – [D] Switching the Control Template Switching the Control Template To switch the Control Templates of the MX49/MX61, use the [KEYBOARD] button or [PIANO] button. Pressing [KEYBOARD]/[PIANO] increases or decreases the Template number. When a specified time has elapsed after the display which switches the Template is shown, operation returns to the previous display. When the Control Template is switched on the MX49/MX61, the Template will also be switched on the Remote Editor. Utility settings Remote*Template 03:HALionSonicSE NOTE If Remote Tools has been installed in your computer, switching the VSTi on Cubase links to the Control Template on the MX49/ MX61. NOTE If you wish to edit the Control Template or create a new Template, you need to use the MX49/MX61 Remote Editor. When editing the Control Template, 50 Control Templates including the edited Templates can be saved to internal memory by pressing [STORE] in the Remote Mode on the MX49/MX61. Utility settings Pressing [UTILITY] in the Remote mode conveniently calls up only the Utility settings relevant to the Remote mode. The parameters of this display are linked to the Remote display (page 68) of Utility. U.R.G., Digital Musical Instruments Division ©2012 Yamaha Corporation 208MW-A0 MX49/MX61 Reference Manual 71