1
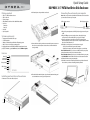
Quick Setup Guide
DX-PHD35 3.5" PATA Hard Drive Disk Enclosure
Package contents
Connecting the enclosure to your computer
2 Pull out the plastic end cap with the circuit board.
Note: Make sure you have already installed a hard drive into the enclosure before
you connect the enclosure to your computer.
•
•
•
•
•
USB 2.0 3.5" PATA hard drive enclosure
USB 2.0 cable A-B
AC power adapter
Utility CD with User Guide and Roxio BackOnTrack software
Accessories:
Screwdriver
Screws (4)
• User Guide
• Quick Setup Guide
USB 2.0 A type connector
System requirements
• Computer with an available USB 2.0 port
• 3.5" PATA hard drive
• Windows 7, Windows Vista, and Windows XP operating system.
• MAC OS X version 10.4 or higher operating system.
For highest performance and reliability, install the latest updates and service
pack (SP). For Windows, go to the Start menu, then select Windows Update.
3 Connect the drive to the 40-pin data connector and to the power connector on
the enclosure circuit board, then secure the drive to the rails with the four
screws (provided).
Features
Power LED
Activity LED
Power switch
Backup button
3.5"
USB 2.0 B type
12V DC
Installing your hard drive in the enclosure
1 Remove two screws on the left side of panel.
Screw
Screw
AH
PAT
ard
e
Driv
4 Place the hard drive with the plastic cap back into the aluminum housing and
secure it with the two screws you previously removed.
USB 2.0 B type connector
1 Plug the AC power adapter into the 12V DC jack, then plug it into an AC power
outlet.
2 Plug the USB B type connector into the enclosure, then plug the A type
connector into one of the available USB 2.0 ports on your computer.
3 Press the power button to turn on the enclosure. The operating system
automatically detects and sets up the new drive. The power LED turns on when
the enclosure/hard drive turns on.
4 If the drive is correctly detected, a new drive letter is assigned.
• For PCs, the new drive letter appears in My Computer.
• For Macintosh computers, the new drive letter appears on your desktop.
Note for Windows users: If you do not see an additional drive in your system,
you must format the new drive. See the instructions below.
Note for Macintosh users: If you do not see an additional drive in your system,
select Disk Utilities from the Utilities folder, then select the external enclosure
and format the drive to meet your requirements.
5 If the drive is new and is not formatted, follow the steps below to format the
drive. Otherwise, continue to “Installing the backup software”.
Formatting the hard drive
Disconnecting the enclosure from your computer
For Windows users:
1 Right click My Computer (or Computer depending on what version of
Windows you have), then click Manage.
2 Under Storage on the LEFT pane, select Disk Management.
3 Click on the new drive, then click on the Action tab at the top of screen.
4 Go to All Tasks, then click Format from the menu.
5 Select other choices you want, then click OK.
For Macintosh users:
1 Start the Disk Utility tool (under Applications).
2 Select the new hard drive you are trying to install.
3 Click the Erase tab.
4 Choose a volume format and assign a name to the new drive.
5 Click Erase.
6 Once complete, an icon for your new hard drive appears on your desktop.
For Windows users:
Note: If a drive window is open or the hard drive enclosure is active, close any
associated windows before attempting to remove the enclosure.
1 Right-click the Safely Remove Hardware icon (located in the notification
area of the taskbar where your usually see the time displayed.).
2 Select the drive you want to unplug, then click STOP.
3 When Windows notifies you that it is safe to do so, unplug the enclosure from
your computer.
To disconnect the enclosure from your Macintosh computer without
shutting it down:
1 Drag the USB icon into the TRASH.
2 Unplug the enclosure.
Installing the software
This Utility CD includes backup software to enable you to back up your files.
Note: This Roxio BackOnTrack software only runs on Windows 7, Windows Vista,
or Windows XP computers.
Important: Before installing the backup software, make sure that your Windows
operating system has been updated to the latest service pack.
To install backup software:
1 Save all files and close all programs.
2 Insert the included utility CD into your optical drive. Your computer
automatically detects the CD. Or, if the screen does not open, locate the CD in
Windows Explorer and double-click Run.exe on the CD. The initial menu opens.
3 Click Install Backup Software. The Welcome screen opens.
4 Click Next. Then Roxio End-User License Agreement screen opens.
5 Read the license agreement, click “I accept...,” then click NEXT. The Choose
Setup Type screen opens.
6 Choose setup type, then click Install to start installation. It may take several
minutes to install the software.
7 When installation is complete, the Setup Wizard Completed screen opens.
8 Click Finish to complete the installation.
See your User Guide located on the CD for information on using the software.
One-year limited warranty
For complete warranty, visit www.dynexproducts.com.
Contact Dynex:
For customer service call 1-800-305-2204
www.dynexproducts.com
© 2011 BBY Solutions, Inc. All Rights Reserved.
DYNEX is a trademark of BBY Solutions, Inc. Registered in some countries. All
other products and brand names are trademarks of their respective owners.
Using one-touch backup
To use one-touch backup if you have set up a backup project:
Press the One-Touch button on the side of the HDD enclosure. The backup process
begins.
To use one-touch backup if you have NOT set up a backup project:
1 Press the One-Touch button on the side of the HDD enclosure. The Roxio
BackOnTrack software opens with the Backup files pages displayed.
2 Follow the on-screen instructions to set up a backup project.
3 After a backup project is set up, push the One-Touch button to backup your
data.
4 To modify One-Touch backups in the future, follow the instructions for setting
up backup in your User Guide.
ENGLISH 11-0173