1
Talk Master™
ii3 intercom system
Software Users′ Guide
For all ii3 series 10/100
Ethernet Intercoms
Models ii3-m, EDB, EDW
TABLE OF CONTENTS
OVERVIEW ..........................................................4
TYPICAL SYSTEM CONFIGURATIONS ..........................5
CONFIGURATION AND IP ADDRESSES .......................5
INTERCOM CONFIGURATION UTILITY.........................6
MAIN SCREEN CONTROLS ........................................8
INTERCOM LISTINGS............................................. 10
MESSAGES WAITING............................................. 10
MENU SELECTIONS ............................................... 11
TALKMASTER PREFERENCES ................................... 12
AUDIO MESSAGE PLAYER....................................... 13
DIRECT MODE CONNECTION AND SETUP.................. 14
TROUBLESHOOTING.............................................. 15
TALKMASTER ONLINE UPDATES .............................. 16
TECHNICAL SUPPORT ............................................ 16
ORDERING INFORMATION...................................... 17
-3-
O VERVIEW
Digital Acoustics IP (Internet Protocol) Intercom modules
provide a functional audio equivalent to the basic "push to
talk" (PTT) intercom. Simply connect the ii3-ED Desktop
intercoms to a 10/100 Ethernet connection and communicate
to a host server PC by voice.
Talk to/from any station to host PC server
High quality, clear transmit and playback audio
Simple operation utilizes push buttons for commands
Fixed, automatic and DHCP compliant IP assignment
Hands-free listen mode at stations
Directly connects through 10/100 ethernet system
Highly scaleable and seamless expansion
Field upgradeable OS using internal Flash memory
TalkMaster™ host software access and controls ii3 clients
Application SDK for Windows® available for developers
Perfect for business, industrial and consumer applications
Audio features include:
Audio modes compatible with PC multimedia PCM, WAV and
uLAW codecs
High quality, internal low noise microphone amplifier with
dynamic gain, AGC and compression
Buffered audio line out and internal 2 watt speaker amplifier
Digital volume control, adjustable locally and remotely.
Low latency, with optimized and adjustable buffering
TalkMaster System Requirements
Operating System
• Windows® 98,Windows ME, Windows 2000,Windows XP
Minimum Hardware Requirements
• Processor – Pentium® II 500 mhz or greater.
• Memory – 128MB or greater
• Installed Disk Space – 6MB
• Sound card (full duplex)
-4-
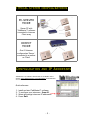
T YPICAL
SYSTEM CONFIGURATIONS
PC-SERVER
MODE
Server PC with
TalkMaster™ software
connected to Intercom
Client array
DIRECT
MODE
One ii3 Intercom
configured as 'Server' ,
connected to a another
as 'Client'
C ONFIGURATION
AND
IP A DDRESSES
TalkMaster™ LE software downloads are available online
Access www.digitalacoustics.com/talkmaster for downloads
and mode information.
Quick reference:
1.
2.
3.
4.
Install and start TalkMaster™ software
To configure your intercoms, Scan All
Select and assign intercoms IP addresses
Press Exit
-5-
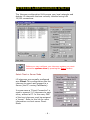
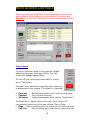
I NTERCOM C ONFIGURATION U TILITY
The Intercom configuration Utility scans your local networks and
detects ii3-intercoms that are correctly installed using LAN
10/100 connections.
Before you can configure your intercom system you must
execute a system scan by pressing the Search button
Select Client or Server Mode
ii3 intercoms are normally configured
as a Client. This configuration sets the
intercom to search and connect to a
Server (the PC running TalkMaster).
In some cases a "Direct Connection" is
used to connect 2 ii3 intercoms to each
other, without a PC. In this case, ONE
of the two intercoms must be assigned
a "server". Refer to this link for more
information on client server Direct
Mode.
-6-
Assign IP address as Static or use DHCP
Select DHCP mode to allow your network server to
automatically assign the IP address, subnet, and gateway to
the intercom. Your system MUST have DHCP assignment
capability if you choose use this option. If you are unsure, do
NOT use DHCP.
After assigning DHCP, press APPLY. The results on the board
list will show the selected IP address, Subnet mask, and
Gateway that were acquired from the DHCP server
Setting the Intercom Alias "Friendly Name"
Location Name:
Set a recognizable text name to
reference a specific Intercom
Choose the Intercoms Server IP address
A client intercom will always attempt to connect to the Server
IP when it is first turned on. This IP address must be assigned
by the Intercom Configuration Utility. It can be assigned
manually or automatically.
Assign this PC address as client's server
When checked, the Server IP text box will be automatically
set with the IP address of the PC running TalkMaster. This will
instruct the intercom to search for the PC running TalkMaster.
When unchecked, the Server IP box may be manually
assigned.
Server IP
Server Port
IP address of the Server
Port for use in connections (default is 3000)
Saving your configuration
Apply Save settings to selected intercom
Cancel Cancel settings before saving
Exit
Close the Configuration Utility Screen
-7-
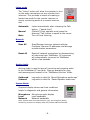
M AIN S CREEN C ONTROLS
Before you can use TalkMaster to communicate you must setup
and configure the intercoms on your network. To setup, click
Scan All to launch the TalkMaster Intercom Configuration Utility.
Communicate
To call an intercom listed in the intercom 'listbox"
select the intercom, then press TALK. The Talk
button will appear lighted (Red).
To turn off your microphone and wait for a reply
press 'Talk' Again.
Intercom Array destination specifies which intercom
is addressed on the system. The default is "selected"
Selected
Checked
All Active
Manual listen mode (client must press button)
Turn off local listening
Listen automatically after talking ""hands-free""
To send a file or signal (rather than your voice using a PC
microphone) select one of the two choices, Play or Page
Page
Play an audible audio file (tone) to the intercom array
Play File
Play Windows 'wav' audio file to intercom array
-8-
Listen mode
The "Listen" button will allow the operator to turn
on the audio microphone as any remote client
intercom. This provides a means of creating a
hands-free mode for the remote intercom or
simply monitoring audio at a remote intercom
site.
Automatic
Manual
Mute
Listen automatically after releasing the Talk
button, ("hands-free")
(Default) Client operator must press the
intercom 'Talk' button to speak to the server.
Turn off local listening
Network
Scan All
Scan/Manage intercom network settings
Configure intercom IP addresses and arrange
communication parameters.
Reset All
Reset all network connections by disconnecting
all intercoms from TalkMaster. All intercoms
will automatically reconnect to TalkMaster
within a few seconds.
Archive Audio
Archive Audio is used to save all incoming and outgoing audio
to the TalkMaster PC hard disk. Files are available for copy
and renaming and located in the 'TalkMaster\iArchive' folder.
Outbound
Inbound
Log audio to disk file 'Saved Microphone audio.wav'
Log audio to disk file 'Saved Speaker audio.wav'
System Watch
Graphical display shows real time conditions
helpful in diagnostic and general information.
Microphone Microphone audio display
Local
Local bandwidth
Network
Network bandwidth
Note: Vertical bars show transmission (up) and reception (down)
Positioning mouse over display area will provide additional details.
-9-
Auto Response
Auto-response provides a convenient method of notifying a
caller that the TalkMaster station attendant is away ("no one
is available" message), or talking to another party ("please
wait" message).
Automatic
Respond to Calls Waiting with default 'busy''
message
Unattended Respond to ALL calls with a 'not available'
message.
Off
Do not play automated responses
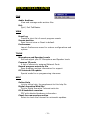
INTERCOM LISTINGS
The intercom listbox displays the detected array of intercoms.
Status and events are
displayed that are specific
to each intercom on the
network.
Right mouse clicking over a selected
row will display a menu dialog of
additional commands. These include
connection details and display
options, such as modifications of an
intercom "alias".
MESSAGES WAITING
The intercom message displays a
list of old and new message
activity. Messages are created
automatically when TalkMaster is
engaged in a call and additional
calls are placed from other
intercoms. Message playback is available using the integrated
Audio Message Player.
- 10 -
MENU SELECTIONS
FILE
Audio Archives
View and manage audio archive files
Exit
Quit / Exit TalkMaster
VIEW
Event log
Display a short list of recent program events
Screen position
Save current view or Reset to default
Preferences
Launch Preferences menu for custom configurations and
options
TOOLS
Microphone and Speaker Levels
Set and adjust your PC Microphone and Speaker levels
Common IP ports
A List of commonly assigned Network Ports
Record program events to file
Save program runtime information for support
ii3 Intercom OS update
Special mode for re-programming intercoms
HELP
Online Help
Link to online help, the supplement to this help file.
Digital Acoustics Web Site
Link to Digital Acoustics' Internet web site
ii3-M technical overview
PDF with detailed hardware information
Check for new versions online
Select to check the Internet for automatic updates.
- 11 -
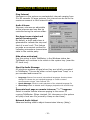
T ALK M ASTER P REFERENCES
Ping Interval
Intercoms on the system are contacted at intervals ranging from
5 to 90 seconds. In large systems, this interval can be set to the
maximum amount to limit network traffic.
Audio Volume
Intercom volumes are adjustable
at the intercom and can also be
controlled using the volume slider.
Use beep tones at start and
end of incoming calls
By default, a short audio tone is
generated to indicate the stop and
start of a user's call. This feature
provides a convenient method for
indicating microphone transmission
state to the remote party.
Hide when minimized
Use this option to hide TalkMaster in the Windows status bar.
TalkMaster will continue to be visible in the system tray (near the
PC clock icon).
Start Up Audio Message
All intercoms produce a signal when they are initially connected
to TalkMaster. This can be either a short signal tone "beep" or a
pre-recorded audio wave file.
Language Choose from several international languages. Use drop down
dialogue to choose the pre-installed language or create a custom
announcement using a "User Defined" file.
Speak Message Check to enable playback of the selected language file
Short Beep Check to disable audio language playbacks with a short beep.
Generate local page on remote intercom ""+"" keypress
Select to enable remote intercom paging to the server PC
running TalkMaster. When checked, ALL intercoms on the system
will play a local wav file (normally a beep or alert tone).
Network Audio Adjust
Advanced setting used to adjust transmission latency (delay).
- 12 -
A UDIO
MESSAGE PLAYER
The Audio Message Player provides a
convenient means to listen and review
messages and archived audio files.
Files will be automatically deleted
after playback unless you UNCHECK to
on-screen delete option.
- 13 -
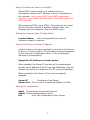
D IRECT M ODE
CONNECTION AND SETUP
Direct mode connects two ii3 intercoms
together in a link that does not require a PC.
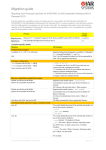
Server-Client assignment example
Server selection and setup
This image show the server selected (highlighted in Blue) and shows it's
configured IP address set to 192.168.0.170
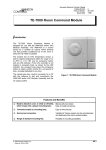
Client selection and setup
This image shows the client selected (highlighted in Blue). It is configured
with IP address 192.168.0.144 and has its server IP pointing to the other ii3
intercom (Server IP 192.168.0.170)
NOTE: Be sure to UNCHECK the option "assign this PC to the clients server"
- 14 -
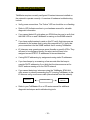
T ROUBLESHOOTING
TalkMaster requires correctly configured ii3-series intercoms installed on
the network to operate correctly. A overview of hardware troubleshooting
include:
Verify power connections. The "Active" LED on should be on or flashing.
Refer to LED Indicator section in your hardware manual for valuable
diagnostic information.
If you cannot detect ii3 units when you SCAN then be sure to verify that
the LINK LED is on and TalkMaster is running on the SAME network.
If you have multiple network cards on this PC verify that intercoms are
connected to the system that is using this computer's IP #. Verify that
your connection is on the SAME network that is running TalkMaster.
ii3 Intercoms may operate across some firewalls or specific VPNs. They
will need to be configured locally (for setup) and will need to be
assigned correct STATIC IP addresses for correct detection.
If using DHCP addressing try assignments using static IP addresses.
If you hear beeps try re-scanning a few seconds after the beep to
override DHCP addressing if you think that the intercoms are set for
DHCP and are running on a non DHCP network.
If you cannot detect any intercoms using the TalkMaster SCAN ALL
utility screen try directly connecting the PC (running TalkMaster) to the
ii3 intercom using a crossover cable (disconnected from the network).
PC running
TalkMaster
Crossover Cable
ii3
intercom
Refer to your TalkMaster ii3-m or ED series manual for additional
diagnostic techniques and troubleshooting tools.
- 15 -
T ALK M ASTER O NLINE U PDATES
TalkMaster version updates are available for automatic
installation. Use TalkMaster menu selection
"Check For New Versions Online".
ii3 intercom hardware is also available for operating system "OS" firmware. Contact
Digital Acoustics to for additional details.
T ECHNICAL
SUPPORT
Technical Support by email is available at:
[email protected]
International telephone support numbers
are available online at:
www.digitalacoustics.com/ii3support
Complete online documentation is available at:
www.digitalacoustics.com/talkmaster
Online web site link
Information online
Email
Telephone
www.digitalacoustics.com
[email protected]
+1 (203)-227-9700 M-F 9-5
- 16 -
O RDERING I NFORMATION
ii3 series models
ii3-m (module)
ii3-EDW-110
ii3-EDW-220
ii3-EDB-110
ii3-EDB-220
Digital Acoustics Corporation 1 Compobeach Road, Westport, CT 06880 U.S.A.
This document may contain advance information. Contact factory for
technical specification before product design and/or use. Design and
specifications are subject to change without notice.
Digital Acoustics® and TalkMaster™ are trademarks of Digital Acoustics Corporation,
all other marks used are properties of their respective owners. Digital Acoustics'
product designs are packaged by leading manufacturers around the world.
ii3-TM-1218B
- 17 -