1
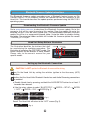
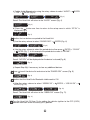
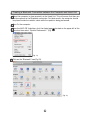
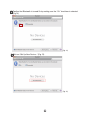
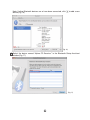
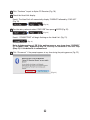
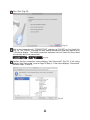
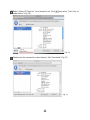
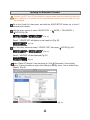
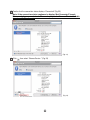
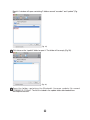
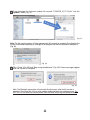
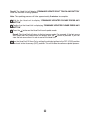
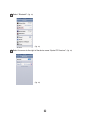
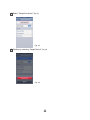
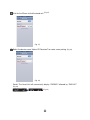
Bluetooth Firmware
Update Manual
®
for MAC OS X
Applicable 2012 products:
CDE-133BT
CDE-135BT
CDE-136BT
CDE-HD137BT
CDE-HD138BT
CDE-W235BT
ALPINE ELECTRONICS OF AMERICA, INC.
19145 Gramercy Place, Torrance,
California, USA
Phone 1-800-ALPINE-1 (1-800-257-4631)
Doc. version 1.0
(March 2013)
Introduction
This manual describes the steps required for updating the Head Units Bluetooth
firmware. The update improves compatibility with new mobile phones. Read all warnings
and steps carefully before performing the update.
Requirements
•A MAC OS X computer (connected to the Internet) with Bluetooth connectivity. This
includes built-in Bluetooth adapters or external USB Bluetooth adapters.
•The Bluetooth adapter must support File Transfer Profile (FTP).
•The Bluetooth firmware update file (Alpine provided).
Caution
•Do NOT update the Bluetooth firmware while driving.
•Do NOT turn Off the vehicle or remove power from the Head Unit while the unit is
updating. The update will not be performed correctly and the Head Unit may be
damaged.
Notice
•Updating will result in all user information being deleted, including user settings, paired
devices, and phone book contacts.
•Please contact Alpine Technical Support with any questions concerning the update
process.
1
Bluetooth Firmware Update Instructions
The Bluetooth firmware update procedure uses a Bluetooth feature known as File
Transfer Profile (FTP) to wirelessly transfer the update file from the computer to the
Head Unit. This manual describes the update process performed using the MAC OS X
operating system. Downloading the Bluetooth Firmware Update
Go to www.alpine-usa.com to download the Bluetooth firmware update file to the
computer that will be used to perform this update. Save the update file onto the
desktop so that it can be easily found later. The downloaded Bluetooth firmware
update file will be in a compressed (zipped) folder. Unzip the folder by double clicking
the folder. The extracted folder contents will include the firmware update file named
“FC6000S_01-27-00.plf”.
Head Unit Setup Buttons Illustration
The illustration identifies the buttons that shall
be used during the updating procedure. This
illustration is based on the CDE-133BT model. The
button locations will be different in some models.
Please refer to the owner’s manual for your
specific model. SOURCE/
Rotary volume
ENTER
AUDIO/SETUP
Setting up the Bluetooth Connection
CAUTION: Do NOT update the Bluetooth firmware while driving.
1 Turn On the Head Unit by setting the vehicles ignition to the Accessory (ACC)
position.
2 Confirm that the Head Units Bluetooth Hands-free and Audio Streaming connections
are enabled.
a) Enable Hands-free by pressing and hold the AUDIO/SETUP button for at least 2
seconds then releases.
b) Use the rotary volume to select “BLUETOOTH” >
> “HFP” > ENTER > “ON” > ENTER (Fig. 1).
ENTER > “BT IN” >
(Fig. 1)
Result: The Head Unit will return to the “HFP” screen (Fig. 2).
(Fig. 2)
2
ENTER
c) Enable Audio Streaming by using the rotary volume to select “AUDIO” >
> “ON” > ENTER (Fig. 3).
ENTER
(Fig. 3)
Result: The Head Unit will return to the “AUDIO” screen (Fig. 4).
(Fig. 4)
button one time to return to the setup menu in which “BT IN” is
d) Press the
displayed (Fig.5)
(Fig. 5)
3 Confirm that no devices are paired to the Head Unit.
a) Use the rotary volume to select “PAIRED DEV” >
ENTER (Fig. 6)
(Fig. 6)
b) Use the rotary volume to select the paired device then press ENTER > “CLEAR”
> ENTER (Fig. 7). In this example the paired device name is “ALPINE”.
(Fig. 7)
Result: “NO DEV” will be displayed after the device is cleared (Fig. 8).
(Fig. 8)
c) Repeat Step 3(b), if necessary, to clear any additional devices.
4 Press
to exit the device list and return to the “PAIRED DEV” screen (Fig. 9).
(Fig. 9)
5 Confirm that the Head Units Bluetooth visible mode is ON.
a) Use the rotary volume to select “VISIBLE M” >
ENTER (Fig. 10).
ENTER > “VISI M ON” >
(Fig. 10)
Result: The Head Unit will return to the “VISIBLE M” screen (Fig. 11).
(Fig. 11)
6 Turn the Head Unit Off then On by setting the vehicles ignition to the OFF (LOCK)
position then back to the Accessory (ACC) position.
3
Creating a Bluetooth Connection between the Computer and Head Unit
1 Place the computer in close proximity to the Head Unit. This will assure that there are
no interruptions to the Bluetooth connection. For ideal results, the computer should
be placed inside the vehicles cabin while the update is being performed.
2 Turn On the computer.
located on the upper-left of the
3 From the MAC OS X desktop, click the Apple logo
menu bar then select “System Preferences...” (Fig. 12)
(Fig. 12)
4 Click on the “Bluetooth” icon (Fig 13).
(Fig. 13)
4
5 Confirm that Bluetooth is turned On by making sure the “On” checkbox is selected
(Fig 14).
(Fig. 14)
6 Click on “Set Up New Device...“ (Fig. 15)
(Fig. 15)
5
Note: If other Bluetooth devices are or have been connected, click
device (Fig. 16)
to add a new
(Fig. 16)
7 Select the device named “Alpine CD Receiver” in the Bluetooth Setup Assistant
window (Fig. 17).
(Fig. 17)
6
8 Click “Continue” to pair to Alpine CD Receiver (Fig. 18).
9 Check the Head Unit display.
Result: The Head Unit will momentarily display “PAIRING” followed by “PAIR NO”
(Fig. 19).
(Fig. 19)
10 Turn the rotary volume to select “PAIR YES” then press
ENTER (Fig. 20).
(Fig. 20)
Result: “CONNECTING” will begin flashing on the Head Unit (Fig. 21).
(Fig. 21)
Note: In later versions of OS X the pairing process may jump from “PAIRING”
to “CONNECTING”, bypassing Step 10. It’s okay to continue to the next step
(Step 11) if this behavior is encountered.
11 Click “Disconnect” if the prompt appears at any time during the pairing process (Fig. 22).
(Fig. 22)
7
12 Click “Quit” (Fig. 23).
(Fig. 23)
13 Wait a few moments until “CONNECTING” changes to “FAILED” on the Head Unit
(Fig. 24). The “FAILED” message will only appear momentarily and may require up to
1 minute to display. The failed connection indicates that the Head Unit has paired
successfully but is not connected. (Fig. 24)
14 Confirm that the connection status displays “Not Connected” (Fig. 25). If the status
displays “Not Connected” jump to Page 10 (Step 1). If the status displays “Connected”
perform Steps 15 and 16.
(Fig. 25)
8
15 Select “Alpine CD Receiver” from the device list. Click
Audio Device” (Fig. 26). then select “Don’t Use as
(Fig. 26)
16 Confirm that the connection status displays “Not Connected” (Fig. 27). (Fig. 27)
9
Updating the Bluetooth Firmware
Caution: Do NOT turn Off the vehicle or remove power from the Head Unit while the
unit is updating. The update will not be performed correctly and the Head Unit may
be damaged. 1 Go to the Head Unit then press and hold the AUDIO/SETUP button for at least 2
seconds then release.
2 Use the rotary volume to select “BLUETOOTH” >
ENTER (Fig. 28).
ENTER > “FW UPDATE” >
(Fig. 28)
Result: “UPDATE NO” will display on the Head Unit (Fig. 29).
(Fig. 29)
3 Turn the rotary volume to select “UPDATE YES” then press
ENTER (Fig. 30).
(Fig. 30)
Result: “WAITING” will be displayed (Fig. 31).
(Fig. 31)
4
Select “Alpine CD Receiver” from the device list. Click
then select “Use as Audio
Device”. If given the option to select either (Mono) or (Stereo), select “Use as Audio Device
(Stereo)”. (Fig. 32)
(Fig. 32)
10
5 Confirm that the connection status displays “Connected” (Fig. 33).
Note: If the connection status continues to display “Not Connected” launch
iTunes and play any music track. The music playback will cause Bluetooth Audio
to automatically connect.
(Fig. 33)
6 Click
then select “Browse Device...” (Fig. 34)
(Fig. 34)
11
Result: A window will open containing 2 folders named “recorder” and “update” (Fig.
35).
(Fig. 35)
7 Click twice on the “update” folder to open it. The folder will be empty (Fig. 36).
(Fig. 36)
8 O p e n th e fo l d e r c o n t a i n i n g th e B l u e to oth f i r mwa r e u p d a te f il e n a m e d
“FC6000S_01-27-00.plf”. The file is included in the update folder downloaded from
www.alpine-usa.com.
12
9 Drag-and-drop the firmware update file named “FC6000S_01-27-00.plf” into the
“update” folder (Fig. 37).
(Fig. 37)
Note: The file transfer process will take approximately 30 seconds to complete. Pay attention that
the file is transfered completely by viewing that the progress bar reaches the end as displayed in
(Fig. 38).
(Fig. 38)
10 Click “Close” (Fig. 39) and “Stop using headphones” (Fig. 40) if these messages appear
after the transfer is complete.
(Fig. 39)
(Fig. 40)
Note: The Bluetooth connection will automatically disconnect after the file transfer is
complete. The Head Unit will then enter update mode and begin the update process. Do
NOT turn Off the vehicle or remove power from the head unit during the update process.
13
Result: The Head Unit will display “FIRMWARE UPDATE DON’T TOUCH ANY BUTTON”
while the firmware is being updated. Note: The updating process will take approximately 2 minutes to complete.
11 Wait for the Head unit to display “FIRMWARE UPDATED PLEASE PRESS ANY
BUTTON”.
12 Confirm that the Head Unit is displaying “FIRMWARE UPDATED PLEASE PRESS ANY
BUTTON”.
13 Press the
button on the Head Unit to exit update mode.
Result: The Head Unit will return to the last source mode. For example, if the last source
was Radio then the Radio source will display after the
button is pressed. If you can
view the last source then it’s safe to restart the Head Unit.
14 Turn the Head Unit Off then On by setting the vehicles ignition to the OFF (LOCK) position
then back to the Accessory (ACC) position. This will finalize the software update process.
14
Confirming that the Update was Successful
1 Go to the Head Unit then press and hold the AUDIO/SETUP button for at least 2
seconds then release.
2 Use the rotary volume to select “BLUETOOTH” >
ENTER (Fig. 41).
ENTER > “FW VERSION” >
(Fig. 41)
3 Confirm that the version displayed is “01.27.00” (Fig. 41).
Congratulations!
You have successfully updated the
Bluetooth firmware!
Note: The Head Units Bluetooth visible mode may change to OFF after the firmware update is
complete. Please refer to Page 3 (Step 5) to turn visible mode ON as needed to pair your mobile
phone to the Head Unit.
Pairing the iPhone to the head unit
A new Bluetooth pairing must be created in order to connect the iPhone to the head unit. Please
perform the following steps to creating a new pairing. 1 Select the “Settings” icon from the home menu. (Fig. 42)
(Fig. 42)
15
2 Select “Bluetooth”. (Fig. 43)
(Fig. 43)
3 Select the arrow to the right of the device name “Alpine CD Receiver”. (Fig. 44)
(Fig. 44)
16
4 Select “Forget this device” (Fig. 45)
(Fig. 45)
5 Confirm by selecting “Forget Device”. (Fig. 46)
(Fig. 46)
17
6 Wait for the iPhone to find the head unit. (Fig. 47)
(Fig. 47)
7 Select the device name “Alpine CD Received” to create a new pairing. (Fig. 48)
(Fig. 48)
Result: The Head Unit will momentarily display “PAIRING” followed by “PAIR NO”.
(Fig. 49)
(Fig. 49)
18
8 Turn the rotary volume to select “PAIR YES” then press ENTER. (Fig. 50)
(Fig. 50)
Result: “CONNECTING” will begin flashing on the Head Unit (Fig. 51).
(Fig. 51)
9 The Bluetooth status will display “Connected” to indicate pairing has completed.
(Fig. 52)
(Fig. 52)
19