1
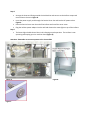
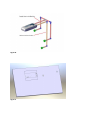
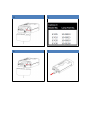
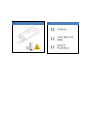
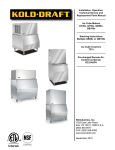
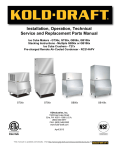
BIOZONE™ ICEZONE™ OWNER'S MANUAL – Single Horizontal Evaporator Style Ice Machines © BioZone Scientific International When correctly installed and properly used, the BioZone IceZone device helps to keep ice machines clean, greatly enhancing their functionality and improving the cleanliness of the ice. • BioZone IceZone significantly diminishes the presence of microbes, mold spores, yeast and other organic growths on the surfaces and in the air inside the ice machine. BioZone IceZone is the result of extensive research and sustained product development. Indeed, BioZone Scientific International Inc. has more than a decade of experience in designing and manufacturing its products. • BioZone IceZone is highly effective and safe to use. Certificates issued to this effect are listed in the Certifications section of this manual. • Every IceZone unit has undergone a strict quality-control regime. However, should the unit malfunction, follow the instructions in the Troubleshooting section of this manual. If the problem persists, please contact your local supplier. • BioZone products are designed to be user-friendly with a high degree of functionality, ease of operation and simple installation the primary considerations. User feedback is important for the continuous development of our products. We value your opinion and would greatly appreciate your feedback at email address: [email protected] For more information, visit our home page at www.biozonescientific.com and find BioZone solutions for other applications such as public restrooms, garbage rooms, power cleaning etc. • Contact information for importers and suppliers BioZone technology As air enters the IceZone unit, it is channeled into the air purification chamber. In the chamber, the air is sterilized by germicidal ultraviolet light. In addition, the UV-light reacts with the gaseous contents of the air to producing purifying plasma, which is led out of the purification chamber. The plasma contains reactive oxygen species such as hydroxyl radicals and ozone, which destroy bacteria, viruses, fungi, yeast, mold, algae, and other harmful micro-organisms as well as unpleasant odors. Warranty Please see the attached warranty card, if included, or contact your local distributor. The provisions of this warranty are in lieu of any other written warranty, whether expressed or implied, written or oral, including any warranty of merchantability or fitness for a particular purpose. The manufacturer's maximum liability shall not exceed the actual purchase price paid by you for the product. In no event shall the manufacturer be liable for special, incidental, consequential or indirect damages. This warranty does not cover a defect that resulted from improper or unreasonable use or maintenance, accident, improper packing, or unauthorized tampering, alteration or modification as determined solely by us. This warranty is void if the label bearing the serial number has been removed or defaced. Safety Instructions Proper Use This appliance is not intended for use by persons (including children) with reduced physical, sensory or mental capabilities, or lack of experience and knowledge, unless they have been given supervision or instruction concerning use of the appliance by a person responsible for their safety. Children are not allowed to use or play with this appliance and should be supervised to ensure this. If there is reason to suspect that the unit has been damaged, do not connect power or attempt to use it. Use only spare parts approved by BioZone Scientific International. Disconnect the device from the power-supply network before cleaning or servicing. Installation and maintenance must be carried out by a maintenance mechanic or appropriately qualified person only. The IceZone Product is intended for installation outside of the ice making area (This is considered the food zone). Do not install the IceZone inside the ice bin or ice production areas of the ice machine. Unit Components (Figure AA.) A. Service Cover B. Service Cover Screw C. Lamp Connector D. Status Light E. Lamp Life Reset Port F. Lamp Seal G. Status Light Remote Connection H. Power Connection I. UV-Lamp J. Plasma Ports K.12VDC 25W Power Adapter L. Mounting Screws / Rivets M. Plasma Distribution Tubing N. Plasma Distribution Fittings Before installation Check that the aforementioned components are included in the package (some are inside the device). In the event that something is missing, contact your supplier. Inspect the device for damage that may have occurred during transportation. If the unit has been damaged, do not connect it to the power supply. In the event of damage, immediately inform the dispatcher or retailer. Check whether the manufacturer of the ice-machine has verified the compatibility of the ice-machine with IceZone and recommended a suitable location for the IceZone unit. If so, comply fully with the manufacturer’s instructions. Only a maintenance mechanic or appropriately qualified person may install the IceZone. The installation may not be carried out in such a way that it damages electronic components, ice-machine components or wiring. Furthermore, installation must not require any modification to or re-positioning of ice-machine components. This installation instruction including the positioning of the plasma ports and use of NSF approved materials must be followed carefully to preserve the NSF compliance of the ice machine. The intention is to maintain the integrity of the ice machine’s boundary between the food zone and mechanical section by using sealed fittings whenever the plumbing must pass through this boundary. ATTENTION: Before installation, disconnect the ice-machine from the power supply. Installation instructions Step 1 To achieve maximum efficiency, the correct placement of the IceZone is very important. It is recommended that it be mounted on top of the ice-machine. The optimal place to introduce the plasma depends on the make and model of the ice-machine. This manual describes the installation for Horizontal Evaporator style ice machines only. Ice machines that fit this category are listed in Appendix A. Please request an Ice machine specific manual if you are installing IceZone on another type of ice machine. These machine specific instructions are also available on our website: Before installation, make sure that the power cord is within easy reach of a power outlet. To prevent contamination of the ice in the ice machine, it is recommended to remove the ice from the bin area while doing the installation of the IceZone. ATTENTION: Do not connect the power adapter to the mains supply at this stage! Step 2 Remove the ice machine top cover. Typically the IceZone Plasma Outlet Tube is directed towards the evaporator sections and the plastic skirts surrounding the evaporator area. Locate the place where one 15/16” (23mm) holes will pass through the back wall of the machine near the upper evaporator and a second similar location near the lower evaporator as shown in Figure A. The return line requires a third 15/16” (23mm) port in the back wall of the bin. See the suggested location in Figure B. Drill the 15/16” (23mm) holes for the bulkhead fitting. Install the bulkhead fittings according to Figure C. Clean the drilling debris from the ice bin and evaporator area. Step 3 Choose to mount the IceZone on the wall adjacent to the ice machine or on top of the ice machine. For Ice Machine top Mounting: Mark the location on the ice machine top cover for the 7/32” (5.5mm) holes for the IceZone plastic mounting rivets. Use the included paper template to place the IceZone where the mounting holes and fasteners will not interfere with Ice Machine components. These holes should be located above the mechanical area of the ice machine and not the ice making area (food zone). Remove the cover from the ice machine and drill the 7/32“ (5.5mm) holes to mount the IceZone. See Figure E. Alternative – Wall Mounting: Mount the IceZone on a wall adjacent to the ice machine using the included wall anchors and #8 Screws. Step 4 Arrange the hoses and fitting outside the Ice Machine and connect to the IceZone output and return tubes as shown in Figure D. Insert the power-supply cord through the Service Cover slot and into the DC power socket. Figure 4. Place the Service Cover over the end of the IceZone and install the cover screw. Plug the IceZone power adapter into the wall and observe the status light on top of the IceZone. Step 5 The Status Light should show a blue circle indicating normal operation. The IceZone is now operating and keeping your ice machine clean! (Figure 9) Attention: Remember to reconnect power to the ice-machine Figure A. Figure C. Figure B. Figure D. Figure E. Maintenance instructions If the device is located in a dusty or smoke-filled area, it is recommended that the lamp be cleaned every three months. This will significantly improve the effectiveness of the lamp. The lamp must be changed once a year in order to ensure maximum functionality and efficiency. Status Light (Figure 9) Steady Blue – Operation is Normal Steady Red – Replace Lamp Flashing Red – Service Required Cleaning and changing the lamp Cleaning (Figure 8) Disconnect the power supply to the device Open the Service Cover in accordance with the installation instructions in this manual Ensure that the lamp has cooled down (5 minutes). Unplug the lamp connector and extract the lamp from the Lamp Seal. When handling the lamp, avoid touching the glass element with exposed fingers. Cleaning the lamp: Clean the lamp with a soft cloth and isopropyl alcohol Reinsert the lamp. Changing (Figures 7 & 8) Disconnect the power supply to the device Open the Service Cover in accordance with the installation instructions in this manual Ensure that the lamp has cooled down. Unplug the lamp connector and extract the lamp from the Lamp Seal. Discard the old lamp according to local hazardous disposal regulations. The lamp contains a small amount of mercury. Insert a new lamp (see Figure 5 in this manual for correct lamp type). Use only a new BioZone Scientific International lamp (using other lamps will void the warranty will not function properly due to incompatibility with the on-board electronics.) Close the Service Cover in accordance with the installation instructions in this manual. Connect the power adapter to the wall outlet Troubleshooting In the event that the following instructions do not solve the problem, contact your supplier. Trouble Check Fan works Status Light – Steady Red Open the IceZone Service Cover and check that the lamp connectors are properly installed. Replace lamp. Fan works Status Light – Flashing Red Lamp Time Expired – Replace Lamp to Maintain Effective Ice Machine Cleaning. Reset Lamp Timer After Installing New Lamp Fan not working Status Light not lit Power supply plugged in. Power outlet is working. Power cord is undamaged. Weak airflow Clean Lamp Blocked Hose or Fittings Disposal/recycling Packaging Packing materials can be recycled. In the interest of environmental protection, dispose of them properly. The UV-lamp UV-lamps contain small traces of mercury. Old, defective or broken lamps must be disposed of in accordance with laws related to the disposal of hazardous wastes. Certifications This device complies with: NSF 169, UL 507, UL935, and Part 15 of the FCC Rules. Illustrations: AA. 1 2 3 4 5 6 7 8 9 Appendix A: Horizontal Evaporator Style Ice Machines Suitable for IceZone Installation Kold Draft GB106x