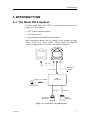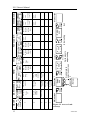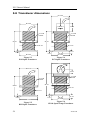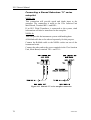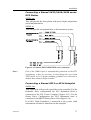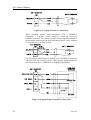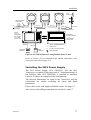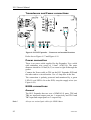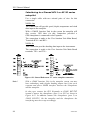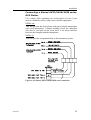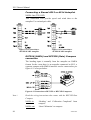
1
MANUAL
Simrad IS15
Instruments
General Manual
This page is intentionally left blank
IS15 General Manual
This manual is intended as a reference guide for operating and
correctly installing a Simrad IS15 Instrument System using the
digital IS15 Combi and IS15 Multi instruments, the analog IS15
Compass instrument and the IS15 Transceiver with speed and
depth transducers.
Please take time to read the manual to get a thorough
understanding of the operation and system components and their
relationship to a complete IS15 instrument system.
Other documentation material that is provided with your system
includes a ‘bridge card’, and a warranty card. The warranty card
must be filled out by the authorized dealer that performed the
installation and mailed in to activate the warranty. You will find
the warranty card in this manual.
20220760L
1
IS15 General Manual
Document revisions
Rev
Date
Written by
G
H
I
J
K
L
300301
290801
180402
200203
060204
190405
NG
NG
NG
NG
NG
Checked by
Approved by
IK
ThH
ThH
ThH
ThH
ThH
Document history
Rev. G
Instrument Software Information on page 48 updated. Figure 6-5
corrected. Depth specifications on page 45 updated.
Rev. H
IS15 Expander included
Rev. I
Updated to software version V1R5.
Rev. J
Corrected supply voltage for IS15 Expander in fig. 6-24 and 6-33.
Included connection drawing for Airmar transducers with 200KHz-G
designator, page 74. Added software information V1R6, page 55. New
transducer ST610 added, page 58.
Rev. K
New transducer ST300/P371 added, page 59. Minor modifications in text
on page 54, 55 and 61. True wind angle and speed added in table page 56.
Rev. L
Corrected the environmental rating on page 51 and 52. Figures 6-20 and 621 corrected.
2
20220760L
IS15 General Manual
Contents
1 INTRODUCTION............................................................................................ 5
1.1 The Basic IS15 System.............................................................................. 5
1.2 Equipment supplied................................................................................... 6
2 OPERATION OF THE IS15 COMBI INSTRUMENT ............................... 9
2.1 General Description................................................................................... 9
2.2 Powering Up.............................................................................................. 9
2.3 Display backlighting.................................................................................. 9
2.4 Display Screens ....................................................................................... 10
2.5 Screen Group 1: Depth, Speed, Trip Log................................................ 13
2.6 Screen Group 2: Wind............................................................................. 17
2.7 Screen Group 3: VMG ............................................................................ 19
2.8 Screen Group 4: Nav(igation) ................................................................. 20
2.9 Screen Group 5: Time Log...................................................................... 23
2.10 Alarm Sounding ...................................................................................... 27
3 OPERATION OF IS15 MULTI INSTRUMENT ....................................... 29
3.1 General Description................................................................................. 29
3.2 Powering Up............................................................................................ 29
3.3 Display backlighting................................................................................ 29
3.4 Display Screens ....................................................................................... 30
3.5 Screen Group 1: Depth ............................................................................ 33
3.6 Screen Group 2: Speed ............................................................................ 35
3.7 Screen Group 3: Wind............................................................................. 37
3.8 Screen Group 4: Nav 1 ............................................................................ 39
3.9 Screen Group 5: Nav 2 ............................................................................ 40
3.10 Screen Group 6: Race.............................................................................. 42
3.11 Screen Group 7: Log ............................................................................... 43
3.12 Alarm Sounding ...................................................................................... 44
4 OPERATION OF IS15 COMPASS INSTRUMENT ................................. 45
4.1 General Description................................................................................. 45
4.2 Powering Up............................................................................................ 46
4.3 Display backlighting................................................................................ 46
4.4 The Heading Display............................................................................... 46
4.5 Alarm Sounding ...................................................................................... 48
5 TECHNICAL SPECIFICATIONS .............................................................. 49
5.1 IS15 Combi and IS15 Multi .................................................................... 49
5.2 IS15 Compass.......................................................................................... 52
5.3 IS15 Transceiver...................................................................................... 52
5.4 IS15 Expander ......................................................................................... 53
20220760L
3
IS15 General Manual
5.5 Instrument Software Information ............................................................ 54
5.6 NMEA messages and data overview....................................................... 55
5.7 Display head and Transceiver dimensions .............................................. 57
5.8 Transducer dimensions............................................................................ 58
6 INSTALLATION ........................................................................................... 61
6.1 General .................................................................................................... 61
6.2 Mounting of Instrument Head ................................................................. 61
6.3 System layout .......................................................................................... 63
6.4 IS15 Transceiver Mounting..................................................................... 64
6.5 Transducers.............................................................................................. 65
6.6 Cabling .................................................................................................... 66
6.7 Instrument head connections ................................................................... 68
6.8 NMEA connections ................................................................................. 69
6.9 IS15 Transceiver...................................................................................... 73
6.10 IS15 Instruments as NMEA repeaters ..................................................... 75
6.11 IS15 Expander ......................................................................................... 79
7 SETTING-UP ................................................................................................. 89
7.1 First time turn on ..................................................................................... 89
7.2 Installation and Calibration Menu........................................................... 90
7.3 General Screen Group ............................................................................. 92
7.4 Depth Screen Group ................................................................................ 94
7.5 Boat Speed Screen Group........................................................................ 95
7.6 Temperature Screen Group ..................................................................... 97
7.7 Wind Screen Group ................................................................................. 97
7.8 Navigation Screen Group ........................................................................ 98
7.9 Compass Screen Group ........................................................................... 98
7.10 Rudder Screen Group ............................................................................ 100
7.11 Expander Screen Group......................................................................... 100
7.12 Leaving the Installation Menu............................................................... 101
7.13 Setting up the Compass Instrument....................................................... 101
8 FAULT FINDING........................................................................................ 107
9 MAINTENANCE ......................................................................................... 117
9.1 General Maintenance............................................................................. 117
9.2 Annual Maintenance.............................................................................. 117
9.3 Removal of Instruments ........................................................................ 117
9.4 Return for Service ................................................................................. 118
9.5 Local Master Reset ................................................................................ 118
10 SPARE PARTS LIST .................................................................................. 119
4
20220760L
Introduction
1 INTRODUCTION
1.1 The Basic IS15 System
A basic stand alone IS15 SDT-1 (tri-data) system is shown in
Figure 1-1. It comprises:
• IS15 Combi instrument head
• IS15 Transceiver
• Speed/temperature and Depth transducers.
More instrument heads may be added to the system by using
single cables in a “daisy chain”. Please study the different
system configurations in section 6 for more information.
IS15 Combi
SIMRAD
SIMRAD
0,3 m (1')
10 m (33')
Supply 10,8-15,6VDC
NMEA input
or output
IS15
Transceiver
Fuse 5A
Circuit breaker
10 m (33')
Speed/temp
transducer
10 m (33')
Depth
transducer
Figure 1-1 - IS15 SDT-1 System Layout
20220760L
5
IS15 General Manual
The IS15 Instrument System uses a single cable to carry power
and data between the IS15 Transceiver and the instruments. The
transfer of power and data is made by a proprietary data link
called Roblink. Interface to peripheral equipment is made on
NMEA 0183 format, the marine industry standard.
1.2 Equipment supplied
The units in an IS15 Instrument system are supplied with the
following parts as standard:
• All instrument heads:
Mounting kit, 0,3 m (1’) IS15
(Roblink) Cable and Operator’s
Quick Reference Guide (“bridge
card”).
• IS15 Transceiver:
Mounting kit, 10 m (33’) IS15
(Roblink) Cable and IS15 General
Manual.
• Speed/Temperature
transducer:
• Depth transducers:
10 m (33’) cable attached
+ mounting instructions.
10 m (33’) cable attached +
mounting instructions.
Optional equipment
• IS15 Cable 2 m (6,5’) P/N 22093728
• IS15 Cable 5 m (16’) P/N 22092548
• IS15 Cable 10 m (33’) P/N 22092027
The cables can be used for extension and/or as cables for
NMEA interface to peripheral equipment.
• IS15 Cable Adapter (joiner) P/N 22092001
Interconnects IS15 cables where cable extension is required.
• IS15 Roblink Power Cable 2,5 m (8’) P/N 22093587.
Required when using 2 or 3 instrument heads as NMEA
repeaters in a “daisy chain”.
Also required when using a single IS15 Wind instrument as
stand alone with the Wind Transducer connected directly to
the head. Comes as standard with a W-1 system.
• IS15 Power Supply P/N 22093595.
Required when using 4-7 instrument heads as NMEA
repeaters in a “daisy chain”.
6
20220760L
Introduction
• IS15 Expander (P/N 22092431)
IS15 Expander is an upgraded version of the IS15
Transceiver.
In addition to electronics for depth sounding and speed/
temperature transducers it offers two NMEA I/O ports and the
capability of driving 8 instrument heads. Further instructions
on how to connect the instruments and peripheral equipment
are found in this manual.
The following parts are included as standard:
− Mounting kit
− 2 ea. 10 m (33’) Roblink cable
− IS15 General Manual
20220760L
7
IS15 General Manual
This page is intentionally left blank
8
20220760L
Operation of IS15 Combi
2 OPERATION OF THE IS15 COMBI INSTRUMENT
Screen group
reverse button
Screen group
advance button
Upper screen
section
LCD
Display
Middle screen
section
Lower screen
section
Screen advance
button/illumination
control
Screen reverse
button
Reset button
2.1 General Description
The instrument is operated by five buttons. By pressing one of
the arrow buttons you can move up, down, or sideways through
the selection of display screens that are available. The table of
screens is shown on page 11. The reset button is only active on
some of the screens. When a button is pressed a beep will
confirm the operation.
The display is divided into three sections, each section normally
containing one set of information. On some screens a graphical
display may cover more than one section.
2.2 Powering Up
When the instruments are powered up for the first time, see
section 7.1. ‘First time turn on’ on page 89.
At normal power up, each instrument shows the start-up screen
with the software version for approximately two seconds. The
display will then change to show the screen that was on at turnoff.
2.3 Display backlighting
Press the
button and hold for 2 seconds. The display then
presents the backlighting level. Repeat pressing until desired
backlighting level. Selectable values are 1-7 and off (0).
20220760L
9
IS15 General Manual
2.4 Display Screens
The Table of Display Screens
The display screens of the COMBI instrument are arranged in a
‘table’ as per below. The table consists of a number of screen
groups, each group being a logical collection of useful screens.
To access the screens you move ‘up’ or ‘down’ through the
groups using the upper
and
buttons, and ‘sideways’
through the screens using the lower
and
buttons. When
moving ‘up’ or ‘down’ to a new screen group the first display
will be the last one accessed in that group. If you press and hold
any of the two
buttons it will return to the group’s
Main Display.
10
20220760L
Operation of IS15 Combi
Screen
Group
Group 1
Screen 1
Screen 2
Group 3
Group 4
Group 5
Screen 4
Screen 5
Depth
Depth
Trim speed
SOG
Shallow
alarm status
Boat speed
SOG
Depth
Boat speed
Deep alarm
status
Trip Log
Sea Temp.
Average
speed
Anchor
alarm status
*2
*3
Group 2
Screen 3
Apparent
Wind Angle
True Wind
Angle
Apparent
Wind Speed
*1
True Wind
Speed
*3
VMG to
wind
Boat speed
VMG to
wind
Trim speed
Apparent
Wind Angle
*1
Apparent
Wind Angle
Heading
Heading
Boat speed
Rudder
angle
*1
COG
SOG
Race time
Local time
Race time
Race log
Local time
*2
*2
*3
Max. speed
*1
Screen 6
Screen 7
*5
Wind
Direction
*1
VMG to
wind
Apparent
Wind Speed
Apparent
Wind Angle
Waypoint
ID
WP bearing
XTE
*1
Waypoint
ID
WP bearing
WP distance
*1
*1
Waypoint
ID
WP bearing
COG
*1
VMG to
WP
Time to go
Local time
Position
*1
Cum. log
Trip log
Passage
time
Figure 2-1 - Table of Display Screens
* Denotes the number of (concealed) sub-screens (-Setup-)
Notes !
1. If data is not available then “----” will be displayed in place
of data on the appropriate screen(s).
2. Some of the main screens have (concealed) sub-screens
attached for added information and user settings.
Sub-screens (- setup -)
The diagram on the next page shows the sub-screen matrix, how
to select a sub-screen and how to change a setting.
Note !
20220760L
Main screens that have repeated or no sub-screen(s) are not
shown in this diagram.
11
12
Shal. Alarm
Limit
Deep alarm
ON-OFF
Depth
Sounder
ON/OFF
Depth damping
3
2 sec.
XXX
- Setup -
Quick press to
select sub screen
Sub screen 2
- Setup XXX
2 sec.
Wind alrm
limit
Alarm
ON/OFF
True Wind
Speed
Mag. Var
Monitor
Auto or
manual
adjust
WIND
Wind
damp.
1-4
Sub screen 1
Anch. Alarm
ON-OFF
5
Main screen
Deep alarm
Limit
4
Damp
0-3
2
1
Shal. Alarm
ON-OFF
DEPTH/SPEED
Boat Speed
SUB
SCREEN
MAIN
SCR.
GROUP
Decrease
Increase
UTC
Offset
Mag. Var
Monitor
Auto or
manual
adjust
- Setup YYY
Enter setting
2 sec.
Mag. Var
Monitor
Auto or
manual
adjust
NAVIGATION
YYY
Mag. Var
Monitor
Auto or
manual
adjust
Quick press to
adjust setting
Damp
0-3
Boat Speed
VMG
Exit
2 sec.
Main screen
UTC
Offset
5-10 min.
3-6 min.
5-10 min.
3-6 min.
UTC
Offset
Select
timer
Select
timer
TIMER LOG
IS15 General Manual
Figure 2-2 Access of subscreen(s)
20220760L
Operation of IS15 Combi
2.5 Screen Group 1: Depth, Speed, Trip Log
There are five screens in this group (all have one or more sub
screens).
Screen 1
DEPTH
BOAT SPEED
TRIP LOG
• The upper screen section displays ‘DEPTH’, unit (e.g. ‘mtrs’)
and the depth value. An arrow indicates a rising (↑) or falling
(↓) bottom. A bargraph indicates the strength of the signal.
‘EXT’ replaces the bargraph if the depth signal is from an
external source on NMEA format.
• The middle screen section displays ‘BOAT’, unit (e.g. ‘kts’)
and boat speed value.
• The lower screen section displays ‘TRIP’ and the trip log
value in nautical miles.
Note !
If the system depth transducer signal is lost, the Depth display
will flash the last good echo value for one minute, then it will
show ---. If there is an alternative depth input to the system on
NMEA format and the sounder is set to Off, this depth will be
displayed instead.
Screen 1 has three sub screens. Setting of the boat (water) speed
damping, switching the depth sounder on and off, and setting the
level of depth damping.
Speed damping
The displayed speed has four damping levels (0-3), 0=Off.
On power up the last set damping level is selected.
To change the speed damping level follow the procedure in
Figure 2-2, page 12 and select the wanted damping level. The
higher the figure the more damping.
To Set the Depth Sounder On or Off
In certain circumstances, e.g., to save power in known waters or
when out of depth range, you may want to turn the depth sounder
off. It is also recommended to turn it off if there is another
sounder on board operating on the same (200 kHz) frequency.
Interference between the two can thus be avoided.
20220760L
13
IS15 General Manual
Note !
When the sounder is turned off, the display will show OFF
instead of the depth reading.
Follow the instructions in Figure 2-2 to access the depth sounder
ON/OFF screen. With the ON-screen flashing select OFF and
return to Screen 1 as per instructions.
This setting is not affected by power off/on or a Communication
Reset, but defaults to ON after a Master Reset.
Depth damping
The displayed depth has four levels (0-3), 0 = Off. On power up
the last set damping is selected. To change the depth damping
level follow the procedure in Figure 2-2, page 12 and select the
wanted damping level.
The higher the figure the more damping.
Screen 2
DEPTH
SPEED OVER GROUND
SEA TEMPERATURE
• The upper screen section displays ‘DEPTH’, as on Screen 1.
• The middle screen section displays ‘SOG’, the unit (e.g.
‘kts’) and the Speed Over Ground value. SOG will only be
displayed if a GPS receiver input is available.
• The lower screen section displays ‘SEA’, the sea temperature
value and the units, ‘°C’ or ‘°F’.
Screen 2 has two sub-screens: one for setting the depth sounder
on and off and one for depth damping. Refer to above.
Screen 3
TRIM SPEED
DEPTH
• The upper screen section displays ‘TRIM’ and the unit, e.g.
‘kts’. The Trim Speed is the difference between the present
boat speed and the target speed.
• At turn on the Trim Speed will only be indicated if it has
been reset (see below), until that time it will show ‘----’.
• The lower screen section displays DEPTH as on screens 1
and 2.
14
20220760L
Operation of IS15 Combi
Screen 3 has three sub-screens, similar to screen 1. Refer to
pages 13 and 14.
To Reset the Trim Speed
The Trim Speed may be reset at any time, as per below:
• Select either of the two display screens that show Trim
Speed.
• A short press of the
(Reset) button will set the target
speed as the current speed. The trim speed displays will then
show changes from the current speed.
Screen 4
SPEED OVER GROUND
BOAT SPEED
BOAT AVERAGE SPEED
BOAT MAX SPEED
• The upper screen section displays ‘SOG’, the unit (e.g. ‘kts’)
and the Speed Over Ground value. SOG will only be
displayed if a GPS receiver input is available.
• The second screen section displays ‘BOAT’, speed value and
the unit (e.g. ‘kts’).
• The third screen section displays ‘AVG’, average speed value
and the unit (e.g. ‘kts’). The average speed is calculated as
the distance covered by the boat since power up or when the
passage time was last reset, divided by the passage time.
• The lower screen section displays ‘MAX’, maximum speed
value and the unit (e.g. ‘kts’).
Screen 4 has a sub-screen for setting the water speed damping.
Note !
20220760L
Average speed and max speed are reset by Passage Time reset
(See paragraph 2.9).
15
IS15 General Manual
Screen 5
SHALLOW ALARM
DEEP ALARM
ANCHOR ALARM
The screen shows the setting of the alarm limits and whether the
alarms are activated or not (On/Off).
The alarms can be set to ON or OFF at any time.
Screen 5 has five sub screens. The first two are for Shallow
Alarm ON/OFF and Shallow Alarm Limit settings. The next two
are for Deep Alarm ON/OFF and Deep Alarm Limit settings.
The last one is for setting the anchor alarm ‘ON’ or ‘OFF’.
SHALLOW ALARM AND DEEP ALARM
The screen displays the Alarm status, ‘ON’ or ‘OFF’, and the set
alarm limit in the order shown.
To turn the alarms ON or OFF and/or set the alarm limits follow
the procedure as shown in Figure 2-2, page 12.
ANCHOR ALARM ON/OFF
Refer to Figure 2-2, page 12 to turn the Anchor Alarm ON or
OFF.
Note !
16
The anchor alarm should be off when the boat is not at anchor.
The alarm will sound when during a 40 seconds time period
there is a change in the depth of 2-3 meters (6-10 ft.).
20220760L
Operation of IS15 Combi
2.6 Screen Group 2: Wind
There are three screens in this group.
Screen 1
APPARENT WIND ANGLE
APPARENT WIND SPEED
• The upper screen section displays ‘APPARENT WIND’
• The middle screen section displays a wind direction icon and
the apparent wind angle value.
• The lower screen section displays the apparent wind speed
reading and the unit (e.g. ‘kts’).
Screen 1 has a sub screen for setting the wind data damping.
Wind damping
The displayed wind information has four damping levels (1-4).
On power up the last set damping level is selected.
To change the damping level follow the procedure in Figure 2-2,
page 12 and select the wanted damping level. The higher the
figure the more damping.
Screen 2
TRUE WIND ANGLE
TRUE WIND SPEED
• The upper screen section displays ‘TRUE WIND’.
• The middle screen section displays a wind direction icon and
the True Wind Angle value.
• The lower screen section displays the True Wind Speed
reading and the unit (e.g. ‘kts’).
Screen 2 has three sub-screens. One for setting the wind
damping, one for switching the wind speed alarm on and off, and
one for setting the wind speed alarm limit.
Wind damping
Refer to screen 1.
True Wind Speed Alarm ON/OFF
Refer to Figure 2-2, page 12 to turn the True Wind Speed Alarm
ON or OFF.
20220760L
17
IS15 General Manual
True Wind Speed Alarm limit
Refer to Figure 2-2, page 12 to set the wind speed alarm limit (099 knots).
Screen 3
WIND DIRECTION
The screen displays the Wind Direction in degrees and the unit
(‘T’rue or ‘M’agnetic). Refer to page 20.
Screen 3 has a sub screen for setting the magnetic variation.
Refer to page 21.
Notes !
1. The Wind Direction is calculated from available heading
data. The wind direction given is the effective wind direction
over the water. The display will be most accurate after a
period on one heading, however, it will respond rapidly to
course changes.
2. If there is no heading data, but Course Over Ground (COG)
data is available then the Wind Direction is calculated from
the Course Over Ground. In this case there is compensation
for the tide, and the wind direction given is the effective wind
direction over the ground. However the display will not be
accurate after a course change, and will require a period on
one heading before it is correct. (Any errors in the
Navigation Receiver’s fix will degrade the accuracy of the
wind direction.)
3. The Wind Direction is referenced to either Magnetic or True
North as selected for the heading. The data can be converted
from one to the other if the local magnetic variation is
available (page 20).
4. Note that the ‘TRUE’ and ‘APPARENT’ readings that are
shown in this group of screens relate to the Wind Speed and
Angle, and not the Wind Direction.
18
20220760L
Operation of IS15 Combi
2.7 Screen Group 3: VMG
There are three screens in this group.
Screen 1
VELOCITY MADE GOOD (VMG) TO WIND
BOAT SPEED
APPARENT WIND ANGLE
• The upper screen section displays ‘VMG’, the VMG to wind
value and the unit (e.g. ‘kts’). The VMG display shows the
Velocity Made Good into the wind, this is shown as a
positive speed if the vessel is travelling upwind, and as a
negative speed if the vessel is travelling downwind.
• The middle section displays ‘BOAT’, the Boat Speed reading
and the unit (e.g. ‘kts’).
• The lower screen section displays ‘WIND APP’, a wind
direction icon and the apparent wind angle reading.
Screen 1 has a sub screen for setting the boat (water) speed
damping.
Refer to page 13.
Screen 2
VELOCITY MADE GOOD (VMG) TO WIND
TRIM SPEED
APPARENT WIND ANGLE
• The upper screen section displays ‘VMG’ as on Screen 1.
• The middle screen section displays ‘TRIM SPD’, the trim
speed value and the unit (e.g. ‘kts’). Trim Speed is the
difference in speed between the present boat speed and the
target speed. It will only be indicated if it has been reset at
turn on, until that time it will show ‘----’.
• The lower screen section displays ‘WIND APP’, a wind
direction icon and the apparent wind angle reading.
Screen 2 has no sub-screen.
20220760L
19
IS15 General Manual
Screen 3
VELOCITY MADE GOOD (VMG) TO WIND
APPARENT WIND SPEED
APPARENT WIND ANGLE
The upper screen section displays ‘VMG’ as on Screen 1.
The middle screen section displays ‘WIND APP.’, apparent wind
speed value and the unit (e.g. ‘kts’).
The lower screen section displays ‘WIND APP.’, a wind
direction icon and the apparent wind angle value.
Screen 3 has no sub-screen.
2.8 Screen Group 4: Nav(igation)
There are seven screens in this group.
Note !
When the instrument is receiving an invalid message from the
navigation receiver or the message is missing, the display will
show ’---‘
Screen 1
HEADING
BOAT SPEED
RUDDER ANGLE
• The upper screen section displays ‘HDG’ (Heading) in
degrees and the unit, ‘M’agnetic’ or ‘T’rue. The heading may
be referenced to either Magnetic or True North as set in
paragraph 7.9 Screen 3 “Bearing Unit”.
Note !
The selection of ‘M’ or ‘T’ will set the reference for all the
bearings that are shown by the instruments, including the
Waypoint Bearing, the Course Over Ground, and the Wind
Direction. If only one of the two readings (‘T’rue or ‘M’agnetic)
is available, and the other one is required, the instruments can
convert from one to the other. This will, however, not change the
displayed unit. See ‘MAG. VARIATION’ below.
• The middle section displays ‘BOAT’, the Boat Speed reading
and the unit (e.g. ‘kts’).
• The lower screen section displays the rudder angle.
Screen 1 has a sub-screen for setting the magnetic variation.
20
20220760L
Operation of IS15 Combi
MAG. VARIATION
The IS15 instruments automatically read the Magnetic Variation
compensation from a connected GPS. The compensation is
presented on the screen. You are not allowed to adjust the
button and
compensation from the GPS. If you press the
hold for 2 seconds the screen just flashes AUTO and returns to
show the compensation from the GPS.
If a GPS is not connected you will be able to enter the magnetic
and
buttons.
variation manually using the
Screen 2
HEADING
COURSE OVER GROUND (COG)
SPEED OVER GROUND (SOG)
• The upper screen section displays ‘HDG’ (Heading) as on
screen 1.
• The middle screen section displays ‘COG’, Course Over
Ground similar to screen 2.
• The lower screen section displays ‘SOG’, Speed Over
Ground value and the unit, (e.g. ‘kts’).
Screen 2 has a sub screen for setting the magnetic variation.
Refer to above.
Screen 3
WAYPOINT ID
WAYPOINT BEARING
CROSS TRACK ERROR (XTE)
• The upper screen section displays the Waypoint ID.
• The middle screen section displays ‘BRNG WP’, the Bearing
to the waypoint in degrees and the unit (‘T’rue or
‘M’agnetic). See note on page 20.
• The lower screen section displays ‘XTE’, the Cross Track
Error (XTE) value and the boat position relative to the track
line. The XTE is shown for any error greater than 0.001 NM
if the XTE message contains three decimal points. Otherwise
it will show errors greater than 0.01 NM. The direction to
steer will be towards the track line. When the boat is on track,
the boat icon will disappear while the track line remains.
20220760L
21
IS15 General Manual
Note !
The direction to the track line may not be the direction to steer
directly to the Waypoint, but may be important for safety
reasons; for instance, if the track passes close to shoals, or a
restricted area.
Screen 3 has a sub screen for setting the magnetic variation.
Refer to page 21.
Screen 4
WAYPOINT ID
WAYPOINT BEARING
DISTANCE TO WAYPOINT
• Here the lower screen section displays the distance to
waypoint and the unit, ‘nm’ or ‘km’.
Screen 4 has a sub screen for setting the magnetic variation.
Refer to page 21.
Screen 5
WAYPOINT ID
WAYPOINT BEARING
COURSE OVER GROUND (COG)
Screen 5 has a sub screen for setting the magnetic variation.
Refer to page 21.
Screen 6
VELOCITY MADE GOOD (VMG) TO WAYPOINT
TIME TO GO
LOCAL TIME
• The upper screen section displays ‘VMG–WP’, the Velocity
Made Good to WP value and the unit (e.g. ‘kts’).
• The middle screen section displays time ‘TO GO’ in
hours:minutes:seconds to the destination waypoint.
• The lower screen section displays ‘LOCAL’ time in
hours:minutes:seconds. The Local Time is only given if a
suitable GPS data input is available. The GPS system runs on
Universal Co-ordinated Time (UTC), which is the same as
Greenwich Mean Time (GMT). The display can be set to
local time.
22
20220760L
Operation of IS15 Combi
UTC offset
Screen 3 has a sub screen for setting of the UTC offset.
To change the UTC offset follow the procedure in Figure 2-2,
page 12. It can be changed in steps of 30 minutes.
Screen 7
POSITION
• The upper screen section displays the ‘LATITUDE’ (N or S)
in degrees and minutes with two or three decimal points.
• The lower screen section displays the ‘LONGITUDE’ (E or
W) in degrees and minutes with two or three decimal points.
Screen 5 has no sub-screen.
2.9 Screen Group 5: Time Log
There are three screens in this group.
Screen 1
RACE TIME
LOCAL TIME
• The upper screen section displays ‘RACE TIME’ start time,
the count down time and the elapsed time after start. See
Notes.
• The lower screen section displays ‘LOCAL TIME’ and
hours:minutes:seconds.
Screen 1 has two sub-screens. One for setting the UTC offset,
and one for selecting a Race Timer of 5-10 min. or 3-6 min.
Race Timer
To change the Race Timer follow the procedure in Figure 2-2,
page 12. 5-10 min. or 3-6 min. are available.
UTC Offset
To change the UTC offset follow the procedure in Figure 2-2,
page 12. It can be changed in steps of 30 minutes.
20220760L
23
IS15 General Manual
Screen 2
RACE TIME
RACE LOG
LOCAL TIME
• The upper section displays ‘RACE TIME’ as on Screen 1.
• The middle screen section displays ‘RACE’ (log), the
distance and the unit, ‘nm’ or ‘km’.
• The lower screen section displays ‘LOCAL’ (time) and
hours:minutes:seconds.
Screen 2 has the same two sub-screens as screen 1.
Notes !
1. Two Race Timers are available; 10-5 minutes or 6-3 minutes.
They are selectable in a sub-screen to the Race timer main
screens.
2. The Race Timer is global and will be counting down towards
the race start time on all of the other instruments that show
the Race Timer.
3. The Race Log gives the distance covered after the race start
time.
4. The Race Log is reset if the system is turned off, or if the
Race Time is reset.
5. The local time is only given if a suitable GPS data input is
available. The GPS system runs on Universal Co-Ordinated
Time (UTC), which is the same as Greenwich Mean Time
(GMT).
6. The Local Time display gives the time of the day in 24 hour
format.
To Start the Race Timer
The Race Timer may be started at any time, as below:
1. Select either of the ‘RACE TIME’ screens.
2. Select between 5 or 10 (3 or 6) minute start time by pressing
button and hold for 2 seconds (ref. Notes above).
the
3. Start the timer by pressing the RESET button. The timer will
count down with audible alarms at times as below:
24
20220760L
Operation of IS15 Combi
5 minutes
1 minute
30 seconds
5 seconds
4 seconds
3 seconds
2 seconds
1 second
BEEP (3 minutes if 3-6 timer selected)
BEEP BEEP
BEEP BEEP BEEP
BEEP
BEEP
BEEP
BEEP
BEEP
BEEP BEEP BEEP BEEP → GO
To Freeze the Race Timer
The Race Timer may be frozen and restarted at any time that it is
running, before or after the start of a race, as below:
1. Apply a short press on the RESET button to freeze the Race
Timer.
2. Press the RESET button a second time to show the running
Race Timer again.
Notes !
1. If the Race Time display is frozen before the start of the race
the timer will stop counting, so that when the display is
unfrozen it carries on from the displayed time, delayed from
its original start time.
2. If the Race Time display is frozen after the start of the race
the timer itself will continue to count, so that when the
display is unfrozen the count is unaffected.
3. The Race Log is unaffected by freezing the Race Time.
To Reset the Race Timer and Race Log
The Race Timer may be stopped and reset at any time, before or
after the start of a race, as below:
1. Select the Race Time and Race Log screen.
2. Press the RESET button and hold for 2 seconds to reset the
Race Time to the previous start time and to reset the Race
Log to zero (- - -).
20220760L
25
IS15 General Manual
Screen 3
CUMULATIVE LOG
TRIP LOG
PASSAGE TIME
• The upper screen section displays ‘LOG’, the cumulative log
value and the units, ‘nm’ or ‘km’. The cumulative log is the
total distance traveled by the vessel. It can only be reset by a
Master Reset.
• The middle screen section displays ‘TRIP’, the trip log value
and the units, ‘nm’ or ‘km’. The trip log can be reset, but is
not lost when the system is turned off.
• The lower screen section displays ‘PASSAGE TIME’, hours,
minutes and seconds. Passage Time is the time since the
system was powered up or since it was last reset.
Screen 3 has no sub-screen.
To Reset the Passage Time to Zero
The passage time may be reset at any time, as per below:
1. Select the Log, Trip Log and Passage Time screen (3).
2. Press the RESET button and hold for 2 seconds. The Passage
Time, Average Speed and Max Speed will be reset.
To Reset the Trip Log to Zero
The trip log may be reset together with the passage time at any
time, as per below:
1. Select the Log, Trip Log and Passage Time display screen (3).
2. Press the RESET button and hold for 2 seconds. This will
initially reset the Passage Time, Average Speed and Max
Speed. Press and hold the button once more and the Trip Log
will also be reset.
Note !
26
The Trip Log and Passage Time are system wide, resetting it on
one instrument will reset it across the whole system.
20220760L
Operation of IS15 Combi
2.10 Alarm Sounding
The alarm is system wide and all the instruments will sound and
flash a warning message.
If there is an external alarm connected then this will be sounded
at the same time (only if an IS15 Expander is part of the system).
To cancel a sounding alarm press any button on any of the
instrument displays.
Note !
The flashing warning will remain as long as the alarm condition
exists and disappears automatically when there is no longer an
alarm condition. The sounding alarm will always have to be
cancelled.
Alarm messages
The text that are shown when an alarm is triggered are as per
below:
‘ALARM SHALLOW’ = The Shallow Water Alarm
‘ALARM DEEP’ = The Deep Water Alarm
‘ALARM ANCHOR’ = The Anchor Alarm
The actual depth is displayed.
‘ALARM WIND SPEED’ = The High Wind Speed Alarm
The actual wind speed is displayed.
‘ALARM SYSTEM XX’ = System failure (Contact your Simrad
dealer)
‘COMPASS CALIBRATION FAILED’ = The calibration failed
and/or a new calibration is required.
20220760L
27
IS15 General Manual
This page is intentionally left blank.
28
20220760L
Operation of IS15 Multi
3 OPERATION OF IS15 MULTI INSTRUMENT
Screen group
reverse button
Screen group
advance button
LCD
Display
Screen reverse
button
Screen advance
button/illumination
control
Reset button
3.1 General Description
The instrument is operated by the five buttons. By pressing one
of the arrow buttons you can move up, down, or sideways
through the selection of display screens that are available. The
table of screens is shown on page 30. The reset button is only
active on some of the screens. When a button is pressed a beep
will confirm the operation.
The display is divided into two sections. The lower section is the
7-segment main display, while complementary information is
written in the top section.
3.2 Powering Up
When the instruments are powered up for the first time, see
section 7.1‘First time turn on’ on page 89.
At normal power up, each instrument shows ‘IS15 Multi’
followed by the software version installed. After approx. 2
seconds the display will change to show the screen that was on at
turn-off.
3.3 Display backlighting
Press the
button and hold for 2 seconds. The display then
presents the backlighting level. Repeat pressing until desired
backlighting level. Selectable values are 1-7 and off (0).
20220760L
29
IS15 General Manual
3.4 Display Screens
The Table of Display Screens
The data screens of the MULTI instrument are arranged in a
‘table’ as per below. The table consists of a number of screen
groups, each group being a logical collection of useful screens.
To access the screens you move ‘up’ or ‘down’ through the
groups using the upper
buttons, and ‘sideways’ through
the screens using the lower
buttons. When moving ‘up’
or ‘down’ to a new screen group the first display will be the last
one accessed in that group. When you press and hold any of the
two
buttons it will return to the group’s Main Display.
Screen
Group
Group 1
Screen 1
Screen 2
Sea
Temperature
Depth
Screen 3
Shallow alarm
status
Boat speed
Screen 5
Screen 6
Anchor alarm
status
Deep alarm
status
*1
*2
*2
*2
Group 2
Screen 4
Trim speed
VMG to wind
SOG
Average
speed
Apparent
Wind Speed
True Wind
Angle
True Wind
Speed
Wind
Direction
Maximum
speed
*1
Group 3
Apparent
Wind Angle
Group 4
Waypoint ID
XTE
Bearing to
waypoint
*1
*3
*1
*1
*1
Distance to
waypoint
Time to go
VMG to
waypoint
*1
Group 5
Heading
COG
*1
Group 6
Race time
Cum. log
Local Time
*1
Race log
*1
Group 7
SOG
*1
Local Time
*1
Trip log
Passage time
Figure 3-1 - The Table of Display Screens
* Denotes the number of (concealed) sub-screens (-Setup-)
30
20220760L
Operation of IS15 Multi
Notes !
1. If data is not available then “---” will be displayed in place of
data on the appropriate screen(s).
2. Some of the main screens have (concealed) sub-screens
attached for added information and user settings.
Sub-screens (- setup -)
The diagram on the next page shows the sub-screen matrix, how
to select a sub-screen and how to change a setting.
Note !
20220760L
Main screens that have repeated or no sub-screen(s) are not
shown in this diagram.
31
32
3
2
1
SUB
SCREEN
MAIN
SCR.
GROUP
Quick press to
select sub screen
Access
2 sec.
Sub screen 2
XXX
Speed
Damp
0-3
SPEED
2 sec.
Anch.
Alarm
ON-OFF
Sub screen 1
Deep
alarm
Limit
ON-OFF
ON-OFF
Shal.
Alarm
Limit
Deep
alarm
Shal.
Alarm
Main screen
Depth
damping
ON-OFF
Sounder
DEPTH
XXX
(Mag. Var.
Monitor
(Auto))
*
Mag. Var.
Adjust
Quick press to
adjust setting
Decrease
Increase
Wind Speed
Alarm. Lim.
Wind Speed
Alarm
ON/OFF
**
Wind damp.
1-4
WIND
YYY
2 sec.
(Mag. Var.
Monitor
(Auto))
*
Mag. Var.
Adjust
**
*
Exit
2 sec.
UTC
Offset
Main screen
3-6 min.
5-10 min.
Select
timer
RACE
Also available for other relevant
main screens
Also available as sub-screen for
COG.
YYY
UTC
Offset
NAV 2
Enter setting
(Mag. Var.
Monitor
(Auto))
*
Mag. Var.
Adjust
NAV 1
IS15 General Manual
Figure 3-2 Access of sub-screen(s)
20220760L
Operation of IS15 Multi
3.5 Screen Group 1: Depth
There are five screens in this group:
Screen 1
DEPTH
• The upper screen section displays ‘DEPTH’ and the data unit,
e.g. ‘MTRS’. An arrow indicates a rising (↑) or falling (↓)
bottom. A bargraph indicates the strength of the signal. If the
depth signal is from an external source on NMEA format, an
“E” will replace the bargraph.
• The lower screen section displays the water depth reading.
Note !
If the system depth transducer signal is lost, the Depth display
will flash the last good echo value for one minute, then it will
show ---. If there is an alternative depth input to the system on
NMEA format and the sounder is set to Off, this depth will be
displayed instead.
Screen 1 has two sub screens. One for switching the depth
sounder on and off and one for setting the depth damping.
Depth Sounder On / Off
In certain circumstances, e.g., to save power in known waters or
when out of depth range, you may want to turn the depth sounder
off. It is also recommended to turn it off if there is another
sounder on board operating on the same (200 kHz) frequency.
Interference between the two can thus be avoided.
Note !
When the sounder is turned off, the display will show OFF
instead of the depth reading.
Follow the instructions in Figure 3-2, page 32 to access the depth
sounder ON/OFF screen. With the ON-screen flashing select
OFF and return to Screen 1 as per instructions.
This setting is not affected by power off/on or a Communication
Reset but will default to ON after a Master Reset.
Depth damping
The displayed depth has four levels (0-3), 0 = Off. On power up
the last set damping is selected. To change the depth damping
level follow the procedure in Figure 3-2, page 32 and select the
wanted damping level.
The higher the figure the more damping.
20220760L
33
IS15 General Manual
Screen 2
SEA TEMPERATURE
• The upper screen section displays ‘SEA’ and the temperature
unit, e.g. ‘°C’.
• The lower screen section displays the sea temperature
reading.
Screen 2 has no sub-screens.
Screen 3
SHALLOW ALARM
• The upper screen section displays ‘SHAL’, the depth that the
Shallow Alarm is set to and the depth unit, such as ‘M’
(metres).
• The lower screen section displays whether the alarm is ON or
OFF.
Screen 3 has two sub screens; one for setting the shallow alarm
‘ON’ or ‘OFF’ and one for setting the shallow alarm limit.
Shallow Alarm On / Off
Refer to Figure 3-2, page 32 to turn the Shallow Alarm ON or
OFF.
Shallow Alarm limit
Refer to Figure 3-2 to set the Shallow Alarm limit.
Screen 4
DEEP ALARM:
• The upper screen section displays ‘DEEP’, the depth that the
Deep Alarm is set to and the data unit, e.g. ‘M’ (metres).
• The lower screen section displays whether the alarm is ON or
OFF.
Screen 4 has two sub screens; one for setting the deep alarm
‘ON’ or ‘OFF’ and one for setting the deep alarm limit.
Deep Alarm On / Off
Refer to Figure 3-2, page 32 to turn the Deep Alarm ON or OFF.
34
20220760L
Operation of IS15 Multi
Deep Alarm limit
Refer to Figure 3-2 to set the Deep Alarm limit.
Screen 5
ANCHOR ALARM STATUS
• The upper screen section displays ‘ANCH ALRM’.
• The lower screen section displays the Anchor Alarm status;
‘ON’ or ‘OFF’.
Screen 5 has a sub screen for setting the anchor alarm ‘ON’ or
‘OFF’.
Anchor Alarm On/Off
Refer to Figure 3-2, page 32 to turn the Anchor Alarm ON or
OFF.
Note !
The anchor alarm should be off when the boat is not at anchor.
The alarm will sound when during a 40 seconds time period
there is a change in the depth of 2-3 meters (6-10 ft.).
3.6 Screen Group 2: Speed
There are six screens in this group:
Screen 1
BOAT SPEED
• The upper screen section always displays ‘BOAT’ and a
speed unit, e.g. ‘KTS’ (knots).
• The lower screen section displays the boat speed reading.
Screen 1 has a sub screen for setting the water speed damping.
Water speed damping
The displayed water speed has four damping levels (0-3). On
power up damping level 0 is always selected.
To change the water speed damping level follow the procedure
in Figure 3-2 and select the wanted damping level. The higher
the figure the more damping.
20220760L
35
IS15 General Manual
Screen 2
TRIM SPEED
• The upper screen section always displays ‘TRIM’, a sign ‘+’
or ‘–‘ showing increasing or decreasing speed, and the trim
speed unit, e.g. ‘KTS’.
• The lower screen section displays the trim speed reading.
The Trim Speed is the difference in speed between the present
boat speed and the target speed. At turn on the Trim Speed will
only be displayed if it has been reset (see below), until that time
it will show ‘---’.
To Reset the Trim Speed
The Trim Speed may be reset at any time, as below:
• Select the Trim Speed display screen.
(Reset) button. This will set
• Apply a quick press on the
the current speed as the target speed. The Trim Speed display
will then show changes from the current speed.
The following screens 3-6 have no sub-screens.
Screen 3
VELOCITY MADE GOOD TO WIND
• The upper screen section displays ‘VMG WIND’ and the
VMG to wind unit, e.g. ‘KTS’.
• The lower screen displays the VMG to wind reading. The
reading is positive sailing upwind and negative sailing
downwind.
Screen 4
SPEED OVER GROUND
• The upper screen section displays ‘SOG’ and a Speed Over
Ground unit, e.g. ‘KTS’.
• The lower screen displays the Speed Over Ground reading.
The SOG will only be displayed if a GPS receiver input is
available.
36
20220760L
Operation of IS15 Multi
Screen 5
BOAT AVERAGE SPEED
• The upper screen section displays ‘BOAT AVG’ and the
Average Speed unit, e.g. ‘KTS’.
• The lower screen section displays the Average Speed
reading.
The Average Speed is calculated as the distance covered by the
boat since power up or when the passage time was last reset,
divided by the passage time. Resets at Passage Time reset and
Trip log reset. (see paragraph 3.11).
Screen 6
MAXIMUM SPEED
• The upper screen section displays ‘BOAT MAX’ and a
Maximum Speed unit, e.g. ‘KTS’.
• The lower screen displays the Maximum Speed reading.
Resets at Passage Time reset and Trip log reset (see paragraph
3.11).
3.7 Screen Group 3: Wind
There are five screens in this group:
Screen 1
APPARENT WIND ANGLE
• The upper screen section displays ‘APP WIND°’ and a wind
direction icon.
• The lower screen section displays the Apparent Wind angle
in degrees.
Screen 1 has a sub-screen for setting the wind damping. Refer to
screen 4.
Screen 2
APPARENT WIND SPEED
• The upper screen section displays ‘APP WIND’ and the unit,
e.g. ‘KTS’.
• The lower screen displays the Apparent Wind speed reading.
Screen 2 has a sub-screen for setting the wind damping. Refer to
screen 4.
20220760L
37
IS15 General Manual
Screen 3
TRUE WIND ANGLE
• The upper screen section displays ‘TRUE WIND°’ and a
wind direction icon.
• The lower screen section displays the True Wind Angle
reading.
Screen 3 has a sub-screen for setting the wind damping. Refer to
screen 4.
Screen 4
TRUE WIND SPEED
• The upper screen section displays ‘TRUE WIND’ and the
unit, e.g. as ‘KTS’.
• The lower screen section displays the True Wind Speed
reading.
Screen 4 has three sub-screens. One for setting the wind
damping, one for switching the True Wind Speed Alarm on or
off, and one for setting the Wind Speed Alarm limit.
Wind damping
The displayed wind information has four damping levels (1-4).
On power up the last set damping level is selected.
To change the damping level follow the procedure in Figure 3-2,
page 32 and select the wanted damping level. The higher the
figure the more damping.
True Wind Speed Alarm ON/OFF
Refer to Figure 3-2, page 32 to turn the True Wind Speed Alarm
ON or OFF.
True Wind Speed Alarm limit
Refer to Figure 3-2, page 32 for setting the alarm limit (0-99
knots).
Screen 5
WIND DIRECTION
• The upper screen section displays ‘WIND DIRECT’ and the
unit type, ‘°T or ‘°M’.
• The lower screen section displays Wind Direction reading.
38
20220760L
Operation of IS15 Multi
Screen 5 has a sub-screen for setting the magnetic variation.
Refer to page 40
Note !
Refer to notes 1-4 on page 18.
3.8 Screen Group 4: Nav 1
There are six screens in this group. Only screen 3 has a subscreen.
Screen 1
WAYPOINT ID
• The upper screen section displays the destination waypoint
I.D.
• The lower screen section is empty.
Screen 2
CROSS TRACK ERROR
• The upper screen section displays ‘XTE’ (Cross Track Error),
the boat position relative to the track line, XTE resolution,
and XTE unit.
• The lower screen section displays the magnitude of the XTE
in 1/1000 NM, or 1/100 NM if the message provides data
with only two decimal places.
Note !
The direction to steer is towards the track line. When the boat is
on track the boat icon will disappear while the track line
remains. The direction to the track line may not be the direction
to steer directly to the Waypoint, but may be important for safety
reasons; for instance, if the track passes close to shoals, or a
restricted area.
Screen 3
BEARING TO WAYPOINT
• The upper screen section displays ‘BRNG TO WP’ and the
bearing type, ‘°M’ or ‘°T’.
• The lower screen displays the bearing to the waypoint in
degrees.
Screen 3 has a sub-screen for setting the magnetic variation.
Refer to page 40. – See also note on page 21.
20220760L
39
IS15 General Manual
Screen 4
DISTANCE TO WAYPOINT
• The upper screen section displays ‘DIST TO WP’ and the
unit, e.g. ‘NM’.
• The lower screen section displays the reading of the distance
to the waypoint.
Screen 5
TIME TO GO
• The upper screen section displays ‘TIME TO GO’.
• The lower screen section displays Time To Go to destination
waypoint in hours and minutes (h:mm or hh:m).
Screen 6
VELOCITY MADE GOOD TO WAYPOINT
• The upper screen section displays ‘VMG TO WP’ and the
unit, e.g. ‘KTS’.
• The lower screen section displays the Velocity Made Good
(VMG) reading to the waypoint.
3.9 Screen Group 5: Nav 2
There are four screens in this group:
Screen 1
HEADING
• The upper screen section displays ‘HEADING’ and the unit,
‘°M’ or ‘°T’. The heading is referenced to either ‘M’agnetic
or ‘T’rue North as set in section 7.9 Screen 3 ‘Heading
Bearing Unit’. See also note on page 21.
• The lower screen displays the Heading in degrees.
Screen 1 has a sub-screen for setting the magnetic variation.
40
20220760L
Operation of IS15 Multi
MAG. VARIATION
The IS15 instruments automatically read the Magnetic Variation
compensation message from a connected GPS. The
compensation is presented on the screen. You are not allowed to
adjust the compensation from the GPS. If you press the
button and hold for 2 seconds the screen just flashes AUTO and
returns to show the compensation from the GPS.
If a GPS is not connected you will be able to enter the magnetic
and
buttons.
variation manually using the
Screen 2
COURSE OVER GROUND
• The upper screen section displays ‘COG’ and the unit, ‘°M’
or ‘°T’.
• The lower screen displays Course over Ground (COG)
reading.
Screen 2 also has a sub-screen for setting the magnetic variation.
Screen 3
SPEED OVER GROUND
• The upper screen section displays ‘SOG’ and a Speed Over
Ground (SOG) unit, e.g. ‘KTS’.
• The lower screen displays the Speed Over Ground (SOG)
reading.
Screen 3 has no sub-screen.
Screen 4
LOCAL TIME
• The upper screen section displays ‘TIME’, the local time in
hours, minutes and seconds (hh:mm:ss). See note 5 on page
24.
• The lower screen section is empty.
Screen 4 has a sub screen for setting the UTC offset.
UTC offset
To change the UTC offset in increments of 30 minutes follow
the procedure in Figure 3-2, page 32.
20220760L
41
IS15 General Manual
3.10 Screen Group 6: Race
There are three screens in this group:
Screen 1
RACE TIME
• The upper screen section displays ‘RACE TIME’.
• The lower screen section normally displays the Race Timer
start time. See Note 1 below.
Screen 1 has a sub-screen for selecting Race Timer (5-10 min. or
3-6 min.)
Screen 2
RACE LOG
• The upper screen section displays ‘RACE LOG’ and the unit,
‘NM’ or ‘KM’.
• The lower screen section displays the Race Log (which is
“- - -“ when the Race Timer is not started). See Notes 3 & 4
on page 24.
To Start the Race Timer
The Race Timer may be started at any time, as below:
1. Select the Race Time display screen and the start time as
required.
2. Select between 5 or 10 (3 or 6) minute start time by pressing
button and hold for 2 seconds.
the
3. Start the timer by a quick press on the
button. The timer
will count down with audible alarms at times as below:
5 minutes
BEEP (3 minutes if 3-6 timer selected)
1 minute
BEEP BEEP
30 seconds
BEEP BEEP BEEP
5 seconds
BEEP
4 seconds
BEEP
3 seconds
BEEP
2 seconds
BEEP
1 second
BEEP
BEEP BEEP BEEP BEEP → GO
42
20220760L
Operation of IS15 Multi
To Freeze the Race Timer
See page 25.
To Reset the Race Timer and Race Log
The Race Timer may be stopped and reset at any time that it is
running, before or after the start of a race, as below:
1. Select the Race Time display screen.
button to reset the Race Time to the
2. Press and hold the
previous start time and to reset the Race Log to “---”.
The Race Timer instructions are echoed to all other Combi and
Multi instruments so that Start/Freeze/Reset occur synchronously
(together).
Screen 3
LOCAL TIME
This is the same as screen 4 in Group 5: ‘Nav2’. See page 40.
Note !
See notes about the Race Timer on page 24 and 25.
3.11 Screen Group 7: Log
There are four main screens and no sub-screens in this group:
Screen 1
CUMULATIVE LOG
• The upper screen section displays ‘LOG’ and the unit, ‘NM’
or ‘KM’ (Nautical miles or Kilometers).
• The lower screen section displays the Cumulative Log
reading.
The Cumulative Log is the total distance travelled by the vessel,
it cannot be reset unless you perform a Master Reset.
Screen 2
TRIP LOG
• The upper screen section displays ‘TRIP’ and the Trip Log
unit, ‘NM’ or ‘KM’.
• The lower screen section displays the Trip Log reading.
The Trip Log can be reset, but is not lost when the system is
turned off.
20220760L
43
IS15 General Manual
To Reset the Trip Log to Zero
The Trip Log may be reset together with the Passage Time,
Average speed and Max. Speed at any time, as below:
1. Select the Trip Log screen.
2. Press the RESET button and hold for 2 seconds. This will
reset the Trip log, Passage Time, Average Speed and Max.
Speed.
3. The Trip Log is system wide, resetting it on this instrument
will reset it across the whole system.
Screen 3
PASSAGE TIME
• The upper screen section displays ‘PASSAGE TIME’.
• The lower screen section displays the Passage Time in hours
and minutes (h:mm or hh:m).
The Passage Time is the time since the system was powered up
or since it was last reset.
To Reset the Passage Time to Zero
The Passage Time may be reset together with the Average speed
and Max. Speed at any time, as per below:
1. Select the Passage Time screen.
2. Press the RESET button and hold for 2 seconds. The Passage
Time, Average speed and Max. Speed will be reset.
Note !
The Passage Time is system wide, resetting on one instrument
will reset it across the whole system.
3.12 Alarm Sounding
See paragraph 2.10, page 27.
44
20220760L
Operation of IS15 Compass
4 OPERATION OF IS15 COMPASS INSTRUMENT
Pointer
Scale
LCD Arrow
Legend
Arrow
Right button
Left button
LCD display
4.1 General Description
The display is divided into two sections, the scale with pointer,
and the LCD. Both are controlled by the two buttons.
The Scale
The scale indicates heading in degrees and the four main
bearings N, S, E, W. The pointer always indicates True or
Magnetic Heading.
The LCD Display
In normal operation the LCD has two modes:
• Heading
• Locked Course/Direction to steer
There are two arrows at the top of the LCD indicating what data
is being displayed at any one time. The arrow legend is printed
on the scale. The right arrow points to LOCK for ‘Locked
Course’ mode, the left arrow points to HDG for ‘Heading’ mode.
20220760L
45
IS15 General Manual
The Buttons
A given press on any of the two buttons will change the mode
from ‘Heading’ to ‘Locked Course’ mode and vice versa.
The left button is used to enter set-up and installation screens.
The right button sets the lighting level. When in a set-up or
installation screen both buttons are used to change settings.
Figure 4-1 - The Buttons
4.2 Powering Up
At first time turn on please refer to section 7.13. At normal
power up, the pointer will TURN to the top, and the LCD will
show the software version for approximately one second.
The display and the pointer will then show the current heading.
Note !
It may take up to 20 seconds before the heading is displayed.
4.3 Display backlighting
Press the
button and hold for 2 seconds. The display then
presents the backlighting level. Repeat pressing until desired
backlighting level. Selectable values are 1-7 and off (0).
4.4 The Heading Display
The Heading Display is the first display that is shown after
power up. The pointer shows the present heading, and so does
the LCD with the left arrow lit.
• The heading may be referenced to either Magnetic or True
North. If only one type of data is available, and the other data
is required then the local magnetic variation may be entered,
or it may be read in from a GPS if one is fitted. This may
enable the display of True heading when only a magnetic
referenced heading sensor is available.
• If no data is available the LCD will show four dashes, ‘----‘
and the pointer will point upwards.
46
20220760L
Operation of IS15 Compass
Magnetic variation [Var]
This is a sub-screen to the Heading display.
The IS15 instruments automatically read the Magnetic Variation
compensation message from a connected GPS. The
compensation is presented on the screen. You are not allowed to
adjust the compensation from the GPS. If you press the
button and hold for 2 seconds the screen just flashes AUtO and
returns to show VAr.
If a GPS is not connected you will be able to enter the magnetic
variation manually.
button and hold for 2 seconds. The MagVar
1. Press the
reading flashes. It indicates ‘000’ when there is no
compensation for the variation.
2. To select or increase an easterly variation value, apply short
button. The reading will be positive.
presses on the
3. To select or increase a westerly variation value, apply short
button. The reading will be negative.
presses on the
4. Press the
setting.
button and hold for 2 seconds to save the
button and hold for 2 seconds to return to the
5. Press the
main screen.
The Locked Course Display
From the Heading Mode a quick single press on the
or
push-button will enter Locked Course Mode and the right arrow
will lit on the LCD. If the boat stays steady on course, the LCD
will display the locked course. Whenever the boat is off course
the LCD shows >XX or XX<. ‘XX’ is the magnitude of the
course error and the arrow (<>) points in the direction to steer to
get back on course.
Changing the Set Course in ‘Locked Mode’
This is a sub-screen to the ‘Locked Course’ display and allows
you to view the set course or to manually set to a new course to
steer.
With the LCD arrow pointing right press the
seconds and the LCD starts flashing.
button for 2
The LCD will flash the current set course. If you want to
button for 2
maintain the set course, press and hold the
seconds.
20220760L
47
IS15 General Manual
If you want to change the set course apply short presses on the
or
button to set the next course to steer to port or
starboard respectively.
Press and hold the
setting.
button for 2 seconds to enter the new
The display will stop flashing and the arrow points in the
direction to steer, while the digits on the LCD show how much
the boat is off the new set course.
4.5 Alarm Sounding
The alarm is system wide and all the instruments will sound and
flash a warning message.
If there is an external alarm connected then this will be sounded
at the same time (only if an IS15 Expander is part of the system).
To cancel a sounding alarm press any button on any of the
instrument displays.
Note !
The flashing warning will remain as long as the alarm condition
exists and disappears automatically when there is no longer an
alarm condition. The sounding alarm will always have to be
cancelled.
Alarm messages
The symbols that are shown when an alarm is triggered are as
below:
‘SHAL’ = The Shallow Water Alarm
‘dEEP’ = The Deep Water Alarm
‘AnCH’ = The Anchor Alarm
‘HIGH’ = The High Wind Speed Alarm
‘Er.XX’ = System failure (Contact your Simrad dealer)
Compass calibration:
‘RUn.C’ = Compass calibration running
‘FAIL’ = Compass calibration failed
‘dOnE’ = Compass calibration done
48
20220760L
Technical Specifications
5 TECHNICAL SPECIFICATIONS
See page 56 for NMEA information.
5.1 IS15 Combi and IS15 Multi
Speed Functions
Speed Display
Speed Units/Resolution
Speed Damping
Average Speed
Maximum speed
Speed Trim
Speed Over Ground
Display
0 to 99.9 Knots
Knots, mph or km/h / 0.1 speed units
3 damping levels + 0=off
From Power On or passage time reset
From Power On or passage time reset
changes in speed to 0.01 Speed Units
(with NMEA sentence input)
Depth functions
Depth Units
Depth Display
Depth Resolution
Depth Alarms
Sounder On/Off Control
Depth Damping
Metres, Feet or Fathoms
0 to 655 mtrs, 0 to 999 feet, 0 to 358 fath
0.1 Depth Units
Deep and Shallow alarm limits, Anchor Alarm,
Alarms On/Off
Switches the Transceiver Sounder On or Off
3 damping levels + 0=off
Sea Temperature Functions
Sea Temperature Units
Sea Temperature
Sea Temperature
Resolution
°C/°F
-10 to +40°C, ± 0.1°C (+14 to +104°F)
To 1°C/°F or to 0.1°C
Heading Functions
Heading Display (Digital)
Heading Resolution
Heading Reference
000 to 359°
1°
True or Magnetic North
True and Apparent Wind Angle Functions
Wind Angle Display
Wind Angle Resolution
Wind Angle Damping
Wind Direction
20220760L
0 to 180° Port /Stbd
1°
4 damping levels (default: 1)
0 to 360° Mag /True
49
IS15 General Manual
True and Apparent Wind Speed Functions
Wind Speed Units
Knots, m/s, km/h or Beaufort Scale
Wind Speed Display
0 to 99.9 Wind Speed Units
Wind Speed Resolution
0.1 Wind Speed Units
Wind Speed Damping
True Wind Speed Alarms
Linked to wind angle damping
On/Off Control, one adjustable alarm limit
Velocity Made Good (VMG) Functions
VMG Units
VMG Display
VMG Resolution
VMG Damping
Knots, km/h or mph (same as boat speed units)
0 to 99.9 VMG Units
0.1 VMG Units
Linked to wind angle damping
Log Functions
Log Units
Log
Nautical Miles or Kilometers
To 9999 Log Units (permanently saved)
Trip Log
To 9999 Log Units (resettable/saved)
Race Log
To 999.9 Log Units (over race distance)
Log Resolution
1, 0.1 or 0.01 Log Units (3 digits)
Timing Functions
Passage Time
Race Timer
0 to 99.59 hours (rolls over to zero / resettable
10 and 5 minute countdown
Position Functions
Lat/Long Display
Datum
Course Over Ground
(COG)
COG Resolution
Speed over Ground (SOG)
SOG Resolution
Local Time
50
Degrees, Minutes and Thousandths of Minutes (Not
IS15 Multi)
As received from Navigator
0 to 359°
True or Magnetic
1°
0 to 99.9 Speed Units
0.01 Speed Units
24 Hour Clock, Hours, Minutes and seconds
20220760L
Technical Specifications
Waypoint Functions
Waypoint Identity
Waypoint Bearings
Waypoint Bearing
Resolution
Waypoint Distance
Waypoint Distance
Resolution
13 Alpha-Numeric characters
0 to 359° (True or Magnetic)
1°
0 to 999 Log Units
1, 0.1 or 0.01 Log Units as appropriate (4 digits)
Navigation Functions
Cross Track Error (XTE)
XTE unit
XTE Resolution
0 to 99 XTE unit
Nautical Miles or Kilometres
0.01 or 0.001 XTE unit (4 digits)
Additional Functions
Display Backlighting Levels
Display Backlighting Colour
Display Backlighting
Control
External Alarm Drive
Seven levels plus Off
Green
Two independent lighting banks or
individual setting (bank 0)
via IS15 Expander unit
General
Power Requirement
Size
Mounting Hole Size
Total Depth Below Panel
Front
Weight
Environmental Rating
Temperature Range
10.8 to 15.6V, 75 mA, (no light), 140 mA (full
light)
110 x 110 x 21 mm (above panel)
85 mm
32 mm
including cable connector
210 grams
IP56 from front, IP43 from rear
Operating: 0°C to 55°C (+32 to +130°F)
Stored: -30°C to 80°C (-22 to +176°F)
Alternative Transducers
Speed, depth, wind and sea temperature will be displayed if
available on NMEA format. However, with a Transceiver or
Expander in the system it will not display (boat) speed or
temperature on NMEA format, nor will it display wind data with
an IS15 wind transducer connected.
Note !
20220760L
All headings and bearings may be referenced to either True or
Magnetic North.
51
IS15 General Manual
5.2 IS15 Compass
Heading Functions
Heading Display (Digital)
Heading Resolution
0 to 359°
1°
Heading Display (Analog)
Heading Resolution
0 to 359,9°
1/6°
Heading Reference
True or Magnetic North
Heading Lock
Direction to steer on digital display.
Course to Steer
Settable on digital display
Direction to steer on digital display.
General
Power Requirement
10,8 to 15,6VDC, 70 mA, (100 mA max with
max lighting)
Size
See Figure 5-1
Weight
225 grams
Environmental Protection
Temperature Range
IP56 from front, IP43 from rear
Operation: 0°C to +55°C (+32 to +130°F)
Storage: -30°C to +80°C (-22 to +176°F)
Display Backlighting
Green colour with seven levels plus Off
Display Backlighting
Control
Two independent lighting banks or
individual settings (bank 0)
5.3 IS15 Transceiver
General
Power Requirement
Dimensions
Weight
Environmental Rating
Temperature Range
Compass safe distance
10.8-15.6V, max 20 W
Refer to Figure 5-2 IS15 Transceiver Dimensions.
0.4 kg
IP44
Operating: 0°C to 55°C (+32 to +130°F)
Stored: -30°C to 70°C (-22 to +158°F)
0.5 m (1.6’)
Cable connections
Instrument port no. 1, J1/J2
Wind sensor, J6
Depth transducer, TB3
52
1-7 instruments, Roblink serial communication
and instrument supply.
Roblink serial communication and sensor supply
200 kHz +5/-2 kHz, 25 W rms
20220760L
Technical Specifications
Speed/temp transducer, TB2
Power supply TB1
Pulse rate 4.8 Hz/knot
10.8 –15.6V
5.4 IS15 Expander
General
Power Requirement
Size
Weight
Environmental Rating
Temperature Range
Compass safe distance
10.8-15.6V, max 20 W
Refer to Figure 5-2 IS15 Transceiver Dimensions
0.4 kg
IP44
Operating: 0°C to 55°C (+32 to +130°F)
Stored: -30°C to 70°C (-22 to +158°F)
0.5 m (1.6’)
Cable connections
Instrument port no. 1, J1
Instrument port no. 2,
J2/J4/J5
Wind sensor, J6
Depth transducer, TB3
Speed/temp transducer, TB2
NMEA input port 1, TB5
NMEA input port 2, TB11
NMEA output port 1, TB6
NMEA output port 2, TB7
External alarm TB12
Power supply TB1
Note !
20220760L
1-7 instruments, Roblink serial communication
and instrument supply. See note.
1-7 instruments, Roblink serial communication
and instrument supply. See note.
Roblink serial communication and sensor supply
200 kHz +5/-2 kHz, 25 W rms
Pulse rate 4.8 Hz/knot
NMEA0183, non polarized
NMEA0183, non polarized
NMEA0183
NMEA0183
Open collector, 0.5A max.
10.8 –15.6V, polarity protected
The number of instrument heads all together on port 1 and port 2
must not exceed 8.
53
IS15 General Manual
5.5 Instrument Software Information
V1R1: Beta version, not used in ordinary production.
V1R2: First production version
V1R3: Upgraded version with added features.
• Trip log replaces sea temperature on first screen of IS15
Combi.
• In Locked Course mode the LCD on IS15 Compass has been
changed to show deviation in degrees from locked course.
• Improved log calibration procedure. Possible to set Log
reading as percent (%) of default value. Log calibration can be
set to same value on identical boats.
• Boat speed always reads 0.0 at zero speed. (V1R2 may show
- - - at turn on and a ‘residual’ speed value when slowing
down to zero speed).
• Improved boat speed and wind speed damping.
• Improved damping of heading displays.
• Depth transducer remains OFF at turn on if it was set to OFF
while the system was running.
• Test screens added to Installation Menu to simplify trouble
shooting.
• Roblink can be turned off and thus eliminate a possible
interference when a single instrument is connected as NMEA
repeater.
• ‘Communication reset’ added. Saves all settings in the event
an anomaly in the system functions calls for a reset.
V1R4: Substitutes V1R3 that contains a bug. V1R3 should not
be used.
V1R5: Upgraded version with added features.
• Two new display screens in Display group 4, Nav. Screen 1
shows heading, boat speed and rudder angle. Screen 5 shows
waypoint bearing and COG. Screen order has been altered.
• Two new screens in the Installation Menu Group 8, Rudder.
Screen 1 shows rudder angle offset and screen 2 shows
rudder angle source.
• New Setup screen for Depth damping in Screen group 1.
• Default depth offset change from –0.3 m to 0.0 m.
54
20220760L
Technical Specifications
• Increased damping of wind display at level 2, 3 and 4.
• Increased damping of boat speed at level 2 and 3.
• Instruments output True Wind Angle and Speed in addition
to Relative Wind Angle and Speed.
• NMEA depth sentence ‘DBT’ added.
• Access to all offset adjustments when the instrument is used
as NMEA repeater.
• Corrected a bug in the UTC offset.
• New NMEA In/Out screen in the Installation Menu Group 1
General. Allows you to manually change the NMEA ‘talker’
port to a ‘listener’ port.
V1R6: New software to comply with PCB Ass’y Revision H (B
on round heads) onwards. V1R6 is backwards compatible with
previous software and hardware versions.
Notes!
1. PCB Ass’y with this revision does not accept V1R2 or V1R4
software.
2. On IS15 Combi, V1R6 should replace V1R5 if the display
turns pale in bright sunshine.
3. V1R6 is backward compatible with V1R2 and V1R4.
However, anomalies may be observed if attention is not
being paid to the NMEA interface. In systems with mixed
software, do not interface NMEA ‘talkers’ to heads with
V1R2 software.
5.6 NMEA messages and data overview
See next page.
20220760L
55
Compass_Data
Compass heading, M
Compass heading, T
Rudder_Data
Rudder angle
Wind_Data
Apparent wind angle and speed
True wind angle and speed
Depth_Data
Depth ref transducer
Transducer-Keel Offset
Depth range
Speed_Temp_Data
Speed through water
Log distance and trip
Water temperature
Gps_Data
Nav_Data
Steering_contr1
IS15 RX:
IS15 TX:
ZTG
HSC
XTE
XTR
RMB
BWR
BWC
BWW
APB
BOD
ZDA
(APA)
VTG
RMC
GLL
RMA
GGA
VLW
VHW
DPT
MTW
DBT
(DBK)
MWV
(VWR)
x
HDT
x
x
RSA
HDG
Message ident.
Remarks:
(HDM)
NMEA messages and data overview for IS15
x
x
x
x
x
x
x
Instruments V1R5 onwards, Expander V1R2
onwards, also transmits MWV with true wind.
1
2
2
x*
x
1: normal priority, 2:higher priority
* Output only. Input offset is ignored and set
on instruments.
x
x
x
Present position Lat, Long
COG, T
COG, M
Universal Time Coordinated (UTC)
Magnetic variation
x
SOG
To-wp ident.
From-wp ident.
Bearing wp-wp, T
Bearing wp-wp, M
Bearing pos-wp, T
Bearing pos-wp, M
Distance pos-wp
Time to go to dest. Wp
XTE
Waypoint closure velocity, VMG
x
x
x
x
x
x
x
x
x
x
x
x
x
x
x
x
Magnetic variation in HDG message see note2.
x
x
x
x
x
x
x
x
x
x
x
x
x
x
x
x
x
x
x
x
Outputs bearing as magnetic
x
x
x
x
x
x
x
Outputs bearing as magnetic
x
x
x
x
x
x
x
x
x
x
x
x
x
x
x
Heading steering cmd, T / M
x Not displayed
x
x
x
x
x
x
x
x
x
x
x
x
x
x
x
x
x
x
x
x
x
x
x
x
x
x
x
x
x
x
x
Note1: APB message may read in true or magnetic bearing wp-wp and bearing pos-wp. These fields are however sent as magnetic bearings from IS15
Note2: Magnetic variation from the HDG message is only used to calculate true heading from the magnetic heading in the same message.
Magnetic variaton out in the HDG-message is however the variation currently in use in the IS15 system.
Proprietary sentences in/out IS15:
In to Is15 $PSTOK,a<CR><LF> Status of compass calibration: a = I:init, R:running, F:failed, C:calibrated
Out from IS15: $PSTOK,,,x.x,*XX<CR><LF> Set compass offset. x.x is offset angle, 0 to 360 degrees
Out from IS15: $PSTOC,*77<CR><LF> Start compass calibration.
x
x
x
x DBT out (instruments V1R5 or later, Expander V1R2)
Technical Specifications
5.7 Display head and Transceiver dimensions
9 mm
[0,35"]
21 mm
[0,83"]
32 mm
[1,26"]
85 mm Dia
[3,35"].
(Panel cut-out)
110 mm [4,33"]
110 mm [4,33"]
30 mm
[1,18"]
110 mm [4,33"]
Figure 5-1 IS15 Display Head Dimensions
Figure 5-2 IS15 Transceiver Dimensions
20220760K
57
IS15 General Manual
5.8 Transducer dimensions
Ø 75 mm
Ø 75 mm
35 mm
2"-12 UN
threads
2"-12 UN
threads
90 mm
89 mm
Ø 51 mm
Ø 51 mm
14 mm
5 mm
5 mm
Ø 75 mm
Ø 75 mm
Figure 5-3
P19 Depth Transducer
Figure 5-4
P17 Depth Transducer
Ø75 mm
Ø78 mm
16 mm
2"-12 UN
threads
2"-12 UN
threads
98 mm
89 mm
Ø 51 mm
Ø 51 mm
Ø 75 mm
Figure 5-5
B22 Depth Transducer
58
14 mm
5 mm
5 mm
Ø 75 mm
Figure 5-6
ST610 Speed/Temp. Transducer
20220760K
Technical Specifications
Ø79 mm
Ø78 mm
35 mm
35 mm
2"-20 UN
threads
2"-12 UN
threads
90 mm
Ø 51 mm
flange nut
Ø 51 mm
isolation
washer
11 mm
isolation
bushing
14 mm
5 mm
6 mm
Ø 75 mm
Figure 5-7
ST650/B17 Speed/Temp. Transducer
Ø 80 mm
Figure 5-8
SS557 Speed/Temp. Transducer
M22 x 1.5
threads
2"-12 UN
threads
76 mm
114 mm
Ø 51 mm
55 mm
Ø 75 mm
101 mm
Figure 5-9
B45 Depth Transducer
20220760K
14 mm
5 mm
31 mm
Figure 5-10
ST300/P371
Speed/Temp. Transducer
59
IS15 General Manual
M22 x 1.5
threads
127 mm
Ø 38 mm
29 mm
Ø 62 mm
79 mm
Figure 5-11
SS505 Depth Transducer
Ø 79 mm
2"-12 UN
threads
134 mm
Ø 51 mm
27 mm
140 mm
Figure 5-12 B744V Tri-ducer
60
Figure 5-13 P52 Tri-ducer
20220760K
Installation
6 INSTALLATION
6.1 General
This section provides detailed information required to
successfully install an IS15 Instrument System utilising the IS15
Combi, IS15 Multi and IS15 Compass instruments. It also
describes the interconnection with an IS15 Wind System and the
connection to peripheral equipment.
6.2 Mounting of Instrument Head
The instrument head is fully waterproof from the front and can
be installed on deck or below.
Caution !
Do not install the instrument where moisture at the rear can be
present. It could cause damage by entering the breathing hole or by
coming into contact with the electrical connectors.
The position selected should, in the first instance, meet the
requirements of the helmsman, or crew.
The selected surface for the instrument head must be flat and
even to within 0.5 mm.
Before installation, note the Serial Number of the unit and keep
it in a safe place.
0.5 mm max.
3
2
2
Figure 6-1 - Installation
20220760L
61
IS15 General Manual
1. Do not remove the protection film on the display before the
installation and setup is completed.
2. Carefully position the self-adhesive template provided on the
surface where the display head is to be mounted.
3. Allow sufficient space for the protection cover as shown on
the template when instruments are installed adjacent to each
other.
4. Drill a small pilot hole first, and then check the location on the
other side of the panel or bulkhead to confirm suitability.
5. Open out the pilot hole to 85 mm (3.4”) using a cutter in a
hand-held brace, or an electric drill saw (86 mm or 3 3/8”).
6. Drill the four screw holes using a 2.5 mm (0.1”) drill.
7. Secure the instrument using the four self-tapping screws
provided. Ensure that the sealing gasket is correctly located.
8. Apply the front panel corners.
Note !
Ensure that all sockets without cable connections have the
protection plug inserted.
Caution !
Do not over-tighten fixing screws.
Do not use sealing compound on the instrument back.
Do not use WD40 or any solvent on any part of the
instrument.
Figure 6-2 - Mounting Details (Not To Scale)
62
20220760L
Installation
6.3 System layout
Basic SDT-1 System
IS15 Combi
SIMRAD
*
**
NMEA from GPS/Chart plotter
10 m (33')
*
Supply 10,8-15,6VDC
IS15
Transceiver
**
Denotes Roblink
cable with connector
Optional extra
Circuit breaker
10 m (33')
Speed/temp
transducer
10 m (33')
Depth
transducer
Figure 6-3 IS15 Combi (Tri-data) System layout
The SDT-1 system is capable of displaying Speed, Depth and
Temperature on a single IS15 Combi instrument head. It can also
display navigation data from a GPS receiver/Chart plotter via the
NMEA input. (Please order separate cable).
The transducers come with 10 m (33’) cable as standard. The
IS15 transceiver comes with a 10 m (33’) Roblink cable as
standard to connect to the instrument head.
20220760L
63
IS15 General Manual
SDT-2 System
IS15 Multi
IS15 Multi
SIMRAD
*
**
SIMRAD
**
*
0.3m (1')
NMEA input
from GPS/Chart plotter
10 m (33')
Output on NMEA
to autopilot and
Chart plotter
Supply 10,8-15,6VDC
IS15
Transceiver
*
**
Denotes Roblink
cable with connector
Optional extra
Circuit breaker
10 m (33')
10 m (33')
Speed/temp
transducer
Depth
transducer
Figure 6-4 IS15 Multi (Tri-data) System layout
This system displays the same information as SDT-1. However,
when using two IS15 Multi heads speed and depth can be
displayed on separate instruments with large characters. With
two instruments you can also transmit speed, depth and
temperature information on NMEA to the autopilot and/or the
chart plotter if installed.
6.4 IS15 Transceiver Mounting
The IS15 Transceiver is not weather proof and should be
mounted vertically in a dry place with the cable outlets pointing
downwards.
The unit is mounted to bulkhead or panel by four screws through
the mounting lugs.
64
20220760L
Installation
6.5 Transducers
Follow carefully the instructions that come with the speed/temp.
and depth transducers.
Mounting Guidelines
Depth Transducers
• The main source of the vessel generated noise is the propeller.
• The deeper the transducer projects the lower the risk of
aerated water.
• On displacement hulls place the transducer 1/3 aft along
waterline.
• Avoid locations near the keel or bow due to aeration.
• Mount the transducer on the side of the hull where the
propeller is moving downward.
• On sailboats mount forward of the fin keel, with minimum
dead rise.
• On planing vessels mount aft near the keel to insure water
contact at high speed.
• On I/O’s mount close to the engine.
• On inboards mount well ahead of the propeller.
• On higher speed vessels (+27 knots) mount in known good
locations.
• Do not mount near water discharge or behind struts or fittings,
which will create turbulence.
• For dead rise greater than 10 degrees a fairing is
recommended.
Speed Transducer
• On sailboats the sensor should be mounted close to the
centerline and 12 to 24” ahead of the keel.
• On displacement vessels the paddlewheel should be mounted
well aft so the sensor is always in contact with the water.
• Do not position the paddlewheel directly ahead of a depth
transducer.
• Do not locate the speed sensor behind struts or thru-hull
fittings.
20220760L
65
IS15 General Manual
6.6 Cabling
Figure 6-5 Interconnection – Principle diagram
Choosing the Cable Routes
After you have decided on the system and mounted the
components of the IS15 System, the next step is to route the
cables between the various parts of the system and to the power
supply. Choose the most direct paths while avoiding the
following hazards:
• Sharp bends or kinks in the cable
• Hot surfaces (exhaust manifolds or cooking equipment)
• Rotating or reciprocating equipment
• Sharp or abrasive surfaces
• Door and window jambs
• Corrosive fluids or gases
Total length of Roblink cables
The IS15 Transceiver can drive a total of 7 instrument heads.
They can be connected in one single “daisy chain” with the
Transceiver in one end, or in two chains with the Transceiver as
a link. The total length of all interconnecting Roblink cables
should not exceed 30 m as shown on Figure 6-6.
Note !
66
The length of the masthead cables shall not be included in the
above.
20220760L
Installation
INSTR. #1
INSTR. #7
SIMRAD
SIMRAD
30m (99')
IS15
TRANSCEIVER
Max 7 instrument heads
Total length of all Roblink cables, max. 30 m (99')
INSTR. #7
INSTR. #1
SIMRAD
SIMRAD
SIMRAD
SIMRAD
30m (99')
Max 7 instrument heads
IS15
TRANSCEIVER
Total length of all Roblink
cables, max. 30 m (99')
Figure 6-6 Total length of Roblink cables
Extending Cables
See page 6 ‘Optional equipment’.
Securing the Cables
After the ideal cable routing has been established, use tie-wraps,
‘P’ - clips or other fixings to secure the cables along the routings.
Note !
To prevent chafing add protection for the cable jackets where the
cables pass through bulkheads, or past sharp edges.
Secure the cable near the terminals for strain relief. See also
Figure 6-7 below.
Secure the cable ends with enough slack to allow for easy
connection / disconnection with the instrument removed from its
location.
Cut any spare wire ends to an appropriate length.
20220760L
67
IS15 General Manual
Securing the connectors
It is recommended that for extra security you secure the
connectors with the enclosed self-tapping screws.
Figure 6-7 Securing connectors to the instrument
Make sure that all empty sockets have the protection plugs
inserted. Coat the connectors with silicone grease or petroleum
jelly. These products will not harm the instrument.
6.7 Instrument head connections
Figure 6-8 - Instrument Connections
The instrument head has four identical two-pin connector sockets
protected by rubber plugs. Each socket is identified by number
and signal markings.
Caution !
68
NMEA cable must be plugged into connector no. 4. Wrong
connection may damage the connected equipment.
20220760L
Installation
Interconnections
Connection between the instrument head and the IS15
Transceiver is made by the 10 m (33’) Roblink cable supplied
with the Transceiver.
Connect the Roblink cable between one of the three Roblink
sockets on the IS15 Transceiver and the PWR-ROBLINK socket
(1) on the display head.
Interconnection between instrument heads is made by the
supplied 0.3 m Roblink cable. Refer to Figure 6-5
Interconnection diagram on page 66.
6.8 NMEA connections
General
The NMEA port on the IS15 instruments is unidirectional, i.e. it
is automatically configured for input (listening) or output
(talking). Thus you will need a minimum of any two instrument
heads to make the system both ‘listen’ and ‘talk’ (I/O).
Note !
Roblink cables have to be ordered separately for NMEA
connections (see page 67).
Figure 6-9 NMEA out
Caution !
20220760L
Figure 6-10 NMEA in
Use no other connector than no. 4.
69
IS15 General Manual
Connecting a Simrad Robertson “X” series
autopilot
NMEA Out
This connection will provide speed and depth input to the
autopilot. The connection is made to the J3xx Junction Unit
Main Board, Terminal RX1+ and RX1-.
If an IS15 Wind Transducer is connected to the system, wind
information will also be transferred to the autopilot.
NMEA In
This will provide the instrument system with heading data.
A Roblink cable has to be ordered separately for this purpose.
Connect the Roblink cable to the NMEA socket on one of the
instrument heads.
Connect the other end to the screw terminals in the J3xx Junction
Unit, Main Board, terminal TX1+ and TX1–.
Figure 6-11 Simrad “X” series autopilot connection
70
20220760L
Installation
Connecting a Simrad XX32/XX40/XX50 series
GPS Plotter
NMEA out
This will provide the chart plotter with speed, depth, temperature
and wind information.
NMEA in
This will provide navigational data to the instrument system.
Figure 6-12 Simrad XX32/XX40/XX50 series connection
Note !
Even if the NMEA input is automatically polarized on the IS15
instruments, it may be necessary to interchange the wires from
XX32/40/50 series if depth sounding problems are observed in
models that contain a depth sounder.
Connecting a Simrad AP12 or AP14 Autopilot
NMEA Out
This connection will provide speed data to the autopilot. For the
Hydraulic Drive configuration the IS15 Instrument Head is
connected to the SCP Course Computer (Figure 6-13). For the
Rotary Drive Configuration the IS15 Instrument head is
connected to the SRD12 Rotary Drive Unit (Figure 6-14).
If an IS15 Wind Transducer is connected to the system, wind
information will also be transferred to the autopilot.
20220760L
71
IS15 General Manual
Figure 6-13 Connection to
AP12H/AP14H Autopilot
Figure 6-14 Connection to
AP12R/AP14R Autopilot
RFC35N (NMEA) and RFC35R (Rate) Compass connection
Figure 6-15 Connection to RFC35N and RFC35R Compasses
Note !
Read the wiring instructions that comes with the RFC35R Rate
Compass.
NMEA in:
‘Heading’ and ‘Calibration Completed’ from
compass
NMEA out: ‘Start Calibration’ to compass.
72
20220760L
Installation
6.9 IS15 Transceiver
This unit contains the depth and the speed/temperature
electronics. The power supply (battery) and the transducers are
connected to the unit.
The unit has three Roblink connectors for instrument heads and
wind transducer.
Speed/temp transducer and depth transducer are hard-wired to
plug-in screw terminals on the PCB (pwr terminal is fixed).
• Remove the top cover to get access to the plug-in terminals.
• Press the cable end through an appropriate recess in the
gasket (ref. to Figure 6-5). Remove about 2 cm (0.8”) of the
cable insulation.
• Pull out the plug-in terminal before connecting the wires.
• Be careful to prepare all wires on each cable before putting it
through the gasket to avoid strands getting onto the PCB.
• Insulate the shields by electrical tape or similar.
• Make the connections according to the following connection
diagrams.
• Leave sufficient free wires so that the plug-in terminals can
be easily connected/disconnected.
• Ensure that no strands are left inside the unit before
putting on the cover.
Figure 6-16 IS15 Transceiver PCB - Connector and terminal
location
20220760L
73
IS15 General Manual
Figure 6-17 Depth Transducer connections
When installing Airmar depth transducers with a 200KHz-G
designator, a 2 Kohm resistor should be connected across the
terminals as shown. The resistor provides a better impedance match to
the particular element used in these transducers, hence erratic readings
are avoided in very shallow waters.
The P52 and the SS505 listed by Simrad have a 200KHz-G designator
and will need the 2 Kohm resistor. Other Airmar depth transducers
listed by Simrad have a 200KHz-U or 200KHz-B designator.
Figure 6-18 Speed/Temp Transducer connections
74
20220760L
Installation
Power connection
There is no power cable supplied for the Transceiver. Use a
cable with minimum wire gauge of 1.5mm2 (AWG14). The outer
diameter should be 10 mm (0,4”) to ensure a tight fit through the
gasket.
Connect the Power cable to TB1 on the IS15 Transceiver PCB
and the other end to a circuit breaker.
The connection is polarity protected and monitored by a green
LED. If a red LED is lit on the PCB, swap the supply wires (see
Figure 6-16).
6.10 IS15 Instruments as NMEA repeaters
Figure 6-20, Figure 6-21 and Figure 6-22 are examples of how
IS15 instruments can be used as NMEA repeaters. Depth, speed
and temperature can be displayed when connected to a Simrad
CEXX Chart plotter/Echo sounder or CAXX Multifunction
radar. Any preferred combination of instruments can be used, the
IS15 Combi for example is an excellent display also for wind
data presentation.
Installing the Roblink Power Cable
The configuration in Figure 6-20 is limited to a total of 3
instruments and a Roblink Power Cable (P/N 22093587) is
required to enhance the Roblink signals. Connect the cable to a
circuit breaker. Extend the cable if necessary using a wire gauge
of 0,75 mm2 (AWG18).
Notes !
1. If an IS15 Wind Transducer is connected to the IS15
instruments when using this configuration, it must be
plugged into connector no. 2 (Roblink) on instrument head
no. 3. Refer to note 2 for NMEA connection.
2. If only a single instrument is installed (Figure 6-22) there is
no need for the Roblink Power Cable. Simply cut the 0,3 m
(1’) cable that comes with the instrument in two and extend
the halves to the 12V supply and the NMEA source
respectively using twisted pair cable. – Also refer to
instructions for Roblink turn-off (paragraphs 7.3 or 7.13.)
20220760L
75
76
**
*
10m (33')
Depth
transducer
10m (33')
Speed/temp
transducer
Supply 10,8-15,6VDC
Junction box (mast foot)
30m (99')
From Chartplotter (NMEA)
To Radar (alternative)
From Autopilot
5-10m (16-33')
To Chartplotter (NMEA)
**
*
To Chartplotter
(alternative)
To Autopilot
0,3m (1')
0,3m (1')
SIMRAD
IS15 Multi (Depth)
*
**
SIMRAD
IS15 Multi (Speed)
*
* 10m (33')
**
SIMRAD
IS15 Compass
0,3m (1')
IS15
Transceiver
10m (33')
*
SIMRAD
IS15 Wind
Group no. 1
*
**
**
Wind Transducer Connector
Roblink Cable/Connector
NMEA data
SIMRAD
Wind
Transducer
*
IS15 Compass
To VHF radio
0,3m (1')
*
Roblink data Bus
To Radar
0,3m (1')
*
SIMRAD
IS15 Multi (Depth)
Note: The order of instrument interconnection
may be any preferred order.
**
SIMRAD
IS15 Multi (Speed)
Group no. 2
IS15 General Manual
Figure 6-19 IS15 Instrument system – Cabling diagram
20220760L
Installation
1.
2.
SIMRAD
3.
SIMRAD
Wind
Transducer
SIMRAD
(Special) Roblink
Power Cable
+
Note 1
Fuse
1A Slow
2,5m (8')
**
0,3m (1')
*
**
0,3m (1')
*
**
10m (33')
30m (100')
12V Supply
Junction box (mast foot)
Simrad
CE-Type
Chart Plotter/
Echo Sounder
or CA Multifunction radar
AC10/AC20
Autopilot Computer
or
J3000X/J300X
Junction Unit
***
10m (33')
Speed/temp
transducer
10m (33')
Depth
transducer
*
**
***
Roblink cable with connector
Optional extra
Only when using AC20/J300X
NMEA signal flow
Figure 6-20 NMEA Repeaters using Roblink Power Cable
Refer to section 6.10 for information and cabling instructions. Also
refer to the note below Figure 6-12.
Installing the IS15 Power Supply
The IS15 Power Supply (P/N 22093595), like the IS15
Transceiver is capable of driving a total of 7 instrument heads. A
5m Roblink cable (P/N 22092548) is included as standard.
Figure 6-21 shows an example of this configuration.
The physical dimensions are equal to the Transceiver and the
connections are similar excluding the speed and depth
transducers.
Please observe the total length of Roblink cables. See page 67.
Also observe the cabling instructions in sections 6.6 and 6.7.
20220760L
77
IS15 General Manual
1.
SIMRAD
2.
3.
7.
SIMRAD
SIMRAD
SIMRAD
Wind
Transducer
30m (100').
*
**
**
0.3m (1').
*
0.3m (1').
**
*
*
0.3m (1').
**
Junction box
(mast foot)
0.3m (1').
10m (33').
5m (16').
12V Supply
*
Simrad
CE-Type
Chart Plotter/
Echo Sounder
or CA Multifunction radar
*
***
IS15 Power Supply
Speed/temp
transducer
Depth
transducer
AC10/AC20
Autopilot Computer
or
J3000X/J300X
Junction Unit
*
**
***
Roblink cable with connector
Optional extra
Only when using AC20/J300X
NMEA signal flow
Figure 6-21 NMEA Repeaters using IS15 Power supply
SIMRAD
12V supply
NMEA
source
Figure 6-22 Single stand alone NMEA repeater
Note !
78
Refer to section 7.3 screen 4 or section 7.13 screen 6 for
instructions on Roblink turn-off.
20220760L
Installation
6.11 IS15 Expander
Mounting
The IS15 Expander is not waterproof and should be mounted
vertically in a dry place with the cable outlets pointing
downwards.
The unit is mounted to bulkhead or panel by four screws through
the mounting lugs.
Transducers
Refer to paragraph 6.5.
Cabling
Figure 6-23 Interconnection – Principle diagram
20220760L
79
IS15 General Manual
Chain no. 1
IS15 Wind
IS15 Compass
SIMRAD
SIMRAD
*
*
IS15 Multi
IS15 Multi
SIMRAD
SIMRAD
*
0,3m (1')
Wind
Transducer
*
*
0,3m (1')
0,3m (1')
Chain no. 2
IS15 Combi
IS15 Multi
IS15 Multi
SIMRAD
SIMRAD
SIMRAD
*
*
0,3m (1')
IS15 Compass
SIMRAD
*
*
0,3m (1')
0,3m (1')
10m (33')
10m (33')
30m (99')
To / from GPS/Chartplotter
To other NMEA listener
*
**
**
**
To / from autopilot
**
To Radar
**
*
Junction box
(mast foot)
*
*
10m (33')
IS15
Expander
Supply
10,8-15,6VDC
10m (33')
10m (33')
Speed/temp
transducer
Depth
transducer
Roblink data Bus
NMEA data (twisted pair cable)
Roblink Cable/Connector
Wind Transducer Connector
Direction of NMEA signal flow
Figure 6-24 IS15 Instrument system with IS15 Expander
Choosing the Cable Routes
Refer to page 66.
80
20220760L
Installation
Total length of Roblink cables
The IS15 Expander can drive a total of 8 instrument heads. They
can be connected to J1 (port 1) and J2/J4/J5 (port 2) of the
Expander with maximum 7 instrument heads to one port. The
total length of the interconnecting Roblink cables should not
exceed 30 m from each port as shown in Figure 6-25.
The length of the masthead cables shall not be included in the
above.
Note !
INSTR. #1
INSTR. #7
SIMRAD
SIMRAD
30m (99')
J1
IS15
EXPANDER
Max 7 instrument heads in one chain
Total length of all Roblink cables, max. 30 m (99')
INSTR. #1
INSTR. #8
SIMRAD
SIMRAD
SIMRAD
30m (99')
SIMRAD
30m (99')
J1
J2/J4/J5
(port 1) (port 2)
IS15
EXPANDER
Max 8 instrument heads
Total length of Roblink cables
from one port, max. 30 m (99')
Figure 6-25 Total length of Roblink cables
Extending Cables
See Optional equipment page 6.
Securing Cables and connectors
See page 67.
20220760L
81
IS15 General Manual
Transducers and Power connections
Figure 6-26 IS15 Expander – Connector and terminal locations
Refer also to Figure 6-17 and Figure 6-18
Power connection
There is no power cable supplied for the Expander. Use a cable
with minimum wire gauge of 1.5mm2 (AWG14). The outer
diameter should be 10 mm (0,4”) to ensure a tight fit through the
gasket.
Connect the Power cable to TB1 on the IS15 Expander PCB and
the other end to a circuit breaker. Use a 5 Amp fuse in the line.
The connection is polarity protected and monitored by a green
LED. If a red LED is lit on the PCB, swap the supply wires (see
Figure 6-26).
NMEA connections
General
The IS15 Expander has two sets of NMEA I/O ports. TB5 and
TB6 are input and output ports no. 1 respectively and TB11 and
TB7 input and output ports no. 2 respectively.
Note !
82
Always use twisted pair cables for NMEA data.
20220760L
Installation
Figure 6-27 NMEA out
The NMEA “listeners” must be
connected to either TB6 or TB7.
Figure 6-28 NMEA in
The NMEA “talkers” must be
connected to either TB5 (GPS) or
TB11 (Autopilot and other). The IN
ports are non polarized (colour
independent).
Notes !
1. The NMEA input ports are dedicated, i.e. port no. 1 is for
GPS/Plotter data and port no. 2 for other data. Refer to the
NMEA table on page 56 to identify which signals (GPS_Data
and Nav_Data) and corresponding NMEA sentences that
should be connected to TB5 (port 1).
2. As a rule of thumb, the GPS/Chartplotter should be connected
to TB5 (input) and TB6 (output), whilst the autopilot should
be connected to TB11 (input) and TB7 (output).
3. Please observe the following:
− IS15 will read depth on NMEA provided the IS15 depth
sounder is turned off.
− IS15 will read wind speed and angle on NMEA when
there is no wind transducer connected.
− IS15 will not read water speed and temperature on NMEA
when there is an IS15 Expander (or IS15 Transceiver) in
the system.
4. The output ports (TB6, TB7) are outputting parallel data and
each port can drive two NMEA “listeners”.
20220760L
83
IS15 General Manual
Interfacing to a Simrad AP11 or AP 20 series
autopilot
Use a single cable with two twisted pairs of wire for this
connection.
NMEA Out
The connection will provide speed, depth, temperature and wind
data input to the autopilot.
With a J3000X Junction Unit in the system the autopilot will
also receive GPS data via this connection provided a
GPS/chartplotter is connected to the Expander.
The connection is made to the J3xx Junction Unit Main Board,
Terminals RX1+ and RX1-.
NMEA In
This connection provides heading data input to the instruments.
The connection is made to the J3xx Junction Unit Main Board
terminals TX1+ and TX1–.
Figure 6-29 Simrad Robertson “X” series autopilot connection
Note !
With a J300X Junction Unit in the autopilot system you may
have redundancy and a higher heading output rate if you run a
separate and direct NMEA interface between the chartplotter
and the autopilot.
In that case connect the IS15 Expander to J300X, RX2/TX2
instead. Connect the chartplotter (port 1) to IS15 as shown in
Figure 6-12. In addition connect the chartplotter (port 2) to
J300X, RX1/TX1. On the autopilot and the chartplotter the
interfacing must be set up accordingly.
84
20220760L
Installation
Connecting a Simrad XX32/XX40/XX50 series
GPS Plotter
Use a single cable containing two twisted pairs of wires if you
need to extend the cable(s) that comes with the equipment.
NMEA out
This will provide the chart plotter with speed, depth, temperature
and wind information. Compass heading (from the autopilot)
will also be provided in the event there is no direct interface
between the autopilot and the chartplotter.
NMEA in
This will provide navigational data to the instrument system.
Figure 6-30 Simrad XX32/XX40/XX50 series connection
20220760L
85
IS15 General Manual
Connecting a Simrad AP12 or AP14 Autopilot
NMEA Out (TX2, RX2)
This connection will provide speed and wind data to the
autopilot. Use twisted pair cable.
Figure 6-31 Connection to
AP12H/AP14H Autopilot
Figure 6-32 Connection to
AP12R/AP14R Autopilot
RFC35N (NMEA) and RFC35R (Rate) Compass
connection
The heading input is normally from the autopilot on NMEA
format. In the event there is no autopilot connected to IS15, a
separate compass with NMEA interface can be connected as per
figure 6-15 or as per below.
Figure 6-33 Connection to RFC35N or RFC35R Compasses
Note !
86
Read the wiring instructions that comes with the RFC35R Rate
Compass.
NMEA in:
‘Heading’ and ‘Calibration Completed’ from
compass
NMEA out:
‘Start Calibration’ to compass.
20220760L
Installation
Setting-Up
Follow the instructions in Section 7 and in the IS15 Wind
Manual, section 6.
Expanding the system
You may add another 7 instruments to an IS15 system that
contains an IS15 Expander. Please refer to Figure 6-34 and
observe the following:
• The Main system is powered by the Expander
• The Secondary system is powered by an IS15 Power Supply
• The two systems are interfaced on NMEA using a single
Roblink cable between the two
• The Secondary system is a repeater system to the Main system
• All sensors are connected to the Expander
• All NMEA interface to peripheral equipment is to the
Expander
Please observe:
1. All system units should be the latest version.
2. The Power Supply has a 5m (16’) Roblink cable as standard.
3. If you need to extend the cables, please order standard IS15
cables and the cable adapter (joiner) as per our price list and
observe the max. cable lengths as per Figure 6-6. Maximum
recommended (NMEA) cable length between Main and
Secondary system is 70 m (230’).
4. Plan your installation so that heads from the two systems are
not placed adjacent to each other. You may notice a minor
delay in response between the Main and the Secondary
system depending on the type of information you are
reading. This is caused by the transfer time on NMEA
format.
5. When commissioning, start with the Main system, then
duplicate on the Secondary system, i.e. first time turn-on,
units, off-sets, illumination bank, etc. Perform the
calibrations using the Main system and then enter the
calibration values into the Secondary system.
6. Normal operational settings, e.g. depth alarms, damping and
illumination must also be set on both systems.
7. You can only turn off the IS15 depth sounder from the Main
system.
20220760L
87
IS15 General Manual
Secondary system (NMEA Chain)
#2
#3
SIMRAD
SIMRAD
#1
SIMRAD
4
1 2
1
RL
2
RL
1
#5
#4
SIMRAD
2
RL
1
SIMRAD
2
RL
1
2
#6
#7
SIMRAD
SIMRAD
1
RL
2
RL
Wind
Transducer
Main system chain 2
#2
#1
SIMRAD
1
SIMRAD
Supply
10,8-15,6VDC
IS15
Power Supply
NMEA*
*
1
2
RL
1
4
Main system chain 1
#1
SIMRAD
1
2
RL
#2
#3
SIMRAD
SIMRAD
1
2
RL
1
2
RL
1
#4
#5
#6
SIMRAD
SIMRAD
SIMRAD
2
RL
1
2
1
RL
30m (99')
10m (33')
RL
10m (33')
RL
Junction box
(mast foot)
LEGEND:
**
= NMEA data
To / from GPS/Chartplotter
**
To other NMEA listener
**
To / from autopilot
**
To Radar
**
= Roblink Cable/Connector
= Wind Transducer Connector
RL
= Roblink cable
10m (33')
= IS15 "Talker" cable
Speed/temp
transducer
= IS15 "Listener" cable
*
10m (33')
IS15
Expander
Supply
10,8-15,6VDC
10m (33')
Depth
transducer
NMEA* = "Talker" cable between Main
and Secondary system, max 70 m (230')
(standard Roblink cable)
Note:
The order of instrument interconnection
may be any preferred order.
Figure 6-34 Expanded system
88
20220760L
Setting-Up
7 SETTING-UP
7.1 First time turn on
Note !
Always turn on all NMEA “listeners” and “talkers” connected
to the system before the first time you turn on the IS15 system.
This includes turn on after a COMMUNICATION RESET or a
MASTER RESET. The system will then automatically configure
the IS15 NMEA ports as talkers (NMEA out) or listeners (NMEA
in).
Before leaving the factory a Master Reset has been performed on
all instruments. The first time power is applied to an instrument,
the display will prompt you to press the illumination key.
IS15 Combi
IS15 Multi
button. In a
To assign an instrument to a system, press the
multiple instrument system the instruments are assigned and
buttons are
given an Id number in the same sequence as the
pressed. The instrument that is assigned as #1 will be the master
unit and broadcast common set-up information on the Roblink to
the other instruments.
Notes !
1. When assigning more than one instrument to a system, allow
an interval between each assignment, while the instruments
read “Please Wait”.
2. With an Expander in the system this will always have Id no.
1, i.e the first instrument to be assigned will then be Id no. 2.
After having assigned all instruments in the system, turn the
power Off and then On (the instruments will display POWER
OFF [P.OFF] if you forget). The system will now display the
start-up screens.
IS15 Combi
20220760L
IS15 Multi
89
IS15 General Manual
When an instrument is replaced it is important that a Master
Reset has been made on the new one before it is connected to the
system. Refer to section 9.5 Local Master Reset on page 118.
Note !
7.2 Installation and Calibration Menu
After installation, certain functions in the system should be
calibrated to take into account the physical position and type of
transducers installed. Furthermore the preferred display units
should be selected.
The installation screens of the IS15 digital instruments are
arranged in a ‘table’ as below. It consists of a number of menu
groups, each group being a logical collection of screens. Access
to the menu and the individual screens are described below.
2 sec.
Screen
Screen 1 Screen 2 Screen 3 Screen 4 Screen 5 Screen 6 Screen 7
Screen 8
General
Illumination bank
LCD
Contrast
Shop mode NMEA
Roblink
(on/off)
communica com. & id
tion In/out (on/off)
Master
reset
Group 2
Depth unit
Depth
offset
Depth
source *
Speed unit
Log
calibration
factor
Log
calibration
SOG
Group
Group 1
Depth
Group 3
Boat speed
Group 4
Temperature
Group 5
Wind
Group 6
Navigation
Log
calibration
Distance
Roblink
test *
Com.
(munication) Reset
Log
source *
Temperature unit
Wind
Speed unit
Wind angle Wind angle Wind
offset
offset
source *
(Automatic) (Manual)
Distance
unit
Pos.
source*
Nav.
Source *
Group 7
Compass
Group 8
Rudder *
Group 9
Expander **
Compass
calibration
Heading
offset
Rudder
angle
offset
Rudder
angle
source
Local
Master
Reset
Software
Version
Bearing
unit
Heading
source *
* IS15 Combi only
** IS15 Combi only. Applies with an IS15 Expander in the system.
90
20220760L
Setting-Up
button and hold for 10 seconds to access the
1. Press the
Installation Menu.
or
2. Apply a short press on the
of screens in the Installation Menu.
button to select a group
3. Again press and hold the
button for 2 seconds to access
the screens in the selected group.
or
4. Apply a short press on the
particular screen in the group.
button to select a
5. Press the
button and hold for 2 seconds to change a setting
shown on a screen. The item to be set starts flashing.
6. Apply short presses on the
or
button to change or
decrease/increase the setting. A quick double press will start
an automatic count down or count up respectively
(autorepeat).
7. Press the
button and hold for 2 seconds to save a setting.
8. Apply a short press on the
or again press and hold the
to the group screen.
9. Press and hold the
main screen.
button to show the next screen
button for 2 seconds to return
button for 2 seconds to return to the
The flow chart below shows the principle of how to access the
installation set-up menu, select a particular installation screen
and change a setting.
Exit
2 sec.
2 sec.
Main screen
Group 1
Screen 1
- Install 10 sec.
2 sec.
Screen 2
Screen 3
XXX
Access
2 sec.
Group 2
XXX
- Install Increase
Short press(es) to adjust setting.
(Short double press for automatic repeat).
Short press to
select groups
Decrease
YYY
2 sec.
YYY
Screen 1
Figure 7-1 Access to installation screen(s)
20220760L
91
IS15 General Manual
Use the above procedure and flowchart as reference when
accessing installation screens and adjusting the settings.
7.3 General Screen Group
The sequence for IS15 Combi and IS15 Multi is identical but the
screens are slightly different. In the following both screens are
presented.
button and hold for 10 seconds to access the
1. Press the
Installation Menu, General Screen Group.
button and hold for 2 seconds to access the
2. Press the
screens in the General Screen Group.
Screen 1
ILLUMINATION BANK
The IS15 instrument system can have two separate illumination
banks of instruments. Setting the lighting level on one display
will set all the other displays in that bank to the same level, but
will not effect any displays in the other bank. For instance, the
lighting level can be independently controlled for:
• The cockpit and chart table instruments of a yacht.
• The cockpit and mast instruments on a yacht.
• The cabin and flybridge instruments of a motor yacht.
Note !
You can also have individual lighting on all instruments. Then
the illumination bank setting must be 0.
Screen 2
CONTRAST
The LCD on IS15 Series instruments can be set to one of eight
contrast levels to best suit the viewing angle of the particular
installation.
The default level (level 4) is suitable for a wide range of viewing
angles and will probably not require alteration. However, view
the display from different angles and adjust if required. In
twilight or in the dark use appropriate illumination when
adjusting the contrast.
92
20220760L
Setting-Up
Screen 3
SHOP MODE
The instrument has a demonstration mode that can be activated
by selecting ‘Shop Mode’ On. This function is very useful for
dealers when they want to demonstrate the IS15 system or when
it is put on display on a show. The Shop Mode is turned off
when power is turned off.
Note !
When in Shop Mode the instruments will display external data if
data is available as input from sensors.
Screen 4
NMEA IN/OUT
This screen allows you to manually change the NMEA ‘listener’
port = NMEA IN to a ‘talker’ port = NMEA OUT, or vice versa.
Hence you need not make a Master reset or a Communication
reset. Refer to chapter 7.1 First time turn on. See also note
below.
The setting is local to each instrument.
Note !
If there is an active ‘talker’ connected to the NMEA port, you
will not be able to change this port from ‘IN’ to an ‘OUT’ port
unless the ‘talker’ is disconnected.
Screen 5
ROBLINK ON/OFF
This screen allows you to turn the Roblink Off (or On). The
setting is local on each instrument.
Notes !
1. The Roblink must be turned Off when the instrument is used
as a single NMEA repeater. However, if more heads are
connected as NMEA repeaters in a daisy chain the Roblink
must be On.
2. When the Roblink has been turned Off it will not default to
ON even after a Master Reset. If required it must therefore be
turned On again using the procedure above.
20220760L
93
IS15 General Manual
Screen 6
ROBLINK TEST
Test screen on IS15 Combi only.
This screen is used for trouble shooting. Refer to Chapter 8.
Screen 7
COMMUNICATION RESET
Allows you to reset the system communication (Roblink) in the
event anomalies are observed on one or more instruments. This
reset will not default the calibration or unit settings.
button and hold for 2 seconds. The display shows
Press the
‘POWER OFF’.
Turn the system off and refer to section 7.1. to assign the
instrument(s) to the system.
Screen 8
MASTER RESET
When a MASTER RESET is performed on one of the
instruments in a system it becomes system wide and all
instruments are reset to default values.
Note ! Do not perform a Master Reset unintentionally, because
you will default settings and calibration values.
button and hold for 2 seconds. The display shows
Press the
‘POWER OFF’.
Turn the system off and refer to section 7.1. to assign the
instrument(s) to the system.
Note !
After the Master Reset a new set-up has to be performed.
7.4 Depth Screen Group
Screen 1
DEPTH UNIT
One of the following depth units may be selected:
• IS15 Combi: Feet (FEET), Metres (MTRS), Fathoms (FATH).
• IS15 Multi: Feet (FT), Metres (M), Fathoms (FA).
94
20220760L
Setting-Up
Screen 2
DEPTH OFFSET
When the depth offset is set to zero, the indicated depth is from
the transducer to the bottom. If you want to indicate the depth
from the water surface to the bottom you have to set the depth
offset according to the vertical distance between the surface and
the transducer (Positive (+) value).
If you want to indicate the depth from the keel to the bottom you
have to set the depth offset according to the vertical distance
between the transducer and the keel (Negative (–) value).
Screen 3
DEPTH SOURCE
Test screen on IS15 Combi only.
Displays the source of the depth information, the software and
hardware version of the IS15 Transceiver/Expander* and the
release date.
NMEA = External source
Rlink = IS15 Transducer
* Depth sounder part.
7.5 Boat Speed Screen Group
Screen 1
SPEED UNIT
One of the following speed units may be selected:
• IS15 Combi: Knots (KTS), Kilometres per hour (KMH),
Miles per hour (MPH)
• IS15 Multi: Same as IS15 Combi
Screen 2
LOG CALIBRATION FACTOR
• A calibration factor of 1.00 equals the factory default
calibration. An onboard calibration using SOG or a known
distance will normally give a different factor.
• If you know the calibration factor of the type of boat you are
on, simply adjust to the known value and the log is calibrated.
20220760L
95
IS15 General Manual
Screen 3
LOG CALIBRATION USING SOG
With a GPS connected to the system the log can easily be
calibrated using the Speed Over Ground input.
1. Maintain a steady speed and course and allow the SOG and
log readings to settle.
2. Adjust the log reading to be equal to the SOG reading.
Note !
If you are sailing in a known tide or current, add to or subtract
this value from the final setting of the log reading.
Screen 4
MANUAL LOG CALIBRATION
This method is used to calibrate the log while sailing a known
distance.
button when starting to sail the known distance.
1. Press the
The display flashes ‘Run(ning)’ and counts up the sailed
distance.
2. When reaching the end of the known distance press the
button again. The display shows ‘LogDist Adj.’ and the
measured distance is flashing.
3. Repeat the above while sailing the distance in the opposite
direction.
4. Finally adjust the reading to be the same as the sailed
distance.
Note !
The distance in one direction should be minimum 0,1 NM and
maximum 10 NM. Otherwise the calibration will fail.
Screen 5
SPEED LOG SOURCE
Test screen on IS15 Combi only.
Displays the source of the speed information, the software and
hardware version of the IS15 Transceiver/Expander* and the
release date.
NMEA = External source
Rlink = IS15 Transducer
* Depth sounder part.
96
20220760L
Setting-Up
7.6 Temperature Screen Group
Screen 1
TEMP. UNIT
One of the following temperature units may be selected:
IS Combi and IS15 Multi: Centigrades (°C), Fahrenheit (°F).
7.7 Wind Screen Group
Screen 1
WIND SPD UNIT
The following apparent and true wind speed units may be
selected: Knots, Metres Per Second, Kilometres Per Hour or
Beaufort.
• IS15 Combi: KTS, M/S, KMH, BEU
• IS15 Multi: KTS, M/S, KMH, BEU
Screen 2
WIND OFFSET, AUTOMATIC OFFSET
The IS15 instrument system can be automatically corrected for
errors in the mounting of the wind angle sensor. Head the vessel
directly into the wind, and then activate the automatic calibration
function by pressing and holding the
button. The display will
then read don(e). Any error in the wind angle will be corrected to
zero the display.
20220760L
97
IS15 General Manual
Screen 3
WIND OFFSET, MANUAL CORRECTION
Any residual error in the apparent wind angle display can be
corrected manually by entering the required offset. Activate
button.
using the
• Adjust the wind angle offset to starboard using the
(positive reading).
button
• Adjust the wind angle offset to port using the
(negative reading).
button
Screen 4
WIND SOURCE
Test screen on IS15 Combi only.
Displays the source of wind, the software and hardware version
of the wind transducer, and the date of the software release.
NMEA = External source
Rlink = IS15 Wind Transducer (MHU)
7.8 Navigation Screen Group
Screen 1
DISTANCE UNIT
The following distance units may be selected: Nautical miles
(NM), Kilometres (KM).
Screen 2
POSITION AND NAVIGATION SOURCE
Test screen on IS15 Combi only.
7.9 Compass Screen Group
Access the screens in the Compass Menu Group. Calibration and
data input should be carried out in the same sequence as
described below.
98
20220760L
Setting-Up
Screen 1
COMPASS CAL.
This function will activate the automatic compass calibration
procedure.
Note !
Do not use the calibration procedure when the IS15 is connected
to a Simrad autopilot.
Before you begin the compass calibration procedure, make sure
you have enough open water around you to make a full
clockwise turn. Let the boat turn at idle.
1. Begin turning the boat to starboard.
2. Press the
‘CAL’.
button and hold for 2 seconds. The LCD flashes
3. When the calibration is completed, (after having made
approximately 1 ¼ turns), it will be confirmed by the display
reading ‘Done’.
Screen 2
HDG OFFSET
Note !
Do not use the Heading Offset procedure when the system is
connected to a Simrad autopilot.
The Heading Offset feature allows you to correct for a
permanent heading offset that may be present as a result of the
compass being installed with a lubber line offset, or a fixed
offset remains after the calibration procedure has been
completed.
• Increase the offset reading using the
offset).
button (positive
• Decrease the offset reading using the
offset).
button (negative
Screen 3
HEADING / BEARING UNIT
The display heading and bearing may be set to reference either
Magnetic (M) or True (T) North. If True North is selected,
magnetic variation must be available from a GPS or entered
manually. See note on page 20.
20220760L
99
IS15 General Manual
Screen 4
HEADING SOURCE
Test screen on IS15 Combi only
7.10 Rudder Screen Group
The Rudder Screen Group applies only for the IS15 Combi.
Screen 1 Rudder angle offset
Local offset adjustment on instrument.
Activate pressing the
button (2 seconds)
Adjust offset to Stbd using the
button (+)
Adjust offset to port using the
button (–)
Screen 2 Rudder angle source
Tells you that IS15 gets valid rudder angle data on NMEA (from
autopilot)
If there is no data available at turn on the display will tell you as
shown.
7.11 Expander Screen Group
These screens are displayed in all system configurations but
applies only when an Expander is installed.
Screen 1
LOCAL MASTER RESET (Expander only)
button to master reset the expander. The display
Press the
will than read 'done'.
Screen 2
SOFTWARE VERSION
Displays the Expander software version.
100
20220760L
Setting-Up
7.12 Leaving the Installation Menu
Return to the main display from the Installation Menu as
follows:
1. From any Installation Menu screen, press the
hold for 2 seconds to return to the group screen.
button and
button and hold for 2
2. From any group screen press the
seconds to leave the Installation Menu and return to the main
screen.
7.13 Setting up the Compass Instrument
First time turn on
Note ! Please read the first note in this chapter (7.) before turn
on.
Before leaving the factory a Master Reset has been performed on
the instrument. The first time power is applied to a Compass
instrument, the display will read:
PrES
button. In a
To assign an instrument to a system, press the
multiple instrument system the instruments are assigned and
buttons are
given an Id number in the same sequence as the
pressed. The instrument that is assigned as #1 will be the master
unit and broadcast common set-up information on the Roblink to
the other instruments.
Id:1
After having assigned the instrument, turn the system off and
then on (the instrument will display P.OFF if you forget). The
pointer will make a 360° turn and then the instrument will
display the heading.
Notes !
1. When assigning more than one instrument to a system, allow
a few seconds interval between each assignment, while/if the
display is showing
– – –
2. When an instrument is replaced it is important that a Master
Reset has been made on the new one before it is connected to
the system. Refer to section 9.5 Local Master Reset.
20220760L
101
IS15 General Manual
Installation and Calibration Menu
The installation menu is arranged as follows:
Screen
Display
Screen 1
Digital
Screen 2
Screen 3
Screen 4
Illumination
bank
Compass
Calibration
Heading Offset
bAn.1
CAL.C
OFFS
Heading T/M
HdG
Screen 5
Shop mode
(on/off)
SHOP
Screen
Display
Digital
Screen 6
Screen 7
Screen 8
Screen 9
Screen 10
NMEA In/out
Roblink on/off
Test display
Communication
reset
Master reset
N 183
robl
tESt
CrES.
rES.
To enter Installation Menu:
button and hold for 10 seconds to access the
1. Press the
Installation Menu.
or
button to select one of
2. Apply a short press on the
the LCD screens in the Installation Menu.
button, hold for 2 seconds and release to access
3. Press the
a setting. The item to be set starts flashing.
4. Apply a short press on the
setting.
5. Press the
or
button to select a new
button and hold for 2 seconds to save a setting.
6. Apply a short press on the
button to show the next screen
button and hold for 2 seconds to return to
or press the
normal operation.
Screen 1
ILLUM. BANK [bAn.1]
The display reads bAn.0 – bAn.2
The IS15 instrument system can have two separate banks of
instruments. Setting the lighting level on one display will set all
the other displays in that bank to the same level, but will not
effect any displays in the other bank. For instance, the lighting
level can be independently controlled for:
• The cockpit and chart table displays of a yacht.
• The cockpit and mast displays of a yacht.
• The cabin and fly bridge of a power boat.
102
20220760L
Setting-Up
Note !
You can also have individual lighting on all instruments. Then
the illumination bank setting must be 0.
Screen 2
COMPASS CALIBRATION [CAL.C]
This function will activate the automatic compass calibration
procedure.
Note !
Do not use the calibration procedure when the IS15 instruments
are connected to a Simrad autopilot.
Before you begin the compass calibration procedure, make sure
you have enough open water around you to make a full
clockwise turn. Let the boat turn at idle engine speed.
1. Begin turning the boat to starboard.
2. Press the
button and hold for 2 seconds. The LCD flashes
‘rUN’ and then ‘CAL.C’.
3. When the calibration is completed, (after having made
approximately 1 ¼ turns), it will be confirmed by the display
reading ‘doNE’.
Screen 3
HEADING OFFSET [OFFS]
Note !
Do not use the Heading Offset procedure when the system is
connected to a Simrad autopilot.
The Heading Offset feature allows you to correct for a
permanent heading offset that may be present as a result of the
compass being installed with a lubber line offset, or a fixed
offset remains after the calibration procedure has been
completed. The value of heading offset is specific to the heading
sensor that is connected at the time the offset is entered.
1. Activate the Heading Offset by pressing and holding the
button for 2 seconds. The reading starts flashing.
button or
2. Increase the compass reading using the
button.
decrease the compass reading using the
3. Save the offset by pressing and holding the
20220760L
button.
103
IS15 General Manual
Screen 4
MAGNETIC OR TRUE HEADING [HdG]
The display heading (and bearings) may be set to reference either
Magnetic (MAG) or True (trUE) North. If True North is
selected magnetic variation must be available from a GPS
receiver or entered manually. See page 47.
Screen 5
SHOP MODE [SHOP]
Like the other IS15 instruments the IS15 Compass has a Shop
button to
Mode. Refer to Page 93 for more details. Press the
activate the selection of Shop Mode ‘OFF’ or ‘On’
Screen 6
NMEA IN/OUT [n 183]
This screen allows you to manually change the NMEA ‘talker’
port = NMEA OUT to a ‘listener’ port = NMEA IN. Hence you
need not make a Master reset or a Communication reset.
The setting is local to each instrument.
or
button to select NMEA OUT. Press and hold
Press the
button to confirm.
the
Note !
If there is an active ‘talker’ connected to the NMEA port, you
will not be able to change this port from ‘IN’ to an ‘OUT’ port
unless the ‘talker’ is disconnected.
Screen 7
ROBLINK ON/OFF [robl]
Turning Roblink Off and On is local on each instrument.
button and hold for 2
The display reads ‘robl’. Press the
seconds. The LCD display flashes ‘Id:x’, ‘x’ being the
instrument’s present Roblink Id. number.
Press the
hold the
or
button to select Roblink OFF. Press and
button to confirm.
Notes !
1. The Roblink must be turned Off when the instrument is used
as a single NMEA repeater. However, if more heads are
connected as NMEA repeaters in a daisy-chain the Roblink
must be On.
104
20220760L
Setting-Up
2. When the Roblink has been turned Off it will not default to
ON even after a Master Reset. If required it must therefore
be turned On again using the procedure above.
Screen 8
ROBLINK TEST [tESt]
Refer to section 8 Fault Finding for details.
Screen 9
COMMUNICATION RESET [C.rES]
Allows you to reset the system communication (Roblink) in the
event anomalies are observed on one or more instruments. This
reset will not default the calibration or settings.
button and hold for 2 seconds. The LCD display
Press the
shows ‘P.OFF’. Turn the system off, refer to the beginning of
this section and assign the instrument(s) to the system.
Screen 10
MASTER RESET [rES]
When a MASTER RESET is performed on one of the
instruments in a system it becomes system wide and all
instruments are reset to default values.
Note !
Do not perform a Master Reset unintentionally because it will
default settings and calibration values.
button and hold for 2 seconds. The LCD display
Press the
shows ‘P.OFF’. Turn the system off, refer to the beginning of
this section and assign the instrument(s) to the system.
Note !
20220760L
After the Master Reset a new set-up has to be performed.
105
IS15 General Manual
This page is intentionally left blank
106
20220760L
Fault Finding
8 FAULT FINDING
This chart assumes that the instrument is part of an IS15
instrument system including an IS15 Transceiver, or an IS15
Power Supply or Expander. If it is connected to another
equipment as a NMEA repeater, then perform the equivalent
checks on that equipment.
General Display and Communications Faults
Condition
Probable Cause
Action
All instruments have
blank displays.
No 12V Power
Supply.
Check that the ships instrument system
fuse(s) or circuit breaker(s) are not blown /
tripped.
Check the power supply wiring to the IS15
Transceiver.
Check the green LED lamp inside the
Transceiver indicating supply polarity OK.
(In order to remove the top cover to the
Transceiver first remove the six fastening
screws.)
Measure the voltage (10,8-15,6V)
Check the Roblink/power cable from the
Transceiver to the instruments.
Measure the voltage. Should be ≈ 18VDC.
Contact your dealer.
One instrument in
the middle of the
chain have blank
display
Instrument head is
defective.
Replace instrument (Perform master reset
and new setup).
One or more
instruments at the
end of a chain have
blank displays.
There is no Roblink/
supply to the affected
instrument (s).
Check the Roblink/power cable(s) to the
affected instrument(s).
20220760L
Contact your dealer.
107
IS15 General Manual
Condition
Probable Cause
Action
One or more
instrument(s) always
show ‘----’, with the
pointer of analog
instruments at their
zero positions.
No data is reaching
the affected
instrument(s).
Check the signal wiring to the affected
instrument(s).
Check Roblink data by entering the
Roblink test menu on a Combi instrument.
See the following fault finding charts for
details.
Wind Display Faults
Condition
Probable Cause
Action
There are no Wind
Speed or Wind
Angle displays, or
these displays
always show ‘----’.
The wind transducer is Check, and fit the transducer if necessary.
not fitted to the mast
Check the wind transducer’s Roblink
head connector.
connection to the Transceiver.
The wind transducer is Check that the wind transducer cable is not
not connected to the
damaged.
IS15 Transceiver
Check the connections in the Junction Box
properly.
at the mast foot.
Contact your dealer.
The Wind Speed
displays always
show ‘0.0’, but the
Wind Angle displays
are shown.
The anemometer
(cups) is seized.
Check the anemometer cups and have the
wind transducer serviced if necessary.
The Wind Speed is
too low, when it was
previously correct.
Worn
anemometer Check the anemometer cups and rotor
cups/bearing.
bearings or have the wind transducer
Damaged anemometer serviced if necessary.
A broken anemometer cup may be
replaced by the dealer/customer.
rotor or transducer
body.
Check that the rotor (cups) and transducer
are not damaged.
Make other checks as for ‘always showing
0.0’ above.
The Wind Speed is
too high or erratic,
when it was
previously correct.
108
Damaged wiring
causing intermittent
contact.
Make checks as for ‘always showing 0.0’
above.
20220760L
Fault Finding
Condition
Probable Cause
Action
The Wind Speed has
always been too low
or too high.
The wind transducer
may be poorly sited.
Check the transducer location.
The Wind Angle
displays are
incorrect.
The wind transducer is
not connected to the
IS15 Transceiver
properly.
Check the wind transducer’s connections
to the IS15 Transceiver and to the Junction
Box.
Contact your dealer.
Check that the wind transducer cable is not
damaged.
Contact your dealer.
The Wind Angle has The wind transducer is Calibrate the wind transducer. (Using
always
been not calibrated.
another instrument.)
incorrect.
Make checks as for ‘the wind angle
displays are incorrect’ above.
Note !
20220760L
A broken vane can only be replaced by the factory, as the Masthead Unit
(MHU) needs new calibration.
109
IS15 General Manual
Speed and Temperature Display Faults
Condition
Probable Cause
Action
The Boat Speed
display always
shows “----“ and/or
Temperature show –
16°C/36°F.
The speed transducer
is not connected to the
IS15 Transceiver
properly.
Check the speed transducer’s connections
to the IS15 Transceiver.
Check that the speed transducer cable is
not damaged.
Contact your dealer.
The Boat Speed
display always
shows ‘0.0’, but the
Sea Temperature
display is shown.
The speed transducer
is not installed in the
hull fitting.
The speed transducer
is not connected to the
IS15 Transceiver
properly.
Check, and replace the blanking plug with
the transducer if necessary.
Check the speed transducers connections
to the IS15 Transceiver (especially the Red
and Green ‘Speed’ wires).
Check that the speed transducer cable is
not damaged.
Jammed paddle wheel.
Damaged paddle
wheel or transducer
body.
Clean the paddle wheel and transducer as
required.
Check that the paddle wheel and
transducer is not damaged, and that there
are not ‘holes’ at the end of any of the
paddle wheels vanes.
Contact your dealer.
110
20220760L
Fault Finding
Condition
Probable Cause
Action
The Boat Speed is Dirty paddle wheel or Clean the paddle wheel and / or the hull as
too low, when it was hull.
required.
previously correct.
Damaged paddle
Check that the paddle wheel and
wheel or transducer
transducer is not damaged, and that there
body.
are not ‘holes’ at the end of any of the
paddle wheels vanes.
The paddle wheel is Check, and if necessary turn the transducer
not aligned fore / aft within the skin fitting so that the cross pin
within the skin fitting. is aligned with the centre line of the vessel.
Make other checks as for ‘always showing
0.0’ above.
The Boat Speed has The speed transducer
always been too low is not calibrated.
or too high.
Calibrate the speed transducer. (Using
another instrument.)
Make other checks as for ‘the speed is too
low when it was previously correct’ above.
The Boat Speed is The hull form and Turn the speed transducer slightly so that
different on each transducer
siting the cross pin is not aligned directly fore /
tack.
produces
different aft, and recheck for the same speed display
water flow rates over on both tacks. Repeat this until the correct
the paddle wheel on angle is found for the same reading on
each tack.
each tack, and then recalibrate the
transducer. (Using another instrument.)
The Sea Temperature display is
incorrect, showing –
degrees (-16°C).
The speed transducer
is not connected to the
IS15 Transceiver
properly.
Check the speed transducer connection to
the IS15 Transceiver (especially the
Brown, White and shield “Temp” wires).
Check that the speed transducer cable is
not damaged.
Check that the Sea Temperature is in fact
incorrect by comparing with another
temperature sensor.
Contact your dealer.
20220760L
111
IS15 General Manual
Heading and Autopilot Display Faults
Condition
Probable Cause
Action
There are no
Heading or Wind
Direction displays.
The required data is
not being received
from the Fluxgate
Compass or Autopilot.
If it is a non Simrad compass, check the
NMEA output compass specification
against the IS15 input specification. (Ref.
Table).
Check the compass power supply wiring.
Check the signal wiring from the compass
to the IS15 Instrument head.
Check that the compass is driving other
instrument head correctly.
Contact your dealer.
All Headings are
incorrect, by the
same amount.
The compass is not See manual for Compass calibration and
aligned correctly.
Heading offset.
Note :
When checking a
Compass ensure that
the check is against a
deviated magnetic
card compass, or
against magnetic
bearings, or against a
good hand held
compass held well
away from any
magnetic or ferrous
objects.
112
20220760L
Fault Finding
Condition
Probable Cause
Action
Some or all
Headings are
incorrect, by
different amounts.
The compass hasn’t
been calibrated.
Recalibrate the compass.
Magnetic or ferrous
objects have been
moved into or away
from the vicinity of
the compass.
Check for possible objects that may affect
the compass, e.g., a portable radio. If the
change is permanent then recalibrate the
Sensor.
Note :
When checking a
Compass ensure that
the check is against a The location of the
deviated magnetic
compass is unsuitable.
card compass, or
against magnetic
bearings, or against a
good hand held
compass held well
away from any
magnetic or ferrous
objects.
Check that the location of the compass is
suitable, if not then resite it.
Contact your dealer.
Navigation Display Faults
Condition
Probable Cause
Action
There are no
Navigation displays,
even though the
GPS/Plotter is
working.
The required data is
not being received
from the GPS/Plotter.
Check that the GPS/Plotter has a position
fix.
Check that the GPS/Plotter’s NMEA
output is set-up correctly.
Check the GPS/Plotter’s NMEA output
specification against the instrument’s input
specification.
Check the signal wiring from the
Navigation Receiver to the IS15
Instrument head.
Check that the Navigation Receiver is
driving other remote displays correctly.
Contact your dealer.
20220760L
113
IS15 General Manual
Condition
Probable Cause
Action
There are no
Waypoint Data
displays, even
though the Course
Over Ground display
is working.
The required data is Check that the GPS/Plotter has a
not available from the destination Waypoint.
GPS/Plotter.
Make other checks as for ‘no navigation
displays’, above.
There is no Cross
Track Error display,
even though the
Waypoint and
Course Over Ground
displays are
working.
The required data is Check that the GPS/Plotter is in Navigate
not available from the Mode.
GPS/Plotter.
Make other checks as for ‘no waypoint
displays’, above.
True / Magnetic
Course Over Ground
and Waypoint
Bearing data is not
shown, even though
the other format is
available.
Data of the required
format is not being
transmitted by the
GPS/Plotter.
Check that the GPS/Plotter is set to the
same navigation mode, and is set up to
transmit the correct navigation format.
Contact your dealer.
Roblink test displays
The Roblink test display monitors the data flow on the Roblink.
The IS15 Multi does not display a Roblink Test.
The Roblink test display on the IS15 Combi is entered as
follows:
button for 10 seconds to enter the
• Press and hold the
installation setup ‘GENERAL’ display.
• Press and hold the
• Press the
or
button for 2 seconds.
button until the display reads:
GENERAL
ROBLINK TEST
Execute
• Press and hold the
114
button for 2 seconds to start the test.
20220760L
Fault Finding
GENERAL
Roblink Sync. OK
Depth OK
Compass heading OK
Wind Speed & Angle OK
SYC
DPT
HDG
WND
DATA DETECT
255
SPD
255
POS
255
NA1
255
NA2
255
255
255
255
Boat speed (Water) OK
GPS Position data OK
Navigation data OK
Waypoint/Route navigation active
All displayed items will start counting at 136. If data are OK
they will count up and stop at 255.
If data are not OK they will count down and stop at 15.
On the IS15 Wind, Tack and Compass the Roblink test only
monitors the data utilized by the instrument head, e.g. wind data
or compass heading.
• Press and hold the
installation menu.
• Press the
or
button for 10 seconds to enter the
button until the display reads tESt.
• Press and hold the
button for 2 seconds to start the test. As
on the Combi, the display will start counting from 136.
There are three more displays available for roblink testing:
Message rate
Messages are sent with a fixed rate from 1 to 5/second. Example:
Heading (HDG) is sent with a rate of 5 and depth (DPT) with a
rate of 2.
Under normal operation the numbers are steady. If the reading
becomes erratic it indicates a problem on the Roblink.
Checksum Err(or)
Counts up detected check sum errors. A check sum error up to
5% of sent message is acceptable.
Verify how much each message is counting up in a periode of
one minute.
Examles:
If a message with a rate of 1 has more than 3 errors in a period of
60 seconds, it indicates a problem on the Roblink.
If a message with a rate of 5 has more than 15 errors in a period
of 60 seconds, the same problem exists.
The fourth display tells you if an instrument is sending NMEA
data to the Roblink.
20220760L
115
IS15 General Manual
Send
Displays ‘-Tx’ if the particular instrument is sending the
particular message on Roblink. Only the instrument receiving
data from NMEA and sending it to the Roblink displays ‘-Tx’.
Actions to Roblink test results:
1. Zero (0) reading means ‘no message available’.
2. If the numbers are continuously flickering or counting down,
perform a Communication Reset on the system.
3. Make sure the recommended cable length or number of
instruments in the system are not exceeded. See Figure 6-6.
4. Check all NMEA connections.
5. Check the output rate of the NMEA ‘talkers’ connected to
IS15. The rate should not be slower than 0.7 Hz.
Note !
116
A Personal Computer (PC) does not comply with the NMEA
hardware specifications. Always use a proper interface between
the PC and the IS15 NMEA ports to avoid possible anomalies in
the IS15 performance.
20220760L
Maintenance
9 MAINTENANCE
9.1 General Maintenance
Caution !
Do not use any abrasives, chemical cleaners, petrol or diesel to clean
the units.
The instrument heads will require no maintenance apart from
occasional cleaning. Use fresh water and a mild soap solution
(not a detergent).
9.2 Annual Maintenance
Check all connections to the instruments and, if necessary, cover
with silicone grease or petroleum jelly.
The wind transducer is a robust unit that should give you years
of reliable service. However, it will benefit from an application
of silicone grease to the connector at the beginning of each
season. It is also recommended that the wand is removed over
Winter if the boat is not in use. To prevent corrosion of the
connector, always fit the protective cap to the socket when the
wand has been removed.
Note !
A broken or lost wind vane can only be replaced by a recalibrated unit from the factory.
A broken anemometer cup may be replaced by the dealer/owner.
9.3 Removal of Instruments
1. If rear access is possible unplug the Roblink connectors from
the back of the instrument.
2. Remove the four front panel corners and the fixing screws.
3. Pull the instrument free from the panel, being careful not to
strain the cables if they have not yet been disconnected.
Unplug the Roblink connectors from the back, and make up
the cables if necessary.
20220760L
117
IS15 General Manual
9.4 Return for Service
Please ensure that an instrument that is believed to be faulty is
correctly installed, the cabling is in good condition and correct,
that all connections are secure, and that a correct supply is
present at the Roblink/power connector.
Should the unit have to be returned to your dealer, adequate
packing must be used. Please ensure that your name, telephone
number, return address, a clear fault description, and if possible a
copy of the proof of purchase are included with any returned
equipment. Simrad and their representatives are not responsible
for any equipment lost in transit.
Please quote the instrument’s serial number in all
correspondence. This is found on the back of the instrument.
9.5 Local Master Reset
When an instrument is leaving the factory a Master Reset has
been made. However, if an instrument is being used in a
different system or setup, you can perform a local Master Reset
on the instrument in that system before you disconnect it and
move it to a system where you want to put it.
Refer to screen 4 on page 93 or screen 6 on page 104.
1. Turn off the Roblink as per instructions
2. Perform a Master Reset as per instructions
3. Turn on the Roblink as per instructions
You can now install the instrument in another system without
having to make a system wide Master Reset and loose the
existing calibration and settings in that system.
118
20220760L
Spare Parts List
10 SPARE PARTS LIST
22092167 IS15 Combi Instrument
22092654 IS15 Combi PROM (programmed) V..R..
20220778 IS15 Combi Operator’s Quick Reference Guide
22092183 IS15 Multi Instrument
22093322 IS15 Multi PROM (programmed) V..R..
20220786 IS15 Multi Operator’s Quick Reference Guide
22092126 IS15 Compass Instrument
22092720 IS15 Compass PROM (programmed) V..R..
20220810 IS15 Compass Operator’s Quick Reference Guide
22092837 IS15 Mounting kit consisting of:
22084529 Cabinet corners
44165181 Screw 3.5x32
44160232 Screw (for securing the connectors)
22091854 IS15 Protection cover
22092241 IS15 Panel gasket
22092449 IS15 Transceiver
22093389 IS15 Transceiver Mounting kit
22093462 IS15 Transceiver PROM (programmed) V..R..
22092068 IS15 Transceiver lid
22092076 IS15 Transceiver housing
22092084 IS15 Transceiver gasket
Roblink Cables
22092019 IS15 Cable 0,3 m
22093728 IS15 Cable 2 m (6,5’)
22092548 IS15 Cable 5 m (16,5’)
22092027 IS15 Cable 10 m (33’)
22093587 IS15 Roblink Power Cable 2,5 m (8’)
22092001 IS15 Cable Adapter (joiner for interconnection of
cables)
20220760L
119
IS15 General Manual
22092456 IS15 Expander
22093389 Mounting kit
22094270 IS15 Expander PROM (programmed) V..R..
22092068 Lid
22092076 Housing
22092084 Gasket
22091953 IS15 Expander PCB Assy
120
20220760L