1
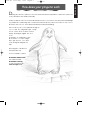
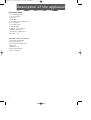
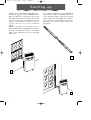
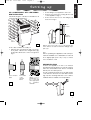
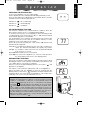
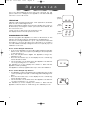
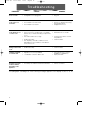
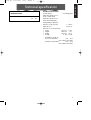
pac160 GB
25-01-2003
10:19
Pagina 4
Important Safe-guards
When using electrical appliances, basic safety precautions should always be taken, with
particular reference to the following:
-
-
Read all instructions.
To protect against fire, electric shock and personal injury, do not immerse cable, plug
or appliance in water or other liquid.
Close supervision is necessary when any appliance is used by or near children.
Unplug from socket when not in use and before cleaning.
Do not operate if the cable, plug or unit itself is damaged or faulty. Return the
appliance to the nearest authorised service centre for examination, repair or adjustment.
The use of accessories or spare parts other than those recommended by the manufacturer may result in fire, electric shock or personal injury.
Do not use outdoors.
Do not use the appliance in ways other than that for which it was intended.
Do not place the power cable under strain. Avoid twisting and/or tangling.
Ensure that the outlet of the discharge hose is kept free from debris and blockages.
Do not obstruct the ventilation holes at the rear of the unit or the front grilles.
The Pinguino should not be installed where there may be combustible gases in the
atmosphere.
Avoid using Pinguino in oily or sulphurous atmospheres or near sources of heat.
Before moving the air conditioner, empty water from condensation tray (see drainage instructions on page 15).
Do not place hot or heavy objects on the unit.
Clean air filter every week (see instructions on page 16).
To disconnect, turn control to “OFF”, then unplug from wall socket.
Important: if an extension is required, use heavy duty cable only (minimum 14 gauge
SAVE THESE INSTRUCTIONS
4
25-01-2003
10:19
Pagina 5
How does your pinguino work
D
uring the summer, optimum comfort is achieved with a temperature of between 75-80°F (2427°C) and about 50% relative humidity.
An air conditioner removes moisture and heat from the room where it is located. One advantage
of portable air conditioning units over fitted models is that they can be moved from one room to
another in the home or even transferred between different buildings.
The hot air in your room is passed through a
coil cooled by refrigerant gas, losing
excess heat and moisture before
being discharged again into the
room.
In Pinguino, a small part of this
air is used to cool the refrigerant gas before, hot and
moist, being discharged outside.
Each Pinguino can also be
used as a fan only.
For more details, contact:
DE’LONGHI AMERICA INC.
Tel: 1-800-322-3848
DE’LONGHI CANADA
or visit our Internet site
www.delonghi.com
5
ENGLISH
pac160 GB
pac160 GB
25-01-2003
10:19
Pagina 6
Description of the appliance
DESCRIPTION MODEL
1) Air discharge grill
2) Control Panel
3) Wheels
4) Handles
5) Housing for air exhaust hose
6) Cord winder
7) Air intake grill
8) Rating plate
9) Water collection tank
10)Water drain tube
11)Stopper for drain tube
12)Power cord
Description of the Accessories
13)Stopper and flange
14)Air exhaust hose
15)Air exhaust attachment
16)Suckers
17)Wheel locks
18) Window bracket
19) Door bracket
6
25-01-2003
10:19
Pagina 7
Setting up
When positioning the appliance, always ensure that nothing obstructs the intake and discharge of
air
AIR CONDITIONING WITHOUT PERMANENT
INSTALLATION
Only a few simple steps are necessary to
obtain the comfort offered by Pinguino.
•
• If you have a double window, use the
suckers (16) supplied to keep the panes from
opening wide (figure 3).
Fit the air exhaust hose (14) in its housing (5)
at the rear of the appliance as shown in fig.1
1
2
3
1
• Fit the window discharge attachment (15)
to the end of the hose (14)
• Place the air-conditioning unit at a window or French window
• Open the window a little and position the
attachment (15) as shown in fig. 2.
2
7
ENGLISH
pac160 GB
pac160 GB
25-01-2003
10:19
Pagina 8
Setting up
Pinguino is equipped with an adjustable window bracket 18. If you have a sliding window,
place the bracket on the window sill, extend
the bracket fully within the window frame and
lower the window onto the bracket. Insert the
nozzle of the exhaust hose into the slot, then
connect the hose to the air conditioner
(Fig.4).
Thanks to the wing nut, it’s possible to use the
window bracket also for sliding windows. Position
the hole of the bracket to allow a correct installation of the exhaust hose (see the following
instructions).
If you have a sliding door, use the additional
set provided in order to extend the accessory
to the desired length; joining the two parts
(fig. 5), adjust the total length according to
your needs then, fit the bracket with the relevant nuts, close the door and connect the
hose (fig. 6).
5
4
6
8
25-01-2003
10:19
Pagina 9
Setting up
AIR CONDITIONING WITH SEMI-PERMANENT INSTALLATION
If desired, Pinguino can also be installed on a
semi-permanent basis fig. 7.
• Fit the flange (13) supplied to the hole.
• Fix the hose (14) in the housing at the rear
of the appliance (fig 1)
• Fit the end of the hose to the flange (15)
as shown in fig. 9.
MAX 45,3"
MAX 115 cm
12 "
30 cm
MIN 19,7"
MIN 50 cm
12 "
30 cm
9
7
4.2" / 106 mm
In this case it will be necessary to:
• Drill a hole in a perimeter wall or in a window pane. Observe the height limits (fig.
9) and the dimensions of the hole given in
fig. 8.
In the windowpane
8
When the hose (14) is not connected, the
hole can be closed off with the flange stopper (13).
N.B.
When operating the appliance with semi-permanent installation, it is advisable to leave a
door slightly ajar (even only 1cm), to ensure
free circulation of air.
DEHUMIDIFICATION
Position the appliance in the room without
inserting the air exhaust hose (14); this ensures
that the dehumidified air will be released
directly into the atmosphere.
In the base
of the
window
frame
In the wall: we
advise you to
insulate the section of the wall
with appropriate
insulation
material.
The air emitted through the front grill will be
cold while the air from the rear will be warm
(fig. 10) thus ensuring that the room is dehumidified without variation in temperature.
10
9
ENGLISH
pac160 GB
pac160 GB
25-01-2003
10:19
Pagina 10
Description of the control panel
THE DISPLAY
A. ON/OFF Button
B. Function Button
Air-conditioning, dehumidifying, ventilation
C. Air-conditioning indicator light
D. dehumidifying indicator light
E. Ventilation indicator light
F. Increase temperature button / increase
operating time button
G. Decrease temperature button / Decrease
operating time button
H. Display
Displays the temperature selected, time
programmed
I. Timer button
L. Timer operation indicator
M/N/O/P. Fan speed indicator
Q. Fan speed button
ELECTRICAL CONNECTION
Before plugging in check that:
• the mains supply corresponds to the value shown in the specifications table;
• the socket and the mains lead correspond to the power requirements of the appliance;
• the socket is suited to the plug, otherwise have the socket replaced;
• the socket is properly grounded. The manufactures cannot be held responsible for any damages due to failure in following normal safety procedures.
Replacement of the power cable must be carried out by qualified personnel.
10
pac160 GB
25-01-2003
10:19
Pagina 11
ENGLISH
O p e r a t i o n
SWITCHING THE APPLIANCE ON
Connect the appliance to the mains supply.
On the display two lines will appear indicating Stand-by mode
Press the ON/OFF button (A) and then the MODE button until the
relevant function indicator appears viz.:
Indicator C
: air-conditioning
Indicator D
: dehumidifying
Indicator E
: ventilation
AIR-CONDITIONING FUNCTION
This function is ideal in hot, humid weather conditions when the
atmosphere requires to be cooled and dehumidified.
To ensure proper function of the appliance, after selecting the airconditioning function, press buttons + (F) or – (G) until the desired
temperature appears on the display.
The temperatures most suited to the atmosphere in summer vary
between (24-27°C) 75°-80°F. We do not advise selection of temperatures much lower than those outside.
Select fan speed by pressing the “FAN” button (Q) until the fan
speed indicator appears:
MAX (P): if you want the maximum power of the air-conditioner to
reach the desired temperature as quickly as possible.
MIN (O): if you want to reduce the level of noise and still maintain
a good level of comfort.
SILENT (N):when minimum noise is required,
AUTO (M):if you prefer the appliance to select the fan speed for
the temperature selected on the display panel.
77
DEHUMIDIFYING FUNCTION
This function is ideal for reducing humidity in the atmosphere while
avoiding increases or decreases in temperature (in between seasons, damp places, wet spells of weather).
When you select the dehumidifying function, the letters “
” will
appear on the display.
The water is collected in the tank at the rear of the appliance.
When the tank is full, the appliance will stop working and the
display will show the letters “ ” (Full Tank); the tank must then be
emptied. When it is re-inserted, the appliance will re-start automatically. N.B. remove the air exhaust hose (14).
In the air-conditioning function, the unit employs an exclusive condensation recycling system to dispose of excess moisture. In normal
conditions, condensation is disposed of automatically. When the
humidity is particularly high, an excess of condensation may built up
in the TANK 9 . When this happens, the display will show the letters
“ “ (Full Tank); indicating that the TANK should be emptied. Whenever conditions of high humidity make the problem recurrent, you
may discharge the excess water directly into a drain, using the rubber tube supplied. The tube should be inserted into the hole provided, after having removed the rubber stopper. (see figure).
Make sure the TANK is put back correctly otherwise the display will
continue to show the letters “
”
11
pac160 GB
25-01-2003
10:19
Pagina 12
O p e r a t i o n
Once the dehumidifying function has been selected, the fan
speed cannot be changed. The appliance will automatically
select the correct fan mode.
“Silent”
speed
VENTILATION
Adjust the fan speed by pressing the “FAN” (Q) button, as illustrated in the air conditioning function.
Bear in mind that the higher the speed, the greater the volume of
air filtered; by selecting the “Silent” speed, less air is filtered, but
the noise level is low.
“AUTO” function cannot be selected in this mode.
The display will show the fan speed selected.
“Min”
speed
“Max”
speed
PROGRAMMING THE TIMER
The timer programs the appliance to switch on and switch off. This
will save electrical energy by optimizing the operating times.
The timer is set using the buttons + (F) or – (G); these increase and
decrease by one hour at a time, but if pressed for more than 2
seconds will automatically change the time more quickly, up to a
maximum of 24 hours.
How to set the delayed start function
• Connect the appliance to the mains supply and press ON/OFF
button: next, select the required operating mode (temperature, fan speed etc.)
• Press the ON/OFF button again: the appliance will go into
stand-by mode.
• Press the timer button (I): on the display the two central segments will start to flash.
• Set the number of hours after which the appliance should switch on, by pressing the + or – buttons.
The indicator (L) on the display will continue to flash until the
appliance starts operating.
The appliance can be programmed for up to 24 hours in advance.
How to set the delayed stop function
• The appliance can be programmed for delayed stop from any
of the operating modes (air-conditioning/dehumidifying/ventilation.
• Press the Timer button (I): on the display the two central segments will start to flash.
• Set the number of hours after which the appliance should switch off by pressing the + or – buttons.
The indicator (L) on the display will continue to flash until the
appliance switches itself off. It will then go into Stand-by mode.
.
12
24
25-01-2003
10:19
Pagina 13
O p e r a t i o n
SELF-DIAGNOSIS
The appliance is equipped with a self-diagnosis system which identifies any operating problems.
IF THE DISPLAY SHOWS…
….WHAT SHOULD YOU DO?
H P HIGH PRESSURE
Insert and re-insert the plug. If the problem persists, call the service
centre.
LOW TEMPERATURE
If the machine is operating as an air-conditioner or dehumidifier, this
will prevent the formation of ice. The appliance will start up automatically once the defrosting process has ended.
F F FAN FAILURE
If either of these messages appears, call the service centre.
P F PROBE FAILURE
FULL TANK
Empty the tank at the rear of the appliance and reposition
correctly.
13
ENGLISH
pac160 GB
pac160 GB
25-01-2003
10:19
Pagina 14
Recommendations
Follow these recommendations to achieve
maximum efficiency from your air conditioning unit:
• Close the doors and windows in the room
where the unit is functioning. The only
exception is in the case of installation through a hole in the wall. In this case, you are
recommended to allow a small amount of
air to enter through a door or window to
guarantee an adequate exchange of air.
• Do not install the heater in humid environments.
• Do not use the appliance outdoors.
• Keep the appliance a safe distance from
combustible surfaces
close doors and windows
• Protect the room from direct exposure to
the sun’s rays by drawing the curtains
and/or partially lowering the blinds so as
to maximise energy savings.
• Do not rest objects on the air conditioning
unit.
• Do not obstruct the air intake or outlet.
• Make sure there are no heat sources in the
room.
lower the blinds or draw the curtains
do not cover
14
• Make sure the unit is located on a level
floor. If necessary, place the two blocking
devices 17 under the front wheels.
pac160 GB
25-01-2003
10:19
Pagina 15
Before cleaning or maintenance, switch off the
appliance by pressing the ON/OFF button (A)
and always unplug it from the mains supply.
CLEANING THE EXTERNAL UNIT
We recommend cleaning the appliance with
a slightly damp cloth. It should then be dried.
For safety reasons, do not wash the air-conditioner with water.
ENGLISH
Cleaning
Dust filter
intake grille
Precautions
Never clean with benzene, alcohol or solvents. Never spray with liquid insecticide or
similar.
CLEANING THE AIR FILTERS
To maintain the air-conditioning unit at peak
efficiency, we advise you to:
1. Clean the dust filter weekly.
The filters are located behind the two intake grills. The grills contain the filters.
To clean the filters:
1. Remove the intake grills by rotating them
outwards. (fig 11)
2. Remove the dust filter by detaching it from
the external grill.
12
BEGIN OF SEASON CHECKS
Check that the power cord and plug are
undamaged and that the appliance is properly earthed.
The installation instructions should be observed
meticulously.
END OF SEASON OPERATIONS
Empty the water from the tank.
Remove the tank (9) and empty it. To drain
any residual water from the internal circuit,
remove the stopper (11) from the drain tube
(10) and drain completely. Re-insert the stopper and re-position the tank correctly (9).
Clean the anti-bacteria filters and dry well
before replacing.
2
1
11
To remove the dust deposited on the antibacterial filter, use a vacuum cleaner. If very
dirty, immerse in warm water (not more than
104° F) and rinse thoroughly.
Allow the filter to dry. To replace, fit the filters
to the intake grill and attach to the appliance.
15
pac160 GB
25-01-2003
10:19
Pagina 16
Troubleshooting
PROBLEM
CAUSES
REMEDY
The air-conditioner
does not work
•
•
the power is off
the appliance is not plugged in
•
Plug it in
The air-conditioner
works only for a
short time
•
•
The exhaust hose is twisted
The exhaust hose is blocked
•
•
•
The exhaust hose is bent
•
Position exhaust hose correctly
Check for obstacles blocking
the exhaust system
Straighten the hose
•
•
a window is open
there is a source of heat in the room (lamp,
burner etc.) or there are many people in the
room.
the thermostat is set too high
•
•
close the window
eliminate source of heat
•
air filters are dirty
the capacity of the air-conditioner is not
adequate for the conditions or the dimensions of the room.
•
set the thermostat to a lower
temperature
clean the filters
Strange odour in the •
room
air filters are dirty
•
clean the filters
Leaking condensate from the unit
•
appliance incorrectly installed
•
•
condensate collection tank is full
•
see instructions for correct
installation of appliance
Empty the tank
•
The safety mechanism has been activated
•
wait for 3 minutes
The air-conditioner
works but does not
cool the room.
•
•
•
The unit does not work
for about 3 minutes
after turning on the
appliance.
See paragraph “Self diagnosis” if the following messages appear on the display: FF, HP, LT, FT, PF.
16
25-01-2003
10:19
Pagina 17
Technical specification
TECHNICAL SPECIFICATION
OPERATING LIMITS
Room temperature
21 ÷ 35°C
69 - 95°F
Power supply
Max. absorbed power
in air conditioning
Max. absorbed power
when dehumidifying
see rating plate
“
“
Refrigerating capacity*
“
Number of fan speeds
2 + silent
Max. air flow
460 m3/h
Dimensions of internal unit:
• width
452 mm 17.80”
• height
800 mm
315”
• depth
455 mm 179.1”
• weight
33 kg 72.8 lb
*
Standard conditions:
Room temperature
35°C - 95°F
40% relative humidity
Outside temperature
35°C - 95°F
40% relative humidity
17
ENGLISH
pac160 GB
pac160 GB
25-01-2003
10:19
Pagina 18
LIMITED WARRANTY
We warrant each DE’LONGHI AIR-CONDITIONER to be free from defects in material and workmanship. Our obligation under this warranty is to provide one year parts and labor free from purchase date, with an additional four (4) years on any part of the sealed system consisting of the
compressor, evaporator, condenser and factory connected refrigerant tubing. This warranty
shall apply only if the AIR-CONDITIONER is used in accordance with the factory directions which
accompany it, and on Alternatign Current (AC) circuit. This warranty is in lieu of all other warranties and representations, expressed or implied, and all other obligations or liabilities on our
part. We do not authorize any other person or company to assume for us any liability in connection with the sale or use of our AIR-CONDITIONER. This warranty shall not apply to assume for
us any liability in connection with the sale or use of our AIR-CONDITIONER. This warranty shall not
apply to any AIR-CONDITIONER which shall have been repaired or altered outside our factory
nor shall it apply to any AIR-CONDITIONER which has been subjected to misuse, negligence or
accidents.
If repairs become necessary or spare parts are needed, please write to:
De’Longhi America Inc.
Park 80 West Plaza One 4th floor
Saddle Brook, NJ 07663
or call Service Tel. No. 1-800-322-3848
18
De’ Longhi CANADA
1040 Ronsa Court
MISSISSAUGA, ONTARIO
L4W 3Y4 CANADA


![PDF [1] - Dep SAE Soudage, Automatismes et Electronique location](http://vs1.manualzilla.com/store/data/005888267_1-8c649f384f0a877ffbc023ff9f75566c-150x150.png)