1
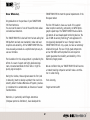
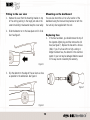
Dear Motorist,
TARGET EURO 550 to meet the special requirements of the
European market.
Congratulations on the purchase of your TARGET EURO
550 from Beltronics.
You are now the owner of one of the world's most advanced radar/laser detectors.
The Euro 550 leads its class as a result of its superior
radar reception sensitivity, particularly on GATSO photographic speed traps. The TARGET EURO 550 also unfailingly detects all laser based speed monitoring devices. The
use of GSM de-sensing TechnologyTM and suppression filters (specially developed for use in Europe) make the
TARGET EURO 550 not only a quiet, but also an extremely
reliable driving aid. The use of high-grade components
and an ISO 9002 certified production and inspection
system guarantee the reliability and durability of this
Beltronics/Target product.
The TARGET EURO 550 is derived from the best-selling Bel
990 platform and sets new standards in radar and laser
reception and versatility. All the TARGET EURO 550's features are easily accessed via a sophisticated yet easy-touse user interface.
The foundation for this unique product is provided by the
efforts of a team of expert and highly dedicated engineers, renowned worldwide for their skills in high frequency signal reception.
We are confident that your TARGET EURO 550 will become
a trusted traveling companion and will make a contribution to safer driving.
During the nineties, these engineers were the first (and
to date only) team to develop a product that could consistently detect the Swiss Multanova 6F system, previously considered to be undetectable, at distances of several
hundred metres.
Yours sincerely,
Target Automotive BV
Beltronics, in partnership with Target Automotive
(European partner & distributor), have developed the
2
TM
CONTENTS
(rel. 1-5-2001)
AUDIBLE WARNINGS
4
FUNCTIONS AND PROPERTIES
6
OVERVIEW OF OPERATING CONTROLS AND
COMPONENTS OF YOUR TARGET EURO 550
7
INSTALLATION
8-10
PROGRAMMING YOUR TARGET EURO 550
(BASIC SETTINGS)
11
BRIEF DESCRIPTION OF FUNCTIONS
11-12
YOUR TARGET EURO 550 IN DAY-TO-DAY USE
13-15
PROGRAMMING YOUR TARGET EURO 550
(ADDITIONAL SETTINGS)
16-18
PERFORMANCE CHECK
19
PROBLEM-SOLVING
20
WARRANTY STATEMENT
21
SPECIFICATIONS
22
TARGET EURO 550 WARRANTY CERTIFICATE
23
3
TM
AUDIBLE WARNINGS
Radar-alert signals
When a radar signal is detected the detector indicates the
relevant radar waveband with a voice message and the
radar frequency is indicated in the display. The alert signals from your TARGET EURO 550 are affected both by the
position of the radar source and by reflective objects in
the immediate vicinity (e.g. other traffic, crash barriers
and traffic signs). If you are driving towards a radar source, the intensity of the received signal increases. As a
result, the display shows both more signal blocks and a
higher numerical value (1-9), and you hear more audible
signals with shorter intervals.
Total Tracking Laser™ (TTL™)
In contrast to radar signals, which are highly reflective,
laser signals hardly reflect at all. Many current laser
detectors are not sensitive enough to detect laser signals
in a wide “field of vision”. The TARGET EURO 550 is
equipped with the best in laser detection technology
from Beltronics. Double laser gates detect not only the
energy of the main laser beam, but even signals far outside the axis of the main beam. This provides a maximum
“field of vision” of 360°. The alert signals emitted by the
detector are identical, regardless of whether the signals
are received from in front of or behind the vehicle.
Laser alert signal
When a laser signal is detected, the detector reports with
a voice message that there is a “LASER ALERT” and the
text message LASER flashes in the display. You also hear
a clear audible signal.
Warning indicating a laser detection.
Voltage meter
The vehicle-battery voltage is measured continuously.
This guarantees that the detector is functioning optimally. The correct supply voltage for the detector is between
10.5 and 16 V. If the voltage exceeds 16.0 V, the message HVoltage will flash in the display. The message will
not disappear from the display until the voltage is back
to a normal level again. If the voltage falls below 10.5 V,
the message Battery appears in the display. In this case
too, the message will not disappear from the display until
the voltage is back to a normal level again.
4
TM
Shadow Technology II
The TARGET EURO 550 is equipped with Shadow
Technology®. This technology renders the TARGET EURO
550 invisible for the Interceptor VG-2 (Radar Detector
detector) and other equipment for remote detection of
radar detectors.
5
TM
FUNCTIONS AND PROPERTIES
The TARGET EURO 550 has an advanced, easy-to-use user
interface, which enables you to adapt the system to the
current situation by pressing a button. This user interface
offers you:
• A choice of 6 languages for the text messages.
• Infallible detection of radar signals in no less than
12 European countries. Depending on your choice of
country, the system automatically selects the frequency of the radar systems used there.
• Choice of 11 different freely programmable radar frequencies.
• Radar and laser alert signals, spoken and by means
of audible signals.
6
TM
OVERVIEW OF OPERATING CONTROLS AND
COMPONENTS OF YOUR TARGET EURO 550
4. AUD button (Volume adjustment): for adjusting
the detector volume or switching the sound off entirely during a radar alert.
5. CTY button (Motorway /City / City All): You can
choose between motorway and city mode in order to
increase the sensitivity of the detector on motorways
and to reduce the sensitivity in areas with many
radar sources.
6. Antenna opening: this side of the detector should
point to the front of the vehicle.
1. PWR button (On-off / start-up mode): press
PWR to switch the unit on. The DEMO, FAST START
and START-UP modes can also be activated with the
PWR knob.
7. Optical sensors for laser signals: these capture
laser signals transmitted from in front of or behind
the vehicle.
2. Display for text messages: all the selected settings are shown in this display. The radar band and
signal strength and the presence of laser equipment
are also indicated in the display.
8. Loudspeaker: for emitting all audible signals.
9. Connection for power supply: the TARGET EURO
550 is connected using the connecting cable supplied with the unit and can be used in any vehicle
with a 12 volt power supply.
3. DRK button (Maximum / Dim / Minimum): for
adjusting the display brightness to your requirements.
7
TM
INSTALLATION
General guidelines
Do not mount the detector directly behind the windscreen wipers or any reflective strips applied to the top
of the windscreen. These block radar and laser signals
and substantially reduce the sensitivity of the unit and
probability of detection. Normal tinted glass does not
affect the reception of radar or laser signals. This is in
contrast to the solar-reflecting windscreens used by some
car manufacturers. Radar signals are also reflected by
heated windscreens, available as an option on certain
vehicles. This type of windscreen will prevent a radar
detector from functioning correctly if mounted on the
dashboard or visor or behind the windscreen. In case of
doubt we advise you to contact your dealer. For optimum
performance, observe the following basic guidelines,
regardless of the chosen mounting point:
3. Ensure that the detector does not touch the windscreen. This will avoid unnecessary vibration.
4. Do not place the detector in direct sunlight. In the
summer the temperature in a closed car can get so
high that this will be detrimental to the life of the
detector.
5. The detector is not waterproof. If it comes into contact with water, electronic circuits may be damaged.
Defects caused in this way are not covered by the
warranty.
The detector can be fitted in 3 different
ways:
• Fitting to the windscreen
• Fitting to the sun visor
• Mounting on the dashboard
1. When selecting a mounting point, take account of
passenger safety. Choose a mounting point at which
the unit cannot present a danger to yourself or passengers.
2. For optimum detection install the detector in such a
way that it has unhindered reception from front and
rear and is not obstructed.
8
TM
Fitting to the windscreen:
1. Assemble the mounting bracket as indicated in figure
2.
4. You can adjust the angle of the mounting bracket so
that it is horizontal.
See figure 3.
Figure 3
Figure 2
5. Slide the detector on to the base plate until it clicks
into place. See figure 4.
2. Remove the mounting bracket cover on top of the
unit by pushing in the rough part and at the same
time sliding it backwards. Keep the cover safely.
3. Clean the windscreen at the point at which you
intend to fit the unit, place the suction cups against
the windscreen and press each suction cup firmly.
Figure 4
9
TM
Fitting to the sun visor
1. Remove the cover from the mounting bracket on top
of the unit by pushing in the rough part and at the
same time sliding it backwards. Keep the cover safely.
Mounting on the dashboard
You can also mount the unit on a flat section of the
dashboard using the hook and loop fastener or with the
four anti-slip feet supplied with the unit.
2. Slide the detector on to the base plate until it clicks
fast. See figure 5.
Replacing fuse
1. If the fuse has blown, you should remove the top of
the cigarette-lighter plug and then remove the old
fuse (see figure 7). Replace the fuse with a 1A fuse
(3AG). If you fit a fuse with too high a rating or
bridge the blown fuse, the detector or the electrical
system in your car may be damaged. Defects caused
in this way are not covered by the warranty.
Figure 5
3. Clip the detector to the edge of the sun visor as close
as possible to the windscreen. See figure 6.
Figure 7
Figure 6
10
TM
PROGRAMMING YOUR TARGET EURO 550
(BASIC SETTINGS)
BRIEF DESCRIPTION OF FUNCTIONS
The system is equipped with a 6-language user interface.
You can select from the following languages: English,
German, French, Spanish, Italian and Dutch.
Self-test / Start-up mode
Each time you switch on your TARGET EURO 550 the
detector carries out a self-test.
NB: if you press PWR during start-up, the test is skipped
and the detector is ready for use.
The user interface also provides a simple way for you to
choose between 12 European countries and North
America. Bear in mind, however, that the possession
and/or use of radar detectors is prohibited in some countries. You can choose from the following countries:
•
•
•
•
•
•
•
United Kingdom
Germany
France
Spain
Italy
Netherlands
Belgium
•
•
•
•
•
•
If, after switching on the detector, you hold the PWR
button pressed in, the following options will appear in
succession in the display.
You can make a selection from these options by releasing
the PWR button at the moment at which the relevant
option appears in the display.
Switzerland
Austria
Portugal
Denmark
Poland
North America
When you select the country in which you are currently
travelling, the detector automatically activates the frequencies used for radar speed checks in that country.
Laser detection is always activated as an identical laser
speed-measurement system is used world-wide and is
detected infallibly by the TARGET EURO 550, regardless of
the country in which you are using it. The unit is shipped
ex factory with the following settings active.
language: English / country: North America.
11
TM
BRIEF DESCRIPTION OF FUNCTIONS
ding on any choice you have made previously. The detector is ready for use.
NORMAL (standard start-up mode)
During this test the selected messages, frequencies and
functions are indicated:
• Laser; Ka 9; K 8; X 7; Selected tanguage; X
9.410; X 9.900; X 10.600; Ku13.45; K24.125;
K24.150; KaNarrow; 34.00; 34.30; 34.70;
• mute on/off;
• R/L voice or tone on/off (radar / laser alert as
spoken message or audible signal);
• SCRL fast/slow (fast or slow text message scrolling
in the display);
• country (followed by the selected country);
• motorway, city or city All; The unit is ready for
use.
A tick next to a frequency or function means that it is
switched on.
A horizontal line means that the frequency or function is
switched off.
TUTORIAL (Demonstration mode)
In this practice mode you can familiarise yourself with all
the audible signals and visual alerts.
Press the PWR button to close practice mode. The detector is ready for use.
'Set and Forget' memory
Whenever the TARGET EURO 550 is switched off or disconnected from the power supply, all selected settings are
stored in the detector’s memory. The ‘Set and Forget’
memory means that you do not have to re-enter your preferred settings every time you switch the detector back
on.
CHANGE/CHANGES (Change mode)
In this case any changes you have made from the factory
settings are shown in the display. Once any changes have
been shown in the display, the detector is ready for use.
Q-START (Fast-start mode)
In this case the unit does not perform a start-up test and
indicates Motorway, City or City All immediately, depen-
12
TM
YOUR TARGET EURO 550 IN DAY-TO-DAY USE
Setting country
In day-to-day use it may be useful to adapt your detector
to changing circumstances. Your detector is therefore
equipped with:
• Selection possibility for optimum use of your detector in 12 European countries (when you select a
country, the appropriate frequencies are automatically activated).
• Volume adjustment (1 - 9).
• Variable display illumination (minimum, dim, maximum and dim-set = adjustment of the dimmed setting to your personal preference)
• Signal suppression in order to prevent unnecessary
alerts in situations where there are a lot of strong
radar signals.
13
Action:
make sure that the detector is switched on
and hold the CTY button pressed in.
Result:
you will see a list of the countries that can
be set.
Action:
release the CTY button as soon as the country
of your choice appears in the display and
then switch the detector off by pressing the
PWR button and then on again immediately
by pressing the PWR button again.
Result:
the detector now starts with a self-test of
laser and radar detection and indicates the
selected language and the radar frequencies
applicable to the chosen country. The system
is now ready for use in motorway, city or city
All mode.
TM
Adjusting volume
Display illumination
Action:
press the AUD button and keep it pressed.
Action:
press the DRK button briefly.
Result:
the current volume is indicated in the display.
You can choose from levels 1-9.
Result:
Action:
release the AUD button at the moment the
desired level is reached. The new volume is
now set.
the display will briefly show the indication
Dark, Dim or Bright, after which the display
will be on minimum, dimmed or maximum
illumination. In the minimum setting only an
abbreviation of the chosen setting;
M(Motorway), C(City) or C All (City All Bands)
will appear.
Switching off sound
(Only during an alert signal)
Action:
press the AUD button briefly during an alert
signal.
Result:
the indication "quiet" appears in the display
and the sound of the detector is muted. The
sound will remain muted until you press the
AUD button again.
14
TM
Setting Dim
Signal suppression
Action:
press the DRK button and keep it pressed in.
Action:
press the CTY button briefly.
Result:
the indication "Dim set" will appear in the
display.
Result:
the indication Motorway, City or City All. will
appear permanently in the display.
Action:
keep the DRK button pressed in until the desired intensity of the "Dim" setting appears in
the display. You can chose from 8 different
settings. The maximum intensity is indicated
by means of a short audible signal.
Result:
the dim setting you have selected has been
stored in the memory. Each time you select
the "Dim" option in the display illumination
menu the information in the display will be
shown at the intensity you have selected.
Explanation:
Selecting "City" or "City All" does not affect the detector's reception sensitivity. At these settings the detector
continues to receive the radar signals with the same sensitivity as if "motorway" were chosen. In the "City" and
"City All" settings, however, you are only warned by
acoustic signals once a certain signal-strength threshold
is exceeded. However, if "City" or "City All" has been
selected, you will see a warning appear in the display
even below this signal level.
• City; only the X band, where applicable, is suppressed.
• City All (= All Bands); all bands selected by the
detector or subsequently by yourself, are suppressed.
• Motorway; none of the frequencies is suppressed.
The detector warns you immediately with audible
signals as soon as a radar source is detected.
Use City or City All only in areas where the "Motorway"
setting could result in a large or excessively large number
of unnecessary alerts as a result of door openers or other
radar sources.
15
TM
PROGRAMMING YOUR TARGET EURO 550
(ADDITIONAL SETTINGS)
The buttons on top of your detector have the following
functions during programming:
PWR:
confirm and close (the changes are stored)
DRK:
previous
AUD:
selection button
CTY:
next
If the standard factory setting on your TARGET EURO 550
do not meet your requirements, you have the option to
change them.
The following programming modifications are permitted:
• Change language (see also page 17)
• Add or remove frequencies
• Select Ka broad or narrow band (Ka Narrow / Ka
Swide)
Important! In Europe, with the exeption of the UK,
it is advisable to select Ka Narrow and then to make
a selection from the available frequencies. Ka Swide
is intended only for use of your detector in North
America.
• Switch Audio mute on or off (if you select audio
mute off, on receiving a radar signal the detector
will warn you with continuous audible signals. If you
select audio mute on, the alert signal will change to
a discreet clicking signal immediately after the first
indication).
• Choice of tone or voice reporting of radar and laser
alerts.
• Set the scroll speed (this is the speed at which text
messages follow each other in the display.
A tick after an option means that the option is switched
on; a horizontal line after an option means that the
option is switched off.
16
TM
Activating the programme menu
Action: Make sure that the detector is switched off. Press and hold down the CTY button while you press the PWR button.
Result: the indication "FEATURES" appears briefly in the display, followed by the selected language (flashing)
Setting language
Action:
using the AUD button select
the language of your choice.
After selection this appears
flashing in the display.
Ready:
Confirm
your
choice
with PWR
Next?
Press CTY.
the first frequency
that you can
change appears in
the display.
Proceed with:
Add/remove frequency
Freq. add/rem.
(except N.America*)
Action:
using the CTY button select the frequency you wish to add or change. A
tick after the frequency indicates that
it is active. A horizontal line after the
frequency means that it is not active.
Press AUD to switch a frequency on or
off.
Ready:
Confirm
your
selection
with PWR
Next?
Press CTY.
The first frequency that
you can change appears
in the display
Proceed with:
Ka Narrow / Ka Swide.
Ka Narrow / Ka Swide
Action:
select Ka Narrow or Ka Swide with the
AUD button. Confirm your selection in
this case with CTY.
Result:
Ka 34.00 appears
in the display.
Result:
Ka Off or Ka on appears in the display.
Action:
proceed as with
remove / add
frequency
Action:
press AUD to switch
Ka on or off.
Ready?
Confirm
your choice
with PWR
Next?
Press CTY. Amute appears
in the display. Proceed
with Aud mute on/off.
Result: : the indication "EXIT" appears briefly in the display, followed by: motorway, City or City All. The language of
your choice has been selected and any modifications are stored in memory.
17
TM
* If N. America has been selected you can only choose between switching the X, K or Ka band on or off.
Mute on/off
Action:
with the AUD button select whether
you want to switch Mute on or off.
A tick after the Mute means that
the function is active. A horizontal
line means that Mute is not active.
Ready:
Confirm
your
choice
with PWR
Next?
Press CTY.
RL Tone or RL Voice will
appear in the display.
Proceed with:
RL Voice/Tone
Result:
the indication "EXIT" will appear
briefly in the display, followed by:
motorway, City or City All.
Modifications are stored in memory.
RL Voice/ Tone
Action:
using the AUD button select whether
you wish to receive tone or voice messages from your detector.
Ready:
Confirm
your choice with
PWR
Next?
Press CTY.
SCRL fast or SCRL long
will appear in the display Proceed with:
Scroll
SCRL (scroll)
Action:
with the AUD button select SCRL
slow/long or SCRL fast and close with PWR
NB:
On detection of a Ku-band signal, no
spoken message is given. In this case
you will hear the standard audible signal
on Ku-band detection.
18
Important:
If you have changed frequencies pertaining to a specific
country and wish to reset such
changes to the factory setting,
proceed as follows:
Select the country to which the
change relates (see set country
on page 13) and then hold the
CTY button down until RESET
appears in the display. Release
the CTY button. "R-xxxxxx" will
appear in the display, with the
country you have selected
appearing instead of xxxxxx.
The factory settings for this
country now apply again. Any
changes you have made to the
programming of other countries
remain unchanged.
TM
PERFORMANCE CHECK
Factors affecting radar alert signals
If you believe that the detector is not responding correctly, check whether the intensity and duration of an
alert signal is possibly being affected by one or more of
the following factors:
1. There is a lot of traffic between you and the police
radar. As a result, signals are being blocked or reflected. If there are various heavy vehicles between you
and the police radar, reception may also be very
poor.
2. In rain and damp weather conditions signals may be
absorbed before they reach your vehicle. This substantially reduces the chance of early detection.
Factors affecting laser alert signals
If you believe that the detector is not responding correctly to the presence of laser signals, check whether the
range within which the laser beam can be detected is
possibly being affected by rain, mist, high humidity or by
the traffic situation.
19
TM
PROBLEM-SOLVING
Solutions for frequently occurring
problems
If the unit is not functioning correctly, consult the
following table.
Problem
Unit cannot be switched
on
Possible cause
The plug is not correctly inserted.
Power-cord fuse faulty.
Poor detection range
False or regular alerts
Display is not legible or
is scarcely legible
Cigarette lighter socket is not clean or
has negative earth.
Fuse or electric wiring for the cigarette
lighter connection is faulty.
Antenna / lens opening partially
blocked.
Radar signals are being blocked by the
windscreen.
High concentration of K-band sources
other than police radar.
Display has been dimmed or the dark
setting has been selected.
20
Solution
Re-insert the power plug in the cigarette lighter socket
and turn the plug.
Replace the fuse with a 1-A 250 V (3AG) fuse
(see page 10).
Contact your supplier.
Contact your supplier.
Position the unit so that is has an uninterrupted “view”
to front and rear.
Check whether your car is equipped with a heated windscreen or a windscreen with solar reflection.
Use the City mode
Consult the section in this manual on Performance checking.
Select a higher brightness. See page 12-13.
TM
WARRANTY STATEMENT
One year warranty
You may only claim under warranty if:
1. The defect relates to possible material or manufacturing faults. The warranty becomes invalid if the unit
has become faulty as a result of damage, incorrect
installation or modification or if the housing or the
serial number has been removed from the unit.
2. You are the original purchaser and user. On sale of
the unit the warranty may not be transferred to the
new owner.
3. You have fully completed your warranty card and
sent it to Complementary Technologies Ltd.
21
TM
SPECIFICATIONS
Radar frequencies
9.41 GHz (X-band), 9.9 GHz (X-band), 10.525 GHz (Xband), 10.600 (X-band), 13.45 GHz (Ku-band), 24.125
GHz (K-band), 24.150 GHz (K-band), 34.0 GHz (Ka Smalband), 34.3 GHz (Ka Smal-band), 34.7 GHz (Ka Smalband), 33.4 tot 36.0 (Ka Super wide band)
Laser receiver
Total Tracking Laser receiver, 904 Nanometer
Operating temperature: -20°C to +60°C
Power supply: 13,8 V (range: 10,5-16-V), 250 mA
Type of radarantenna: patented die-cast horn with
integrated transition to micro strip mixer.
Dimensions: 13,5 x 7,9 x 4,6 cm
Weight: 240 grams
22
TM
TARGET EURO 550 WARRANTY CERTIFICATE
Warranty conditions
1. The manufacturer warrants the soundness of the
Target EURO 550. The warranty applies for a period
of 12 months in respect of defects in materials and
workmanship and solely:
- provided that the system has been used for the
purpose for which it is intended and that it has been
fitted and used in the usual manner and in conditions that can be described as normal; all in accordance with any regulations and/or directions issued
by the manufacturer;
- provided that the purchaser has met all his obligations and has immediately but not later than one
week after discovery of the defect, informed the
relevant dealer hereof and the dealer has found the
system to be in the condition that applied at the
time of discovery of the defect.
2. The warranty applies if the purchaser has fully completed the warranty registration card and submitted
it within two weeks of the purchase date.
3. If parties other than the manufacturer perform or
have performed work on the system during the warranty period, without obtaining prior written permission from the manufacturer, the warranty will lapse.
4. The warranty claim will be processed on presentation
of the defective system or the relevant component.
The purchaser must also submit the warranty card
bearing the dealer's stamp and the serial number,
together with the original purchase receipt.
5. In fulfilling its warranty obligation the manufacturer
is entitled and obliged exclusively to re-supply or
repair the relevant system or components thereof, at
the manufacturer's discretion.
6. The manufacturer is not obliged to carry out or pay
for dismantling and/or installation work in connection with implementation of the warranty. Shipping
costs are for the purchaser's account.
7. The manufacturer is in no case liable for any damages to people or goods arising from failure of the
system to function or to function correctly.
8. All deliveries of the Target EURO 550 are governed
exclusively by UK law.
23
TM
NOTES
24
TM
25
TM


![10780-90006 - 10780A Laser Receiver for 5501A [Prefix 1948] (Mar](http://vs1.manualzilla.com/store/data/006009643_1-6e2f54ebb2199ef6df634558ba4c1bb6-150x150.png)