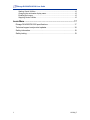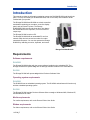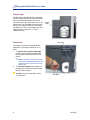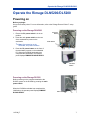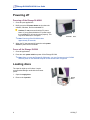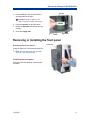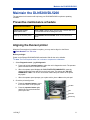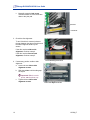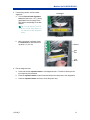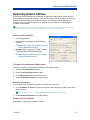
1
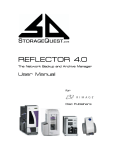
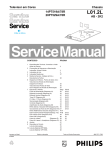
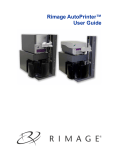
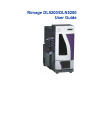
Rimage DL5200/DLN5200
User Guide
Corporate Headquarters:
Rimage Corporation
7725 Washington Avenue South
Minneapolis, MN 55439
USA
800 553 8312 (toll free US)
Service: +1 952 946 0004
(International)
Fax: +1 952 944 6956
European Headquarters:
Rimage Europe GmbH
Albert-Einstein-Str. 26
63128 Dietzenbach Germany
Rimage Corporation reserves the right to make
improvements to the equipment and software
described in this document at any time without any
prior notice. Rimage Corporation reserves the right to
revise this publication and to make changes from
time to time in the content hereof without obligation of
Rimage Corporation to notify any person or
organization of such revisions or changes.
This document may contain links to web sites that
were current at the time of publication, but may have
moved or become inactive since. This document may
contain links to sites on the Internet that are owned
and operated by third parties. Rimage Corporation is
not responsible for the content of any such third-party
site.
Tel: +49-(0) 6074-8521-0
Fax: +49-(0) 6074-8521-21
©2007, Rimage Corporation
CD and DVD Recording Software
Disclaimer
Rimage™ is a trademark of the Rimage Corporation.
DL5200/DLN5200™ is a trademark of the Rimage
®
Corporation. Dell is registered trademark of Dell
®
Computer Corporation. FireWire is a registered
trademark of Apple Computer, Inc.
This Product, Software, or Documentation may be
designed to assist you in reproducing material in
which you own the copyright or have obtained
permission to copy from the copyright owner.
Unless you own the copyright or have permission
to copy from the copyright owner, you may be
violating copyright law and be subject to payment
of damages and other remedies. If you are
uncertain about your rights, you should contact
your legal advisor. If you are neither in possession
of the copyright nor have authorization from the
owner of the copyright, unauthorized copying of
CDs violates national and international legislation
and can result in severe penalties.
All other trademarks and registered trademarks are
the property of their respective owners.
110768-000_E
Rimage DL5200/DLN5200 User Guide
Support information
US, Asia/Pacific, Mexico/Latin America
Europe
Rimage Corporation
Rimage Europe GmbH
Albert-Einstein-Str. 26
63128 Dietzenbach Germany
7725 Washington Avenue South
Minneapolis, MN 55439
USA
Attn: Rimage Services
Tel: +49-(0) 6074-8521-0
Fax: +49-(0) 6074-8521-21
Service:
Rimage Europe Technical Website:
Email: http://www.rimage.com/support_form.cfm
North America: 800-553-8312
Asia/Pacific, Mexico/ Latin America: 952-946-0004
http://www.rimage.com/support.html
Select the appropriate Support link to
learn more. If you cannot find a solution
on our website, email Rimage Services,
Europe at [email protected].
FAX: 952-946-6956
When you contact Rimage Services, please
provide:
• Unit serial number and software version.
• Functional and technical description of the problem.
• Exact error message received.
Learn more online
At www.rimage.com/support.html, you can experience Rimage’s world-class Support and
Services.
1. Select your product family.
2. Select your product.
3. Learn more on your
product page.
From your product page you can access:
• Information about the latest software and firmware updates
• Product specifications
• Troubleshooting tips and FAQs
• The latest documents
• Printing tips
• Current firmware and driver downloads
Contents
Contents
Introduction ...................................................................................... 1
Requirements ..................................................................................................1
Software requirements .......................................................................................... 1
Operating system requirements ............................................................................ 1
Media requirements............................................................................................... 1
Ribbon requirements ............................................................................................. 1
Label design requirements .................................................................................... 2
Networking ability ............................................................................................2
Identify the parts of the Rimage DLN5200/DL5200........................ 3
Front view ........................................................................................................3
Rear view - Rimage DLN5200 .........................................................................4
Rear view - Rimage DL5200............................................................................4
Description of Parts .........................................................................................5
Operator panel ...................................................................................................... 5
Operator button ..................................................................................................... 5
Beeper................................................................................................................... 5
Output trays........................................................................................................... 6
Output bin.............................................................................................................. 6
Operate the Rimage DLN5200/DL5200 ........................................... 7
Powering on.....................................................................................................7
Powering on the Rimage DLN5200....................................................................... 7
Powering on the Rimage DL5200 ......................................................................... 7
Powering off.....................................................................................................8
Powering off the Rimage DLN5200....................................................................... 8
Power off the Rimage DL5200 .............................................................................. 8
Loading discs...................................................................................................8
Removing or installing the front panel .............................................................9
Removing the front panel ...................................................................................... 9
Installing the front panel ........................................................................................ 9
Maintain the DLN5200/DL5200 ...................................................... 11
Preventive maintenance schedule.................................................................11
Aligning the Everest printer ...........................................................................11
Operating Gemini Utilities ..............................................................................15
110768_E
i
Rimage DL5200/DLN5200 User Guide
Starting Gemini Utilities ....................................................................................... 15
Changing the autoloader display name............................................................... 15
Enabling the beeper ............................................................................................ 15
Stopping Gemini Utilities ..................................................................................... 15
Learn More ...................................................................................... 17
Rimage DLN5200/DL5200 specifications ......................................................17
Technical support and product updates.........................................................18
Safety information..........................................................................................18
Safety testing.................................................................................................19
.
ii
110768_E
Introduction
Introduction
This manual provides the information needed to operate the DLN5200/DL5200 and identify the
parts. To set up and install your DLN5200/DL5200, refer to the Setup and Installation Guide
included with your product.
The Rimage DLN5200 and DL5200 are robotic-controlled
autoloaders containing two recorders, a two-line display
panel, and an Everest™ printer. The Rimage
DLN5200/DL5200 records and prints discs, then places
the finished discs in the output bin, or in one of the five
output trays.
The Rimage DL5200 requires a PC.
The Rimage DLN5200 has an embedded PC and is a
network ready device that receives orders from other
networked computers. You can also operate the Rimage
DLN5200 by attaching a monitor, keyboard, and mouse.
Rimage DLN5200/DL5200
Requirements
Software requirements
DLN5200
The Rimage DLN5200 ships with the correct software installed on the embedded PC. The
Rimage DLN5200 will operate only with the Rimage software installed on the embedded PC.
DL5200
The Rimage DL5200 will operate only with the Producer Software Suite.
Operating system requirements
DLN5200
The DLN5200 has an embedded operating system. The DLN5200 and software will function only
with the embedded operating system.
DL5200
The Rimage DL5200 and the Producer Software Suite run only on Windows 2000, Windows XP,
and Windows Server 2003.
Media requirements
For media requirements, refer to the Everest Printer User Guide.
Ribbon requirements
For ribbon requirements, refer to the Everest Printer User Guide.
110768_E
1
Rimage DL5200/DLN5200 User Guide
Label design requirements
For label design requirements, refer to the Everest Printer User Guide.
Networking ability
To submit orders from a networked PC, refer to the Rimage Advanced Setup Guide (110721).
2
110768_E
Identify the parts of the Rimage DLN5200/DL5200
Identify the parts of the Rimage
DLN5200/DL5200
This section describes the Rimage DLN5200/DL5200 hardware and its features.
Front view
Operator
Button
Printer
Operator
Panel
Printer
Lift Arm
Output
Trays
Recorders
Output Bin
Input Bin
110768_E
Supply Door
PC Power
Button
(DLN5200
only)
3
Rimage DL5200/DLN5200 User Guide
Rear view - Rimage DLN5200
Printer USB Cable
Printer Cable
Printer Power Cord
PC Power Cord
Serial Cable
Mouse Cable
(if using)
Network
Connection
Keyboard Cable
(if using)
USB cable
Power Switch
Power Cord
Monitor Cable
(if using)
Rear view - Rimage DL5200
Printer Cable
Printer USB Cable
Printer Power Cord
Printer Cable
USB Cable
FireWire Cable
Power Switch
Power Cord
Note: The 9-Pin serial connector is not used.
4
110768_E
Identify the parts of the Rimage DLN5200/DL5200
Description of Parts
Operator panel
Operator Panel
The operator panel has a two-line display that
informs you of operations or any conditions
that require operator intervention.
The Rimage DLN5200 displays the name of
the embedded PC or product name after it
initializes. The computer name is displayed by
default. This is helpful in identifying the
embedded PC on the network. Refer to the
Operate Gemini Utilities section on page 15 to
see other options.
Operator Button
Operator Panel
Operator button
The operator button is a push button used to
open and close the print drawer. The operator
button is only accessed by removing the front
panel.
Press the operator button to open the print
drawer. Press it again to close the print
drawer.
Beeper
The Rimage DLN5200/DL5200 has a beeper that sounds when user intervention is required.
Read the condition on the operator panel or at the client application and take appropriate action
to correct the problem. To stop the beeping, open the supply door.
To change the number of beeps or to disable the beeper, refer to the Enabling the beeper section
on page 15.
110768_E
5
Rimage DL5200/DLN5200 User Guide
Output trays
The Rimage DLN5200/DL5200 is configured
with five output trays and an output bin. When
a disc is recorded and printed, the lift arm
moves the disc to the output bin or one of the
output trays. The disc slides out to the end of
the tray. The sensor located on each output
tray detects if a disc is in the output tray. The
output trays are numbered 1 - 5, with 1
located at the top.
Output bin
Output
Trays
Output Bin
The output bin receives completed and/or
failed discs. The output bin holds up to 75
discs.
1. To remove discs from the output bin,
hold the output bin with one hand while
moving the bin latch up and then lower
the bin.
Note: Each time you fill the input bin,
remove the completed discs from the
output bin so the output bin does not
become full.
2. To raise the output bin into position, lift
the output bin and then pull the bin latch
down to lock it in place.
p
6
Caution: Do not use the latch to raise
the output bin!
Bin Latch
110768_E
Operate the Rimage DLN5200/DL5200
Operate the Rimage DLN5200/DL5200
Powering on
Before you begin:
Set up the Everest printer. For more information, refer to the Rimage Everest Printer™ setup
guide.
Powering on the Rimage DLN5200
PC Power
Switch
1. Ensure the PC power switch is in the on
position.
2. Press the main power switch on the rear
of the autoloader to power on the
autoloader.
Power Switch
Note: After powering on the
autoloader, the printer initializes.
3. Press the PC power button on the front of
the autoloader to power on the embedded
PC. When the DLN5200 autoloader has
completed the initialization, the operator
panel displays RIMAGE DLN5200 READY.
PC Power
Button
Powering on the Rimage DL5200
Before powering on the computer attached to the
DL5200, power on the DL5200 by pressing the main
power switch.
When the DL5200 autoloader has completed the
initialization, the operator panel displays RIMAGE
DL5200 READY.
110768_E
Power Switch
7
Rimage DL5200/DLN5200 User Guide
Powering off
Powering off the Rimage DLN5200
1. Close all open applications.
2. Briefly press the PC power button to shut down the
software, Windows, and the embedded PC.
p
Caution: Do not press and hold the PC power
button. If you press and hold the PC power button,
the embedded PC will not shut down properly. This
may cause data loss or corruption.
PC Power Button
Note: Powering off the DLN5200 takes
approximately 30 seconds.
3. When the PC has powered off, press the main power
switch to power off the DLN5200.
Power off the Rimage DL5200
1. Close all applications.
2. Press the main power switch to power off the Rimage DL5200.
Note: When you start the Rimage DL5200 again, you must first power on the DL5200
and then power on the attached computer so the recorders are recognized.
Loading discs
The input bin holds up to 50 discs. Use the
recommended Rimage media with the Everest
printer.
1. Open the supply door.
2. Remove the input bin.
8
Supply
Door
110768_E
Operate the Rimage DLN5200/DL5200
Input Bin
3. Place the discs in the input bin with the
recording side facing down.
- Important! Hold the discs by the
edge. Fingerprints affect print quality.
4. Place the input bin on the base plate.
5. Rotate the input bin until it drops into the
notches.
6. Close the supply door.
Notch
Base Plate
Removing or installing the front panel
Removing the front panel
Front Panel
Grasp the sides of the front panel and pull out.
Note: The front panel has four pins that
are held in with retaining clips.
Installing the front panel
Align the pins to the retaining clips and press
into place.
110768_E
9
Maintain the DLN5200/DL5200
Maintain the DLN5200/DL5200
The procedures in this section will help keep your DLN5200/DL5200 in optimum operating
condition.
Preventive maintenance schedule
Maintenance Procedure
Schedule
Cleaning the Rimage
DLN5200/DL5200
Once a week. Using a damp, lint free cloth, remove dust from
the autoloader and surrounding work area.
Aligning the Everest printer
On installation and as needed. Refer to the instructions
below.
Aligning the Everest printer
When the Everest printer is installed or replace, you may need to align it to the lift arm.
# Tools Needed: Torx T25 driver
Before you begin:
Power on the Rimage DLN5200/DL5200 autoloader. Wait for the unit to initialize.
Note: The Everest printer takes 2 to 3 minutes to complete the initialization.
1. Select Diagnostic test 4 - jog lift diagnostic.
a. Press and hold the operator button to place the unit in diagnostics mode. The operator
panel indicates when to release the button.
b. When the operator panel displays 01 CYCLE OUTPUTS DIAGNOSTIC, press the
operator button four times and hold on the fourth press. This selects the JOG LIFT
DIAGNOSTIC TEST. The lift arm moves down toward the print drawer as the printer
tray opens.
c.
When the operator panel prompts you to place a disc, place a disc on the print pad.
2. Check the printer alignment.
a. Press the operator button to move
the lift arm closer to the print pad.
b. Press the operator button again
and the lift arm moves down and
picks up the disc.
Lift Arm
Disc
Print Pad
Printer Tray
110768_E
11
Rimage DL5200/DLN5200 User Guide
c.
Manually rotate the lead screw
counterclockwise to move the lift arm
down to the print pad.
Print Pad
Lead Screw
3. Check the disc alignment.
To see if the disc is centered, observe
the gap between the edge of the disc and
the raised edges as shown by the
arrows.
If the disc requires side to side
alignment, continue to step 4.
If the disc requires front to back
alignment, continue to step 5.
4. If necessary, perform a side to side
alignment.
Front to Back Alignment Screw
a. Loosen the two side to side
alignment screws.
b. Slide the printer until the side gaps
are equal.
- Important! Slide the entire
printer, not the printer tray.
c.
12
Tighten the two side to side
alignment screws.
Side to Side Alignment Screws
110768_E
Maintain the DLN5200/DL5200
5. If necessary, perform a front to back
alignment.
Disc Retainer
a. Turn the front to back alignment
screw until there is a 1/16” (1.5mm)
gap between the front edge of the
disc and the raised edge of the disc
retainer.
# Tip: You can use the Torx T25
driver, or 5/32” Allen wrench, to
turn the front to back alignment
screw.
Gap Distance
b. When the printer is aligned, rotate
the lead screw to raise the lift arm
up about 1.0” (2.5 cm).
Lift Arm
Print
Pad
Lead
Screw
6. Exit the diagnostic test.
a. Press and hold the operator button to exit diagnostic test 4. The disc is lifted up to the
top output tray and released.
b. Press the operator button fourteen times and hold on the last press to exit diagnostics.
c.
Press the operator button one time to close the printer tray.
110768_E
13
Maintain the DLN5200/DL5200
Operating Gemini Utilities
The Rimage Producer Software Suite includes an application called Gemini Utilities, which is
used to update the autoloader firmware. It may also be used to change the display name of the
Rimage DLN5200/DL5200 and to enable the beeper. The Rimage DLN5200 displays the
computer name on the operator panel. The computer name is helpful when identifying the
computer on the network.
# Tip: To access Gemini Utilities on a DLN5200, use the remote desktop connection from a
networked PC, or connect a monitor, keyboard, and mouse to the DLN5200.
Starting Gemini Utilities
1. Close all applications.
2. In Rimage Service Manager, stop all Rimage
Services.
Note: Refer to your Rimage Software online
help for additional information.
3. Navigate: Start > Programs > Rimage > Utilities
> Gemini Utilities. Gemini Utilities opens.
Note: When the desired tasks are complete,
restart the Rimage Services.
Changing the autoloader display name
Use Gemini Utilities to enter the name displayed on the operator panel.
1. Select the Override Name checkbox.
2. Clear the Use Computer Name checkbox.
3. In the Display Name field, enter the new name.
4. Select Set DiscLab Params to save the settings.
Enabling the beeper
You can change the number of beeps that occur when there is an error.
1. In the # of Beeps on Fault field, select or enter the number of beeps you wish to hear when
there is an error.
# Tip: Entering 0 (zero) in the # of Beeps on Fault field disables the beeper.
2. Select Set DiscLab Params to save the settings.
Stopping Gemini Utilities
Select Exit to close Gemini Transporter Utilities.
110768_E
15
Rimage DL5200/DLN5200 User Guide
Learn More
Rimage DLN5200/DL5200 specifications
Note: For printer specifications, refer to your Everest Printer User Guide or PrismPlus! Printer
User Guide.
Rimage DLN5200
Two disc recorders, Rimage DLN5200 autoloader, an Everest printer,
a network-ready embedded PC, and Rimage software.
Rimage DL5200
Two disc recorders, Rimage DL5200 autoloader, an Everest printer,
and Rimage software.
Input Bin Capacity
One removable 50-disc bin.
Output Capacities
Five single-disc output trays and one 75-disc output bin.
Rimage DLN5200
(Embedded PC)
Celeron D 340 processor with 533Mhz Front Side Bus
512MB DDR2-400, SDRAM
Windows XP Embedded with Service Pack 2
Two 36 GB, Serial ATA, 10,000 RPM, 8 MB cache, Hard Drives
Rimage DL5200 PC
requirements
Pentium 4 2.8 GHz, 512MB L2 Cache , 800MHz FSB
512MB DDR2-200, 400Mhz Bus
Microsoft Windows® 2000 Professional Service Pack 4, Microsoft
Windows XP Professional Service Pack 1or 2, Windows Server 2003
Rimage recommends 4 hard drives – One for the OS, one for the
Rimage System Folder, and two for caching (one for each recorder).
One open PCI slot for the provided FireWire®/USB card.
Height
23.25 inches (59.1 cm)
Width
14.5 inches (36.8 cm)
Allow an additional 2.4 inches (6.1 cm) of space for the door to swing
open.
Depth
23.5 inches (59.1 cm)
Allow an additional 2.5 inches (6.4 cm) for cabling in the rear of the
autoloader.
DLN5200 Weight
51 lbs (23.2 kg) without Everest printer, 95 lbs. (43.2 kg) with Everest
printer.
DL5200 Weight
44.5 lbs (20.2 kg) without Everest printer, 88.5 lbs. (40.2 kg) with
Everest printer.
Power
100 – 240VAC, 60/50 Hz, 4.7 – 3.7 Amps
Operating
Temperature
60° – 80º F (15.5º – 26.7° C)
Humidity
40–80% non-condensing
17
Rimage DL5200/DLN5200 User Guide
Technical support and product updates
Support for the DLN5200/DL5200 autoloader is available through your authorized reseller.
- Important: Be sure to register your Rimage DLN5200/DL5200 autoloader online or complete
and return the registration card so we can notify you of upgrades as they become available.
Safety information
This manual and the indications on the product allow proper and safe operation. The indication
marks below help protect you and other persons from injury, and equipment from damage.
n Warning!
According to ANSI (American National Standards Institute) standards, a warning is used to
indicate situations that could result in bodily injury to personnel operating or maintaining the equipment.
p
Caution: Indicates that failure to observe this guideline could result in loss or damage to the
equipment, product, software, or data.
Safety precautions
To ensure safety, please read the precautions in the User Guide and familiarize yourself with their
meaning before using the equipment.
n Warning:
•
The laser beam used by this CD-R or DVD-R recorder is a class 1 laser and can be
harmful to the eyes. Do not attempt to open the recorder. Do not attempt to view the
laser beam.
•
Never use any optical instrument in conjunction with this unit. To do so will greatly
increase the hazard to your eyes.
•
Please observe all warning and caution labels to ensure safety of personnel.
•
Replace all fuses with the same voltage and current ratings to maintain UL safety
approvals.
•
Use the supplied AC power cord, or use a safety agency-approved power cord.
p Caution:
18
•
Any equipment that has AC line voltage, or low DC voltages, such as switches, power
supplies, fuses, fans, non-stepper motors, must be replaced with Rimage–approved
components to maintain the safety approval issued by UL.
•
The DLN5200 model contains a lithium battery. There is a risk of explosion if the battery
is replaced by an incorrect battery. Dispose the old battery according to the
manufacture’s instructions included with the battery package.
110768_E
Learn More
Safety testing
Product name: Rimage DLN5200/DL5200
Model:
•
DLN5200: RAS15E
•
DL5200: RAS15
Notice for USA
Tested to Comply with FCC Standards FOR HOME OR OFFICE USE.
NOTE: This equipment has been tested and found to comply with the limits for a
Class B digital device, pursuant to Part 15 of the FCC Rules. These limits are
designed to provide reasonable protection against harmful interference in a
residential installation. This equipment generates, uses and can radiate radio
frequency energy and, if not installed and used in accordance with the
instructions, may cause harmful interference to radio communications. However,
there is no guarantee that interference will not occur in a particular installation. If
this equipment does cause harmful interference to radio or television reception,
which can be determined by turning the equipment off and on, the user is
encouraged to try to correct the interference by one or more of the following
measures:
• Reorient or relocate the receiving antenna.
• Increase the separation between the equipment and receiver.
• Connect the equipment into an outlet on a circuit different from that to which the
receiver is connected.
• Consult the dealer or an experienced radio/TV technician for help.
This product complies with UL 60950-1.
Notice for Canada
C
This Class B digital apparatus complies with Canadian ICES-003 Issue 3:1997.
Cet appareil numerique de la classe B est conforme a la norme NMB-003 du
Canada.
This product complies with CAN/CSA-C22.2 No. 60950-1-03
Notice for Europe
This product is in conformity with the EMC Directive (89/336/EEC) and the LowVoltage Directive (73/23/EEC) through compliance with the following European
standards: EN 55022: 1998 + Amd 1: 2000 Amd 2:2003 Class B Limit;
EN 55024: 1998; EN 61000-3-2:1995; EN 61000-3-3:1995 + Amd 1: 2001;
IEC 60950-1 (2001). The CE mark has been affixed in accordance with the CE
Marking Directive 93/68/EEC.
110768_E
19