1
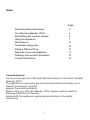
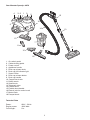
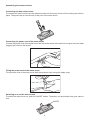
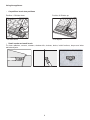
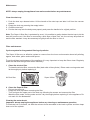
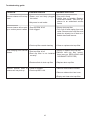
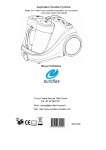
Instruction Manual Powerful Cyclonic Action HEPA Filter Motorised Brush 097H Speedy Plus Cyclonic Vacuum Cleaner Index Page Important safety instructions Your Monster Speedy+ 097H Assemblling the vacuum cleaner Using the appliance Maintenance Troubleshooting guide Fitting a Different Plug Disposal of your old appliance Warranty and service information Contact Information 2 3 4 7 9 10 11 11 12 12 Congratulations! Youʼve just bought one of the most efficient cleaners in the world, Monster Speedy+ 097H. The appliance comes with a set of accessories which will enable you to clean most surfaces, included carpets, floors and upholstery. Before using your Monster Speedy+ 097H, please carefully read the following instructions to become familiar with the appliance, paying special attention to the safety instructions. 1 Important safety instructions When using an electrical appliance, basic safety precautions should always be observed, including the following. READ CAREFULLY ALL INSTRUCTIONS BEFORE USING YOUR VACUUM CLEANER. WARNING: To reduce the risk of fire, electrical shock, or injury: 1. 2. 3. 4. 5. 6. 7. 8. 9. 10. 11. 12. 13. 14. 15. 16. 17. 18. 19. 20. 21. Do not leave appliance unattended when plugged in. Unplug from outlet when not in use. Do not use outdoors or on wet surfaces. Do not leave the appliance unattended when in use or used near children. Do not allow to be used as a toy. Close attention is necessary when used by or near children. This appliance has been designed for domestic use only. Use only as described in this manual. Use only manufacturerʼs recommended attachments. Do not use with damaged cord or plug. Do not use vacuum if it has been dropped, damaged, left outdoors, or dropped in water. To reduce the risk of electric shock do not attempt to disassemble or repair the appliance. Return it to your retail or to an authorized service centre to check and/or repair it. If the appliance is repaired or assembled improperly it may cause electric shock or personal injury. Do not pull or carry by cord, use cord as a handle, or pull cord around sharp edges or corners. Do not run appliance over cord. Keep cord away from heated surfaces. Do not unplug by pulling on cord. To unplug grasp the plug, not the cord. Do not handle plug or appliance with wet hands. Do not put any object into openings. Do not use with any opening blocked; keep free of dust, lint, hair and anything that may reduce air flow. Keep hair, loose clothing, fingers, and all parts of body away from openings and moving parts. Do not pick up anything that is burning or smoking, such as cigarettes, matches, or hot ashes. Always turn off the control before unplugging. Do not use to pick up flammable or combustible liquids, such as gasoline, or use in areas where they may be present. Do not use extension cables or cables with an improper conduction capacity. Pay attention that nobody can pull or trip on the cable. Do not use the vacuum cleaner without dust cup filter in place. Always unplug this appliance before connecting or disconnecting vacuum hose. Store the vacuum indoors. Put the vacuum away after use to prevent tripping accidents. Using improper voltage may result in damage to the motor and possible injury to the user. Correct voltage is listed on the rating label. If the cleaner is damaged, it must be repaired by the manufacturer or an authorized service centre or a similarly qualified person in order to avoid possible hazards. 2 Your Monster Speedy+ 097H 4 3 6 1 9 5 15 16 2 14 13 10 7 11 17 8 12 18 1. On-switch pedal 2. Cable-winding pedal 3. Power control 4. Appliance handle 5. Dust cup release knob 6. Dust cup full indicator light 7. Super H filter 8. Dust cup release button 9. Dust cup handle 10. Carpet-floor brush 11. Detail nozzle 12. Small brush 13. Telescopic tube 14. Flexible hose 15. Flexible hose handle 16. Electric joint for motor brush 17. Motor brush 18. Parquet brush Technical Data Power: Engine power: Cord length: 230V - 50 Hz 1600 Watt 5m 3 Assembling the vacuum cleaner Always remove the plug from the power socket before fitting or removing accessories. Fitting the flexible hose - Insert hose joint into the air intake duct on the front of appliance. - Press until it clicks into position. Removing the flexible hose - To release the flexible hose, press the release buttons on the sides of the hose to unblock the connection mechanism. Remove the flexible hose from the air intake duct. Fitting the extension tubes and accessories - Insert the telescopic tubes into the curved handle of the flexible hose. To extend the tube, press the button in the central joint and pull the inner tube toward the outside. - Insert the vacuum accessory you intend to use into the end of the telescopic tube. Removing the telescopic tube and accessories To remove the plastic tubes and accessories, grasp firmly and pull hard. 4 Assembling the vacuum cleaner Important: always unplug the appliance before inserting or removing the accessories Inserting the flexible hose and the power cord of the motor brush Insert the flexible hose in the front part of the appliance until it locks in place. Plug the electrical joint into the socket (under the flexible hose). Do not push too hard when plugging the joint into the socket. Releasing the flexible hose To release the flexible hose unplug the electrical joint of the motor brush. Then push the two buttons on the base of the flexible hose and remove the flexible hose. Fitting in the extension tube To insert the extension tube push the end of the curved handle of the flexible hose inside the extension tube until you hear a click. Push downwards the pin on the handle and fit it into the last hole of the extension tube. 5 Assembling the vacuum cleaner Connecting the floor motor brush To connect the motor brush insert the extension tube into the motor brush until the locking pin clicks in place. Then push the pin into the hole of the joint of the motor brush. Connecting the power cord of the motor brush Connect the power cord of the motor brush into the socket under the handle. Do not push too hard when plugging the joint into the socket. Fixing the power cord of the motor brush Fix the power cord of the motor brush with the extension tube using the rubber strap. Switching on or off the motor brush To switch the motor brush on, push the ON/OFF button. The button can be pushed using your hand or foot. ON/OFF 6 Using the appliance Unwind a sufficient length of cable. A YELLOW mark on the power cable shows the ideal cable length. Donʼt expend the cable beyond the RED mark. Make sure the cable cannot be treaded on or pressed by any object and insert the plug into the power socket. 1. Press the on-switch pedal to start the appliance. 2. To adjust the vacuum power slide the power control on the handle. The vacuum will be lowered opening the air hole. Rewinding the cable To rewind the cable, press the cable-rewinding pedal. ATTENTION: The cable rewinds very fast. Pay attention not to get hurt. Using the cleaning accessories • Motor brush You can use this brush for cleaning carpets and moquette. • Parquet brush This brush has been specially designed for delicate wood surfaces. Thanks to its bristles made of natural fabrics, you can vacuum parquet floors without scratching them. 7 Using the appliance • Carpet/floor brush two positions Position 1: Bristles down Position 2: Bristles up - For hard floors - For carpets • Detail nozzle and small brush To clean radiators, corners, drawers, window-sills, shelves, books, inlaid furniture, lamps and other delicate objects. 8 Maintenance NOTE: always unplug the appliance from mains socket before any maintenance Clean the dust cup 1. Push the dust cup release button. Lift the handle of the dust cup and take it off from the vacuum cleaner. 2. Empty the dust cup pressing the empty button. 3. Close the dust cup. 4. Put the dust cup onto the body case properly and press the handle to its original position. Note: The Super H filter filter is protected by a net. It is possible to gently shaken the dust cup to let the dust fall from the net. If the filter is covered by a thick layer of dust, hair, etc. the net may be pulled out and the filter washed. It may be necessary to lightly brush the filter or rinse it. Filter maintenance Cyclone system for the greatest filtering of particles The Super H filter are an effective system to remove from the inner environments almost all polluting agents, dust-mites, pollen and mould spores. To get the highest performance of the appliance it is very important to keep the filters clean. Regularly clean the filter and change them when necessary. 1 Clean the air duct filter To clean the air duct filter, remove the filter (back side of the cylinder). Rinse under running water and let thoroughly dry before replacing it. Air Duct filter 2 - Super H filter Clean the Super H filter Pull out the dust cup Empty the dust cup before removing the filter Turn and open the upper part of the dust cup following the arrows and unscrew the filter Wash the filter under running water and let it dry thoroughly before replacing it in the appliance. Do not wash it in the dishwasher Cleaning the motor brush Important: always unplug the appliance before any cleaning or maintenance operation. To eliminate hair or threads, cut with the scissors those wounded in the brush cylinder and then keep them out of the cylinder. 9 Troubleshooting guide PROBLEM POSSIBLE REASON POSSIBLE SOLUTION Vacuum cleaner will not op- 1 Power cord not firmly plugged 1 Plug unit in firmly erate 2 Check fuse or breaker. Replace into outlet fuse/reset breaker. Take the appliance to an authorized service 2 No power in wall outlet centre Vacuum cleaner will not pick- 1 Dust cup filter is full up or suction power is weak 2 Unit clogged 3. Dust cup filter needs cleaning 1 Empty dust cup filter 2 Turn unit off and unplug from wall outlet. Remove dust cup filter and check for object(s) in air duct or in flexible hose and remove 3 Clean or replace dust cup filter Dust escaping from vacuum 1 Dust cup filter is full 1 Empty or replace dust cup filter cleaner 2 Dust cup filter is not installed 2 Review dust cup filter instructions (see par. REPLACING AND correctly CLEANING THE FILTER) 3 Puncture/hole in dust cup filter Vacuum cleaner hose or 1. Hose is clogged brushes will not pick-up 2. Dust cup filter is full 3 Replace dust cup filter 1 Remove hose and/or brushes 2 Remove obstruction from hose 3.Empty and clean dust cup filter 10 FITTING A DIFFERENT PLUG This appliance is already fitted with a BS 1363 13 Amp. plug. The wires in the mains lead are coloured as follows: Blue : Neutral Brown : Live Should you need to replace the plug, please read the instructions and connect the wires as detailed below. If in any doubt, consult a qualified electrician. The coloured markings identifying the terminals in your replacement plug may not correspond with the colours of the wires in the mains lead of this appliance, so proceed as follows: Always fit the same value of fuse as that originally supplied with your appliance. Only use BS 1362 approved fuses. As a guide only: Appliances under 700 W can have a 3 Amp. fuse (red) and all others should have a 13 Amp. fuse (brown). The wire that is coloured brown must be connected to the terminal marked with the letter L or coloured red. When disposing of an old plug (particularly the moulded type that has been cut from the mains cord) always remove the fuse as the plug could be dangerous if ever inserted in a live socket. The wire that is coloured blue must be connected to the terminal marked with the letter N or coloured black. DISPOSAL OF YOUR OLD APPLIANCE 1. When the crossed-out bin symbol appears on a product it means that the product is covered by European Directive 2002/96/EC. 2. All electrical and electronic products should be disposed of separately from the municipal waste stream via specific collection facilities designated by the government or the local authorities. 3. Proper disposal of your old appliance will help prevent potential negative consequences for the environment and human health. For more detailed information about disposal of your old appliance, please contact your local council, the waste disposal service or the shop where you purchased the product. 11 Euroflex Warranty Information Your new Monster Cleaner comes with a 12 month full parts and labour warranty for domestic use. During the warranty period, any malfunction of the product caused by material or manufacturing defect will be repaired or replaced, at Euroflex's option without charge to the customer. If a replacement product is sent it will carry the remaining warranty of the original product. In the event of a warranty claim, please contact Euroflex UK. Contact details are printed below. We advise you to record the following information here we will need this to process any claim. Date of Purchase: Product Serial No: Euroflex will not be liable for damages occurring as a consequence of improper handling of the product, non-domestic use or failure to observe the information in the instruction manual. Use on current or voltage other than that stamped on the product or disassembly, alteration or repair not authorised by Euroflex will void the warranty. Monster is the brand name of Euroflex, Europe's fastest growing and most innovative manufacturer of domestic cleaning and ironing products. We take pride in the superior build quality of our products, our attention to detail and our commitment to customer service. For product information and customer service in the United Kingdom please contact Euroflex UK as follows: Product Help line (not 24 hour) : 02380821960 Main Phone Number : 02380635131 Postal Address : Euroflex UK Portman House Millbrook Road East Southampton SO15 1HN E-mail Addresses : [email protected] [email protected] 12 12 py097h-09-05-13