1
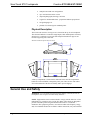
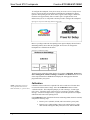
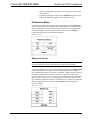
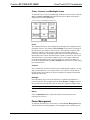
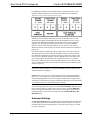
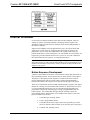
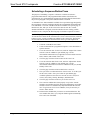
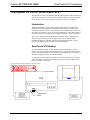
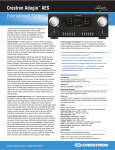
Crestron ST-1550 & ST-1550C
SmarTouch STS Touchpanels
Contents
SmarTouch STS
SmarTouch STS Description
Functional Description
Physical Description
General Use and Safety
Recommended Touchpanel Cleaning
Applying Power
Configuring the Touchpanel
Calibration
Preferences Menu
Power Management
Advanced Settings
Internal Scheduler
Button Sequence Development
Scheduling a Sequence/Button Press
Touchpanel as Part of SmarTouch STS
Introduction
SmarTouch STS Hookup
Problem Solving
Troubleshooting
Further Inquiries
User's Operations Guide - DOC. 5804
1
1
1
2
2
3
3
3
4
5
7
8
9
9
10
11
11
11
13
13
13
Contents • i
Crestron ST-1550 & ST-1550C
SmarTouch STS Touchpanels
SmarTouch STS
SmarTouch STS Description
Functional Description
The SmarTouch STS touchpanels are Crestron’s six inch touchscreen control panels
that can be used in either a Cresnet remote control system or as part of the
SmarTouch STS. These touchpanels provide a means of user interface via one-way
RF communication. The type of system employed determines the type of receiver.
There are six SmarTouch STS configurations available. Three offer 256 color
display and are denoted with the suffix “-C”. The three other offer four shades of
grayscale display. Another primary difference between the configurations is the type
of power availability, 120V versus 220V, and the transmission frequency. The table
below provides a breakdown of all six configurations.
Table of SmarTouch STS Configurations
SMARTOUCH STS
CONFIGURATION
DISPLAY
POWER
(VOLTAGE)
TRANSMISSION
FREQUENCY
STS
STS-C
STSI
STSI-C
STSI/UK
STSI-C/UK
Grayscale
Color
Grayscale
Color
Grayscale
Color
120V AC
120V AC
220V AC
220V AC
220V AC
220V AC
433.92 MHz
433.92 MHz
433.92 MHz
433.92 MHz
418 MHz
418 MHz
Since the touchpanel is the only user interface device in the SmarTouch STS, the
bulk of this guide’s content concentrates on this component. The touchpanel
component of the SmarTouch STS is capable of replacing large, complicated panels
with a series of simpler screens, each specific to the control problem at hand. Thus
very large numbers of functions can be made available to the user without the
confusion associated with hardware panels of that complexity. The touchpanel icons,
graphics, and text can dramatically increase any user’s comprehension of the control
environment. Devices, functions, and control zones are quickly organized and more
easily accessed. The touchpanel offers:
User's Operations Guide - DOC. 5804
•
256 color display or four shades of grayscale display
•
pop-up subpages to reduce memory requirements, providing optimal
speed and performance
SmarTouch STS • 1
SmarTouch STS Touchpanels
Crestron ST-1550 & ST-1550C
•
multiple button and icon configurations
•
up to 999 functions and 96 screens
•
imported photographs, drawings, and icons
•
support for downloadable fonts - proportional and non-proportional
•
foreign language text
•
printout of screen designs on standard printer
Physical Description
The 6 inch touch sensitive viewing screen is located on the top of each touchpanel.
The electronic hardware is housed in a high impact, black molded plastic enclosure,
shown below. Connectors to power the unit and upload touchscreen projects are
located on opposing sides of the unit.
SmarTouch STS Touchpanel Physical Views
A battery compartment is located on the underside of the unit. The compartment
holds one Crestron ST-BTP, rechargeable power pack. There are also four rubber
feet on the underside of the unit for stability and to prevent slippage.
General Use and Safety
WARNING: To avoid shock hazard and possible damage to the unit, do not use
touchpanel in rain or expose it to unnecessary moisture.
NOTE: Equipment has been tested and found to comply with the limits for a Class
B digital device, pursuant to part 15 of the FCC Rules. These limits are designed to
provide reasonable protection against harmful interference in a residential
installation. The equipment generates, uses and can radiate radio frequency energy
and, if not installed and used in accordance with the instructions, may cause harmful
2 • SmarTouch STS
User's Operations Guide - DOC. 5804
Crestron ST-1550 & ST-1550C
SmarTouch STS Touchpanels
interference to radio communications. However, there is no guarantee that
interference will not occur in a particular installation. If this equipment does cause
harmful interference to radio or television reception, which can be determined by
turning the equipment off and on, the user is encouraged to try to correct the
interference by one or more of the following measures:
Reorient or relocate the receiving antenna.
Increase the separation between the equipment and receiver.
Connect the equipment into an outlet on a circuit different from that to which the
receiver is connected.
Consult the dealer or an experienced radio/TV technician for help.
As of the date of manufacture, the unit has been tested and found to comply with
specifications for CE marking.
Recommended Touchpanel Cleaning
Keep the surface of the touchscreen free of dirt, dust, or other materials that could
degrade optical properties. Long term contact with abrasive materials can scratch the
surface which may detrimentally affect image quality.
For best cleaning results, use a clean, damp, non-abrasive cloth with any
commercially available non-ammonia glass cleaner. Surrounding plastic enclosure
may not provide a complete water-tight seal. Therefore, apply cleaning solution to
the cloth rather than the surface of the touchscreen. Wipe touchscreen clean and
avoid ingress of moisture beneath panels.
Applying Power
The touchpanel can be powered via an external AC power pack, while resting in the
ST-DS, or via the ST-BTP. Each of these supplied items have their own Operations
Guides which details proper usage. Refer to the table below for the required
document number. This table does not account for the latest revision letter of each
document.
Devices that Power the SmarTouch STS Touchpanel
POWER OPTION
NOMENCLATURE
DOCUMENT
NUMBER
Domestic External AC Power Pack
International External AC Power Pack
Docking Station
Battery Pack
PW-1210
PWI-1210
ST-DS
ST-BTP
5762
5763
5738
5746
Configuring the Touchpanel
It may be necessary to make adjustments or configure your touchpanel due to
personal preference or the way you would like to use it. If you are uncomfortable
with making these adjustments yourself, consult the dealer in your area.
User's Operations Guide - DOC. 5804
SmarTouch STS • 3
SmarTouch STS Touchpanels
Crestron ST-1550 & ST-1550C
To configure the touchpanel, it may be necessary to access a series of setup screens
prior to viewing run-time screens that are loaded into the touchpanel for normal
operation. The Opening Screen, shown below, appears when a finger is held to the
touchscreen for approximately three seconds as power is applied. This screen
indicates that you are in “setup mode” and can proceed to configure the touchpanel.
Opening Screen for ST-1550C (left) and ST-1550 (right)
Remove your finger and touch the Opening Screen again to display the Preferences
and Settings Menu, shown after this paragraph. All resources to configure the
touchpanel are available from this menu.
Preferences and Settings Menu
The Preferences and Settings Menu displays five buttons: Calibration, Preferences,
Power Management, Advanced Settings, and Return. The Return button saves all
of the setup information to EEPROM and displays the main page that has been
programmed into your system.
Calibration
NOTE: Calibration works best
when performed with a narrow,
blunt instrument (i.e., pencil eraser).
Calibration of the touchscreen is required if the active touch area of a button does
not coincide with the button’s image. Select the Calibration button to initiate
“calibration mode”. The touchpanel prompts you with a message, “Touch Upper
Left Corner”. Touch the corner of the screen; be as accurate as possible. Another
message, “Touch Lower Right Corner”, appears. Perform the operation to complete
calibration and return to the Opening Screen.
If the Calibration button from the Preferences and Settings Menu cannot be reached,
complete the following steps.
4 • SmarTouch STS
1.
Remove power (ST-BTP, ST-DS, and/or external AC power pack).
2.
Reapply power while holding a finger to the touchscreen for at least
three seconds. During this short period, the words “SETUP MODE”
User's Operations Guide - DOC. 5804
Crestron ST-1550 & ST-1550C
SmarTouch STS Touchpanels
appear. The Opening Screen appears when the finger is removed from
the touchscreen.
3.
Touch the Opening Screen and select the Calibration button from the
Preferences and Settings Menu to enter “calibration mode”.
Preferences Menu
To obtain the Preferences Menu, shown after this paragraph, touch the Preferences
button from the Preferences and Settings Menu. Many options for setting parameters
of the touchpanel are available from the Preferences Menu and are explained in the
following paragraphs. After these parameters have been set, select the Return
button, located at the bottom of the Preferences Menu.
Preferences Menu
Battery Life Screen
NOTE: Detach the external AC power pack when viewing Battery Life Screen. If
this pack is attached, the gauges read full charge which may be misleading.
To obtain the Battery Life Screen, shown after this paragraph, touch the Battery Life
button from the Preferences Menu. This screen indicates the amount of charge (or
life) remaining in the batteries, if batteries are installed. A digital and analog gauge is
provided. The digital gauge, located on the left side of the screen, indicates five
levels of charge: 0%, 25%, 50%, 75%, and 100%. The illustration below shows that
the battery life is at the 0% level. The analog gauge, located on the right side of the
screen, indicates smaller and continuous incremental levels of charge. The analog bar
fills to the appropriate level of charge. Touch the Return button to display the
Preferences Menu.
Battery Life Screen
User's Operations Guide - DOC. 5804
SmarTouch STS • 5
SmarTouch STS Touchpanels
Crestron ST-1550 & ST-1550C
Clock Adjust Screen
If a screen page in your customized program employs a clock display or if the
software’s scheduler is utilized, the touchpanel’s internal clock and date setting must
be set. To set date and time parameters select the Clock Adjust button located in the
Preferences Menu and display the Clock Adjust Screen, shown below.
Clock Adjust Screen
The very top portion of this screen displays the current date and time setting as a
scratchpad. Use the string of six buttons, Month Down, Month Up, Date Down,
Date Up, Year Down, and Year Up, to alter the date values in the scratchpad to the
current date. Use the string of six buttons, Hour Down, Hour Up, Minute Down,
Minute Up, Second Down, and Second Up, to synchronize the time values in the
scratchpad to the current time. To save the settings in the scratchpad to the
touchpanel’s internal clock and return to the Preferences Menu, touch the RETURN
button.
Sound Menu
The touchpanels are equipped with audible feedback that can be turned on or off and
have its volume adjusted. To obtain the Sound Menu, shown after this paragraph,
touch the Sound button from the Preferences Menu. The KEYCLICK ON and
KEYCLICK OFF buttons activate and deactivate the audible feedback,
respectively. The VOLUME UP and VOLUME DOWN buttons increase and
decrease the sound’s volume, respectively. A sample of sound volume is omitted
with each incremental press. Touch the Return button, located at the bottom of the
menu, to save the settings and display the Preferences Menu.
Sound Menu
6 • SmarTouch STS
User's Operations Guide - DOC. 5804
Crestron ST-1550 & ST-1550C
SmarTouch STS Touchpanels
Power, Contrast, and Backlight Screen
To obtain the Power, Contrast, and Backlight (PCB) Screen, shown below, touch the
Power / Contrast / Backlight button from the Preferences Menu. Each option is
explained in the following paragraphs.
Power, Contrast, and Backlight (PCB) Screen
Power
The touchpanel battery life can be lengthened by turning off the backlight when the
touchpanel is inactive. Two buttons, Off and Standby, located in the left column of
the PCB Screen are available to conserve power. The Off button completely shuts
down the touchpanel so that no power is drawn from the ST-BTP, ST-DS, or
external AC power pack. The Standby button shuts down the touchpanel display so
that minimal power is drawn from the ST-BTP, ST-DS, or external AC power pack.
These buttons have special software identities (reserve join numbers) and can be
recreated and programmed onto any page in the project. Consult your dealer. To
reactivate the touchpanel after the Off or Standby buttons have been utilized, simply
press the touchscreen.
Contrast
Screen contrast may need to be altered because of ambient light conditions, viewing
angle, panel temperature, or personal preference. One of the two contrast buttons
located centrally in the PCB Screen may be held down for continuous and smooth
adjustment of the screen.
Backlight
Screen brightness may need to be altered because of ambient light conditions or
personal preference. Three brightness buttons, Low, Medium, and High, located in
the right column of the PCB Screen may be selected to assign the backlight setting.
NOTE: Display backlight requires warm-up time to reach full brightness.
Return
Select the RETURN button, located at the bottom of the PCB Screen, after
parameters have been set.
Power Management
To obtain the Timeout Screen, shown below, touch the Power Management button
from the Preferences and Settings Menu. The touchpanel battery (ST-BTP) life can
User's Operations Guide - DOC. 5804
SmarTouch STS • 7
SmarTouch STS Touchpanels
Crestron ST-1550 & ST-1550C
be lengthened by turning off the backlight when the touchpanel is inactive. The
length of touchpanel inactivity can be specified to minimize power utilization.
Timeout Screen for ST-1550C (left) and ST-1550 (right)
Standby Timeout is displayed in the top left corner of the Timeout Screen. This
setting turns the display and backlight off when the touchpanel is inactive for the
specified time. When the touchpanel is activated, the last screen to be displayed
reappears. The specified time is displayed in minutes. A two minute Standby
Timeout is shown in the illustration. Minutes can vary from 0 to 120, where 0
disables the timeout. Down and up arrow buttons decrease and increase the timeout,
respectively.
Power Down Timeout is displayed in the top right corner of the Timeout Screen.
This setting turns off all power when the touchpanel is inactive for the specified
time. When the touchpanel is activated, the first page of the project appears or the
last screen to be displayed reappears. Selection depends on how your dealer setup
your custom program. The specified time is displayed in minutes. A 10 minute
Power Down Timeout is shown in the illustration. Minutes can vary from 0 to 120,
where 0 disables the timeout. Down and up arrow buttons decrease and increase the
timeout, respectively.
NOTE: Power Down Timeout should be set low to maximize battery life. However,
Power Down Timeout should be set greater than Standby Timeout. Otherwise, the
Standby Timeout is meaningless.
NOTE: If the external AC power pack is attached to the touchpanel and plugged
into an active AC receptacle or if the touchpanel is resting in the docking station
(ST-DS) and plugged into an active AC receptacle, the panel does not power down
when the power down timeout is achieved. Recall that the purpose of the this timeout
is to maximize battery life. Standby timeout still functions.
After timeout parameters have been set, touch the SAVE TIMEOUTS button in the
lower left corner of the ST-1550C to save the new settings. Touch the RETURN
button, located in the bottom right corner of the screen, to display the Preferences
and Settings Menu. For the ST-1550, simply touch the SAVE TIMEOUTS and
RETURN button.
Advanced Settings
The Advanced Settings button from the Preferences and Settings Menu should only
be used under supervision from the dealer that provided your system. The options
available from the Advanced Settings Screen, shown on the next page, are beyond
the scope of this guide.
8 • SmarTouch STS
User's Operations Guide - DOC. 5804
Crestron ST-1550 & ST-1550C
SmarTouch STS Touchpanels
Advanced Settings Screen
Internal Scheduler
Crestron offers an internal scheduler feature built into the touchpanel. There are
actually two parts to the internal scheduler: developing a button sequence and
scheduling a button sequence/function. Each part can be utilized independently of
the other or combined.
Sequences and schedules can be programmed into your system by the dealer that
supplied your system. However, with proper and careful project design by the
programmer, you can easily make adjustments to the system to better suit your
personal needs and way of life. Furthermore, you can schedule an event so that it can
begin at any given date and time and reoccur as you see fit. An event is defined as
the actions initiated by one sequence or a single button function.
NOTE: Since the exact screen layout for your system is unique, the following
descriptions for the two parts of the internal scheduler is only a generalization. If you
decide to take advantage of this feature, consult your dealer for the personal layout
details of your system.
Button Sequence Development
A button sequence differs from macros created from the Control pull-down menu of
the programming software, because the end user can assign actions to the sequence.
The purpose of developing a button sequence is to build a consecutive order of
preselected buttons that runs in real time when a single programmed button is
touched. The buttons in the sequence can be chosen from any page in the project.
There are two buttons that must be touched when developing a sequence. One button
initiates the “learning” function and the other terminates it. These buttons as well as
a set of programmable buttons may exist on a specialized page designed by the
programmer. Complete the following steps to assign a programmable button to a
button sequence. It is assumed that the begin and end “learning” buttons, the
programmable buttons, and the buttons to be included in the sequence exist in the
project available to the end user.
User's Operations Guide - DOC. 5804
1.
Touch the begin “learning” button.
2.
Touch a programmable button.
3.
Touch the buttons in the sequence at the same speed that you would
like to be replicated. These buttons can be from any page in the project.
4.
Touch the end “learning” button.
SmarTouch STS • 9
SmarTouch STS Touchpanels
Crestron ST-1550 & ST-1550C
Scheduling a Sequence/Button Press
The purpose of scheduling a sequence or button is to initiate an action at a
programmed date and time. The programmed date and time is defined as the
activation time. It is assumed that the sequence has been developed as described in
the previous paragraph or the preferred button initiates a function.
A “Schedule Event” button should be available from a specialized page designed by
the programmer. It must be touched to identify the programmable button that needs
to be scheduled. A “scratch” schedule must also be available on a separate page so
that the time, date, and cycle of the event can be entered. Once the “scratch”
schedule information is assigned, it must be transferred to one of thirty possible
scheduled events. Complete the following steps to schedule a sequence or button.
NOTE: The programmer of your system may have implemented a “Set Event Time
To Current Time” button. If the activation time is close to the current time, touch this
button to set the “scratch” schedule time and date to the current time. Then use the
increment/decrement buttons as described in the next step to make adjustments.
1.
Touch the “Schedule Event” button.
2.
Touch a button that has a programmed sequence or one that initiates a
specific function.
3.
To set the activation time for the event, touch an “Adjust Time” button
from the ‘scratch” schedule to open another page. Use the
increment/decrement buttons (if supplied) to increase and decrease the
hours, minutes, and seconds of the event.
4.
Close the page when the activation time for the event is set.
5.
To set the activation date for the event, touch an “Adjust Date” button
from the ‘scratch” schedule to open another page. Use the
increment/decrement buttons to increase and decrease the year, month,
and day of the event.
6.
Close the page when the activation date for the event is set.
7.
The cycle of the event determines how often it occurs. To set the cycle
for the event, touch a “Set Cycle” button to open another page.
Available options for how often an event can occur are: Off (never
occurs), Once, Daily, Weekly, Weekdays, and Weekends.
8.
Close the page when the activation cycle for the event is set.
9.
The event time and date have been properly set up in the “scratch”
schedule. Open another specially design page that displays 30 possible
schedule events. Five schedules may only be defined on the screen at
once. To gain access to five more schedules, it may be necessary to
touch a “More” button.
10. Determine the schedule that you want to use and touch that line. The
new schedule time, date, cycle, and join number appear automatically.
The event is now scheduled.
10 • SmarTouch STS
User's Operations Guide - DOC. 5804
Crestron ST-1550 & ST-1550C
SmarTouch STS Touchpanels
Touchpanel as Part of SmarTouch STS
This section of the User’s Operation Guide only applies to those with a SmarTouch
STS. If your touchpanel is part of a Cresnet remote control system, the information
in this section is not relevant. Consult your dealer if you have any questions.
Introduction
The SmarTouch STS a Crestron radio-frequency (RF) wireless control system
designed for numerous applications ranging from boardroom to complete home
automation. Electronic devices or subsystems can be controlled from anywhere via
the wireless user interface. Users are no longer tethered by a wired control panel or
limited to infrared line-of-sight control, as with most ordinary wireless controllers.
There are six SmarTouch STS configurations available. These configurations are
identical except for display color, the type of input power required, and the
transmission frequency. The table shown in “Functional Description” on page 1
provides a breakdown of the SmarTouch STS configurations.
SmarTouch STS Hookup
Your SmarTouch dealer has used the SmarTouch software package to create a
custom touch screen program and installed it into your system. This unique panel
layout is especially designed for your specific needs. Should it become necessary to
modify the program, contact your SmarTouch dealer.
To setup the SmarTouch STS for operation, refer to the figure below for a typical
connection diagram. Complete the following steps in the order provided to ensure
proper connection of the system.
Typical Connection Diagram During Normal Operation
ATTACH ANTENNA
VCR
EXTERNAL AC
POWER PACK
(500 mA Supply)
(1000 mA for
International Applications)
User's Operations Guide - DOC. 5804
SENSOR
STIRP
EXTERNAL AC
POWER PACK
(1000 mA Supply)
SmarTouch STS • 11
SmarTouch STS Touchpanels
12 • SmarTouch STS
Crestron ST-1550 & ST-1550C
1.
Attach supplied antenna to BNC connector labeled RF on the back of
the control processor.
2.
Attach appropriate external AC power pack to control processor and
plug into outlet.
3.
Insert the mono mini plug of the STIRP into one of the four IR OUT
ports of the control processor. Refer to the latest revision of the STIRP
Installation Instructions (Doc. 5674) for details to attach the STIRP to
IR sensor windows. Furthermore, your SmarTouch dealer should
provide a listing of equipment that needs to be connected via the STIRP
to each IR OUT port. For example, in the connection diagram provided,
the STIRP in IR PORT A is attached to the VCR.
4.
Repeat the previous step, as necessary.
5.
Apply power to the touchpanel. Consult the appropriate document
listed in “Applying Power” on page 3.
- If the external AC power pack is used, attach it to the touchpanel and
plug into outlet.
- If the ST-DS is used, rest touchpanel in station and plug into outlet.
- If the ST-BTP is used, insert battery pack into battery compartment.
6.
To begin using your SmarTouch STS, simply touch the screen to wake
up your touchpanel. Consult your SmarTouch dealer if your have
questions regarding the appearance of each screen page.
User's Operations Guide - DOC. 5804
Crestron ST-1550 & ST-1550C
SmarTouch STS Touchpanels
Problem Solving
Troubleshooting
The table below provides corrective action for possible trouble situations. If further
assistance is required, please contact your dealer.
Troubleshooting Table
TROUBLE
Touchpanel
display is
dark.
Touchpanel
display is
dark or too
light.
Unexpected
response
from
touchpanel.
System does
not
function
(LEDs on
ST-CP do not
illuminate).
RF LED on
ST-CP does
not illuminate
when trying to
control A/V
equipment.
A/V device
does not
respond.
POSSIBLE
CAUSE(S)
CORRECTIVE ACTION
Backlight timeout has Touch screen to reactivate.
elapsed.
Power is not applied to Verify that the touchpanel is receiving power
the touchpanel.
from either the ST-BTP, ST-DS, or an
external AC power pack.
Screen brightness or
Hold a finger to the touchscreen for more
contrast is improperly than 10 seconds as power is applied. The
set.
display sets the brightness and contrast to a
safe value.
Touchpanel is
Enter "setup mode" and recalibrate. Refer to
incorrectly calibrated. "Calibration".
No power to the
system.
Touchpanel is
incorrectly calibrated.
Confirm power is supplied to the system.
Enter "setup mode" and correct. Refer to
"Interface Menu".
ST-CP is not receiving Verify that the external AC power pack is
power.
attached to ST-CP.
RF transmitter in
Contact your dealer.
SmarTouch is faulty.
Verify that ST-CP RF antenna is properly
RF antenna is not
securely attached to ST-attached.
CP RF port.
RF antenna is not
Remotely locate RF antenna. Mount the
properly located (i.e., antenna outside of the rack by using a
inside a metal rack).
bulkhead type BNC barrel and a BNC to BNC
50 ohm cable.
STIRP or serial port not Verify placement of STIRP (Hold phosphor
placed properly.
card under STIRP while pressing button) and
tightness of serial cable.
Used wrong IR or serial Verify proper IR or serial port is defined.
port.
Further Inquiries
If after reviewing this User’s Operations Guide, you still have additional questions
about using your system, please call the dealer in your area.
User's Operations Guide - DOC. 5804
SmarTouch STS • 13
SmarTouch STS Touchpanels
Crestron ST-1550 & ST-1550C
This page intentionally left blank.
14 • SmarTouch STS
User's Operations Guide - DOC. 5804
Crestron ST-1550 & ST-1550C
SmarTouch STS Touchpanels
This page intentionally left blank.
User's Operations Guide - DOC. 5804
SmarTouch STS • 15