1
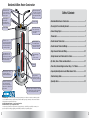
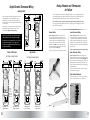
Residential Water Heater Construction
Flexible stainless steel
or copper connectors—
connects to hot and cold
water pipe system
Temperature and pressure
(T & P) valve— safety device
to relieve excessive pressure
and/or temperature buildup
in tank
Dielectric nipples or
Heat Traps with
thermoplastic lining—
prevents thread corrosion
Cold water inlet
Run-off tube— carries
water or steam safely to
drain or drain pan if T & P
valve activates
Hot water outlet
Table of Contents
Residential Water Heater Construction..............................................................2
Choosing the Correct Heating Element..............................................................4
Element Flange Styles...........................................................................................5
Thermostats.............................................................................................................7
Anode rod— a rod
composed of sacrificial metal
that prevents deterioration of
the steel tank and elements
by controlling electrolysis
Cold water dip tube—
a non-metallic tube that
directs incoming cold water
to the bottom of the tank
Steel tank with glass
lining—
to prevent corrosion
Testing Elements and Thermostats for Failure...............................................11
Dip Tubes, Run-off Tubes and Anode Rods.....................................................12
Insulation
Drain valve— a metal or plastic
valve used when draining
heater for periodic cleaning or
replacement of a defective water
heater element
Double Element Thermostat Wiring....................................................................9
Single Element Thermostat Wiring....................................................................10
Upper thermostat— turns
heating elements on or off
to maintain preset or desired
temperature; regulates power
to the lower thermostat
Lower thermostat— controls
lower heating element to
maintain desired temperature
Double Element Thermostats...............................................................................8
150˚F
125˚F
Drain Pans, Dielectric Nipples & Heat Traps, T & P Valves.........................13
Frequently Asked Questions about Water Heater Parts................................14
90˚F
Heating element—
a resistant type electrical
component to generate heat
Troubleshooting Guide.........................................................................................16
Speciality Items.....................................................................................................18
Drain pan— plastic or metal pan to collect and
drain off leaking water or water from activated
T & P valve; must be plumbed to drain
Limited Warranty: Elements will be replaced to the original purchaser if proven defective in materials or workmanship. No labor
costs are included in this warranty. Complete warranty information available upon request. Warranty is void if element is installed in
anything other than a residential hot water heater.
Standard and Better Elements – 1 year from purchase date.
Premium Elements – 5 years from purchase date.
Our return policy is limited to the replacement of original purchase. No other liability, responsibility or warranty is expressed or implied, including any regarding merchantability or suitability for a particular purpose.
2
3
Choosing the Correct Heating Element
Element Flange Styles
When choosing the correct replacement element, three factors must be considered:
1. Element Flange Style (Screw-In, Flat, etc...) 2. Voltage/wattage
3. Watt-density
1. Element Flange Style
3. Watt-Density
Water heater elements are offered in several styles.
Since the development of the modern water heater,
manufacturers have used various methods of installing
elements in their water heaters. There are still many of
these older units in operation today that have the older
style elements. The most common are the Universal
Flange, Flat Flange and the Round Head style. The
Universal and the Flat Flange elements are bolted to
the tank with four 3/8" bolts. The Round Head element
is secured to the tank with a separate 4-bolt flange.
Another significant difference that should be noted
when choosing a replacement element is the
watt-density construction. Whether the element is
120v or 240v, screw-in or bolt-in, there are three
watt-density ratings available. The watt-density
of an element is basically the amount of heat
concentrated on any point on the surface of
the element.
Note: The Universal Adapter Kit (Camco #07223) will adapt
a screw-in style element to a bolt-in style element that can
replace the above elements.
Today, all manufacturers of residential water heaters use
only Screw-in style elements. This style provides for easy
installation and serviceability because it screws into a spud
welded directly on the tank of the water heater. The thread
is a 1" (diameter) x 11-1/2 NPSM thread and is standard for
all residential water heaters that use screw-in elements.
EXCEPTION: For a period
of time, State Industries
manufactured a Duron brand
heater that used a 1-3/8"
thread. These elements are
not interchangeable with the
standard 1" threaded element.
2. Voltages and Wattages
The majority of residential style water heaters use
240v power. The 120v elements are primarily used
for smaller water heaters, point-of-use heaters and
in locations where a 240v circuit is not available.
The wattage rating, which determines the heat
output, of the 240v elements can be anywhere
from 1000 watts to 6000 watts. The wattage rating
of 120v elements is 1000 watts to 2500 watts.
Each model water heater is designed for a specific
voltage/wattage rated element. The replacement
element must be the same voltage and wattage
as the element being replaced. Never exceed the
nameplate rating on the water heater.
4
Screw-In Flange
Universal Flange
Fits most GE, Rheem, Rudd, Richmond,
Montgomery Ward, Sears/ Kenmore,
State, Norge, Westinghouse, Reliance,
Noland, A.O. Smith, Bradford White,
GS Wood, Maytag, Whirlpool and
Duro-Matic water heaters, some
Mor-Flo, American and Craftmaster
prior to 1991 and all water heaters
manufactured after 1994.
Fits older Bradford-White, U.S. Water
Heater, most D&R, Day and Night,
Briggs, Jackson, Tennessee Tank and
early models of State and A.O. Smith.
Flat Flange
Round Head Style
Fits most older Mor-Flo, American,
Craftmaster, some older State, Reliance,
Rheem, Rudd, Richmond, Montgomery
Ward, Norge, Intertherm and
Westinghouse models. Fits some Briggs,
Bradford-White, U.S. Water Heater,
Republic, Day and Night, Jackson,
Tennessee Tank and Duro-Matic.
Fits July 1975 or older models of State,
Reliance, Sears, J.C. Penney, Crane and
some A.O. Smith. Camco no longer
stocks this style. To replace this style,
use a Screw-In Flange element with a
Universal Adapter Kit (#07223).
The lower the watt-density, the greater the amount
of element surface. The heat per square inch of the
surface is reduced, but the total surface is increased
so that the total heat of the element is the same for a
particular wattage. Generally, a lower watt-density in
an element would mean a longer expected life. The
lower watt-density elements normally last longer in
water with high lime content. It helps lower lime
deposit build-up. The fold-back feature of most low
watt-density and Lime Life elements is to keep the
length short enough to fit all tanks.
STANDARD:
Regular High Watt-Density Element
Most common; same as original equipment provided with
most water heaters. It is the least expensive. Can be used in
all replacement situations if the same wattage and voltage
are used.
BETTER: Low Watt Density Element
Most are fold-back elements. Better suited for areas with
problem water (hard water, lime, etc). The lower wattdensity provides no loss of efficiency, yet reduces lime
deposit build-up. Can be used to replace any high wattdensity element if same wattage and voltage are used.
Normally it is more expensive than high watt-density.
PREMIUM: Lime Life Element
Carries a limited 5 year warranty. Ultra low watt-density and
special metal surface (premium grade nickel and stainless
steel) reduce chances of lime build-up. Also resists dryfiring. Ideal for problem water areas and locations with
intermittent water supply. Higher initial cost, but may last
the life of the water heater.
5
Element Removal
Dry-Fired Elements
Thermostat Settings
A long socket wrench is needed to remove and install the
Screw-in style elements. The Camco element wrench
(#09943, 09951, 09883) is designed specifically for the
standard and the Duron screw-in elements.
Dry-fired means the element operated without being
immersed in water.
All residential thermostats are factory
preset at 120°. This is a safe, energyefficient setting. If a higher or lower
setting is desired or required, the
thermostat dial may be turned to the
new setting. A flat head screwdriver
may be needed to turn the dial.
Element Conversion Kit
Use a standard screw-in element to replace a flat,
universal or round flange element using the Element
Conversion Kit.
This adapter kit is intended for use with a screw-in type
element to replace water heater elements that look like
figures 1, 2 or 3.
High watt-density and low watt-density elements are
manufactured with a resistance coil wire imbedded in
a magnesium oxide material covered by copper tubing.
Water heater elements are designed to operate only in
water. Dry-firing (applying power to an element with
inadequate or no water in the tank) raises the internal
and tubing temperatures on the copper element to cause
melt-down of the sheath and failure of the internal heating
resistance wire. The expected life of a dry-fired copper
element is 30-45 seconds. In a dry tank the element
temperature may reach 1900 to 2000° F.
Lime Life elements are manufactured of
premium grade nickel and stainless steel
and will resist dry-firing.
Use caution when setting to higher
setting. Scalding can occur.
Therm-O-Disc thermostats have the
temperature settings marked on the
dial. Apcom thermostats do not have
the temperatures on the dial.
Evidence of Dry-Firing
1. The element shaft is annealed so soft you can bend it
with your fingers.
2. Shows evidence of melting.
White Dot
=
110° F
Hot
=
120° F
A
=
130° F
B
=
140° F
C
=
150° F
Very Hot
=
160° F
The settings on both the Apcom and
the Therm-O-Disc thermostats are
accurate to +/- 5° F.
Apcom Style
Fig 2: Flat
1
Replacement gasket goes here.
Fig 3: Round
Directions:
1. Remove screws and discard old element
and thermostat bracket.
2. Install screw-in element and gasket supplied with element
into square adapter flange. Tighten firmly.
3. Install gasket (supplied with this kit) in element seat, being
careful to ensure a good seat. See diagrams above to
determine which gasket to use. 4. Install element with new thermostat bracket using old
screws or new ones provided. Be careful that screws
are not too long and bottom out against the tank.
6
2
Exhibit A
Double Element Water Heaters
The majority of residential water
heaters are designed with two elements
controlled by two different thermostats.
(See drawings on pages 8–9.) The upper
thermostat is the “brain” of the water
heater. It controls the heat generated
by the upper and lower element. Most,
if not all, residential water heaters are
designed to have the upper and lower
thermostats work separately. The lower
element provides the main heat supply.
Apcom settings:
3. Plastic terminal block melted, even slightly, indicates
that you have positive proof that element was dry-fired.
Fig. 1: Universal
Thermostats
3
An immersion element that has been dry-fired has
been misused and therefore is not covered by any
manufacturer’s warranty.
The upper thermostat has a safety
device attached to it called a High Limit
Control (HLC). It has a heat sensor that
will shut down the power to the heater
if the temperature of the tank exceeds
safety limits. The button may be reset to
restore power to the heater.
Do not reset the HLC until the problem
causing the unit to trip is corrected.
Operation Cycle of Double Element Water Heaters
1. The upper thermostat senses cold
water and has energized the upper
element. Although contacts on both
thermostats are normally closed
in response to the cold water, the
double throw upper thermostat
completes the circuit only to the
upper heating element. Because of
the double throw action, power to
the lower thermostat is cut off.
2. As the upper element operates,
it heats the water above it
(approximately one quarter of the
tank’s capacity).
3. The water in the upper quarter of
the tank is heated until it reaches
the temperature set on the upper
thermostat. The upper thermostat
then breaks the circuit to the upper
heating element and completes the
circuit to the lower thermostat.
4
The upper and the lower thermostats
never operate simultaneously.
4. The lower element then operates and
heats the remainder of the water in
the tank.
5. The lower thermostat breaks the
circuit to the lower element when
the water in the lower portion of
the tank has been heated to its set
temperature. The entire tank is now
filled with hot water.
6. As hot water is drawn from the top
of the tank, cool water comes in at
the bottom through the dip tube.
The lower thermostat reacts to the
entering cold water by closing its
contacts, energizing the lower heating
element and heating the water as it
enters the tank.
7. Thermostats are factory preset
at 120°F.
Therm-O-Disc Style
NOTE: A melted sheath can also be caused by
an electrical storm, which is obviously not a
defect in material or workmanship and is therefore
not covered by warranty.
We bring this to your attention with the hope that
it will be of some value to you, as it might avoid the
cost and effort of returning the elements.
7
Double Element Thermostats
Double Element Thermostat Wiring
Note: Wire color may vary on some water heaters, but connections remain the same.
Apcom Style
Therm-O-Disc Style
Apcom Style
Therm-O-Disc Style
Fits: State/Reliance, Sears,
A.O. Smith, American, Whirlpool
and Bradford White Heater
Fits: Rheem/Rudd/Richmond,
GE, and GSW
Wiring diagram of thermostats to standard
water heater elements
Wiring diagram of thermostats to standard
water heater elements
Upper thermostat
(with high limit)
Power inlet
terminals
Reset button
Power inlet
terminals
Reset button
High limit
control
Jumper connects
hlc to
thermostat
NOT USED
FOR WIRING
Connects to
both elements
(2 wires)
Adjustable
temperature
control
Upper
thermostat
High limit
control
Jumper connects
hlc to
thermostat
NOT USED
FOR WIRING
Connects
to lower
thermostat
Upper
thermostat
#07863
#08163
Connects
to lower
thermostat
Connects to
upper element
Connects to
both elements
(2 wires)
Connects to
upper element
Adjustable
temperature
control
Lower thermostat
Connects to
upper thermostat
Connects
to upper
thermostat
Connects to
lower element
#07723
Adjustable
temperature
control
Connects to
lower element
#08123
Adjustable
temperature
control
Standard 240v
double element
8
Standard 240v
double element
9
Testing Elements and Thermostats
for Failure
Single Element Thermostat Wiring
(with high limit)
Camco’s Water Heater Tester (#10023) is designed specifically for use on electric water heaters. The
elements and thermostats are tested while installed on the heater. The tester’s specially engineered
light emitting diode will identify filament connections that other testers routinely miss.
Most of the smaller water heaters and point-of-use heaters
are designed with only one element and thus only one
thermostat. Most of the single element water heaters are
wired for 120v. Never connect or adapt a 120v water heater
to a 240v system.
Never use this tester on live electrical circuits. Electricity must be turned off at the power source.
The tester comes with 2 AAA batteries installed. To test the batteries, touch the alligator clip to the test
probe. The diode should glow.
High limit
control
Because there is no “upper” thermostat on this type heater,
the high limit control is attached to the only or lower
thermostat. (See diagrams for proper wiring.)
NOTE: Because the HLC is attached to the single
element thermostat, it looks similar to an upper
thermostat for a two-element heater. Care should
be taken in choosing the correct replacement
thermostat. An upper thermostat will not work on
a single element heater.
Therm-O-Disc Style
for Single element heater
Apcom Style
for Single element heater
Element Testing
Lower Thermostat Testing
Be sure the power is off. Disconnect the two wires
from the element. Attach or touch the clip to one of
the element terminals and the tester probe to the other
element contact. The tester diode light should glow.
Touch the probe to the metal on the element flange.
The diode should NOT glow. Now attach the clip to
the other terminal and touch the probe to the element
flange. The diode should NOT glow.
Be sure the power is off. Disconnect wires from the
lower element terminals. Touch the clip and the probe
to terminals on the lower thermostat. If the water in the
tank is colder than the thermostat setting – thermostat
calling for heat – the diode will glow. If not, replace the
thermostat. If the water is hot, turn the setting higher and
perform the test.
If any or all of these three tests fail, replace the element.
Be sure to return the setting back to the proper setting.
Upper Thermostat Testing
Be sure the power is off. Disconnect wires from the
upper element terminals. Touch the clip and the probe to
terminals 1 and 2 on the thermostat. (See diagram.) If the
water in the tank is cold – thermostat calling for heat – the
diode should glow. If not, replace the thermostat. If the
tank is hot, turn the thermostat setting to a higher setting
and perform the test.
Be sure to return the thermostat to the proper setting if
the thermostat is not replaced.
Single Element Thermostat
The test is the same as the one for the lower thermostat
(above). Use terminals 1 and 2 on the thermostat.
Can be
used as
120v by
bypassing
screws on
right side
Standard 240v
single element
10
Standard 120v
single element
Standard 240v
single element
Standard 120v
single element
11
Dip Tubes, Run-off Tubes and Anode Rods
Temperature and
Pressure Relief Valve
The T&P valve is the most important
safety device on the water heater.
No water heater should be
installed without a T&P valve.
In the event of thermostat
failure (thermostat fails to shut
off properly and continues to
heat water beyond safe limits),
the T&P valve will open and
relieve the pressure in the
tank to prevent catastrophic
explosion. The T&P valve is
set to open at 150 psi and/
or 210°F. If this valve leaks
or opens within the safe
operating temperatures set
on the thermostats, it should
be replaced.
Anode Rod: Corrosion Protection
What is it?
What metals are used?
It is a simple and inexpensive
system designed to prevent or deter
corrosion of any metal exposed to the
water inside the water heater.
Aluminum, magnesium and zinc or an
alloy of any of the three. Aluminum
is the most common because it is
inexpensive and works in most areas
of the country.
What metal is exposed?
All heaters today are coated on the
inside with a dense, impermeable,
corrosion-resistant coating, but there
is still exposed metal, some intended
and some not: elements, T&P valve
threads, welded joints in the tank,
pin holes in the coating, unprotected
fittings in the waterway, etc.
How does it work?
First, let’s explain the process of
corrosion. When a pure metal
is immersed in an electrolyte
(conductive) – in this instance water –
it tends to dissolve in the solution;
in other words, corrode. In the
process, the atoms of the metal
become positively charged and
accumulate on the metal. Since
most common, commercially used
metals are not pure (usually an alloy)
a single piece of metal will exhibit
areas within the metal with different
potentials (electric charge). The
electric current will flow to the other
areas of the metal with less potential,
or it will flow to another metal of
a lesser charge in the water, taking
minute particles of metal with it,
causing corrosion.
The anode rod is made of a metal
with a higher current potential than
other metals in the water heater. This
is to ensure that the galvanic current
flows from the rod to other exposed
metals, preventing their corrosion. In
other words, the anode rod corrodes
and not the tank or the element.
The anode rod is “self-sacrificing.”
12
Drain Pans, Dielectric Nipples
& Heat Traps, T & P Valves
Why is magnesium used
in some areas?
Not all water has the same
conductivity (e.g., pure water is
much less conductive than seawater.)
Different areas of the country have
different degrees of hardness or may
have several natural chemicals that
could affect conductivity.
Magnesium is the best conductor
of the three, but it is expensive. If
magnesium were used in water with
good conductivity, the rod would not
last very long. It would dissolve at an
undesirable rate, causing the heater to
eventually be unprotected.
What about odor?
The odor is hydrogen sulfide gas. The
source is sulfate-reducing bacteria
present in many water systems. A
water temperature of 140°–170°F
makes for a rich growth medium.
This type of anaerobic bacteria feeds
off the hydrogen gas produced by
the magnesium anode rod. Periodic
flushing of the tank with bleach
solution will reduce the problem.
Dielectric Nipples
Water Heater Dip Tube
When two dissimilar metals are used for
water heater inlet and outlet hook-ups (i.e.,
copper piping to steel tank of the heater),
the connection must be protected from
galvanic corrosion of the threads, which
will cause leaking. Dielectric nipples are
provided with a thermoplastic lining for
this purpose. Use only dielectric fittings or
dielectric heat traps and connectors when
installing a water heater.
Dielectric Heat Traps
A heat trap is an energy savings device
for connecting a water heater to the inlet
and outlet water pipes. It is an alternative
to the dielectric nipple.
A water heater is typically responsible
for about 20% of a homeowner’s utility
bill. A water heater can waste up to 15%
of the heat it produces through stand-by
losses. Heat loss occurs through the tank
walls, pipes, and into the surrounding air
of the utility room, garage or basement.
Heat traps prevent this heat loss through
the inlet and outlet pipes. Hot water is
less dense than cold water, it will rise
in the outlet pipe and the cold water
Water Heater Drain Pans
Water heaters should be set into drain
pans when the heater is installed in a
living space or over a living space, where
water leaks or T&P valve activation
would damage property. Pans should be
plumbed to a proper drain or to a safe
disposal area.
Pans are provided in various diameters to
accommodate all size water heaters. Pans
should be 4" wider in diameter than the
diameter of the water heater.
will sink down from the inlet pipe. This
results in a continuous and wasteful
cooling circulation. Camco's flapper style
heat trap design (see diagram) prevents
this process while allowing proper flow
when the heater is in use.
Flapper
Style
Rubber baffle
This is a non-metallic tube inside
the tank under the cold-water
inlet connection. It directs the cold
water to the bottom of the tank, so
as not to cool the hot water in the
top of the tank. The detachment
or deterioration of this tube can be
the cause of insufficient hot water
production.
To inspect the dip tube, turn off
power to the water heater, turn off
the main water supply, and drain
the tank. Disconnect the cold water
inlet pipe from the nipple on the
top of the tank. Remove the nipple
and the dip tube can be removed.
On some heaters the dip tube is
attached to the nipple.
Run-Off Tubes
This is a metal or plastic tube that
is attached to the outlet of the
T&P valve, to safely pipe away the
steam and scalding hot water in the
event the valve activates. It can be
directed to the water heater pan
if the pan is plumbed to a drain
or other disposal area. Orient the
run-off tube so that any discharge
will exit only within 6" above the
structure floor or any distance below
the structure floor. Do not connect
directly to a discharge drain unless
air gap is provided.
There are three configurations of
run-off tubes: side mount, top
mount and center top mount.
Which configuration to use depends
on the location of the T&P valve on
the water heater.
Metal pans can be used for both gas
and electric water heaters.
Plastic pans should only be used for
electric water heaters.
13
Frequently Asked Questions
Water Heater Elements
Q: I don’t have hot water. How do I determine
what is wrong?
A: Check the breaker or fuse box for a blown fuse or
tripped breaker. If this is not the problem, shut off the power
to the water heater. (IMPORTANT!) The problem may be
caused by a defective or shorted element(s) or thermostat(s)
or both. If you are experienced with plumbing and electrical
tools, you can do the repairs yourself. If you are at all
hesitant, call a plumber or electrician. Camco Mfg. provides
a water heater tester (#10023) that lets you test the elements
and thermostats while they remain installed on the heater.
Instructions are included.
Q: What causes water heater elements to fail, some
sooner than others?
A: Several reasons: power surges, lightning, dry-firing (see
below) and lime build-up. Most water heaters come with
standard high watt-density (HWD) elements. These are the
least expensive type, and are more susceptible to these
problems. On a “Standard-Better-Premium” scale the
HWD elements are Standard.
Q: Why are some water heater elements folded back?
A: These are low watt-density (LWD) elements. The heat
(watts) per square inch of surface has been lowered by 50%
from that of a regular element. In order for total heat to be
the same, the total surface has been increased. It is folded
back so the length will fit the tank. Not all LWD elements are
fold-backs. In areas with “hard” water, a LWD element resists
lime build-up on its surface, thus extending its life. These
elements are BETTER.
Q: What are Lime Life elements?
A: These elements are Premium. They are made of nickel/
stainless steel and are ultra low watt-density. These features
prevent lime build-up and extend the life of the element.
A Lime Life element resists dry-firing. These elements carry
a limited 5 year warranty. Because of the low watt-density,
these elements are folded back to reduce the length. Some
are rippled to further reduce the length to fit the diameter of
the tank.
Q: What is meant by the term “dry-firing?”
A: High watt density and low watt-density are designed to
function in water. If not surrounded by water, the intense
heat they generate (dry fire) will cause them to burn out. The
water tank must be full of water whenever the power is on.
Dry-fire failure is not covered by any warranty. It is a human
error. Dry-fired elements are easily detected. The element is
soft and easily bent. In most cases, a hole is burned through
the surface.
14
Q: Can I replace the element in my water heater with
elements with higher wattage?
A: It is not recommended. The water heater is designed
for that element size. Higher wattage might require heavier
gauge wire and a larger capacity circuit breaker.
Q: Why do some elements of the same style, wattage and
voltage come in different lengths?
A: Different manufacturers have different designs. The
shorter element has a wider diameter tubing; the longer
element has a narrower diameter, but heat output is
measured by total surface. Both have the same amount of
surface and both will fit all standard water heaters. Quality is
the same.
Q: Can I use a water heater element in an application
other than a water heater?
A: It is not recommended. These elements are designed
specifically for residential water heaters. We have no
experience or knowledge of other uses. You may do so at
your own risk. Non-water heater use of our elements and
thermostats voids all warranties.
Q: I just installed a water heater element and now my
heater makes a humming sound.
A: This is called a “harmonic.” If the element is installed
so that the loop is horizontal, the vibration from the electric
current will cause the element to hum. This noise can be
prevented by installing so that the loop is vertical. The flanged
elements have arrows on the flange indicating the vertical
position of the loop. To eliminate the humming on screwin elements, tighten the element another half turn. In some
instances, less than a half turn will stop the harmonic.
Q: Why aren’t the two elements operating
simultaneously?
A: In most residential water heaters only one element is on
at any given time. The lower element does 90% or more of
the heating. During periods of heavy use, the upper element
clicks on (the lower switches off) and heats the upper part of
the tank to 120°. It then shuts off, turns on the lower, and it
heats the water to the setting of the lower thermostat.
...about Water Heater Parts
Water Heater Thermostats
Q: Are water heater thermostats adjustable?
A: Most water heater thermostats provided by Camco
are adjustable. They are factory set at 120°. On a twoelement water heater, it is not recommended that the
upper thermostat be adjusted. If higher water temperature
is desired, adjust the lower to a higher setting. Both may be
lowered if a cooler temperature is desired.
Q: What are dielectric fittings and connectors?
A: When fittings of unlike metals are joined together
(copper with brass, brass with steel, etc.) the faint electrical
current that is present in any water pipe system will cause
erosion of the threads in one or both of the fittings and
cause leaking. The plastic liner or sleeve in the dielectric
fittings and connectors prevents this from happening.
Note: Stainless steel fittings and connectors are naturally
dielectric and do not need the plastic lining.
Q: On thermostats without a degree dial, what are the
temperatures of the dial settings?
Q: What is an anode rod?
A: The temperature range is:
heater, from the top, in an opening of its own or as part of
the outlet nipple. The metal is self-sacrificing (corrodes);
this protects the tank and elements from corroding.
Replacement anode rods are available and easy to install.
the Dot =
Hot=
A=
B=
C=
Very Hot=
110° F
120° F
130° F
140° F
150° F
160° F
Q: At what temperature should I set the thermostats?
A: Water heater thermostats are factory pre-set at 120°.
However, most are adjustable. It is recommended that the
upper thermostat remain set at 120°. If a higher temperature
is desired, adjust only the lower thermostat. Caution: High
temperature can cause injury.
Q: I noticed that there are two styles of water heater thermostats. Are they interchangeable?
A: Yes, like models of the two thermostat manufacturers
are interchangeable. Use caution in selecting the correct
model for their position on the heater (upper, lower, single
element T-stat).
Q: How do I know which thermostat to buy?
A: A two-element water heater has two thermostats: an
upper and a lower. Each must be replaced with a thermostat
with the same function: upper for upper, lower for lower.
They cannot be interchanged, as they perform specific
functions. A single-element water heater has only one
thermostat and that is called a “single element thermostat.”
The upper and lower thermostats for a two-element heater
cannot be used on a single-element water heater and vice
versa.
Other Miscellaneous Questions
Q: The Temperature and Pressure relief valve has a
threaded outlet. What attaches to it?
A: The T&P valve outlet must have a run-off tube attached
to it. Most building codes require a tube that terminates 6"
from the floor. If the T&P valve activates, water should flow
into a drain or into a water heater pan that is plumbed to a
drain. This run-off tube may be metal or plastic. Check local
plumbing codes for correct material for your area.
A: It is a magnesium or aluminum rod inserted in the
Q: Are water heater drain pans necessary?
A: It depends on the plumbing codes in your area and the
location of your water heater. If your heater is in a garage or
a non-finished basement where leaking water would flow
harmlessly into a drain, a pan is not necessary. However, if
the heater is in or above a living space where leaking could
cause extensive water damage, it is cheap insurance to
protect your home from such an event.
Q: What type of pan should be used?
A: For gas water heaters, only metal pans can be used.
Codes in some areas require metal pans for all water heaters
installed in a living space. If codes allow, plastic pans can be
used with electric water heaters.
Q: I opened the drain valve and very little water flowed.
A: You probably have sediment and scale build-up on the
bottom of the tank that is blocking the valve. In areas where
the water is very “hard” or well water is used, lime build-up
can occur. The high heat of the heater elements will cause
scale and sediment to coat the elements and settle on the
tank bottom. Light build-up of sediment may be removed
by attaching a water hose to the drain valve. Drain the tank
every 6-12 months, more often if necessary. Important: Turn
off power first or it could cause element burn out.
Q: What is the purpose of a water heater stand?
A: A stand is used primarily with gas water heaters when
installed in garages and basements where combustible fumes
may exist. Gas heaters have an open flame, and tests have
shown that placing a gas water heater at least 16" above
the floor will offer some protection against combustion of
volatile fumes.
15
Troubleshooting Guide
Troubleshooting Guide
Condition
Cause
Remedy
Condition
Cause
Remedy
No hot water
No power
Check fuses/circuit breaker; replace/reset
Defective T&P relief valve
Replace
Loose wiring connection
Locate, clean carefully, reconnect properly
Excessive T & P
relief valve operation
Excessive water pressure
Install proper pressure-reducing valve with built-in by-pass
Lightning
Inspect/replace fuse, heater elements and thermostat
High voltage
Check utility for correction
Restriction in cold water line
Remove restriction; no check valve should be installed in
cold water line unless you have expansion tank
Short
Locate short circuit and correct
Surge from washer solenoid valve
Install blind pipe air cushion
Element burn-out
Check element and replace as needed
Defective thermostat
Replace
Inoperative thermostat
Replace
Loose wiring connection
Locate, clean carefully, reconnect properly
Open high limit (HLC)
Reset
Lightning
Inspect/replace fuse, heater elements and thermostat
Lower element burn-out
Replace element
Power surge
Inspect/replace fuse, heater elements and thermostat
Undersized heater
Replace with larger heater
Low voltage
Check utility for correction
Elements too small
Replace with higher watt element (check with utility)Do
not exceed nameplate wattage on heater
High voltage
Check utility for correction
Short
Locate short circuit and correct
Leaking faucets/nipples
Locate and correct
Undersized heater
Replace with larger heater
Wasted hot water
Advise consumer
Sediment or lime in tank
Check to see if water treatment is necessary
Elements too small
Replace with higher watt element (check with utility)
Do not exceed nameplate wattage on heater
Check to see if dip tube is
installed and nipple tight
If not, install and tighten
Thermostat not flush with tank
Position properly; be sure insulation covers thermostat
Defective thermostat
Replace
Lime formation on elements
Clean elements, replace if necessary
Leak in faucets on hot water line
Repair leak
Loose wiring connection
Locate, clean carefully, reconnect properly
Leaking fitting
Check all fittings and correct leaks
Thermostat set too low
Turn knob to desired temperature caution: Hotter
water increases the risk of scalding injury. Before changing
temperature setting, see instruction manual
Leaks around heat trap
(side plumbing)
Remove; apply pipe "dope" and reinstall
Inoperative thermostat
Replace
Leaks around heating elements
Tighten, clean and smooth face to tank flange and gasket
Inoperative high limit (ECO)
Replace
Loose wiring connection
Locate, clean carefully, reconnect properly
Replace with higher watt element (check with utility)Do
not exceed nameplate wattage on heater
Lightning
Inspect/replace fuse, heater elements and thermostat
Elements too small
Power surge
Inspect/replace fuse, heater elements and thermostat
Lime formation on elements
Clean elements, replace if necessary
Low voltage
Check utility for correction
Loose wiring connection
Locate, clean carefully, reconnect properly
High voltage
Check utility for correction
Excessive mineral deposits
Flush tank thoroughly, install water filter
Short
Locate short circuit and correct
Check to see if dip tube is
installed and nipple tight
If not, install and tighten
Gas odor and/or taste
in water
Gas from anode rod
Replace with aluminum anode rod and chlorinate system
Short in element or thermostat
Locate short circuit and correct
Fluctuating temperature
Thermostat not flush with tank
Position properly; be sure insulation covers thermostat
Thermostat set too high
Turn knob to desired temperature
Defective thermostat
Replace
Thermostat or element(s)
installed wrong
Reinstall properly, making sure to cover with insulation
Defective T&P relief valve
Replace
Loose wiring connection
Locate, clean carefully, reconnect properly
Sediment or lime in tank
Check to see if water treatment is necessary
Wrong piping connections
Reconnect pipes to proper fittings
Excessive water pressure
Install proper pressure-reducing valve with built-in by-pass
Long runs of exposed piping
Insulate piping
Surge from washer solenoid valve
Install blind pipe air cushion valve
Hot water piping in outside walls
Insulate piping
Defective thermostat
Replace
Defective thermostat
Replace
Dip tube missing or floating
Install dip tube or tighten nipple
Insufficient hot water
Slow hot water recovery
Overheated water
steaming
Drip from
T & P relief valve
16
Element failure
Continuous operation
Wet Insulation
Thermostat failure
17
Speciality Items
Water Heater Element Quick Change
Professional Element Socket
For Electric Water Heaters
Save time and water with Camco’s
Water Heater Element Quick Change.
Chrome Plated Element Socket fits standard
1/2" socket drive to make easy work of replacing
screw-in water heater elements.
Turn off water at the water heater
to create a vacuum. Securely attach
Water Heater Element Quick Change
and place bucket handle in grooves
of tool to catch excess water while
replacing your water heater elements.
09951
Plumber’s Packs
Therm-O-Disc and Apcom
Water Heater Repair Kits
D
E
E
N in
All the parts needed to repair or
renew an electric water heater system
NOto dratank
r
HWD Plumber’s Packs
LWD Plumber’s Packs
07013 Plumber’s Pack
w/Therm-O-Disc Style T-stats
07033 Plumber’s Pack
w/Therm-O-Disc Style T-stats
Contains:
(2) High Watt Density Elements #02342 4500w 240v
(1) TOD lower thermostat #08122
(1) TOD upper thermostat #08162
07023 Plumber’s Pack w/Apcom Style Thermostats
Contains:
(2) High Watt Density Elements #02342 4500w 240v
(1) Apcom style lower thermostat w/protector #07722
(1) Apcom style upper thermostat w/protector #07862
you
Contains:
(2) Low Watt Density Elements #02582 4500w 240v
(1) TOD style lower thermostat #08122
(1) TOD style upper thermostat #08162
07043 Plumber’s Pack w/Apcom Style Thermostats
Contains:
(2) Low Watt Density Elements #02582 4500w 240v
(1) Apcom style lower thermostat w/protector #07722
(1) Apcom style upper thermostat w/protector #07862
Water Heater Tester
Test elements and thermostats while they are in the heater.
May also be used to test continuity in fluorescent lights,
fuses and all appliances. Sensitive enough to measure even
the fine filament wire in a light bulb. LED light indicates
continuity. Batteries included.
18
AVAILABLE IN LENGTHS OF 25', 50' & 100'
• Reinforced
• Abrasion resistant
• For hot water use
• 10-year limited replacement warranty
• Spring reinforced to reduce kinking
• Easier to clean
• Drinking water safe
For more product
information and a full
listing of replacement
parts and accessories
please call us at
1-800-334-2004
or visit us online at
www.camco.net for your
copy of the Plumbing and
Hardware Repair Parts
and Accessories catalog.
You may also want to check out our diverse line
of RV and Marine related merchandise.
121 Landmark Drive • Greensboro, NC 27409
800-334-2004 • 336-668-7661 • www.camco.net • [email protected]
#511
MARINE
70040