1
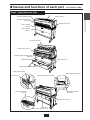
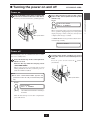
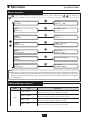
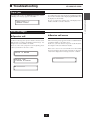
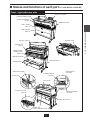
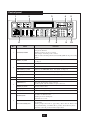
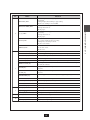
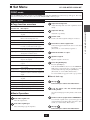
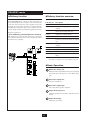
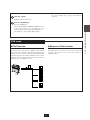
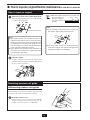
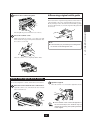
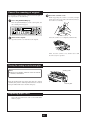
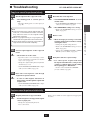
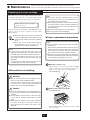
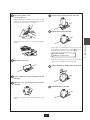
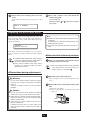
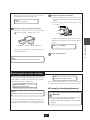
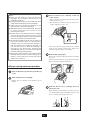
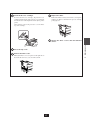
U00107692700
Quick Reference Guide
Black-and-White Raster Plotter
LP-1020
LP-1020L
Network Multi Function Plotter
LP-1020-MF
LP-1020L-MF
Introduction
Thank you for purchasing our LP-1020/LP-1020L Black-and-white Raster Plotter and LP1020-MF/LP-1020L-MF Network Multi-Function Plotter.
This manual explains the basic operations of LP-1020/LP-1020L and LP-1020-MF/LP1020L-MF. For details, refer to the respective PDF data saved in CD-ROM.
The DSCAN format described in this manual as well as DSCAN that appears on the
operation display are for only customers in Japan.
Table of Contents
1
LP-1020/LP-1020L ............................................................................................. 1
Name and functions of each part ............................................................... 1
Turning the power on and off ..................................................................... 3
Set menu ................................................................................................... 4
How to set the paper rolls .......................................................................... 6
Troubleshooting ......................................................................................... 9
◆◆◆
2
LP-1020-MF/LP-1020L-MF .............................................................................. 11
Name and functions of each part ............................................................. 11
Turning the power on and off ................................................................... 14
Set menu ................................................................................................. 15
How to input an original / Routine maintenance ...................................... 18
Troubleshooting ....................................................................................... 21
◆◆◆
3
Maintenance .................................................................................................... 22
● Names and functions of each part
LP-1020/LP-1020L
Front / right side/rear side
Toner cover
Finished drawing outlet
Manual feed drawer
(door 4)
Waste toner door
Roll 1 drawer
(door 1)
Roll 2 drawer
(door 2)
LP-1020/LP-1020L
Control panel
1
Top cover (door 6)
Fixation door (door 7)
Manual paper feeding guide
(door 8)
Manual feed inlet
Paper feed knob
Paper flange
Main power switch
USB interface connector
Power cord
Parallel interface connector
Ethernet interface
connector
Cutter door inside
(door 9)
Cutter door (door 5)
Cutter door
lower small door (door 10)
1
Control panel
➁LCD
➃Power key
➀LEDs
➂Keys
Number
1LED's
2Display
3Keys
4Power
Name
Function
Error lamp (red)
Indicates the presence or absence of errors.
On: Error present
Off: No error present
Toner lamp (green)
Indicates the amount of remaining toner.
On: There is sufficient toner.
Flashing: Toner is running low.
Off: There is no toner (plots cannot be produced without replenishment.)
Waste toner lamp
(green)
Indicates the toner waste bottle replacement time.
On: Normal
Flashing: Replacement timing is approaching
Off: Plots cannot be produced without replacement
Process lamp
(green)
Indicates the process cartridge replacement time.
On: Normal
Flashing: Replacement time is approaching
Off: Process cartridge is not installed.
Menu lamp
(green)
Indicates that this device is ready for setting, receiving data, or printing.
On: Setting operations can be performed
Off: Ready to receive data and print.
LCD
Displays a variety of messages in a 20-figure and 2-line display to inform you of
the device status.
MENU key
Switches the status of the device from setting ready status to data receive
and print ready status.
ENTER key
Inputs the parameters.
CANCEL key
Cancels parameter input.
▲ Key
Switches menu items and changes parameters.
▼ Key
Switches menu items and changes parameters.
Key
Switches menu items/hierarchy and changes.
Key
Switches menu items/hierarchy and changes.
Power key
Turns the device power on and off.
2
● Turning the power on and off
LP-1020/LP-1020L
Power on
I N I T I A L I Z I NG
WA I T A MOMEN T
When you first turn on the power after purchasing this
device, a guidance display prompts you to set the panel's
display language. If this setting has already been
completed, this message is omitted.
Main power switch
A “PRINT READY” message indicates that the device
is functioning normally.
P R I N T RE ADY
Power off
When turning the power off, confirm that the device is in the
data receive standby mode.
Turn the main power off when you are not
using this device for an extended period of
time.
Press the Power key on the control panel for
about 1 second.
Press the power switch toward the
(downwards).
Release the key when the display reads
“SHUTTING DOWN.”
symbol
When a job is present, it is automatically saved and
will be printable the next time you turn the power on.
(Only when HDD is installed)
Note
◆ Even when “SHUTTING DOWN” appears, the
power will not turn off until you release the power
key.
Main power switch
ON/OFF
S HU T DOWN
WA I T A MOMEN T
This indicates that the device is executing a
shut down.
When the shut down process has been completed, the
power will turn off.
3
1
ON/OFF
Press the power switch toward the ⎪ symbol (upwards).
LP-1020/LP-1020L
Press the power key located on the control
panel of this device (when the main power
switch is on).
Turn on the Main power switch located at the
lower-left as seen from the rear of the device.
● Set menu
LP-1020/LP-1020L
Menu structure
Press
to set the device offline before performing setting operations. Select a menu using the
,
keys and press the
key to enter each menu. Changed parameters are saved in non-volatile memory and are not lost when the power is turned
off.
MENU
# S E T UP
Setup menu
S E T UP
# POR T 1 _ HPG L
MENU
# DE V I CE
Device menu
# POWER S A V E
> 1 5m i n
MENU
# P A P ER
Protocol menu
P A P ER
# RO L L 1
MENU
# F UNC T I ON
Function menu
#MENU PR I N T
> S Y S T EM
MENU
# PROTOCO L
Paper menu
PROTOCO L
# POR T 1 : X P T
MENU
# RE S E T
Reset menu
# S Y S T EM R E S E T
>
MENU
# S Y S T EM
System menu
S Y S T EM
# COMM . P AR AM
Note
◆ When using our company’s printer driver, the printer parameters set for this device are disabled and printing is
performed in accordance with the print parameters set for the print driver (printing in accord with the print driver
settings). If you wish to enable the PDL menu print parameters using our company’s print driver, see Chapter 3
in “User’s Guide.”
Items which you can set
Menu
Item
Functions
PORT n_HPGL
Sets the PDL table parameter settings for Ethernet port n.
Performs the settings relating to HPGL format printing.
PORT n_DSCAN
Sets the PDL table parameter settings for Ethernet port n.
Performs the settings relating to DSCAN format printing.
PORT n_TIFF
Sets PDL table parameter settings for Ethernet port n.
Perform the settings relating to TIFF format printing.
PORT n_CALS
Sets PDL table parameter settings for Ethernet port n.
Performs the settings relating to CALS format printing.
Setup
4
Paper
Function
Protocol
Sets the time until the device enters the power saving mode.
EDGE CUT TIMER
Sets the data standby time to automatically have the paper roll end cut
before plotting using data received after a data standby status has
continued for a while.
DOOR OPEN CUT
To plot the first data after the roll door is opened and ¥closed, sets whether
to start plotting after the end of the roll paper is automatically cut.
DENSITY
Adjusts the printing density.
TRACE PAP. MODE
Sets the tracing paper printing mode.
BOTTLE MAINT.
Sets whether the maintenance of waste toner bottle starts automatically
or manually.
ROLLn
Specifes the paper type and series.
MENU PRINT
Prints the status of consumables, device information, and panel settings.
HPGL SELF PLOT
Outputs the drawing for the data format (HPGL) built in this device.
DSCAN SELF PLOT
Outputs the drawing for the data format (DSCAN) built in this device.
ERROR LOG
Prints error log information.a
JOB LOG
Prints job log information.
ENGINE LOG
Prints detailed information for the engine.
SYSTEM DATE
Sets the date (year, month, day).
SYSTEM TIME
Sets the time (hour, minutes, seconds).
INIT CHARG. INF
Initializes accounting information.
PRINT CHARG. INF
Prints accounting information.
MAINT. INFO
Prints maintenance information.
DATA DUMP
Outputs a portion of the plotting data in hexadecimal digit onto paper.
PORTn : xxx
The Ethernet port PDL selection and protocol name are set here. N
indicates the port number, xxx indicates the Ethernet protocol type. Up
to 10 ports may be specified.
To set the protocol name, XPT sets the XPT port, LPD sets the printer
name, and FTP sets the user name.
PARALLEL
Performs the PDL selection for the parallel channel.
SYSTEM RESET
System reset
Initializes the device to the same status as when the device power is
turned on.
PORT RESET
Ethernet port reset
Resets the communication for the selected logical port.
COMM. PARAM
Sets the communication parameters.
WEB LOCK
Sets whether to allow setup privileges from the web browser to User
administrator and above.
ENABLE SERIES
Sets the media series to be used in this device.
APPLY ROLL
Sets the roll sizes for each media series you use in this device.
CHINA SIZE
Sets the roll sizes to be used in China in this device.
INITIAL SET
Sets all parameter settings to their initial values.
LANGUAGE
Switches the language on the LCD message display.
LENGTH UNITS
Switches the length unit (millimeter or inch).
ADMIN PASSWORD
Specifies the administrator password. This password prevents the
settings of the plotter from being changed.
5
LP-1020/LP-1020L
POWER SAVE
Reset
System
Function
1
Device
Item
Menu
● How to set the paper rolls
LP-1020/LP-1020L
Replacing paper rolls
◆How to detach the paper rolls
Detach and replace a paper roll when the device has run out
of paper rolls or when you change the paper roll size on type.
When the paper is used up during printing, the Error lamp
will turn on and the LCD will display the following message:
Example:
Pull out the Roll 1 or Roll 2 drawer.
Use your fingers to grasp the handle in the center of
the drawer and pull the drawer out gently.
(The diagram indicates a case where the Roll 2 drawer
is opened.)
S E T P A P ER
A0
Note
◆ The display may be automatically switched to the
paper menu when the paper roll is reloaded. In
such a case, set the type and series and of the
paper roll.
◆Precautions during replacement
Caution
◆ The rolls are heavy so be careful not to hurt
yourself by dropping them while you are
replacing the rolls.
◆ When attaching the rolls, use a cutter to cut the
end of the paper roll. While doing this, take care
not to cut yourself or damage the device.
◆ When opening and closing the paper roll
drawers, take care not to get your hands caught
in the drawer.
Do not open other paper roll drawers while one
paper roll drawer is open. Doing so will increase
your chances of getting your hands caught in the
drawers.
Rewind the paper roll and then remove it.
Turn the paper flange in the direction indicated in the
diagram and continue to rewind the roll until you see
the end of roll. Lift up the paper flange and remove the
paper roll.
Paper flange
Remove the paper flange and take out the
paper roll.
Note
◆ If you change the paper type, you must also
change the device settings accordingly.
⇒Page 5
◆ Use media types specified by our company.
If you use media types which are not specified by
our company, we cannot assure printing quality.
◆ Store the paper in a cool, dark location with low
humidity.
Loosen the paper flange by turning the knobs in the
“OPEN” direction and remove both ends of the paper
flange.
C L OS
E
O
P E N
Knob
Note
◆ Take care not to use excessive force when you
turn the paper flange knobs. The flange ends
may come off.
6
◆How to attach the paper roll
Hold the paper roll so that the end of the paper is
positioned at the bottom facing the back of the device.
Then align the paper flange to the depressions in the
flange guide and gently insert the flange in place.
◆ The paper flange ends do not have a
designated right or left side. You can attach
them to either side.
Attach the paper flange to a paper roll.
Push in the paper flange ends until they contact the
paper roll tube, then secure the flange ends by turning
the knob in the “CLOSE” direction.
LP-1020/LP-1020L
Load the paper into the drawer.
1
Note
◆ Take care not to drop the paper roll while
performing these activities.
C L OS
E
O
P E N
Knob
Insert the end of the paper roll into the paper
feed inlet of the device.
Note
◆ If the paper flange knobs are loosely fitted, the
paper roll will move adversely to the right and left
and negatively affect the drawing. Make sure that
the knobs are tightened securely.
Turn the paper flange and insert the end of the paper
roll so that it is straight. Turn the paper feed knob so
that the end of the paper roll projects about 10 cm.
Move the flange guide.
The label which is affixed to the inside of the drawer
indicates the flange positions for different roll widths.
Move the flange guide to match the paper roll size you
are using.
Paper feed knob
Flange guide
Cut the end of the paper.
While holding the end of the paper roll, cut it off with
the cutter.
The “Paper cutter position” label is affixed to both ends
of the space where the cutter blade should be inserted.
Insert the cutter blade into the space beneath where the
label arrow is pointing. Slide the cutter blade along the
space and cut the paper.
Label
◆ The paper can be cut cleanly when the
cutter is inserted in a perfectly sideways
direction.
C L O
S
E
O
7
P EN
Caution
Note
◆ After closing the paper roll drawer, wait until the
“WAIT A MOMENT” message disappears before
opening the paper roll drawer again.
As the device initiates a paper detection just after
the paper roll drawer is closed, so opening the
paper roll drawer during this operation may
cause a paper jam.
◆ Take care not to hurt yourself and damage the
device when handling the cutter.
◆ Handle the cutter blade with care so that you do
not break it.
◆ When sliding the cutter along the space, take
care not to cut the back of your hand on the sides
of the paper tray.
After the replacement, the device will return to the
status before the paper roll was replaced.
Close the paper roll drawer.
Gently push in the Roll 1 or Roll 2 drawer.
When the paper roll drawer is closed, the following
message appears.
Note
◆ If you change the type of paper roll, you must
change the setting of the paper menu.
WA I T A MOMEN T
(It will take about 30 seconds until paper feeding is
ready.)
Manual paper feeding (cut paper)
◆Manual paper feeding procedure
This device offers a manual feeding feature as a service
function. As this is a service function, we cannot assure the
picture quality and printing accuracy.
Set the paper feeding mode.
◆Manual feeding procedures
When the PDL setup paper feeding mode is set to the
continuous or optimum mode, paper should be
manually fed only for the drawings for which the data
was processed immediately after the paper was fed into
the manual paper feeding unit (this function is called
"interrupt manual feeding function".)
When the PDL setup paper feeding mode is the manual
feeding mode, paper should be always fed from the
manual paper feeding unit. If no paper has been fed
into the manual paper feeding unit when data is
transferred, paper to be used is indicated on the display
(this function is called "continuous manual paper
feeding function".)
Refer to the User’s Guide for details of the paper
feeding mode.
Adjust the paper guide.
Adjust the paper guide to the position where you will
set the cut paper for manual feeding.
Set the paper so that the printing surface is
face down.
Load the cut paper.
When you insert the paper into the manual paper feed
inlet, the paper is drawn in and the paper is ready for
printing.
For cut paper and its setup method, refer to the
respective User’s Guide.
8
● Troubleshooting
LP-1020/LP-1020L
If a paper jam occurs, the ERROR lamp lights and the
following error message appears on the LCD.
According to the paper jam point, the door number from which
the corrective measure starts is displayed (plural numbers may
be displayed as shown left).
In case of a paper jam, open the door of the displayed door
number, and take a corrective measure.
OP EN DOOR 9 , 4
REMOV E P A P ER
Error messages
LP-1020/LP-1020L
Paper jam
1
◆Operator call
◆Service call errors
For this error message, the operator can take corrective action.
Take measures according to the displayed error message. See
Chapter 14 in “User’s Guide” for details.
However, if the same symptom recurs frequently, please
contact your dealer or our service center.
This error message may appear if an unrecoverable hardware
or firmware failure occurs in the device.
In this case, you need call a service person to take measures.
See Chpater 14 in User’s Guide for details.
If the device does not recover from this error after turning
the power off and on, please notify your dealer or our service
center of the displayed error message and error condition.
S E TU P I S WRONG
E xxxxxxxx
D E L E T E J OB ?
Y = EN T ER N = CANCE L
W xxxxxxxx
9
Symptom and corrective measure
◆Items to be checked
Symptom
No power
Failure to start or
operate correctly
Failure to plot
Failure to plot
transmitted data
immediately
Frequent paper jam
Items to be checked
Corrective measure
Power cable connection
Plug the power cable into the outlet correctly.
Power supply to the outlet
Supply the power to the outlet.
ERROR lights and LC
message display
Take appropriate measures according to the error message.
⇒Chapter 14 in User's Guide
Interface cable connection
Connect the interface cable correctly.
ERROR lights and LC message
display (See "Note" below)
Take appropriate measures according to the error message.
⇒Chapter 14 in User's Guide
DATA lights (on or flashing?)
Review the time-out setting.
Paper type
Check whether the paper type setting matches the type of the
loaded paper. ⇒Chapter 7 in User's Guide
Use our recommended paper. ⇒Chapter 1 in User's Guide
Paper roll
Load the paper correctly. ⇒Chapter 2 in User's Guide
Check whether there is any
foreign material in the paper
path
Remove any foreign material. ⇒Chapter 14 in User's Guide
◆Measures to solve print quality problems
Symptom
Plotting is light/dark
Plotting is locally
deleted
Plotting is locally
streaked
Cause
Corrective measure
Adjust the density. ⇒ Chapter 6 in User's Guide
---------The type of loaded paper does not match
the type of paper specified on the panel.
Replace the paper, or change the setting. ⇒
Chapter 2 or 7 in User's Guide
Paper contains moisture.
Cut the end of the rolled paper and retry plotting.
⇒ Chapter 14 in User's Guide
The recommended paper is not used.
Use our recommended paper.
⇒ Chapter 1 in User's Guide
Process cartridge reached its life.
Replace the process cartridge.
⇒ Page 26
Refer to User’s Guide for other symptoms and appropriate measures.
10
● Names and functions of each part LP-1020-MF/LP-1020L-MF
Front / right side/rear side
Control panel
Scanner exit guide
Finished drawing outlet
Manual feed drawer
(door 4)
Waste toner door
Roll 1 drawer
(door 1)
Top door (door 6)
Scanner cover
Fixation door
(door 7)
Manual paper
feeding guide
(door 8)
Manual feed inlet
Paper feed knob
Paper flange
Main power switch
Power cord
2 LP-1020-MF/LP-1020L-MF
Roll 2 drawer
(door 2)
Parallel interface
connector
USB interface
connector
Toner cover
Cutter door inside
(door 9)
Ethernet interface
connector
Cutter door (door 5)
Cutter door
lower small door (door 10)
11
Control panel
1
2
WARNING LIGHT
3
4
MENU
COPY
PRINT
MEMORY
RESET
POWER
SAVING
DELIVERY
FILE
REPRINT
STOP
5
POWER
SCAN STOP
ORIGINAL
SIZE
TONER
PROCESS
WASTE
TONER
ORIGINAL
TYPE
AUTO
TEXT/LINE
FIXED-SIZE
PORTRAIT
TEXT/PHOTO
FIXED-SIZE
LANDSCAPE
PHOTO
SYNCHRO
BLUE PRINT
BACKGROUND
REMOVAL
DENSITY
PAPER
FEED
DARK
MANUAL FEED
NORMAL
LIGHT
DATA
SCALE x1
FIXED SCALE
ORIGINAL
NON-PROPORTIONAL
SORT
SCALE
FUNCTION
ERROR
6
No.
1
START
IMAGE
QUALITY
ZOOM
7
Name
8
9
10
Function
WARNING LIGHT
Indicates a print mode or standby status of the device.
ON (green): Normal
Flashing (orange): An error occurred
ON (orange): A warning event occurred
OFF: A status other than print mode and standby (OFF also in power saving
status)
[MENU] key/LED
Switches to the MENU mode for various settings of the device. For details,
see Page 4.
[POWER SAVING] key/LED Switches to the POWER SAVING mode.
2
3
4
5
[COPY] key/LED
Switches to the COPY mode. For details, see Page 15.
[DELIVERY] key/LED
Switches to the DELIVERY mode. For details, see Page 16.
[PRINT] key/LED
Switches to the PRINT mode for printing.
[FILE] key/LED
Switches to the FILE mode. For details, see Page 17.
SCREEN
Displays the status of the device.
[MEMORY] key/lLED
Various settings used frequently can be registered in the memory.
[REPRINT] key
The print outputted last can be reprinted.
For the reprint, only the number of copies can be set.
[RESET] key/LED
Resets to initial values.
[STOP] key/LED
Stops in the midway.
[Power] key
Turns on/off the power supply to the device.
[TONER] LED
Indicates the amount of remaining toner.
On: There is sufficient toner.
Flashing: Toner is running low.
Off: There is no toner.
[WASTE TONER] LED
Indicates the toner waste bottle status.
On: Normal.
Flashing: Replacement time is approaching. (Even after the Waste toner
lamp starts flashing, you will be able to produce about 120 m of plots.)
Off: Plots cannot be produced without replacement
6
12
Name
[MANUAL FEED] LED
6
7
8
9
10
Indicates whether the paper to be fed manually has been set.
On: Paper has been set.
Off: No paper.
[1], [2] LEDs
Indicate whether the paper has been set in the roll 1 and roll 2 drawers
respectively.
On: Paper has been set.
Off: No paper.
[DATA] LED
Indicates the data receiving status.
On: A job is waiting for the processing.
Flashing: Data are being received.
Off: No received data.
[ERROR] LED
Indicates whether an error exists in the device.
On: An error exists.
Off: No error.
[ORIGINAL SIZE] key
Selects the original size.
[ORIGINAL TYPE] key
Selects the type of image quality according to the original.
[REMOVAL] key
Removes the background color.
[DENSITY] key
Adjusts the copy density.
[SCALEx1] key
Takes a copy in same size as the original without enlargement or reduction.
[FIXED SCALE] key
The enlargement or reduction ratio to the same fixed-size series as original
can easily be selected.
[ZOOM] key
Enlarges or reduces the original at same scale in vertical and horizontal
directions.
[NON-PROPORTIONAL
SCALE] key
Enlarges or reduces the original at different scale in vertical and horizontal
directions.
[PAPER FEED] key
Makes the paper feed related settings such as paper type,margin, frameless,
etc.
[ORIGINAL] key
Sets the media series of original set in the device.
[IMAGE QUALITY] key
Sets the image quality according to the ORIGINAL TYPE.
[SORT] key
Inactive on this device.
[FUNCTION] key
Inactive on this device.
[Enter] key
Inputs the parameters.
[▲][▼][ ][ ] key
Switches menu items and changes parameters.
[Cancel] key
Cancels parameter input.
Ten keys
Enter the number of copies or to set values.
[SCAN STOP] key
Stops the scanning of original.
[START] key
Starts the scanning of original in the manual start mode.
13
2 LP-1020-MF/LP-1020L-MF
[PROCESS] LED
Function
Indicates the process cartridge replacement time.
On: Normal.
Flashing: Replacement timing is approaching.
Off: Process cartridge is not installed.
No.
● Turning the power on and off
LP-1020-MF/LP-1020L-MF
Power on
Turn on the Main power switch located at the
lower-left as seen from the rear of the device.
Press the power key located on the control
panel of this device (when the main power
switch is on).
Press the power switch toward the ⎪ symbol (upwards).
I n i t i a l i z i ng
When you first turn on the power after purchasing this
device, a guidance display prompts you to set the
panel's display language. If this setting has already been
completed, this message is omitted.
Main power switch
The message indicates that the device is now online
(“Print Ready”).
Pr i n t Ready
In the “Print Ready” status, press the PRINT key or
send data. The PRINT mode will be active and the print
will be ready.
Power off
When turning the power off, confirm that the device is in the
data receive standby mode.
Turn the main power off when you are not
using this device for an extended period of
time.
Press the Power key on the device panel for
about 1 second. Release the key when the
display reads “Shutdown.”
Press the power switch toward the
(downwards).
symbol
When a job is present, it is automatically saved and
will be printable the next time you turn the power on.
(Only when HDD is installed)
Note
◆ Even when “Shutdown” appears, the power will
not turn off until you release the power key.
Main power switch
Shu t down
This indicates that the device is executing a
shut down.
When the shut down process has been completed, the
power will turn off.
14
● Set Menu
LP-1020-MF/LP-1020L-MF
PRINT mode
Press the [MENU] key during stand-by or in the PRINT mode and enter OFLINE. The menu message will appear. The setup
method and setting items are the same as those of LP-1020/LP-1020L. Refer to page 4.
COPY mode
◆Copy function overview
Original Type
Selects the image type according to the
original.
Adjust the density.
Adjust the copy density.
Background Removal
Removes the background color.
Density
Adjusts the copy density.
Scale
Enlarges or reduces the original.
Auto
Reduces the original automatically so that
it can be accommodated in the paper.
Set the scale.
Set the scale if the original is enlarged or reduced.
Select the location of paper feed.
Select which paper loaded into the device is to be used
for printing.
(For details, see “User’s Guide, Copy Part.”)
Paper Location Selects which paper among the paper
loaded into the device is used for copy.
Paper Type
Selects what type of paper is used for copy
among those set in the device.
Copy Count
selects the number of copies.
Margin
Sets the margin at the top and bottom
edges of an original.
Move
Adjusts the position where an original is
copied.
FramErase
Takes a copy by erasing the surrounding
of an original.
Original Series
Selects the media series of an original.
Enter the number of copies.
Input the original.
Input the original to the device.
Press the [START] key.
Press the [START] key.
If the SCAN START has been set to the ORIGINAL
SET in the system menu, the copy/delivery starts
automatically without pressing the [START] key.
(For details, see "User's Guide, Plotter Unit.")
See “User's Guide, Copy part” for the copy operation.
Original Reject Direction
Sets the location to which an original is
output.
Sharpness
■Manual feed copy
Adjusts the sharpness of outline of an
original.
Contrast
Adjusts the contrast of an original.
Mirror
Copies the mirrored original.
Reverse
Copies the reverse original.
Long Original
Copies a long original.
Sort
Sorts multiple originals and copies them.
through
Perform the procedures described above.
Load the paper onto the manual paper
feeding holder.
Open the manual paper feeding holder, and load the
paper.
◆Basic Operation
Set the location of paper feed to “MANUALS.”
Select the original size.
Set so that the original can be copied on the paper set
on the manual paper feeding holder of the device. (For
details, see “User's Guide, Plotter Unit.”)
Select the original size.
Select the original type.
Select what image type the original is.
through
Perform the procedures described above.
15
2 LP-1020-MF/LP-1020L-MF
Description
Sets the original size.
Adjust the background color if the original has uneven
density.
Function list
Original Size
Adjust the background.
DELIVERY mode
◆Delivery function overview
◆Delivery function
In the DELIVERY mode of the device, the scanned data can
be saved in the delivery host computer connected via network,
or the data can be transferred to other computers on the same
network. To use the delivery function, plotshare must be
installed beforehand in the delivery host computer used and
various settings must be made with this application software.
Function list
Original Size
Description
Sets the original size.
Original Type
Selects the image type according to the
original.
Background Removal
Removes the background color.
Exclusive application:.
•TeriostarDelivery (standard application attached)
This application provides the function that saves the image
data transferred from the device in the designated folder in
the delivery host computer.
Density
Adjusts the scanning density.
Original Series
Selects the media series of an original.
Original Eject Direction
Sets the location from which an original
eject.
Sharpness
Adjusts the sharpness of outline of an
original.
Contrast
Adjusts the contrast of an original.
Reverse
Copies the reverse original.
Resolution
Selects the resolution of scanning.
File transfer
Selects a transfer method of the scanned
image.
Delivery Host computer
For details, see Chapter 3 in “User’s Guide, Copy part. ”
Plotter
◆Basic Operation
Obtain the delivery list.
Obtain the delivery list from the delivery host computer.
For details, refer to the respective “User’s Guide, Copy
part.”
Select the original size.
Select the original size.
Select the original type.
Select what image type the original is.
Adjust the background.
Adjust the background color if the original has uneven
density.
Adjust the density.
Adjust the copy density.
16
See “User's Guide, Copy part” for the delivery
operation.
Input the original.
Input the original to the device.
FILE mode
◆File Function
◆Screens of file function
Change the mode of the device to “FILE,” and the original
data is read from a computer connected via network. To use
this function, the exclusive application PlotShareOneDX
(standard application attached) is installed in advance in the
computer connected via network and one of the functions of
that application “ScanToFile” is used.
The file function is ensured via a network-connected
computer. For details, refer to the User’s Guide for
Application Side.
Plotter
17
Press the [START] key.
If the SCAN START or ORIGINAL SET has been set
in the system menu, the copy/delivery starts
automatically without pressing the [START] key.
(For details, see “User's Guide, Plotter Unit.”)
2 LP-1020-MF/LP-1020L-MF
Press the [START] key.
● How to input an original/Routine maintenanceLP-1020-MF/LP-1020L-MF
How to input an original
◆ Butt the original against the front roller and
give it a slack, so
Roller
Slack
that the original
can be inserted
straight.
Adjust the position of the original width guide.
Adjust the original width guide to the applicable line
according to the original size.
Note
◆ If you selected the front reject of the original, set
the original, aligning with correct size line.
Original width guide
Note
◆ This device allows you to select whether the
original is returned to the front or the rear of the
scanner. In case of front return, the original could
be damaged if the original width guide is in its
way. Accordingly, move the original width guide
to the right end if selecting this option.
◆ In this device, the original must be positioned in
the center. The non-fixed size original must also
be positioned in the center.
◆ If a carrier sheet is used, do not select the front
outlet of the original. The carrier could get stuck,
causing the original to be damaged.
Input the original.
Input the original facedown along the original width
guide. The inserted original is automatically pulled in
the device and set in position.
Removing scanner exit guide
◆Removing scanner exit guide
When scanning a long original or rounded original from the
rear, remove the scanner exit guide before scanning.
Open the scanner cover.
Lift the scanner cover up to its stop position. Pull the
stopper towards the arrow direction and raise the
scanner cover. The scanner cover will be held.
18
◆Removing original width guide
Remove the scanner exit guide.
Lift and pull the guide toward the rear to remove.
Close the scanner cover.
While supporting the scanner cover with your right
hand, release the stopper with your left hand and close
the scanner cover slowly.
2
Note
◆ Take care that you pull toward you. Pulling down
on the claw could damage the claw.
LP-1020-MF/LP-1020L-MF
If the return of the original is changed between front and rear
exit frequently, remove the original width guide in advance.
Hook your finger on the claw at the bottom and while opening
the claw, pull towand you, and the original width guide will
be removed.
Close the scanner cover completely until it clicks.
How to scan originals with a crease
Input the original.
If a creased original is scanned, switch the lever in advance.
Close the scanner cover, and set the original facedown.
Move the lever toward the rear of the device.
Open the scanner cover, and switch each lever on both
sides toward the rear.
Lever
◆ If the shadow of the crease still appears in
the scanned output, the shadow may be
reduced by reversing the inputting direction
of the original.
19
Cancel the scanning of original
To cancel the scanning because of the feed isn’t straight or
the original jams, do the following:
Close the scanner cover.
While supporting the scanner cover with your right
hand, release the stopper with your left hand and close
the scanner cover slowly.
Press the [SCAN STOP] key
Press the [SCAN STOP] key on the control panel, and
the scanning is then stopped.
WARNING LIGHT
MENU
COPY
PRINT
MEMORY
RESET
POWER
SAVING
DELIVERY
FILE
REPRINT
STOP
POWER
SCAN STOP
ORIGINAL
SIZE
TONER
PROCESS
WASTE
TONER
AUTO
ORIGINAL
TYPE
BACKGROUND
REMOVAL
DENSITY
PAPER
FEED
DARK
FIXED-SIZE
PORTRAIT
TEXT/PHOTO
FIXED-SIZE
LANDSCAPE
PHOTO
SYNCHRO
BLUE PRINT
NORMAL
LIGHT
DATA
SCALE x1
TEXT/LINE
MANUAL FEED
FIXED SCALE
ZOOM
NON-PROPORTIONAL
ORIGINAL
IMAGE
QUALITY
START
SORT
SCALE
ERROR
FUNCTION
Close the scanner cover completely until it clicks.
Remove the original.
Open the scanner cover and remove the original.
Then, close the scanner cover, and the device will
become ready for operation.
Cleaning the scanning area and scanner glass
Note
◆ Never use volatile solvents such as thinner,
benzine, and alcohol.
Shading guide
Wipe the shading guide and scanner glass with a dry cloth. If
extremely dirty, use the cloth dampened with water or neutral
detergent diluted with water and then wrung dry.
Scanner glass
Replacing paper rolls
Paper roll replacement is the same as that of LP-1020.
Refer to page 6.
20
● Troubleshooting
LP-1020-MF/LP-1020L-MF
Copy/scan cannot be performed clearly
Q.
A.
Streaks appear in the copy/scan result
• The shading guide or scanner glass is
dirty.
➝Clean the shading guide or scanner glass (⇒
page 20).
A.
Note
◆ Copying/scanning the original stained with the
toner, ink, or dust makes the inside of scanner
dirty. Remove stains on the original before
starting the copy/scan.
◆ When copying/scanning a long original, be
careful that the original does not touch the floor.
◆ Use a carrier sheet for copy/scan, if the stains on
original cannot be removed completely.
Q.
A.
Dust attaches to background.
• The BACKGROUND REMOVAL is set to
smaller value.
➝ Set the BACKGROUND REMOVAL to larger
value (⇒ User’s Guide, Copy part).
• The SHARPNESS setting is too strong.
➝ Reduce the SHARPNESS setting (⇒ User’s
Guide, Copy part).
Moire occurs.
• When an image processing is executed,
regularly-arranged dots and lines overlap,
causing the moire.
➝ Change the original setting direction.
➝ Reduce the SHARPNESS setting (⇒ User’s
Guide, Copy part).
A.
➝ Change the ORIGINAL TYPE to TEXT/
PHOTO (⇒ User’s Guide, Copy part).
A fold of original appears on the copy/scan
result.
2
Q.
• The shadow of a fold is read.
➝ Open the scanner cover and change over the
levers on both sides toward the rear and then
retry to scan (⇒ page 19).
Q.
A.
➝ Change the original setting direction (turn 90°
and then retry to scan.
➝ Set the BACKGROUND REMOVAL to larger
value (⇒ User’s Guide, Copy part).
Blue print cannot be copied clearly.
• For a blue print original with dark
background and thin lines, it may not be
copied or scanned clearly only by setting
the original type to “Blue Print”.
➝ Set the contrast adjustment to BRIGHT.
(⇒ User’s Guide, Copy part).
Q.
A.
Back side of an original is seen through
original and copied/scanned.
• In case of a thin original, characters on
the back are seen through the original and
may be read.
➝ Set the BACKGROUND REMOVAL to larger
value (⇒ User’s Guide, Copy part).
Copy/scan cannot be performed satisfactorily
Q.
A.
LP-1020-MF/LP-1020L-MF
Q.
A.
Refer to User’s Guide for other symptoms and appropriate
measures.
Original jammed and copy/scan failed.
• A folded original or strongly curled original
causes a paper jam.
➝ Change the original setting direction.
➝ Use a carrier sheet.
21
● Maintenance
Panel messages used in this manual refer to those used in LP-1020/LP-1020L.
Kanji is also used in LP-1020-MF/LP-1020L-MF to improve the ease of reading messages.
Replacing the toner cartridge
When there is no more toner availabe, the Toner lamp will go
out, the Error lamp will come on, and plotting will no longer
be possible. The following message appears on the LCD.
Note
◆ If you move the toner cartridge from a cold to a
warm location, leave it in room temperature for
over three hours before using it.
◆ After replacing the toner, try to use it up within a
six month period. A toner cartridge installed for
an extended period of time will degrade the
drawing quality.
◆ Keep toner cartridges in a cool, dark place.
◆ Use only genuine toner cartridges.
Se t T o n e r Ca r t r i d g e
Op e n L e v e r
If the Toner lamp starts flashing or The ERROR message
appears, replace the toner according to the procedures
indicated below.
◆ When you open the toner door, you will find
a “Toner replacement” label affixed to the
inside surface. Refer to this when replacing
toner.
◆ After the Toner lamp starts flashing,
approximately 50 m of plots can be
produced at normal size and density.
◆Toner replacement procedures
Note
◆ Toner should be replaced only when the device
power is On.
If the toner is replaced while the power is Off, the
device will not be able to detect the amount of
toner and an error status will not be cancelled
even when toner has been replaced correctly.
◆ Replace toner after plotting finishes. Replacing
the toner during plotting may cause the operation
to stop and the plotting data to be lost.
Note
◆ If plots with a high printing rate—such as
drawings containing many solid print areas and
inversed (black and white inverted) drawings—
are printed just before the toner runs out, the
toner may be used up and the device may be
damaged.
To avoid such a case, refill toner as soon as
possible when the toner lamp is flashing.
Open the scanner cover.
Lift the scanner cover up to its stop position. Pull the
stopper towards the arrow direction and raise the
scanner cover. The scanner cover will be held.
◆Precautions on handling
(for LP-1020-MF only)
Warning
◆ Do not throw empty toner cartridges into fire.
Doing so may cause accident and fire.
Put the waste cartridge into the wrapping
contained in the toner cartridge package and
dispose of it as non-burnable garbage.
Caution
Remove the scanner exit guide.
◆ Do not drop and tap the toner cartridge with force.
Doing so may cause the toner to leak from the
cartridge.
◆ Do not directly touch the toner. If the toner gets
on your skin or clothing, quickly wash it off with
water.
◆ Take care not to get toner in your eyes or breathe
it in. If the toner gets in your eyes, wash your
eyes out with lots of water and consult your
physician.
(for LP-1020-MF only)
Lift and pull the guide toward the rear to remove while
the cover is open.
22
Close the scanner cover.
Set the toner cartridge into the main unit.
(for LP-1020-MF only)
While supporting the scanner cover with your right
hand, release the stopper in the middle with your left
hand and close the scanner cover slowly.
Pull the lever to the right end.
At this time, the following message appears on the
LCD. After performing the procedure
operation,
return the lever and remove the toner cartridge.
3
C L OS E L E V ER
REMOV E CAR TR I DGE
Maintenance
Slowly close the scanner cover completely until it
clicks.
If the above message does not appear, check to see that
the lever has been pulled up to the right end.
Open the toner cover.
Tap the cartridge to allow toner to drop down.
Take out the new toner cartridge from the
package.
Mix the toner by shaking the new toner
cartridge.
Return the lever to the left.
Shake it strongly up, down, left and right, five or six
times.
23
Remove the toner cartridge and close the
cover.
Close the scanner cover and attach the
scanner exit guide.
At this time, the following message appears on the
LCD.
(for LP-1020-MF only)
Follow procedures
reject guide.
to
and attach the original
WA I T A MOMEN T
Replacing the waste toner bottle
When the waste bottle becomes full with waste toner, the
Waste toner lamp will go out. The Error lamp will turn on
and plotting will not be possible. The following message
appears on the LCD.
Note
◆ Replace the waste bottle after plotting has been
completed.
If replacement is attemped during plotting, the
plotting data may be lost.
◆ The toner inside the waste bottle cannot be reused.
CHANGE
WAS T E BOT T L E
If the Waste toner lamp starts flashing or goes out, replace
the waste bottle in accordance with the procedures outlined
below.
◆Waste toner bottle replacement procedures
◆ A “Waste bottle replacement” label is affixed
to the side of the waste toner bottle. Refer to
this when replacing the waste bottle.
◆ Even after the Waste toner lamp starts
flashing, you should be able to produce
about 120 m of plots.
Take out a new waste toner bottle from its
package and remove the cap.
◆ This cap should be used to cover the waste
toner bottle which you are removing, so
keep it at hand. ⇒ procedure .
◆Precautions during replacement
Open the waste toner bottle door.
Warning
The waste bottle door is located at the right side of the
device.
Do not throw waste bottles containing waste
toner into fire. Doing so may cause an accident
and fire.
Dispose of waste bottles as non-burnable
garbage.
Remove the waste toner bottle from the main
unit.
1Lift up the waste bottle,
2Remove it by pulling it out from the bottom end
toward you.
Caution
◆ Do not drop and hit waste bottles containing
waste toner. Doing so may cause toner to leak.
◆ Take care not to directly contact the waste toner.
If the toner gets on your skin or clothing, quickly
wash it out with water.
◆ Take care not to get the waste toner into your
eyes or breathe it in.
If waste toner gets into your eyes, wash your
eyes out with plenty of water and consult a
physician.
24
When you have removed the waste toner bottle, the
LCD will display the following message.
Attach a new waste toner bottle.
1Insert the mouth of the waste toner bottle onto the
waste toner discharge port of the main unit by slightly
lifting it.
2Set it onto the bottom surface and position it so that
it is stable.
SET
WAS T E BOT T L E
Attach the cap to the waste toner bottle.
Attach the cap which you have removed in procedure
to the waste bottle containing waste toner.
New bottle
WA I T A MOMENT
Bottle containing waste toner
Dispose of the waste bottle containing waste toner as
non-burnable garbage.
3
Close the waste door.
Maintenance
After the following message appears, the device status
will return to the status before the waste bottle was
replaced.
Note
◆ Attach the cap securely as it may come off.
Replacing the process cartridge
When the Process cartridge approaches the end of its life, the
Process lamp flashes and the following message appears. It
is still possible to continue to produce plots in this condition,
but you must replace the cartridge soon.
SET
PROCE S S C AR T R I DGE
When the Process lamp flashes or goes out, follow the
procedures indicated below to replace the Process cartridge.
PR I N T R E ADY
RE P L ACE PROCE S S
◆Precautions during replacement
Note
◆ Above message may not appear in certain cases.
Warning
◆ Do not throw the process cartridge into fire.
Doing so may cause accident and fire.
Dispose of process cartridge as non-burnable
garbage.
If a new pocess cartridge is not installed soon, the Process
lamp goes out, Error lamp comes on and plotting becomes
impossible. The following error message appears on LCD.
25
Note
◆ Until you are ready to install the Process
cartridge, do not unpack it and store it in its
cardboard container.
◆ Firmly hold the handles on both sides with both
hands when handling the Process cartridge.
◆ Take care not to scratch the surface of the
photoconductor drum during handling.
◆ With the exception of the handle area, take care
to avoid contacting the surface of the
photoconductor drum.
◆ Except when you Install the Process cartridge
into the device body, keep the cover on the
Process cartridge to protect the photoconductor
drum and to prevent optical deterioration.
◆ Some black developing toner may be visible on
the photoconductor drum of a new Process
cartridge. This is to ensure that the cartridge is
kept in a ready-to-use condition at all times, so
you may use it as it is. After the cartridge is
mounted on the device body, cleaning will
automatically start so you need not worry about
the liquid affecting printing quality.
◆ Since waste toner remains in the used Process
cartridge, take care not to shake it strongly, tilt it
sharply, or hit it with force as this may cause
waste toner to spill out.
Place a new Process cartridge on the top
of the device.
1Remove the Process cartridge from the box together
with its protective case.
2Place the Process cartridge on the top of the device
together with the protective case.
Two types of filters for replacement use are contained
in the process cartridge packaging box. Replace the
filter after replacing the process cartridge.
Remove the orange tape.
Remove the orange tape affixed to the Process cartridge
(4 points).
A sheet is attached to the tape at (2 points) on the inside.
Remove the sheet together with the tape.
◆Process cartridge replacement procedures
Turn off the device power and open the top
cover.
Take out the Process cartridge.
Pull the Process cartridge out by holding onto its
handles.
Remove the Process cartridge from its
protective case.
While holding onto the handles, open the protective
case while pushing with your thumbs and remove the
Process cartridge from the protective case.
26
Insert the Process cartridge.
Replace the filter.
To insert the Process cartridge, align the Process
cartridge with the angle of the open top cover and insert
it in the direction of the alignment arrows (three points/
green).
After insertion, remove the protective cover from the
top of the cartridge.
Pull out the filters toward you and remove, and replace
with the two filters contained in the process cartridge
packaging box.
Maintenance
Attach the filter covers and turn ON the
device.
Close the top cover.
Remove the filter cover.
3
Pull out the filter covers at 2 points on the right side of
the main unit as it faces you, and remove them.
27
8, Nakase 1-chome, Mihamaku, Chiba-shi.
Chiba 261-8507, Japan
U00107692700
November 2007
Copyright © 2007 by Seiko I Infotech Inc.
All rights reserved
is a trademark of Seiko Instruments Inc.
This equipment has been tested and found to comply with the limits for a Class A digital device, pursuant to Part
15 of the FCC Rules. These limits are designed to provide reasonable protection against harmful interference
when the equipment is operated in a commercial environment.
This equipment generates, uses, and can radiate radio frequency energy and, if not installed and used in
accordance with the instruction manual, may cause harmful interference to radio communications. Operation of
this equipment in a residential area is likely to cause harmful interference in which case the user will be required
to correct the interference at his own expense.
Durch die Kennzeichnung dieses Produktes mit dem CE-Zeichen erklärt Seiko den folgenden Direktiven der
Europäischen Union zu entsprechen (mit Wirkung vom siehe Datum):
Januar 1996:- EG-Direktive 73/23/EEC ergänzt durch EG-Direktive 93/68/EEC, Angleichung der Gesetze der
einzelnen Mitgliedsstaaten bezüglich Geräten mit niedriger Betriebsspannung.
Januar 1996:- EG-Direktive 89/336/EEC, Angleichung der Gesetze der einzelnen Mitgliedsstaaten bezüglich
elektromagnetischer Kompatibilität.
Den vollständigen Text dieser Erklärung einschließlich der Definition der entsprechenden Direktiven sowie der
jeweiligen Standards erhalten Sie von Ihrem Seiko Colorgrafx Systems Kundendienst oder Ihrem Seiko
Engineering Systems Kundendienst.
This Perchlorate warnig applies ONLY in California USA
“Perchlorate Material - special handling may apply,
See www.dtsc.ca.gov/hazardouswaste/perchlorate”