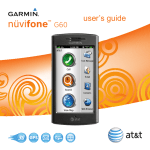
1
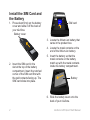
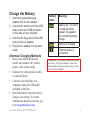
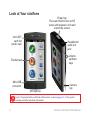
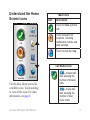
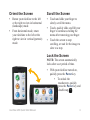
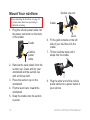
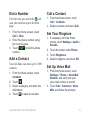
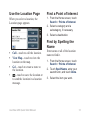
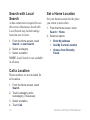
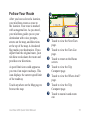
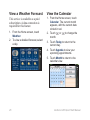
nüvifone™ G60
quick start manual
Install the SIM Card and
the Battery
1. Press down firmly on the battery
cover and slide it off the back of
your nüvifone.
Battery cover
2. Insert the SIM card in the
slot at the top of the battery
compartment. Insert the notched
corner of the SIM card first with
the gold contacts facing up. The
SIM card clicks into place.
SIM card
3. Locate the lithium‑ion battery that
came in the product box.
4. Locate the metal contacts on the
end of the lithium‑ion battery.
5. Insert the battery so that the
metal contacts on the battery
match up with the metal contacts
inside the battery compartment.
Battery
6. Slide the battery cover onto the
back of your nüvifone.
nüvifone G60 Quick Start Manual
Charge the Battery
1. Insert the appropriate plug
adapter into the AC adapter.
2. Connect the small end of the USB
cable to the mini-USB connector
on the side of your nüvifone.
3. Connect the large end of the USB
cable to the AC adapter.
4. Plug the AC adapter into a power
outlet.
Alternate Charging Methods
• Insert your nüvifone into the
cradle, and connect the vehicle
power cable to the cradle.
• Connect the vehicle power cable
to your nüvifone.
• Connect your nüvifone to a
computer using the USB cable
included in the box.
• Insert the battery into the battery
charger (accessory). For more
information about accessories, go
to www.garminasus.com.
nüvifone G60 Quick Start Manual
Battery
Icons
Meaning
Battery life. The more
colored bars that
appear, the greater
the remaining battery
charge.
Battery is charging.
External power is
connected.
Warning: This product contains a lithiumion battery. To prevent damage, remove the
device from the vehicle when exiting or store
it out of direct sunlight.
Look at Your nüvifone
microSD™
card slot
(under cap)
Power key:
Press and hold to turn on/off;
press and release to lock and
unlock the screen.
Headphone/
audio out
jack
Volume
up/down
keys
Touchscreen
Mini-USB
connector
Microphone
Camera
key
S ee the “Important Safety and Product Information” section on pages 31–41 for product
warnings and other important information.
nüvifone G60 Quick Start Manual
Understand the Home
Screen Icons
Main Icons
Icon
Description
Touch to make a phone
call.
Touch to search for
locations, including
restaurants, hotels, and
auto services.
Touch to view the map.
Call Status Icons
The nüvifone Home screen has
scrollable icons. Touch and drag
to view all the icons. For more
information, see page 6.
nüvifone G60 Quick Start Manual
—missed call
icon showing the
number of missed
calls.
—voice mail
icon showing the
number of new
voice mails.
Understand the Scrolling Screen Icons
Scrolling Icons
Icons
Application
Icons Application
Browse the web.
Use the camera.
Access text
messages.
Access the tools, such as
checklists and the alarm clock.
Access your e-mail
account(s).
Open Ciao!™.
Access your calendar.
Open the music player.
View weather
information for your
area.
Access the settings for your
phone.
Access your contacts.
Tips and Shortcuts
• Touch to return to the previous screen.
• To quickly return to the Home screen, touch and hold from any screen.
• Touch and to see more choices. Quickly tap these buttons to scroll
faster.
nüvifone G60 Quick Start Manual
Understand the Status Bar Icons
Icon
Description
Mobile signal strength. The more colored bars that appear, the
stronger the signal. A red “X” indicates no mobile signal strength.
Network connectivity. This icon appears when the nüvifone is
connected for Internet access. If the icon is white, the connection
is in use. If the icon is gray, your nüvifone is trying to establish the
data connection with the network. The connection type appears
next to the icon: G—GPRS (2.5), E—Edge (2.75), 3G—3G (3.0).
An alarm is set.
Wi-Fi® connectivity. This icon appears in place of the network
connectivity icon when the nüvifone is using Wi-Fi.
Current time. The time is based on the location of the device or the
selected time zone.
nüvifone G60 Quick Start Manual
Icons
Description
The nüvifone is connected to a device using Bluetooth® wireless
technology.
Bluetooth wireless technology is enabled. The nüvifone is not
connected to a device.
Satellite connectivity. The more colored bars that appear, the
stronger the satellite signal. If there is no satellite signal or the
nüvifone is in simulator mode, a red “X” appears.
Teletypewriter (TTY) mode is activated.
Battery charge. See page 3 for more information.
nüvifone G60 Quick Start Manual
Orient the Screen
• Rotate your nüvifone to the left
or the right to view in horizontal
(landscape) mode.
• From horizontal mode, rotate
your nüvifone to the left or the
right to view in vertical (portrait)
mode.
Scroll the Screen
• Touch and slide your finger to
slowly scroll the menu.
• Touch, quickly slide, and lift your
finger to continue scrolling the
menu after removing your finger.
• Touch the screen to stop
scrolling, or wait for the image to
slow to a stop.
Lock the Screen
NOTE: The screen automatically
locks after a set period of time.
• With your nüvifone turned on,
quickly press the Power key.
• To unlock the
touchscreen, quickly
press the Power key and
double-tap .
nüvifone G60 Quick Start Manual
Mount Your nüvifone
Before mounting the nüvifone, see page 34
for information about laws pertaining to
windshield mounting.
1. Plug the vehicle power cable into
the power connector on the back
of the cradle.
Cradle
Vehicle
power
cable
2. Remove the clear plastic from the
suction cup. Clean and dry your
windshield and the suction cup
with a lint-free cloth.
3. Place the suction cup on the
windshield.
4. Flip the lever back, toward the
windshield.
5. Snap the cradle onto the suction
cup arm.
10
Suction cup arm
Cradle
Lever
6. Fit the gold contacts on the left
side of your nüvifone into the
cradle.
7. Tilt the nüvifone back until it
snaps into the cradle.
8. Plug the other end of the vehicle
power cable into a power outlet in
your vehicle.
nüvifone G60 Quick Start Manual
Dial a Number
Call a Contact
The first time you touch the call
icon, the nüvifone opens the Dial
page.
1. From the Home screen, touch
Call > Contacts.
2. Select a contact, and touch Call.
1. From the Home screen, touch
Call (> Dial).
2. Enter the phone number using
the touch keypad.
3. Touch
to dial the phone
number.
Set Your Ringtone
Add a Contact
Your nüvifone can store up to 5,000
contacts.
1. From the Home screen, touch
Contacts.
2. Touch
.
3. Select a category, and enter the
information.
4. Touch
to save the contact.
nüvifone G60 Quick Start Manual
1. If necessary, from the Home
screen, touch Settings > Audio >
Sounds.
2. Touch the button under Phone.
3. Touch Ringtones.
4. Select a ringtone, and touch OK.
Set Up Voice Mail
1. From the Home screen, touch
Settings > Phone > Voice Mail
Number, and verify that your
voice mail number is correct.
2. Touch Call > Contacts > Voice
Mail, and follow the prompts.
11
Call Voice Mail
The voice mail icon appears on the
Home screen when you have new
voice mail.
Select one of following methods
to call your voice mail:
• Touch Call > Contacts >
Voice Mail.
• Touch Call > Dial, and touch
and hold “1.”
• Touch Contacts > Voice Mail.
Find an Address
NOTE: Depending on the version of
the built-in map data on your device,
the button names and the order of
steps could be different than the
steps below.
1. From the Home screen, touch
Search > Address.
2. Change the state, country, or
province, if necessary.
3. Select an option:
12
4.
5.
6.
7.
8.
• To search all cities, touch
Search All.
• To enter a city or postal code,
touch Spell City, enter the
city/postal code, and touch
Done. Select the city/postal
code in the list. (Not all map
data provides postal code
searching.)
Enter the number of the address,
and touch Done.
Enter the street name, and touch
Done.
Select the correct street in the list,
if necessary.
Touch the address, if necessary.
Touch Go! to create a route to the
address.
nüvifone G60 Quick Start Manual
Use the Location Page
When you select a location, the
Location page appears.
Find a Point of Interest
1. From the Home screen, touch
Search > Points of Interest.
2. Select a category and a
subcategory, if necessary.
3. Select a destination.
Find by Spelling the
Name
• Call—touch to call the location.
• View Map—touch to view the
location on the map.
• Go!—touch to create a route to
the location.
•
—touch to save the location or
to send the location in a location
message.
nüvifone G60 Quick Start Manual
Enter some or all of the location
name to find it.
1. From the Home screen, touch
Search > Points of Interest.
2. Touch Spell Name, enter your
search term, and touch Done.
3. Select the item you want.
13
Search with Local
Search
A data connection is required to use
this service. Businesses listed with
Local Search may include ratings
based on user reviews.
1. From the Home screen, touch
Search > Local Search.
2. Select a category.
3. Select a location.
NOTE: Local Search is not available
in all areas.
Set a Home Location
Set your home location for the place
you return to most often.
1. From the Home screen, touch
Search > Home.
2. Select an option:
• Enter My Address
• Use My Current Location
• Choose from Recently
Found
Call a Location
Phone numbers are not included for
all locations.
1. From the Home screen, touch
Search.
2. Touch a category and a
subcategory, if necessary.
3. Select a location.
4. Touch Call.
14
nüvifone G60 Quick Start Manual
Follow Your Route
After you have selected a location,
your nüvifone creates a route to
the location. Your route is marked
with a magenta line. As you travel,
your nüvifone guides you to your
destination with voice prompts,
arrows on the map, and directions
at the top of the map. A checkered
flag marks your destination. If you
depart from the original route, your
nüvifone recalculates the route and
provides new directions.
➊
➐
➎
➌ ➍
➏
➊ Touch to view the Next Turn
➋
➌
A speed limit icon could appear as
you travel on major roadways. This
icon displays the current speed limit
of the roadway.
➍
Touch anywhere on the Map page to
browse the map.
➏
nüvifone G60 Quick Start Manual
➋
➎
➐
page.
Touch to view the Turn List
page.
Touch to return to the Home
screen.
Touch to view the Trip
Computer page.
Touch to view the Where Am I?
page.
Touch to view the Trip
Computer page.
Touch to zoom in and zoom
out.
15
Add a Stop
1. While navigating a route, touch
> Search.
2. Search for the extra stop.
3. Touch Go!.
4. Touch Add As a Via Point to
add this stop before your final
destination.
Take a Detour
1. While navigating a route, touch
.
2. Touch Detour.
Send a Text Message
1. From the Home screen, touch
Text Message > New Message.
2. Touch anywhere in the To: box to
enter recipient information.
3. Touch Use Dial Pad to enter the
phone number of the recipient,
or touch Add Contact to select a
contact as the recipient.
16
4. Touch anywhere in the Message:
box to enter a message.
5. Enter a message, and touch
Done.
6. Touch Send.
Read a Text Message
When you receive a text message, a
number icon appears next to the Text
Message icon on the Home screen.
1. From the Home screen, touch
Text Message.
2. Touch the conversation to read
the text message.
3. Touch Reply to compose a reply
to the message.
nüvifone G60 Quick Start Manual
Send a Location
Message
Location messages contain text and
GPS information that other nüvifone
users can view. Non-nüvifone users
receive a plain text message with
location information.
NOTE: Use caution when sharing
your location information with
others.
1. From the Home screen, touch
Text Message > New Message.
2. Touch
> Insert Location.
3. Select a location.
4. Select a recipient.
5. Enter a message, if necessary.
6. Touch Send.
nüvifone G60 Quick Start Manual
Set Up E-Mail
1. From the Home screen, touch
E-mail.
2. Touch Add Account.
3. Enter the e-mail address, and
touch Done.
4. Enter the e-mail username (if
necessary), and touch Done.
5. Enter the e-mail password, and
touch Done.
6. If prompted, follow the prompts to
enter e-mail account information
from your e-mail account provider.
7. If necessary, touch Mail Settings
or SMTP Settings, and enter the
e-mail account information.
8. Touch Test Settings to test the
account settings.
9. Touch Save to save the account
settings.
17
Send an E-Mail Message
1. From the Home screen, touch
E-mail.
2. Touch Compose.
3. If necessary, touch From: to
select the e-mail account from
which you want to send the e-mail
message. If you do not select
an e-mail account, the e-mail
message will be sent from the
default e-mail account.
4. Touch To: to enter recipient
information.
5. Touch the corresponding boxes
to enter a subject and to add an
attachment.
6. Touch Message, enter the
message, and touch Done.
7. Touch Send.
18
Check E-mail Messages
1. From the Home screen, touch
E-mail.
2. Touch
> Check E-mail.
3. Select an e-mail message to view
it.
4. Touch Reply or Reply All to
write a response. Touch Forward
to send the e-mail message to
another recipient.
nüvifone G60 Quick Start Manual
Transfer Files
You can transfer files, such as MP3s
and JPEGs, to your nüvifone.
1. If necessary, insert a microSD
card in the memory card slot on
the side of the nüvifone.
2. Connect the mini-USB cable to
the mini-USB connector on the
nüvifone. Connect the other end
of the cable to your computer.
3. Touch Yes to change to mass
storage mode.
Two additional drives (volumes)
appear in the list of drives on your
computer. One is the available
storage in the internal memory
of the nüvifone. The other is the
memory card inserted into the
nüvifone.
4. Double-click the My Computer
icon (Windows® computers) or
the mounted-volume icon (Mac®
computers) on your computer.
nüvifone G60 Quick Start Manual
5. Copy and paste the files you want
to transfer (Windows computers),
or click and drag the files to the
drive (Mac computers.)
Play a Song
1. From the Home screen, touch
Music Player.
2. Touch .
3. Select a category.
4. Select an option:
• Select a song or playlist.
The selected song or playlist
begins playing.
• Touch
> All Songs. All the
songs in the selected category
are added to the current
playlist.
19
Create a Playlist
1. From the Home screen, touch
Music Player.
2. Touch .
3. Touch Playlists > New Playlist.
4. Select a category.
5. Select songs to add to the
playlist, or touch
> Select All
Songs to add all songs.
6. Touch OK. The playlist is saved
with a generic name (for example,
“Playlist 1”).
Playlists are saved as .m3u files on
the nüvifone.
Take a Picture
1. Press the Camera key.
2. Press the Camera key halfway
to focus on the object. A green
box appears on the screen. Your
nüvifone focuses on the object
inside of the box.
3. Press and hold the Camera key
until you hear the camera click.
The picture is saved.
View a Picture
1. Press the Camera key.
2. Touch .
3. Select a picture.
Touch the arrows to view additional
pictures.
20
nüvifone G60 Quick Start Manual
Use Bluetooth® Wireless
Technology
3. Touch Add Device. An hourglass
icon appears, indicating that the
nüvifone is scanning for devices.
If you do not see an hourglass
icon, touch Scan to scan.
4. Select the device you want to
add, and touch Yes.
5. Enter the passkey of the device,
and touch OK.
1. From the Home screen, touch
Settings > System > Bluetooth.
2. Touch Bluetooth Off.
3. Touch On > OK.
NOTE: The passkey for the
nüvifone is 1234.
Your nüvifone can be paired with
other devices using Bluetooth
wireless technology. You must
activate Bluetooth technology on
your nüvifone before pairing with
another device.
Pair with a Device
The first time you use two devices
together, you must “pair” them by
establishing a relationship using a
PIN/passkey.
1. Verify that the device you want to
pair with is in pairing mode.
2. On the nüvifone Home screen,
touch Settings > System >
Bluetooth.
nüvifone G60 Quick Start Manual
Connect to a Paired Device
You must pair with a device before
you are able to connect to it.
1. From the Home screen, touch
Settings > System > Bluetooth.
2. Select a paired device, and touch
Connect Device.
21
Synchronize Your
nüvifone
By synchronizing your nüvifone
with your computer, you can transfer
your Microsoft® Outlook® contacts
and calendar events to your nüvifone
contact list and calendar.
See your owner’s manual for more
information on downloading and
installing nüvifone Sync Agent.
1. Verify that you have downloaded
and installed nüvifone Sync Agent
software on your computer.
2. Connect the mini-USB cable to
the mini-USB connector on the
nüvifone. Connect the other end
of the cable to your computer.
3. Touch No when asked if you want
to enter mass storage mode.
4. Touch Tools > Synchronize.
22
Use Wi-Fi®
1. From the Home screen, touch
Settings > System > Wi-Fi.
2. Touch Wi-Fi Off.
3. Touch On > OK.
4. Select a network. indicates
networks that require an
encryption key.
5. Enter an encryption key, if
necessary, and touch Done.
6. Touch Connect.
Use the Web Browser
1. From the Home screen, touch
Web Browser.
2. Touch .
3. Enter a URL, and touch Done.
nüvifone G60 Quick Start Manual
page in your history.
Web Browser Icons
Use the following icons when
browsing the Internet.
—zoom in on the center of
the screen.
—zoom out from the center
of the screen.
—return to the Home screen.
—refresh the current Web
page.
—stop loading the Web page.
Tips for Browsing the Web
• Touch and drag the screen to
scroll a Web page.
• Touch links, text-entry boxes, and
other interactive items to activate
them.
Use Traffic
This service is available as a paid
subscription. A data connection is
required for this feature.
When you are receiving traffic
information, the traffic icon
appears in the upper-left corner of
the Map page. The icon changes
color to indicate the severity of
traffic conditions on your route or on
the road you are currently traveling.
—enter a URL.
—traffic is flowing freely.
—return to the previous Web
—moderate traffic congestion.
nüvifone G60 Quick Start Manual
23
—very slow or stop-and-go
traffic.
NOTE: Traffic information and
delay times are not available in all
areas. For more information, go to
www.garminasus.com.
Use Ciao!
Ciao! helps you keep track of your
friends. It works by periodically
sending your location to our partner
networks and by downloading the
most recent location of your friends.
This application will only submit
your location when you tell it to,
unless you enable automatic updates.
Register with Ciao!
Before you join Ciao! for the first
time, you must register your device.
1. From the Home screen, touch
Ciao!.
2. Read and accept the on-screen
messages.
3. Touch Register. The Web
browser launches.
4. Follow the steps to register your
nüvifone. After registering, you
receive an SMS/text message for
verification.
5. Open the SMS/text message,
and click the link to complete the
verification process.
Ciao! is not available in all areas.
NOTE: Use caution when sharing
your location information with
others.
24
nüvifone G60 Quick Start Manual
Join Ciao!
After you register your device, you
can join Ciao!.
1. From the Home screen, touch
Ciao!.
2. Read and accept the registration
information.
3. Select a location update, Manual
or Automatic.
4. Enter a display name, and touch
Done.
5. Touch Complete. Your location is
updated and sent to your friends.
Invite a Friend
1. From the Home screen, touch
Ciao! > Invite.
2. Select an option to enter a phone
number.
3. Touch the button under Friend’s
Country, and select a country.
4. Touch Send Invitation.
nüvifone G60 Quick Start Manual
5. Select the network your friend is
using. If your friend is using Ciao!,
you can select any network in the
list. Touch OK.
Accept an Invitation
When you receive an invitation, a
message appears on the screen.
1. Touch OK or Yes.
2. Select the invitation in your list of
friends.
3. Touch Accept.
4. Touch Yes to allow the sender to
view your location. The sender’s
location information appears.
5. Touch Go! to create a route to the
sender’s location, or touch Map to
view the sender’s location on the
map.
25
View a Weather Forecast
This service is available as a paid
subscription. A data connection is
required for this feature.
1. From the Home screen, touch
Weather.
2. To view a detailed forecast, select
a day. 26
View the Calendar
1. From the Home screen, touch
Calendar. The current month
appears, with the current date
circled in red.
2. Touch
or
to change the
month.
3. Touch Today to return to the
current day.
4. Touch Agenda to view your
upcoming appointments.
5. Touch Month to return to the
calendar view.
nüvifone G60 Quick Start Manual
Schedule an
Appointment
1. From the Home screen, touch
Calendar.
2. Touch
or
to change the
month.
3. Select the date on the calendar,
and touch New.
4. Touch Subject, and enter a
subject.
5. Touch Location, and select an
option.
6. Select a start time and an end
time.
7. Touch Reminder, and select a
time.
8. Select how often you want the
appointment to recur:
nüvifone G60 Quick Start Manual
• Touch Repeat, and select an
option.
• Touch Repeat End, and
select the date on which you
want the appointment to stop
recurring.
9. Touch Notes, and enter a note.
10.Touch Save.
Register Your Product
Register your product at
www.garminasus.com/support to
help us better support you. Keep the
original sales receipt, or a photocopy,
in a safe place.
27
Care for Your Device
• Avoid dropping your device and
operating it in high-shock and highvibration environments.
• Do not expose the device to water.
Contact with water can cause this
device to malfunction.
• Do not store the device where
prolonged exposure to extreme
temperatures can occur, because it can
cause permanent damage.
• Never use a hard or sharp object to
operate the touchscreen, or damage
may result. Though a stylus can be
used to operate the touchscreen, never
attempt this while operating a vehicle.
• To help avoid theft, remove the device
and mount from sight when not in use.
Remove the residue on the windshield
left by the suction cup.
28
nüMaps Guarantee™
To receive one free map update (if
available), register your nüvifone at
www.garminasus.com/support within
60 days of acquiring satellites and
driving with your nüvifone. You are
not eligible for the free map update if
you register by phone or wait longer
than 60 days after the first time you
drive with your nüvifone.
Update the Software
Go to www.garminasus.com/support
to download the latest software
update.
Get Support
Go to www.garminasus.com/support
and click Support for in-country
support information.
nüvifone G60 Quick Start Manual
Troubleshooting
Problem/Question
Solution/Answer
My nüvifone will not
acquire satellites.
• Ensure that the GPS simulator is turned off.
From the Home screen, touch Settings >
System > General > GPS Simulator > Off.
• Ensure that you are receiving satellite
signals. From the Home screen, touch View
Map.
Touch the vehicle icon.
Touch
> Satellite Info.
• Verify that the GPS antenna is unobstructed.
You must be outdoors or in a vehicle and
have a clear view of the sky. Solid materials
(except untinted glass), buildings, and dense
trees can block satellite signals.
• Ensure that the GPS has enough time to
initialize. When the GPS is turned on for
the first time, it may take a few minutes to
initialize.
My nüvifone will not turn
on.
• Charge the battery.
• Replace the battery. See your owner’s
manual for more information.
nüvifone G60 Quick Start Manual
29
Problem/Question
Solution/Answer
I need to turn off the
wireless features of my
nüvifone (for example,
for an airplane flight).
From the Home screen, touch Settings >
System > General > Airplane Mode > On.
I am trying to charge
my nüvifone, but I
receive a message that
battery charging was
suspended.
The battery might have exceeded the maximum
charging temperature. If the nüvifone is
mounted, remove it from the mount and place it
somewhere out of direct sunlight.
30
nüvifone G60 Quick Start Manual
Important Safety and Product Information
Warnings
Failure to avoid the following
potentially hazardous situations
could result in an accident or collision
resulting in death or serious injury.
General Device Warnings:
• When installing the device in a
vehicle, place the device securely
so it does not obstruct the driver’s
view of the road or interfere with
vehicle operating controls, such as
the steering wheel, foot pedals, or
transmission levers. Do not place in
front of or above any airbag.
• Do not become distracted by the
device while driving, and always
be fully aware of all driving
conditions.
nüvifone G60 Quick Start Manual
• Always operate the vehicle in a safe
manner.
• Minimize the amount of time spent
viewing the device’s screen while
driving and use voice prompts when
possible.
• Do not send text messages, place
or receive phone calls, input
destinations, change settings, or
access any functions requiring
prolonged use of the device’s controls
while driving. Pull over in a safe and
legal manner before attempting such
operations.
• Check and follow local laws
regarding device usage.
31
Navigation Warnings:
• When navigating, carefully compare
information displayed on the device
to all available navigation sources,
including information from street
signs, visual sightings, and maps.
For safety, always resolve any
discrepancies or questions before
continuing navigation and defer to
posted road signs.
Warning: This product, its packaging,
and its components contain chemicals
known to the State of California to cause
cancer, birth defects, or reproductive
harm. This notice is provided in
accordance with California’s Proposition
65. See www.garmin.com/prop65 for
more information.
Battery Warnings
If these guidelines are not followed,
the internal lithium-ion battery may
experience a shortened life span or may
present a risk of damage to the GPS
32
• The device is designed to provide
route suggestions. It is not designed
to replace the need for driver
attentiveness regarding road closures
or road conditions, traffic congestion,
weather conditions, or other factors
that may affect safety while driving.
device, fire, chemical burn, electrolyte
leak, and/or injury.
• Do not leave the device exposed to a
heat source or in a high temperature
location, such as in the sun in an
unattended vehicle. To prevent damage,
remove the device from the vehicle or
store it out of direct sunlight, such as in
the glove box.
• Do not puncture or incinerate.
nüvifone G60 Quick Start Manual
• When storing the device for an
extended time, store within the
following temperature range: 5°F to
140°F (from -15°C to 60°C).
• Do not operate the device outside of
the following temperature range: 5°F to
131°F (from -15°C to 55°C).
• Contact your local waste disposal
department to properly recycle/dispose
of the device/battery.
Additional User-replaceable Battery
Warnings:
• Do not use a sharp object to remove
the battery.
• Keep the battery away from children.
• Do not disassemble, puncture, or
damage the battery.
• If using an AC charger or external
battery charger, only use the accessory
approved for your product.
nüvifone G60 Quick Start Manual
• Only replace the battery with the
correct replacement battery. Using
another battery presents a risk of fire or
explosion. To purchase a replacement
battery, see your Garmin or ASUS
dealer or the Garmin-Asus Web site.
Additional Non-user-replaceable
Battery Warnings:
• Do not remove or attempt to remove
the non-user-replaceable battery.
• When disposing of the device, take it to
a professional service, such as a waste
electronics treatment facility, to have
the battery removed and recycled.
Important Information
The California Electronic Waste
Recycling Act of 2003 requires the
recycling of certain electronics. For more
information on the applicability to this
product, see www.erecycle.org.
33
Map Data Information: One
of the goals of Garmin and ASUS is
to provide customers with the most
complete and accurate cartography that
is available to us at a reasonable cost. We
use a combination of governmental and
private data sources, which we identify
in product literature and copyright
messages displayed to the consumer.
Virtually all data sources contain some
inaccurate or incomplete data. In some
countries, complete and accurate map
information is either not available or is
prohibitively expensive.
NOTICE REGARDING
WINDSHIELD MOUNTING LEGAL
RESTRICTIONS: Before using the
suction cup mount on your windshield,
check the state and local laws and
ordinances where you drive. Some
state laws prohibit drivers from using
suction mounts on their windshields
while operating motor vehicles. Other
state laws allow the suction mount to
be located only in specific locations
on the windshield. Many other states
have enacted restrictions against
34
placing “non-transparent material”
on the windshield or placing objects
on the windshield in locations that
obstruct the driver’s vision. It is the
user’s responsibility to
use the GARMIN-ASUS device
and mounting options in
such a manner that the
user is in compliance with
all applicable laws and
ordinances. Where required, other
Garmin-Asus dashboard or friction
mount options should be used to comply
with state and local laws and ordinances.
Always mount your Garmin-Asus device
in a location that does not obstruct the
driver’s view of the road. Garmin and
ASUS do not assume any responsibility
for any fines, penalties, or damages
that may be incurred as a result of
disregarding this notice or as a result
of any state or local law or ordinance
relating to the use of your Garmin-Asus
device.
nüvifone G60 Quick Start Manual
Avoid Hearing Damage
You can permanently damage your
ears and lose hearing if you listen to
the receiver, earbuds, headphones, or
headsets at high volume.
Turn the volume down. The volume is
typically too loud if you cannot hear
people speaking around you. Limit
the amount of time you listen at high
volume.
If you experience ringing in your ears or
muffled speech, stop listening and have
your hearing checked.
Avoid Repetitive Motion
You may experience occasional
discomfort in your hands, arms,
shoulders, neck, or other parts of your
body if you perform repetitive activities,
such as typing or playing games, on the
device.
Take frequent breaks. If you have
discomfort while or after using the
device, stop using and see a physician.
nüvifone G60 Quick Start Manual
Avoid Seizures, Blackouts,
and Eyestrain
A very small percentage of people can
experience seizures or blackouts caused
by light flashes or patterns, such as while
watching videos or playing games.
If you have experienced, or have a family
history of, seizures or blackouts, consult
a physician before playing games or
watching videos on your device.
Follow these guidelines to reduce the risk
of blackouts, seizures, and eyestrain:
• Avoid prolonged use of and take
frequent breaks from using the device.
• Hold the device away from your eyes.
• Use the device in a well-lit room.
If you experience convulsions, eye or
muscle twitching, loss of awareness,
involuntary movement, or disorientation,
stop using the device and consult a
physician.
35
Pacemakers and Other
Medical Devices
Studies have shown that there may be
a potential interaction between mobile
phones and normal pacemaker operation.
The pacemaker industry recommends
that people with pacemakers follow
these guidelines to minimize any risk of
interference with pacemaker operation:
• Always maintain a distance of 15 cm
(6 inches) between the pacemaker and
any mobile phone that is turned on.
• Store the phone on the opposite side of
the pacemaker. Do not carry the phone
in a breast pocket.
• Use the ear furthest from the
pacemaker in order to minimize any
potential for interference.
• If you think that interference may
be occurring, turn off the phone
immediately.
36
For other medical devices, consult with
your physician or the manufacturer
to determine if your mobile phone
may interfere with the device, and to
determine any precautions that you can
take to avoid interference.
Radio Frequency Exposure/
Specific Absorption Rate
This device is a transmitter and
receiver that uses its antenna to
send and receive low levels of radio
frequency (RF) energy for voice and
data communications. When in portrait
mode, the cellular antenna is located
along the bottom edge on the back of
the device. The Wi-Fi® and Bluetooth®
technology antenna is located between
the camera lens and the volume keys.
Regular review of scientific research
and studies has led to the formation
of international safety guidelines and
regulations regarding limiting exposure
to this RF energy. This product emits RF
energy below the published limits when
operating in its maximum output power
mode and when used with Garminnüvifone G60 Quick Start Manual
Asus authorized accessories. In normal
operation, the device will operate at even
lower output power modes, depending
on many factors including proximity to
network cellular towers and the absence
of external interference.
The RF exposure guidelines use a unit
of measurement known as the specific
absorption rate, SAR. The SAR limit
applicable to this device set by the FCC
is 1.6 watts per kilogram (W/kg), 1.6
W/kg by Industry Canada, and 2.0 W/kg
by the Council of the European Union.
This device has been tested and is in
compliance with international SAR
Exposure limits. The actual measured
values are as follows:
GSM 900: 0.74 W/kg
GSM 1800: 0.588 W/kg
UMTS 2100: 0.838 W/kg
To be sure that your exposure to RF
energy does not exceed the FCC and
European Union guidelines, follow these
precautions:
nüvifone G60 Quick Start Manual
• Position the device antenna at least 15
mm (5/8 inch) from your body.
• Only use the device with GarminAsus approved accessories. Only use
accessories that do not have metal parts
and that maintain at least 15 mm (5/8
inch) separation between the device
and your body.
FCC Compliance
This device complies with part 15 of the
FCC Rules. Operation is subject to the
following two conditions: (1) this device
may not cause harmful interference,
and (2) this device must accept any
interference received, including
interference that may cause undesired
operation.
This equipment has been tested and
found to comply with the limits for
a Class B digital device, pursuant to
part 15 of the FCC rules. These limits
are designed to provide reasonable
protection against harmful interference in
a residential installation. This equipment
generates, uses, and can radiate radio
frequency energy and may cause harmful
37
interference to radio communications
if not installed and used in accordance
with the instructions. However, there
is no guarantee that interference will
not occur in a particular installation.
If this equipment does cause harmful
interference to radio or television
reception, which can be determined by
turning the equipment off and on, the
user is encouraged to try to correct the
interference by one of the following
measures:
• Reorient or relocate the receiving
antenna.
• Increase the separation between the
equipment and the receiver.
• Connect the equipment into an outlet
that is on a different circuit from the
GPS unit.
• Consult the dealer or an experienced
radio/TV technician for help.
This product does not contain any
user-serviceable parts. Repairs should
only be made by an authorized Garmin
service center. Unauthorized repairs or
modifications could result in permanent
38
damage to the equipment, and void your
warranty and your authority to operate
this device under Part 15 regulations.
Industry Canada Compliance
Category I radiocommunication
devices comply with Industry Canada
Standard RSS-210. Category II
radiocommunication devices comply
with Industry Canada Standard RSS-310.
Declaration of Conformity
Hereby, Garmin and ASUS declare that
this product is in compliance with the
essential requirements and other relevant
provisions of Directive 1999/5/EC. To
view the full Declaration of Conformity,
see www.garminasus.com/declaration-of
-conformity.
nüvifone G60 Quick Start Manual
Limited Warranty
This Garmin-Asus product is warranted
to be free from defects in materials
and workmanship under normal use
per the terms outlined herein for the
term of 1 year starting from the date of
retail purchase by the original end-user
purchaser (collectively the “Warranty
Period”). THIS WARRANTY DOES
NOT AFFECT YOUR STATUTORY
RIGHTS.
Within the relevant Warranty Period,
Garmin and/or ASUSTeK Computer,
Inc. (“Asus”) will, at its sole option,
either repair or replace any components
that fail in normal use. Such repairs or
replacement will be made at no charge to
the customer for parts or labor, provided
that the customer shall be responsible for
any transportation cost. A replacement
product or part assumes the remaining
Warranty Period of the original product
or ninety (90) days from the date of
replacement or repair, whichever
provides longer coverage for you. When
a product or part is exchanged, any
nüvifone G60 Quick Start Manual
replacement item becomes your property
and the replaced item becomes Garmin’s
or Asus’ property as the case may be.
Exclusions and Limitations
This Limited Warranty applies only to
the hardware product manufactured by or
for Garmin or Asus that can be identified
by the Garmin-Asus logo affixed to it.
Software distributed by Garmin or Asus
with or as part of the product (including
system software) is not covered under
this Limited Warranty and is instead
covered by the accompanying End User
License Agreement.
Neither Garmin nor Asus warrants
that the operation of the product will
be uninterrupted or error-free, nor is
Garmin or Asus responsible for damage
arising from failure to follow product
instructions. In addition, this warranty
does not apply to: (i) cosmetic damage,
such as scratches, nicks and dents; (ii)
consumable parts, such as batteries,
unless product damage has occurred due
to a defect in materials or workmanship;
(iii) damage caused by use of the product
39
with non Garmin-Asus products; (iv)
damage caused by accident, abuse,
misuse, water, flood, fire, or other acts
of nature or external causes; (v) damage
caused by service performed by anyone
who is not an authorized service provider
of Garmin or Asus; or (iv) damage to a
product that has been modified or altered
without the written permission of Garmin
or Asus.
TO THE MAXIMUM EXTENT
PERMITTED BY APPLICABLE LAW,
THE WARRANTIES AND REMEDIES
CONTAINED HEREIN ARE
EXCLUSIVE AND IN LIEU OF ALL
OTHER WARRANTIES, WHETHER
ORAL, WRITTEN, EXPRESS,
IMPLIED, OR STATUTORY,
INCLUDING, WITHOUT
LIMITATION, ANY LIABILITY
ARISING UNDER ANY WARRANTY
OF MERCHANTABILITY OR
FITNESS FOR A PARTICULAR
PURPOSE. IN NO EVENT SHALL
GARMIN OR ASUS BE LIABLE
FOR ANY DIRECT, SPECIAL,
INCIDENTAL, INDIRECT, OR
40
CONSEQUENTIAL DAMAGES,
WHETHER RESULTING FROM THE
USE, MISUSE, OR INABILITY TO
USE THIS PRODUCT OR FROM
DEFECTS IN THE PRODUCT
OR FROM ANY BREACH OF
WARRANTY OR OTHER LEGAL
THEORY.
Some states, provinces or countries do
not allow the exclusion of incidental or
consequential damages, so the above
limitations may not apply to you. This
warranty gives you specific legal rights,
and you may also have other rights
that vary by country, state or province.
This limited warranty is governed by
and construed under the laws of the
country in which the product purchase
took place. If any term is held to be
illegal or unenforceable, the legality or
enforceability of the remaining terms
shall remain valid and shall not be
affected.
nüvifone G60 Quick Start Manual
Garmin and/or Asus retains the exclusive
right to repair, have repaired or replace
(with a new or newly-overhauled
replacement product) the product or
component parts or offer a full refund of
the purchase price at its sole discretion.
SUCH REMEDY SHALL BE YOUR
SOLE AND EXCLUSIVE REMEDY
FOR ANY BREACH OF WARRANTY.
When a refund is given, the product for
which the refund is provided must be
returned to Garmin or Asus and becomes
Garmin-Asus property.
Obtaining Warranty Service
To obtain warranty service visit
www.garminasus.com/support/warranty
for specific instructions on where and
how to return your Garmin-Asus product
for warranty service if it is still eligible
for warranty coverage. Garmin-Asus may
restrict warranty service to the country
in which Garmin-Asus or its authorized
dealers originally sold the product. An
original or copy of the product sales
receipt from the original retailer is
required to obtain warranty service.
nüvifone G60 Quick Start Manual
Online Auction Purchases
Products sold through online auctions
are not eligible for warranty coverage
or protection from Garmin and/or Asus.
Online auction confirmations are not
accepted for warranty verification.
41
For the latest free software updates (excluding map data) throughout the life of
your nüvifone, visit www.garminasus.com.
The combined Garmin/Asus logo is a trademark of Garmin Ltd. and ASUSTek Computer, Inc.
Garmin® is a trademark of Garmin Ltd. or its subsidiaries, registered in the USA and other countries.
Ciao!™, nüMaps Guarantee™, and nüvifone™ are trademarks of Garmin Ltd. or its subsidiaries. These
trademarks may not be used without the express permission of Garmin.
The Bluetooth® word mark and logos are owned by the Bluetooth SIG, Inc., and any use of such marks
by Garmin is under license. Microsoft®, Windows®, and Outlook® are registered trademarks of Microsoft
Corporation in the United States and/or other countries. Mac® is a registered trademark of Apple
Computer, Inc., registered in the U.S. and other countries. microSD™ is a trademark of SanDisk or its
subsidiaries. Wi-Fi® is a registered mark of the Wi-Fi Alliance.
Information on this product’s compliance with the European Union regulation 1907/2006 (Registration,
Evaluation, Authorisation, and Restriction of Chemicals) may be found at http://green.asus
.com/english/REACH.htm.
© 2009 Garmin Ltd. or its subsidiaries and ASUSTek Computer, Inc.
0682
15G06A469000
October 2009
Part Number 190-01118-01 Rev. B
Printed in China
October 2009
Part Number 190-01118-01 Rev. B
15G06A469000
Printed in China