1
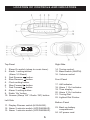
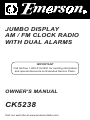
JUMBO DISPLAY
AM / FM CLOCK RADIO
WITH DUAL ALARMS
IMPORTANT
Call toll-free 1-800-210-2281 for exciting information
and special discounts on Extended Service Plans.
OWNER'S MANUAL
CK5238
Visit our web site at www.emersonradio.com
Thank you for purchasing this Emerson Jumbo Display AM/FM Clock Radio
with Dual Alarms.
The extra large 1.8” green display is designed to be highly visible and easily
readable from anywhere in your room. And in spite of the extra large size display
we have managed to minimize the cabinet size so that the radio won’t take up too
much space on your night table.
The dual alarms can be set and used independently. And since there are two
separate Radio/Buzzer selector switches, you can set one alarm to wake you to
buzzer and the other to wake you to radio if your wish. All of the controls are easy
to see and easy to use. The radio dial has a lighted dial pointer for easy night time
tuning. The clock has fast and slow, forward or backward setting controls for
quick and easy adjustments.
The Sure-Alarm battery back up system will remember the time and alarm settings
of course, but it can do more than that. As long as there is a fresh 9-volt battery
installed, the Sure-Alarm system will operate the radio or buzzer alarm to wake
you up even if the power is off at your normal wake up time.
We have taken great care to make sure that your radio was in perfect working
order when it left our factory. It has been designed to give you many years of
enjoyment and trouble free operation. Should you experience any problems with
the operation or performance of this product please refer to the service and
warranty information at the end of this instruction manual.
Once again, from all of us at Emerson Radio Corp., thanks for your purchase.
For future reference, record the serial number in the space provided.
Serial Number:
1
IMPORTANT NOTES
CAUTION
RISK OF ELECTRIC SHOCK
DO NOT OPEN
CAUTION: TO REDUCE THE RISK OF ELECTRIC SHOCK,
DO NOT REMOVE COVER (OR BACK). NO USER
SERVICEABLE PARTS INSIDE. REFER SERVICING TO
QUALIFIED SERVICE PERSONNEL.
Avoid installing the unit in locations described below:
• Places exposed to direct sunlight or close heat radiating appliances such as electric
heaters.
• Dusty places.
• Places subject to constant vibration.
• Humid or moist places.
WARNING: TO PREVENT FIRE OR SHOCK HAZARD,
DO NOT EXPOSE THIS UNIT TO RAIN OR MOISTURE.
DANGEROUS VOLTAGE
Uninsulated Dangerous Voltage, that may be of sufficient
magnitude to constitute a risk of electric shock to persons is
present within this product's enclosure.
ATTENTION
The Owner's Manual contains important operating and
maintenance instructions.
For your safety, it is necessary to refer to the manual.
This device complies with part 15 of the FCC rules. Operation is subject to the
condition that this device does not cause harmful interference.
2
PREPARATION FOR USE
UNPACKING AND SET UP
• Remove the radio from the carton and remove all packing material from the
radio. We suggest that you save the packing material, if possible, in the unlikely
event that your radio ever needs to be returned for service. The original carton
and packing material is the only safe way to pack your radio to protect it from
damage in transit.
• Remove any descriptive labels or stickers on the front or top of the cabinet. Do
not remove any labels or stickers from the back or bottom of the cabinet.
• Note the serial number on the bottom of your radio and write this number in the
space provided on Page 1 of this manual.
• Place your radio on a level surface such as a table, desk or shelf, convenient to
an AC outlet, out of direct sunlight, and away from sources of excess heat, dirt,
dust, moisture, humidity, or vibration.
• Unwind the AC power cord and extend it to its full length. The FM antenna is
built in to this cord. It must be fully extended to provide the best FM reception.
SURE-ALARM BATTERY BACK UP SYSTEM
The Sure-Alarm battery back up system in this radio will maintain the time and
alarm settings in the event of a temporary power interruption. When the power is
restored the time and alarm settings will be correct. If the power is off at your wake
up time, the Sure-Alarm system will use the battery power to turn on the radio or
buzzer alarm as usual, as long as the back up battery is installed and has sufficient
power remaining.
The Sure-Alarm battery back up system requires one 9-volt battery, not included.
We recommend that you install an alkaline battery for longest life and best
performance.
3
To install the battery:
•
Open the battery compartment cover on the bottom
of the radio by pressing the tab in the direction of
the arrow.
•
Connect the 9-volt battery to the battery terminal.
It can only be connected one way.
Push the battery into the battery compartment and
replace the cover.
•
Press
9V
OLT
POWER FAILURE INDICATOR
If no battery is installed in the radio, or if the battery in the compartment is weak
or dead, the time and alarm settings will be lost if the power is interrupted. When
the power is restored the clock display will begin flashing. This is your indication
that the time display is incorrect and needs to be reset. Important: After you reset
the time, be sure to reset your alarm settings as well.
POWER SOURCE
This radio is designed to operate on normal 110V-120V 60Hz AC power only. Do
not attempt to operate the radio on any other power source. You could cause
damage to the radio that is not covered by your warranty.
This radio should be connected to an AC outlet that is always ‘live’. Do not connect
it to an outlet that is controlled by a wall switch. When the power to the radio is
interrupted, the Sure Alarm battery back up system takes over to maintain the
time and alarm settings. To maximize the life of the back up battery, keep the
radio connected to a ‘live’ AC outlet at all times.
This radio uses a polarized AC plug which has
one blade wider than the other. This plug will
only fit into a polarized AC outlet. This is a
safety feature. If the plug will not fit, you may
have an older non-polarized AC outlet. Do not
defeat the safety feature by trying to file the
wider blade, or replacing the plug. Contact an
electrician to replace your outdated outlet.
4
LOCATION OF CONTROLS AND INDICATORS
1 2:38
Top Panel
Right Side
1. Sleep On switch (sleep to music timer).
2. Alarm 1 setting button.
(Alarm 1/2 Reset)
3. Fast Reverse
button.
4. Slow Reverse
button.
5. Clock setting button.
6. Slow Forward
button.
7. Fast Forward
button.
8. Alarm 2 setting button..
9. Radio ‘On’ button.
10. Snooze (Sleep ‘Off’ / Radio ‘Off’) button.
14. Tuning control.
15. Band switch (AM/FM).
16. Volume control.
Left Side
Front Panel
17.
18.
19.
20.
21.
22.
AM indicator.
Alarm 1 ‘On’ indicator.
Time display.
Alarm 2 ‘On’ indicator.
Tuning Dial.
Lighted Dial Pointer.
Bottom Panel
11. Display Dimmer switch (HIGH/LOW).
12. Alarm 2 selector switch (OFF/RAD/BUZ).
13. Alarm 1 selector switch (OFF/RAD/BUZ).
5
23. Back up battery
compartment.
24. AC power cord.
OPERATING INSTRUCTIONS
SETTING THE CLOCK
When you connect the radio to your AC outlet for the first time the clock display
will begin flashing “12:00” (AM). The flashing will stop when you set the time.
AM indicator
ALM 1(ALARM 1)
ALM 2(ALARM 2)
indicator
indicator
1. Depress the Clock button and either the Fast Forward
or Fast Reverse
buttons to rapidly move the time display forward or back.
2. As the display approaches the correct time release fast setting buttons and
depress the Slow Forward
or Slow Reverse
buttons until the correct time
appears, then release all buttons.
Note: Be sure to observe the AM indicator to make sure that the time is set
correctly for AM or PM. If the AM indicator is ‘on’, the time displayed is “AM”. If
the AM indicator is ‘off’, the time displayed is “PM”.
SETTING THE WAKE UP TIMES
This clock radio has two separate alarms that can be set and used independently.
You may use the alarms to wake two people at different times, or you may use
one alarm for weekdays and the other for weekend wake up times. The procedure
for adjusting the wake up time is the same for both Alarm 1 and Alarm 2.
1. Depress and hold either the Alarm 1 or Alarm 2 setting button. The display
will change from the correct time to the Alarm 1 or Alarm 2 wake up time.
2. While holding the Alarm 1 or Alarm 2 setting button, depress either the Fast
Forward
or Fast Reverse
button to move the display rapidly ahead or
back.
3. As the display approaches your desired wake up time, release fast setting
buttons and depress the Slow Forward
or Slow Reverse
buttons until the
desired wake up time appears, then release all buttons.
Note: Be sure that you have set the wake up time correctly by observing the AM
indicator. If the AM indicator is ‘on’ the wake up time is “AM”. If the AM indicator
is ‘off’, the wake up time is “PM”.
6
CHECKING THE WAKE UP TIMES
Whenever you want to check the wake up times, simply press either the Alarm 1
or Alarm 2 setting buttons. The display will change from correct time to wake up
time. Release the Alarm 1 or Alarm 2 setting buttons to return to correct time.
LISTENING TO THE RADIO
1. Set the Band selector to the desired band, AM or FM.
2. Set the Volume control to a low setting.
3. Press the Radio On button to turn the radio ‘On’. The radio dial pointer will
light.
4. Select your desired station with the Tuning control.
5. Adjust the Volume control to the desired setting.
6. When you are finished listening, press the Snooze/Radio Off button to turn
the radio ‘Off’. The radio dial pointer light goes off.
ANTENNA INFORMATION
AM – The AM bar antenna is inside the cabinet. If AM reception is weak, change
the position of cabinet until the internal antenna picks up the strongest
signal.
FM – The FM antenna is built in to the AC power cord. If FM reception is weak try
varying the position and direction of the power cord until you find the
strongest signal.
WAKE TO RADIO
1. Turn the radio ‘On’ and select the band, station, and volume level that you
wish to hear when the alarm comes on, then turn the radio ‘Off’ again.
2. Reconfirm the wake up time settings for the alarm you are using, Alarm 1,
Alarm 2, or both alarms.
3. Set the Alarm selector switch for one or both alarms to the ‘Radio’ position.
The appropriate Alarm 1 and/or Alarm 2 indicators will light up to confirm that
the alarms are set.
7
4. At the selected wake up time the radio will turn ‘On’. It will play for one hour
and then shut off automatically.
5. To stop the radio sooner, press the Alarm 1 (Alarm 1/2 Reset) button. The
radio will stop but the alarm remains set and will turn the radio on again at the
same time on the following day.
6. If you do not want the alarm to turn the radio on the following day, set the
appropriate Alarm selector to the ‘Off’ position.
WAKE TO BUZZER
1. Reconfirm the wake up time settings for the alarm you are using, Alarm 1,
Alarm 2, or both alarms.
2. Set the Alarm selector switch for one or both alarms to the Buzzer (Buz) position.
The appropriate Alarm 1 and/or Alarm 2 indicators will light up to confirm that
the alarms are set.
3. At the selected wake up time the buzzer will sound. It will continue for one
hour and then shut off automatically.
4. To stop the buzzer sooner, press the Alarm 1 (Alarm 1/2 Reset) button. The
buzzer will stop but the alarm remains set and will turn the buzzer on again at
the same time on the following day.
5. If you do not want the alarm to turn the buzzer on the following day, set the
appropriate Alarm selector to the ‘Off’ position.
RADIO AND BUZZER OPERATION
You may also set one alarm for wake to radio and the other for wake to buzzer.
Just set the Alarm 1 and Alarm 2 selector switches to the desired positions.
SNOOZE ALARM
After the radio or buzzer alarm sounds in the morning you may press the Snooze
Bar for a few more minutes sleep. The alarm will stop for approximately 9 minutes
and then turn on again. You may repeat the Snooze operation up to seven times
if desired, but after the seventh time the alarm will not turn on again.
Note: Whenever the Snooze Bar is depressed the display changes from normal
time to a “minutes and seconds” display. The minute will be the last digit that
appeared in the time display, and the seconds will continue to advance. When
the Snooze Bar is released the display returns to the correct time.
8
SLEEP TO MUSIC TIMER
You can program the sleep timer to play the radio for up to 59 minutes and then
shut off automatically.
1. Press the Sleep On button. The display will briefly show “0:59” and the radio
will begin to play. After 59 minutes the radio will shut off automatically.
2. To adjust the amount of time that the radio will play before shutting off, hold
the Sleep On button. The radio will begin counting down from “0:59”. When
the desired amount of sleep time appears on the display, release the Sleep
On button.
3. To cancel the sleep timer before it counts down to “00” and shut the radio ‘Off’
immediately, press the Snooze Bar.
Important: Remember that the station and volume settings you choose for the
Sleep To Music operation are the same settings you will hear if you set the alarm
for wake to radio the following morning.
DIMMER CONTROL
The Dimmer control was set to the ‘High’ position at our factory. If you find the
clock display is too bright in a darkened room, set the Dimmer control to the ‘Low’
position.
9
CARE AND MAINTENANCE
There are no user serviceable parts inside this radio. Please refer all service
problems to a qualified service facility. See the warranty page of this manual for
further details.
If the cabinet becomes dusty, wipe the exterior with a soft dust cloth only. Never
use dusting sprays or polishes on the cabinet.
If the cabinet becomes dirty or smudged with fingerprints it may be wiped with a
soft cloth that has been slightly dampened with a mild soap and water solution.
Always disconnect the power cord from the AC outlet before cleaning, and never
allow any liquid to get inside the cabinet.
Note: If there is no battery in the back-up battery compartment, the Time and Alarm
settings will be lost when the power cord is disconnected for cleaning. Reset
the clock and wake up times after reconnecting the power cord.
SERVICE
TO FIND THE LOCATION AND PHONE
NUMBER OF YOUR NEAREST SERVICE
CENTER PERMITTED TO PERFORM
WARRANTY...
CALL TOLL FREE: 1-800-695-0098
FOR ADDITIONAL SET-UP OR OPERATING ASSISTANCE
PLEASE CALL:
1-972-884-2350
FOR CUSTOMER SERVICE,PLEASE WRITE TO:
Emerson Radio Corp.
Consumer Affairs Dept.
1901 Diplomat Drive,
Farmers Branch, TX 75234.
10
EMERSON RADIO CORP.
LIMITED WARRANTY
What does this warranty cover ? Any manufacturing defects in original material, including
original parts and workmanship, under normal use and conditions.
For how long? For a period of ninety (90) days from the date of original purchase in the U.S.
What will we do ? If you need service under this Warranty, and you provide us with the dated proof
of purchase, we will provide repair service at no charge for labor and parts at an authorized Depot Repair
Facility, or replace the product in our discretion.
How do you make your warranty claim ? If it becomes necessary to repair or replace your unit,
please call Emerson Consumer Affairs Department by dialing (972) 884-2350 (press one (1) and then
press five (5) on a touch tone phone), to obtain instructions for the repair or replacement of your unit free
of charge.
What does your warranty not cover ? Your warranty does not cover the following :
· Damage from negligence, misuse, abuse, accident, or failure to follow operating instructions.
· Use of product in a commercial application or rentals.
· Changes or repairs by anyone other than an authorized Depot Repair Facility.
· Damage because your unit is improperly connected to the equipment of other manufacturers.
· Unit on which the serial number has been defaced, modified or removed.
· Damage to equipment not properly connected to the product.
· Ordinary adjustments which you can perform as outlined in the owner’s manual.
· Signal reception problems caused by external antenna or cable systems.
· Products purchased, used, serviced, or damaged outside of the United States.
· Damage to compact discs or cassettes.
What other limitations apply to your warranty ?
THIS WARRANTY IS NON-TRANSFERABLE AND APPLIES ONLY TO THE ORIGINAL PURCHASER
AND DOES NOT EXTEND TO SUBSEQUENT OWNERS OF THE PRODUCT. THIS WARRANTY IS
VALID ONLY IN THE UNITED STATES OF AMERICA. ANY APPLICABLE IMPLIED WARRANTIES,
INCLUDING THE WARRANTY OF MERCHANTABILITY, ARE LIMITED IN DURATION TO A
PERIOD OF THE EXPRESSED WARRANTY AS PROVIDED ABOVE BEGINNING WITH THE DATE
OF ORIGINAL PURCHASE AT RETAIL AND NO WARRANTIES, WHETHER EXPRESSED OR
IMPLIED, SHALL APPLY TO THE PRODUCT THEREAFTER. WE MAKE NO WARRANTY AS TO
THE FITNESS OF THE PRODUCT FOR ANY PARTICULAR PURPOSE OR USE.
THE EXTENT OF OUR LIABILITY UNDER THIS WARRANTY IS THE REPAIR OR REPLACEMENT
PROVIDED ABOVE AND IN NO EVENT WILL OUR LIABILITY EXCEED THE PURCHASE PRICE
PAID BY THE PURCHASER OF THE PRODUCT. UNDER NO CIRCUMSTANCES WILL WE BE
LIABLE FOR ANY LOSS, DIRECT, INDIRECT, INCIDENTAL, SPECIAL, OR CONSEQUENTIAL
DAMAGE ARISING OUT OF OR IN CONNECTION WITH THE USE OF THIS PRODUCT.
How does state law apply to your warranty ?
THIS WARRANTY GIVES YOU SPECIFIC LEGAL RIGHTS, BUT YOU MAY ALSO HAVE OTHER
RIGHTS WHICH VARY FROM STATE TO STATE. SOME STATES DO NOT ALLOW LIMITATIONS
ON IMPLIED WARRANTIES OR EXCLUSION OR LIMITATION OF INCIDENTAL OR
CONSEQUENTIAL DAMAGE, SO THESE RESTRICTIONS MAY NOT APPLY TO YOU.
SP998N
(2918)
11
EMERSON RADIO CORP.
EMERSON
Part No. : 16-2787
006-01
Printed in China