1
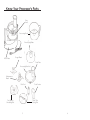
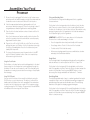
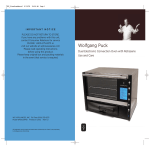
I M P O R TA N T N OT I C E
PLEASE DO NOT RETURN TO STORE.
If you have any problems with this unit,
contact Consumer Relations for service
PHONE: 1-800-275-8273.
Please read operating instructions
before using this product.
Please keep original box and packing materials
in the event that service is required.
W.P. APPLIANCES, INC. Toll Free (800) 275-8273
Website: www.wppotsandpans.com
Model BFPR0011
Printed in China
REV 1.0
All trademarks, service marks and trade names (collectively the “Marks”) are proprietary
to Wolfgang Puck World Wide.
Wolfgang Puck
11 - Cup Food Processor
Use and Care
IMPORTANT SAFEGUARDS
When using electrical appliances, basic safety precautions should always
be followed, including the following:
1
Read all instructions carefully.
2
To protect against risk of electrical shock, do not put appliance, cord
or plug in water or other liquid.
3
Close supervision is necessary when any appliance is used by or near
children.
4
Turn unit off and unplug from outlet when not in use, before putting
on or taking off parts, and before cleaning. To disconnect, turn unit
off, grasp plug, and pull from the wall. Never yank on cord.
5
Avoid contact with moving parts. Keep fingers out of feed tube.
6
Keep hands, hair, clothing as well as spatulas and other utensils,
away from moving blades or discs during operation to prevent injury
and/or damage to the food processor. A scraper may be used but
must be used only when the food processor is not running.
7
Do not operate any appliance with a damaged cord or plug or after
the appliance malfunctions or is dropped or damaged in any manner.
Return the appliance to an authorized service facility for examination, repair, or electrical or mechanical adjustment.
8
The use of attachments not recommended or sold by the appliance
manufacturer may cause fire, electric shock, or injury.
9
Do not use outdoors.
This appliance has a polarized plug (one blade is wider than the other).
As a safety feature, this plug will fit in a polarized outlet only one way. If
the plug does not fit fully in the outlet, reverse the plug. If it still does
not fit, contact a qualified electrician. Do not attempt to defeat this
safety feature.
Before Your First Use
Carefully unpack the food processor and remove all packaging materials.
Wash the accessories, bowl and cover in warm, soapy water to remove
any dust that may have accumulated during packaging. Do not immerse
the appliance body, cord or plug in water. Wipe the food processor body
with a damp cloth.
Place the food processor base on a dry, level surface. Do not plug unit in
until completely assembled.
10 Do not let cord hang over edge of table or counter or touch hot
surfaces, including the stove.
11
Blades are sharp; handle carefully.
12 To reduce the risk of injury, never place cutting blades or discs on
base without first putting bowl properly in place.
13 Be certain lid is securely locked in place before operating appliance.
14 Never feed food by hand. Always use food pusher.
15 Do not attempt to defeat the lid interlock mechanism.
16 Do not use this appliance for other than intended use.
SAVE THESE INSTRUCTIONS
HOUSEHOLD USE ONLY.
1
2
Table of Contents
Wolfgang Puck,
owner of the famous
Spago restaurants and
one of the most influential
chef-restauranteurs in
America, is credited
with reviving California’s
rich culinary heritage.
His cooking innovations,
a result of blending
fresh California ingredients with his classical French techniques, are
enjoyed by world leaders, stars and fellow chefs alike. He established
other trend-setting restaurants like Postrio in San Francisco, Chinois
on Main in Santa Monica, Granita, Vert and Trattoria del Lupo. Home
chefs can also share Mr. Puck’s talents through his cookbooks and,
of course, through his appliances!
3
Important Safeguards
1
About Wolfgang Puck
3
Know Your Blender
5
Before Your First Use
6
Helpful Hints
6
Assembling Your Blender
7
Disassembling Your Blender
7
Using Your Blender Attachment
8
Recipes
9
Limited Warranty
21
Contact Information
back
Know Your Processor’s Parts
Drive
Shaft
Processing Bowl
Emulsifying Blade
Motor Base
Dough Blade
Feed Tube
Processing Bowl Lid
Multipurpose
Blade
Disk Post
Fine/Coarse
Shredding Disk
Food Pusher
Thick/Thin
Slicing Disk
5
6
Assembling Your Food
Processor
1
Be sure the unit is unplugged. Put the bowl on the food processor
motor base with the handle towards your right. Press down and turn
the handle counter-clockwise until the bowl clicks into place.
Slicing and Shredding Disks
Use these disks for slicing and shredding meats, fruits, vegetables,
cheeses and more.
2
Select the appropriate attachment and assemble onto food
processor as directed on pages 6-7. Place food or dough in bowl if
using multipurpose blade, dough blade or emulsifying blade.
3
Place the lid on the bowl and turn counter-clockwise until the lid
clicks into place.
Put the bowl on the housing and position the disk post onto the drive
shaft. Turn post counter-clockwise to lock into place. Carefully attach
the disk onto the disk post. Lock the lid on the bowl. Turn machine on by
pressing the green button. Put ingredients in the feed tube and press
the food pusher lightly onto the ingredients.
4
5
Note: Your food processor features a safety interlock system. The
unit will not operate unless the bowl and bowl cover are properly
aligned and locked into place.
IMPORTANT: Use GENTLE force to press down on the food pusher.
Excessive force could cause damage to the disk.
Plug unit into a 120-volt 60 Hz AC only outlet. Turn the unit on by
pressing the green on/off button. Use the food pusher when using
the slicing or shredding disks. Press the food down slowly and
steadily with the pusher.
•
Press the ingredients down slowly and steadily with the pusher.
•
Precut large chunks of food to fit the size of the feed tube.
•
For best results, fill the feed tube evenly.
•
When processing large quantities, process small batches at a time
and empty the bowl between batches.
To stop your food processor, press the green button to the OFF
position. Wait until the blade or disc comes to a complete stop
before removing the lid or bowl.
Using the Food Pusher
The feed tube on the bowl can be used to add ingredients to the bowl
for processing. Use the food pusher to push ingredients through the
feed tube. You can also use the pusher to seal off the feed tube while
the appliance is running to prevent dust from entering or foods/liquids
from escaping.
Using PULSE Control
You can control the texture of processed foods better by using the
PULSE button on your food processor. The button is located on the
handle near the feed tube, when unit is assembled. Press and release
to quickly turn the food processor on and off. For longer processing,
continue pressing the PULSE button. The green button should NOT be
in the ON position when using the Pulse feature.
7
Dough Blade
Use the dough blade for kneading bread dough and for mixing batters
and cake mixtures. Use with recipes that call for 4 to 5 cups flour.
Put the bowl on the housing and fit the dough blade onto the drive
shaft. Put ingredients into bowl. Fasten the lid onto the bowl and put the
pusher in the feed tube. Press the green ON/OFF button to start
processing. Most doughs and batters will take about 1 - 3 minutes.
Emulsifying Blade
The emulsifying blade makes it easy to combine ingredients that would
normally be tough to mix. Use the blade when making vinegar and oil
salad dressings, mayonnaise and hollandaise sauce. The emulsifying
blade also works great for whipping eggs and meringues.
Put the bowl on the housing and fit the emulsifying blade onto the drive
shaft. Put ingredients into bowl. Fasten the lid onto the bowl and put the
pusher in the feed tube to prevent splattering. Press the green ON/OFF
button to start processing
8
Using The Attachments
Disassembling Your Food
Processor
Caution: Blades are very sharp. Use care when handling.
Multipurpose Blade
Use the multipurpose blade for chopping, mixing, blending, pureeing
and preparing puff pastry, crumbs, and short crust pastry.
1
Be sure the unit is turned off and is unplugged.
2
Turn the lid on the bowl clockwise and remove.
3
If using a slicing or shredding disk, remove the disk before removing
the bowl. Put two fingers through the holes in the disk and lift the
disk straight up.
Fit the blade onto the drive shaft of the assembled bowl. Put ingredients
into bowl. Fasten the lid onto the bowl and put the food pusher in the
feed tube. Press the green ON/OFF button to start processing.
•
Cut food into 1” to 1 1/2” pieces for best results.
•
Use the pulse feature to prevent overprocessing.
•
Most foods should take 10 to 60 seconds to process. Avoid letting
the appliance run continuously.
•
If food sticks to the blade or side of bowl while processing, turn the
unit off, remove the lid, and use a spatula to remove the ingredients.
Caution: Blades are very sharp. Use care when handling.
If using the multipurpose blade, kneading blade or emulsifying blade,
remove it from the bowl before emptying processed food, or grasp
the bowl from the bottom with one finger in the center opening to
hold the blade in place. Empty processed food or remove with a
spatula.
4
Turn the bowl clockwise to unlock it from the motor base. Lift up to
remove.
Processing Guide
When using the multipurpose blade to chop, mince or puree, do not
exceed the following quantities. Use maximum quantity, and then empty
bowl for another batch. Always cube the following foods before
processing.
FOOD
MAX. AMOUNT
Meats
Fruits and Vegetables
Hard Cheeses (Parmesan)
Soft Cheeses (Cheddar)
14 ounces or 1 3/4 cups
11 cups
10 ounces
16 ounces
9
10
Helpful Hints
Peanut Butter
•
Never attempt to process any food that cannot be cut with a
sharp knife.
Yield: 2 cups
•
When mincing garlic, fresh herbs or small quantities of foods, add to
feed tube with multipurpose blade in place and processor running.
Make sure bowl and all parts are very dry before processing garlic or
fresh herbs.
1 1/2 cups roasted peanuts, salted or unsalted
1 stick canola spread
1/4 cup light brown sugar
•
To chop nuts, use multipurpose blade and the pulse setting. Use short
pulses. Process smaller batches for coarser texture.
1
In food processor fitted with multipurpose blade,
place all ingredients.
•
Let hard cheeses, such as Parmesan and Romano, come to room
temperature before processing. Freeze soft cheeses, such as cheddar
and mozzarella, for 10 to 15 minutes before processing.
2
Turn power on; cream to desired smoothness.
•
Make sure uncooked meats and poultry are very cold
before processing.
•
Do not overfill processing bowl. Fill no more then 1/3 to 1/2 full
when chopping. The bowl can hold up to 11 cups of dry ingredients or
4 cups liquid.
•
Position the slicing and shredding disks so that cutting surfaces are to
the right of the feed tube. This will allow one full rotation of the blade
before contacting food.
•
If any part becomes stained or discolored after processing, clean with
a bleach and water solution.
•
When processing several slices or pieces of food, put as many pieces
as will fit in feed tube together to help hold each other in place.
•
This food processor is NOT designed to grind coffee beans or spices
or crush ice.
•
Most foods can be processed in 10 to 30 seconds, depending on the
quantity. For large quantities, process in several batches. Let the
processor rest about 1 minute between batches.
•
If the food processor suddenly stops running, turn the unit OFF and
unplug. Let the unit cool down for 15 minutes and restart.
•
A food processor is not recommended for making Italian meringue (a
meringue made by using hot sugar syrup).
•
Use the emulsifying blade when beating egg whites. Make sure the
bowl is completely clean; any oily residue will interfere with the task.
11
INGREDIENTS
METHOD
12
Strawberry Shortcake
Hearty Bolognese Sauce
Serves 6 - 8
Makes about 7 cups
INGREDIENTS
INGREDIENTS
Shortcake:
2 3/4 cups pastry
or cake flour
1/4 cup sugar plus additional
to sprinkle on top
1 tablespoon plus
1 teaspoon baking powder
1 teaspoon salt
10 tablespoons chilled unsalted butter,
cut into 2 tablespoon-pieces
1 cup heavy cream
plus additional to brush on top
Filling:
2 pints fresh strawberries,
stemmed
2 tablespoons sugar
2 teaspoons lemon juice
2 teaspoons kirsch
1/2 teaspoon orange zest
Vanilla ice cream
1/2 cup sweetened
whipped cream
METHOD
1
Prepare the shortcake: Preheat the oven to 375°. Line a baking tray
with parchment paper.
2
In food processor fitted with the multipurpose blade, combine the
flour, 1/4 cup sugar, baking powder, and salt with a few pulses. Add
the chilled butter and process just until combined. With the motor
running, pour the cream through the feed tube, stopping just before
the dough forms a ball.
3
Turn out the dough onto a lightly floured surface and gently knead,
forming a smooth ball. Do not overwork. Roll out the dough to a
round 3/4 inch thick. Using a 3-inch cookie cutter, cut out 8 circles.
(Knead the scraps together and reroll as required.)
4
Arrange the 8 circles on the prepared baking tray, brush the tops
with cream and sprinkle lightly with sugar. Bake 30-35 minutes, or
until the cakes are golden and firm to the touch. Cool on a wire rack.
5
Meanwhile, rinse and drain the strawberries. Cut each berry into
thick slices and toss with the sugar in a large mixing bowl. Add the
lemon juice, kirsch, and orange zest, and gently mix. Set aside.
6
When ready to serve, split each shortcake in half and warm slightly.
PRESENTATION
For each serving, place the bottom half of the shortcake on a
dessert plate. Spoon about 1 cup of ice cream on the cake, arrange a
scant cup of strawberries over and around the ice cream, and top with
the remaining half of the cake. Add a dollop of sweetened whipped
cream on the side of the plate and serve immediately.
13
6 tablespoons extra-virgin olive oil
1 pound lean ground beef
1 teaspoon salt
1/4 teaspoon freshly ground black pepper
2 teaspoons minced shallots
1 teaspoon minced garlic
1/2 cup dry red wine
5 pounds Roma tomatoes, cored, blanched,
peeled, seeded and chopped
2 tablespoons tomato paste
3 tablespoons sugar
1 bouquet garni made up of 2 sprigs each rosemary, basil, parsley,
1 sprig oregano, 2 bay leaves, 1 tablespoon black peppercorns
1 medium onion, finely diced
1 medium carrot, finely diced
1 medium celery stalk, finely diced
2 cups chicken stock
METHOD
1
In large stock pot, heat 3 tablespoons of olive oil. Add ground
beef and sauté until browned, breaking up the large chunks of
meat as they cook. Season with salt and pepper. Add shallots
and garlic, continue cooking for about 3 more minutes or until
shallots are soft.
2
Add red wine and deglaze pan, reduce until almost all liquid has
been absorbed.
3
Add chopped tomatoes, tomato paste, sugar and bouquet garni.
Bring mixture to a boil. Cover and reduce heat. Simmer for about
45 minutes, stirring frequently.
4
Meanwhile, in a small skillet, heat remaining 3 tablespoons olive
oil. Add onion, carrot and celery. Sauté for about 4 minutes or
until onion is translucent.
5
Add sautéed vegetables along with chicken stock to meat sauce
and simmer for another 30 minutes until meat sauce is rich and
thickened. Season to taste, if necessary.
NOTE: Beef bolognese sauce can be made ahead and refrigerated
in a covered container for 2 to 3 days in refrigerator or frozen for up
to 3 months.
14
Pizza Dough
Homemade Mayonnaise
Makes four 8 - inch pizzas
Yield: 1 cup
INGREDIENTS
INGREDIENTS
1 package active dry or fresh yeast
1 teaspoon honey
1 cup warm water (105º F to 115º F)
3 cups all-purpose flour
1 teaspoon kosher salt
1 tablespoon extra-virgin olive oil, plus more for brushing
Topping of your choice
3 large egg yolks
1 teaspoon white vinegar
1/4 teaspoon salt
1/4 teaspoon white pepper
1 cup mild flavored oil, such as vegetable oil
1 teaspoon dijon mustard
METHOD
1
In food processor fitted with emulsifying blade, place egg yolks,
vinegar, mustard, salt and pepper.
2
Start food processor and process until egg yolks are well beaten.
1
In a small bowl, dissolve the yeast and honey in 1/4 cup of the
warm water.
METHOD
2
Combine the flour and salt in the bowl of the food processor fitted
with the dough blade. Pulse once or twice, add the remaining
ingredients, and process until the dough begins to form a ball.
3
SLOWLY drizzle oil into feed tube. This is very important; if the oil
enters egg yolks too fast in the beginning, the emulsion will not
work. Continue with remaining oil.
3
Turn the dough out onto a clean work surface and knead by hand
2 or 3 minutes longer. The dough should be smooth and firm.
Cover the dough with a clean, damp towel and let it rise in a warm
spot for about 30 minutes. (When ready, the dough will stretch as
it is lightly pulled.)
4
When finished drizzling in all oil, process for an additional
30 seconds.
4
Place a pizza stone on the roaster oven rack and preheat the oven
to 450°.
5
Divide the dough into 4 balls, about 6 ounces each. Work each ball
by pulling down the sides and tucking under the bottom of the ball.
Repeat 4 or 5 times. Then on a smooth, unfloured surface, roll the
ball under the palm of your hand until the top of the dough is
smooth and firm, about 1 minute. Cover the dough with a damp
towel and let it rest for 15 to 20 minutes. At this point, the balls can
be wrapped in plastic and refrigerated for up to 2 days.
6
To prepare each pizza, dip the ball of dough into flour, shake off the
excess flour, place the dough on a clean, lightly floured surface, and
start to stretch the dough. Press down on the center, spreading the
dough into an 8-inch circle, with outer border a little thicker than the
inner circle. If you find this difficult to do, use a small rolling pin to
roll out the dough. Lightly brush the inner circle of the dough with
oil and arrange the toppings of your choice over the inner circle.
7
Using a lightly floured baker’s peel or a rimless flat baking tray,
slide the pizza onto the baking stone and bake until the pizza
crust is nicely browned, 10 to 12 minutes. Remember that the
oven is very hot and be careful as you place the pizza into and
out of the oven. Transfer the pizza to a firm surface and cut into
slices with a pizza cutter or very sharp knife. Serve immediately.
15
SERVING SUGGESTIONS
Try adding a tablespoon of fresh chopped herbs to the prepared
mayonnaise. Tarragon mayonnaise is wonderful in a chicken or potato
salad. Basil mayonnaise is amazing on a BLT.
16
Striped Bass in
Ginger Vinaigrette
You could also use red snapper in this recipe.
Serves 4
INGREDIENTS
One 1-inch piece ginger, peeled
2 large shallots
1/4 cup rice wine vinegar
1 cup extra-virgin olive oil
juice of 2 limes
2 tablespoons soy sauce
2 tablespoons dark sesame oil
salt
freshly ground white pepper
4 striped bass fillets, 6 ounces each
1 bunch cilantro or Italian parsley, roughly chopped,
plus a few whole leaves for garnish
1/4 cup toasted sesame seeds for garnish
METHOD
Limited Warranty
This warranty covers all defects in workmanship or materials in the
mechanical and electrical parts, arising under normal usage and care,
in this product for a period of 12 months from the date of purchase
provided you are able to present a valid proof-of-purchase. A valid
proof-of-purchase is a receipt specifying item, date purchased, and cost
of item. A gift receipt with date of purchase and item is also an
acceptable proof-of-purchase. Product is intended for household use
only. Any commercial use voids the warranty.
This warranty covers the original retail purchaser or gift recipient.
During the applicable warranty period within normal household use, we
will repair or replace, at our discretion, any mechanical or electrical part
which proves defective, or replace unit with a comparable model.
To obtain service under the terms of this warranty,
call Toll Free (800) 275-8273.
THIS LIMITED WARRANTY COVERS UNITS PURCHASED AND USED
WITHIN THE UNITED STATES AND DOES NOT COVER:
•
Damages from improper installation.
•
Defects other than manufacturing defects.
Damages from misuse, abuse, accident, alteration, lack of proper
care and maintenance, or incorrect current or voltage.
Damage from service by other than an authorized dealer or
service center.
1
Mince ginger and shallots in bowl of food processor fitted with
multipurpose blade.
•
2
Add vinegar, olive oil, lime juice and soy sauce to ginger and
shallots. Pulse for a few seconds to combine.
•
3
Turn food processor to the lowest speed and add the sesame oil
and salt and pepper to taste through the feed tube.
4
Season the striped bass on both sides with salt and pepper. Grill
it over high heat until lightly done or sauté it in a little butter and
oil. Striped bass fillets that are only 1/2 inch thick take only 1 to 2
minutes on each side.
5
Just before serving, mix the cilantro or parsley into the
vinaigrette. (This prevents the herbs from turning dark.)
This warranty gives you special legal rights and you may also have other
rights to which you are entitled which may vary from state to state.
PRESENTATION
Make a pool of the ginger vinaigrette on dinner plates at room
temperature. Top with the grilled fish. Garnish with the toasted
sesame seeds and a few cilantro or parsley leaves.
17
18