1
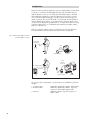
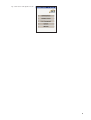
English
Brief instructions
Hydras 3 Pocket application
software
Hydras 3 P
ocket
Pocket PC
We reserve the right to make technical improvements!
Scope of delivery
䊳 Pocket PC*
with
Hydras 3
Pocket
䊳 Hydras 3
Pocket
1 Pocket PC* with Hydras 3 Pocket Software to set the operating parameters and
read-out of OTT dataloggers via IrDA and RS-232 interfaces; incl. USB connecting line; incl. 230 V power supply; for details see part numbers
1 Brief Instructions
1 Hydras 3 Pocket Software; Individual license;
CD-ROM for installation via Microsoft ActiveSync
1 Brief Instructions
Part numbers
䊳 Hydras 3
Pocket
䊳 Accessories
Pocket PC* with software
– RS-232 and infrared interface
– combined USB/RS-232 connection line
– Pocket PC operating system: German language version
– software preinstalled
56.WPH.01M.1.D
Pocket PC* with software
– RS-232 and infrared interface
– combined USB/RS-232 connection line
– Pocket PC operating system: English language version
– software preinstalled
56.WPH.01M.1.E
Pocket PC* with software
– Infrared interface
– Pocket PC operating system: German language version
– software preinstalled
56.WPH.01M.2.D
Pocket PC* with software
– Infrared interface
– Pocket PC operating system: English language version
– software preinstalled
56.WPH.01M.2.E
Individual software license
56.WPH.01M.1.M
Combined USB/RS-232 connection line
97.961.085.9.5
Other accessory items for Pocket PCs can be found in the computer industry
* The scope of delivery and equipment features of Pocket PCs may vary;
available Pocket PC versions are continuously subject to product adjustments!
3
Introduction
Hydras 3 Pocket expands the application spectrum of the Hydras 3 product family
to include use on PDA's (Personal Digital Assistant), and especially Pocket PCs.
With the Hydras 3 Pocket, you can easily and comfortably configure, download
data and display instantaneous values through the Observer function on site for
sensors with an integrated datalogger or for the LogoSens station manager (for
details, see below). The communication link is set up through an internal infrared
interface (IrDA) in the Pocket PC, or via an RS-232 line connection. Read in measurements can be displayed in graphical form or as a table. The further processing
of measured data is done on a standard PC after transferring to Hydras 3 Basic,
Hydras 3 or Hydras 3 Pro.
Hydras 3 Pocket also offers the option of saving the measured values that have
been downloaded in OTT raw data format or text format in separate files.
Fig. 1: Communication Options with the
Pocket PC/Hydras 3 Pocket.
for example
Orphimedes
IrDA
IrDA
USB
RS-232
Blue Tooth
Hydras 3 Pocket
Hydras 3
USB
RS-232
Blue Tooth
for example Nimbus
RS-232
Hydras 3 Pocket
Hydras 3
The overview shows which Hydras 3 Pocket functions are available for which dataloggers:
䊳 Configure device
䊳 Download data
䊳 Observer
4
Thalimedes, Orphimedes, Nimbus, Orpheus Mini
Thalimedes, Orphimedes, Nimbus, LogoSens/
LogoSens 2, Pluvio NADP, Orpheus Mini
Thalimedes, Nimbus, LogoSens/LogoSens 2,
Orpheus Mini
Fig. 2: Start Screen of the Hydras 3 Pocket
5
Installing Hydras 3 Pocket
Note: The procedures described in these instructions are based on the example
of an HP iPAQ Pocket PC 3715 with the Windows Mobile 2003 operating system
(Pocket PC 2003). If other hardware or software is used, slight modifications may
need to be made. For information on how to do so, consult the Readme file on the
Hydras 3 Pocket Installation CD-ROM and the handbook of the Pocket PC you are
using.
Overview Installation of the delivered product
䊳 HP iPAQ Pocket PC 3715* including Hydras 3 Pocket
* or similar model of another manufacturer/ next generation model
If you purchase a Pocket PC by OTT, you will receive Hydras 3 Pocket already
preinstalled. No further installation is required in this case. If you wish to copy
data from the PocketPC to a conventional PC, you must have already installed
the ActiveSync synchronisation software from Microsoft onto the PC. ActiveSync
is part of the scope of supply of the Pocket PC. Alternatively, ActiveSync can be
downloaded at no charge from the Internet page www.microsoft.com.
䊳 Hydras 3 Pocket (without Pocket PC)
Preconditions for installation:
– Pocket PC with infrared and RS-232 interface (optional); ARM compatible
processor (for example, Intel® XScale™, Samsung S3C 2440); clock frequency
300 MHz; working memory 64 MB; operating system: Windows Mobile
2003 (Pocket PC 2003) or later
– Current standard PC (desktop or tower model or notebook) with operating
system Microsoft Windows® 98 or later
– Synchronisation software Microsoft ActiveSync® as from version 3.7 or later
– Installation file Hydras3Pocket_PPC.ARMV4.CAB
– Pocket PC/standard PC line connection or link via infrared interface (optional)
or Blue Tooth (optional).
Installing the Hydras 3 Pocket:
䡵 Start ActiveSync on the standard PC.
䡵 Set up a new partnership (guest partnership) between the PocketPC and the
standard PC (e.g. via a USB or infrared connection).
䡵 Copy the file "Hydras3Pocket_PPC.ARMV4.CAB" to the Pocket PC in the Temp
directory (not in the program directory!).
䡵 Start file "Hydras3Pocket_PPC.ARMV4.CAB“ on the Pocket PC. The Pocket PC
will now install Hydras 3 Pocket in the program directory.
䡵 If necessary, create a link to the start menu (Start > Settings > Personal > tab
Menus > activate 聺 Hydras3Pocket check box.)
䡵 When first starting Hydras 3 Pocket, input the license key. The license key is
located on the CD-ROM box (adhesive label).
Notes:
䊳 If you do not input a license key (pressing Cancel when asked for the license
key), Hydras 3 Pocket runs in demo mode with greatly limited functionality.
䊳 Hydras 3 Pocket automatically sets the language of the user interface upon
installation to the language of the Pocket PC’s operating system.
Available languages: German, English, French, Spanish, Italian, traditional
Chinese, simplified Chinese. For all other operating system languages Hydras 3
Pocket uses English.
Caution! When using Windows Mobile 2003 operating system:
Recharge the batteries to your Pocket PC regularly! A completely dead main and
reserve battery will completely erase the Hydras 3 Pocket software and all measurements read in (this behaviour has been fixed for Windows Mobile 2005).
6
Making necessary basic adjustments
Three basic settings must be made on the PocketPC to ensure that the Hydras 3
Pocket works properly.
䊳 Deactivate automatic acceptance of incoming infrared transmissions:
䡵 Click Start > Settings > Connections tab > Transmit.
䡵 Deactivate checkbox 䡺 Receive all incoming beams.
䡵 Confirm the setting: press ok.
This setting prevents the built-in infrared interface from being continuously in
use by being in a state of permanent readiness to receive any incoming transmissions.
䊳 Deactivate the automatic device shut-off:
䡵 Click on Start > Settings > System tab > Power > Advanced tab.
䡵 On battery power: Deactivate the 䡺 Turn off device if not used for checkbox.
䡵 Confirm the setting: press ok.
This setting prevents the PocketPC from switching off by itself during active
communication (the Download data and Configure device functions).
Caution: Turn the PocketPC off each time after use, using the on/off switch!
䊳 Setting the communications channels (IrDA/RS232):
䡵 Start Hydras 3 Pocket.
䡵 Click on the Settings > Communication tab.
䡵 For the Thalimedes*, Orphimedes, Pluvio NADP*, LogoSens* and Orpheus
Mini dataloggers, activate the 聺 Utilize IrDA checkbox.
䡵 For the Thalimedes*, Nimbus, Pluvio NADP*, and LogoSens* dataloggers,
activate the 聺 Utilize RS232 checkbox.
䡵 Select the serial interface for IrDA: HP iPAQ 3715 and Siemens Pocket
Loox 400: COM2; Dell Axim X30 and X50: COM4.
䡵 Select the serial interface for RS232: HP iPAQ 3715 and Siemens Pocket
Loox 400: COM1.
* These dataloggers can communicate both via the IrDA interface and via the
RS-232 interface.
Assignment of serial interfaces for Pocket PC's not listed: Please refer to the
hardware description (internet, handbook) of the Pocket PC being used.
7
Download data – Thalimedes/Orphimedes/Nimbus/
LogoSens/Pluvio NADP/Orpheus Mini
䡵 Click on the Download Data button.
䡵 – With communication channel RS232: Making the PocketPC/datalogger line
connection (see scope of delivery/accessories).
– With communication channel IrDA: Activating the datalogger (Thalimedes/
Orphimedes/LogoSens only)1) and aligning the infrared interface of the Pocket PC to the datalogger1) infrared interface.
䡵 Select the datalogger: Place a check in the 聺 Thalimedes/Orphimedes/
Nimbus control box or the 聺 LogoSens/Orpheus Mini/Pluvio NADP control
box.
䡵 Select Read period or All data2) or Since last reading if station is known.
䡵 Starting communication: Click on the IrDA or RS232 interfaces. The Hydras 3
Pocket copies the selected measured values to the PocketPC and converts them
to the Hydras 3 data format. A progress bar shows how far the copying/converting process has gone. The read in values can now be transferred to
Hydras 33) or displayed and exported via Data Management.
1)
2)
3)
see the operating instructions for the datalogger
not for LogoSens/Orpheus Mini/Pluvio NADP
Application software Hydras 3 Basic, Hydras 3 or Hydras 3 Pro on a standard PC
Configure device –
Thalimedes/Orphimedes/Nimbus/Orpheus Mini
䡵 Click on the Configure Device button.
䡵 – With communication channel RS232: Making the PocketPC/datalogger line
connection (see scope of delivery /accessories).
– With communication channel IrDA: Activating the datalogger (Thalimedes/
Orphimedes only)1) and aligning the infrared interface of the Pocket PC to the
datalogger1) infrared interface.
䡵 Select the datalogger: Place a check in the 聺 Thalimedes/Orphimedes/
Nimbus control box or in the 聺 Orpheus Mini control box.
䡵 Starting communication: Click on the IrDA or RS232 interfaces. A screen (multiple tabs) appears with the fields to configure the device. In addition, there is
the Additional Functions popup menu for Orpheus Mini2) containing the functions Observer, Date/Time, Delete Data Memory and Enter Password. Use of
the individual fields is described in the operating instructions of the relevant
data logger.
䡵 Store modified/new settings to the datalogger: click on the Programming
button.
䡵 Read in operating parameters again: Click on the Refresh button.
1)
2)
8
see the operating instructions for the datalogger
The functions Depth to water/Water level/Pressure value set newly in the Orpheus Mini operating program (Basic operation) are done using Hydras 3 Pocket through Additional functions, Observer.
Displaying downloaded values
Measurements read into the Pocket PC can be displayed graphically and numerically (tabular) for cross-checking purposes. Currently information data cannot be
displayed on a PocketPC.
Displaying the measured values numerically
䡵 Click on the Data Management button.
䡵 Click on the desired sensor.
䡵 Click on the Numerical button. The Hydras 3 pocket now displays a table,
whereby each cell of the table displays an item of date/time information with
the associated measurement.
Displaying the measured values in graphic form
䡵 Click on the Data Management button.
䡵 Click on the desired sensor.
䡵 Click on the Graph button. The Hydras 3 Pocket displays the measured values
in an X-Y diagram that is scaled automatically.
Enlarging the diagram section:
䡵 Set the Zoom slider to the desired zoom factor
(left: 1; right: maximum).
䡵 Select the desired section with the upper slider.
(This slider is only visible with zoom factor > 1).
Deleting downloaded values
䡵 Click on the Data Management button.
䡵 Click on the desired sensor and hold the pen. A pop-up menu opens.
䡵 Deleting the measurements of an individual sensor: Click on Delete File;
deleting the measured values of all the sensors: Click on Delete All Files.
Transferring downloaded values to Hydras 3*
䡵 Start ActiveSync on the standard PC.
䡵 Set up a new partnership (guest partnership) between the PocketPC and the
standard PC e.g. via a USB or infrared interface).
䡵 Start Hydras 3*. (PocketPC compatible Hydras 3 version: 2.02.0 or later)
䡵 Select the measuring station from within the tree diagram of Hydras 3 (Basic);
select the Communication > Read/Operate menu.
䡵 In the Communication window, Type: PDA, > select Read data: standard. The
settings for the protocol type and communication channel are not relevant.
䡵 Press Start.
䡵 Select the files to be transferred.
䡵 Press Start. Hydras 3 copies the measured values from the Pocket PC to the
standard PC. The data are then available in the raw data pool.
* Application software Hydras 3 Basic, Hydras 3 or Hydras 3 Pro on a standard PC
9
Displaying Instantaneous Values –
Thalimedes/Nimbus/LogoSens/Orpheus Mini
䡵 Click on the Observer button.
䡵 – With communication channel RS232: Making the PocketPC/datalogger line
connection (see scope of delivery /accessories).
– With communication channel IrDA: Activating the datalogger (Thalimedes/
Orphimedes/LogoSens only)* and aligning the Pocket PC infrared interface
to the datalogger* infrared interface.
䡵 Select the datalogger: Place a check in the 聺 Thalimedes/Orphimedes/
Nimbus control box or in the 聺 LogoSens/Orpheus Mini control box.
䡵 Starting communication: Click on the IrDA or RS232 button. The datalogger
starts an instantaneous measurement. When the instantaneous measurement is
finished, the screen displays the instantaneous value for all sensors and the
date/time of the datalogger and of the Pocket PC. Current observer values can
be entered in the fields behind the instantaneous values. Hydras 3 Pocket stores
these observer values as info data on the PDA (not in the datalogger).
䡵 When an observer value is input: Click on the Store (PDA) button.
䡵 Restart the instantaneous measurement: Click on the Refresh button.
* see the operating instructions for the datalogger
Exporting downloaded values
The Hydras 3 Pocket offers the option to save the measurements that have been
read in OTT raw data or text format in separate files for each sensor. The export
format is selected under Settings.
Selecting the export format
䡵 Click on the Settings > Export tab.
䡵 Select the file format Spreadsheet or Rawdata on the Export File Format screen.
The file format Spreadsheet requires additional settings: Field Separator, Decimal Separator, Date Format and Time Format. The selected settings are shown
in the Preview field as they will appear.
Possible
d
dd
ddd
dddd
M
date formats (placeholders):
Day of the month. Single-digit day details have no leading zeroes.
Day of the month. Single-digit day details have one leading zero.
Abbreviated name of the weekday.
The full name of the weekday.
The month in numeric form. Single-digit month details have no leading zeroes.
MM
The month in numeric form. Single-digit month details have one leading zero.
MMM
Abbreviated name of the month.
MMMM Full name of the month.
y
The year without the century. If the number of the year is less than ten
and the century is not given, it will be shown without a leading zero.
yy
The year without the century. If the number of the year is less than ten
and the century is not given, it will be shown with a leading zero.
yyyy
The four-digit number for the year, including details of the century.
10
/
Placeholder for the default separator for date details.
(See Settings > System tab > Regional settings > Date tab)
Possible time formats (placeholders):
h
The hour in 12-hour notation. Single-digit hour details have no
leading zeroes.
hh
The hour in 12-hour notation. Single-digit hour details have one
leading zero.
H
The hour in 24-hour notation. Single-digit hour details have no
leading zeroes.
HH
The hour in 24-hour notation. Single-digit hour details have one
leading zero.
m
The minute. Single-digit minute details have no leading zeroes.
mm
The minute. Single-digit minute details have one leading zero.
s
The second. Single-digit second details have no leading zeroes.
ss
The second. Single-digit second details have one leading zero.
:
Placeholder for the default separator for time details.
(See Settings > System tab > Regional Settings > Time tab)
Exporting measured values
䡵 Click on the Data Management button.
䡵 Click on the desired sensor*.
䡵 If necessary: Place a check in the 聺 Delete file after export control box.
䡵 Click on the Export button.
䡵 In the Save as screen, input/select Name (without suffix), folder (directory),
location (PocketPC main memory or File Store; HP iPAQ Pocket PC 3715 only).
It is not possible to enter a type (the type is determined by the selection of the
export format).
䡵 Click on the OK button.
* alternatively: do not select a sensor, and then click on Export All
Example of formatting exported measured values:
25:10:2004;00:05;499,1
25:10:2004;00:10;499,6
25:10:2004;00:15;499,9
25:10:2004;00:20;500,2
25:10:2004;00:25;500,1
25:10:2004;00:30;500,2
…
Note: Exported measured values can not be opened with Pocket Excel.
Displaying software version of Hydras 3 Pocket
䡵 Click on the Settings > Info tab.
䡵 The screen displays the current version of Hydras 3 Pocket being used.
11
OTT Hydromet GmbH
Ludwigstrasse 16
87437 Kempten · Germany
Phone +49 8 31 56 17- 0
Fax
+49 8 31 56 17- 2 09
Document number
56.WPH.01M.B.E 03-0511
[email protected]
www.ott.com