1
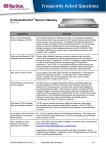
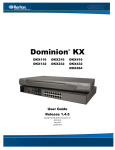
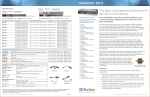
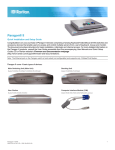
Quick Installation and Setup Guide
USTIP
I. Prepare Servers and Network for Remote Operation
Congratulations on your purchase of USTIP, the industry-leading solution for multi-platform, high-performance, network-based, remote KVM console access. USTIP enables highly-secure, multi-user, bandwidthefficient, and software-independent access to your servers' KVM consoles via a web browser. USTIP uses
Raritan's powerful frame-grabber and Video Compression Algorithm to capture, digitize, and compress the
video signal before transmitting to a remote PC. The remote user has direct access and total control of target servers for maintenance, administration, and trouble-shooting, from running GUI applications to BIOSlevel troubleshooting, and even rebooting.
All Servers
A. For optimal bandwidth efficiency and video performance,
set the desktop background to a
predominantly solid, plain, lightcolored graphic.
B. Ensure that the server’s
video resolution and refresh rate
are supported by USTIP, and
the signal is non-interlaced:
Text Modes:
640x480
640x480
640x480
640x480
720x400
720x400
800x600
800x600
800x600
800x600
800x600
@
@
@
@
@
@
@
@
@
@
@
60Hz
72Hz
75Hz
85Hz
70Hz
85Hz
56Hz
60Hz
72Hz
75Hz
85Hz
1024x768 @ 60Hz
1024x768 @ 70Hz
1024x768 @ 75Hz
1024x768 @ 85Hz
1152x864 @ 60Hz
1152x864 @ 70Hz
1152x864 @ 75Hz
1280x960 @ 60Hz
1280x1024 @ 60Hz
Windows XP
Disable Enhanced Pointer
Precision
and set the mouse motion
speed exactly to the middle
speed setting; these options are
located in Control Panel >
Mouse > Mouse Pointers.
Windows 2000 / ME
Set mouse pointer acceleration
to none, and the mouse motion
speed to the middle speed setting.
Windows 95 / 98 / NT
Set mouse motion speed to the
slowest setting in Control Panel
> Mouse > Motion.
Linux
Set mouse acceleration to
exactly 1, and threshold to
exactly 1.
Sun Solaris
Set mouse acceleration to
exactly 1.0. Ensure that your
video card is set to a supported
resolution, and is outputting
VGA (H-and-V Sync, not composite sync). This non-default
configuration can be set in the
bootprom mode by issuing the
command
setenv output-device screen
:r1024x768x70
followed by the command boot
to reboot.
Macintosh
No specific mouse settings are
required when using USTIP to
access and control a Macintosh
system, but you must set the
USTIP client to single cursor
mode.
Network / Firewall
To enable USTIP, your network
and firewall must allow communication on TCP Port 5000.
Alternatively, USTIP can be configured to use a different TCP
port of your own designation (in
step II-6 below).
II. Attach Local Console for Initial Configuration
1. Attach the included AC power
cord to USTIP and plug the
other end into a nearby AC
power outlet.
2. Connect the client PC to the
USTIP ADMIN Port using a serial (DB9) cable.
3. Connect a standard Ethernet
cable from the Network Port to
an Ethernet switch, hub, or
router.
4. On a USTIP1 unit, connect
the single Paragon port to the
User port on your UMT unit
using a CAT5 cable. On a
USTIP2 unit, connect both the
upper and the lower Paragon
ports to User ports on your UMT
unit using CAT5 cables. The
upper Paragon port allows you
to download the Paragon database to the USTIP unit, and the
lower Paragon port allows local
access to the Paragon unit.
5. Launch a Hyperterminal session from the client PC. To
access the Serial Admin Port,
use HyperTerminal to configure
specific settings with the following steps:
A. In Windows, click on the
Start > Programs > Accessories
> Communications, and then
click HyperTerminal to start a
session.
B. Name the HyperTerminal
session, select a session icon - if
required - and then click OK.
C. In the Connect To window,
click on the Connect Using dropdown arrow and select COM1
(or other option, depending on
where your PC's serial cable is connected)
and click OK.
D. In the COM1 Properties window, click
on the Port Settings tab. Make sure the
Bits per second drop-down is 115200 and
Flow control drop-down is set to NONE,
and click OK.
E. On the File menu, click Properties;
click on the Settings tab, then click on the
Emulation drop-down arrow and select
VT100.
i. Click ASCII Setup and ensure that
the checkbox before Wrap lines that
exceed terminal width is checked and that
this is the only checkbox enabled on this
screen.
ii. Click OK.
iii. Click Terminal Setup and ensure
that the checkbox before Keypad application mode is checked.
iv. Click OK.
6. Power ON USTIP.
7. After booting, the USTIP Setup Wizard
appears on the Admin Console screen.
6
4
UST-IP1/2
3
5
1
To AC Power Outlet
2
Press the letter B on the Admin Console
keyboard to configure USTIP.
8. Navigate to the Network Configuration
Screen, assign a unique name to the
USTIP unit, such as its location
(“ServerRoom”), and type its IP Address
parameters. Press CTRL+S to save the
data.
9. When the Main Menu appears, browse
through the Admin Console options to configure USTIP for your environment. Please
Local Port
keyboard and mouse used to
perform initial configuration
see Raritan’s USTIP User Guide on the
enclosed CDROM for detailed instructions
on USTIP Configuration.
10. When you are finished configuring the
USTIP unit, return to the Main Menu. Press
the letter R and then press ENTER to
restart the USTIP and save your changes.
11. Press the letter S and then press
ENTER to shut the USTIP down, and physically power OFF the unit.
III. Connect Remotely Using MPC or RRC
When you complete the physical installation of your USTIP unit, access Raritan Multi-Client Platform or Raritan Remote Client and establish an initial network connection. Raritan Multi-Platform Client (MPC) and Raritan Remote Client (RRC) are graphical interfaces that allow
you to remotely access the target devices connected to Raritan's Dominion, IP-Reach, and USTIP units.
Note: Please see the Raritan Multi-Platform Client and Raritan Remote Client User Guide, available on Raritan's Website http://www.raritan.com/support/sup_prdmanuals.aspx, or on the Raritan User Manuals & Quick Setup Guides CD ROM, included with this shipment, for
details on installing and operating MPC and RRC.
Launch MPC
To launch MPC from a Windows PC running
Internet
Explorer,
type
http://<IP
address>/mpc into the IE address line.
Please note that the MPC applet will launch
in a new window that does not contain the IE
Menu bar, Tool bar, Scroll bar, or Address
bar. You can work in this window and toggle
to other open windows using the command
ALT+TAB when in a Windows environment.
You can also install MPC as a standalone
applet, described further in the Raritan MultiPlatform Client and Raritan Remote Client
User Guide.
To launch MPC from any browser except
Internet Explorer running on a Windows PC,
type http://<IP address> into your browser's
address line, where <IP address> is the IP
address of the Raritan device.
2. If you are using Windows NT, 2000, XP,
or 2003, ensure that you are not a "restricted" user.
3. Launch Microsoft Internet Explorer
(ensure that your Internet Explorer security
settings allow the download and execution
of ActiveX controls).
Note: A Windows default security setting of
Medium is sufficient.
4. In the URL text field of your Web browser, type the IP address you assigned earlier
in Step II-8. Press ENTER.
5. After RRC launches, a device tree of all
automatically detected Raritan devices
found on your subnet is displayed on the left
side of the screen. If you do not find your
Raritan unit listed by name, create an icon
manually by selecting New Profile on the
Connection menu.
6 Double-click on the icon that corresponds to your Raritan unit.
Note: RRC works only with MS Internet
Explorer. If you are using a different Web
browser, MPC will load automatically.
Note: You must disable any pop-up blockers
in order to launch MPC.
Launch RRC
1. Log on to any Windows-based computer with network access to your Raritan
devices.
For more detailed instructions, please consult the User Guide found on the enclosed CD-ROM or visit www.raritan.com
Rev. D April 2006 255-31-0007
Quick Installation and Setup Guide
USTIP
IV. Establish a Connection
V. Maximize UST-IP Performance
Upon launching MPC or RRC, USTIP will request your user credentials. (See Raritan’s USTIP User Guide for user
account administration). Log on using Paragon’s default username and password (admin / raritan). You will immediately be connected to your USTIP unit. Use the Navigator on the left-hand side of the RRC window, to select and
connect to a port.
USTIP’s dynamic video compression algorithms maintain usability under varying bandwidth constraints. Unlike competitive solutions, USTIP optimizes its output for not just LAN utilization, but also via the WAN and dial-up. By adjusting color depth and limiting video output, USTIP offers the optimal balance between video quality and system responsiveness in any bandwidth constraint. Familiarize yourself with the following configurable parameters to adjust performance options even further.
Note: The default username and password (admin / raritan) will work only if the Paragon unit is configured to recognize them, because USTIP authenticates off of the Paragon User Database. If your USTIP device is new but
is being connected to a previously-existing Paragon setup, this default password has probably been changed.
Please check with your Network Administrator for the current username and password.
Please notice that the MPC and RRC screens vary only in that the MPC screen has a Message Panel in its lower
left corner. The MPC Message Panel displays a simplified log of connection attempts and other significant system
events.
Video Smoothing
Color Calibration
Setting the video smoothing level too high
may prohibit USTIP from correctly transmitting color gradations.
On the Connection menu, click
Properties and adjust the Smoothing
level to an appropriate setting for your
environment.
Some video cards output non-standard
signal levels. To optimize transmitted
color for accuracy, perform a color calibration upon inital USTIP setup:
Noise Filter
The Navigator displays all
known Raritan networked
devices.
Click the Synchronize Mouse tool to
converge the mouse pointers displayed.
The Toolbar provides single-click
access to frequently-used
features and commands.
Double-click on a port to
establish control over the
server or KVM switch
attached to that port.
application and maximizing its window
size.
2. In the RRC menu bar, on the Video
menu, click Calibrate Color and adjust
the color calibration for optimal viewing.
1. On the remote server desktop that you
are controlling with USTIP, ensure that a
solid light color covers 15% or more of the
screen. We suggest opening the Notepad
All video graphics cards generate electrical noise that cannot be seen by the
naked eye when displayed on a monitor.
USTIP reduces the bandwidth it consumes by intelligently ignoring extraneous signal noise.
Setting the noise filter too high may prohibit USTIP from correctly transmitting
screen changes.
On the Video menu, click Video Settings
and to adjust the Noise Filter level to an
appropriate setting for your environment.
Users with Administrator
privileges may modify
USTIP configuration settings
remotely.
Remotely access VT100
serial consoles connected to
the “Serial IN” port of
USTIP.
The RRC Status Bar provides
real-time information on connection parameters.
Once connected to a
port, keystrokes and
video signals are
transmitted in realtime, as if you were
situated locally.
For assistance in North or South America, please contact the Raritan Technical Support Team by telephone (732) 764-8886, by fax (732)
764-8887, or by e-mail [email protected] - Ask for Technical Support - Monday through Friday, 8:00 a.m. to 8:00 p.m., Eastern.