1
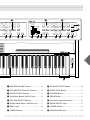
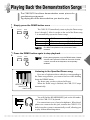
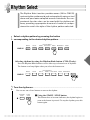
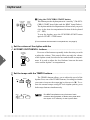
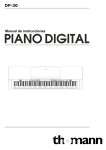
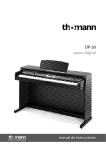
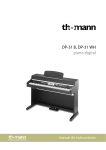
SPECIAL MESSAGE SECTION
PRODUCT SAFETY MARKINGS: Yamaha electronic
products may have either labels similar to the graphics
shown below or molded/stamped facsimiles of these
graphics on the enclosure. The explanation of these graphics appears on this page. Please observe all cautions indicated on this page and those indicated in the safety instruction section.
CAUTION
RISK OF ELECTRIC SHOCK
DO NOT OPEN
CAUTION: TO REDUCE THE RISK OF ELECTRIC SHOCK.
DO NOT REMOVE COVER (OR BACK).
NO USER-SERVICEABLE PARTS INSIDE.
REFER SERVICING TO QUALIFIED SERVICE PERSONNEL.
See bottom of Keyboard enclosure for graphic
symbol markings.
The exclamation point within the
equilateral triangle is intended to alert
the user to the presence of important
operating and maintenance (servicing) instructions in the literature
accompanying the product.
The lightning flash with arrowhead
symbol, within the equilateral triangle, is intended to alert the user to the
presence of uninsulated “dangerous
voltage” within the product’s enclosure that may be of sufficient magnitude to constitute a risk of electrical
shock.
ENVIRONMENTAL ISSUES: Yamaha strives to produce products that are both user safe and environmentally
friendly. We sincerely believe that our products and the
production methods used to produce them, meet these
goals. In keeping with both the letter and the spirit of the
law, we want you to be aware of the following:
Battery Notice: This product MAY contain a small nonrechargable battery which (if applicable) is soldered in
place. The average life span of this type of battery is approximately five years. When replacement becomes necessary, contact a qualified service representative to perform
the replacement.
Warning: Do not attempt to recharge, disassemble, or
incinerate this type of battery. Keep all batteries away
from children. Dispose of used batteries promptly and as
regulated by applicable laws. Note: In some areas, the
servicer is required by law to return the defective parts.
However, you do have the option of having the servicer
dispose of these parts for you.
Disposal Notice: Should this product become damaged
beyond repair, or for some reason its useful life is considered to be at an end, please observe all local, state, and
federal regulations that relate to the disposal of products
that contain lead, batteries, plastics, etc.
NOTICE: Service charges incurred due to lack of knowledge relating to how a function or effect works (when the
unit is operating as designed) are not covered by the
manufacturer’s warranty, and are therefore the owners
responsibility. Please study this manual carefully and
consult your dealer before requesting service.
NAME PLATE LOCATION: The graphic below indicates the location of the name plate. The model number,
serial number, power requirements, etc., are located on
this plate. You should record the model number, serial
number, and the date of purchase in the spaces provided
below and retain this manual as a permanent record of
your purchase.
IMPORTANT NOTICE: All Yamaha electronic products are tested and approved by an independent safety
testing laboratory in order that you may be sure that when
it is properly installed and used in its normal and customary manner, all foreseeable risks have been eliminated.
DO NOT modify this unit or commission others to do so
unless specifically authorized by Yamaha. Product performance and/or safety standards may be diminished.
Claims filed under the expressed warranty may be denied
if the unit is/has been modified. Implied warranties may
also be affected.
SPECIFICATIONS SUBJECT TO CHANGE: The
information contained in this manual is believed to be
correct at the time of printing. However, Yamaha reserves
the right to change or modify any of the specifications
without notice or obligation to update existing units.
Model _________________________________
Serial No. ______________________________
Purchase Date __________________________
92-469-1
IMPORTANT SAFETY INSTRUCTIONS
INFORMATION RELATING TO PERSONAL INJURY, ELECTRICAL SHOCK,
AND FIRE HAZARD POSSIBILITIES HAS BEEN INCLUDED IN THIS LIST.
WARNING- When using any electrical or electronic
product, basic precautions should always be followed.
These precautions include, but are not limited to, the following:
1.
Read all Safety Instructions, Installation Instructions, Special Message Section items, and any Assembly
Instructions found in this manual BEFORE making any
connections, including connection to the main supply.
2.
Main Power Supply Verification: Yamaha products are manufactured specifically for the supply voltage
in the area where they are to be sold. If you should move,
or if any doubt exists about the supply voltage in your
area, please contact your dealer for supply voltage verification and (if applicable) instructions. The required supply
voltage is printed on the name plate. For name plate location, please refer to the graphic found in the Special Message Section of this manual.
3.
This product may be equipped with a polarized
plug (one blade wider than the other). If you are unable to
insert the plug into the outlet, turn the plug over and try
again. If the problem persists, contact an electrician to
have the obsolete outlet replaced. Do NOT defeat the
safety purpose of the plug.
4.
Some electronic products utilize external power
supplies or adapters. Do NOT connect this type of product
to any power supply or adapter other than one described in
the owners manual, on the name plate, or specifically
recommended by Yamaha.
5.
WARNING: Do not place this product or any
other objects on the power cord or place it in a position
where anyone could walk on, trip over, or roll anything
over power or connecting cords of any kind. The use of an
extension cord is not recommended! If you must use an
extension cord, the minimum wire size for a 25' cord (or
less) is 18 AWG. NOTE: The smaller the AWG number,
the larger the current handling capacity. For longer extension cords, consult a local electrician.
6.
Ventilation: Electronic products, unless specifically designed for enclosed installations, should be placed
in locations that do not interfere with proper ventilation. If
instructions for enclosed installations are not provided, it
must be assumed that unobstructed ventilation is required.
7.
Temperature considerations: Electronic products
should be installed in locations that do not significantly
contribute to their operating temperature. Placement of
this product close to heat sources such as; radiators, heat
registers and other devices that produce heat should be
avoided.
92-469-2
8.
This product was NOT designed for use in wet/
damp locations and should not be used near water or exposed to rain. Examples of wet/damp locations are; near a
swimming pool, spa, tub, sink, or wet basement.
9.
This product should be used only with the components supplied or; a cart, rack, or stand that is recommended by the manufacturer. If a cart, rack, or stand is
used, please observe all safety markings and instructions
that accompany the accessory product.
10.
The power supply cord (plug) should be disconnected from the outlet when electronic products are to be
left unused for extended periods of time. Cords should
also be disconnected when there is a high probability of
lightening and/or electrical storm activity.
11.
Care should be taken that objects do not fall and
liquids are not spilled into the enclosure through any
openings that may exist.
12.
Electrical/electronic products should be serviced
by a qualified service person when:
a. The power supply cord has been damaged; or
b. Objects have fallen, been inserted, or liquids
have been spilled into the enclosure through
openings; or
c. The product has been exposed to rain: or
d. The product dose not operate, exhibits a
marked change in performance; or
e. The product has been dropped, or the enclosure
of the product has been damaged.
13.
Do not attempt to service this product beyond that
described in the user-maintenance instructions. All other
servicing should be referred to qualified service personnel.
14.
This product, either alone or in combination with
an amplifier and headphones or speaker/s, may be capable
of producing sound levels that could cause permanent
hearing loss. DO NOT operate for a long period of time at
a high volume level or at a level that is uncomfortable. If
you experience any hearing loss or ringing in the ears, you
should consult an audiologist.
IMPORTANT: The louder the sound, the shorter the time
period before damage occurs.
15.
Some Yamaha products may have benches and/or
accessory mounting fixtures that are either supplied as a
part of the product or as optional accessories. Some of
these items are designed to be dealer assembled or installed. Please make sure that benches are stable and any
optional fixtures (where applicable) are well secured BEFORE using. Benches supplied by Yamaha are designed
for seating only. No other uses are recommended.
PLEASE KEEP THIS MANUAL
Panel Controls
3
CNR-35
MASTER VOLUME
STRINGS
BRASS
MARCH
WALTZ
MAX ACCOMP.
/RHYTHM
VOL.
MIN
1
MASTER VOLUME
STRINGS
BRASS
MAX ACCOMP.
/RHYTHM
VOL.
MIN
2
TEMPO
BEAT
2 7
8
VOICE SELECT
CLARINET SAXOPHONE PIANO
GUITAR
HORN
FLUTE
MARCH
POLKA
RHYTHM SELECT
WALTZ
SWING 1 SLOW ROCK
TANGO
COUNTRY
BEAT
BALLAD
VIBRAPHONE
ACCORDION
ORGAN
SYNTH.
LEAD
JAZZ
ORGAN
8 BEAT
BOSSANOVA
SWING 2 ROCK'N ROLL 16 BEAT
SYNCHRO
START
TEMPO
BANJO
START
/STOP
Contents
Panel Controls ................................................. 2
Getting Started .............................................. 4
Playing Back the
Demonstration Songs ............................... 5
#
Voice Select ........................................................ 6
Rhythm Select .................................................. 7
Automatic Accompaniment ................. 9
Troubleshooting ........................................... 12
Specifications ................................................. 13
^
○ ○ ○ ○ ○ ○ ○ ○ ○ ○ ○ ○ ○ ○ ○ ○ ○ ○ ○ ○ ○ ○ ○ ○ ○ ○ ○ ○ ○ ○ ○ ○ ○ ○ ○ ○ ○ ○ ○ ○ ○ ○ ○ ○ ○ ○ ○ ○ ○ ○ ○ ○ ○ ○ ○ ○ ○ ○
SAMBA
SUSTAIN
5
VOICE SELECT
FLUTE
PIANO
CLARINET
RHYTHM SELECT
SWING SLOW ROCK
8BEAT
SYNCHRO
START
9
START
/STOP
0
GUITAR
BOSSANOVA
3
CNR-55
MASTER VOLUME
ORGAN
BRASS
MAX ACCOMP.
/RHYTHM
VOL.
TANGO
SUSTAIN
STRINGS
MIN
DEMO
! @
1
5
VOICE SELECT
CLARINET SAXOPHONE PIANO
GUITAR
HORN
FLUTE
MARCH
POLKA
RHYTHM SELECT
WALTZ
SWING 1 SLOW ROCK
TANGO
COUNTRY
BEAT
2 7
TEMPO
8
BALLAD
VIBRAPHONE
BANJO
ACCORDION
ORGAN
SYNTH.
LEAD
JAZZ
ORGAN
8 BEAT
BOSSANOVA
SWING 2 ROCK'N ROLL 16 BEAT
SYNCHRO
START
START
/STOP
6
SAMBA
SUSTAIN
9 0
4
DEMO
! @
A
DEMO
DEMO SELECT
1
2
3
POWER
3
%
$
1 MASTER VOLUME Control ..................... 4
9 SYNCHRO START Button ...................... 8
2 ACCOMP./RHYTHM VOL. Buttons .......... 8
0 START/STOP Button ............................... 7
3 VOICE SELECT Buttons ......................... 6
! SUSTAIN Button ..................................... 6
4 Voice Bank Button (CNR-55 only) ........... 6
@ DEMO Button .......................................... 5
5 RHYTHM SELECT Buttons .................... 7
# Auto Accompaniment Section ................. 9
6 Rhythm Bank Button (CNR-55 only) ....... 7
$ DEMO SELECT Keys ............................. 5
7 BEAT Lamp ............................................. 8
% POWER Switch ....................................... 4
8 TEMPO Buttons ...................................... 8
^ HEADPHONES Jack ............................... 5
○ ○ ○ ○ ○ ○ ○ ○ ○ ○ ○ ○ ○ ○ ○ ○ ○ ○ ○ ○ ○ ○ ○ ○ ○ ○ ○ ○ ○ ○ ○ ○ ○ ○ ○ ○ ○ ○ ○ ○ ○ ○ ○ ○ ○ ○ ○ ○ ○ ○ ○ ○ ○ ○ ○ ○ ○ ○
Getting Started
1
Plug the power cord in to an appropriate electrical outlet. .......................................
2
Turn on the CNR-35/55 with the POWER switch. .........................................................................
3
Set the MASTER VOLUME slider. ...........................................................................................................................
• Yamaha products are manufactured specifically for the supply voltage in the area where they are to be sold. If you should move, or if
any doubt exists about the supply voltage, please consult with a
qualified technician.
POWER
4
MASTER VOLUME
MAX
The MASTER VOLUME control is an overall control which
affects the volume of the entire instrument.
Set the slider to roughly this position when using the
built-in speaker system. This is the normal playing level.
MIN
4
• Be careful not to turn up the volume too loud when
using headphones, to avoid damaging your ears. About
the headphones jack, see page 5.
Press the Expression Pedal down with your foot. ....................................................................
Minimum
volume
Maximum
volume
The Expression Pedal also controls the entire volume of the
CNR-35/55. Once you have set the MASTER VOLUME control to a suitable level, you can use the Expression Pedal to
change the volume with your foot as you play.
For now, press the pedal down slightly beyond the halfway
point.
○ ○ ○ ○ ○ ○ ○ ○ ○ ○ ○ ○ ○ ○ ○ ○ ○ ○ ○ ○ ○ ○ ○ ○ ○ ○ ○ ○ ○ ○ ○ ○ ○ ○ ○ ○ ○ ○ ○ ○ ○ ○ ○ ○ ○ ○ ○ ○ ○ ○ ○ ○ ○ ○ ○ ○ ○ ○
Playing Back the Demonstration Songs
The CNR-35/55 has three demonstration music pieces for
your listening enjoyment.
Try playing back the demos before you start to play.
1
Simply press the DEMO button once. ...........................................................................................................
SUSTAIN
The CNR-35/55 immediately starts to play the Demo songs
from 1 through 3. After it reaches to the end of the Demo song
3, it automatically repeats the Demo songs.
DEMO
Demo song 1
Demo song 2
Demo song 3
Oh! Susanna
Rêverie
Air for the G-string
(By S. C. Foster)
(By C.A. Debussy)
(By J. S. Bach)
• The BEAT lamp flashes every first beat of each
measure.
2
Press the DEMO button again to stop playback. ........................................................................
SUSTAIN
DEMO SELECT
DEMO
1
2
• During demo playback, only the DEMO button, Master
Volume and Expression Pedal can be used. All other
controls, as well as the keyboard, are temporally
disabled.
3
Demo song 1
Demo song 2
Demo song 3
Listening to the Specified Demo song:
Press one of right most three white keys corresponding to
the Demo song number you want to listen to while holding
down the DEMO button.
The demo song you have selected will start.
When the Demo song is finished, the CNR-35/55 stops
automatically.
You will find the HEADPHONES jack on the left underside of the CNR-35/55 keyboard.
For connection to a set of stereo headphones. When headphones are connected to this jack, sound to the CNR-35/55’s
built-in speaker system is automatically cut off, allowing you
to play without disturbing others.
○ ○ ○ ○ ○ ○ ○ ○ ○ ○ ○ ○ ○ ○ ○ ○ ○ ○ ○ ○ ○ ○ ○ ○ ○ ○ ○ ○ ○ ○ ○ ○ ○ ○ ○ ○ ○ ○ ○ ○ ○ ○ ○ ○ ○ ○ ○ ○ ○ ○ ○ ○ ○ ○ ○ ○ ○ ○
5
Voice Select
The Voice Select section provides seven (14 for the CNR55) different high-quality instrument voices. You can also
add the Sustain effect while you play.
Selecting Voices
■ Select a voice by pressing the button
corresponding to the desired voice. ................................................................................................................
STRINGS
BRASS
CLARINET
VOICE SELECT
FLUTE
PIANO
GUITAR
ORGAN
CNR-35
6
Selecting Voices by using the Voice Bank button (CNR-55 only).
Press the Voice Bank button to select either top or bottom row of voices.
The bottom row lamp lights when you select the bottom row.
STRINGS
VOICE SELECT
CLARINET SAXOPHONE PIANO
GUITAR
ACCORDION
ORGAN
SYNTH.
LEAD
JAZZ
ORGAN
CNR-55
BRASS
HORN
FLUTE
VIBRAPHONE
BANJO
Sustain
SUSTAIN
DEMO
Sustain makes the sound gradually fade out when the keys
are released.
Press the SUSTAIN button once to turn the Sustain function on, press it again to turn the function off.
○ ○ ○ ○ ○ ○ ○ ○ ○ ○ ○ ○ ○ ○ ○ ○ ○ ○ ○ ○ ○ ○ ○ ○ ○ ○ ○ ○ ○ ○ ○ ○ ○ ○ ○ ○ ○ ○ ○ ○ ○ ○ ○ ○ ○ ○ ○ ○ ○ ○ ○ ○ ○ ○ ○ ○ ○ ○
Rhythm Select
The Rhythm Select section provides seven (14 for CNR-55)
various rhythm patterns played automatically using actual
drum and percussion sampled sounds. Automatic Accompaniment function also can be used with the rhythm patterns, providing appropriate bass and chordal accompaniment to match the style of the rhythm pattern selected.
1
Select a rhythm pattern by pressing the button
corresponding to the desired rhythm pattern. ................................................................................
MARCH
WALTZ
SWING
RHYTHM SELECT
SLOW ROCK
8BEAT
BOSSANOVA
TANGO
CNR-35
Selecting rhythms by using the Rhythm Bank button (CNR-55 only).
Press the Rhythm Bank button to select either top or bottom row of rhythms.
The bottom row lamp lights when you select the bottom row.
MARCH
POLKA
WALTZ
TANGO
COUNTRY
BALLAD
RHYTHM SELECT
SWING 1 SLOW ROCK
8 BEAT
BOSSANOVA
CNR-55
2
SWING 2 ROCK'N ROLL 16 BEAT
SAMBA
Turn the rhythm on. .......................................................................................................................................................................
You can use one of two buttons to turn on the rhythm:
SYNCHRO
START
START
/STOP
1Using the START / STOP button
This button does as its name indicates; the rhythm begins as
soon as the button is pressed. To stop the rhythm, press this
button again.
○ ○ ○ ○ ○ ○ ○ ○ ○ ○ ○ ○ ○ ○ ○ ○ ○ ○ ○ ○ ○ ○ ○ ○ ○ ○ ○ ○ ○ ○ ○ ○ ○ ○ ○ ○ ○ ○ ○ ○ ○ ○ ○ ○ ○ ○ ○ ○ ○ ○ ○ ○ ○ ○ ○ ○ ○ ○
7
Rhythm Select
2Using the SYNCHRO START button
SYNCHRO
START
START
/STOP
This button puts the rhythm pattern in “stand-by” (The SYNCHRO START lamp lights and the BEAT lamp flashes.).
The rhythm and the accompaniment will start when you press
a key in the Auto Accompaniment Section of the keyboard
(C1 - F#2).
To stop the rhythm, press the SYNCHRO START button
again or START / STOP button.
(For more about the Automatic Accompaniment, see page 9)
3
Set the volume of the rhythm with the
ACCOMP./ RHYTHM VOL. buttons. ......................................................................................................................
ACCOMP.
/RHYTHM
VOL.
8
4
Press one of the buttons repeatedly in the direction you wish
to adjust the volume. This control affects not only the volume
of the rhythm sound, but also the bass and chordal accompaniment. It is used to adjust the level balance between the main
voice and the rhythm / accompaniment.
Set the tempo with the TEMPO buttons. ....................................................................................................
BEAT
TEMPO
BEAT
TEMPO
The TEMPO buttons allows you to adjust the speed of the
rhythm. Press one of the TEMPO buttons, according to whether
you want to increase the tempo (▲) or decrease it (▼). To restore the normal tempo setting for each rhythm pattern, press
both tempo buttons simultaneously.
• The BEAT lamp flashes every first beat of each
measure during playback. It flashes every beat while
the rhythm is in “stand-by” for the Synchro Start.
○ ○ ○ ○ ○ ○ ○ ○ ○ ○ ○ ○ ○ ○ ○ ○ ○ ○ ○ ○ ○ ○ ○ ○ ○ ○ ○ ○ ○ ○ ○ ○ ○ ○ ○ ○ ○ ○ ○ ○ ○ ○ ○ ○ ○ ○ ○ ○ ○ ○ ○ ○ ○ ○ ○ ○ ○ ○
Automatic Accompaniment
The Automatic Accompaniment function works with the
rhythm of the CNR-35/55 to produce bass and chordal accompaniment automatically as you play chords in the Auto
Accompaniment Section of the keyboard (C1 - F#2).
Auto Accompaniment Section (C1 - F#2)
9
You can play accompaniment in either ways you like, Single Finger or Fingered Chord.
You don’t have to select one specific fingering “mode” between these two ways because the
CNR-35/55 automatically recognize in which way you play the chords.
● Single Finger
This is the faster and easier way to obtain many different chord/bass combinations, by
simply using one, or at most, two fingers to play the chords.
Refer to the chart, “Chords Recognized in the Single Finger” on page 10 for details on
playing chords in this way.
● Fingered Chord
The Fingered Chord is the way automatically produces chord/bass accompaniment for
chords played in the Auto Accompaniment Section of the keyboard (C1 - F#2). It allows
you to use a wider range of chord types than in the Single Finger way. In this way, you
play all the notes of the chord while the CNR-35/55 automatically selects the appropriate
bass pattern and rhythmic accents.
Refer to the chart, “Chords Recognized in the Fingered Chord” on page 11 for details on
playing chords in this way.
○ ○ ○ ○ ○ ○ ○ ○ ○ ○ ○ ○ ○ ○ ○ ○ ○ ○ ○ ○ ○ ○ ○ ○ ○ ○ ○ ○ ○ ○ ○ ○ ○ ○ ○ ○ ○ ○ ○ ○ ○ ○ ○ ○ ○ ○ ○ ○ ○ ○ ○ ○ ○ ○ ○ ○ ○ ○
Automatic Accompaniment
■ Chords Recognized in the Single Finger (e.g. Key of C) ...............................................
Major, minor and 7th chords can all be played in this way.
C
Major chords:
Press the root of the chord (the note that corresponds to the
chord’s name).
Cm
Minor chords:
Simultaneously press the root and any one black key to the left
of it.
C7
7th chords:
Simultaneously press the root and any one white key to the left
of it.
10
• Minor and 7th chords with black key roots (such as Bb
or F#) are played in the same way as those with white
key roots.
• With Single Finger, the chord produced will sound in the
same octave regardless of where it is played in the Auto
Accompaniment Section of the keyboard (C1 - F#2).
Automatic Accompaniment Off
ACCOMP.
/RHYTHM
VOL.
POWER
Turning the POWER switch on while holding either of the
ACCOMP./ VOL. buttons put the CNR-35/55 to be “Automatic Accompaniment Off” condition. In this condition, bass
and chordal accompaniment doesn’t sound at all while playback of the rhythm patterns, even though you play chords in
the Auto Accompaniment Section of the keyboard (C1 - F#2).
If you use this function, you can start playback of the rhythm
patterns by pressing any of the entire keys (C1 - C5) while the
rhythm is in “stand-by” condition for the Synchro Start.
○ ○ ○ ○ ○ ○ ○ ○ ○ ○ ○ ○ ○ ○ ○ ○ ○ ○ ○ ○ ○ ○ ○ ○ ○ ○ ○ ○ ○ ○ ○ ○ ○ ○ ○ ○ ○ ○ ○ ○ ○ ○ ○ ○ ○ ○ ○ ○ ○ ○ ○ ○ ○ ○ ○ ○ ○ ○
Automatic Accompaniment
■ Chords Recognized in the Fingered Chord (e.g. Key of C) .......................................
Cm
C7
Cm 7
CM 7
CmM 7
Caug
C 7aug
Cdim
Csus 4
C 7 sus4
Cm 7 b5
C 7 b5
C6
Cm 6
(
)
(
)
C
• Because of the range of the Auto Accompaniment
Section of the keyboard (C1 - F#2), the following
chords cannot be recognized:
Bb6, B6, Baug, Bbm6, Bm6, A7b5, Bb7b5 and B7b5.
○ ○ ○ ○ ○ ○ ○ ○ ○ ○ ○ ○ ○ ○ ○ ○ ○ ○ ○ ○ ○ ○ ○ ○ ○ ○ ○ ○ ○ ○ ○ ○ ○ ○ ○ ○ ○ ○ ○ ○ ○ ○ ○ ○ ○ ○ ○ ○ ○ ○ ○ ○ ○ ○ ○ ○ ○ ○
11
Troubleshooting
Please note that the appearance of any of the following
phenomena does not indicate a mechanical failure of the
CNR-35/55.
Problem
Possible Cause and Solution
A cracking noise is sometimes
heard.
Noise may be produced when either an electrical appliance is turned on or off, or an electric power tool
(such as drill) is used in the proximity of the CNR35/55. If this occurs, plug the CNR-35/55 into an
electrical outlet located as far as possible from the
device that seems to be the source of the problem.
Interference from radio, TV, or
other sources occurs.
This is caused by the proximity of a high-power
broadcasting station or amateur ham radio setup.
The sound of the CNR-35/55
causes surrounding objects to
resonate.
Because the CNR-35/55 is capable of producing
powerful bass sounds, resonance may be caused in
surrounding objects, such as cabinets or glass windows. To avoid this, relocate the objects or lower the
CNR-35/55’s volume.
The sound is too soft, despite
the volume being set to the
maximum.
Check all of the volume controls, making sure that
they are set to suitable levels: the ACCOMP./
RHYTHM VOL. control (When using rhythm / accompaniment) and the Expression Pedal as well as
the MASTER VOLUME control.
Chord/bass accompaniment
doesn’t sound at all while playback of the rhythm patterns even
though playing the chords in the
Auto Accompaniment Section of
the keyboard (C1 - F#2).
Check that the CNR-35/55 is not in “Automatic Accompaniment Off” condition. (See page 10)
If the instrument is in that condition, simply turn the
POWER off then turn it on again.
12
○ ○ ○ ○ ○ ○ ○ ○ ○ ○ ○ ○ ○ ○ ○ ○ ○ ○ ○ ○ ○ ○ ○ ○ ○ ○ ○ ○ ○ ○ ○ ○ ○ ○ ○ ○ ○ ○ ○ ○ ○ ○ ○ ○ ○ ○ ○ ○ ○ ○ ○ ○ ○ ○ ○ ○ ○ ○
Specifications
CNR-35
Keyboard
Voice Select
Effect
Rhythm Select
Rhythm and
Accompaniment Controls
Other Controls
CNR-55
49 keys: C1 - C5 (4 octaves)
Strings, Brass, Clarinet, Horn,
Saxophone, Flute, Piano,
Vibraphone, Guitar, Banjo,
Accordion, Synth. Lead,
Organ, Jazz Organ
Strings, Brass, Clarinet, Flute,
Piano, Guitar, Organ
Sustain (on/off)
March, Waltz, Swing, Slow Rock,
8 Beat, Bossanova, Tango
March, Tango, Polka, Country,
Waltz, Ballad, Swing 1, Swing 2,
Slow Rock, Rock’n Roll, 8 Beat,
16 Beat, Bossanova, Samba
Start/Stop, Synchro Start, Tempo, Accomp./Rhythm Volume
Power Switch, Master Volume, Expression Pedal
Demo Songs
3 songs
Output Jack
Headphones (Stereo Type)
Amplifier
10 W
Speaker
16 cm
Power Supply
Dimensions
Weight
Bench Dimensions
AC 220 V
754 (H) x 786 (W) x 410 (D) mm
29-2/3" (H) x 30-15/16" (W) x 16-1/8" (D)
H + book rest = 1,003 mm, 39-1/2"
28 kg, (61 lbs. 12 oz)
512 (H) x 510 (W) x 360 (D) mm
20-1/8" (H) x 20-1/16" (W) x 14-1/8" (D)
○ ○ ○ ○ ○ ○ ○ ○ ○ ○ ○ ○ ○ ○ ○ ○ ○ ○ ○ ○ ○ ○ ○ ○ ○ ○ ○ ○ ○ ○ ○ ○ ○ ○ ○ ○ ○ ○ ○ ○ ○ ○ ○ ○ ○ ○ ○ ○ ○ ○ ○ ○ ○ ○ ○ ○ ○ ○
13
Yamaha Corporation
International Group
M.D.G., EMI Division © Yamaha Corporation 1996
VV41340 608POCP16.2-01A0 Printed in Japan
P.O.Box1, Hamamatsu, Japan
Phone: 81(Country Code)-53-460-2317
Fax: 81-53-456-8872, 1109