1
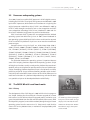
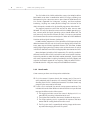
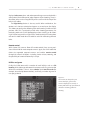
1
1
Introduction
On Sept. 2, 2009, a group of MIT students launched a balloon with a digital
camera into near space to take photographs of the earth (http://
space.1337arts.com). Five hours later, the camera returned from the flight,
having reached a height of 17.5 miles. All of the equipment was put together from off-the-shelf components (balloon, parachute, camera, GPS
tracker, etc.) and did not cost more than $150. Several missions similar to
this one had been completed before by other groups, but not at such a low
cost. For example, in 2008, an Italian group launched a digital camera into
space taking both photos and videos (http://www.francescobonomi.it/
ICBNN).
Both projects used Canon compact cameras for taking pictures. The MIT
students used a Canon A470, the Italian group a Digital Elph SD 1100 IS (Ixus
80 IS). In addition, both cameras were equipped with the CHDK, the Canon
Hack Development Kit. Despite its intimidating name, the CHDK is a readyto-run piece of software that can be installed on the camera’s memory card
and that enhances the camera with many new features. In the abovementioned space missions, the CHDK determined when to begin shooting
and in what intervals. In the case of the SD 1100 IS, the CHDK also ran a
shutter priority exposure program that the camera normally does not offer.
These are only a few tricks that the CHDK has up its sleeve. RAW shooting, live histograms, remote control, ultrashort and ultralong exposure
times, time-lapsing, motion detection, exposure and focus bracketing,
camera automation with scripts, and, and, and… More than a few highpriced DSLRs would be proud to have such features. No wonder the CHDK
has hit the columns of nearly every photography-related magazine and
e-zine around the world.
Today, the CHDK can be regarded as a mature product that is robust
enough for the most demanding missions. It is available in many languages.
The documentation, too, such as manuals and tutorials, is rapidly improving.
There is a lively online community at http://chdk.setepontos.com/.
How this book is organized
We start with an introduction to Canon compact cameras and the operating systems they use. An introduction to the CHDK—what it is and why
you should use it—completes chapter 2.
2
CHAPTER 1
Introduction
Chapter 3 deals with how to install the CHDK—both utility-augmented
installation on a PC and manual installation by utilizing camera functions.
Chapter 4 discusses the out-of-the-box functions of the CHDK. First, we
examine how to tame the beast—at times, the information overflow can
be overwhelming. Then we unleash it again: advanced exposure control,
ultrashort and ultralong exposure times, manual focusing, shooting RAW,
bracketing, edge overlay, remote control, etc.
Chapter 5 then turns your camera into a robot via scripting in uBasic
and Lua. After short introductions to these programming languages, we
discuss scripts for time lapse, bracketing, motion detection, exposure control, and configuration switching.
Chapter 6 covers some advanced techniques: large panoramas, superwide-angle shots, and combining High Dynamic Range (HDR) photography
with panoramas and time-lapse movies.
A CHDK spin-off, the Stereo Data Maker (SDM) is discussed in chapter 7.
Shooting 3D stereo images is an important topic in this chapter, along with
the strong capabilities of the SDM for remote photography, communication with external devices, and Digiscoping.
Application of the SDM (and CHDK) to areas such as Kite Aerial Photography (KAP), balloon-based photography, and other remote platforms is
discussed in chapter 8.
Chapter 9 takes a short look at similar “camera enhancement” projects,
such as the EOS-CHDK, MagicLantern (which turns the Canon EOS 5D into
a professional movie camera), and the Pentax project.
Finally, the appendix contains information on using memory cards of
more than 4 GB with the CHDK. There is a section with important web links
and another section with tips in case you run into trouble. Finally, you’ll
find out how to contribute to the further development of the CHDK.
Acknowledgments
First and foremost, I wish to thank the publishers. Thanks go to my lector,
René Schönfeld, at dpunkt.verlag Heidelberg for co-parenting the idea of
writing a book about the CHDK; and to Gerhard Rossbach, publisher at
Rocky Nook, Santa Barbara, for his enthusiasm. Copyediting was done by
Cynthia Anderson, typesetting and graphic design by Petra Strauch, Just in
Print. Thanks go also to Alice Philipp, my partner in life, for her patience and
support.
This book would not have been possible without the many volunteers
who have contributed to the CHDK in various forms: the initial creators of
the CHDK core, VitalyB and GrAnd; later contributors such as Fingalo,
Juciphox, MicroFunguy, and others; the volunteers who ported (and continue to port) the CHDK to new cameras; the many script, documentation,
and utility authors; and the whole vibrant CHDK community that continues to improve an already strong product. With this book, I hope to give
something back to the community.
2.1
2
Cameras and Operating
Systems
Before turning to the virtues of the CHDK, let’s first have a look at some of
the platforms the CHDK runs on. As its name suggests, the CHDK runs on
Canon cameras. Specifically, the classic form of the CHDK runs on Canon
compact cameras, such as Powershot and Digital Elph (Digital IXUS). For the
still-experimental (at time of writing) EOS-CHDK, please see section 9.1.
2.1
Camera hardware
Practically all digital Canon compact cameras (and all of the newer camera
models) are equipped with a zoom lens, allowing for an optical zoom range
from 1:3 to 1:20+. The optical zoom can be extended via an optional digital
zoom. All zoom lenses are equipped with a macro function, which again
can be extended with a digital macro. Digital zoom and digital macro come
at a cost, however: they reduce image resolution because only a part of the
sensor is used for the final image.
Most Canon cameras are equipped with an optical image stabilizer;
usually, these cameras carry the suffix “IS” in their name. “Optical” means
that a lens element is moved to counteract camera shake. With this technique, it is possible to increase exposure times by a factor of 2–16
(1–4 f-stops) when shooting without a tripod. An image stabilizer is a very
useful feature, especially for telephoto shots and for shooting in low light
conditions.
Most Canon cameras use CCD (charge coupled device) type sensors;
only a few use CMOS type sensors. Smaller models have sensors with a
diameter of 1/2.5 inch (10 mm), while larger models have sensors with a
diameter of 1/1.7 inch (14.9 mm). The focal length conversion factors are
6.2 and 4.6 respectively, compared to the 35mm format.
For most Canon cameras, the resulting image is delivered in the form of
a JPEG file with selectable resolutions and formats, and selectable compression ratios. Top-range cameras offer an option to deliver the RAW sensor data, too. Actually, the prime motivation behind the development of
the CHDK was to enable smaller, low-cost cameras to deliver sensor data in
RAW format. It should be mentioned that digital zoom and digital macro
do not work with RAW format; the format delivers the pure sensor data
without any post-processing.
Camera hardware
3
4
CHAPTER 2
Cameras and Operating Systems
For the smaller models—especially the Digital Elph (Ixus) series—the
shutter mechanism consists of a simple mechanical shutter plus an electronic shutter. Because the circuitry for the electronic shutter requires
some space on the sensor chip, less sensor area is left for the light-sensitive
parts—resulting in a less than optimal signal-to-noise ratio compared to a
DSLR. Therefore, the top-of-the-range Powershot models, such as the
G-series, use a mechanical shutter in order not to sacrifice valuable sensor
real estate.
Similarly, the lenses of the low-cost cameras are not equipped with a
diaphragm but rather with an ND (neutral density) filter that is switched
on when the scene becomes too bright. Because the lens is always used at
full aperture, it is not possible to increase the depth of sharpness (DOF) by
stopping down with these cameras. Variations in brightness and shutter
speed are compensated for by the ND filter and by changing the sensor’s
sensitivity (ISO speed). Higher-priced cameras are equipped with a traditional diaphragm.
All Canon cameras are, of course, equipped with autofocus (AF) and
automatic exposure (AE) control. Newer models even have face detection.
Only the top-range models allow for manual control of focus, shutter
speed, aperture, and ISO. With the CHDK, manual control of focus and exposure is achieved for all models—within the physical limits of the camera,
of course.
All Canon cameras are equipped with an internal flash unit. Some larger
cameras offer the option of connecting an external flash as well. Unfortunately, not all cameras allow fine-tuned manual control of the flash power.
As a result, flash images can often look unnatural and flat. In many cases,
the flash is too bright. The CHDK allows a manual flash on all models with
three different power settings, resulting in more natural-looking flash
images.
All Canon cameras are equipped with a video function, in some cases an
HD video function. Because the camera’s image sensor has a much higher
resolution than a video frame, digital zoom (Digital Converter) can be utilized to a certain degree for video shots without losing quality. In most
cases, the optical zoom is disabled during video shooting, as the zoom motor’s noise would ruin the soundtrack. With the CHDK, this behavior can be
overridden (for some cameras) and the optical zoom can be used while
shooting video (section 4.8). Some editing will be required, however, for the
soundtrack.
The built-in audio facility (microphone and audio digitizer) that is used
for the video soundtrack can be used for photos, too. Voice notes can be
attached to photos, or the camera can be utilized as a dictating machine.
2.2
2.2
Processors and operating systems
5
Processors and operating systems
Since 2002, Canon has used the DIGIC processor in all of its digital cameras,
including the EOS DSLRs. The original DIGIC processor was followed in 2004
by the DIGIC II processor, which combines all functions on a single chip (the
original processor needed three chips). DIGIC II was followed in 2007 by
DIGIC III, which brought new features such as face recognition and iSAPS
scene-recognition technology. DIGIC IV was introduced in 2008 and features faster and better image processing and live face detection.
DIGIC II and some DIGIC III processors are equipped with the VxWorks
operating system from Wind River Systems. In 2007, Canon introduced its
own operating system called DryOS that has been used since then on most
DIGIC III and DIGIC IV platforms. DryOS can run on more than 10 different
processor types.
Compact cameras using the DryOS are: A470, A480, A580, A590 IS,
A650 IS, A720 IS, A1000 IS, A1100 IS, A2000 IS, A2100 IS, D10, E1, G9, G10,
G11, SD1100 IS (IXUS80 IS), SD770 IS (IXUS85 IS), SD780 IS (IXUS100IS),
SD790 IS (IXUS90 IS), SD1200 IS (IXUS95 IS), SD960 IS (IXUS110 IS), SD940 IS
(IXUS120 IS), SD980 IS (IXUS200 IS), SD870 IS (IXUS860 IS), SD880 IS
(IXUS870 IS), SD950 IS (IXUS960 IS), S5 IS, S90, SX1 IS, SX10 IS, SX20 IS,
SX100 IS, SX110 IS, and SX200 IS.
The distinction between the operating systems is important because
some CHDK scripting functions depend on the operating systems. Scripts
utilizing these functions usually run only on the platform they were developed for, or they must implement special provisions for cross-platform operation. Developing platform-dependent scripts is fine for home use. When
publishing scripts for a larger audience, however, portable scripts are definitely the preferred solution. Newer versions of the CHDK allow access to
most camera functions in a platform-independent way, so that with some
care, portable scripts can be developed without much difficulty.
2.3
The CHDK: What it is and how it works
2.3.1 History
The development of the CHDK began in 2006 with the Russian programmer VitalyB. Studying the disassembly of a firmware upgrade for a Canon
IXUS camera, he was able to analyze the upgrade process and write a program that would boot from the card and take control of the camera. With
the help of this program, he was able to read out (dump) the original Canon
operating system from the camera to a PC. Data transfer used the blue
camera LED and a phototransistor, a method still employed today with
some cameras.
Figure 2-1
The CHDK logo shows up during the
boot process of the CHDK. The logo
display can be switched off via the
CHDK menu function ALT > MENU >
Miscellaneous Stuff > Show Splash
Screen on Load.
6
CHAPTER 2
Cameras and Operating Systems
The first build of the CHDK enabled the camera (an A610) to deliver
RAW 10-bit sensor data in combination with JPEG images, allowing true
RAW processing for a consumer camera. Apart from the RAW format, this
first version supported live histograms, scripting, and three-exposure
bracketing. Scripting was made possible through the inclusion of the
uBasic interpreter, created earlier by Swedish programmer Adam Dunkel.
The program proved so useful that versions for other cameras soon
followed. This was first done for cameras with the VxWorks operating system; cameras with the DryOS operating system should follow later. For
each camera (in fact, for each firmware version), it is necessary to read out
the firmware from the camera and analyze it in order to link the additional
functions to the original firmware (section A.4).
In 2007, another programmer, GrAnd, joined the CHDK community and
added numerous features such as the on-screen display (OSD) of focal distance, zoom step and factor, hyperfocal distance, DOF calculator, shadow
and highlight clipping warnings, battery meter, and much more. An article
in DP Review about the new features brought public attention to the CHDK.
More developers joined the CHDK community. This initially resulted in
different branches of the CHDK, each with its own set of special functions.
Particularly notable are MX3’s build with motion detection, Fingalo’s build
with much-improved uBasic scripting functionality and USB support, and
Juciphox’s build with support for Lua scripting. Today, the official CHDK—
the MoreBest build—integrates many of these additional functions.
2.3.2 How it works
Canon cameras perform several steps when switched on:
f First, the camera’s firmware checks the memory card. If the card is
write-protected, and if it contains a file named DISKBOOT.BIN in its root
directory, then this file is loaded and executed. This allows almost any
program in the camera to be infiltrated.
f If such a file is not found, the normal start-up process continues. This
includes the launch of four different native tasks that run in parallel and
manage the different units of the camera:
g The Logging task takes care of the camera’s display unit. It is responsible for presenting information to the user.
g The Keyboard task monitors the camera’s buttons for key presses.
g The Image-capturing task is responsible for exposure and focus
control and for reading the data from the sensor.
g The File-system task is responsible for writing images to the memory card and managing the card’s file system.
2.3
The CHDK: What it is and how it works
7
The CHDK adds an additional task that manages the CHDK functions. In
addition, the CHDK needs hooks in the native tasks to communicate with
them. Therefore, the CHDK loader embodied in the file DISKBOOT.BIN performs the following steps:
f Copies the core CHDK code into a suitable memory location within the
camera. Of course, this is only possible if the camera has enough free
memory. On some cameras this is not the case, and limited or no CHDK
support is possible.
f Restarts the camera with the CHDK code as the entry point. Instead of
the native boot process, the CHDK boot process is now performed. This
process will:
g Launch the CHDK task.
g Add hooks to the native tasks (logging task, keyboard task, imagecapturing task, file-system task) while loading and launching those
tasks.
In this way, the changes applied to the native firmware are only temporary
and remain minimal. Unfortunately, the position of the hooks is different
for every firmware version, so a different CHDK version is required for each
firmware version. The main task of migrating the CHDK code to a new
camera is to find out the correct position of the required hooks (section A.4).
2.3.3 What the CHDK can do for you
RAW images
One of the most outstanding functions of the CHDK (and historically the
first) is the ability to deliver and process RAW sensor data. The popularity of
RAW image processing relies on the fact that RAW files contain the full information gathered by the sensor. The JPEG format, in contrast, resamples
the 10-, 12-, or 14-bit pixel values down to an 8-bit scheme. This can result
in washed-out highlights. PC-based RAW converters, on the other hand, are
able to recover at least some of the blown-out highlights.
An additional problem with the JPEG format is interpolation. Sensor
cells responsive for red, green, and blue light are placed side by side. Therefore, interpolation is required to compute a complete pixel value as required by the JPEG format. PC-based RAW converters (section 4.5.4) can do
a better job than the tiny processor within the camera, resulting in improved sharpness and fewer artifacts such as moirés.
Another advantage of the RAW format is that processing decisions, such
as white point and color space (e.g., sRGB, AdobeRGB), can be postponed
until the image is in the development phase on the PC. There, the photographer can try out different settings without risking loss of image detail.
Figure 2-2
The CHDK main menu organizes the
numerous functions into 11 groups.
The menu is obtained by changing into
<Alt> mode (chapter 4), then pressing
the MENU button.
8
CHAPTER 2
Cameras and Operating Systems
Recent versions of the CHDK are able to deliver RAW data in the popular
DNG format, created by Adobe as a camera-manufacturer-independent
RAW format. It’s a sensible choice; manufacturers of premium cameras
such as Hasselblad, Leica, and Pentax have chosen it as their native RAW
output format.
Scripting and motion detection
An outstanding feature of the CHDK is its ability to automate tasks by writing a script. While older versions of the CHDK support only the easy but
rather simplistic scripting language uBasic, newer versions come with
built-in support for the more advanced Lua language, which is also used by
Adobe Lightroom for automation purposes. With scripting, it becomes possible to shoot long time series or to let the camera operate autonomously,
as in unmanned aerial missions.
A rather surprising feature of both uBasic and Lua is the possibility of
motion detection. Under the control of a script, the camera shoots when
motion occurs within the image field, or if a detected motion stops. The
CHDK uses the camera sensor for this purpose, allowing highly configurable motion detection without the need for extra hardware.
More control
Most Canon compact cameras operate automatically. If they offer a manual
mode, it enables you to dial in correction values for exposure but does not
allow you to set explicit values for shutter speed, aperture, or ISO speed, or
to focus manually. The CHDK, in contrast, enables you to do exactly that. Not
only is it possible to dial in precise values for shutter speed, aperture, ISO
speed, or focus distance, but the range of available shutter speeds is significantly expanded. Extremely short shutter speeds, such as 1/60,000 sec., and
extremely long exposure times are possible under the control of the CHDK,
depending on the physical limits of the camera. For video clips, it becomes
possible to influence the video quality, and on some cameras, to enable the
optical zoom while shooting video.
Better information
While these possibilities extend the application range of the camera, the
additional OSD (On Screen Display) provides greater control over the general image-making process. This starts with a battery meter that gives you
a precise readout (in percent) of the remaining battery power. This feature
alone makes it worth installing the CHDK, because shooting sessions and
battery usage can be planned in a much better way. Precise exposure control is achieved through a highly configurable live histogram and the
2.3
The CHDK: What it is and how it works
9
display of zebra areas (over- and underexposed image areas masked with a
zebra pattern) that allow you to judge exposure before shooting. These information items can be arranged freely on the screen with the help of the
built-in OSD editor.
The Edge Overlay feature is also very useful. When switched on, the
contours of a shot are extracted and appear as an overlay on the display.
This allows you to align the following shots to the overlay, and thus to the
previous shot. This is particularly useful when shooting panoramas, for
bracketing work such as HDR photography or focus stacking, or for shooting 3D stereo images with a single camera. Unfortunately, this feature does
not work in video mode where it could be useful for connecting different
takes.
Remote control
While Canon EOS cameras allow full remote control, there are no provisions of that kind for most compact cameras. Again, the CHDK adds that
feature to supported compact cameras and enables remote control
through the camera’s USB port—including shutter release, zooming, and
the possibility of remote functionality in scripts.
Utilities and games
Finally, the CHDK comes with a number of useful utilities such as a file
browser, which allows you to browse the memory card’s file system and to
delete files and folders. There is also a calendar and a text file reader (for
example, to read script documentation), and finally, a number of games in
case you get bored.
Figure 2-3
An incentive to always take your
camera with you: games in the
camera’s display (here, Reversi). A
battery indicator keeps you informed
about the remaining power for
shooting.