1
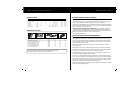
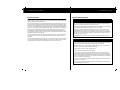
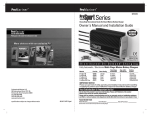
ProMa r i ne r
®
Visit ProMariner Online at www.pmariner.com, for a Complete
Selection of Quality Marine Products...
Here are just a few:
ProMa r i ne r
®
ProSport Series
Owner's Manual and Installation Guide
Recreational Grade ProSport Waterproof Marine Battery Chargers
WATERPROOF
SALTWATER
and
Professional Grade ProTournament Waterproof Marine Battery Chargers
TESTED
Advanced 4 Step Dry Mount Marine Battery Chargers
Battery Maintainers
AC Plug Holders
Battery Isolators
Pro Inverters
DC to DC Converters
Constructed to:
Marine UL 1236
FCC Class A Part 15
Advanced Regulators
Corrosion Control Products
Waterproof Marine Binoculars
Marine CCTV Color Camera Equipment
Gold Plated Fuses and Holders
A complete selection of panel meters and shunts
A complete line of hand held test meters
Visit frequently, we are always adding new products for your
boating enjoyment!
Professional Mariner, LLC
PO. Box 968
Rye, New Hampshire 03870
TEL: 603-433-4440
FAX: 603-433-4442
www.pmariner.com
Distributed-On-Demand Charging
Fully Automatic / Electronic Multi-Stage Marine Battery Chargers
Models
ProSport Portable (maintainer)
ProSport On-Board (maintainer)
ProSport6
ProSport8
ProSport12
ProSport20
ProSport20 Plus
Amperage
No. Of Banks
Volts
1.5 Amps
1.5 Amps
6 Amps
8 Amps
12 Amps
20 Amps
20 Amps
1 Bank
1 Bank
1 Banks
2 Banks
2 Banks
2 Banks
3 Banks
12
12
12
12/24
12/24
12/24
12/24/36
IMPORTANT NOTICE
Please save and read all safety, operating and installation instructions before
installing or applying AC power to your ProMariner on-board battery charger.
For all product, installation or service questions call ProMariner
directly at: 1-800-824-0524 8am to 5pm (Eastern Standard Time).
ProMa r i ne r
Notes
®
ProMa r i ne r
®
Table Of Contents
Safety Instructions...
pages 1-2
ProSport Overview...
pages 3-6
Installation Guidelines...
pages 6-9
Charging Your Batteries...
page 9-10
Maintenance...
page 11
Trouble Shooting...
page 12
Specifications & Accessories...
page 13
Customer Service & Warranty...
page 14
Introduction
Thank you from all of us at Professional Mariner and congratulations on your
recent purchase of the ProSport On-board Marine Battery Charger.
For over 20 years ProMariner has been a leading designer and manufacturer of
marine battery chargers. We have expand our offering to include our latest line
of ProSport Chargers. Designed for the sport fisherman and recreational boater
the ProSport Series offers many features not seen in competitive chargers.
Please save and read this manual carefully and fully understand the safety
instructions before installing your new ProSport Marine Battery Charger.
Safety Instructions
Customer Service & Warranty
14
1
General Safety Instructions
Customer Service & Warranty
Before connecting your batteries or AC power, read all instructions and cautionary markings
on the battery charger and batteries.
We are committed to customer satisfaction and value your business. If at any time
during the warranty period you experience a problem with your new ProSport
Marine Battery Charger simply call us at 1-800-824-0524 for technical support.
CAUTION - To reduce the risk of injury; charge only lead acid type rechargeable batteries
(lead acid, sealed lead acid, gel cell and AGM). Other types of batteries may burst, causing
personal injury. The ProSport is factory set for lead acid batteries.
Use of attachments not recommended or sold by Professional Mariner, LLC may result in
a risk of fire, electrical shock or personal injury.
Do not operate the charger if it has received a sharp blow, direct hit of force, dropped or
otherwise damaged in any way.
Do not disassemble the charger. Call the factory directly when service or repair is required.
Incorrect assembly may result in risk of electrical shock or fire.
To reduce the risk of electrical shock, remove AC power from the charger prior to any
maintenance or cleaning.
WARNING: RISK OF EXPLOSIVE GASES
WORKING IN THE VICINITY OF A LEAD ACID BATTERY IS DANGEROUS. BATTERIES
GENERATE EXPLOSIVE GASES DURING NORMAL BATTERY OPERATION. FOR THIS
REASON IT IS OF EXTREME IMPORTANCE THAT EACH TIME BEFORE USING YOUR
CHARGER YOU FOLLOW THESE SAFETY INSTRUCTIONS.
PROSPORT
LIMITED TWO-YEAR FACTORY WARRANTY
& LIFETIME REPAIR POLICY
Each ProSport model is guaranteed against defects in material and workmanship to the original consumer in
normal use for 2 years from the date of purchase. Professional Mariner, LLC will at it's discretion repair or replace
free of charge any defects in material or workmanship. The following conditions apply:
• Warranty is calculated from manufacture date if not registered within
two weeks of sale.
• Warranty void if unauthorized repairs attempted.
• Customer is responsible for returning the product to Professional Mariner, LLC.
Inbound shipping costs must be prepaid .
• This warranty does not cover blemishes due to normal wear and tear or
damaged caused by accidents, abuse, alterations or misuse.
• Cosmetic repairs can be done at owner's request and expense.
Purchase or other acceptance of the product shall be on the condition and agreement that Professional Mariner
SHALL NOT BE LIABLE FOR INCIDENTAL OR CONSEQUENTIAL DAMAGES OF ANY KIND. (Some states do not
allow the exclusion or limitation of incidental or consequential damages, so the above limitations may not apply
to you.) This warranty is made in lieu of all other obligations or liabilities on the part of Professional Mariner.
Professional Mariner neither assumes nor authorizes any person for any obligation or liability in connection with
the sale of this product.
To reduce risk of battery explosion, follow these instructions and those published by the
battery manufacturer, and of any equipment you intend to use in the vicinity of a battery.
Review all cautionary markings and labels.
To make a claim under warranty, write directly to Professional Mariner, LLC at P.O. Box 968, Rye, NH 03870,
identifying the product and giving its locations. Follow the company’s return instructions, which will then be
provided by the company. Professional Mariner will make its best effort to repair or replace the product, if found
defective within the terms of the warranty, within (30) days after return of the product to the company. Professional
Mariner will ship the repaired, or replaced product back to the purchaser.
Personal Safety Precautions
This warranty gives you specific legal rights, and you may also have other rights, which vary from state to state.
This warranty is in lieu of all others expressed or implied.
Someone should be within the range of your voice or close enough to come to your aid
when working near a lead acid battery.
Have plenty of water and soap nearby in case battery acid comes in contact with skin,
clothes or eyes.
Wear complete eye protection and clothing protection. Avoid touching eyes while working
with a battery.
If battery acid contacts skin or clothing, wash immediately with soap and water. If acid
enters the eye(s) flood eye(s) with running cold water for at least 10 minutes and get
medical attention immediately.
Professional Mariner, LLC Headquarters
P.O. Box 968 Rye, 03870
Tel: (603) 433-4440 / Fax: (603) 433-4442
Factory Service Center & Technical Offices
Professional Mariner, LLC
200 International Drive STE 195
Portsmouth, NH 0380
Tel: 1-800-824-0524 www.pmariner.com
Safety Instructions
Specifications & Accessories
2
13
Personal Safety Precautions Continued
Specifications
model
ProSport Portable
ProSport On-Board
ProSport 6
ProSport8
ProSport12
ProSport20
ProSport20 Plus
volts
amps
banks
DC cable size
12
12
12
12/24
12/24
12/24
12/24/36
1.5
1.5
6
8
12
20
20
1
1
1
2
2
2
3
4’
4’
6’
6’/6’
6’/6’
6’/6’
6’/6’/6
size L x W x H
est. weight
AC in
1.5 lbs
1.75 lbs
5 lbs
6 lbs
8 lbs
10 lbs
12 lbs
95-135
95-135
90-135
90-135
90-135
90-135
90-135
2.2” x 2.5” x 3.3”
2.2” x 3.5” x 3.9”
5.75”x 7.25” x 2.5”
7”x 7.25” x 2.5”
8.5”x 7.25” x 2.5”
10.75”x 7.25” x 2.5”
10.75”x 7.25” x 2.5”
Remove all personal metal items such as rings, bracelets, necklaces, watches, and jewelry
when working near a battery. A battery can produce a short circuit high enough to weld
a ring or any metal, causing serious burns.
51201 ProSport Plug Holder
Cha
rger
/Alte
rnat
or Out
put
Never charge a frozen battery.
31V
Ove
Reg rvolt
Faile ular age
d
Max
Cha .
Volta rger
ge
Cha
Alte rger
Cha rnatorand
rging
29V
26.4V
Batt
ery
Be extra cautious to reduce risk of dropping a metal tool onto a battery. It may spark or
short-circuit the battery or other electrical parts that may cause explosion.
Use the ProSport for charging lead acid batteries only. It is not intended to supply low
voltage electrical systems other than in a marine application. Do not use the battery
charger to charge dry cell batteries that are commonly used with home appliances. These
batteries may burst and cause injury to persons and property.
Optional Accessories
25.2VConditio
n
Never smoke or allow a spark or a flame in the vicinity of a battery or engine.
Full
24V
50%
23V
Low
24
Safety Precautions Prior to Charging Batteries
VD
DV
C ON
LY
87710
51060
model
Handheld DC System Tester
Remote Battery Bank Status Monitor
ProSport AC Plug Holder (white)
ProSport AC Plug Holder (black)
Universal AC Plug Holder (black)
Universal AC Plug Holder (white)
Battery Bank Cable Extender
51070
51202 Universal Plug Holder
part no.
cable size
volts
banks
87710
51060
51200
51201
51202
51203
51070
n/a
10'
n/a
n/a
n/a
n/a
9'
n/a
12
n/a
n/a
n/a
n/a
n/a
n/a
3
n/a
n/a
n/a
n/a
n/a
To Place an Order Please Contact Your Local Dealer or ProMariner at:
Tel: 603-433-4440 / Fax: 603-433-4442 / www.pmariner.com
If necessary to remove a battery from a boat to charge, always remove grounded terminal
from battery first. Make sure all accessories in the boat are off, as to not cause an arc.
Be sure the area around the charger and batteries is well ventilated while the batteries
are being charged. Gases can be forcefully blown away using a piece of cardboard or
other nonmetallic material as a fan.
Clean battery terminals with full eye protection to prevent corrosion from coming in
contact with eyes.
Add distilled water in each cell until electrolyte reaches levels specified by the battery
manufacturer. This helps purge excessive gases from cells. Do not overfill. For batteries
without caps, carefully follow manufacturer's recharging instructions.
Study all manufacturer’s specific precautions, such as removing or not removing cell
caps while charging, in addition to rates of charge.
Extension cords should be industrial grade / heavy duty U.L. approved and grounded.
Check extension cord before use for damage, bent prongs, and cuts. Replace if damaged.
Always make your extension cord connection on the charger side first. After connecting
the extension cord to the charger then proceed to plug the extension cord to a nearby
120 VAC GFCI protected (Ground Fault Circuit Interrupt) outlet.
Always remove the extension cord from the 120 VAC outlet first when charging is completed
followed by unplugging the charger.
ProSport Overview
Tr o u b l e s h o o t i n g
12
3
General Overview
The ProSport charger is a fully Automatic/ Electronic Multi-Stage On-board Marine
Battery Charger. ProSport is prewired for easy installation and is 100% waterproof
for fresh and salt water applications.
The ProSport incorporates an extruded aluminum housing with plastic end caps.
This design offers improved durability and heat transfer while comparing it to full
plastic case competitive products. The ProSport offers multi-stage charging which
includes a "Float " maintenance mode that is safe for long and short term storage.
ProSport can be left on indefinitely without harming or over charging your batteries.
The ProSport's Distributed-On-Demand Multi-Stage Charging Technology will
automatically sense and distribute 100% of the available charging amp output,
8,12,or 20 amps (model specific) to any one bank or combination of all banks. Each
battery bank output is fully isolated.
Trouble Shooting Guide
No Red or Green LED Indicator
Check for loss of AC power at the 120VAC Outlet. Confirm GFCI (Ground Fault
Circuit Interrupter) has not tripped. Check with a meter or 120VAC test light
that AC is present at the end or your extension cord.
Confirm all charger cables are installed with the correct polarity connections
at each battery and that all connections are clean and tight.
With the AC Power removed and the engine off, check the charge level of
each battery with a DC meter or Handheld DC Tester. If there is no charge
level indication for a battery, check each battery with a hydrometer to determine
if it has one or more bad cells. (batteries should always be replaced in sets,
and always the same type.)
Easy to view LED indicators will provide you with AC Power On and Charging Status.
The LED Indicators can be seen from the front and side of the charger when
installed.
If everything above checks out ok, contact ProMariner for product service.
The ProSport is available in 5 models and can be used in 12,24, and 36 volt (model
specific) configurations without rewiring or switching. Just attach the DC output
cable terminals as illustrated in the installation section of this manual.
Battery is Not Charging, Red and Green Indicator is “on”
Confirm all charger cables are installed with the correct polarity connections
at each battery, and that all connections are clean and tight. Reverse polarity
connections will blow output fuse, resulting in no output voltage.
With the charger on, read DC voltage at each battery. If any of the readings
are less than 13 VDC Proceed with the following:
A. Disconnect AC power at the 120VAC outlet.
B. Remove charger cables from each battery.
C. Reconnect AC power and read DC Voltage across each output cable, if
output voltage is approximately 14.5VDC the charger is ok and each battery
should be tested with a hydrometer with the charger and engine off to determine
if one or more batteries have bad cells. (batteries should always be replaced
in sets, and always the same type.)
D. If there is no output when trying to read DC voltage check each output fuse
and replace as needed.
If the DC voltage at each charger output there is less than 14.0 volts contact
ProMariner for product service.
ProSport Overview
Maintenance
4
11
Owner's Periodic Maintenance Guide
Item:
Battery Connections
Process:
Clean and tighten all battery connections. Follow battery
manufacturer's instructions for cleaning a battery. Clean all
battery terminals with a wire brush where required and tighten
all battery connections.
When:
Distributed-On-Demand Charging Versus Standard Chargers.
ProSport's "Distributed-On-Demand " feature will automatically distribute 100% of its
available charging amps of 8, 12, or 20 amps ( model specific ) to any one bank or combination
of all battery banks. This feature ensures all available charging amps are used unlike other
2 and 3 bank chargers with a fixed amp limit per bank.
Distributed-On-Demand Multi-Stage Charging Overview
ProSport12
Monthly
12 Amps Fully Distributed
Item:
Battery Electrolyte
Process:
Per battery manufactures instructions monitor and maintain
proper levels of distilled water in each battery.
When:
Monthly
10
2
+
Bank No. 1
Bank No. 2
Trolling
Battery 1
Engine
Start Battery 2
Item:
ProSport DC Output Wiring
Process:
Visually inspect all wiring for cuts and abrasions. Contact
ProMariner if charger needs to be serviced with new wiring.
When:
Monthly
Up to 5 Amps per Bank
(5/5)
Item:
AC Power Cord and Mounting Hardware Inspection
5
Process:
Process: Visually inspect the AC power cord. Confirm ground
blade is present and all plug blades are in good conditions
and not bent out of place.
Check all mounting hardware to ensure there is no loose
hardware. Tighten were required.
When:
Monthly
ProSport's Distributed-On-Demand Charging
Technology ensures 100% of the available
charging amps are fully utilized. The ProSport
Series will distribute its total available charging
amps to meet the demand of each battery onboard. Let’s say your engine start battery only
needs 2 amps from your “ProSport 12” (6/6) 2 bank
charger; No problem the unused 4 amps will be
automatically Distributed-On-Demand to battery
bank # 2 providing a total of 10 amps to the trolling
motor battery versus only 5 amps that the
conventional 5/5 charger would provide. The
competitive 5/5 charger has a 5 amp limit per bank
.
Typical Leading Competitive Charging Output
competitive 5/5 10 amp charger
+
Competitive chargers have an amp limitation
per bank. As illustrated the (5/5) 10 amp charger
can not transfer the unused 3 amps not required
by the engine start battery, leaving only a
maximum of 5 amps for the trolling motor battery.
2
Bank No. 1
Bank No. 2
Trolling
Battery 1
Engine
Start Battery 2
Note: Above illustration reflects typical battery usage after a day of fishing.
Trolling motor batteries are 50% discharged and not usable. Engine start battery
is 90% charged from the engine charging system.
ProSport Overview
C h a r g i n g Yo u r B a t t e r i e s
5
10
General Operation
Charging Batteries Continued
Install your ProSport - Fully Automatic / Electronic Multi-Stage Battery Charger to
the guidelines in this manual.
3. Connect a heavy duty U.L. approved extension cord to the ProSport charger first. After
connecting the extension cord to the charger then proceed to plug the extension cord to
a nearby 120VAC GFCI protected (Ground Fault Circuit Interrupt) outlet.
Make sure your charger and batteries are properly vented. Connect your extension
cord with no AC Power present to the ProSport and proceed to plug your extension
cord in at a nearby 120 VAC GFCI protected (Ground Fault Circuit Interrupt) outlet.
4. Observe the on-board LED indicators for a solid green and red Indication. This will tell
you the batteries are in the charging process.
With your ProSport plugged in properly, it will automatically / fully charges your
batteries while it conditions and extends the life of your batteries. When your not
at home always leave your charger plugged in to reduce sulfate buildup allowing
your batteries to be fully charged and maintained until your next fishing trip.
5. Charge your batteries until only the green LED indicator remains on. This indicates the
charging process is completed and your batteries are fully charged and are now being
maintained in a gentle float / storage mode. (recommended while your boat is not in use).
The ProSport can be left on in this mode indefinitely and will never overcharge your
batteries. Refer to the page 5.
AC Power and Charging LED Status Indicators
The ProSport includes two LED indicators as shown below.
Green "AC Power" LED indicator:
When on, the green LED indicates when AC Power is present.
Red " Charging" LED indicator:
When on, the red LED indicates the batteries are in the Multi-Stage Charging Mode.
When charging is complete only the green LED will remain on.
6. When ready to use your boat, unplug the extension cord from the 120 VAC outlet first,
followed by unplugging the charger.
Optional Battery Bank Status Monitor
See your local dealer or retailer for the ProMariner Remote Battery Bank Status Monitor.
The Remote Monitor is easy to install and connects directly to your boats batteries. Once
installed simply hold down the "Push-To-Test" button and observe the charge level indicator
for each battery. (up to 3 batteries can be monitored). Note: AC power and the boats engine
must be off when using the Remote Battery Bank Status Monitor.
Important Notice: FCC Class A Part 15 Notification.
The Multi-Stage Charger will provide the following:
Your ProSport On-Board Marine Battery Charger has been designed and tested to
comply with FCC Class A part 15. These regulations are to provide adequate
protection against harmful interference while operated in a commercial application.
If in a residential setting you are encountering interference with TV and radio
reception. Simply remove AC from the ProSport to confirm if your battery charger
is causing interference. End user can explore the following to minimize interference.
ProSport Charging
1) Chose a different AC circuit to power your On-board Marine Charger
During this mode the ProSport will use its available charging amps (as controlled
by temperature) until battery voltage is raised to 14.6 VDC ( lead acid factory
setting).
2) Make sure your outlet is properly grounded
ProSport Conditioning
4) Purchase a separate AC line filter
The ProSport will hold batteries at 14.6 VDC ( factory set for lead acid batteries)
to complete charging while conditioning batteries by desulfating each battery
connected. Upon completion the ProSport will go to into its maintenance mode.
5) Relocate charger so that it is at the furthest point from home receiving
equipment. TV, radio, etc.
Multi-Stage Charging Overview
When the ProSport On-board Marine Battery Charger is turned on the green AC
power indicator with turn on followed by the red charging LED indicator.
3) Re-position receiving antenna.
I n s t a l l a t i o n G u i d e l i n e s / C h a r g i n g Yo u r B a t t e r i e s
ProSport Overview / Installation Guidelines
9
6
ProSport Series Wiring Diagrams
ProSport 6 Wiring Diagram
Multi-Stage Charging Overview Continued
ProSport 8, 12 and 20 Wiring Diagram
AC power
During this mode the red "Charging" LED will turn off indicating that the charging
process is over and the charger is now maintaining your batteries on-board. Only
the green LED will remain on, indicating Power On / Float-Maintenance mode.
A precision 13.3 volts (lead acid factory setting) finishing voltage that maintains
each battery (step down voltage regulation mode) which is perfect for short or long
storage periods and will never overcharge your batteries.
AC power
output no.1
output no.1
_
+
Engine or Trolling
Motor Battery 1
_
Trolling Motor
Battery 1
+
black or
yellow
red
black or
yellow
red
red
black or
yellow
output no.2
+
ProSport Float / Maintenance
Note: The only LED Indicator that will be on during the maintenance mode will
be the green "Power" LED indicator.
_
Engine or Trolling
Motor Battery 2
Average Voltage
14.6V
14
13.3V
AC power
output no.1
13
ProSport20 Plus
Wiring Diagram
output no.2
12
+
_
Trolling Motor
Battery 1
+
_
black or
yellow
red
black or
yellow
red
black or
yellow
red
Volts
output no.3
C h a r g i n g Yo u r B a t t e r i e s
Trolling Motor
Battery 2
+
_
Engine or Trolling
Motor Battery 3
Charging
Conditioning
Maintenance / Float Mode
11
Installation
All ProSport Battery Chargers are designed to be permanently mounted
on-board, and can be mounted as follows:
Charging Batteries
All ProSport Battery Chargers are designed to be permanently mounted on-board.
Always mount your ProSport Charger horizontally with the extruded "fins" on top,
or vertically with the battery and power cord facing down.
The ProSport Series is designed to charge, condition and maintain your batteries. Please
follow these steps each time you use your ProSport Charger:
Do NOT make any electrical connections to the ProSport or batteries until the
following steps are completed:
1. Open all battery compartments and ventilate for at least 15 minutes before applying AC
power to your charger. While charging your batteries make sure to keep your battery
compartment open allowing for free air ventilation.
11 Easy to follow installation steps:
2. Make sure all DC battery connections are tight and clean. Follow battery manufacturer's
recommendations for battery cell caps. (loosen caps if applicable)
1. Select a mounting location that allows for free air ventilation with a minimum of 8 inches
of clear unobstructed space around and infront of the ProSport On-board Marine Battery
Charger. Open all battery and engine compartments and ventilate for at least 15 minutes
before starting the installation of the ProSport Charger.
Installation Guidelines
Installation Guidelines
7
8
Installation Continued
Installation Continued
2. Confirm the selected mounting location allows for a minimum of 8 inches of free space
around front and sides of the ProSport charger. Do not install charger on carpeted ,
upholstered , vinyl or varnished areas. Be sure to place the ProSport in an accessible
area where all indicators are viewable. Confirm all battery cables can reach each of the
batteries.
7. Run your cables free from sharp objects and hold each of them in place with
cable ties. Coil excess cable, do not cut or shorten the length of the cables as there
are in-line fuses located 4 inches from the end of each red (positive) cable. These
fuses are in place to protect the charger and output cables in the event of a short
or reverse polarity.
3. Using the ProSport as a template use a small awl or screwdriver to mark the position
of each mounting hole.
8. Connect the DC output cables as illustrated on page 9. Make sure the (black or
yellow) wires are connected as illustrated to the negative side of the battery and
the red wires are connected to the positive side of the battery.
4. Using a 1/8" drill bit, drill pilot holes in the (4) marked locations as described in step 3.
Apply a silicon sealer in each of the mounting locations to waterproof the screw holes.
9. Make sure all DC connections are tight and correct.
5. Position the ProSport over the mounting holes and secure with a power screwdriver
by installing 4 marine grade or stainless steel screws.
10. Locate the AC power cord in an open-air area of your boat at least 21 inches
from the charger, batteries and fuel fill lines.
1/8" pilot hole
with silicon sealer
stainless steel
screws provided
IMPORTANT NOTICE
Confirm the surface you will
be mounting the charger to is
adequate in strength and
thickness to hold the ProSport
in place with the mounting
screws you have selected.
6. Prepare each battery in advance by cleaning each terminal post with a wire
brush until a shiny surface is obtained.
11. Connect a heavy duty U.L. approved extension cord to the ProSport charger
first. After connecting the extension cord to the charger then proceed to plug the
extension cord to a nearby 120VAC GFCI protected (Ground Fault Circuit Interrupt)
outlet. Always remove the extension cord from the 120VAC outlet first when charging
is completed, followed by unplugging the charger.
You are now connected and charging your batteries. View the LED indicators.
Assuming your batteries are discharged you should observe both the green "Power"
LED and the red "Charging" LED on , indicating charging mode is in process.
Lead Acid / Gel Battery Selector - IMPORTANT NOTICE
The ProSport On-Board Marine Battery Charger is factory set for Lead Acid Batteries.
The ProSport is equipped with a one time Gel Selector. This selector is simply a
jumper on the side of the charger where all of the DC cables are located. By cutting
and removing the jumper the ProSport will be set for Gel Battery Operation. After
cutting the jumper fill the dimpled area with a marine grade silicon sealant. Please
call ProMariner at 1-800-824-0524 with any questions. This is a one time selector.
ProSport Series Wiring Diagrams
IMPORTANT NOTICE
As you prepare to attach the positive (red) and negative (yellow or black wires)
to the batteries there will be brief low power spark that is generated as you
make the connection. This is due to the high frequency capacitors taking a charge.
Make sure the (black or yellow) wires are connected as illustrated to the
negative side of the battery and the red wires are connected to the positive
side or the battery.
If only two batteries are used with a 3 bank charger, than connect the unused
output cable to either one of the two batteries, as instructed in item 8 above
Always connect each charger output to a single 12V battery even if the batteries
are wired series for 24V or 36V.
PLACE
STAMP
HERE
PROFESSIONAL MARINER, LLC
PO.BOX 968
RYE, NEW HAMPSHIRE 03870
ProMa r i ne r
®
Warranty Registration Card
Visit www.pmariner.com for online warranty registration
NOTE: REGISTRATION CARD MUST BE COMPLETELY FILLED OUT AND MUST BE RECEIVED
WITHIN TWO WEEKS OF PRODUCT PURCHASE
DATE OF PURCHASE:
FIRST & LAST NAME:
ADDRESS:
CITY:
STATE:
ZIP:
E-MAIL ADDRESS:
PHONE:
SERIAL NUMBER ON PRODUCT:
MODEL NUMBER:
TYPE OF BOAT INSTALLED ON:
PURCHASED FROM:
INSTALLED BY: (CHECK ONE)
SEND ME A FULL COLOR BROCHURE:
COMMENTS:
FACTORY
YES
DEALER
NO
SELF