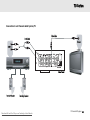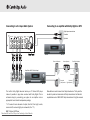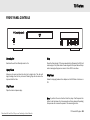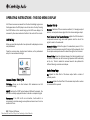
1
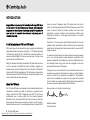
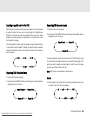
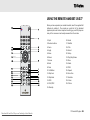
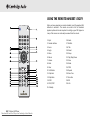
70 Series DVD Player
Downloaded From Disc-Player.com Cambridge Audio Manuals
1 70 Series DVD player
Downloaded From Disc-Player.com Cambridge Audio Manuals
70 Series
CONTENTS
Introduction ........................................................................3
Using the remote handset - DVD77................................23
Safety precautions ..............................................................4
Troubleshooting.................................................................24
Installation...........................................................................5
Specifications....................................................................24
Rear panel connections - DVD77.......................................6
Limited warranty................................................................25
Rear panel connections - DVD79 ......................................7
Connection to a TV/Display.................................................8
Connection to a TV/Display (With DVI-D)...........................9
Front Panel Controls..........................................................12
Operating instructions (DVD menu display)....................13
Operating instructions ......................................................15
Progressive Scan - DVD77 Only ......................................20
DVD Audio..........................................................................21
Using the remote handset - DVD77.................................22
Downloaded From Disc-Player.com Cambridge Audio Manuals
70 Series DVD player 2
INTRODUCTION
Congratulations on purchasing this Cambridge Audio range DVD player.
It is the result of our most extensive ever research and development
program in over three decades of producing quality Hi Fi products. We
hope that you will appreciate the results and enjoy many years of
rewarding ownership.
times per second. Progressive Scan DVD players scan from top to
bottom in one fluid pass, painting 50/60 whole frames per second. This
makes it harder to discern a picture's individual scan lines, which
dramatically increases resolution while minimising distortion and
flickering. This allows for a stunningly realistic picture on a suitably
equipped monitor.
A brief introduction to DVD and DVD Audio
Sonically, the 70 series player adds DVD-Audio playback for the best
possible musical performance in both multi-channel surround and high
quality stereo. Cambridge Audio has also worked hard to ensure that CD
replay is excellent.
DVD is well known for its extraordinarily large capacity and outstanding
audio-video effects. Its capacity is as high as 4.7-17 GB (approximately
7-26 times the capacity of CD). With 500-line horizontal resolution of
pictures and Dolby Digital 5.1 Channel surround sound, it brings a new
era to audio visual entertainment .
Using MLP Lossless from Dolby Laboratories, DVD-Audio discs can store
up to six channels of 24-bit/96 kHz audio, including a separate lowfrequency bass channel. Compare that to two channels of 16-bit/44.1
kHz sound from CDs! For audiophiles, a DVD-Audio disc can alternatively
hold two channels of 24-bit/192 kHz audio, exceeding the quality of any
music audio format previously developed.
About the 70 Series
The 70 Series DVD player encompasses the most sophisticated picture
reproduction, including the ability to reproduce a progressive scan
image in both PAL and NTSC. Progressive scan (DVD77 only) offers a
considerable leap in picture quality from the already impressive
standards set by conventional DVD-Video. The usual way of creating a
picture process draws screen lines twice per frame: once for the evennumbered lines and once for the odd-numbered lines, interlacing 25/30
3 70 Series DVD player
Downloaded From Disc-Player.com Cambridge Audio Manuals
To maximise the performance from this equipment we would encourage
you to use only high quality viewing equipment, amplification and
capable loudspeakers. We particularly recommend amplification from
the Cambridge Audio range, which has been designed to the same
exacting standards as our DVD players.
Cabling is also an area that should not be overlooked. Please do not
compromise your system's performance by using poor quality cables to
connect your DVD to your television and amplifier or the amplifiers'
output to your loudspeakers. A system is only as good as its weakest
link. Your dealer can supply quality Cambridge Audio interconnects that
will ensure your whole system realises its full potential.
Now we invite you to sit back, relax and enjoy!
Matthew Bramble
Technical Director
70 Series
SAFETY PRECAUTIONS
Checking the power supply rating
Plug fitting instructions (UK only)
For your own safety please read the following instructions carefully before
attempting to connect this unit to the mains.
The cord supplied with this appliance is factory fitted with a 13A mains plug fitted
with a 3A fuse inside. If it is necessary to change the fuse, it is important that a 3A
one is used. If the plug needs to be changed because it is not suitable for your
socket, or becomes damaged, it should be cut off and an appropriate plug fitted
following the wiring instructions below. The plug must then be disposed of safely,
as insertion into a 13A socket is likely to cause an electrical hazard. Should it be
necessary to fit a 3-pin BS mains plug to the power cord the wires should be fitted
as shown in this diagram. The colours of the wires in the mains lead of this
appliance may not correspond with the coloured markings identifying the
terminals in your plug. Connect them as follows:-
Check that the rear of your unit indicates the correct supply voltage. If your mains
supply voltage is different, consult your dealer.
This unit is designed to operate only on the supply voltage and type that is
indicated on the rear panel of the unit. Connecting to other power sources may
damage the unit.
This equipment must be switched off when not in use and must not be used unless
correctly earthed. To reduce the risk of electric shock, do not remove the unit's
cover (or back). There are no user serviceable parts inside. Refer servicing to
qualified service personnel. If the power cord is fitted with a moulded mains plug
the unit must not be used if the plastic fuse carrier is not in place. Should you lose
the fuse carrier the correct part must be reordered from your Cambridge Audio
dealer.
The lightning flash with the arrowhead symbol within an equilateral
triangle is intended to alert the user to the presence of uninsulated
'dangerous voltage' within the product's enclosure that may be of
sufficient magnitude to constitute a risk of electric shock to
persons.
The exclamation point within an equilateral triangle is intended to
alert the user to the presence of important operating and
maintenance instructions in the service literature relevant to this
appliance.
This product complies with European Low Voltage (73/23/EEC)
and Electromagnetic Compatibility (89/336/EEC) Directives
when used and installed according to this instruction manual. For
continued compliance only Cambridge Audio accessories should
be used with this product and servicing must be referred to
qualified service personnel.
Downloaded From Disc-Player.com Cambridge Audio Manuals
The wire which is coloured BLUE must be
connected to the terminal which is marked
with the letter 'N' or coloured BLACK.
The wire which is coloured BROWN must be
connected to the terminal which is marked
with the letter 'L' or coloured RED
The wire which is coloured GREEN/YELLOW
must be connected to the terminal which is
marked with the letter 'E' or coloured
GREEN.
If your model does not have an earth wire,
then disregard this instruction.
If a 13 Amp (BS 1363) plug is used, a 3 Amp fuse must be fitted, or if any other
type of plug is used a 3 Amp or 5 Amp fuse must be fitted, either in the plug or
adaptor, or on the distribution board.
70 Series DVD player 4
INSTALLATION
Important Safety Instructions
Please take a moment to read these notes before installing your DVD player, they
will enable you to get the best performance and prolong the life of the product. We
advise you follow all instructions, heed all warnings and keep the instructions for
future reference.
The unit is of Class 1 construction and must be connected to a Mains socket outlet
with a protective earthing connection.
This unit must be installed on a sturdy, level surface.
The unit requires ventilation. Do not situate it on a rug or other soft surface and do
not obstruct any air inlets or outlet grills.
Do not place in a sealed area such as a bookcase or in a cabinet. Any space open
at the back (such as a dedicated equipment rack) is fine however.
WARNING - To reduce the risk of fire or electric shock, do not expose this unit to
rain or moisture. This unit must not be exposed to dripping or splashing water or
other liquids. No objects filled with liquid, such as vases, shall be placed on the
unit. In the event, switch off immediately, disconnect from the mains supply and
contact your dealer for advice.
To clean the unit, wipe its case with a moist, lint-free cloth. Do not use any cleaning
fluids containing alcohol, ammonia or abrasives. Do not spray an aerosol at or near
your DVD player.
Ensure that small objects do not fall through any ventilation grille. If this happens,
switch off immediately, disconnect from the mains supply and contact your dealer
for advice.
Do not route the power cable so that it can be walked upon or damaged by other
items near it.
If you do not intend to use this unit for a long period, switch it to Standby and
unplug it from the mains socket. Also unplug the unit during lightning storms.
5 70 Series DVD player
Downloaded From Disc-Player.com Cambridge Audio Manuals
Refer all servicing to qualified service personnel. Servicing is required when the
unit has been damaged in any way, such as a damaged power-supply cord or plug,
liquid has been spilled or objects have fallen into the unit, the unit has been
exposed to rain or moisture, does not operate normally, or has been dropped.
If you have checked the Troubleshooting guide in the manual with no improvement,
do not attempt to repair, disassemble or reconstruct the unit. A serious electric
shock could result if this precautionary measure is ignored.
70 Series
REAR PANEL CONNECTIONS DVD77
L
Digital
Audio Out
Video Out
Audio Out
5.1 Channel DVD Audio/Surround Out
Front
2-CH Out
L
Surr
Centre
Component
Video
Cb/Pb
L
CAUTION: SERIAL
NUMBER REMOVED
Y
This product complies with DHHS rules 21 CFR,
Chapter 1, Subchapter J Part 1040 at date of
manufacture
Apparatus claims of US patent nos. 4,631 603;
4577,216; 4,819,098 and 4,907,093 licensed
for limited viewing only
"DTS" and "DTS Digital Out" are trademarks of
Digital Theatre Systems Inc.
Cr/Pr
R
R
R
Sub
S-Video
Coaxial
Optical
PCM/DTS/DOLY DIGITAL
SCART OUT (COMPOSITE/RGB)
Video Connections
The DVD77 is equipped with Composite (CVBS), S-Video (SVHS), SCART
(RGB and CVBS) and Component Video (YCbCr) connections. Progressive
Scan is only available from the Component video output. With the
exception of the SCART output, these outputs are picture only.
It is only necessary to use one of the picture connections at any one
time.
Manufactures under license from Dolby
Laboratories. "Dolby" and the double -D
Symbol are trademarks of "Dolby" Laboratories.
Confidential Unpublished Works. c 1992 1997 Dolby Laboratories. All rights reserved
DVD77 70 Series DVD Player
Power Rating: 100-240V AC 50/60Hz
Max Power Consumption: 40W
Caution
Risk of electric shock
Do not open
Avis
Risque de choc electrique
Ne pas ouvrir
Achtung
Vorm offnen des gerates
Netzstecker ziehen
POWER
AC
CLASS 1 LASER PRODUCT
LUOKAN 1 LASERLAITE
KLASS 1 LASERAPPARAT
www.cambridge-audio.co.uk
Analogue outputs -The DVD77 is equipped with a conventional stereo
RCA (phono) out that outputs stereo audio for connection to a
conventional stereo amplifier. It also has a six channel decoded output
in Dolby Digital 5.1 format that enables connection to a suitable 6
channel amplifier. A DVD Audio disc will only output through the 5.1
analogue outs. See An Introduction to DVD Audio on page 3 and
page 21.
Note: A DTS encoded disc will only output the DTS soundtrack through
the digital outputs for external decoding.
Audio Connections
Digital outputs - The DVD77 is equipped with an optical and a coaxial
digital output. These allow for a digital soundtrack on a DVD disc to be
sent to a suitably equipped AV receiver for decoding and amplification.
Both outputs perform the same function- simply choose the type that
best suits your needs.
Downloaded From Disc-Player.com Cambridge Audio Manuals
AC power socket
Once you have completed all connections to the amplifier, plug the AC
Power Cable into an appropriate mains socket.
70 Series DVD player 6
REAR PANEL CONNECTIONS DVD79
Power Rating: 100-240V AC 50/60Hz
Max Power Consumption: 40W
Caution
Risk of electric shock
Do not open
Avis
Risque de choc electrique
Ne pas ouvrir
Achtung
Vorm offnen des gerates
Netzstecker ziehen
This product complies with
DHHS rules 21 CFR, Chapter
1, Subchapter J Part 1040 at
date of manufacture
"DTS" and "DTS Digital Out"
are trademarks of Digital
Theatre Systems Inc.
Apparatus claims of US
patent nos. 4,631 603; 4577,
216; 4,819,098 and 4,907,
093 licensed for limited
viewing only
L
L
Digital
Audio Out
Video Out
Audio Out
5.1 Channel DVD Audio/Surround Out
Front
2-CH Out
DVD79 70 Series DVD Player
Surr
Centre
Component
Video
Cb/Pb
L
CAUTION: SERIAL
NUMBER REMOVED
Y
Cr/Pr
R
R
R
c
Sub
DVI OUT
Video Connections
The DVD79 is equipped with Composite (CVBS), S-Video (SVHS), SCART
(RGB and CVBS) and Component Video (YCbCr) connections. Also DVI-D
Digital Video Interface
Audio Connections
Digital outputs - The DVD79 is equipped with an optical and a coaxial
digital output. These allow for a digital soundtrack on a DVD disc to be
sent to a suitably equipped AV receiver for decoding and amplification.
Both outputs perform the same function- simply choose the type that
best suits your needs.
Note:
Progressive scan is only available through the DVI out socket.
7 70 Series DVD player
Downloaded From Disc-Player.com Cambridge Audio Manuals
S-Video
Coaxial
Optical
PCM/DTS/DOLY DIGITAL
CLASS 1 LASER PRODUCT
LUOKAN 1 LASERLAITE
KLASS 1 LASERAPPARAT
Manufactures under license from
Dolby Laboratories. "Dolby" and the
double -D Symbol are trademarks of
"Dolby" Laboratories. Confidential
Unpublished Works. 1992 - 1997
Dolby Laboratories.
All rights reserved
SCART OUT (COMPOSITE/RGB)
POWER
AC
www.cambridge-audio.co.uk
Analogue outputs - The DVD79 is equipped with a conventional stereo
RCA (phono) out that outputs stereo audio for connection to a
conventional stereo amplifier. It also has a six channel decoded output
in Dolby Digital 5.1 format that enables connection to a suitable 6
channel amplifier. A DVD Audio disc will only output through the 5.1
analogue outs. See An Introduction to DVD Audio on page 3 and
page 21.
Note: A DTS encoded disc will only output the DTS soundtrack through
the digital outputs for external decoding.
AC power socket
Once you have completed all connections to the amplifier, plug the AC
Power Cable into an appropriate mains socket.
Connections to a TV /Display - DVD77 only
(Y)
(Cr)
(Cb)
Scart
Audio In
Video In
S-V
Video
Rear panel
Audio Cable
or
S-V
Video
Video Cable
S-V
Video Cable
If your TV has S-Video inputs, an S-Video interconnect can be used to
connect this player. When the S-Video output is used the component
video outputs cannot be used.
If the TV has a component video input, the component video output of
this player can be used. When the component video outputs are in use
the S-Video output cannot also be used.
Downloaded From Disc-Player.com Cambridge Audio Manuals
If the Audio Out of this player is connected to your TV, the ‘2-CH out’
sockets should be connected to your TV’s Audio In terminals.
The RGB outputs from the Scart connector and the component outputs
cannot be used simultaneously.
70 Series DVD player 8
Connecting to a Digital TV set with DVI-D input - DVD79 Only
2-CH Out
L
DVD79 70 Series DVD Player
Power Rating: 100-240V AC 50/60Hz
Max Power Consumption: 40W
Caution
Risk of electric shock
Do not open
Avis
Risque de choc electrique
Ne pas ouvrir
Achtung
Vorm offnen des gerates
Netzstecker ziehen
R
DVI OUT
DVI-D
D
To select the DVI-D
D output mode
The DVD79 has everything you would expect from a standard DVD
player. The player also features a DVI-D output. (Digital visual Interface).
The DVD79 player transfers the digital signal from the DVD player to the
television without the need for Digital to Analogue conversation. This
reduces signal loss resulting in the purist transfer of video information.
Press Once: 720-line progressive output.
Press again: 1080-line interlacing output
Press again: 480-line progressive output (NTSC output) or 576- line
progressive output (PAL output) according to the current
output system of the DVD player.
Note:
Progressive scan will only be available from the DVI output socket.
9 70 Series DVD player
Downloaded From Disc-Player.com Cambridge Audio Manuals
70 Series
Connection to a 2 Channel Audio System/TV
Video Cable
Audio Cable
Video In
Audio In
Rear Panel
Front Left Speaker
Front Right Speaker
Downloaded From Disc-Player.com Cambridge Audio Manuals
70 Series DVD player 10
Connecting to a 5.1 Input Audio System
Connecting to an amplifier with Dolby Digital or DTS
Digital input connections
Coaxial in
Optical In
Rear Panel
Front Left Speaker
Front Right Speaker
Centre Speaker
Amplifier with 5.1 Audio Input
L
R
Front
Sub
Surr Centre
The built-in Dolby Digital decoder inside your 70 Series DVD player
makes it possible to play discs recorded with Dolby Digital. This is
achieved simply by connecting your player to an amplifier and an
appropriate home theatre loudspeaker package
“5.1” means 5 main channels of output (front left, front right, centre,
surround left, surround right) plus subwoofer (the “.1”).
11 70 Series DVD Player
Downloaded From Disc-Player.com Cambridge Audio Manuals
Subwoofer
Surround
Left Speaker
Surround
Right Speaker
Manufactured under license from Dolby laboratories. “Dolby and the
double-D symbol are trademarks of Dolby Laboratories. Confidential
unpublished works. 1992-1997 Dolby Laboratories. All rights reserved.
70 Series
FRONT PANEL CONTROLS
Standby/On
Stop
Switches the unit from Standby mode to On.
Stops the Disc playing. If Play is pressed shortly afterwards, the DVD will
resume play in the place where it was stopped. A Compact disc will stop
and a message will appear on screen. Press PLAY to continue.
Open/Close
Allows you to open and close the disc tray to load a disc. The disc will
begin loading when the tray is closed. Pressing Play will also close the
tray and start the Disc.
Skip/Scan
Allows for skipping between the chapters on the DVD disc or tracks on a
CD.
Play/Pause
Plays the disc and pauses play.
Note: To perform the scan function from the player it'self requires the
button to be held down for a few seconds and then released. Repeating
this process will increase the speed of the scanning function.
Downloaded From Disc-Player.com Cambridge Audio Manuals
70 Series DVD player 12
OPERATING INSTRUCTIONS - THE DVD MENU DISPLAY
All of these menus are accessed from the blue Cambridge Logo screen
that appears when the DVD player is on with no disc in the tray. Pressing
the SETUP button on the remote brings up the DVD menu display. It is
accessed by the cursors and select button in the centre of the remote.
DVD79 Only
When you press the setup button two options will be displayed, common
and professional.
Press the common setup, to setup basic functions, or the professional
setup for more advanced settings.
Speaker Set Up
Downmix: Switches off the surround soundtrack (5.1 analogue output
section) and outputs a stereo signal from the stereo analogue output.
Front, Centre and Rear Speaker Settings: adjusts the DVD decoder to
compensate between large and small speakers and the size of the
signal it sends to the subwoofer.
Subwoofer Off/On: Informs the player if a subwoofer is present. If it is
present the low frequencies are split off and sent to the subwoofer, if not
the complete audio spectrum will be heard through the front channel.
Channel Delay: Allows the distance between the listening position and
the centre, subwoofer, rear left and rear right speakers to be individually
set (in cm). This is to enable the surround sound to be optimised for
different listening room sizes and shapes.
Audio Setup Page
General Setup - DVD77/79
TV Display: Allows you to alter between 16.9 widescreen and 4.3
conventional image.
SCART: Switches the SCART output between RGB and Component. You
will need a suitably equipped television to handle a component signal.
Screensaver: If the DVD is left on and inactive, it will switch to a
screensaver to minimise energy consumption and screen burn. It can be
switched off here.
13 70 Series DVD player
Downloaded From Disc-Player.com Cambridge Audio Manuals
EQ: Adjusts the final effect of the stereo output with a number of
optional presets.
Soundfield: Adjusts the final effect of the decoder output with a number
of surround effects presets.
70 Series
SPDIF output: Switches the digital audio section of the decoder/output
between bitstream (Raw) and uncompressed stereo digital out (PCM).
The bitstream (Raw) must be selected to enable surround sound (Dolby
digital/DTS) to be sent to an external decoder via the audio digital
output (coaxial or optical). If a only a stereo speaker system is to be
used then it is only necessary to set this option to PCM, then only two
channels of information are decoded and sent to the stereo audio
outputs (and the coax/optical digital audio output).
LPCM Out: This sets the maximum data rate for the digital audio output
(not the actual data rate) for connection to an external decoding
amplifier. The internal decoder will downsample if the recorded material
has a higher audio data rate although it will not upsample if the
recorded material has a lower audio data rate.
Dolby Digital setup/Dynamic: This allows the adjustment of the Dynamic
compression applied to the audio. This can be useful when listening to
action films (large dynamic range between talking and explosions) late
at night. When set to maximum this will force the quiet and loud parts
of the signal to a similar level.
Channel Trim: Allows adjustment of the decoder levels for each
individual channel in turn to optimise audio setup.
Video Setup Page
The various settings on this screen are all concerned with fine tuning
your DVD picture. You can adjust settings here whilst leaving the
television settings as they are.
Downloaded From Disc-Player.com Cambridge Audio Manuals
Preference Page
TV Type: the DVD player can be set for either a European PAL television
or an NTSC unit. Alternatively AUTO will allow the DVD to adjust
automatically, following the TV format of the DVD disc.
Audio Setting: Setting a particular language here will mean the DVD will
automatically look for that language on any DVD inserted into the
machine.
Subtitle: Setting a particular language here means that the DVD will look
for this particular language. Setting it to the same as the Audio setting
will cancel the subtitles out.
Disc Menu: This allows adjustment of the Scene selection/Special
features menu where permissible by the disc.
Parental: Adjusting this blocks films above a set classification level (ie
PG13) from playing on the player if children are using it, if you wish.
Password: This is how to alter the above settings. The password default
is 7890 and can be changed by correctly entering the default followed
by your new password.
Default: This can restore all of the original factory settings if required.
Note: When a film is playing it is not possible to access the setup menu
unless the stop button is pressed twice (clearing the film position
altogether).
70 Series DVD player 14
OPERATING INSTRUCTIONS
Loading and unloading discs
Normal disc play
1. Press the Standby/On switch.
2. Press the Open/Close button.
1. Switch on your television and if you have an amplifier, set its input
selector to the correct position and reduce the volume control to a
minimum.
3. When the disc tray has opened fully, place a disc carefully in the tray
with the label side facing up.
2. Press the On/Standby switch. Most televisions will automatically
switch to the channel/input that the DVD is connected to.
4. To close the disc tray, press the OPEN/CLOSE button again. When the
tray with a correctly loaded disc is fully closed, the disc will start
turning automatically. After the DVD player has read the disc it will
start to play. Pressing PLAY will also close the tray and start playing
the disc.
3. Press the Open/Close button to open the disc tray, and load a disc.
5. The disc tray can be opened at any time by pressing the OPEN/CLOSE
button. Only remove the disc after the tray has fully opened
Note:
Do not put anything except a DVD/CD sized disc into the tray, foreign
objects may damage the mechanism.
Do not force the tray by hand during the opening and closing operations.
To avoid dirt and dust entering the mechanism, keep the disc tray
closed.
If the Disc is seriously scratched or too dirty the player may not be able
to read it or play it.
Never load more than one disc into the disc tray at one time.
15 70 Series DVD player
Downloaded From Disc-Player.com Cambridge Audio Manuals
4. Press the Open/Close button again to close the tray. The DVD player
will read the disc and begin to load. Alternatively, pressing Play will
close the tray and start playing the disc. If you have loaded a CD, you
will need to press play.
5. The DVD disc should load to the opening menu (where scene
selection, sound/special features can be accessed). Some discs will
begin playing the film but can be returned to the menu by pressing
the Menu button.
6. To stop the disc at any point, press the Stop button. Pressing the Play
button on the front of the DVD player while the disc is playing will
pause the disc. Pressing play on the remote will have no effect as
there is a separate pause button. When the disc is paused the display
will flash, play can be resumed by pressing the PLAY button again.
When the DVD has finished playing, it will cycle back to the start menu,
a CD will return to standby mode. If the REPEAT button has been
pressed, the DVD player will start the film or CD again.
70 Series
Locating a specific point in the DVD
Repeating CD discs and tracks
Start the disc as mentioned in the previous chapter. It is often possible
to locate the point that you wish to view through the Chapter/Scene
Selection on the disc menu that is navigated by the cursor keys. These
chapters can be accessed by the skip buttons on the remote or on the
front panel of the player.
1. Ensure that the disc is playing.
2. Each press of the REPEAT button scrolls through the available options
displayed on your TV screen.
Repeat track
It is also possible to search within the chapter using the Search buttons
on the remote control handset. Pressing the Search button repeatedly
will speed the playback up from x2 through x32 speed. This can also be
done in reverse
>> x2
>> x4
>> x8
<
<< x32
<< x16
Repeat all
Repeat off
It is also possible to repeat a favourite point of a CD/DVD disc by using
the A-B function. Pressing the button once "marks" the beginning of the
section you wish to repeat, pressing it again "marks" the end. The player
will now repeat this section of the disc.
Repeating DVD discs and tracks
Note: This function is unavailable on certain discs.
1. Ensure that the disc is playing.
Zoom
2. Each press of the REPEAT button scrolls through the available options
displayed on your TV screen.
1. When playing a disc, press the Zoom button repeatedly to zoom into
a specific area of the TV screen display.
Repeat chapter
Repeat title
Repeat off
Repeat all
Downloaded From Disc-Player.com Cambridge Audio Manuals
x2
x4
x3
x1
x1/4
x1/2
x1/3
70 Series DVD player 16
MPEG4/MP3 and JPEG File Playing
With a scalable bitstream, it can be adapted to dynamically varying
requirements.
Press UP/DOWN arrows to select the desired directory. Press SELECT for
verification. For example, you select the directory DU000 in Figure A and
press SELECT as shown in Figure B. The window returns back to the
Press UP/DOWN arrows to select the desired directory. Press SELECT for
verification. For example, you select the directory DU000 in Figure A and
press SELECT as shown in Figure B. The window returns back to the
previous directory when you select [ .. ] in the first line or press LEFT
arrow.
Playing MPEG4 File
Press UP/DOWN arrows in Figure B to select the desired MPEG4 file.
Press SELECT for verification. The player will then play the MPEG4 files.
The MPEG4 is the audio standard publicised by MPEG4 (Moving
Picture Experts Group). MPEG4 allows video and audio to be
compressed to a fraction of its original size.
When you insert a MPEG4 disc, the TV screen displays the operation
menu as shown in Figure A (the displayed contents vary with the disc.)
B:
A:
00:00 00:00
001/004
00:00 00:00
001/369
\
\Du000\
Du000
..
Du001
A/V
Du002
A/V
Du003
A/V
MP000
MP001
MP002
MP3 file Playback
When you load the MP3 disc into the unit, it will search the disc for
information and display the operation menu as shown in the diagram
on page 18.
For operational information, please follow the steps for the MPEG4.
MP3 / JPEG Picture CD File Playing
MP3 utilises the third layer audio compression mode of the international
standard MPEG with the compression ratio 12:1. Employing MP3, one
disc can record 600-minutes music or 170 songs with sound quality
almost as good as CD for everyday listening.
JPEG (Joint Photographic Experts Group) is the most widely used picture
compression and storage format today. Utilising the high efficiency
compression calculating method, JPEG compresses the original picture
15 to 20 times with excellent picture quality.
17 70 Series DVD Player
Downloaded From Disc-Player.com Cambridge Audio Manuals
70 Series
Playing MP3 Files
when you insert When you insert an MP3 disc, the TV screen displays
the operation menu as shown in Figure A. (The displayed contents vary
with each disc)>
1
A:
B:
2
3
4
5
6
1. Status window - displays the current status information.
2. Directory window- displays the current path
3. File window - displays the current path’s files
4. Scroll bar window - Indicates the current files’ position
Using the UP/DOWN cursor keys to select the desired directory. Press
SELECT to confirm. For example, you select the directory DU000 in
figure A and press SELECT as shown in figure B. The window returns
back to the previous directory when you select ( ..) in the first line or
press the LEFT key. Use the UP/DOWN cursor keys, as in figure *B to
select the desired MP3 file. Press SELECT to confirm. The player starts
playing the MP3 songs.
5. Preview window - JPEG image preview
6. Information window - Displays the current operating prompts
Downloaded From Disc-Player.com Cambridge Audio Manuals
70 series DVD player 18
JPEG Picture CD file Playing
Playing JPEG Files
When you insert a disc with JPEG files, the TV screen displays the
operation menu as shown in the figure. The operating menus are the
same as operating MP3 files except that the preview image will appear
in the preview window when selecting a JPEG file.
When the zooming in/out function is on, press the FWD button to
magnify the picture. You can magnify the frame twice as much as the
original one. Press the REV button to minimise the picture. You can
minimise the frame half as much as the original one.
When playing JPEG files, press the STOP button to stop preview playback
function, at the same time all JPEG files are displayed on the TV screen.
One frame can display up to 12 pictures. The rest of your pictures are
shown on the next frame. Press the SKIP NEXT button to enter the next
frame. Press the SKIP PREV button to enter the previous frame. You can
also press the NUMBER buttons or DIRECTION ARROWS to select the
desired picture. Press the SELECT button to confirm
Press the MENU button to exit
Press the DIRECTION ARROW to rotate a picture when playing JPEG files.
Basic Operating Menus
1. Press the PREV or NEXT button to skip to the last or next page in stop
mode.
2. Press ANGLE to toggle the file playback mode and the directory
playback mode.
JPEG Files and Functions
When playing JPEG files, press the ZOOM button to start zooming in/out
functions. Press the ZOOM button again to stop zooming in/out
functions.
19 DVD77 70 Series Player
Downloaded From Disc-Player.com Cambridge Audio Manuals
NOTE
Compatibility of JPG/Photo Cd’s
To enable the player to display the JPG files correctly please ensure that
the disc used has been finalised to enable the TOC ‘table of contents’ to
be created on the disc.
New digital cameras support very high picture resolution, this player can
support a maximum resolution of 1840x 1232 pixels with 16.7 million
colours.
For images of higher resolution than above please convert the JPEG files
using a suitable photo editing package to enable correct playback.
70 Series
CONNECTION TO A PROGRESSIVE SCAN TV/DISPLAY
Some televisions and monitors are equipped with component video
inputs and are capable of reproducing a progressively scanned video
signal. Connecting to these inputs allows you to view higher quality
pictures with less flicker.
Y
Pr
Pb
Rear Panel
DVD77 Only
If you find that you have no display but are getting sound from your
speakers, you have set the DVD player to progressive scan mode. Simply
press the I-Scan button on your remote control.
Audio In
Audio Cord
Note: TV set with progressive-scan
video input
If your progressive scan TV has Y, Pb Pr video inputs you can use the
players Y, Cb/Pb, Cr/Pr outputs . Press the p-Scan button to switch the
player to the progressive scan video output mode.
If this player’s audio outputs are also connected to the TV, the L/R
channels of 2-CH OUT should be connected to the TV’s AUDIO IN
terminals.
It is imperative that you use high quality component video cables to
ensure the best possible performance.
Downloaded From Disc-Player.com Cambridge Audio Manuals
70 Series DVD Player 20
DVD AUDIO
What is DVD Audio?
Using MLP lossless from Dolby Laboratories. DVD-Audio discs can store
up to six channels of 24-bit/96 kHz audio, including a separate lowfrequency bass channel. Compare that to two channels of 16-bit/44.1
kHz sound from CD’s! For stereo buffs, a DVD-Audio disc can
alternatively hold two channels of 24-bit/192 kHz audio, exceeding the
quality of any music audio format previously available.
21 70 Series DVD Player
Downloaded From Disc-Player.com Cambridge Audio Manuals
DVD-Audio discs can also add a visual element to your music. Discs can
carry picture galleries, lyrics, notes, or any combination of still images,
animation, and text. Producers and artists can even add audio
commentary, similar to that found on many DVD-Video discs. And, as
with DVD-Video, each DVD-Audio disc can also contain full-motion video,
with accompanying Dolby Digital sound in up to 5.1 channels.
70 Series
USING THE REMOTE HANDSET- DVD77
15
1
2
16
17
18
3
4
5
19
20
6
21
7
8
22
23
24
25
26
27
28
29
Downloaded From Disc-Player.com Cambridge Audio Manuals
9
10
11
12
13
14
When you have unpacked your remote handset, insert the supplied AAA
batteries to activate it. The remote can control all of the standard
playback options but is also important in setting up your DVD player as
many of the menus are most easily accessed from the remote.
1. Eject
2. Number buttons
3. Zoom
4. Angle
5. Menu
6. Return
7. Volume
8. Mute
9. Clear
10. A-B Button
11. Skip Fwd
12. Skip Back
13. OSD
14. PAL/NTSC
15. Standby
16. Audio
17. Subtitle
18. Title
19. Select
20. Setup
21. Play/Stop/Pause
22. Slow
23. Mode
24. PSM
25. Repeat
26. Scan Prev
27. Scan Rev
28. I-Scan
29. P-Scan
70 Series DVD player 22
USING THE REMOTE HANDSET- DVD79
15
1
2
16
17
18
3
4
5
19
20
6
21
7
8
22
23
24
25
26
27
28
29
23 70 Series DVD Player
Downloaded From Disc-Player.com Cambridge Audio Manuals
9
10
11
12
13
14
When you have unpacked your remote handset, insert the supplied AAA
batteries to activate it. The remote can control all of the standard
playback options but is also important in setting up your DVD player as
many of the menus are most easily accessed from the remote.
1. Eject
2. Number buttons
3. Zoom
4. Angle
5. Menu
6. Return
7. Volume
8. Mute
9. Clear
10. A-B Button
11. Skip Fwd
12. Skip Back
13. OSD
14. PAL/NTSC
15. Standby
16. Audio
17. Subtitle
18. Title
19. Select
20. Setup
21. Play/Stop/Pause
22. Slow
23. Mode
24. PSM
25. Repeat
26. Scan Prev
27. Scan Rev
28. DVI
29. Info
70 Series
TROUBLESHOOTING
SPECIFICATIONS
There is no power
Disc types
Ensure the AC power cord is connected securely.
Ensure the plug is fully inserted into the wall socket and is switched on.
Check fuse in the mains plug or adaptor.
Audio formats
The player will not read the disc
Check the disc is not loaded upside down.
Check that the disc is not too scratched or dirty.
There is no sound
Video
Composite Video (CVBS)
S-Video (SVHS)
RGB
DVI-D (Digital Video Interface DVD79 Only)
Component (YCbCr)
PAL/NTSC
Interlaced/Progressive scan
THD (unweighed)
< 0.01%
Ensure that the amplifier is set correctly.
Check that the interconnects are inserted correctly.
The disc is skipping
Check that the disc is not too scratched or dirty.
Ensure the player is on a firm surface and not subject to vibrations.
There is a hum coming from the speaker
Ensure that all cable connections are secure.
The remote handset will not function
Check that the batteries have not expired.
Ensure that nothing is blocking the remote sensor.
DVD, DVD-A, DVD-V, Mp3, CD-RW,
CD-R, CD-DA, Kodak picture CD,
DIVX (DVD 79 Only)
5.1 and stereo downmix
LPCM 16 bit 44.1kHz
Dolby Digital 5.1 24 bit 96kHz
DTS output (digital audio out only)
DVD audio 2 channel 24 bit 192kHz
DVD audio 5.1 (MLP) 24 bit 96kHz
Dynamic Range
>103dB
Frequency response
5Hz - 20kHz
Video amplitude
1.0V pk-pk (75 ohms)
S-V
Video amplitude
Y: 1.0V pk-pk n (75 ohms)
C: 0.286V pk-pk (75 ohms)
Power supply
100-240V AC
There is no image, but sound (DVD77 Only)
Max power consumption
40W
You have set the DVD player to progressive scan mode. Simply press
the I-Scan button.
Dimensions (mm) (H x W x D)
55 x 430 x 263
Weight (kg)
2.56 kg
Downloaded From Disc-Player.com Cambridge Audio Manuals
50/60Hz
70 Series DVD player 24
LIMITED WARRANTY
Cambridge Audio warrants this product to be free from defects in
materials and workmanship (subject to the terms set forth below).
Cambridge Audio will repair or replace (at Cambridge Audio's option) this
product or any defective parts in this product. Warranty periods may vary
from country to country. If in doubt consult your dealer and ensure that
you retain proof of purchase.
To obtain warranty service, please contact the Cambridge Audio
authorised dealer from which you purchased this product. If your dealer
is not equipped to perform the repair of your Cambridge Audio product,
it can be returned by your dealer to Cambridge Audio or an authorised
Cambridge Audio service agent. You will need to ship this product in
either its original packaging or packaging affording an equal degree of
protection.
Proof of purchase in the form of a bill of sale or receipted invoice, which
is evidence that this product is within the warranty period, must be
presented to obtain warranty service.
This Warranty is invalid if (a) the factory-applied serial number has been
altered or removed from this product or (b) this product was not
purchased from a Cambridge Audio authorised dealer. You may call
Cambridge Audio or your local country Cambridge Audio distributor to
confirm that you have an unaltered serial number and/or you purchased
from a Cambridge Audio authorised dealer.
This Warranty does not cover cosmetic damage or damage due to acts
of God, accident, misuse, abuse, negligence, commercial use, or
modification of, or to any part of, the product. This Warranty does not
cover damage due to improper operation, maintenance or installation,
or attempted repair by anyone other than Cambridge Audio or a
25 70 Series DVD player
Downloaded From Disc-Player.com Cambridge Audio Manuals
Cambridge Audio dealer, or authorised service agent which is authorised
to do Cambridge Audio warranty work. Any unauthorised repairs will void
this Warranty. This Warranty does not cover products sold AS IS or WITH
ALL FAULTS.
REPAIRS OR REPLACEMENTS AS PROVIDED UNDER THIS WARRANTY
ARE THE EXCLUSIVE REMEDY OF THE CONSUMER. CAMBRIDGE AUDIO
SHALL NOT BE LIABLE FOR ANY INCIDENTAL OR CONSEQUENTIAL
DAMAGES FOR BREACH OF ANY EXPRESS OR IMPLIED WARRANTY IN
THIS PRODUCT. EXCEPT TO THE EXTENT PROHIBITED BY LAW, THIS
WARRANTY IS EXCLUSIVE AND IN LIEU OF ALL OTHER EXPRESS AND
IMPLIED WARRANTIES WHATSOEVER INCLUDING, BUT NOT LIMITED TO,
THE WARRANTY OF MERCHANTABILITY AND FITNESS FOR A PRACTICAL
PURPOSE.
Some countries and US states do not allow the exclusion or limitation of
incidental or consequential damages or implied warranties so the above
exclusions may not apply to you. This Warranty gives you specific legal
rights, and you may have other statutory rights, which vary from state to
state or country to country.
70 Series
Downloaded From Disc-Player.com Cambridge Audio Manuals
70 Series DVD player 26
70 Series DVD Player
www.cambridge-a
audio.com
Part No. AP16515/2
Downloaded From Disc-Player.com Cambridge Audio Manuals