1
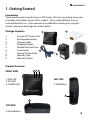
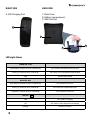
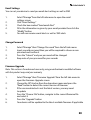
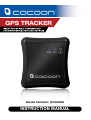
GPS TRACKER
GREAT FOR QUICKLY TRACKING AND
LOCATING PEOPLE, PETS AND VEHICLE
S
Model Number: GT42395
INSTRUCTION MANUAL
Safety Warnings & Cautions
1.
Carefully read all safety instructions and the user manual before operation.
2.
Keep the GPS Tracker away from liquid.
3.
Do not expose or immerse the GPS Tracker in liquid.
4.
Keep away from heat sources such as heaters and ovens
5.
Never add any attachments and/or equipment without the approval of the manufacturer.
Unauthorized modifications may result in fire, electric shock or other personal injury and may void your warranty.
6.
Do not drop or jar the GPS Tracker. Dropping or rough use of the GPS Tracker will cause damage.
7.
8.
Do not place near strong magnets or strong electric currents.
Caution: Risk of explosion if battery is replaced by an incorrect type. Dispose of used batteries according to the instructions.
Cocoon GPS tracker has been tested and meets applicable limits for Radio Frequency (RF) exposure.
Specific Absorption Rate (SAR) refers to the rate at which the body absorbs RF energy. SAR exposure
is limited at 1.6 Watts per Kilogram (over a volume containing a mass of 1 gram of tissue) in Australia.
During testing, the Cocoon GPS tracker is set to the highest transmission level and placed in
positions to simulate use near the body, with 10mm separation.
Carry the Cocoon GPS tracker at least 10mm away from your body to ensure exposure levels remain
at or below the as-tested levels. Cases with metal parts may change the RF performance of the
device, including conformance with RF exposure guidelines, in a manner that has not been tested
or certified.
Although this device has been tested to determine SAR in each band of operation, not all bands are
available in all areas. Bands are dependent on your service provider’s wireless and roaming networks.
Mobile data may be required for some features such as viewing the Tracker via Google Maps.
The supplier is not responsible for any charges incurred.
In the case of improper usage or if you have opened, altered and repaired the product yourself, all
guarantees are void.
The supplier does not accept responsibility for additional or consequential damage other than
covered by legal product responsibility.
The supplier is not responsible for the end use of this product including any improper use or when
used for purposes that are not specified.
2
Contents
Safety Instructions............................................................................................................................................. i
1. Getting Started
- Package Contents........................................................................................................................................... 4
- Product Overview........................................................................................................................................... 4
- LED Light Status.............................................................................................................................................. 5
- Charging the GPS Tracker............................................................................................................................ 6
- Powering On / Off the Cocoon GPS Tracker.......................................................................................... 6
2. Functions
- Setting Authorized Numbers...................................................................................................................
- Removing an Authorized Number...........................................................................................................
- Reset to Factory Settings.............................................................................................................................
- Checking the Authorized Numbers & Status of Features................................................................
- Changing the Password...............................................................................................................................
- Setting the Time Zone..................................................................................................................................
- Naming the GPS Tracker..............................................................................................................................
- Locating the GPS Tracker with Latitude and Longitude..................................................................
- Locating the GPS Tracker with Google Maps ......................................................................................
- Locating the GPS Tracker with GPRS Address......................................................................................
- Obtaining the IMEI & Version Numbers.................................................................................................
- Setting up a Geo-Fence Alarm..................................................................................................................
- Turning off a Geo-Fence Alarm.................................................................................................................
- Setting a Speed Alert...................................................................................................................................
- Setting up GPS Signal Loss Alert..............................................................................................................
- Movement Alert.............................................................................................................................................
- Using the SMS Button..................................................................................................................................
7
7
8
8
8
9
9
9
10
10
10
11
12
12
12
13
13
3. Web Tracking
- Navigating the Map......................................................................................................................................
- Registering the GPS......................................................................................................................................
- Changing Settings.........................................................................................................................................
- Setting a Point of Interest...........................................................................................................................
- Adding a New Geo-Fence Online.............................................................................................................
- Modifying/Deleting an existing Geo-Fence Online...........................................................................
- History................................................................................................................................................................
- Reports...............................................................................................................................................................
- Latitude and Longitude Values on the Map.........................................................................................
- Ruler....................................................................................................................................................................
- Chart...................................................................................................................................................................
- Adding a New Tracker...................................................................................................................................
- Deleting / Modifying an Existing Tracker...............................................................................................
- Email Settings..................................................................................................................................................
- Change Password...........................................................................................................................................
- Firmware Upgrade.........................................................................................................................................
14
14
15
15
16
17
17
17
18
18
18
19
19
20
20
20
4. Understanding The Buttons / Commonly Used Abbreviations....................................................... 21
5. FAQ’s....................................................................................................................................................................... 22-23
6. SMS Commands................................................................................................................................................ 24-25
7. Support / Warranty Details............................................................................................................................ 26
3
1. Getting Started
Introduction
Thank your for purchasing the Cocoon GPS Tracker. We trust you will get many years
of carefree and reliable use out of this product. Please read and follow the user
manual before first use. If you experience any difficulties setting up or using this
product, please see back page for contact details:
Package Contents
1.
2.
3.
4.
5.
6.
7.
8.
9.
2
1
Cocoon GPS Tracker Unit
Rechargeable battery
Charging Cable
Charging Adaptor
Weather Resistant Case
3
User Manual
Getting Started Guide
Warranty Card
Warranty Stickers
5
4
Product Overview
2 3
FRONT VIEW
1. GSM LED
2. GPS LED
3. CHARGE LED
LEFT SIDE
5. SMS Button
5
4
TOP VIEW
4. Power Button
4
RIGHT SIDE
BACK SIDE
6. USB Charging Port
7. Back Cover
8. Battery Compartment
9. SIM Card Slot
6
7
8
LED Light Status
GREEN LED - GSM
Quick flash(0.2 seconds on and 2.8 seconds off )
GPS Tracker is connected to GSM network
Flashing (1 second on and 2 seconds off )
GPS Tracker is not connected to GSM network
Solid
No SIM Card inserted
BLUE LED - GPS
Quick flash (0.2 seconds on and 2.8 seconds off )
GPS Tracker has a GPS fix
Flashing (1 second on and 2 seconds off )
GPS Tracker has GSM positioning fix
Long flash (2 seconds on and 1 second off )
GPS Tracker has no GPS fix
RED LED
5
Solid
GPS Tracker is Charging
Off
GPS Tracker is fully charged or not charging
Flashing
Device is in motion
9
Charging the GPS Tracker
1. 2.
3.
4.
Open the back cover of the GPS Tracker
Insert the battery into the GPS Tracker
Connect the USB cable to the GPS Tracker
Connect the other end of the USB cable to your computer or included
charging adaptor
NOTE: Charge the GPS Tracker for a minimum of 4 hours before first use to maximise the battery life
Powering On / Off the Cocoon GPS Tracker
1.
2.
3.
4. Hold the Power button on the top of the unit for 5 seconds to turn the GPS tracker on
The GSM & GPS lights will TURN ON to indicate the GPS Tracker is on
Hold the Power button on the top of the unit for 5 seconds to turn the GPS tracker off
The Power button will fade to indicate the GPS is turned off
6
2. Advanced SMS functions
Important: When using SMS commands please ensure there are no spaces in the
text and that all letters are in CAPITALS unless otherwise stated.
Note: The default password is 123456. It is recommended that you change this password.
Setting Authorized Numbers
The Cocoon GPS Tracker allows up 3 phone numbers to send and receive commands.
Follow the steps below to authorize a phone number.
1.
2.
From the mobile you would like to authorize, SMS [PASSWORD]+[A/B/C]+1
For example if your password is 123456 and you would like to authorize mobile number 1, you would SMS 123456A1 to the Cocoon GPS Tracker
If you would like to set a second or third authorized number simply change the letter of the command
For example, if your password is 123456 and you would like to authorise mobile number 2, you would SMS 123456B1 to the Cocoon GPS Tracker
Removing an Authorized Number
To remove an authorized number from the Cocoon GPS Tracker follow the steps below.
1.
2.
From the mobile you would like to unauthorize,
SMS [PASSWORD]+[A/B/C]+0
For example, if your password is 123456 and you would like mobile number
1 to be no longer authorized, you would SMS 123456A0 to the Cocoon
GPS Tracker
The phone number you have selected will no longer receive SMS’s from the GPS Tracker
7
Reset to Factory Settings
The Cocoon GPS Tracker can be reset to factory settings by using the following
command. This can be useful if you forget your password.
Warning: All settings, data and preferences will be lost and reset to a default state.
1.
To reset the Cocoon GPS Tracker to factory settings SMS RESET!
Note: unlike other SMS commands, no reply will be sent to indicate the device has accepted the command. The exclamation point must be included in the command for it to be accepted
Checking the Authorized Numbers & Status of Features
1.
2.
To request a list of authorized numbers and the current status of the Cocoon GPS Tracker, SMS [PASSWORD]+G
For example, if your password is 123456 you would SMS 123456G to the Cocoon GPS Tracker
The device will reply “A[AUTHNUMBER], B[AUTHNUMBER], C [AUTHNUMBER], Speed: 0,100km/h, GEO:0,0,0, Coord Sv:0, Listen-in:0, UTC-T:0.0, Motion:0,Movement:0,0, Bat:100”
Changing the password
Note: The default password is 123456. It is recommended that you change this password.
1.
To change the password of the Cocoon GPS Tracker, SMS [PASSWORD]+H+[NEWPASSWORD]
For example, if your password is 123456 and you would like to change it to 987654 you would SMS 123456H987654 to the Cocoon GPS Tracker
2.
Make sure the new password is 6 Digits or it will not be recognized
NOTE: Letters and numbers can be used for the password.
Symbols will not be recognized
8
Setting the Time Zone
The unit is set to Australian Eastern Standard Time by default.
1.
To modify the time zone, SMS [PASSWORD]+L+[+00/-00] to the Cocoon
GPS Tracker
For example, if your password is 123456 and you want Eastern Standard Time, you would SMS 123456L+10 to the Cocoon GPS Tracker
Naming the GPS Tracker
You can add a name to the Cocoon GPS Tracker to give individualised SMS reports.
This can be useful if you need to distinguish between multiple GPS trackers
1.
2.
To attach a unit name to all SMS alerts, SMS [PASSWORD]+U+1,[NAME]
For example if your password is 123456 and you want to name the unit “John”, you would SMS 123456U1,John to the Cocoon GPS Tracker
If successful the device will reply “John UserName set! +GPS info”
Locating the Cocoon GPS Tracker with Latitude and Longitude
Your Cocoon GPS Tracker can send its current location using Latitude and
Longitude; this information can be then entered into mapping software to find its
current location.
1.
2.
3.
To request the Latitude and Longitude Coordinates of the Cocoon GPS Tracker, SMS [PASSWORD]+F
For example, if your password is 123456 you would SMS 123456F to the Cocoon GPS Tracker
The device will reply “GPS Info!
Date: xx; Time:xx; LAT:xx; LOT:xx; Speed:xx”
Using the LAT and LOT values you can locate the device using mapping software such as Google Earth or Google Maps
9
Locating the Cocoon GPS Tracker with Google Maps link
Your Cocoon GPS Tracker can send you an active website link to Google Maps of the
latest GPS coordinates of the device.
1.
2.
To request a Google Maps link showing the location of the Cocoon GPS Tracker SMS [PASSWORD]+FM
For example, if your password is 123456, you would SMS 123456FM to the Cocoon GPS Tracker
The device will reply “http://maps.google.com/mapsxxxx” Open the link on your mobile device and the location of the Cocoon GPS Tracker when the SMS was sent, will be displayed
Locating the Cocoon GPS Tracker with GPRS Address
Your Cocoon GPS Tracker can send you the current address location of the GPS unit.
This will be given using the street address of the trackers location.
1.
To request the current address of the Cocoon GPS Tracker, SMS [PASSWORD]+ADD
For example, if your password is 123456, you would SMS 123456ADD to the Cocoon GPS Tracker
2.
The device will reply “LAT: xx; LOT: xx; Add: number street suffix, suburb, state, postcode, country.”
Note: A GPRS signal must be available for this feature to work
Obtaining the IMEI and Version numbers
1.
2.
3. To request the IMEI and version numbers of the Cocoon GPS Tracker,
SMS [PASSWORD]+V
For example, if your password is 123456, you would SMS 123456V to the
Cocoon GPS Tracker
The device will reply “Version: Soft:xxxxxxx Hard:xxxxxxx IMEI:xxxxxxxxxxxxxxx GSM CSQ:xx”
This information will be required for Web Tracking applications
10
Setting up a Geo-Fence Alarm
A geo-fence is a virtual perimeter for a real world geographic area. A geo-fence
could be set around a neighbourhood, a school’s boundary or a residence. Once a
geo-fence is set up, a notification can be sent to an authorised number when the
GPS tracker enters or exits the predefined area.
Note: While you can set up a geo-fence using an SMS, it is recommended you use
the Web service. We recommend only advanced users set up a Geo-Fence using SMS
commands.
1.
To set up a geo-fence alarm around current location of the Cocoon GPS Tracker, send an SMS to the Cocoon GPS Tracker in the following format:
0=Alarm on Entry 1=Alarm on Exit
Geo Fence number. Value can be 1-3
Distance in Meters/Kilometers
SMS [PASSWORD]+I+(1-3),(0-1),(0-1),(001-999)(M/KM)
For example, if your password is 123456 and you wanted to set geo-fence 1 to be on 100
meters around the GPS trackers’ current location and to send an alarm when the GPS
leaves the geo-fence, you would SMS 123456I1,1,0,100M to the Cocoon GPS Tracker
2.
3.
11
If successful the device will alert you when the unit enters/leaves the defined geo-fence area
You will receive an SMS in the following format: “Geo Alarm!+Geo Info”
Turning off a Geo-Fence Alarm
1.
To turn off a previously set up geo-fence alarm, SMS [PASSWORD]+I+[1-3],0,0 to the Cocoon GPS Tracker
For example, if your password is 123456 and you want to turn off geo-fence 1, you would SMS 123456I1,0,0 to the Cocoon GPS Tracker
Setting a Speed Alert
Your Cocoon GPS can be set to alert you when it exceeds a set speed.
1.
2.
3.
To set up a speed alert, SMS [PASSWORD]+J+1+(001-255) to the Cocoon
GPS Tracker
For example if your password is 123456 and you wanted to set a speed limit of 20km/h you would SMS 123456J1,020
The device will send an SMS to the authorized numbers stating “Over-speed! + GPS-INFO” when the Cocoon GPS Tracker’s recorded speed exceeds 20km/h
To turn off a speed alert, SMS: [PASSWORD] + J+0 to the Cocoon
GPS Tracker
For example, if your password is123456, you would SMS 123456J0 to the Cocoon GPS Tracker
Setting up GPS Signal Loss Alert
This function lets the Cocoon GPS Tracker automatically send the last known GPS info
to all authorized numbers when it enters an area without a GPS signal.
1.
2.
3.
To set up a GPS signal loss alert, SMS [PASSWORD]+K+1
For example, if your password is 123456 you would SMS 123456K1 to the Cocoon GPS Tracker
The device will send “Before +GPS info” to the preset numbers, when GPS signal is lost
To turn off this function, SMS [PASSWORD]+K+0
For example if your password is 123456 you would SMS 123456K0 to the Cocoon GPS Tracker
12
Movement Alert
This function will send an SMS to the authorized numbers if the GPS unit moves a
certain distance away from its location when the command is given.
1.
2.
To set up a Movement Alert SMS [PASSWORD]+R+1,xxxM/KM
For example, if your password is 123456 and you would like to be alerted if the unit moves more than 100 meters from its current location, you would SMS 123456R1,100M to the Cocoon GPS Tracker
Note: the set distance must be submitted in a three digit format.
For example; To set a 15m alert, you would SMS 123456R1,015M
To set a 1km alert, you would SMS123456R1,001KM
To turn off this function, SMS [PASSWORD]+R+0
For example if your password is 123456, you would SMS 123456R0 to the Cocoon GPS Tracker
Using the SMS Button
The SMS button will send an SMS to all registered mobiles with the current
coordinates of the GPS tracker.
1.
2.
Press the SMS button for 3 seconds
The GSM light will dim and the Cocoon GPS Tracker will send an SMS to all registered numbers stating “Help me! +GPS Info” with the current coordinates of the GPS Tracker
3. Web Tracking
NOTE: To use the online functions you will need the IMEI & Version Numbers
associated with your device. Please see “Obtaining the IMEI and version numbers” on
page 10 of this instruction manual
Using your PC or Mac web browser go to www.gpsmaptracker.com and enter the
username and password provided on the back of your instruction manual and press
the login button.
13
Navigating the Map- Computer Mouse
MIDDLE BUTTON
Roll to zoom in/out
LEFT BUTTON
Click and drag to
move the map
Registering the Cocoon GPS Device
1.
2.
3.
4.
5.
6.
7.
8.
Click on “Manage” from the menu located on the left side of the webpage
Click “Tracker Info”
Click on the “Add New Tracker” button and fill in the name, tracker icon, hard version, IMEI, user ID and Tracker SIM number fields
Click the “Add” button
You will be returned to the tracker info screen which you can close by clicking the [x] in the top right corner
Click “Real Time Tracking” from the menu on the left side of the screen
Locate the check box next to the name of the GPS tracker you just added and ensure there is a tick in the box
You should now see the GPS tracker’s live location on the map opposite
3
2
14
6
7
Changing Settings
1.
Click on “Settings” from the menu on the left side of the webpage to open the settings dialogue box
2.
From this dialogue box you can change the authorized numbers, change the interval of data reporting, set a speed alarm, modify the time zone, set a movement alarm, enable/disable coordinate saving and request a
status SMS
Warning: Please do not change any settings if you are unsure what the effect will be
Setting a Point of Interest
Using the web tracker you can set points of interest at any location on the map. This
could include your house, local parks or any nearby areas you wish to keep visible on
your map.
1.
2.
3.
15
Clicking “Interest Point” from the menu on the left side of the webpage will drop a blue call out on the map
This call out can be clicked and dragged to another area of the map.
You can also input text to name the point of interest
Adding a new Geo-Fence - Online
A geo-fence is a virtual perimeter for a real world geographic area. A geo-fence
could be set around a neighbourhood, a school’s boundary or a residence. Once a
geo-fence is set up, a notification can be sent to an authorised number when the
GPS tracker enters or exits the predefined area.
1.
2.
3.
4.
5.
6.
7.
8.
9.
10.
11.
12.
13.
14.
To set up a geo-fence, select “Geo-Fence” from the menu on the left side of the webpage
Click “Add New Geo-Fence”
Enter a name for the geo-fence you want to create
Click the “Select range from map” button
The dialogue box will disappear and the map will be visible again
Find the area you want to set up a geo-fence around – see navigating the map, page 14
Left click on the map to set the first corner of the geo-fence
Move the mouse and click a second time to set the opposite corner.
Don’t worry about trying to set the area perfectly the first time, you can fine tune the area later
You will now see a green rectangle with a red line outline and white squares along the edges. The red line is the border of the new geo-fence
You can change the geo-fence by clicking and dragging one of the white squares to a new location. By doing this you can fine tune the borders of the geo-fence to fit any area you like
While re-sizing you may notice transparent squares along the border, these are additional points you can add, by clicking and dragging, that allow further control over the geo-fence area
When you are happy with the area set click the “Ok” button on the “Finish GEO editing?” dialogue box to return to the “Add New
Geo-Fence” menu
You can now change the alarm to either send an alert when the Cocoon GPS tracker enters the geo-fence or when it leaves
Click the “Submit” button. The geo-fence is now active
16
Modifying/Deleting an existing Geo-Fence - Online
1.
2.
3.
4.
5.
Select “Geo-Fence” from the left side menu to open up the geo-fence
dialogue box
In the “Operation” column click on the green modify text to open the “Edit Geo-Fence” dialogue box
Modify the fields required then click the “Submit” button
In the “Operation” column click on the green “delete” text
Click the “OK” button when prompted to delete the geo-fence entirely
Note: This will remove the geo-fence and cannot be restored.
History
View the GPS Tracker’s recorded location for the past 3 months in 7 day blocks.
1.
2.
3.
4.
5.
6.
7.
Select “History” from the left side menu to expand the History menu
Set a start and end date
Click the “Search” button
Note: The search period cannot be more than 7 days long
When you hit “search” the web tool will return every GPS point reported within the specified time frame.
Note: Each point is recorded separately (usually at 30 second increments) and can be viewed as an individual point
You can click the “Play” button to chronologically cycle through the recorded points. Use the “-“ and “+” buttons to change the cycle speed
You can manually navigate the list of GPS points by clicking “Previous”
and “Next”
Clicking “Save to XML file” will save the file in a format that can be used with various applications and Web services
Reports
1.
2.
3.
17
Select “Reports” from the left side menu to expand the Reports menu
Set a start and end date
Click the “Search” button
Note: The search period cannot be more than 7 days long
4.
5.
6.
A filter can be applied via the drop down menu if a certain type of data
is required
When you hit “search” the web tool will return every GPS point reported within the specified time frame
From the “Reports” dialogue box you can choose to export the data to an .xls format by clicking “Export Excel” at the bottom of the report
Using Latitude and Longitude Values on the Map
You can manual input any latitude and longitude values on the map navigate to that
given area.
1.
2.
3.
4.
Select “Map” from the left side menu to expand the Map menu
Enter a pair of Latitude and Longitude coordinates
Click the “Locate” button
This will put a red pin on that location and zoom to it using the map
Ruler
Utilising the map you can measure between any points selected.
1.
2.
3.
4.
5.
Select “Ruler” from the left side menu to select the ruler tool
While the mouse is over the map, left click to set the start point of
the measurement
Click the left mouse button again to add another point of measurement
Right click to set the end point
When set the total length between the two or more points is displayed
in kilometres
Chart
1.
2.
3.
4.
Select “Chart” from the left side menu to open the Chart screen
Select the Chart Type and time interval from the drop down menus
Set the start and end dates
Note: The chart period must be more than two and less than twelve days
Click “OK” to generate the chart for the period selected
18
Manage
Adding a New Tracker
1.
2.
3.
4.
5.
6.
Click on “Manage” from the menu of the left side of the webpage
Click “Tracker Info”
Click on the “Add New Tracker” button
Fill in the name, tracker icon, hard version, IMEI, User ID and Tracker
SIM number fields
Click the “Add” button
You can repeat the steps to add another GPS tracker to the same account if you choose
Deleting an Existing Tracker
1.
2.
3.
4.
5.
Click on “Manage” from the menu of the left side of the webpage
Click “Tracker Info”
Select the Tracker you wish to delete by checking the box next to
its name
Click the “Delete” button
You will be prompted to confirm your choice
Warning: Deleting the tracker will remove all data (history, geo-fences etc.) related to the device
Modifying an Existing Tracker
1.
2.
3.
4.
5.
19
Select “Manage” from the left side menu to open the Tracker
info window
Click “Tracker info”
Select the Tracker you wish to modify by checking the box next to
its name
Click the “Modify” button
Now you can modify the GPS Tracker details
Email Settings
You can set your device to send you email alert settings as well as SMS
1.
2.
3.
4.
5.
Select “Manage” from the left side menu to open the email
settings screen
Click “Email Settings”
Check the box marked “Send email Alert”
Fill in the information as given by your email provider then click the
“Modify” button
You will now receive email alerts as well as SMS alerts
Change Password
1.
2.
3.
4.
Select “Manage” then “Change Password” from the left side menu
Input your old password then you will be required to choose a new password and confirm it
Press the “Submit” and your password will be changed
Keep note of your password for your records
Firmware Upgrade
Note: This section is for advanced users only; using unauthorized or modified software
with this product may void your warranty
1.
2.
3.
4.
5.
6.
Select “Manage” then “Firmware Upgrade” from the left side menu to open the Firmware Upgrade screen
Choose the GPS tracker from the drop down menu and press the “Read” button to detect the current version of firmware
If the version detected is not the latest version, you may need
to update
Press the “Choose File” button, navigate to the current firmware file
and select it
Press the “Upgrade” button
Your device will be updated to the latest available firmware if applicable
20
Understanding The Buttons
Power
SMS
Press and hold for 5 seconds to turn on/off the GPS Tracker
Press for 3 seconds to send SMS’ to all sorted numbers
Commonly Used Abbreviations
GPS INFO
:DD-MM-YY Time:HH:MM:SS Lat:000.00000000N
Long:000.00000000E Speed:000.0
GEO INFO
Date:DD-MM-YY Time:HH:MM:SS Speed: 000.0
SMS COMMAND
Send an SMS to the SIM card inserted in the GPS Tracker
21
FAQ’S
Problem
Solution
The GPS Tracker will not turn on
- Hold the power button for 5 seconds
- Charge the GPS Tracker for a minimum of
4 hours
The GPS Tracker is no longer
sending SMS’s
- Check the GPS Tracker has power and
recharge if necessary
- Check the mobile SIM has enough credit to
send SMS’s
How long do I need to charge the
GPS Tracker
Charge at least four hours before the first use,
typically around 3 hours from completely flat
How long does the GPS tracker
battery last per charge?
The battery should last about 100 hours
in standby mode. Keep in mind the unit
consumes more power when sending or
receiving SMS commands
How many phone numbers can I
authorize on the GPS tracker?
The Cocoon GPS Tracker can have up to three
authorized phone numbers at any one time
How do I view a map on my
smart-phone with the current GPS
location?
Request an SMS with Google maps link
(see page 10), then click the link in the SMS
you receive back
What is a Geo-Fence and what do I
do with it?
A geo-fence is a virtual perimeter or barrier.
You can set up a geo-fence for any location
and monitor when the GPS tracker leaves or
enters that location. For example; You could
use a geo-fence to alert you if your pet leaves
your property, or you could set up a
geo-fence around your child’s school to alert
you when they arrive
How do I stop receiving SMS’s from
the GPS Tracker?
Follow the steps for removing an authorized
number on page 7
22
Which device pays for the texts, my
mobile or the GPS Tracker?
When you SMS the GPS Tracker your mobile
is charged for the text. When you receive a
text from the GPS Tracker, the GPS Tracker is
charged for the text
How do I know if the GPS tracker is
out of credit?
The Cocoon GPS Tracker will not be able to
send replies to you SMS commands if it is out
of credit. Please refer to your service provider
for account balance
Why is my GPS tracker sending me
SMS’s every 30 seconds?
‘Frequent SMS’s can be due to any of the
following reasons:
speed alert is set up for a low speed
-turn off speed alerts (see page 12)
Geo-fence alert is set up in a frequented area
-turn off geo fence alerts (see page 12)
Signal loss is set up in a poor reception area
-turn off signal loss alert (see page 12)
23
Summary of SMS Commands
Note: Ensure there are no spaces in the texts and that all letters in CAPITALS unless
otherwise stated
The phrase PASSWORD should be substituted with your own password.
The default password is 123456 as used in the example below
SUMMARY OF SMS COMMANDS
Function
Command
Set Authorized Number A
123456A1
Set Authorized Number B
123456B1
Set Authorized Number c
123456C1
Remove Authorized Number
A
123456A0
Remove Authorized Number
B
123456B0
Remove Authorized Number
C
123456C0
Check Authorized Numbers
123456G
Change the password
123456HXXXXXX
Set Time Zone
Comment
Password must be 6 digits
where XXXXXX is the new
password
+/- is GMT/UTC time
Australian Eastern Standard
Time
123456L+10
Time zone = +10 UTC
Australian Eastern Daylight
Time
123456L+11
Time zone = +11 UTC
Western Standard Time
123456L+08
Time zone = +08 UTC
24
SUMMARY OF SMS COMMANDS
Function
Command
Comment
Western Daylight Time
123456+09
Time zone = +09 UTC
Add name to SMS alerts
123456U1,John
Name can be lower case
Request LAT + LONG
Coordinates
123456F
Request Coordinates with
Google Maps Link
123456FM
Request Coordinates +
Address
123456ADD
GPRS signal must be
Available
Request IMEI + Version
numbers
123456V
Required for Web Tracking
Set geo-fence alarm
123456I111200M
See Instruction Manual
Turn off geo-fence alarm
123456I100
See Instruction Manual
Set Speed Alert
123456J1,020
Last 3 digits denote speed
in km/h
Set Signal Loss Alert
123456K1
Turn off Signal Loss Alert
123456K0
Turn off the LEDs
123456Y0
Turn off device
123456D
25
Support
For additional support including helpful guides and videos, visit the Cocoon support
website at www.winplus.com.au/cocoon.html
Telephone: Email:
Website:
1300 663 907
[email protected]
www.winplus.com.au
Warranty Details
This product is warranted against defects for a period of One year If the product is
faulty, Winplus will repair or replace the product (at its discretion) at no cost to you
provided the product has been used in accordance with instructions provided. You
are responsible for any expenses associated with making a claim under this warranty
(incl. postage).The benefits under our Warranty are in addition to other rights and
remedies under consumer law in relation to these goods. Our goods come with
guarantees that cannot be excluded under the Australian Consumer Law. You are
entitled to a replacement or refund for a major failure and for compensation for any
other reasonably foreseeable loss or damage. You are also entitled to have the goods
repaired or replaced if the goods fail to be of acceptable quality and the failure
does not amount to a major failure.
Winplus Australasia Pty Ltd
PO Box 537
Bayswater Business Centre Vic 3153
03 8727 7600
26
Notes:
27
28