1
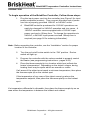
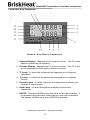
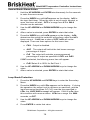
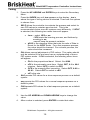
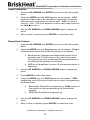
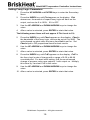
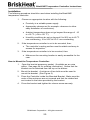
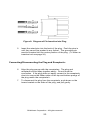
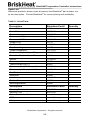
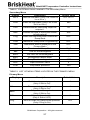
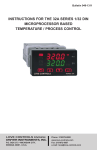
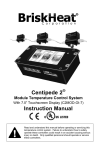
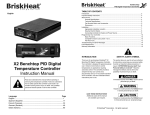
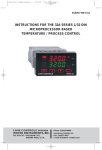
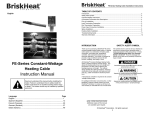
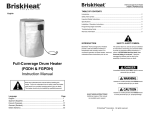
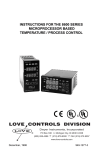
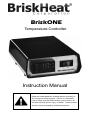
BriskONE Temperature Controller Instruction Manual Read and understand this material before operating or servicing these heating tapes. Failure to understand how to safely operate these heaters could result in an accident causing serious injury or death. These heaters should only be operated by qualified personnel. BriskONE Temperature Controller Instructions Table of Contents Introduction ............................................................................................. 3 Operation ................................................................................................. 4 Controller Key Functions ..................................................................... 6 Key Combinations ............................................................................... 7 Programming Instructions .................................................................... 8 Security ............................................................................................... 9 Temperature Unit................................................................................. 10 Setpoint Range .................................................................................... 10 Setpoint ............................................................................................... 10 Method of Control ................................................................................ 11 Setting the Alarm ................................................................................. 11 Sensor Break Alarm Action.................................................................. 14 Loop Break Protection ......................................................................... 14 Tuning ................................................................................................. 15 Input Calibration .................................................................................. 16 Ramp / Soak Feature .......................................................................... 16 Setting Fuzzy Logic Parameters .......................................................... 19 Installation ............................................................................................... 20 How to Mount the Temperature Controller .......................................... 20 Connecting the Heater’s Wire to the Pins ............................................ 22 Inserting the Pins into the Plug ............................................................ 23 Connecting/Disconnecting the Plug and Receptacle ........................... 23 Troubleshooting ..................................................................................... 24 Parts List ................................................................................................. 25 Programming: Quick Reference Table .................................................. 26 BriskHeat® Corporation. All rights reserved 2 BriskONE Temperature Controller Instructions INTRODUCTION BriskONE is a compact one zone controller which provides excellent temperature control in areas with limited space. Features: Compact size: 7.6” x 5.0” x 2.5” [194mm x 127mm x 64mm] Provides 15A@120V or 10A@240V output power. Output power protected with fuse. Dual display allows user to view both the process and setpoint temperature simultaneously. Displays either oC or oF. Additional Features: Fuzzy Logic Self Tuning Heater Break Protection Sensor Break Protection Auto/Manual Control Capability 16 segment Ramp and Soak with adjustable time base Figure 1: Pictorial of Controller (Front) Figure 2: Pictorial of Controller (Back) BriskHeat® Corporation. All rights reserved 3 BriskONE Temperature Controller Instructions OPERATION To begin operation of the BriskOne Controller, Follow these steps: 1. Plug the input power cord into the controller (see Figure 2 for input power receptacle location). Then connect the other end of power cord into a properly grounded 120VAC or 240VAC outlet. A BriskONE controller purchased for 120VAC operations can easily be changed for 240VAC operation and vice versa. A 120VAC controller comes equipped with a 120VAC input power cord and a 15Amp fuse. To change the operations to 240VAC, a 240VAC input power cord and 10Amp fuse is required (see page 26 for ordering information). Note: Before operating the controller, see the “Installation” section for proper location of the controller. 2. Turn the red on/off rocker switch to the “ON” position. Rocker switch will light up. 3. Program the controller with the values needed to properly control the heater (see programming instructions - pages 9-20). 4. Place the thermocouple tip in a location which best reflects the heater’s temperature. Depending on the object’s shape, during heating there may be spots which are warmer or colder. If all areas of the object must reach a minimum temperature, then place the thermocouple tip on the coldest spot. If the temperature of any area of the object cannot go above the temperature setpoint, then place the thermocouple tip on the hottest spot. If a temperature differential is allowable, then place the thermocouple tip on an area where the temperature is between the hottest and coldest. BriskHeat® Corporation. All rights reserved 4 BriskONE Temperature Controller Instructions 5. Plug thermocouple into the controller. Verify that the temperature displayed on the upper display is the actual temperature of the heating system. If not, check to ensure the thermocouple plug was correctly wired and connected to the controller. 6. Plug the power cord for the heater into the controller (see “Installation” section for instructions on how to assemble the plug to the heater cord). FIGURE 3: LAYOUT OF INTERNAL COMPONENTS BriskHeat® Corporation. All rights reserved 5 BriskONE Temperature Controller Instructions Controller Key Functions FIGURE 4: DUAL DISPLAY CONTROLLER 1. Setpoint Display: Displays the SV (setpoint value). The SV is the setpoint entered by the operator. 2. Process Display: Displays the PV (process value). The PV is the actual temperature of the system being controlled. 3. oF Lamp: Lit when the temperatures displayed are in degrees Fahrenheit. 4. oC Lamp: Lit when the temperatures displayed are in degrees Celsius. 5. Percent Lamp: Lit when controller is programmed to display percentage of output power. 6. Hold Lamp: Lit when Ramp/Soak program functions are suspended. 7. ENTER: Pressing ENTER stores the value or the item changes. If not pressed, the previously stored value or item will be retained. The display will flash once when ENTER is pressed. BriskHeat® Corporation. All rights reserved 6 BriskONE Temperature Controller Instructions 8. This decimal point flashes when SELF-TUNE is operating. 9. ARROW: Decrements a value, changes a menu item, or selects the item to OFF. The minimum value obtainable is -1999 regardless of the decimal point placement. 10. UP ARROW: Increments a value, changes a menu item, or selects the item to ON. Maximum value attainable is 9999 regardless of the decimal point placement. 11. INDEX: Pressing the INDEX key advances the display to the next menu item. Also used in conjunction with other keys. 12. Manual Indicator: Lit when output of control is being manually adjusted. 13. Alarm Indicator: Lit when a fault condition exists. 14. Setpoint 2 Lamp: Lit when the SV displayed relates to setpoint 2. 15. Setpoint 1 Lamp: Lit when the SV displayed relates to setpoint Key Combinations UP ARROW & ENTER: Pressing these keys simultaneously brings up the Secondary Menu starting at the alarm, tune, or cycle item (depending on the programming). Pressing these keys for 5 seconds will bring up the Secure Menu. INDEX & DOWN ARROW: Pressing these keys simultaneously will allow backing up one menu item, or if at the first menu item, they will cause the display to return to the Primary Menu. If an alarm condition has occurred, then these keys may be used to reset the alarm. To reset an alarm press and hold both keys for three seconds. INDEX & ENTER: Pressing these keys simultaneously and holding them for 5 seconds allows recovery from the various error messages. BriskHeat® Corporation. All rights reserved 7 BriskONE Temperature Controller Instructions Programming Instructions The controller’s Programming is divided up into three menus: Primary Menu Secondary Menu Secure Menu Within each menu are menu items. Each of the menu items pertains to a parameter of the controller. To enter and move from menu item to menu item within the Primary Menu: Press the UP ARROW and ENTER keys. Press INDEX to advance through the menu items. Simultaneously, press INDEX and DOWN ARROW keys to back up one menu item. Press UP ARROW or DOWN ARROW to change the value in the display. Press ENTER to retain the value. To enter and move from menu item to menu item within the Secondary Menu: Press the UP ARROW and ENTER keys. Press INDEX to advance through the menu items. Simultaneously, press INDEX and DOWN ARROW keys to back up one menu item. Press UP ARROW or DOWN ARROW to change the value in the display. Press ENTER to retain the value. To enter and move from menu item to menu item within the Secure Menu: Hold the UP ARROW and ENTER simultaneously for five seconds to enter the secure menu. Press INDEX to advance through the menu items. Simultaneously, press INDEX and DOWN ARROW keys to back up one menu item. Press UP ARROW or DOWN ARROW to change the value in the display. Press ENTER to retain the value. BriskHeat® Corporation. All rights reserved 8 BriskONE Temperature Controller Instructions Security The security code is located in the Secure Menu. The Code locks out programming access to specific menus. To access the locked out menus the security level must be changed. To change the security level, the correct password must be entered into the SECr menu item. 1. Hold the UP ARROW and ENTER simultaneously for five seconds to enter the secure menu. 2. The menu item SECr should be the first to appear. The value shown is the current security level. 3. Change the security level, by using the UP ARROW and DOWN ARROW keys to change the value in the upper display until the password of the desired security level is shown. 4. Press the ENTER key to retain the value. The display will blink, and the new security level will be shown in the upper display. Refer to the following table for the correct value to enter for the security level desired. Note: The passwords cannot be altered. Security Level Menu Primary Status Locked Secondary Locked Secure Locked Primary Unlocked Secondary Locked Secure Locked Primary Unlocked Secondary Unlocked Secure Locked Primary Unlocked Secondary Secure Unlocked Unlocked Security Level Value Password To Enter 1 1110 2 1101 3 1011 4 111 Table 1: Security Levels and Passwords BriskHeat® Corporation. All rights reserved 9 BriskONE Temperature Controller Instructions Temperature Unit 1. Hold the UP ARROW and ENTER simultaneously for five seconds to enter the secure menu. 2. Press the INDEX key until Unit is shown on the lower display. 3. Change the unit of measurement, by using the UP ARROW and DOWN ARROW keys to select C (Celsius) or F (Fahrenheit). 4. Press the ENTER key to retain the value. Setpoint Range Menu Items SPL and SPH limit the value that may be entered for the setpoint 1. Hold the UP ARROW and ENTER simultaneously for five seconds to enter the secure menu. 2. Press the INDEX key until SPL is shown on the lower display. SPL is the lowest allowable value that the set point may be entered in as. 3. Use the UP ARROW and DOWN ARROW keys to change the value. 4. Press ENTER to retain the value. 5. Press the INDEX key until SPH is shown on the lower display. SPH is the highest allowable value that the set point may be entered in as. 6. Use the UP ARROW and DOWN ARROW keys to change the value. 7. Press ENTER to retain the value. Note: SPL and SPH only limit what value may be entered for the setpoint. These values are not used in the actual control of the heater. Setpoint 1. Press INDEX to the advance to SP1. 2. Use the UP ARROW and DOWN ARROW keys to change the value until the desired setpoint is displayed. 3. Press ENTER to retain that value. Note: For entering the set point while in the Ramp/Soak mode, see Ramp/Soak instructions on page 15. BriskHeat® Corporation. All rights reserved 10 BriskONE Temperature Controller Instructions Method of Control 1. Press the UP ARROW and ENTER keys simultaneously. 2. Press the INDEX key until Out1 is shown on the lower display. Menu item Out1 designates the control method to be used by the controller. There are essentially two selections to choose from: ONOF allows the controller to simple on/off mode. This setting forces the controller to turn off at the setpoint, and turn on at the setpoint plus the differential (SP_d). ##tP sets the controller to time proportioning control. The available 1 second steps range from 1tP to 80tP. A value of 1tP is recommended for solid state outputs. For mechanical outputs, the longest possible time should be selected without causing the process to wander. 3. Use the UP ARROW and DOWN ARROW keys to change the value. 4. Press ENTER to retain that value. 5. If ONOF is selected under the Out1 menu item, press the INDEX key until SP_d is shown on the lower display. SP_d is the Set Point On-OFF Differential (hysteresis), which should be negative for a heating process. 6. Use the UP ARROW and DOWN ARROW keys to change the value. 7. Press ENTER to retain that value. Setting the Alarm 1. Hold the UP ARROW and ENTER simultaneously for five seconds to enter the secure menu. 2. Press the INDEX key until AL is shown on the lower display. AL is the temperature alarm function. Five different options are available for this menu item. OFF Alarm is disabled. Lo Low Alarm only. Hi High Alarm only. HiLo High and Low alarm shares the same alarm output. Evnt Alarm is controlled by the Ramp/Soak program function BriskHeat® Corporation. All rights reserved 11 BriskONE Temperature Controller Instructions 3. Use the UP ARROW and DOWN ARROW keys to change the value. 4. Press ENTER to retain that value. If OFF is selected for the value for AL, the following menu items will not appear. 5. Press the INDEX key until ALT appears on the display. ALT is the menu item that selects the temperature alarm type. There are two values to choose from. AbS Absolute Alarm may be set anywhere between 0-1600 and is independent from SP1. Deviation Alarm is dependent on SP1, and alarms when the process temperature is beyond acceptable limits enter in ALLo and ALHi. dE 6. Use the UP ARROW and DOWN ARROW keys to change the value. 7. After a value is selected, press ENTER to retain that value. 8. Press the INDEX key until ALHi is shown on the lower display. ALHi is the alarm inhibit menu item. On The alarm action is suspended until the process temperature first enters a non-alarm condition. OFF Turns the alarm inhibit off. 9. Use the UP ARROW and DOWN ARROW keys to change the value. 10. After a value is selected, press ENTER to retain that value. 11. Press the INDEX key until ALSt appears on the display. ALSt is the alarm output state menu item. BriskONE’s design requires ALSt be set to OPEN. If ALSt is set to CLOSE, then press UP ARROW and DOWN ARROW keys until the value shown is OPEN. Press ENTER to retain that value 12. Press the INDEX key until ALLP appears on the display. ALLP is the alarm lamp. BriskONE’s design requires ALLP be set to OFF. If ALLP is set to On, the press UP ARROW and DOWN ARROW keys until the value shown is OFF. Press ENTER to retain that value. BriskHeat® Corporation. All rights reserved 12 BriskONE Temperature Controller Instructions 13. Press the INDEX key until ALLb appears on the display. ALLb is the alarm loop break menu item. On The controller will alarm if no change has been detect by the sensor under full output conditions for a period of time. OFF The controller will not alarm. 14. Use the UP ARROW and DOWN ARROW keys to change the value. 15. Press ENTER to retain that value. 16. The next two menu items are located in the Secondary Menu. Their appearance depends on the values entered in the menu items above. To return to the Primary Menu, wait 30 seconds, or for a faster response, press the UP ARROW and ENTER keys followed by pressing the DOWN ARROW and INDEX keys. 17. Press the UP ARROW and ENTER keys simultaneously to enter the Secondary Menu. 18. Press the INDEX key until ALLo appears on the display. ALLo is the low limit alarm and will only appear, if AL has a value of Lo or HiLo. 19. Use the UP ARROW and DOWN ARROW keys to change the value. 20. Press ENTER to retain that value. 21. Press the INDEX key until ALHi appears on the display. ALHi is the high limit alarm and will only appear, if AL has a value of Hi or HiLo. 22. Use the UP ARROW and DOWN ARROW keys to change the value. 23. Press ENTER to retain that value. BriskHeat® Corporation. All rights reserved 13 BriskONE Temperature Controller Instructions Sensor Break Alarm Action 1. Hold the UP ARROW and ENTER simultaneously for five seconds to enter the secure menu. 2. Press the INDEX key until InPt appears on the display. InPt is the input fault timer. When the input is out of range, shorted, or open, the timer will start. OFF or a range from 0.1 to 540.0 minutes can be selected. 3. Use the UP ARROW and DOWN ARROW keys to change the value. 4. After a value is selected, press ENTER to retain that value. 5. Press the INDEX key until InPb appears on the display. InPb determines the action the controller will perform, when the InPt timer runs out. If InPt has a value of OFF, InPb will not be displayed. There are three options for this menu item: FAIL Output is disabled. AVE The output will hold at the last known average percentage of output. PrE The output will maintain a preprogrammed percentage of output as specified in PrE1 and PrE2. If PrE is selected, the following menu item will appear. PrE1 Select 0 to 100% for Set Point 1 6. 7. Use the UP ARROW and DOWN ARROW keys to change the value. After a value is selected, press ENTER to retain that value. Loop Break Protection 1. Press the UP ARROW and ENTER keys to enter the Secondary Menu. 2. Press the INDEX key until LPbr appears on the display. If, during the operation, the output is at its minimum or maximum, and the input has moved less than 5oF (3oC) over the time specified in LPbr, the LOOP BAD message will appear. If ALLb is On, then this condition will cause an alarm. LPbr has a range 1 to 9999 seconds, or OFF. 3. Use the UP ARROW and DOWN ARROW keys to change the value. 4. Press ENTER to retain that value. BriskHeat® Corporation. All rights reserved 14 BriskONE Temperature Controller Instructions Tuning 1. Press the UP ARROW and ENTER keys to enter the Secondary Menu. 2. Press the INDEX key until tun appears on the display. tun is where the type of tuning choice is selected. There are five options to choose from. SELF allows the controller to evaluate the process and select its own PID values to maintain good control. This is the recommended choice since all systems react differently. If SELF is selected, the following two menu items will appear. Lern -- select YES or no. - YES starts the learning process, and finishes by reverting to no. - no will keep the present variables. dFAC is the damping factor that sets the ratio of Rate to Reset for the SELF mode. For a fast response process, the value should be lowered. For a slower process, the value should be increased. Pid allows manual adjustment of PID values. This option should only be selected if the end user has an understanding of how a PID system works. If Pid is selected, the following menu items will appear. Pb1 is the proportional band. Select 1 to 9999. rES is the automatic reset time. Select OFF, 0.1 to 99.9 minutes. Select OFF to switch to OFS. OFS is the manual offset correction. Select OFF, 0.01 to 99.9%. Select OFF to switch to rES. rtE is the rate. SLO presets PID values for a slow response process on a default system. nor presets the PID values for a normal response process on a default system. FASt presets PID values for a fast response process on a default system. 3. Use the UP ARROW and DOWN ARROW keys to change the value. 4. After a value is selected, press ENTER to retain that value. BriskHeat® Corporation. All rights reserved 15 BriskONE Temperature Controller Instructions Input Calibration 1. Press the UP ARROW and ENTER keys to enter the Secondary Menu. 2. Press the INDEX key until InPC appears on the display. InPC allows the input value to be changed to agree with an external reference or to compensate for sensor error. InPC can have a value of + 500. (The units depend on which value was entered in the Unit menu item.) 3. Use the UP ARROW and DOWN ARROW keys to change the value. 4. After a value is selected, press ENTER to retain that value. Ramp/Soak Feature 1. Press the UP ARROW and ENTER keys to enter the Secondary Menu. 2. Press the INDEX key until Prog appears on the display. Prog is a Ramp/Soak feature that allows the process to be started. On allows the Programmed Ramp/Soak function to be started by the Run/Hold key on the control front panel. This option can only be selected after the parameters of the Ramp/Soak operation are entered. OFF turns Ramp/Soak function off and resets program to beginning. 3. Use the UP ARROW and DOWN ARROW keys to change the value. 4. Press ENTER to retain that value. 5. Press the INDEX key until PSEt appears on the display. PSEt enables the rest of the menu items that are used in programming the Ramp/Soak. On enables Ramp/Soak programming. PSEt must be in this position to start programming the Ramp/Soak features. OFF skips Ramp/Soak programming. 6. Use the UP ARROW and DOWN ARROW keys to change the value. 7. After a value is selected, press ENTER to retain that value BriskHeat® Corporation. All rights reserved 16 BriskONE Temperature Controller Instructions 8. Press the INDEX key until StAt appears on the display. StAt controls how the Primary Menu will display the Ramp/Soak parameters. OFF allows the Primary Menu to operate normally. On alters the Primary Menu to display the following items. ####/ti is time remaining in segment. ####/##ti is the total time in active segment. ####/##SP is the target set point for the segment. 9. Use the UP ARROW and DOWN ARROW keys to change the value. 10. After a value is selected, press ENTER to retain that value. 11. Press the INDEX key until tbAS appears on the display. tbAS is the Ramp/Soak time unit measurement. 1_S is the time base in 1 second increments. 60_S is the time base in 1 minute increments. 12. Use the UP ARROW and DOWN ARROW keys to change the value. 13. After a value is selected, press ENTER to retain that value. The following items are located in the secondary menu after tbAS, and are the parameters for the 16 segments of the Ramp/Soak. To save space, only the descriptions for the first segment will be listed. The number at the beginning of the display represents the segment of the Ramp/Soak. 14. Press the INDEX key until 1ti appears on the display. 1ti is the time for the first segment with a range of 0 to 9999. The units will depend on what was entered in tbAS. 15. Use the UP ARROW and DOWN ARROW keys to change the value. 16. After a value is selected, press ENTER to retain that value. 17. Press the INDEX key until 1SP appears on the display. 1SP is the first segment’s Set Point. 18. Use the UP ARROW and DOWN ARROW keys to change the value. 19. After a value is selected, press ENTER to retain that value. BriskHeat® Corporation. All rights reserved 17 BriskONE Temperature Controller Instructions 20. Press the INDEX key until 1AL appears on the display. 1AL is the first segment’s alarm event. On activates the alarm during segment 1’s time. OFF deactivates the alarm during segment 1’s time. 21. Use the UP ARROW and DOWN ARROW keys to change the value. 22. After a value is selected, press ENTER to retain that value. The following items appear at the end of the 16 segment program in the Secondary Menu. 23. Press the INDEX key until PEnd appears on the display. PEnd is the program’s end action. Hold keeps the temperature at the present set point. OFF turns off the output at the end of the program. LOOP repeats the program starting at 1ti. If the program is to repeat, the last segments must return the process to the same condition when the program started. SP1 reverts to the SP1 (Primary Menu) value. The next two menu items can be found in the Primary Menu. Their appearance will be dependent on which values were entered in the menu items above. To return to the Primary Menu, wait 30 seconds, or for a faster response, press the UP ARROW and ENTER keys followed by pressing the DOWN ARROW and INDEX keys. 24. If StAt is On, three menu items will appear in the Primary Menu. ti is the time remaining for the current segment. ##ti is the total time for segment ##. ##SP is the target set point for segment ##. 25. If Prog, in Secondary Menu, is OFF, then Prog will not appear in Primary Menu. Prog is the Ramp/Soak Run/Holds function run means the Ramp/Soak is in operation. OFF holds the Ramp/Soak program. 26. Use the UP ARROW and DOWN ARROW keys to change the value. 27. After a value is selected, press ENTER to retain that value. BriskHeat® Corporation. All rights reserved 18 BriskONE Temperature Controller Instructions Setting Fuzzy Logic Parameters 1. Press the UP ARROW and ENTER keys to enter the Secondary Menu. 2. Press the INDEX key until Fint appears on the display. Fint determines the amount of impact fuzzy logic will have on the output, and can be 0 to 100%. 0% is OFF. 3. Use the UP ARROW and DOWN ARROW keys to change the value. 4. After a value is selected, press ENTER to retain that value. The following menu items will not appear if Fint is set to 0%. 5. Press the INDEX key until Fbnd appears on the display. Fbnd is the bandwidth of the fuzzy logic, and can be set at 0 to 4000. The units depend on what value the menu item Unit is set for. Set Fbnd equal to PID proportional band for best results. 6. Use the UP ARROW and DOWN ARROW keys to change the value. 7. After a value is selected, press ENTER to retain that value. 8. Press the INDEX key until FrtE appears on the display. FrtE is the fuzzy logic’s rate of change with a range of 0.00 to 99.99 counts/second. For best initial setting, find the count/second change of process value near setpoint 1 with output on. Multiply this value by 3 and set FrtE to this value. 9. Use the UP ARROW and DOWN ARROW keys to change the value. 10. After a value is selected, press ENTER to retain that value. BriskHeat® Corporation. All rights reserved 19 BriskONE Temperature Controller Instructions Installation The following procedure should be used when installing the BriskONE temperature controller. 1. Choose an appropriate location with the following: Proximity to a suitable power supply. Appropriate clearances (for example: clearance to allow easy installation of connectors). Ambient temperature does not go beyond the range of -10 to +55 oC (+14 to 131 oF). Humidity conditions do not go beyond 0 to 90% up to 40 oC non-condensing, 10 to 50% at 55 oC non-condensing 2. If the temperature controller is not to be mounted, then: The controller’s resting surface must be stable and easy to access for inspection. 3. If the temperature controller is to be mounted, then: Make sure the mounting location is easily accessible for the user. How to Mount the Temperature Controller: 1. 2. Open the bracket accessory packet. (Available as an extra option. See page 24 for ordering information). Notice that the bracket can be attached from the top or the bottom. Mount the bracket. A minimum of two bolts must be used to mount the bracket. (See Figure 5). 3. Place the Controller inside the Mounted Bracket. Make sure the vents of the enclosure are not covered and that the rubber feet are located in the holes provided by the bracket. 4. Close the bracket and tighten the closure screw securely. BriskHeat® Corporation. All rights reserved 20 BriskONE Temperature Controller Instructions Figure 5: Mounting Bracket Figure 6: Controller within Bracket BriskHeat® Corporation. All rights reserved 21 BriskONE Temperature Controller Instructions Connecting the Heater’s Wire to the Pins: 20-14 AWG Wire Body of Pin Wire Barrel Insulation Support Barrel Figure 7: Diagram of Pin and Stripped Wire 1. For heater’s power leads use the bronze pins. If the heater has a ground wire, then use the silver pin for the ground wire. 2. Strip off enough insulation to uncover the length of wire needed to fit the pin’s wire barrel (approximately 1/8”). 3. Use a crimp tool to crimp the insulation support barrel to the insulated wire. (To order a crimp tool see page 24). 4. Crimp the wire barrel around the uninsulated wire. BriskHeat® Corporation. All rights reserved 22 BriskONE Temperature Controller Instructions Inserting the Pins into the Plug: Figure 8: Diagram of Pin Insertion into Plug 5. Insert the wired pins into the back of the plug. Push the pins in until they cannot be pushed in any further. The grounding pin must be inserted into the center position of the plug. (To order an insertion tool see page 24). Connecting/Disconnecting the Plug and Receptacle: 6. Align the plug prongs with the receptacles. The plug and receptacle should snap together easily. Do not force the connection. If the plug does not easily connect to the receptacle, check to ensure the flatten sides of the top and bottom prongs of the plug match the receptacle’s. 7. To disconnect the plug from the receptacle, push down on the levers located on the sides of the plug, and pull gently. BriskHeat® Corporation. All rights reserved 23 BriskONE Temperature Controller Instructions Troubleshooting Before calling for assistance, please review this troubleshooting guide. If, after consulting the guide, you are still unable to identify the problem or if you need additional assistance then Please contact BriskHeat® Problem Solution CONTROLLER DOES NOT TURN ON Plug is disconnected from outlet. Push plug firmly into outlet. Power switch is not on. Turn switch to on position. Controller has not correctly booted. Wait approximately 5 seconds after turning on controller. Fuse has blown. Replace fuse. Incorrect voltage supply. Supply correct voltage. Setpoint is too low. Increase the setpoint value. NO TEMPERATURE INCREASE Controller parameters are set improperly. Review operating procedures and reset parameters. Fuse has blown. Replace fuse. SSR is defective. Test and replace SSR. Internal diagnostics has detected a failure. If FAIL TEST followed by FACt dFLt, then memory may be corrupted. Press ENTER and DOWN ARROW to start factory default procedure. DISPLAY SHOWS FAIL TEST If FAIL TEST followed by rEt FACt, then an unrecoverable error has occurred. Return controller to the factory for service. DISPLAY SHOWS CHEC SPI, CHEC SP2, CHEC 1SP, ... CHEC 16SP SP1, SP2, #SP1 or ##SP is set outside the setpoint low or high boundary limits (SPL or SPH). Correct SP1, etc. or program new values for SPL or SPH. DISPLAY SHOWS OPEN InP OPEN InP means thermocouple is open. Correct or replace the sensor. To reset, use the INDEX and ENTER keys. DISPLAY SHOWS LOOP bAd The sensor may be defective, heater fuse open, heater open, or the output power to device is bad. Correct or replace any element in the control loop that may have failed. Reset the control by pressing INDEX and ENTER keys, or index to Lpbr and press ENTER. BriskHeat® Corporation. All rights reserved 24 BriskONE Temperature Controller Instructions Parts List Whenever possible, please order all parts by the BriskHeat® part number, not by the description. Contact BriskHeat® for current pricing and availability. Table 2: List of Parts Description BriskHeat Part # Quantity Fuse, 15 A 40030 1 Fuse, 10 A 40030-01 1 Fuse holder Power cord,120V Power cord,240V 40034-05 40911 40911 -01 1 1 1 Output Plug 11175 1 Pin, Power Pin, Grounding Output Receptacle 11329-01 11177 11175-01 2 1 1 Protective Cap for Output Plug 40914-01 1 Protective Cap for Output Receptacle 40914 1 Socket Power Input Inlet Thermocouple Plug “J” 11329-03 40908 40257 3 1 1 Thermocouple Wire Clamp “J” Thermocouple Receptacle “J” 40257-01 40257-10 1 1 Red Rocker Enclosure Labels 40044 40909 40909-02 1 1 1 Rubber Feet Mounting Bracket 40287 20906 4 1 Description BriskHeat Part # Quantity Crimping Tool 40912-02 1 Insertion Tool 40913-02 1 Power Distribution Cord consult factory 1 SSR consult factory 1 Microprocessor consult factory 1 BriskHeat® Corporation. All rights reserved 25 BriskONE Temperature Controller Instructions Programming: Quick Reference Table Table 3: List of Menu Items Located in the Secure Menu Secure Menu Display SECr Unit dPt InPt InPb SEnC SPL SPH AL ALt ALiH ALSt ALLP ALLb Description Security level Temperature Units Decimal point positioning Input fault timer Input alarm action Sensor rate of change Lowest allowable value for setpoint. Highest allowable value for setpoint. Temperature Alarm setting Temperature Alarm Type Alarm Inhibit Feature Alarm Output State Alarm Lamp Setting Alarm Loop Break BriskHeat® Corporation. All rights reserved 26 Default Value 4 F 0 0.5 Fail OFF 32oF or 0oC 999 Hi AbS OFF OPEN OFF OFF BriskONE Temperature Controller Instructions Table 4: List Of Menu Items Located In The Secondary Menu Secondary Menu Display Description Value for low alarm (Only if AL is set for Lo or HiLo.) Default Value ALHi Value for high alarm (Only if AL is set for Hi or HiLo) 999 Out1 Determines the controlling output for setpoint 1 1tP tunE Controls the type of tuning the controller will perform Self Prog Allows the Run/Hold button control the Ramp/Soak OFF PSEt Enables the Ramp/Soak Programming OFF StAt Determines what is displayed in the Primary Menu OFF tbAS Time base for Ramp/Soak 60_S ##ti Time for the ## segment * ##SP Set Point for the ## segment * ALLo 32oF or 0oC ##AL ## segment's alarm event * PEnd Ramp/Soak's ending action OFF InPC Input correction value 0 LPbr Loop break protection 360 TABLE 5: LIST OF MENU ITEMS LOCATED IN THE PRIMARY MENU Primary Menu Display ti ##ti ##SP SP1 Prog Description Default Value Total time in current segment (Only if StAt is On) Time remaining in ## segment (Only if StAt is On) Set point in ## segment (Only if StAt is On) Set point for output one (Only if StAt is OFF) Runs or holds the Ramp/Soak operation (Only if Prog is On) * * Value set by the end user. BriskHeat® Corporation. All rights reserved 27 * * * OFF BriskONE Temperature Controller Instructions 1055 Gibbard Ave, Columbus, OH 43201 Toll Free: 800-848-7673 Phone: 614-294-3376 Fax: 614-294-3807 Email: [email protected] BriskHeat® Corporation. All rights reserved 28 PN: 40890-03 Rev B