1
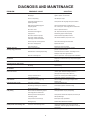
Pressure Washers
and Accessories
COBALT SERIES
PRESSURE WASHERS
Operators Manual
Delco Pressure Washers - LIT-COB-DEL
INTRODUCTION
Thank you for selecting a high pressure power washer from Delco Pressure Washers.
Your pressure washer has been manufactured using the most advanced components in the pressure industry.
When operated properly, our equipment has been designed and manufactured to give you years of trouble
free, reliable use, with a minimal amount of regular maintenance.
Your pressure washer is mechanical, as with all mechanical equipment it requires proper installation, operation and maintenance as outlined in this manual.
The Operators Manual has been written for your benefit. For your safety and the safety of others, we recommend you and all operators read and understand the contents.
Should you experience any difficulty with your Delco pressure washer, please contact your nearest Delco
Distributor immediately.
We are aware of your investment in an Delco pressure washer, therefore, our prime concern is that you become one of our “satisfied” owners. Please feel free to send us your comments and ideas.
THANK YOU!!!
2
Pressure Washer Limited Warranty
1. DELCO Cleaning Systems, LLC warrants its products for a period of one year from the date of purchase, against defects in material and/or workmanship. The warranty covers parts and labor, but excludes transportation.
2. Normal wear and tear items such as valves, seals, etc., are warranted for the initial 30 days following
purchase by the end-user.
3. The high-pressure hose and accessories (trigger gun, extension/lance/wand and cleaning nozzles) are
warranted for the initial 30 days following purchase by the end-user.
4. The burner coil on all DELCO Cleaning Systems, LLC, hot water pressure washers and steam cleaners is warranted for five (5) years, excluding abuse due to leaving unit in unheated building, causing coil
to freeze and burst.
5. Parts repaired or replaced under this warranty (except wear items) are warranted for the balance of the
original warranty period or ninety (90) days, whichever is longer. Defective parts replaced under this warranty are the property of DELCO Cleaning Systems, LLC.
6. All warranty service will be performed by a trained technician employed by an DELCO Cleaning Systems, LLC distributor/dealer. Servicing distributor/dealer will abide by the DELCOCleaning Systems,
LLC, Service Center Warranty Policy.
7. Warranty does not cover damage caused by freezing, abuse or chemicals. Abuse includes but is not limited to unauthorized repair, alterations carried out by any entity or individuals other than DELCO Cleaning Systems, LLC, authorized service personnel, damage caused by contaminants in the water supply
or operation in a manner which conflicts with instructions found in the Owners Manual.
8. DELCO Cleaning Systems, LLC, and its distributors/dealers disclaim responsibility for any loss of time,
use of equipment, loss of income, or any incidental or consequential damages.
9. Settlement of any warranty claim will be at the sole discretion of DELCOCleaning Systems, LLC.
Thank You for Purchasing our Products!
Effective January 2005, and supercedes all other warranties.
3
IMPORTANT SAFETY PRECAUTIONS
IMPORTANT:
Please read the following instructions before installing and operating this equipment.
DANGER
THIS EQUIPMENT CAN BE HAZARDOUS TO OPERATOR SAFETY AND ONLY AUTHORIZED PERSONNEL WHO HAVE READ AND UNDERSTAND THE INSTALLATION AND OPERATION MANUAL SHOULD
BE PERMITTED TO OPERATE THIS EQUIPMENT. DO NOT LEAVE WAND UNATTENDED WHILE
EQUIPMENT IS RUNNING.
Failure to follow all cautionary warnings and procedures may result in serious or fatal injury and/or property
damage including, but not limited to: fire, severe burns, concussion from explosion, electrocution, scalding,
penetration by pressurized water, chemical reaction, asphyxiation, cuts, contusions, laceration, and loss of
body parts and/or life.
DO’S
1 . ALWAYS WEAR SAFETY GLASSES, GOGGLES or FULL FACE SHIELD; GLOVES, and when spraying
acids WEAR RAIN GEAR. NEVER RUN ACIDS THROUGH THE PUMP ON THIS EQUIPMENT.
2. USE ONLY THE SAME SIZE NOZZLE SUPPLIED WITH THIS EQUIPMENT.
3. USE ¾” (inch) x 50’ (or shorter) GARDEN HOSE FOR WATER SUPPLY-.
4. Always follow chemical manufacturer’s recommendations in use of chemicals with this equipment. Immediately after using chemical solutions through this equipment, flush thoroughly with clear water.
5. Disconnect all electrical power before performing any maintenance on this equipment.
6. Use a water softener on your water system if it is high in mineral content (HARDNESS). Failure to do so
will result in lime build-up in plumbing systems.
7. Use only manufacturer approved components when replacing parts on this equipment. Failure to do so
may create operating conditions that are hazardous to personal health, safety, and will void the warranty.
8. Use only recommended oil in pump.
4
DO NOT’S
DO NOT - UNDER ANY CIRCUMSTANCES POINT THE HIGH PRESSURE NOZZLE AT YOURSELF, OTHER PEOPLE, OR ANIMALS!
1. DO NOT use an undersized discharge nozzle.
2. DO NOT disconnect the pressure hoses or wand while the equipment is HOT, PRESSURIZED or RUNNING.
3. DO NOT operate this equiopment without sufficent water supply to the pump.
4. DO NOT operate this equipment without proper ventilation.
6. DO NOT leave wand unattended while equipment is running.
7. DO NOT point the stream of water from nozzle toward any person or animal (including the operator).
8. DO NOT use this equipment around or near explosive enviroment of any kind.(Gas, paint, solvents, etc.)
8. DO NOT adjust the unloader-regulator valve (on trigger control units) to a pressure in excess of 200 PSI
of equipments motor or pump rating.
10. DO NOT secure trigger gun in the open position (ON). Operate ONLY with your hand during operation to
prevent injury.
11. DO NOT allow air into the water system through soap valve or loose fittings.
12. DO NOT operate the machine if the water pressure drops or is low.
13. DO NOT smoke or operate this machine while connecting/disconnecting tanks and fittings.
14. DO NOT alter machine from manufacturer’s design.
15. DO NOT attempt to service this machine without first disconnecting the electrical service. Failure to do
so may cause severe or fatal electrical shock.
16. DO NOT BY-PASS ANY SAFETY DEVICE ON THIS MACHINE!
17. DO NOT USE ANY TYPE OF INSECTICIDE, TOXICS, OR ACID THAT PRODUCE TOXIC FUMES, OR
EXPLOSIVE MATERALS IN THE SOAP SUCTION SYSTEM OF THIS EQUIPMENT. USE ONLY DETERGENTS PROVEN SAFE FOR HUMAN CONTACT.
5
INSTALLATION
1. N/A, portable unit mounted on wheels.
6
OPERATING THE MACHINE
PRE-OPERATING INSTRUCTIONS 1. Connect the power cord to an adequately wired and grounded electrical source (115V or 230V depending on model).
2. Check pump oil level and fill if necessary.
3. Turn the water source on. If leaks are detected, check hoses, fittings and check or replace o-rings.
4. Place the end of the detergent injector siphon hose into your soap solution container.
OPERATING INSTRUCTIONS NOTE: On initial start up, or if machine has not been operated for several days, it is advisable to remove the
nozzle from the cleaning gun and flush out any foreign material. Turn the switch to position 1 ( ON ) and let
the unit run until clear water flows through the cleaning gun.
1. Turn on the water supply.
NOTE: If the machine is hooked up to a hot water supply (120°F max) PROPER PROTECTIVE
WEAR (GLOVES, FACE PROTECTION, CLOTHING) MUST BE WORN TO PREVENT HARM TO THE
OPERATOR!
2. Install the nozzle tip into the cleaning gun.
3. Close the soap valve. (If equiped with an adjustable injector, turn fully clockwise)
4. Securely hold the cleaning gun and turn the “ON/OFF” switch to “ON”.
5. The recommended method of cleaning is:
A. Wet entire surface and remove the loose dirt with water only.
B. Then, turn on the detergent injector by opening the detergent valve or installing the soap nozzle
C. Cover the entire surface to be cleaned with soap/water solution by applying from the bottom up. Allow
the soap to stay on surface four to five minutes.
D. Close the valve or remove the soap nozzle and wash at high pressure with water only from the top down.
SHUT DOWN INSTRUCTIONS 1. Turn “ON/OFF” switch to “OFF”.
2. Squeeze gun trigger to relief system pressure and run cool water through the pumping system until cool
water flows from the end of the gun and wand.
3. Release the trigger.
4. Turn off the water supply.
5. Coil hose neatly to storage.
7
MAINTENANCE OF COMPONENTS
THINGS TO CHECK DAILY 1. Check oil level in pump.
2. Fill soap container (If applicable).
THINGS TO CHECK WEEKLY 1. Check all hoses for leaks and damage. Repair or replace as needed.
2. Check cleaning nozzles for wear. Replace if needed.
4. Check all nuts and bolts. Tighten as needed (DO NOT OVER TIGHTEN.)
5. Check all water connections for leaks. Tighten if loose.
PUMP 1. Refer to pump breakdown for your specific model.
2. Change pump oil after the first 25 hours of use. Subsequent changes should be every 250 hours or 3
months, whichever comes first.
A. Disconnect power supply.
B. Remove drain plug on pump and drain oil.
C. If the oil has water in it, it is important to flush out the pump with oil before refilling pump with the
proper oil.
3. Refilling: Replace drain plug and fill slowly to the dot in the center of sight glass, or th the proper level on
dip stick. Do not over fill.
4. Use a high quality 30 wt. non-detergent oil.
UNLOADER 1. Check for leaks.
2. Check fittings and bolts/nuts for tightness.
GUN, WAND, HOSE 1. Check for wear or damage of components and replace if necessary.
2. Check o-rings in the quick couplers and replace if worn or damaged.
8
DIAGNOSIS AND MAINTENANCE
PROBLEM
Low Pressure
PROBABLE CAUSE
SOLUTION
Worn nozzle
Replace nozzle of proper size.
Belt slippage.
Tighten or replace; use correct belt.
Air leak in inlet plumbing.
Use PTFE liquid or tape.
Pressure gauge inoperative or not
registering accurately.
Check pressure with new guage and replace as needed.
Relief valve stuck partially plugged or
improperly adjusted.
Clean and reset relief valve to system pressure
and correct by-pass. Check supply tank for contamination.
Worn seat or valves.
Clean or replace with valve kit.
Inlet suction strainer clogged or
improprly sized.
Use adequate size for inlet pump connection
and fluid being pumped. Clean frequently.
Worn seals. Abrasives in pumped
fluid, severe cavitation; inadequate
water supply, stressful inlet conditions.
Install and maintain proper filter, check line
size and flow available to pump. Install a C.A.T.
Fouled or dirty inlet or discharge valves.
Clean inlet and discharge valve assemblies.
Worn inlet or discharge valves.
Replace with valve kit.
Leaky discharge hose.
Faulty Pulsation Dampener
Replace hose. Check connections.
Check precharge (should be 30-50%) of system
pressure or replace as needed.
Restricted inlet or air entering inlet plumbing.
Check filters and clean as needed. Check fittings and use
PTFE liquid or tape for air tight connection.
Stuck inlet or discharge valve
Worn seals
Worn crankcase seals
Clean or replace valve. Check supply tank for contamination.
Replace with seal kit, check inlet pressure and system
temperature, use Thermo Valve in by- inlet pressure regulator
in inlet line.
Replace crankcase seals
Worn crankshaft seal
Bad bearing
Worn bearing
Replace damaged seals.
Replace bearing.
Replace bearing.
Humid air condensing into water
Change oil every 3 months or 500 hours intervels using
premium grade 10W30 Non-detergent hydraulic oil,
(other approved oil every month or 200 hours.)
Oil leaking at the rear portion
of the crankcase
Leaking of crankcase seals or
seals installed backward
Damaged or improperly installed oil guage,
crankcase cover, or drain plug o-ring
Loud knocking noise in pump
Pulley loose on crankshaft
Replace seals. Follow proper installation procedure.
Contact pump supplier for crankcase servicing.
Replace oil gauge, crankcase cover or drain plug o-ring.
Thread in oil guage and drain plug hand tight to avoid
extruding o-ring.
Check key and tighten screw
Worn bearing, connecting rod or crankshaft.
Consult pump supplier for crankcase servicing.
Stressful inlet conditions.
Cracked or scored plungers
Abrasive material in the fluid being pumped
Check supply tank for contamination.
Install C.A.T.
Replace plungers
Install proper filtration on pump inlet plumbing.
Excessive pressure and/or temperature
of fluid being pumped.
Check pressure and fluid inlet temperature; be sure they are
within specified range.
Over pressure of inlet or discharge
Reduce pressure per specifications.
Running pump dry.
Foreign particles in the inlet or discharge
valve or worn inlet or discharge valves.
DO NOT RUN PUMP WITHOUT WATER!
Check for smooth surfaces on inlet and discharge valve seats.
Replace with kit if pitted or worn. Check supply tank for
contamination, Install and regularly clean filter. Do not pump
abrasive fluids.
Pulsation, pump runs
extremely rough, pressure low.
Water leakage from under
the manifold
Oil leak between crankcase
and pumping section *Slight leakage.
Oil leaking in area of crankshaft
Excessive play in the end of
the crankshaft.
Water in crankcase
inside of the crankcase
Frequent or premature failure
of the packing
Strong surging at the inlet
and low pressure at the discharge side.
9
1111 E. Lake Francis Dr., Siloam Springs, AR 72761 • 800-BUY-DELCO