1
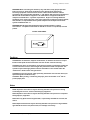
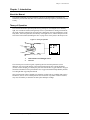
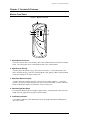
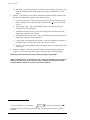
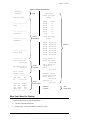
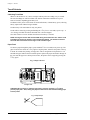
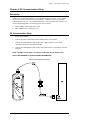
Pulse Oximeter for Sleep
Screening
Operation Manual
Catalog Number 1884SS
Version 1, April 2002
Copyright BCI, Inc. - 2002
Table of Contents
Clinician’s Operation Manual
Warranty & Service Information ................................................................................................... iii
Proprietary Notice ....................................................................................................................... iii
Limited Warranty ........................................................................................................................ iii
Service Support ........................................................................................................................... iii
CE Notice....................................................................................................................................... iii
Warnings, Cautions, & Notes
iv
Symbol Definitions ........................................................................................................................ iv
Warnings ........................................................................................................................................ iv
Cautions ...........................................................................................................................................v
Notes ................................................................................................................................................v
Chapter 1: Introduction
1-1
About the Manual......................................................................................................................... 1-1
Theory of Operation..................................................................................................................... 1-1
Chapter 2: Intended Use and Monitor Features
2-1
Intended Use ................................................................................................................................ 2-1
Monitor Features .......................................................................................................................... 2-1
Chapter 3: Controls & Features
3-1
Monitor Front Panel ..................................................................................................................... 3-1
Sensor/Serial Connector............................................................................................................ 3-1
SpO2 Numeric Display .............................................................................................................. 3-1
Pulse Rate Numeric Display...................................................................................................... 3-1
Pulse Strength Bar Graph.......................................................................................................... 3-1
Low Battery Indicator ............................................................................................................... 3-1
x ON OFF Key......................................................................................................................... 3-2
F PRINT Key ........................................................................................................................... 3-2
Chapter 4: Operating Instructions
4-1
Unpacking the Monitor ................................................................................................................ 4-1
Installing the Batteries.................................................................................................................. 4-1
Attaching the Sensor to the Patient .............................................................................................. 4-2
Choosing the Sensor.................................................................................................................. 4-2
Care and Handling of the Sensor............................................................................................... 4-3
Checking the Sensor and Oximetry Cable ................................................................................ 4-4
Cleaning or Disinfecting the Sensors ........................................................................................ 4-4
Turning On the Monitor............................................................................................................... 4-5
Low Battery Indicator .................................................................................................................. 4-6
Turning Off the Monitor .............................................................................................................. 4-6
Checking the Monitor’s Performance .......................................................................................... 4-6
Operating Modes.......................................................................................................................... 4-6
Verification Mode ........................................................................................................................ 4-7
Data Collection Mode .................................................................................................................. 4-7
Trend Printing Mode.................................................................................................................... 4-8
Chapter 5: Instructions for Training the Home User
5-1
Equipment and Supplies Checklist for Home Use ....................................................................... 5-1
Training the Home User............................................................................................................... 5-1
Chapter 6: Trend Data
6-1
Description ................................................................................................................................... 6-1
Clearing Trend Data..................................................................................................................... 6-1
Pulse Oximeter for Sleep Screening Operation Manual
i
Table of Contents
Chapter 7: Printer
7-1
Description................................................................................................................................... 7-1
Trend Summary Printout ............................................................................................................. 7-1
What You’ll Need for Printing .................................................................................................... 7-3
Trend Printouts ............................................................................................................................ 7-4
Collecting Trend Data............................................................................................................... 7-4
Paper Feed................................................................................................................................. 7-4
Chapter 8: PC Communication Setup
8-1
Description................................................................................................................................... 8-1
PC Communication Setup............................................................................................................ 8-1
Chapter 9: Maintenance
9-1
Schedule of Maintenance............................................................................................................. 9-1
Storage ......................................................................................................................................... 9-1
Chapter 10: Troubleshooting
10-1
EMI Interference........................................................................................................................ 10-2
Chapter 11: Optional Supplies & Accessories
11-1
Ordering Information:................................................................................................................ 11-1
Chapter 12: Specifications
12-1
Equipment Classification ........................................................................................................... 12-1
Displays, Indicators, & Keys ..................................................................................................... 12-1
SpO2 ........................................................................................................................................... 12-1
Pulse Rate .................................................................................................................................. 12-2
Printer ........................................................................................................................................ 12-2
Power Requirements .................................................................................................................. 12-2
Battery Life ................................................................................................................................ 12-2
Dimensions ................................................................................................................................ 12-2
Environmental Specifications .................................................................................................... 12-2
Appendix A: Data Format
Appendix-1
Data format. .................................................................................................................Appendix-1
Appendix B: Setting the Optional Real Time Clock
ii
Appendix-2
Pulse Oximeter for Sleep Screening Operations Manual
Warranty & Service Information
Warranty & Service Information
Proprietary Notice
Information contained in this document is copyrighted by BCI, Inc. and may not be duplicated
in full or part by any person without prior written approval of BCI, Inc. Its purpose is to
provide the user with adequately detailed documentation to efficiently install, operate,
maintain and order spare parts for the device supplied. Every effort has been made to keep the
information contained in this document current and accurate as of the date of publication or
revision. However, no guarantee is given or implied that the document is error free or that it is
accurate regarding any specification.
Limited Warranty
BCI, Inc. warrants each new device to be free from defects in workmanship and materials
under normal use and service for a period of two (2) years from the date of shipment. The sole
obligation of BCI, Inc. under this warranty will be to repair or replace, at its option, products
that prove to be defective during the warranty period. The foregoing shall be the sole
warranty remedy. Except as set forth herein, seller makes no warranties, either expressed or
implied, including the implied warranties of merchantability and fitness for a particular
purpose. No warranty is provided if the products are modified without the express written
consent of BCI, Inc., and seller shall not be liable in any event for incidental or consequential
damage. This warranty is not assignable.
Service Support
Repairs for devices manufactured by BCI, Inc. under warranty must be made at authorized
repair centers. If the device needs repair, contact your local distributor or the BCI, Inc. service
department. When calling, have the device’s model and serial number ready.
If you need to ship the device, pack the device and accessories carefully to prevent shipping
damage. All accessories should accompany the device.
BCI, Inc.
Phone: (262) 542-3100
N7 W22025 Johnson Road
Fax: (262) 542-3325
Waukesha, WI USA 53186-1856
Toll Free; (800) 558-2345
email : [email protected]
CE Notice
Marking by the symbol C0473 indicates compliance of this device to the Medical Device
Directive 93/42/EEC.
Authorized Representative (as defined by the Medical Device Directive):
Graseby Medical Ltd.
Colonial Way, Watford, Herts,
UK WD2 4LG
Pulse Oximeter for Sleep Screening Operation Manual
Phone: (44) 1923 246434
Fax: (44) 1923 240273
iii
Warnings, Cautions, & Notes
Warnings, Cautions, & Notes
KEYWORD
DEFINITION
WARNING
Tells you about something that could hurt the patient or hurt the operator
CAUTION
Tells you something that could damage the monitor
NOTE
Tells you other important information
Symbol Definitions
SYMBOL
DEFINITION
r
2
1
Type BF equipment
SN
Serial Number
Attention, consult accompanying documents
Refer servicing to qualified service personnel
REF
Catalog Number
F
y
2
x
1
l
C
Printer On/Off
IPX1
Drip Proof
Date of Manufacturing
Do not reuse
On/Off
Non AP device
Lot Number
Use By
Warnings
WARNING! Federal law (USA) restricts the use or sale of this device by, or on the order
of a physician.
WARNING! Do not use this device in the presence of flammable anesthetics.
WARNING! Do not use this device in the presence of magnetic resonance imaging (MR
or MRI) equipment.
WARNING! This device must be used in conjunction with clinical signs and symptoms.
This device is only intended to be an adjunct in patient assessment.
WARNING! Prolonged use or the patient’s condition may require changing the sensor
site periodically. Patients setting up the device at home should be instructed of the
signs/symptoms of sensor misuse (e.g., pressure sores from prolonged application) and
should be advised to move the sensor to another finger if necessary.
1
WARNING! When attaching sensors with Microfoam® tape, do not stretch the tape or
attach the tape too tightly. Any device (tape, Velcro™) applied too tightly may cause
inaccurate readings and blisters on the patient’s skin (lack of skin respiration, not heat,
causes the blisters).
1
iv
Microfoam® is a registered trademark of the 3M Company
Pulse Oximeter for Sleep Screening Operation Manual
Warnings, Cautions, & Notes
WARNING! When connecting this monitor to any instrument, verify proper operation
before clinical use. Refer to the instrument’s user manual for full instructions.
Accessory equipment connected to the monitor’s data interface must be certified
according to the respective IEC standards, i.e., IEC 950 for data processing equipment or
IEC 601-1 for electromedical equipment. All combinations of equipment must be in
compliance with IEC 601-1-1 systems requirements. Anyone connecting additional
equipment to the signal input port or the signal output port configures a medical system,
and, therefore, is responsible that the system complies with the requirements of the
system standard IEC 601-1-1.
WARNING! IEC 950 approved equipment must be placed outside the “patient
environment.” The patient environment is defined as an area 1.5 m (4.92 feet) from the
patient.
PATIENT ENVIRONMENT
.9
5m
R
(4
ft)
1.
Cautions
CAUTION! Do not autoclave, ethylene oxide sterilize, or immerse the sensors in liquid.
Evidence that liquid has been allowed to enter the monitor voids the warranty.
CAUTION! This device is intended for use by persons trained in professional health care
or those who have access to the oversight of a professional health care provider. The
operator must be thoroughly familiar with the information in this manual and/or the
“Home User’s Guide” before using the device.
CAUTION! Connect only the PC cable specifically intended for use with this device (see
Optional Supplies and Accessories).
CAUTION! When printing, or advancing the paper, place the oximeter on its’ side to
prevent paper jams.
Notes
NOTE! Operation of this device may be adversely affected in the presence of strong
electromagnetic sources, such as electrosurgery equipment.
NOTE! Operation of this device may be adversely affected in the presence of computed
tomograph (CT) equipment.
NOTE! Use only SpO2 sensors supplied with, or specifically intended for use with, this
device.
NOTE! SpO2 measurements may be adversely affected in the presence of high ambient
light. Shield the sensor area (with a towel, for example) if necessary.
Pulse Oximeter for Sleep Screening Operation Manual
v
Warnings, Cautions, & Notes
NOTE! Dyes introduced into the bloodstream, such as methylene blue, indocyanine
green, indigo carmine, patent blue V (PBV), and fluorescein, may adversely affect the
accuracy of the SpO2 reading.
NOTE! Any condition that restricts blood flow, such as use of a blood pressure cuff or
extremes in systemic vascular resistance, may cause an inability to determine accurate
pulse rate and SpO2 readings.
NOTE! Remove fingernail polish or false fingernails before applying SpO2 sensors.
Fingernail polish or false fingernails may cause inaccurate SpO2 readings.
NOTE! Batteries are designed to be replaceable by individuals trained in this procedure.
Follow local governing ordinances and recycling instructions regarding disposal or
recycling of device components, including batteries.
NOTE! SpO2 averaging is the number of pulse beats over which the SpO2 value is
averaged; pulse averaging is the number of seconds over which the pulse value is
averaged.
NOTE! Hazards arising from software errors have been minimized. Hazard analysis was
performed to meet EN60601-1-4:2000.
NOTE! Optical cross-talk can occur when two or more sensors are placed in close
proximity. It can be eliminated by covering each site with an opaque material.
NOTE! All user and patient accessible materials are non-toxic.
vi
Pulse Oximeter for Sleep Screening Operation Manual
Chapter 1: Introduction
Chapter 1: Introduction
About the Manual
The Operation Manual provides installation, operation, and maintenance instructions for
health-care professionals and other users, trained in monitoring respiratory and cardiovascular
activity.
Theory of Operation
The oximeter determines SpO2 and pulse rate by passing two wavelengths of low intensity
light, one red and one infrared, through body tissue to a photodetector. During measurement,
the signal strength resulting from each light source depends on the color and thickness of the
body tissue, the sensor placement, the intensity of the light sources, and the absorption of the
arterial and venous blood (including the time varying effects of the pulse) in the body tissues.
Figure 1.0: Theory of Operation
1.
Red and infrared LED light sources
2.
Detector
The oximeter processes these signals, separating the time invariant parameters (tissue
thickness, skin color, light intensity, and venous blood) from the time variant parameters
(arterial volume and SpO2) to identify the pulse rate and calculate oxygen saturation. Oxygen
saturation calculations can be performed because oxygen saturated blood predictably absorbs
less red light than oxygen depleted blood.
Since measurement of SpO2 depends on a pulsating vascular bed, any condition that restricts
blood flow, such as use of a blood pressure cuff or extremes in systemic vascular resistance,
may cause an inability to determine accurate pulse and SpO2 readings.
Pulse Oximeter for Sleep Screening Operation Manual
1-1
Chapter 2: Intended Use & Monitor Features
Chapter 2: Intended Use and Monitor Features
Intended Use
This device is a handheld pulse oximeter that measures SpO2, pulse rate, and pulse strength. It
may be used as a spot check device in the hospital or clinical environments. Additionally, it
may be used to collect long term data in overnight sleep screening studies in the sleep lab or
home. The oximeter will provide reliable measurements on patients ranging from neonate to
adults for spot checking applications and from pediatric to adult for sleep screening
applications when using the appropriate catalog accessories. The oximeter will operate
accurately over an ambient temperature range of 32 to 131°F (0 to 55°C).
This device is not intended for continuous patient monitoring, but can be used for spot
checking and/or long-term data collection applications. There are no audible or visible patient
alarms.
Monitor Features
•
Provides fast, reliable SpO2, pulse rate, and pulse strength measurements on any patient,
from neonates to adults for spot-checking applications and on pediatric to adults for sleep
screening applications.
•
Ideally suited for use in overnight sleep screening applications allowing printing of
summated data results.
•
Three modes of operation: Verification Mode for spot checking, Data Collection Mode
for long term data collection in sleep screening environments and Trend Printing Mode
for outputting summarized trend data to the built-in printer or to a PC.
•
Device automatically enters Data Collection Mode after 10 minutes of continuous use.
•
Minimal LED display during Data Collection Mode lengthens battery life (I.e. – display is
reduced to a single flashing bar).
•
Portable and lightweight. Weighs only 13 ounces (369 grams)., with batteries.
•
Ergonomically designed to fit comfortably in the palm of your hand.
•
Uses four (4) standard “AA” (type IEC LR6) alkaline cells.
•
Battery life (Alkaline Cells):
-
2 sleep screening cycles (1 cycle = 10 minutes with display on, 8 hours with
display off, 5 minutes printing)
or
-
Intermittent monitoring: 1 min on, 2 min off (= 1 cycle) 80 hours or 1600 cycles
•
Bright, easy-to-read LED displays indicate SpO2 and pulse rate measurements.
•
An eight-segment LED bar graph indicates pulse strength in the Verification Mode.
•
Low Battery Indicator flashes when about 30 minutes of battery use remains.
•
Capable of 12 hours of data storage.
Pulse Oximeter for Sleep Screening Operation Manual
2-1
Chapter 3: Controls & Features
Chapter 3: Controls & Features
Monitor Front Panel
Figure 3.1: Monitor Front Panel
1. Sensor/Serial Connector
The sensor connects here, or an oximetry cable can be connected between the monitor and the
sensor. The serial printer or PC communication cable is also connected here.
2. SpO2 Numeric Display
A number shows the patient’s SpO2 value in percent. Dashes (--) mean the monitor is not
able to calculate the SpO2 value in Verification Mode. SpO2 display in Data Collection Mode
will be one flashing bar to conserve battery life.
3. Pulse Rate Numeric Display
A number shows the patient’s pulse rate value in beats per minute. Dashes (---) mean the
monitor is not able to calculate the pulse rate value in Verification Mode. In Data Collection
Mode, the Heart Rate display will be blank to conserve battery life.
4. Pulse Strength Bar Graph
In Verification Mode, the pulse strength bar graph “pulses” with the patient’s pulse beat. The
height of the bar graph shows the patient’s pulse strength.
5. Low Battery Indicator
A Low Battery Indicator will be indicated by the top bar graph LED quickly flashing about
once every second.
Pulse Oximeter for Sleep Screening Operation Manual
3-1
Chapter 3: Controls & Features
Figure 3.2: Monitor Operating Keys
6.
x ON OFF Key
Pressing this key turns the monitor ON and OFF.
7.
F PRINT Key
See Chapter 4 for more details on the three modes.
Verification Mode: In this mode, momentarily pressing the F key will not activate the
printer as the printer function is suppressed in this mode. Pressing and holding the F key in
the Verification Mode will advance the paper. Reloading the paper is allowed in this mode.
Pressing and holding the F key at power up will erase trends, even if the trend memory is
clear.
Data Collection Mode: In this mode, momentarily pressing the F key will not activate the
printer as the printer function is suppressed in this mode. However, in the Data Collection
Mode, pressing and holding this key will advance the paper in the printer. Reloading the
paper is allowed in this mode.
Trend Printing Mode: Momentarily pressing the F key will activate a printout (statistical
sleep screening information). Pressing the F key during the printout will terminate the
printout. Pressing and holding the F key will advance the paper. Holding the F key for 6 to
8 seconds at power up will clear the trend and switch the unit into Verification Mode.
Reloading the paper is allowed in this mode.
NOTE! All data will be irretrievably lost when the trend data is cleared.
3-2
Pulse Oximeter for Sleep Screening Operation Manual
Chapter 4: Operating Instructions
Chapter 4: Operating Instructions
2
WARNING: This device must be used in conjunction with clinical signs and
symptoms. This device is only intended to be an adjunct in patient assessment.
Unpacking the Monitor
1.
Carefully remove the monitor and its accessories from the shipping carton. Save the
packing materials in case the monitor must be shipped or stored.
2.
Compare the packing list with the supplies and equipment you received to make sure you
have everything you’ll need.
Installing the Batteries
The oximeter uses 4 standard “AA” alkaline cells, IEC Type LR6.
To install/replace the batteries:
1.
Depress the battery door tab and lift up.
2.
Install the negative end of each battery first, compressing the battery terminal spring until
the positive terminal clears the positive tab. Press the battery down into place.
3.
Place battery door tabs into the slots of the monitor back panel, depress the door tab and
press the door into place.
NOTE: If you install disposable batteries, be sure to dispose of them in compliance with
your institution’s guidelines and local ordinances.
NOTE: The unit will hold data for about one and a half minutes with no battery power.
This allows for battery replacement without loss of stored data.
Figure 4.0: Installing the Batteries.
Pulse Oximeter for Sleep Screening Operation Manual
4-1
Chapter 4: Operating instructions
Attaching the Sensor to the Patient
What you need to know about attaching the sensor to the patient:
2
WARNING! Prolonged use or the patient’s condition may require changing the
sensor site periodically. Patients setting up the device at home should be
instructed of the signs/symptoms of sensor misuse (e.g., pressure sores from
prolonged application) and should be advised to move the sensor to another finger
if necessary.
2
WARNING! When attaching sensors with Microfoam® tape, do not stretch the tape
or attach the tape too tightly. A sensor applied too tightly by any method (tape,
Velcro™) may cause inaccurate readings and blisters on the patient’s skin (lack of
skin respiration, not heat, causes the blisters).
Attaching the patient to the monitor requires these steps:
1.
Choose the sensor.
2.
Check the sensor and oximetry cable.
3.
Clean or disinfect the sensor if using the reusable type. (Disposable sensors are for singlepatient use and do not require cleaning or disinfecting.)
4.
Attach the sensor to the patient.
Choosing the Sensor
Choose the appropriate sensor from the following chart.
PATIENT
Adult
> 45 Kg
SITE
Finger
DESCRIPTION
3044: Sensor, Adult (reusable)
3444, Comfort Clip™ Finger Sensor (reusable)
Finger or Toe
3043: Sensor, Universal “Y” (reusable)
1300: Sensor, Disposable, Adult Finger
1310: D.O.T Sensor
1311: D.O.T Sensor
Pediatric
15-45 Kg
Ear
3078: Sensor, Ear (reusable)
Finger
3044: Sensor, Adult (reusable)
3444, Comfort Clip™ Finger Sensor (reusable)
Finger or Toe
3043: Sensor, Universal “Y” (reusable)
1301: Sensor, Disposable, Ped. Finger
4-2
Ear
3078: Sensor, Ear (reusable)
Infant
3-15 Kg (for
spot-check
only)
Hand or Foot
3043: Sensor, Universal “Y” (reusable)
Toe
3025: Sensor, Wrap, Infant (reusable)
Finger or Toe
1303: Sensor, Disposable, Infant
Neonate
< 3 Kg (for
spot-check
only)
Hand or Foot
1302: Sensor, Disposable, Neonate
Foot
3026: Sensor, Wrap, Neonate (reusable)
Pulse Oximeter for Sleep Screening Operation Manual
Chapter 4: Operating Instructions
Care and Handling of the Sensor
2
WARNING! Misuse or improper handling of the sensor and cable could result in
damage to the sensor. This may cause inaccurate readings.
Hold the connector rather than the cable when connecting or disconnecting the sensor to the
device as shown in Figure 4.1.
Figure 4.1: Disconnecting or connecting the sensor.
1.
Connector
2.
Cable
Do not use excessive force or unnecessary twisting when connecting, disconnecting, storing,
or using the sensor.
When placing the sensor on the patient, allow the cable to lay across the palm of the hand and
parallel to the arm of the patient as shown in Figure 4.2.
Figure 4.2: Positioning the cable of the finger sensor.
Upon completion of patient monitoring, detach the sensor as shown in Figure 4.1 and loosely
coil the finger sensor cable.
Pulse Oximeter for Sleep Screening Operation Manual
4-3
Chapter 4: Operating instructions
Checking the Sensor and Oximetry Cable
Follow these instructions each time before you attach the sensor to the patient. This helps
ensure the sensor and oximetry cable is working properly.
2
WARNING! Using a damaged sensor may cause inaccurate readings. Inspect each
sensor. If a sensor appears damaged, do not use it. Use another sensor or contact
your authorized repair center for help.
2
WARNING! Using a damaged oximetry cable may cause inaccurate readings.
Inspect the oximetry cable. If the oximetry cable appears damaged, do not use it.
Contact your authorized repair center for help.
1.
Carefully inspect the sensor to make sure it does not appear damaged.
2.
If using the oximetry cable:
a.
Carefully inspect the oximetry cable to make sure it does not appear damaged.
b.
If the sensor is not already connected to the oximetry cable, connect the sensor to the
oximetry cable. Carefully align and push the connectors together firmly and close the
latch to secure the connectors.
c.
If the oximetry cable is not already connected to the monitor, connect the oximetry
cable to the monitor. Carefully align and push the connector firmly into the monitor.
3.
If not using the oximetry cable, connect the sensor to the monitor. Push the connector
firmly into the monitor.
4.
If the monitor is not already on, press the x key to turn on the monitor.
2
5.
WARNING! If any of the integrity checks fail, do not attempt to monitor the patient.
Use another sensor or oximetry cable, or contact the equipment dealer for help if
necessary.
Before the sensor is attached to the patient, check the integrity of the sensor, oximetry
cable, and oximeter by making sure the red light in the sensor is illuminated.
NOTE! Obstructions or dirt on the sensor’s red light or detector may cause the integrity
checks to fail. Make sure there are no obstructions and the sensor is clean.
6.
You are now ready to attach the sensor to the patient.
Cleaning or Disinfecting the Sensors
Clean or disinfect reusable sensors before attaching to a new patient.
2
WARNING! Do not autoclave, ethylene oxide sterilize, or immerse the sensors in
liquid.
2
CAUTION! Unplug the sensor from the monitor before cleaning or disinfecting.
Clean the sensor with a soft cloth moistened in water or a mild soap solution. To disinfect the
sensor, wipe the sensor with isopropyl alcohol.
4-4
Pulse Oximeter for Sleep Screening Operation Manual
Chapter 4: Operating Instructions
Turning On the Monitor
1.
To turn on the monitor, press the x key. When turned ON, the monitor does the
following:
•
The pulse strength bar graph segments rapidly light the bottom and top LED.
•
The monitor's software revision is momentarily displayed.
Figure 4.3: SpO2, pulse rate, and pulse strength bar graph.
1.
Patient’s SpO2 Shown Here
2.
Patient’s Pulse Shown Here
3.
Patient’s Pulse Strength Shown Here
Pulse Oximeter for Sleep Screening Operation Manual
4-5
Chapter 4: Operating instructions
Low Battery Indicator
1.
The Low Battery Indicator is the top LED segment of the pulse strength bargraph.
2.
The Low Battery Indicator will flash rapidly when the batteries need to be replaced.
3.
The Low Battery Indicator and “trn” will flash rapidly if the monitor is trying to print
and there is not enough battery life for printing. This indicator will go away when the
printing stops.
2
WARNING! When the LOW BATTERY INDICATOR flashes, you must immediately
replace the monitor’s batteries. Otherwise, the monitor turns itself off about 30
minutes after the highest bargraph LED begins to flash in any mode.
Turning Off the Monitor
Turn off the monitor when you are not monitoring a patient.
To turn off the monitor, press the x key. To turn off the monitor in the Data Collection
Mode, the x key must be pressed and held for 6 seconds.
NOTE! Once the monitor is powered off in the Data Collection Mode, it cannot resume
collection of trend data without clearing all previously obtained data.
Checking the Monitor’s Performance
Pulse oximeters do not require user calibration. If checking the function of the device is
desired, an optional Oximeter/ECG Patient Simulator (Catalog No. 1606HH) is available as an
accessory. The simulator attaches to the oximeter via the 3311 oximetry cable. It provides a
known SpO2 and pulse rate signal to the oximeter. This allows the oximeter's performance to
be checked.
NOTE! The 1606HH Oximeter/ECG Patient Simulator does not calibrate the monitor; the
monitor does not require calibration. The 1606HH provides a known SpO2 and pulse rate
to the monitor that allows you to check the monitor’s performance.
NOTE! Follow the instructions included with the 1606HH Oximeter/ECG Patient
Simulator.
Operating Modes
The monitor has three operating modes: Verification Mode, Data Collection Mode, and Trend
Printing Mode.
4-6
•
Verification Mode is intended for use in spot checking and for verification of correct
sensor placement.
•
Data Collection Mode is intended for use in long-term data collection in sleep screening
environments.
•
Trend Printing Mode is intended for use in the output of the trend data summation to the
printer or a full computer data download.
Pulse Oximeter for Sleep Screening Operation Manual
Chapter 4: Operating Instructions
Verification Mode
Verification Mode is intended for use in spot checking and for verifying that the user has
correct placement of the finger sensor.
•
The monitor will enter the Verification Mode as soon as trend memory is cleared.
•
In this mode the patient will be able to position the sensor on his/her finger (or appropriate
site) and obtain SpO2 and heart rate data on the display.
•
This mode will last for 10 minutes of continuous valid data collection.
•
If the monitor is powered down during this mode, it will be powered up in this mode and
the verification timer will be reset.
•
Once the verification timer reads 10 minutes, the monitor exits theVerification Mode and
enters the Data Collection Mode.
•
The user functions in Verification Mode are:
•
The display will show % SpO2 and heart rate values (if available, otherwise “dashes”
[ - - ] for invalid data are displayed).
•
The x key will turn the unit OFF without changing modes.
•
Pressing the F key momentarily will not activate the printer. The printer function is
suppressed in this mode.
•
Pressing and holding the F key will advance the paper (see pg. 7-5) Reloading the
paper is allowed in this mode.
•
Pressing and holding the F key at power up will erase trends, even if the trend
memory is already clear.
•
The serial link to the PC computer will be suppressed in this mode.
Data Collection Mode
Data Collection Mode is intended for use in long-term collection of data in sleep screening
environments.
•
The Data Collection Mode will be entered when the verification timer reaches 10 minutes.
•
Once the trend data collection process has been started, trend memory will be filled
continuously until the end-of-memory is detected (approx. 12 hours) or the monitor is
powered down.
•
Invalid data (such as sensor off) is stored in trend memory, but is not used in the statistical
calculations.
•
The user functions in Data Collection Mode are:
•
The SpO2 display will show one flashing bar and heart rate display will be blank (see
Fig. 4.4).
•
Pressing and holding the x key for six (6) seconds will turn off the unit. While
pressing the x key, the flashing bar will flash at a higher frequency indicating that
the unit is about to be powered down.
NOTE! If the x key is released before the six seconds elapses, the bar will return to its
normal flashing pattern.
•
After the power down, the unit will power up in the Trend Printing Mode.
Pulse Oximeter for Sleep Screening Operation Manual
4-7
Chapter 4: Operating instructions
NOTE! Once the monitor is powered off in the Data Collection Mode, it cannot resume
collection of trend data without clearing all previously obtained data.
•
Momentarily pressing the F key will not activate the printer in the Data Collection
Mode. The printer function is suppressed in this mode.
•
Pressing and holding the F key will advance the paper (see pg. 7-5). Reloading the
paper is allowed in this mode.
•
The serial link to the PC computer will be suppressed in this mode.
Trend Printing Mode
The Trend Printing Mode is intended for use in the output of the trend data summation to the
built-in printer or to a PC for a full computer data download.
•
The Trend Printing Mode is entered after the monitor is powered down in the Data
Collection Mode, and powered back up, or when the trend memory becomes full.
•
The user functions in Trend Printing Mode are:
•
The SpO2 display will be blank and the heart rate display will flash “trn”. The
oximetry function will be suppressed in this mode (see Fig. 4.5).
•
Pressing the x key will turn off the power. After power down, the unit will be
powered up to the same Trend Printing mode.
•
Briefly pressing the F key will activate a printout (statistical sleep screening
information, see Fig. 7.1) Pressing the F key during the printout will terminate the
printout. Printing the printout can be repeated an unlimited number of times.
•
Pressing and holding the F key will advance the paper (see pg. 7-5). Reloading the
paper is allowed in this mode.
•
Holding the F key for 6 to 8 seconds at power up will clear the trend data and switch
the unit into Verification Mode (see Ch. 6).
•
The serial link to a PC will start as soon as the monitor is powered up. If a
miscommunication between the monitor and the PC occurs, turning ‘Off’ the monitor
and then back ‘On’ will re-establish the link. (see Appendix A for output protocol)
Figure 4.4: Data Collection Mode display
4-8
Figure 4.5: Trend Printing Mode display
Pulse Oximeter for Sleep Screening Operation Manual
Chapter 5: Instructions for Training the Home User
Chapter 5: Instructions for Training the Home User
Equipment and Supplies Checklist for Home Use
QUANTITY
CAT. NO.
1
1
DESCRIPTION
Handheld Oximeter
1884SSHU
Home Users Guide
*The physician or home care provider will provide the type and quantity of the sensors
needed for home use.
*
3044
Sensor, Reusable, Finger
*
3444
Sensor, Reusable, Finger
1
3311
Cable, Oximetry, 5 Feet (1.5 meters)
*
1300
Sensor, Disposable, Adult
*
1301
Sensor, Disposable, Pediatric
*
1310, 1311
D.O.T Sensor, Adult
*
3049
Adhesive Strips (Adhesive Tape)
The home user may also need these supplies and reference materials:
1
Scissors (for trimming adhesive strips or adhesive tape).
1
Phone number for equipment supplier in case of equipment problems.
Training the Home User
1.
Make sure all previous trend data has been printed and that the trend memory is cleared
by pressing and holding the F key for 6-8 seconds at power up.
2.
Replace batteries if unsure of life expectancy (i.e. – will they last long enough to complete
the sleep screening? See p.2-1 for battery life expectancy)
3.
(Following the Home User’s Guide while teaching these tasks may help you and the home
user.) Show the home user how to:
a.
b.
c.
d.
e.
f.
g.
h.
i.
j.
visually inspect the sensor and oximetry cable.
connect the sensor to the oximetry cable.
connect the oximetry cable to the monitor.
turn on the monitor.
route the cable safely from the patient to the monitor to prevent possible
entanglements and dangerous situations (tripping, strangulation) etc.
attach the sensor prescribed by the doctor.
read the SpO2, pulse rate, and pulse strength bar graph readouts displayed on the
monitor.
know when the monitor has gone into the Data Collection Mode and how the
monitors display will look.
turn off the monitor only upon completion of test.
call home care provider if monitor is accidentally turned off before test completion
occurs.
Pulse Oximeter for Sleep Screening Operation Manual
5-1
Chapter 6: Trend Data
Chapter 6: Trend Data
Description
Whenever the monitor is on, it stores one SpO2 and one pulse rate reading every 4 seconds.
The stored readings are called trend data. The monitor remembers trend data for at least 12
hours of run-time, possibly more, depending upon battery condition.
A summary of trend data can be printed on the built-in printer or stored data can be
downloaded to a computer.
Trend data will be preserved for about one and a half minutes, without battery power, allowing
battery replacement without losing trend data.
Clearing Trend Data
1.
Turn the monitor off.
2.
Press and hold the F key, then turn the monitor on. Do not release the F key.
3.
clr will flash in the monitors’ display, while the F key is pressed.
4.
When clr stops flashing, the trend data is cleared. Release the F key.
NOTE! Holding the F key for 6 to 8 seconds at power up will clear the trend data and
switch the unit into Verification Mode. See pg. 7-5 on use of F key for Paper Feed.
Pulse Oximeter for Sleep Screening Operation Manual
6-1
Chapter 7: Printer
Chapter 7: Printer
Description
Up to 12 hours of previously stored data can be printed as a summation of data from the
monitors built-in printer or as a data download to a computer.
Trend Summary Printout
To print the trend summary from the monitor’s built-in printer:
1.
The monitor must be in the Trend Printing Mode.
2.
The Trend Printing Mode will be entered after the monitor is powered down in the Data
Collection Mode or when the trend memory becomes full.
3.
Press the F key to print out the summary report.
4.
Press the F key again to stop printing or unit will stop printing after the summary report
has been printed.
The trend summary printout from the monitor’s built-in printer will contain the following
sections: (see Figure 7.1: Sample Trend Printout)
•
Report Title – The first section will contain a report title to indicate that a new printout
has begun.
•
Patient Information – The patient information section supplies a space for the user to write
the following patient information on the printout:
•
•
•
Patient name
•
Date
•
Diagnosis
•
Comments
•
Start time
Study Duration – The study duration section reports the total time consumed by separating
the data into the following three items:
•
Total duration
•
Excluded time (due to invalid data caused by sensor disconnect, artifact, etc.)
•
Total valid sample
Study Maximums and Minimums – The study maximums and minimums section contains
the following information:
•
Low SpO2 – The lowest recorded SpO2 value taken from the total valid sample.
•
Time of Lowest SpO2 – Records the time the lowest SpO2 reading occurred (clock
does not ignore invalid data when determining lowest SpO2 time).
•
High PR – The highest recorded pulse rate value taken from the total valid sample.
•
Low PR – The lowest recorded pulse rate value taken from the total valid sample.
•
Avg. SpO2 – The average SpO2 value from the total valid sample.
Pulse Oximeter for Sleep Screening Operation Manual
7-1
Chapter 7: Printer
•
•
•
SpO2 STD – The standard deviation is a measure of the variability of the sample. The
larger the standard deviation of the sample data, the more variability there is in the
sample.1
Statistics - The statistics section contains information calculated from the valid data only.
The following information is supplied in the statistics section:
•
% Time per SpO2 range – This section displays the percent of the valid sample time
that the readings were in a specified range. (Sample must be > 1% to be accounted
for here.)
•
Time per SpO2 range – This section displays the total valid sample time that the
readings were in a specified range.
•
Total duration below 90% SpO2 – This section displays the total valid sample time
that the SpO2 readings were below 90%.
•
Total duration 88% SpO2 & below – This section displays the total valid sample time
that the SpO2 readings were 88% and below.
•
Longest single event with SpO2 88% & below – This section displays the duration of
the longest single event when the % SpO2 value was 88% or below.
•
Started at – This section displays the time the longest single event with SpO2 88% and
below began.
Summary Complete – This final section will contain a notification that the summary is
complete. This section is important because of the pauses that occur during printing.
NOTE! Only stored data will be printed. Real-time printing is not available.
NOTE! The monitor uses a “relative time” clock. The times indicated on the printout are
relative to the start of the study. When the monitor switches from Verification to Data
Collection Mode, it restarts the “relative” time clock to 00:00:00.
1
The standard deviation, s, is calculated by: s =
∑ (X
− X
n −1
)
2
where X is the sample value,
X
is
the sample mean, and n is the number of samples. Note: The data sample is generally not normally
distributed.
7-2
Pulse Oximeter for Sleep Screening Operation Manual
Chapter 7: Printer
Figure 7.1: Sample Trend Printout
Oximetry
Summary
Title
Patient name
%SpO2
95-99
90-94
85-89
80-84
70-79
0-69
--------------Date
--------------Diagnosis
--------------Comments
Patient
Information
--------------Total duration
00:36:00
Study
Duration
Total valid
sample 00:31:
--------------Low SpO2
64%
At
00:31:00
High PR 105bpm
Low PR
60bpm
Avg SpO2
83%
SpO2 STD
12%
---------------
Study
Max & Min
%Time
20
16
16
16
16
16
Time per SpO2
range
%SpO2
95-99
90-94
85-89
80-84
70-79
0-69
--------------Start time
Excluded time
00:05:00
STATISTICS
%Time per SpO2
range
Duration
00:06:00
00:05:00
00:05:00
00:05:00
00:05:00
00:05:00
Statistics
Total duration
below 90% SpO2
00:20:00
Total duration
88% SpO2 &
below
00:20:00
Longest single
event with SpO2
88% & below
00:20:00
Started at
00:15:00
Summary
Complete
End
Notification
What You’ll Need for Printing
You’ll need these items to print trend printouts:
•
Oximeter with installed printer
•
Printer Paper: 1-inch wide thermal, Catalog No. 6012.
Pulse Oximeter for Sleep Screening Operation Manual
7-3
Chapter 7: Printer
Trend Printouts
Collecting Trend Data
Whenever the monitor is on, it stores one SpO2 and one pulse rate reading every 4 seconds.
The stored readings are called trend data. The monitor remembers trend data for up to 12
hours of run-time, depending upon battery life.
Trend data will be preserved for about one and a half minutes, without battery power, allowing
battery replacement without losing trend data.
Trend memory will contain data for only one patient.
Trends will be cleared by pressing and holding the F key for 6 to 8 seconds, at power-up. A
“clr” message will flash to indicate that trend clear is about to happen.
New data will not overwrite old data when the end of memory is reached.
NOTE! Turning the monitor OFF and back ON during Trend Collection will “freeze” trend
information and place the monitor in the Trend Printing Mode. The monitor must have
the trend data cleared and reset to begin Trend Collection again.
Paper Feed
To advance paper through the printer, press and hold F for 3 seconds (not at power up). The
paper-feed will start. Press the F key again to stop the printer, otherwise the printer will stop
in about 25 seconds after printing 30 empty lines. This is enough time to flip the device over
and slide the paper end into the slot until the printer captures the paper and feeds it through. If
the user feeds the paper in a shorter period of time, the printer can be stopped by pressing the
F key again.
Fig 7.2 Paper Advance
1
1. Paper exit.
CAUTION! When printing, or advancing the paper, place the oximeter on it’s side to
prevent paper jams. Also, cutting the paper as shown below will facilitate feeding paper
into the printer.
Fig 7.3 Paper Shape
7-4
Pulse Oximeter for Sleep Screening Operation Manual
Chapter 8: PC Communication Setup
Chapter 8: PC Communication Setup
Description
The device will send out Trend Data to a PC through the sensor connector. To accomplish
this, the sensor must be disconnected from the device. Additional cables are required to
connect the device to a PC. The communication device will be dormant if the system is not
in the Trend Printing Mode. The following items will be needed:
1.
Printer Adapter Cable (Catalog No. 3350)
2.
DB-9 Modem Cable (Catalog No.3339)
PC Communication Setup
1.
Power up the monitor.
2.
Connect the printer communication cable labeled “BCI” to the monitor.
3.
Connect the standard RS-232 null modem cable’s DB-9 connector to the mating
connector of the printer cable labeled “Printer”.
4.
Connect the standard RS-232 null modem cable's DB connector to the mating connector
on the PC.
NOTE! The DB-9 modem cable is an industry standard RS-232 null modem cable.
NOTE! SEE APPENDIX A FOR DATA FORMAT INFORMATION
Figure 8.1: PC Communication Setup
Pulse Oximeter for Sleep Screening Operation Manual
8-1
Chapter 9: Maintenance
Chapter 9: Maintenance
Schedule of Maintenance
MAINTENANCE:
HOW OFTEN:
BY DOING THIS:
Replace battery
When Low Battery Indicator
is flashing or 12-15 hours of
battery use has elapsed.
Follow the instructions for
installing the batteries.
Disinfect the reusable sensor
Before attaching the sensor
to the patient.
Follow the instructions for
cleaning the reusable sensor.
Disinfect the monitor
When necessary.
1. Remove the batteries from
the unit.
NOTE: print tend data
before cleaning. Trend
data will be lost if batteries
are disconnected more
than one and a half
minutes.
2. Wipe the surfaces of the
monitor with a soft, clean
cloth dampened in
isopropyl alcohol. Use only
a cloth that is dampened,
not wet.
2 CAUTION! Do not
allow isopropyl alcohol or
any liquid to enter any of
the openings on the
monitor.
Storage
Whenever possible, the monitor should be stored at room temperature in a dry environment.
If it is necessary to store the monitor for an extended period of time, the unit should be packed
in its original shipping container. Storing the monitor for a long period of time may degrade
the battery capacity. Batteries should be removed from the monitor before storing.
Storage specifications are as follows:
Temperature:
-40oC to 75oC (-40oF to 167oF)
Relative Humidity:
10% to 95% (noncondensing)
Pulse Oximeter for Sleep Screening Operation Manual
9-1
Chapter 10: Troubleshooting
Chapter 10: Troubleshooting
Problem
Possible Cause
Corrective Action
Patient cable or sensor
is disconnected from the
oximeter.
Check sensor connections to the
patient cable and to the oximeter.
Sensor is incorrectly
positioned on the
patient.
Reposition the sensor.
Poor patient perfusion.
Reposition the sensor.
Defective sensor or
patient cable.
Try a new sensor or contact your
authorized repair center for help.
Monitor is in the Data
Collection or Trend Print
Mode.
None required.
Sensor incorrectly
positioned.
Reposition the sensor.
Patient motion
Patient must remain still to obtain an
accurate measurement.
SpO2 value is erratic,
intermittent, or incorrect.
Poor patient perfusion.
Reposition the sensor
Patient motion.
Patient must remain still to obtain an
accurate measurement.
The oximeter doesn't
turn on.
Batteries weak.
Replace the batteries.
Batteries not installed or
batteries incorrectly
installed.
Ensure the batteries are installed
correctly.
The oximeter displays
only one flashing LED
with no SpO2 or heart
rate
The oximeter has been
on continuously and
collecting data for 10
minutes and has gone
into the Data Collection
Mode.
If not collecting trend data, press and
No printout on built-in
printer.
Batteries are weak.
Replace the batteries.
Batteries are not
properly installed.
Ensure the batteries are installed
properly.
No trends in memory.
Take trend data.
Printer interface
malfunction.
Contact your authorized repair center
for help.
No pulse shown on the
bargraph.
Pulse rate is erratic,
intermittent, or incorrect.
hold the x key for 6 seconds, which
will turn off the unit. To return monitor
to Verification Mode, hold F key for 6
to 8 seconds at power up. This will
clear the trend data and switch the
unit to the Verification Mode.
E00
ROM Error
Contact service representative
E01
RAM Error
Contact service representative
Pulse Oximeter for Sleep Screening Operation Manual
10-1
Chapter 10: Troubleshooting
EMI Interference
2
CAUTION: This device has been tested and found to comply within the limits for
medical devices to IEC 601-1-2:1993, EN 60601-1-2:1994, and the Medical Device
Directive 93/42/EEC. These limits are designed to provide reasonable protection
against harmful interference in a typical medical installation. However, because of
the proliferation of radio-frequency transmitting equipment and other sources of
electrical noise in the heath-care and home environments (for example, cellular
phone, mobile two-way radios, electrical appliances), it is possible that high levels
of such interference due to close proximity or strength of a source, may result in
disruption of performance of this device.
The monitor is designed for use in environments in which the signal can be obscured by
electromagnetic interference. During such interference, measurements may seem inappropriate
or the monitor may not operate correctly.
The monitor generates, uses, and can radiate radio frequency energy and, if not installed and
used in accordance with these instructions, may cause harmful interference with other devices
in the vicinity. Disruption may be evidenced by erratic readings, cessation of operation, or
other incorrect function. If this occurs, the site of use should be surveyed to determine the
source of this disruption, and actions taken to eliminate the source:
•
Turn equipment in the vicinity off and on to isolate the offending equipment.
•
Reorient or relocate the other receiving device.
•
Increase the separation between the interfering equipment and this equipment.
If assistance is required, contact a service representative.
10-2
Pulse Oximeter for Sleep Screening Operation Manual
Chapter 11: Ordering Supplies & Accessories
Chapter 11: Optional Supplies & Accessories
Cat. No
Description
Quantity
1300
Sensor, Oximetry, Disp., Adult Finger
10/box
1301
Sensor, Oximetry, Disp., Ped. Finger, 15-45 Kg
10/box
1302
Sensor, Oximetry, Disp., Neonate, < 3 Kg
10/box
1303
Sensor, Oximetry, Disp., Infant, 3-15 Kg
10/box
1606HH
Simulator & Cable , Oximeter, 5 ft.
each
1884SS
Manual, Operation
each
1885
Manual, Service
each
3025
Sensor, Oximetry, Wrap, Infant, 3-15 Kg
each
3026
Sensor, Oximetry, Wrap, Neonate, < 3 Kg
each
3043
Sensor, Oximetry, Universal “Y”
each
3044
Sensor, Oximetry, Finger
each
3049
Strips, Adhesive
3078
Sensor, Oximetry, Ear
3134
Tape, Attachment, Neonatal
40/pkg
each
50/pkg
3135
Tape, Attachment, Infant
50/pkg
3136
Tape, Attachment, Neonatal
100/pkg
3137
Tape, Attachment, Infant
100/pkg
3138
Posey Wrap, Attachment, Universal "Y"
10/pkg.
3143
3143B
3144
3144B
3145
3145B
®
Attachment, OxiLink Small Finger
100/ctn
Small Finger OxiLink ®
10/box
Attachment, OxiLink
®
Medium Finger
Medium Finger OxiLink
®
100/ctn
10/box
Attachment, OxiLink ® Large Finger
100/ctn
Large Finger OxiLink ®
10/box
3311
Cable, Patient (Oximetry Extension)
each
3339
PC Adapter Cable
each
3350
Cable, Printer Interface
each
3418
Boot Protective 3401
each
3415
Case, Carrying
each
3444
Comfort Clip™ finger Sensor
each
6012
Paper, Printer
4/pk
Ordering Information:
For ordering information, contact your local distributor or the BCI, Inc. customer service
department.
BCI, Inc.
Phone: (262) 542-3100
N7 W22025 Johnson Road
Fax: (262) 542-3325
Waukesha, WI USA 53186-1856
Toll Free; (800) 558-2345
email : [email protected]
Pulse Oximeter for Sleep Screening Operation Manual
11-1
Chapter 12: Specifications
Chapter 12: Specifications
Equipment Classification
Type of Protection Against
Electric shock:
Internally Powered
Mode of operation:
Continuous
Degree of Protection Against
ingress of Liquids:
IPX1, drip proof
Degree of Mobility:
Portable
Degree of Protection Against
Electric Shock:
Type BF
Safety Requirements:
EN60601-1: 1990
Displays, Indicators, & Keys
SpO2:
LED numeric display, 0.43 inches (10.9 mm) high
Pulse Rate:
LED numeric display, 0.43 inches (10.9 mm) high
Pulse Strength:
Logarithmically scaled 8-segment LED bargraph
Low Battery Indicator:
1 Segment LED
Keys:
x On/Off key
F key
SpO2
Range:
0 - 99% Functional SpO2 (1% increments)
Accuracy:
±2 at 70 - 99% less than 70% is unspecified
Alarms:
None
Averaging:
4 pulse beat average
Display Response:
The display is to functional saturation.
Display Update Rate:
1 Hz (SpO2); 60 Hz (pulse strength)
Calibration:
Factory calibrated over the range of 70% to 100% SpO2
using human blood samples to functional saturation. Test
methods available upon request. No in-service calibration
is required.
Sensor:
Red
660nm, 2mW (typical)
Infrared 905nm, 2-2.4mW (typical)
Pulse Oximeter for Sleep Screening Operation Manual
12-1
Chapter 12: Specifications
Pulse Rate
Range:
30-254 BPM (1 bpm increments)
Accuracy:
±2% or 2 BPM, which ever is greater
Averaging:
8 second average
Display Update Rate:
1 Hz
Printer
1 inch wide paper thermal printer (# 6012)
15 characters per line with two dots between symbols
5x7 dot characters
Power Requirements
Four standard “AA” alkaline cells (IEC Type LR6)
Battery Life
Alkaline Cells:
2 sleep screening cycles (1 cycle = 10 minutes with
display on, 8 hours with display off, 5 minutes printing)
or
Intermittent monitoring: 1 min on, 2 min off (= 1 cycle)
80 hours or 1600 cycles
Dimensions
Width:
2.75 inches (69.85 mm)
Height:
6.6 inches (167.64 mm)
Depth:
1.43 inches (36.322 mm)
Weight:
13 ounces (369 grams) with batteries
Environmental Specifications
12-2
Operating Temp.:
0 - 55° C (32 - 131° F)
Storage Temp.:
-40 - 75° C (-40 - 167° F)
Relative Humidity:
10 - 95% (storage), non-condensing
15 - 95% (operating), non-condensing
Pulse Oximeter for Sleep Screening Operation Manual
Appendix A: Data Format
Appendix A: Data Format
Data format.
Baud rate: 19200, 8 bits, one start, one stop, no parity check.
Data output starts in the Trend Printing Mode as soon as power is turned on.
Data transmission is unidirectional from the oximeter to the receiving device. The CTS (clearto-send) line from the receiving device to the oximeter can be used to control data flow.
After data pack has been sent, data communications stop, and can be resumed by cycling the
power of the oximeter.
Data pack consists of binary data. The overall structure of the pack is shown in the table
below:
Byte 0
Least significant byte of the length of the data block (excluding check sum)
Byte 1
Most significant byte of the length of the data block (excluding check sum)
Byte 2
First byte of the data block
Byte 3
Second byte of the data block
Byte 4..
byte n
The rest of the data block
Byte n+1
Least significant byte of the check sum, which is the sum of all bytes in the data
block
Byte n+2
Most significant byte of the check sum
As indicated in the table, each pack includes length, data block and check sum. Data in the
data block represents four-second samples.
Data blocked is compressed. The compression method is described below.
Each stored data byte is split into low and high nibbles, except for the cases described later.
Each nibble can have a signed value in the range of -7 to 7. Bits 0 to 3 are used for SpO2, bits
4 to 7 are used for the Pulse Rate. To obtain the n+1-st value, the value of the corresponding
nibble should be added to the n-th value (considering sign). For example, if n-th SpO2 value is
96%, and bits 0 to 3 contain a signed –1 (0xf in HEX notation), then the n+1-st value is 96% 1 = 95%.
A special case is a byte 0x88 (88-hex). This byte is used for a marker. If this marker is found
in the byte sequence, the byte immediately following the marker byte is SpO2 value in the
range 30 to 100 (value 255 means “no data”). The byte immediately following SpO2 is Pulse
Rate in the range of 30 to 254 (value 255 means “no data”).
The next byte and all sequential bytes are the bytes divided into low and high nibbles, until the
next marker is found.
This method allows for almost 2:1 data compression rate.
Pulse Oximeter for Sleep Screening Operation Manual
Appendix-1
Appendix A: Data Format
The following table shows an example of data de-compression:
Byte in HEX
De-compression
88
Marker byte, expect the next byte to be SpO2;
60
SpO2 value, HEX 60 equals to 96% SpO2 decimal, expect the next byte
to be Pulse Rate;
52
Pulse Rate, HEX 52 equals to 82 bpm decimal, expect the next byte to be
the byte divided into low and high nibbles;
f0
Low nibble is 0, SpO2 = 96% + 0 = 96%;
High nibble is –1, Pulse Rate = 82bpm – 1 = 81 bpm;
ef
Low nibble is -1, SpO2 = 96% - 1 = 95%;
High nibble is –2, Pulse Rate = 82bpm – 2 = 80 bpm;
30
Low nibble is 0, SpO2 = 95% + 0 = 95%;
High nibble is 3, Pulse Rate = 80bpm + 3 = 83 bpm;
Note: Your service representative can supply an ANSI C de-compression routine.
Appendix B: Setting the Optional Real Time Clock
1.
Clear trend memory by pressing and holding the print key at power up until CLR
stops flashing.
2.
Turn the monitor off. Power on the monitor and continue to hold the on key for 6-8
seconds. The version number should be displayed and then the display will go blank
except for one set of digits. This is the minutes setting.
3.
Adjust the minutes by pressing the print key until the desired setting is reached.
4.
Press the power key again to show the hour setting. Use the print key to set the
desired hour.
5.
Press the power key again to show the day setting. Use the print key to set the
desired day.
6.
Press the power key again to show the month setting. Use the print key to set the
desired month.
7.
Press the power key again to show the year setting. Use the print key to set the
desired year.
8.
Press the power key again to exit the time setting menu. After the power key is
pressed a time stamp is printed and the monitor turns itself off.
9.
Verify that the correct time stamp was printed. If the correct time and date was not
printed, repeat steps 2 through 9 until the proper time and date is verified.
The time and date can be verified by repeating step 2 and then pressing the print key until
the current time and date is printed and the monitor turns itself off.
Appendix-2
Pulse Oximeter for Sleep Screening Operation Manual
A
Smiths Medical – a part of Smiths Group plc
C
0473
Authorized Representative (as defined by the Medical Device Directive):
Graseby Medical Ltd.
Colonial Way, Watford, Herts,
UK WD2 4LG
Phone: (44) 1923 246434
Fax: (44) 1923 240273