1
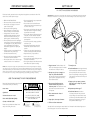
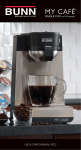
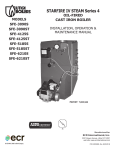
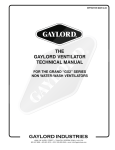
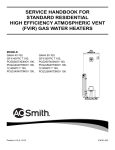
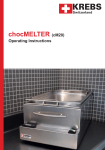
MY CAFÉ
SINGLE SERVE
POD BREWER
USE & CARE
MANUAL
For use with MC
®
MY CAFÉ
SINGLE SERVE
TABLE OF CONTENTS
®
POD BREWER
Get To Know Your Brewer........................ 1
Energy Saving Functions............................ 5
Important Safeguards................................ 2
Cleaning & Maintenance........................... 6
Setting up My Café .................................. 3
Troubleshooting.......................................... 8
Brewing Better with My Café................... 4
Authorized Service..................................... 9
Brewing Better with Pods......................... 5
Limited Warranty......................................10
®
BREW BETTER WITH PODS AND MY CAFÉ
Every BUNN ® brewer is designed to brew better, not bitter.
The BUNN My Café Single Serve Pod Brewer brings you the coffee experience
you expect from BUNN, plus the added benefit of pods!
fresh coffee aroma
Open a pod and enjoy fresh coffee aroma
even before brewing begins.
GET TO KNOW YOUR BREWER
BUNN MY CAFÉ SINGLE SERVE POD BREWER
spin lid
POUR-IN
BOWL
BREW
BUTTON
PATENTED
JET ACTION
sprayhead
INDICATOR
LIGHT
POD DRAWER
better taste
snap-in
screen
PULSE
BUTTON
DRAWER
GUIDES
Unlock rich coffee flavor from your pods with our
Patented Jet Action Sprayhead.
STAINLESS
STEEL HOT
WATER TANK
incredible variety
STAINLESS
STEEL
BACK SPLASH
TRAVEL MUG
BASE
DRIP TRAY
COVER
removable
drip tray
Select from hundreds of coffee and tea pods.
better for the environment
Feel good about pods – they’re compostable and they use
less packaging than other single serve formats.
specifications
electrical : UL and C-UL Listed for Household Use Only. Brewer has an attached,
3-prong grounded cord set and requires 2-wire service with ground, rated 120 volts AC,
11.9 amps, single phase, 60 Hz. Total watts 1425.
brew capacity : 4 to 14 oz. cup.
high altitude programming : Water boils at a lower temperature in high altitude
Find pods and accessories at
bunn.com & mycafe.com
environments (over 4,000 feet). To program My Café for use at high altitude, push the
Pulse Button 5 times (in under 10 seconds). The Indicator Light will flash green 5 times,
indicating that the brewer is programmed for high altitude use. To return My Café to normal
operation, push the Pulse Button 5 times (in under 10 seconds). The Indicator Light will now
flash red 5 times, indicating that the brewer is programmed for normal use.
1
IMPORTANT SAFEGUARDS
SETTING UP
MY CAFÉ® SINGLE SERVE POD BREWER
Follow basic safety precautions when using electrical appliances to reduce the risk of fire,
electric shock, and/or personal injury:
important : My Café has an internal hot water tank that must be filled with water before brewing.
Fill the Pour-in Bowl and run 2-3 brew cycles. The machine will begin to heat and be ready to brew.
• Do not use brewer for any purpose other
than its intended use.
• Do not insert or remove Pod Drawer
while brewing. Press brew button to stop
or cancel a brew cycle.
• Do not pour any liquid into the water tank
other than water or vinegar for cleaning,
as specified in this manual.
• Do not clean brewer with cleansers, steel
wool pads, or other abrasive materials.
• When brewer is not in use, keep lid in the
closed position.
• To avoid cup overflow, empty cup before
each brew cycle.
• Never place hands directly under Pod
Holder. Hot water and steam can be
present.
• Always use a cup that is larger than the
amount of water poured into the brewer.
• Keep hands away if cup overflows.
• Pour in cold water only.
• Do not place torn pods, coffee grounds or
loose tea in Pod Drawer.
• Do not place objects in Pod Drawer other
than coffee or tea pods or tea bags.
• READ ALL INSTRUCTIONS.
• Do not touch hot surfaces. Use handles.
• Do not place cord, plugs, or brewer in
water or other liquids.
• Do not open lid during brewing.
• Close supervision is necessary when
brewer is used by or around children.
• Unplug brewer when not in use for
extended periods and before cleaning.
Let brewer cool before removing or
replacing parts, and before cleaning.
• Do not operate brewer with a damaged
cord or plug or if the brewer malfunctions
or is damaged in any way. Return brewer
to an Authorized Service Facility for
examination, adjustment or repair (see
page 9).
• Using an accessory not evaluated for use
with this brewer may cause injury.
• For indoor household use only.
• Do not let cord hang over edge of table
or counter or touch hot surfaces.
• Do not place brewer on or near a hot gas
or electric burner or in a heated oven.
note : The short power-supply cord supplied reduces the risk of becoming entangled in or tripping
over a longer cord. If an extension cord is used, its marked electrical rating must be at least as great
as the electrical rating of the brewer. Make sure the extension cord does not hang over the edge of a
table or counter and that it cannot be pulled on by children or tripped over. The extension cord must
be a 3-wire cord of the 3-prong, 3-socketed, grounding type (including grounding conductor).
keep this booklet for future reference
Record the Date Code before using (located
on the lower back of your brewer).
WARNING
RISK OF FIRE OR ELECTRICAL SHOCK
date code : TO REDUCE RISK OF FIRE OR ELECTRIC SHOCK
DO NOT DISASSEMBLE THE BREWER
NO USER-SERVICEABLE PARTS INSIDE
REPAIR SHOULD BE DONE BY AUTHORIZED
SERVICE PERSONNEL ONLY
Questions?
Visit www.bunn.com or call
USA 1-800-352-BUNN (2866)
Canada 1-800-263-2256
This symbol alerts
you to important
operating and
service instructions.
Please have your Model and Date Code
ready when calling for service.
2
This symbol alerts .
you to the risk of fire .
or electric shock in the .
accompanying message.
7. Close Spin Lid.
1. Plug in brewer. The Brew Button will
flash red, indicating that water is needed
and the brewer is ready for set-up.
8. Push Brew Button. Wait approximately
two minutes for the internal hot water
tank to partially fill with water. You may
hear some squeaking as the pump primes.
This is perfectly normal and will only occur
during setup.
2. Position cup (14 oz. or larger) on
Drip Tray under Pod Drawer.
Do not brew directly into untempered
glass or plastic cups/glasses. Use only
heat-resistant vessels.
9. Empty cup if any water is present,
then place cup on Drip Tray under
Pod Drawer.
3. Place empty Pod Drawer into
Drawer Guides and push in to
lock into place. The Pod Drawer must
be locked into place before brewer
will operate.
10. Repeat steps 4 through 7.
11. Push Brew Button. Wait about
2 minutes for internal hot water tank
to finish filling with water. Excess water
will fill the cup. If the Brew Button is still
flashing red, repeat steps 4 through 7
and push Brew Button again.
4. Fill a container with 14 oz. of
cold water.
5. Open Spin Lid on top of brewer.
6. Fill Pour-in Bowl with water.
Your My Café is now heating the water. Wait 2 to 3 minutes for the indicator light to turn
from red to green. You are now ready to brew!
3
BREWING BETTER
BREWING BETTER
MY CAFÉ® SINGLE SERVE POD BREWER
WITH PODS
1. Press down on the button located on top of Pod Drawer
handle and pull Pod Drawer out along the Drawer Guides.
The My Café® Single Serve Pod Brewer precisely controls brewing temperature and
time to extract superior flavor from your favorite coffee and tea pods. Pods typically
range in weight from 6 to 12 grams or more, so experiment with different amounts of
water and a variety of pod weights to create your perfect cup.
• Start with your favorite pod and 8 ounces of water.
2. Place coffee or tea pod in Pod Drawer cavity.
Center pod in holder and gently press the pod completely into the
Pod Drawer cavity. Ensure that pod is fully seated.
• For a bolder cup, use less water or a heavier pod.
• For a weaker cup, use more water or a lighter pod (it contains less coffee) with the same
amount of water.
note : Too much water and too little coffee can lead to over-extraction of the grounds
3. Slide Pod Drawer into Drawer Guides and push in to lock
into place.
Pod Drawer must be locked into place before brewer will operate.
4. Open Spin Lid on top of brewer.
5. Using your preferred cup, fill Pour-In-Bowl with desired
amount of water (minimum 4 oz., maximum 14 oz.).
Note: the cup positioned on Drip Tray and under the Pod Drawer
must be larger than the amount of water used.
6. Close Spin Lid on top of brewer and position cup on
Drip Tray under Pod Drawer.
Note: be sure cup is heat resistant.
7. For regular brew, push the Brew Button.
For bolder brew or for tea, push the Pulse Button to set the pulse
feature and then push the Brew Button.
and a bitter taste.
• Use the Pulse Button to steep tea pods or for bolder coffee flavor.
For more information on pods, visit mycafe.com
MORE BEVERAGES
• Use My Café to dispense hot water for hot cocoa and other beverages. Just leave the pod
or tea bag out of the Pod Drawer and press Brew. Use caution, the dispensed water will be
approximately 200°F.
• Brew iced coffee and tea by brewing over a cup filled with ice (make sure cup is resistant
to both hot and cold). After brewing, add milk and/or your favorite sweetener.
ENERGY SAVING FUNCTIONS
• After 6 hours idle, the temperature inside the stainless steel hot water tank drops to 140°F.
It takes about 1 minute to get back to an optimal brewing temperature of about 200°F.
• After 26 hours idle, My Café enters sleep mode. It takes about 2 minutes to return to
optimal brewing temperature (about 200°F).
• When Pod Drawer is removed or inserted, or if any button is pushed, the brewer exits
energy saver/sleep mode and begins to heat up to optimal brewing temperature. When
the indicator light is green, your brewer is ready to use.
8. At end of brew cycle, remove cup from Drip Tray.
Dispose of used pod by removing the Pod Drawer (see #1) and
flipping the pod into a waste container. Do not touch hot pod!
4
5
CLEANING & MAINTENANCE
CLEANING & MAINTENANCE
basic cleaning
reassembling the sprayhead/seal
Rinse the Pod Drawer after each use – especially when switching between coffee and
tea pods. Pod Drawer, Drip Tray and Drip Tray Cover are top rack dishwasher safe.
Occasionally wipe outside of the brewer, including the Drip Tray and Drip Tray Cover,
with a mild, no citrus added dish soap and a damp cloth.
If Sprayhead and seal are separated during removal or cleaning, they must be
reassembled properly.
deep cleaning
Deep clean your brewer at least every 3 months. Mineral deposits may accumulate due
to impurities in the water used to brew. If deposits are not removed, they can impair the
operation of the brewer and reduce product life. The frequency of cleaning depends on the
mineral content of your water (the higher the mineral content, the more often you should
deep clean).
1. Open Spin Lid on top of brewer.
6. Run at least two additional 14 oz. cycles of
water through brewer to flush remaining
vinegar from brewer.
7. Follow the steps below to clean the
Sprayhead.
2. Fill Pour-in Bowl with 14 oz. white vinegar.
3. Close Spin Lid.
4. Place empty cup (greater than 14 oz.) on
the Travel Mug Base or Drip Tray Cover.
1. Identify the top of the seal – it will have
Make sure it is completely in the channel.
When properly assembled, the Sprayhead
will slide easily into the channel of the
seal and will not cause any buckles in the
surface of the seal.
rough ridges and the bottom is smooth
2. Identify the top of the Sprayhead – it has
a star pattern and a threaded hole where
the Sprayhead attaches to the brewer.
3. While carefully stretching the seal, guide
the Sprayhead into the channel of the seal.
CAUTION: Improper reassembly could
result in personal injury from hot water.
inspecting the sprayhead seal
5. Push Brew Button to cycle vinegar through
brewer.
cleaning the sprayhead
Mineral deposits and loose coffee or tea granules may clog the Sprayhead, causing the brew
cycle to slow.
When disassembling your brewer for cleaning, inspect the Sprayhead seal for cracks, tears
and holes. Although the seal should last for an extended period of time, damage can occur
through handling.
CAUTION: The seal confines hot liquid to the Pod Drawer. If damaged, call Customer
Service at 800-352-2866 or visit www.bunn.com to obtain a replacement seal.
storing the brewer
Unplug the brewer and wait for it to cool. It must be stored above 32°F/0°C to prevent
damage to the internal water tank. If you do not use your brewer for an extended period of
time, we recommend running two to three cycles of water through prior to brewing coffee
or tea.
1. Unplug the brewer and allow it to cool
CAUTION: If the Sprayhead and seal are
separated, they must be reassembled.
Improper reassembly could result in injury
from scalding water
5. With your fingers, rotate Sprayhead
counter-clockwise until finger tight.
6. Replace Pod Drawer.
7. Plug in brewer to restore power.
(minimum 1 hour).
2. Remove Pod Drawer.
3. Using your fingers, rotate the Sprayhead
assembly clockwise until the Sprayhead
and seal are removed.
4. Clean Sprayhead and seal with mild
detergent and rinse thoroughly. A
toothpick may also be used to clear
debris from Sprayhead holes.
6
7
TROUBLESHOOTING
problem
suggestions
TROUBLESHOOTING
problem
suggestions
Brew Button
Flashes Red
• Internal hot water tank must be filled with water. See Setting up
My Café® on page 3.
Takes too long
to brew
• Mineral deposits may be present in your brewer. See Deep Cleaning
and Cleaning the Sprayhead on page 6.
Brew Button
is Red
• Your machine is brewing. Press the Brew Button again to stop the
brew process.
Brewer only
brews water
• Make sure a pod is in the Pod Drawer.
Indicator Light
is Green
• Water is hot and ready to brew.
Water speed
varies during
brew
• The Pulse Brew Button has been pressed. During the brew, water
flow will vary to properly steep tea or for stronger coffee.
Indicator Light
is Red
• Water is heating.
Indicator Light
Flashes Red
• The Brew Button was pressed but the water is heating. Wait
for indicator light to turn green and press Brew Button again.
Water leaks
out around the
Sprayhead
• The Sprayhead may be clogged, loose or the seal may be damaged.
Please refer to Cleaning the Sprayhead, Reassembling the Sprayhead/
Seal and Inspecting the Sprayhead Seal on pages 6 and 7.
Indicator Light
Flashes Green
• Add water. NOTE: Make sure that a cup is positioned on the Drip Tray
under the Pod Drawer prior to pushing Brew Button.
Indicator Light
Flashes Red
and Green
• Pod Drawer is not fully inserted. Press in the Pod Drawer to lock
into place.
Pulse Button
is Red
• The Pulse option is activated. Press the Pulse Button again
to deactivate.
Brewer doesn’t
turn on
• Make sure brewer is plugged into a working outlet.
• Press Brew Button to begin brew (Brew Button will be illuminated).
Coffee/tea is
not brewing
• Make sure brewer is plugged into a working outlet.
• Make sure brewer is filled with water. The hot water tank needs to be
filled to begin brewing (indicator light will flash green). See Setting up
My Café on page 3.
• Make sure Pod Drawer is fully inserted (the indicator light will
alternately flash red and green if it is not fully inserted).
• If indicator light flashes red, brewer is heating water to proper brew
temperature in approximately 2 minutes. When the light is green, press
Brew Button.
• Press Brew Button to begin brew (Brew Button will be illuminated).
Brew is weak
The Pod Holder • The pod in the Pod Drawer may be swelled to a point where the
will not come out drawer does not slide out easily. Wait 10 minutes for the pressure to
drop and try carefully removing the Pod Drawer again.
of the brewer
Water leaks
out around the
Pod Drawer
• Make sure the pod is fully seated in the Pod Drawer cavity.
note : Do not disassemble. There are no user serviceable parts inside the brewer.
AUTHORIZED SERVICE
www.bunn.com
bunn - o - matic ® corporation
in the united states :
1400 Stevenson Drive, Springfield, IL 62703
900 E. Townline Rd., Creston, Iowa 50801
1-800-352-BUNN (2866)
in canada :
280 Industrial Parkway S., Aurora, Ontario L4G 3T9
1-800-263-2256
To receive full assistance, have the Model and Date Code ready when calling.
• Pod should be fully seated in Pod Drawer cavity for maximum
flavor extraction.
• The amount of water used for brewing may be too large for the pod’s
weight. Try using a heavier pod or less water.
• Try using the Pulse Button to extend the water to coffee contact time.
8
9
LIMITED WARRANTY
Bunn-O-Matic® warrants the My Café® Single Serve Pod Brewer to be free from defects in
materials and workmanship existing at the time of manufacture and appearing within one of
the following warranty periods:
a) Two (2) years from the date of original purchase of a NEW BREWER.
b) The later of two (2) years from the date of original purchase or one (1) year from the
date REPAIRED OR REPLACEMENT BREWER is received by the customer when
returned to Bunn-O-Matic before the new Brewer warranty has expired.
c) One (1) year from the date REPAIRED OR REPLACEMENT BREWER is received by
the customer when returned to Bunn-O-Matic after the new Brewer warranty
has expired.
d) One (1) year from the date of purchase of a REMANUFACTURED BREWER.
If such a defect appears during the warranty period, we will (at our sole option) repair
or replace the defective Brewer with no charge for service or parts, provided Brewer is
delivered at the customer’s expense to one of the authorized service centers listed on page
9 of this booklet.
Warranty does not cover claims resulting from misuse, failure to follow instructions on
installation and use, use with water having a high mineral content, neglect, use of
unauthorized attachments, commercial use, use on a current or voltage other than
specified on the Brewer, or unauthorized service during the warranty period on conditions
otherwise covered by warranty.
THIS WARRANTY SHALL BE EXCLUSIVE AND SHALL BE IN LIEU OF ANY OTHER
EXPRESS WARRANTY, WRITTEN OR ORAL, INCLUDING BUT NOT LIMITED TO
ANY EXPRESS WARRANTY OF MERCHANTABILITY OR FITNESS FOR A PARTICULAR
PURPOSE. THE DURATION OF ANY IMPLIED WARRANTIES, INCLUDING BUT NOT
LIMITED TO ANY IMPLIED WARRANTIES OF MERCHANTABILITY OR FITNESS FOR A
PARTICULAR PURPOSE, IS EXPRESSLY LIMITED TO THE PERIOD OF DURATION OF
THIS LIMITED WARRANTY.
Some states do not allow time limitations on how long implied warranty lasts, so the above
limitation may not apply to you.
THE CUSTOMER’S EXCLUSIVE REMEDY FOR BREACH OF THIS WARRANTY OR OF
ANY IMPLIED WARRANTY OR OF ANY OTHER OBLIGATION ARISING BY OPERATION
OF LAW OR OTHERWISE SHALL BE LIMITED AS SPECIFIED HEREIN TO REPAIR OR
REPLACEMENT, AT OUR SOLE OPTION. IN ANY EVENT, RESPONSIBILITY FOR SPECIAL,
INCIDENTAL, AND CONSEQUENTIAL DAMAGES IS EXPRESSLY EXCLUDED.
Some states do not allow the limitation or exclusion of incidental or consequential damages,
so the above limitation or exclusion may not apply to you.
This warranty gives you specific legal rights; you may have other rights, which vary from
state to state.
The BUNN logo is a trademark of Bunn-O-Matic Corporation.
43460.0000 ©2010 BUNN-O-MATIC CORPORATION
www.bunn.com
10