1
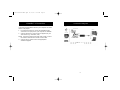
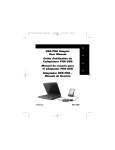
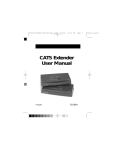
P74024-F5U208-MAC.qxd 12/12/00 9:57 AM Page 1
Belkin Components
USB VideoBus™ II
Instruction Manual
for Macintosh®
P74024
F5U208-MAC
P74024-F5U208-MAC.qxd 12/12/00 9:57 AM Page 2
Introduction
Features:
•
•
•
•
•
•
•
•
Make your own movies.
Includes award-winning video and photo-editing software
from Strata™.
Capture audio and video in a fast and convenient way.
Connect your camcorder, VCR, digital camera, or any
standard video device directly to your MAC, and save the
playback in still-image format or full-motion video.
E-mail pictures or video clips to friends and relatives or
business associates.
Video-conference around the world using your camcorder.
Easy to use Plug-and-Play operation.
Easy to install USB device doesn’t require opening
your computer.
Specifications:
•
•
•
•
•
•
•
•
•
•
Full-motion video—30 fps at CIF resolution video capture
via USB.
Motion video up to 15 fps at VGA resolution (progressive
video source) video capture via USB.
VGA (640X480) resolution still image capture.
Audio input up to stereo 16KHz/16 Bit—Audio capture
via USB.
Data input transfer up to 2Mbit/s via the bulk input pipe
on USB.
Software-controlled digital PAN and ZOOM.
Any standard NTSC/PAL/SECAM video source is supported.
Easy Plug-and-Play operation.
Compatible with popular video applications.
Compatible with Mac OS 8.6 or higher.
1
P74024-F5U208-MAC.qxd 12/12/00 9:57 AM Page 2
Introduction
(continued)
Hardware Installation
System Requirements:
Minimum Recommended System:
• Mac® or iMac™ Computer with USB Capabilities
• Mac OS 8.6 or Higher
Please read this manual thoroughly before starting the
installation of the VideoBus II.
Package Contents:
1. Insert the USB VideoBus II software installation CD into your
CD-ROM drive. When the CD icon appears on your desktop
named "Belkin F5U208-Mac", double-click on the icon.
• Belkin USB VideoBus™ II for Macintosh®
• Installation CD Including Stata™ VideoShop 4.5
• Instruction Manual
2. A screen will appear with the contents of the disk listed.
Double-click on the icon named "UVP 2.26 INST (BELKIN).1".
3. A screen will appear. Click "Install".
4. A message will appear warning you to restart your
computer after installation. Click "Continue".
5. After the installation is complete, click "Restart".
6. After the computer has restarted, the installation is
complete. Follow the directions on VideoBus II Connection
in the next section.
2
3
P74024-F5U208-MAC.qxd 12/12/00 9:57 AM Page 4
VideoBus™ II Connection
Connecting the VideoBus II between your computer and video
device is very simple.
1. If not already connected, connect the VideoBus II USB
connector to an open port on your computer or USB Hub.
2. Connect the RCA A/V patch cords (not supplied) to your
video device (e.g. camcorder, VCR).
NOTE: If you have a video device that used S-Video, connect
the S-Video cable instead of the RCA video cable.
3. Connect the A/V patch cords to the appropriate
VideoBus II pigtails.
Connection Diagram
Source
Optional S-Video
Desktop
Camcorder
Optional S-Video
USB port
Belkin VideoBus™ II
Television
RCA A/V Patch Cords
Laptop
VCR
Signal Flow
4
5
P74024-F5U208-MAC.qxd 12/12/00 9:57 AM Page 6
Digitizing Clips using Strata VideoShop 4.5
on the USB VideoBus™
Configuring Audio
Installing and Using Strata™ VideoShop 4.5 on the
USB VideoBus™ II
The USB VideoBus driver CD comes with a software
called Strata VideoShop 4.5 that will allow you to
capture video and create amazing images; you can now
proceed with installing this software. To install Strata
VideoShop, double-click "Install VideoShop 4.5". Then
follow the on-screen instructions.
The Strata VideoShop manual is in PDF format. If you do
not have Adobe Acrobat Viewer, you must install Viewer.
On the CD, double-click on "Acrobat Reader Install".
Then on the following screen that appears, double-click
on Reader 3.01 Installer. Next, follow the on-screen
instructions. Once Adobe Acrobat is installed, you can
open "Tutorial" to learn how to use Strata VideoShop 4.5.
You can also browse “VideoShop 4.5 ReadMe” and
“Documentation” for additional information.
Using VideoShop’s digitizing function, you can capture your
own clips.
Equipment Needed for Digitizing:
•
•
USB VideoBus—this will be your digitizing hardware installed
on the computer
VCR or camcorder and necessary cables
Digitizing Equipment Setup:
For digitizing, you will be capturing clips from an external
source, such as a VCR or camcorder. Follow the instructions on
the previous pages about connecting your VCR or camcorder to
the USB VideoBus.
Before Digitizing:
•
•
Important: To capture sound, follow the steps on the
previous page regarding “Configuring Audio”.
To improve digitizing performance, it is recommended that
you follow these rules:
a) Turn off network sharing.
b) Quit any other applications you are not using.
c) Defragment your hard drive.
d) Make sure you have adequate space on your hard
drive to store the digitized clips. The following
digitizing example will require at least 50MB.
Digitizing Clips (Example)
To Display the Digitizing Window:
1.
2.
6
Start VideoShop.
Select “New” from the “File” menu to start a new project.
7
P74024-F5U208-MAC.qxd 12/12/00 9:57 AM Page 8
Digitizing Clips using Strata™ VideoShop 4.5
on the USB VideoBus™ (continued)
Note:
3.
4.
5.
OR
You do not have to have a project open to digitize.
You can open the digitizing window at anytime with
the “Show Digitizing Window” command. The
digitized clips will be stored in the VideoShop cache
folder (or designated digitizing folder). To use the clips,
import them into the bin when you start a project.
The “Project Settings” dialog appears. Click on the
“Internet” setting. Both the “Recording” and “Project
Settings” change to “Width: 160”, “Height: 120”, and
“FPS: 15”. This means that the clip you digitize will be 160
pixels wide x 120 pixels high. Your VideoShop project will
also have the same settings and have a frame rate of 15
frames per second.
Click “OK” to start a new project with these settings. A
new project starts and VideoShop’s main windows appear.
Select “Show Digitizing Window” from the “Windows” menu.
Click the “Digitize” button on the button bar (icon that
looks like a video camcorder located on the upper
right-hand corner of your screen). The “Digitizing” window
is displayed. The size of the digitizing area is displayed at
the top left: 160x120.
To Configure the Digitizing Software:
1.
From the “Digitize” menu, select “Video On” to enable
the video digitizing function.
Note:
This command is only enabled if VideoShop detects a
digitizing card in your computer (in our case it is the
USB VideoBus).
A check mark next to the command indicates it’s already active.
2. From the Digitizing menu, select “Video Settings”. The
“Video” dialog box appears.
3. From the “Video Settings” pop-up menu (top left) select
“Source”. This option is used to select the source for
8
Digitizing Clips using Strata™ VideoShop 4.5
on the USB VideoBus™ (continued)
the Video input to be digitized. The options in the
dialog box will change to “Source Options”.
4. Your Digitizer is “USB Vision”. This may be the only option.
5. Select your “Input”: either “S-Video” or “C-Video”
depending on the type of your connection.
6. Select your “Format”: NTSC, PAL, or SECAM. NTSC is
the standard in the United States and Japan; PAL is used
in Europe, and SECAM is used in France. Click “OK”.
7. Again, from the “Digitize” menu, select “Sound On” to
enable the Audio digitizing function.
A check mark next to the command indicates it’s already active.
8. From the “Digitizing” menu, select “Sound Settings”.
The “Sound” dialogue box appears.
9. From the “Sound Settings” pop-up menu select
“Source”. This option is used to select the source for the
audio input to be digitized. The options in the left half of
the “Sound” dialogue change to “Source” options.
10. From the “Device” pop-up menu, select “Built-in”. This
may be the only option.
11. From the “Input” pop-up menu, select “Sound In”.
12. From the “Speaker” pop-up menu, select “On”. This will
allow you to hear the audio through your computer’s
speaker while you are recording. Click “OK”.
To Test Your Connections:
1.
2.
3.
Turn on your VCR. Insert a tape, and press play. If you
are using a camcorder, turn the power on.
Observe the video appears in the preview area of the
“Digitizing Window”.
Observe the audio is playing through the
computer’s speaker.
9
P74024-F5U208-MAC.qxd 12/12/00 9:57 AM Page 10
Digitizing Clips using Strata™ VideoShop 4.5
on the USB VideoBus™ (continued)
Digitizing Clips using Strata™ VideoShop 4.5
on the USB VideoBus™ (continued)
To Adjust the Digitized Video Image:
1.
2.
3.
Click the “Image” button in the “Digitize Window”. The
“Image Settings” dialog appears.
Adjust the settings as desired. The results are shown in
the preview window.
Click “OK” to accept your image changes.
6.
To Adjust the Signal Level of the Digitized Audio:
1.
2.
Select the “Sound Settings” command from the
“Digitizing” menu. The “Sound Settings” dialog appears.
Adjust the “Gain Control” slider until the audio signal
peaks slightly into the red on the “Level” meter.
To Digitize Clips:
1.
2.
3.
4.
Locate a portion of the videotape that you want to digitize.
Select a passage that has both video and sound. If you are
using a camcorder, film something with motion and sound.
Play the tape.
Press the “Record” button in the “Digitize Window”
using your mouse. Digitizing begins and the “Record”
button turns into a “Stop” button. The “Disk Space
Available” bar at the bottom of the window shows the
space remaining on your hard drive.
Wait approximately 15 seconds and press the “Stop”
button using your mouse. The digitized clip is stored in
the “VideoShop Cache” folder and also appears in the
“Bin” window as an “Untitled Movie Clip”.
Note:
5.
You can change the location for storing digitized
clips by designating a new “Digitizing” folder. Click
the “Digitizing Folder” button in the “Digitizing”
window to assign a new location.
Record two more 15-second clips using different footage
if possible. You should have three movie clips in your
10
“Bin” named “Untitled Movie1”, “Untitled Movie2”, and
“Untitled Movie3”.
After digitizing clips, you can rename them in the “Bin”.
To rename files in the “Bin”:
1. Hold down the “Option” key, and click on the file
name in the “Bin”.
2. Rename the file.
Note:
Renaming the file in the “Bin” does not rename the
file on your hard drive.
To Digitize Still Images:
1.
Locate an image on the videotape that you want to
digitize. If you are using a camcorder, aim it at an image
you want to capture.
2. Play the tape. If your VCR has the capability to display
freeze frames, freeze the tape at the frame desired.
3. Press the “Digitize Still Frame” button (icon that looks
like a camera) using your mouse in the “Digitizing”
window. The image is captured and stored in the
“VideoShop Cache” folder with the name "Grabbed
Picture X". Each new still image captured is given a
different number.
4. Digitize two more still images. You should now have
three files in the “VideoShop Cache” folder named
“Grabbed Picture1”, “Grabbed Picture2”, and “Grabbed
Picture3”.
For further information about digitizing clips and using
digitized clips in a movie, open "Tutorial" on the USB
VideoBus CD. Go to Chapter 9, “Digitizing Clips and Printing
to Videotape”. It is recommended that you read the
contents of the "Tutorial" file starting from the beginning
(Chapter 1), so you will be familiar with all the terminology.
11
P74024-F5U208-MAC.qxd 12/12/00 9:57 AM Page 12
Information
FCC Statement
DECLARATION OF CONFORMITY WITH FCC RULES
FOR ELECTROMAGNETIC COMPATIBILITY
We, Belkin Components, of 501 West Walnut Street, Compton CA 90220,
declare under our sole responsibility that the product:
F5U208-MAC
to which this declaration relates:
Complies with Part 15 of the FCC Rules. Operation is subject to the following
two conditions: (1) this device may not cause harmful interference, and (2) this
device must accept any interference received, including interference that may
cause undesired operation.
Belkin Components Limited Lifetime Product Warranty
Belkin Components warrants this product against defects in materials and workmanship for
its lifetime . If a defect is discovered, Belkin will, at its option, repair or replace the product
at no charge provided it is returned during the warranty period, with transportation charges
prepaid, to the authorized Belkin dealer from whom you purchased the product. Proof of
purchase may be required.
This warranty does not apply if the product has been damaged by accident, abuse, misuse,
or misapplication; if the product has been modified without the written permission of Belkin;
or if any Belkin serial number has been removed or defaced. The warranty and remedies set
forth above are exclusive in lieu of all others, whether oral or written, expressed or implied.
Belkin specifically disclaims any and all implied warranties, including, without limitation,
warranties of merchantability and fitness for a particular purpose. No Belkin dealer, agent, or
employee is authorized to make any modification, extension, or addition to this warranty.
Belkin is not responsible for special, incidental, or consequential damages resulting from any
breach of warranty, or under any legal theory, including but not limited to lost profits,
downtime, goodwill, damage to or reprogramming, or reproducing any program or data
stored in or used with Belkin products. Some states do not allow the exclusion or limitation
of incidental or consequential damages or exclusions of implied warranties, so the above
limitations of exclusions may not apply to you. This warranty gives you specific legal rights,
and you may also have other rights that vary from state to state.
DECLARATION OF CONFORMITY WITH FCC RULES
FOR ELECTROMAGNETIC COMPATIBILITY
We, Belkin Components, of 501 West Walnut Street, Compton CA 90220, declare under our
sole responsibility that the product, VideoBus™II, F5U208 to which declaration relates,
complies with Part 15 of the FCC Rules. Operation is subject to the following two conditions:
(1) this device may not cause harmful interference, and(2) this device must accept any
interference received, including interference that may cause undesired operation.
12
P74024-F5U208-MAC.qxd 12/12/00 9:57 AM Page 14
belkin.com
Belkin Components
501 West Walnut Street
Compton • CA • 90220 • USA
Tel: 310.898.1100
Fax: 310.898.1111
Technical Support:
800.223.5546 ext. 2263
belkin.com/support/tech
Belkin Components, Ltd.
Unit 13 • Gatelodge Close • Round Spinney
Northampton • Northants • NN3 8RX • United Kingdom
Tel: +44 (0) 1604678300
Fax: +44 (0) 1604678330
Belkin Components B.V.
Diamantlaan 8 • 2132 WV
Hoofddorp • The Netherlands
Tel: +31 (0) 235698765
Fax: +31 (0) 235612694
© 2000 Belkin Components. All rights reserved. All trade names are registered trademarks of
respective manufacturers listed. Macintosh® is a trademark of Macintosh® Laboratory, Inc. licensed to
Apple Computer, Inc., and is being used with the express permission of its owner.