1
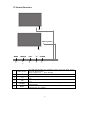
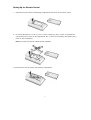
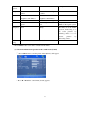
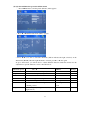
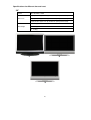
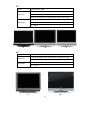
BEFORE USING THIS PRODUCT .......................................................................... 2
SAFETY PRECAUTIONS ........................................................................................................................ 2
INTRODUCTION YOUR TELEVISION ................................................................. 5
SUPPLIED ACCESSORIES...................................................................................................................... 5
TV CONTROL FUNCTIONS .................................................................................................................... 6
SETTING UP THE REMOTE CONTROL...................................................................................................... 7
REMOTE CONTROL FUNCTIONS ............................................................................................................. 8
INPUTS AND OUTPUTS ......................................................................................................................... 9
DESCRIPTION OF OPERATION .............................................................................10
1. POWER ON/OFF .............................................................................................................................10
2. INPUT SWITCHING ...........................................................................................................................10
3. VOLUME CONTROL .........................................................................................................................10
4. MUTE...........................................................................................................................................10
5. SCREEN DISPLAY OF INPUT SIGNALS ..................................................................................................10
6. SLEEP TIMER .................................................................................................................................11
7. OPERATION MENU ..........................................................................................................................11
8. PICTURE MODE ..............................................................................................................................17
9. SOUND SYSTEM, ............................................................................................................................17
10. PICTURE FREEZE .........................................................................................................................17
11. FAST REVIEW ...............................................................................................................................17
12. MONO/STEREO/NICAM SELECT ....................................................................................................17
13. TELETEXT CONTROL BUTTONS ........................................................................................................18
GENERAL SPECIFICATIONS ..................................................................................................19
SPECIFICATIONS FOR DIFFERENT SIZE AND CRUST .................................................20
RGB FREQUENCY TABLE .......................................................................................................23
1
Before Using This Product
Safety Precautions
Electrical energy can perform many useful functions, but it can also cause personal injuries and
property damage if improperly handled. This product has been engineered and manufactured
with the highest priority on safety. But IMPROPER USE CAN RESULT IN POTENTIAL
ELECTRICAL SHOCK OR FIRE HAZARD. In order to prevent potential danger, please observe
the following instructions when installing, operating and cleaning the product. To ensure your
safety and prolong the service life of your LCD TV product, please read the following
precautions carefully before using the product.
1. Read these instructions---All operating instructions must be read and understood before the product
is operated.
2. Keep these instructions---These safety and operating instructions must be kept in a safe place for
future reference.
3. Heed all warnings---All warnings on the product and in the instructions must be observed closely.
4. Follow all instructions---All operating instructions must be followed.
5.Attachments---Only use attachments/accessories specified by the manufacturer. Do not use
attachments not recommended by the manufacturer. Use of improper attachments can result in accidents.
6. Power source---This product is intended to be supplied by a listed power supply indicated on the
marking label. If you are not sure of the type of power supply to your home, consult your product dealer or
local power company. For added protection for this product during a lightning storm, or when it is left
unattended and unused for long periods of time, unplug it from the wall outlet and disconnect the cable
system.
7.Power cord protection---Protect the power cord from being walked on or pinched particularly at plugs,
convenience receptacles, and the point where they exit from the apparatus.
8.Overloading---Do not overload wall outlets, extension cords, or convenience receptacles on other
equipment as this can result in a risk of fire or electric shock.
9.Entering of objects and liquids---Never insert an object into the product through vents or openings.
High voltage flows in the product, and inserting an object can cause electric shock and/or short internal
parts. For the same reason, do not spill water or liquid on the product.
10.Servicing---Refer all servicing to qualified service personnel. Servicing is required when the apparatus
has been damaged in any way, such as power-supply cord or plug is damaged, liquid has been spilled or
objects have fallen into the apparatus, the apparatus has been exposed to rain or moisture, does not
operate normally, or has been dropped.
2
11.Damage requiring service---If any of the following conditions occurs, unplug the power cord from the
AC outlet, and request a qualified service person to perform repairs.
a.
When the power cord or plug is damaged.
b.
When a liquid is spilled on the product or when objects have fallen into the product.
c.
When the product has been exposed to rain or water.
d.
When the product does not operate properly as described in the operating instructions.
Do not touch the controls other than those described in the operating instructions. Improper
adjustment of controls not described in the instructions can cause damage, which often requires extensive
adjustment work by a qualified technician.
e.
If the product has been dropped or the cabinet has been damaged in any way.
f.
When the product displays an abnormal condition or exhibits a distinct change in performance. Any
noticeable abnormality in the product indicates that the product needs servicing.
12.Replacement parts---In case the product needs replacement parts, make sure that the service person
uses replacement parts specified by the manufacturer, or those with the same characteristics and
performance as the original parts. Use of unauthorized parts can result in fire, electric shock and/or other
danger.
13.Safety checks--- Upon completion of service or repair work, request the service technician to perform
safety checks to ensure that the product is in proper operating condition.
14.Wall or ceiling mounting---When mounting the product on a wall or ceiling, be sure to install the
product according to the method recommended by the manufacturer. This is a safety feature.
15. Stand---Use only with the cart, stand, tripod, bracket, or table specified by
the manufacturer, or sold with the apparatus. Do not place the product on an
unstable trolley, stand, tripod or table. Placing the product on an unstable base
can cause the product to fall, resulting in serious personal injuries as well as
damage to the product. When mounting the product on a wall, be sure to follow
the manufacturer.
16. Careful move--- When a cart is used, use caution when the cart/apparatus
combination to avoid injury from tip-over. Sudden stops, excessive force and
uneven floor surfaces can cause the product to fall from the trolley
17. Lightning---Unplug this apparatus during lightning storms or when
unused for long periods of time. For added protection for this television
equipment during a lightning storm, or when it is left unattended and unused
for long periods of time, unplug it from the wall outlet and disconnect the
antenna. This will prevent damage to the equipment due to lightning and
power-line surges.
3
18. Do not use this apparatus near water---for example, near a bathtub,
washbowl, kitchen sink, or laundry tub, in a wet basement, or near a swimming
pool, and the like. Do not use immediately after moving from a low temperature
to high temperature environment, as this causes condensation, which may
result in fire, electric shock, or other hazards.
19. Clean only with dry cloth---Unplug this product from the wall outlet
before cleaning. Do not use liquid cleaners or aerosol cleaners. Use a damp
cloth for cleaning.
20. Ventilation---Do not block any ventilation openings. Install in accordance
with the manufacturer instructions. The vents and other openings in the
cabinet are designed for ventilation. Do not cover or block these vents and
openings since insufficient ventilation can cause overheating and/or shorten
the life of the product. Do not place the product on a bed, sofa, rug or other
similar surface, since they can block ventilation openings. This product is not
designed for built-in installation; do not place the product in an enclosed place
such as a bookcase or rack, unless proper ventilation is provided or the
manufacturer
21.Heat sources---Do not install near any heat sources such as radiators,
heat registers, stoves, or other apparatus (including amplifiers) that produce
heat.
22.Panel protection---The LCD panel used in this product is made of glass.
Therefore, it can break when the product is dropped or impacted upon by other
objects. Be careful not to be injured by broken glass pieces in case the LCD
panel breaks.
23.Pixel defect---The LCD panel is a very high technology product, giving you finely detailed pictures.
Occasionally, a few non-active pixels may appear on the screen as a fixed point of blue, green or red.
Please note that this does not affect the performance of your product.
4
Introduction Your Television
Supplied Accessories
The following items come along with your LCD TV:
5
TV Control Functions
1
button (Beneath)
button (profile)
1
MENU
SOURCE
6
5
1
LED Indicators
2
POWER
3
P+
4
VOL+
5
SOURCE
6
MENU
–VOL+
4
–P+
POWER
3
2
The LED indicator light up in 2 different colours green, red. Each colours
represent different status.
Green - Power is on;
Red - Standby.
Press this button to turn the power on/standby.
Press to change channel/when is menu mode, these acts as navigation
keys.
Press to adjust the volume/when is menu mode, these acts as navigation
keys.
Video input selection. Press this button to display the menu for input
selection mode.
Press this button to display the OSD menu.It contains all the options to
configure your TV's settings.
6
Setting Up the Remote Control
1.
Open the lid of your remote control battery compartment on the back of the remote control.
2.
Insert two AA batteries. Use the (+) and (-) marks to guide you. The (+) marks on your batteries
correspond to the (+) marks on the compartment. The (-) marks on your battery correspond to the (-)
marks on the compartment.
Note: Do not mix new and old or different kind of batteries
3. Put the lid back onto the remote control battery compartment.
7
Remote Control Functions
The table below explains each button’s function.
1
POWER
Power on/off.
2
DISPLAY
3
I/II
Mono/Stereo select button.
4
ON/OFF
TELETEXT ON/OFF button.
5
MIX
Switch to the teletext with mix mode.
6
REVEAL
Show the hidden words.
7
UPDATE
TELETEXT UPDATE button.
8
VOL
Volume DOWN/UP button.
9
PIC.MODE
Picture mode button.
Press to display information about the
current source.
Navigation keys in Setup menu.
10 / 16
Navigation keys in Setup menu.
11 / 17
12
MENU
Press this key to display the OSD menu. In
the OSD menu, press this key to exit the
menu.
13 0
0~9
Numerical keys to select desired channel
14
RECALL
Recall last channel.
15
-/--
Digital selection button.
18
SOUND.SYS
19
MUTE
Sound system select button.
Press this key to turn off the sound.
Press the "MUTE" button again or press
"VOL +" to enable sound.
20
CH
Press these keys to change the channels.
There are four color buttons and the colors sre
21
Four
color
buttons
red, green, yellow, and blue from left to right. By
pressing these buttons, you can enter relative
pages fastly which is indicated in the last row of
current teletext page
Some page attach sub-page, press this button
22
SUBPAGE
23
HOLD
Toggle hold on or off for current display page.
24
INDEX
Request index page.
25
SIZE
Change teletext display size.
26
FREEZE
27
SLEEP
28
SOURCE
8
to view sub page
Press this key to freeze current frame from
the screen.
Activates the sleep timer.
Press this key to display the video source
selection menu.
Inputs and Outputs
Your LCD TV has five types of video connections. You should capitalize on the best connection
available
from
your
LCD
TV
to
get
the
best display quality. For example, if you have a
progressive DVD player that supports a component video connection, you should connect the DVD player
to your LCD TV using component video
connections
instead
of composite video or S-video
connections.
Available Interface
Description
1 Tuner
2 SCART1 input
75ohm
Full SCART
3 SCART2 input
Half SCART
Recommended Devices
4 HDMI1
HDTV,Set-top Box, Progressive HD DVD
Player.
5 HDMI2
HDTV,Set-top Box, Progressive HD DVD
Player.
6 PC and Audio input
7 AV Inputs
Contains
S-video,
composite
video, a pair of R/L audio inputs.
8 Component input
Inputs
Definition
Component support both High
programs
720p/1080i)
and
standard definition programs (480i/ 480p)
9
Description of Operation
1. Power on/off
After power is connected, press power on/off button, and the power indicator will be on; if the
indicator is red, it indicates that the TV set is in the standby state. Press “Power” button on the
remote control, and the power indicator will turn green, so the TV set is on. Please disconnect
power supply before leaving the TV out of use for an extended period of time.
Note:
(1) In the TV signal mode, when there is no signal for 5 minutes or more, the TV set will
automatically access the standby state. If restart is required, please press “power” button or CH
“▼/▲” button on the remote control.
(2) Try not to repeat switching on/off the unit repeatedly within a short time.
2. Input switching
Press “Source” button to select the input signal with the switching sequence as
TV -- SCART1 – SCART2
AV
Component
HDMI1— HDMI2
PC
3. Volume control
Press the functional buttons on the panel or “VOL+ or VOL-” button on the remote control to
increase or decrease Volume. The volume control menu will be displayed on the screen.
4. Mute
Press “Mute” button on the remote control to switch off sound, and the mute mark will be
displayed on the screen; press “MUTE” button or VOL+, VOL- button once again to cancel mute.
5. Screen display of input signals
Press “DISPLAY” button on the remote control, and the current input signals will be displayed
on the screen. In several seconds, such display information will disappear automatically.
10
6. Sleep timer
Press “SLEEP” button on the remote control to be able to set the waiting time for the TV set to
automatically turn to the standby state. The current sleep time will be displayed on the screen (unit:
minute); to repeatedly press “SLEEP” button, you can select different times, with the switching
sequence as:
Off – 10 - 20- 30 – 40 – 50 – 60 – 70 – 80 – 90 – 100 – 110 - 120;
7. Operation menu
By using “MENU”, “► / ◄” or “▼/▲” button on the remote control or on the panel of the
host, you can regulate and set picture, sound, setup, search or PC signals. For details, please refer
to:
Menu operation:
(1) Selection and function operation of the setup menu
Press MENU button and the main menu will be displayed on the screen.
Press ► or ◄ until SETUP menu appears.
11
Press ▼/▲ to be able to select submenus (Yellow indicating right selection) on the SETUP
Menu. After you select the submenu, press ► / ◄ button once again to be able to regulate
different functions under this menu. For specific function adjustment, see the table below:
►/◄
Submenu option
Language
Aspect
Prompt
Set menu language
Full screen – Full scene -- Zoom1 -Zoom2 – Standard
3D NR
Off
TTX Language
West
L
M
Europe-
H
Please note that this operation
will be invalid in the PC signal
mode
East
Select the teletext language
Europe-Russia-Arabic
Scart2 Input
CVBS – Y/C
All Reset
Restored to the factory default
state
Press MENU button to be able to quit the current menu.
(2) Selection and function operation of the picture menu (Picture)
Press MENU button and the picture menu (Picture) will appear
Press ▼/▲button to be able to select the submenus (Yellow indicates the right selection) in
the picture menu. After the right submenu is selected, press ► / ◄ button once again to be able
to regulate different functions under this menu. For specific adjustments, refer to the table
below:
12
◄
Submenu
options
►
Prompt
Brightness
Pictures become dim as a
whole
Pictures become bright as
a whole
Contrast
Reduce contrast between
brightness and dimness
Increase contrast between
brightness and dimness
Color
Colors become weaker
Colors become stronger
Tint
Increase red and reduce
green
Increase green and reduce
red
Only adjustable when it is
NTSC in the signal system
Sharpness
Soft
Sharp
Normally set in the middle
position, functioning as to
be softer pictures by
reducing values or to be
clearer
pictures
by
increasing values.
Color
temp
Cold – Warm – Standard
Press MENU button to be able to exit the current menu.
(3) Selection and function operation of the sound menu (Sound)
Press MENU button, and the picture menu (Picture) will appear
Press ► /◄ until the sound menu (Sound) appears.
13
Press ▼/ ▲ to be able to select the submenus (Yellow indicates the right selection) in the
sound menu. After the right selection of the submenu, press ► / ◄ once again.
To press this button, you will be able to regulate different functions under this menu. For
specific adjustment of functions, refer to the table below:
Submenu
options
◄
►
Volume
Reduce the volume
Increase the volume
Bass
Reduce the bass volume
Increase the bass volume
Treble
Reduce the treble volume
Increase the treble volume
Balance
To regulate the balance between the right and left speakers
Surround
To be able to select the surrounded effect of sound fields
AVL
To automatically turn on/off volume
Equalizer
To access the equalizer menu (For details, see the figure below)
Press MENU button to exit the current menu.
14
Prompt
(4) Selection and function operation of Tune menu
Press MENU button, and the picture (Picture) menu appears
Press ► /◄ until the Tune menu (Tune) appears.
Press ▼/ ▲ to be able to select the submenus (Yellow indicates the right selection) on the
Tune menu (TUNE). After the right submenu is selected, press ► / ◄ once again.
To press this button, you will be able to adjust different functions under this menu. For the
adjustment of specific functions, refer to the table below:
Submenu options
►/◄
MENU
Channel
To decrease or increase frequency numbers
Skip
To turn on/off frequency skip
Band
To select bands: VHF L
Fine tune
For fine tuning from low/high
Manual Scan
Drop/rise in frequencies
To stop manual scan
Auto Scan
To start automatic scanning from current
channel position
To stop automatic
scan
Swap to
To set frequency swap (For details, see the
figure below)
VHF H — UHF
15
Prompt
For example: If you want to swap between Channel 8 and Channel 12, the specific operations
are as follows:
a. First select “SWAP to” submenu according to the following steps
,
b. Press ► / ◄ button and the above Channel swap menu will appear.
Press ▼/▲button to select “Src Channel ” (Yellow indicates the right selection) in the
menu, and then press ► / ◄ button until the Channel number on the right skips to “8”;
Press ▼/▲button once again to select “ Tag Channel ” in the menu, and then press ► / ◄
button until the Channel number on the right skips to “12”.
c. Finally, press ▼/▲button to select the “ Exchange ” submenu. Then press ► / ◄ again to
complete the swap between Channel 8 and Channel 12.
(5) Selection and function operation of PC Menu (PC Setup)
(Please note: To select the PC Menu, you will have to ensure that the current signal mode is PC)
Press “MENU” button, and the picture menu (Picture) will appear
Press ► /◄ until the PC menu (PC) appears
Press ▼/ ▲ button to be able to select submenus in the PC Menu (PC) (Yellow indicates
the right selection). After the right submenu is selected, press ► / ◄ button once again to be
able to adjust different functions under this menu. For the adjustment of specific functions,
refer to the table below:
16
◄
Submenu
options
►
Auto Adjust
To automatically set up the positions of pictures
H-Position
To adjust the horizontal positions of pictures to move
left/right
V-Position
The vertical pictures move up/down
Phase
To adjust phases
Clock
To adjust the clock
Prompt
8. Picture mode
Press “PIC.MODE” picture mode button on the remote control to be able to select from
different picture modes, at the sequence of soft – Standard – Vivid – User – PC. (Note: The “PC”
mode functions only when the signal source is selected at PC).
9. Sound system,
Press “ SOUND.SYS ” button on the remote control to be able to adjust the sound system:
M BG DK I.
10. Picture Freeze
Press “ Freeze ” button on the remote control to still the picture when you want.
11. Fast review
While watching TV, press “ RECALL ” button on the remote control to be able to return to the
TV program you previously watched. If you select no other program after the unit is switched on, it
will be invalid to press this button.
12. Mono/Stereo/NICAM select
Depending on the particular program being broadcast, Press “I/II” button you can listen to
Mono/Stereo/NICAM/A2 sound mode.
17
13. Teletext control buttons
Below is a guide to the functions of the remote control teletext buttons
(1). Teletext ON/OFF control
To view teletext press “ON/OFF” button .Press again to return to normal broadcast
viewing .Program can not be changed until teletext is cancelled.
(2). Teletext INDEX page display control
Press “ INDEX ” to return to the index/initial page.
(3). Teletext MIX page display control
Press “ MIX ” to superimpose teletext over a normal broadcast picture. Press again to return
to normal TV viewing.
(4). Reveal concealed text in the Teletext page
Press “ Reveal ” to To discover the solutions on quiz and joke pages.
(5). Hold a wanted page
At times it is convenient to hold a page of text. Press “ HOLD ” and the page will be held
on screen until the button is pressed again.
(6). To enlarge the teletext display size
Press “SIZE” once to enlarge the top half of the page, press again to enlarge the bottom half
of the page. Press again to revert to normal size.
(7). Red / Green / Yellow / Blue buttons
In FASTEXT or TOP mode these correspond to the differently coloured subjects.In List mode
they correspond to the differently coloured page numbers.
(8). Page Numbers Up and Down
The “▼/▲” button are used to move to higher or lower page numbers.
(9). Page Number buttons
The “ 0 – 9 ” digit buttons allow you to directly enter the page number that you want to view.
(10). SubPage button
Press SUBPAGE button.Enter directly the subpage number you want with the remote control
NUMBER 0...9 buttons : for example to enter the 2nd page, sequence 0002.
(11). Update buttons
Press UPDATE button. Then TV programme appears on screen and the teletext symbol
appears at the top of the screen. When teletext programme will be updated, concerned page
number appears on screen. Note that TV programme cannot be changed with UPDATE button
activated. Pressing the UPDATE button again, the teletext page appears with the updated
information
18
General Specifications
LCD Panel
Input/Output
Audio
Compatibility
Compatibility
Screen Size
26" / 32” / 37” / 42” diagonal
Resolution
WXGA (H) 1366 X (V) 768pixels
Display Color
16, 777, 216 Color
Aspect Ratio
16 9 WIDE
Video in
1 Vp-p/75
Y / Pb/Cb / Pr/Cr
Y 1 Vp-p/75
SCART in
SCART X 2 (SCART1:Full; SCART2: CVBS + YC)
RGB Video + Audio in
VGA X 1 + Phone Jack X 1
HDMI in
HDMI X 2
Antenna input
75
Built-in speaker
8W X 2
Color Temperature
Normal/Warm/Cool
Progressive Scan
Yes
3-2 pull down
Yes
Color system
PAL, NTSC, SECAM
SDTV/HDTV
480i, 480p, 576i, 576p, 1080i, 720p
PC
VGA/SVGA/XGA
Operative temperature
32°F ~ +105°F
Storage temperature
14°F ~ +120° F
, L/R Audio 20K
, Cb/Pb / Cr/Pr 1±0.3 Vp-p/75
19
, L/R Audio
Specifications for different size and crust
26”
Power
AC 100~240V, 130W
*1 (W) 27.56 X (D) 8.50 X (H) 22.13 inch (with speaker/stand)
Dimension
*2 (W) 27.56 X (D) 8.31 X (H) 24.20 inch (with speaker/stand)
*3 (W) 27.56 X (D) 8.31 X (H) 24.20 inch (with speaker/stand)
*1 14.0kg
Net Weight
*2 15.0kg
*3 15.0kg
*1
*2
*3
20
32”
Power
AC 100~240V, 190W
*1 (W) 32.32 X (D)
9.45 X (H) 24.49 inch (with speaker/stand)
*2 (W) 32.32 X (D) 10.43 X (H) 24.70 inch (with speaker/stand)
Dimension
*3 (W) 32.32 X (D) 10.43 X (H) 24.60 inch (with speaker/stand)
*4 (W) 40.31 X (D) 10.43 X (H) 23.39 inch (with speaker/stand)
*5 (W) 40.31 X (D) 10.43 X (H) 23.39 inch (with speaker/stand)
*1 17.5kg
*2 18.0kg
Net Weight
*3 18.0kg
*4 19.0kg
*5 19.0kg
*1
*2
*3
*4
*5
21
37”
Power
AC 100~240V, 220W
*1 (W) 37.32 X (D)
Dimension
9.45 X (H) 27.28 inch (with speaker/stand)
*2 (W) 37.32 X (D) 10.61 X (H) 29.80 inch (with speaker/stand)
*3 (W) 37.32 X (D) 10.61 X (H) 29.80 inch (with speaker/stand)
*1 25.8kg
Net Weight
*2 25.5kg
*3 25.5kg
*1
*2
*3
42”
Power
AC 100~240V, 260W
*1 (W) 40.25 X (D) 10.30 X (H) 29.30 inch (with speaker/stand)
Dimension
*2 (W) 42.05 X (D) 12.20 X (H) 31.61 inch (with speaker/stand)
*1 28.0kg
Net Weight
*2 27.0kg
*1
*2
22
RGB Frequency Table
The table below shows the frequency ranges supported by the LCD TV. It supports from
VGA to XGA.If you are connecting your PC to the LCD TV via the RGB port, please use the following table in
order to setup your PC’s VGA output for maximum optimization.
Source
Resolution
Vertical Frequency
HDMI input
480i / P
60
576i / P
50
1080i
50 / 60
720p
50 / 60
Component
480i / P
60
(Y/PbCb/PrCr)
576i / p
60
1080i
50 / 60
720p
50 / 60
59.94
72.81
640 x 480
75.00
85.01
56.25
60.32
70.10
800 x 600
72.19
PC input
75.00
85.06
60.00
70.07
1024 x 768
75.03
85.00
1280 x 768
60.00
1360 x 768
60.00
23