1
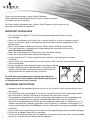
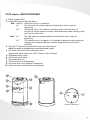
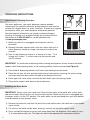
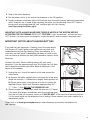
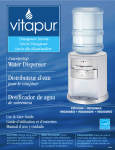
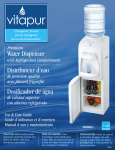
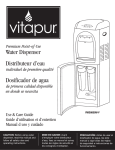
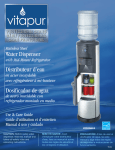
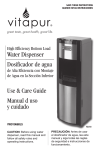
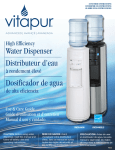
save These Instructions
Conserver ces instructionS
guarde estas instrucciones
Designer Series
Série Designer
Serie de diseñador
Countertop
Water Dispenser
Distributeur d’eau
pour le comptoir
Dosificador de agua
de sobremesa
Use & Care Guide
Guide d’utilisation et d’entretien
Manual d uso y cuidado
CAUTION: Before using water
dispenser, read this manual and follow all safety rules and operating instructions.
VWD2636W-1 • VWD2636BLK-1
VWD2636RED-1
MISE EN GARDE: Avant
d'employer votre distributeur
d'eau, lisez ce manuel et suivez
toutes les règles de sécurité et
les consignes d'utilisation.
PRECAUCIÓN: Antes de usar el
dosificador de agua, lea este
manual y siga todas las reglas
de seguridad e instrucciones de
funcionamiento.
REV00
Thank you for purchasing a vitapur® Water Dispenser.
Please read the enclosed operating instructions carefully and retain
this booklet for future reference.
We have carefully engineered your vitapur® Water Dispenser to give you years of
enjoyment and trouble free operation.
IMPORTANT SAFEGUARDS
• For use with 3 or 5 gallon (12 or 19 liter) water bottles and most filtration systems,
(not included).
• Never use this dispenser with water that is unsafe to drink or is from an unknown source.
• Never use any other liquid in the dispenser other than known and microbiologically safe
bottled water.
• Never allow children to dispense hot water without proper and direct supervision.
• This water dispenser is equipped with a grounded power cord plug for your safety
(see G
rounding Instructions).
• Keep your water dispenser in a dry place away from direct sunlight.
• Never put anything flammable close to the dispenser.
• Leave a minimum of 2” (5 cm) around the back and sides of the dispenser for proper
ventilation.
• Always install your water dispenser on a level counter. Wait 3 minutes before restarting machine
after shutting down.
• Always unplug the water dispenser before servicing or cleaning.
• Regular cleaning of your water dispenser is required for your
warranty. Please follow cleaning instructions outlined in this
manual and clean the dispenser every 4 months.
o avoid water overflowing when cleaning your dispenser,
T
always remove the bottle support collar before pouring water
or cleaning solution into the reservoir.
GROUNDING INSTRUCTIONS
1
• Improper use of the grounding plug can result in a risk of electric shock causing serious injury,
even death.
• This appliance must be grounded. In the event of an electrical short circuit, grounding reduces
the risk of electric shock by providing an escape wire for the electric current.
• This appliance is equipped with a power cord having a grounding wire with a grounding plug
and must be connected into a properly grounded polarized outlet. Consult a qualified
electrician if the grounding instructions are not completely understood, or if doubt exists as to
whether the appliance is properly grounded. If the wall outlet is a standard 2 prong outlet, it is
your personal responsibility and obligation to have it replaced with a properly grounded 3-prong
wall outlet.
• Do not under any circumstances cut or remove the third (ground) prong from the power cord plug.
• Do not use an adapter plug with this appliance.
• Do not use an extension cord with this appliance. If the power cord is too short, have a qualified
electrician install an electrical outlet near the appliance.
YOUR vitapur® WATER DISPENSER
1. Bottle support collar
2. Ready-To-Dispense indicator lights:
Red: “flashing” Heater (hot tank) is in operation
"on”
The hot water has reached optimum temperature and is ready for
dispensing
"off"
Heater (hot tank) is off, however remaining water within the tank still
may be hot, always exercise caution when dispensing and/or draining water
from the hot water tank.
Blue: "on"
The cold water has reached optimum temperature and is ready for
dispensing
"off"
The cooling cycle is in progress, it is possible to dispense water during the
cooling cycle, however, optimum cooling temperature may not yet be
achieved.
3. Insta-HOT* Feature (on demand hot water) activation button
NOTE: This button is designed to be recessed inside the cabinet.
4. Hot water push button (also dispenses room
temperature water when Insta-HOT* Feature is not activated)
5. Childproof safety switch
6. Cold water push button
7. Removable drip tray
8. Power switch (rear of dispenser)
9. Hot water drain valve (bottom of dispenser)
10. Cold water drain valve (bottom of dispenser)
1
3
4
8
2
6
5
9
7
10
bottom of dispenser
2
OPERATING INSTRUCTIONS
Initial Product Cleaning Procedure
Like most appliances, your water dispenser requires periodic
maintenance for maximum efficiency and performance and must be
cleaned on a regular basis (i.e. every 4 months). To maintain a hygienic
environment within your water dispenser and prevent potential
formation (growth) of bacteria, we strongly recommend regular
cleaning. A cleaning kit is available through our Customer Service
Department at 1-866-253-0447 or can be ordered on line
at www.greenwayhp.com.
Figure A
Cleaning Kit
1. Make sure the unit is unplugged and the power switch is
turned off.
2. Remove the bottle support collar, saturate a clean cloth with a
water dispenser cleaner or vinegar and wipe the inside of the reservoir.
3. Pour a water dispenser cleaner or a mixture of 4 cups / 1L of vinegar with 4 cups / 1L of hot water into the reservoir and
wait 20 minutes.
Available online at
www.greenwayhp.com
IMPORTANT: To avoid water overflowing while cleaning the dispenser, always remove the bottle
support collar before pouring water or the cleaning solution into the reservoir (see Figure A).
4. Press/hold all dispensing buttons until water stops flowing from the faucet.
5. Place the unit over the sink and drain both internal reservoirs by removing the spring clamps
and caps from both drain outlets located on the bottom of the unit.
6. Rinse again with clean water, re-install the drain outlet caps and spring clamps.
7. Place bottle support collar back on top of dispenser.
Installing the Water Bottle
IMPORTANT: Always wash your hands first! Clean the top (neck) of the bottle with a clean cloth
and do not touch the part of the unit that the water touches. Make sure the unit is unplugged and
the power switch is in the OFF position. The water bottle can be purchased from your local bottled
water distributor or most grocery stores.
1. Remove the protective cap from the end of the water bottle unless the bottle has a puncturable
cap or sticker.
2. Lift and turn the bottle upside down, placing it securely on the bottle support collar.
3. Press and hold all dispenser buttons until water flows from the dispenser. Drain about 4 cups / 1L of water before initial use. This does not need to be repeated with replacement bottles.
3
4. Plug in the water dispenser.
5. Set the power switch at the rear of the dispenser to the ON position.
6. Ready-to-dispense indicator lights will illuminate when the water reaches optimum temperature
and is ready for use. In order to get steaming hot water, the (on demand) Insta-HOT* feature
button must be activated and the "red" indicator light will start flashing
(see Dispensing Hot Water, pg 5).
IMPORTANT NOTE: Always make sure there is water in the system before
activating the on demand Insta-HOT* feature. If you "accidentally" activate the InstaHOT* feature, you must cancel the program, simply disconnect and re-connect the power cord.
IMPORTANT NOTICE ABout leaking bottles
If you find that your dispenser is leaking, check the water bottle
first! Almost all 3 and 5 gallon water bottles are recycled, and
handled extensively during cleaning, filling, and shipping. As a
result they are very prone to developing pin holes or small cracks
that can cause an overflow (or leak) when placed on top of a water
dispenser.
In almost all cases, there is nothing wrong with your water
dispenser. If you are experiencing a leak, this simple test will allow
you to determine whether your water bottle or dispenser is the
source of the problem.
1.
2.a
1.Unplug the unit, turn off the power switch and remove the
water bottle.
2. a)Remove the bottle support collar and check the water level
inside the reservoir – it should be at roughly three-quarters full.
b) Please add or drain a few glasses of water to achieve the
required fill level. Water level should be approximately 3/4” –
1” / 1.9cm - 2.5cm below the reservoir lip.
3.
2.b
Reservoir Lip
Water Level
Closely monitor the water level inside the reservoir, (1-2 hours)
if the water level drops, immediately drain the remaining water
from the unit and call customer service at 1-866-253-0447. If the water level remains constant
it is the water bottle not the dispenser that is leaking. Please contact your water supplier for a
replacement bottle.
Please visit us at www.greenwayhp.com for water dispenser accessories and helpful use
and care tips.
4
Dispensing Room and Cold Water
Place a glass under the spigot. For cold water, press the
button downward until the desired
amount of water is dispensed. Before the Insta-HOT* Feature is activated, the
button
dispenses room temperature water. To dispense room water, press the
button downward until
the desired amount of water is dispensed (for hot water, see Dispensing Hot Water).
Temperature Setting
The water temperatures (hot and cold) are factory set and cannot be adjusted.
Dispensing Hot Water
NOTE: The Insta-HOT* feature button is designed to be recessed inside the cabinet.
The hot water (Insta-HOT* feature) dispensing system on this unit is designed to save energy and
money. Conventional hot water dispensing systems operate 24/7 regardless of water usage. The (on
demand) Insta-HOT* feature activates the hot water system "only" when the Insta-HOT* feature
button is activated delivering steaming hot water in less than 3 minutes.
To dispense hot water, first press the Insta-HOT* Feature activation button. The red indicator light
will begin flashing to indicate that the water heater is active. In approximately 3 minutes the set
temperature point will be reached and the red light will stop flashing and remain on. The water is
now ready to be dispensed; press down on the
button until the desired amount of water is
dispensed, then release the button. If water is not immediately dispensed, the water will begin to
cool and the red light will shut off, requiring you to initiate another cycle.
Child Resistant Safety Switch
To prevent hot water from accidentally harming a child, the hot
water dispenser button has a safety switch on it. Slide the switch
to the left and push the button down to dispense hot water.
DANGER: The hot water is heated to approximately 201˚F / 91˚C.
Temperatures above 125˚F / 52˚C can cause severe burns from
scalding. DO NOT ALLOW CHILDREN TO USE THE HOT WATER
DISPENSING BUTTON WITHOUT PROPER AND DIRECT
SUPERVISION.
Child Resistant
Safety Switch
CLEANING AND MAINTENANCE
Like most appliances, your water dispenser requires periodic maintenance for maximum efficiency
and performance and must be cleaned on a regular basis (i.e. every 4 months). To maintain a
hygienic environment within your water dispenser and prevent potential formation (growth) of
bacteria, we strongly recommend regular cleaning. A cleaning kit is available through our Customer
Service Department at 1-866-253-0447 or can be ordered on line at www.greenwayhp.com.
5
Cleaning Your Water Dispenser
IMPORTANT: Make sure you turn the power switch to the OFF position and unplug the dispenser
before performing any of the following cleaning procedures.
Cleaning the Outside of the Water Dispenser
The outside of the dispenser can be wiped clean with a water dispenser cleaning solution or a mild
soap and water mixture. Never use harsh chemicals or abrasive cleaners. Rinse thoroughly with
clean water and then dry surfaces.
Cleaning the Drip Tray
To remove, take the grill off the tray and firmly lift the tray up,
dislodging it from the guides. Drain and clean.
The drip tray should be emptied and cleaned regularly to remove
spotting and any mineral deposits. Clean with a water dispenser
cleaning solution or a mild soap and water mixture. For tough deposits,
add vinegar and let it soak until the deposits come loose. Then wash,
rinse and dry thoroughly (not dishwasher safe).
To replace, put the grill back on the tray and slide the tray onto the guides.
Draining the Reservoirs
bottom of dispenser
Drain the reservoirs before and after cleaning, when going on long
vacations or if not using the dispenser for long periods of time.
IMPORTANT! Turn the power switch to the OFF position and
unplug the dispenser before performing this procedure. Dispense
hot water until temperature drops to a safe level to avoid the risk of
scalding.
Hot
Cool
1. Remove the water bottle.
2. Press/hold all dispensing buttons until water stops flowing from
the faucet.
3. Place the unit over the sink and drain both internal reservoirs by
removing the spring clamps and caps from both drain outlets
located on the bottom of the unit.
4. When the water completely stops flowing, replace the drain
caps and spring clamps.
IMPORTANT: Drain the water into a container and/or sink,
not the drip tray.
6
Cleaning the Inside of the Dispenser
Like most appliances, your water dispenser requires periodic
maintenance for maximum efficiency and performance and must be
cleaned on a regular basis (i.e. every 4 months). To maintain a
hygienic environment within your water dispenser and prevent
potential formation (growth) of bacteria, we strongly recommend
regular cleaning. A cleaning kit is available through our Customer
Service Department at 1-866-253-0447 or can be ordered on line at
www.greenwayhp.com.
Cleaning Kit
Available online at
www.greenwayhp.com
1. Make sure the power switch is in the OFF position.
2. Remove the water bottle and bottle support collar.
3. Drain the reservoirs (see Draining the Reservoirs, pg 6).
4. Pour a water dispenser cleaner or a mixture of 4 cups / 1L of
vinegar with 4 cups / 1L of hot water into the reservoir and wait
20 minutes. If using a water dispenser cleaning solution, please
follow the manufacturer's instructions.
IMPORTANT: To avoid water overflow while cleaning dispenser, always remove the bottle support
collar before pouring water or cleaning solution into the reservoir (see Figure A, pg 3).
5. Press/hold all dispensing buttons until water stops flowing from the faucet.
6. Drain the reservoirs.
IMPORTANT: Drain the water into a container and/or sink, not the drip tray.
7. Rinse with clean water.
8. Replace the bottle support collar and the water bottle (see Installing the Water Bottle, pg 3).
IMPORTANT: Drain approximately 4 glasses of water from each button before initial use. This does
not need to be done with replacement bottles.
Going Away on Vacation
When not using the dispenser for long periods of time or when going on vacation, conserve energy
by setting the power switch to the OFF position, unplug the dispenser and drain the reservoirs (see
Draining the Reservoirs, pg 6). Follow Initial Product Cleaning Procedures upon return and startup
of the dispenser.
7
SPECIFICATIONS
VWD2636-1
Output per hr:
Hot
Cool
0.1 gal / 0.4 L
Internal Tank Capacity:
Hot
0.16 gal / 0.6 L
Cool
0.2 gal / 0.8 L
Heating Temp (approx.):
201°F / 91°C
Cooling Temp (approx.):
Power Consumption (Watts):
Power Consumption (Amps):
WARNING: The Water Dispenser heats
and dispenses water to 201˚ F / 91˚ C
which can cause severe burns or
scalding.
1.3 gal / 5.0 L
42.8°F - 46.4°F / 6°C - 8°C
Hot
1200 W
Cool
65 W
Hot
10.5 A
Cool
1A
Voltage
DO NOT ALLOW CHILDREN TO USE
THE HOT WATER DISPENSING
BUTTON WITHOUT PROPER AND
DIRECT SUPERVISION.
Child Resistant
Safety Switch
120 V
TROUBLESHOOTING TIPS
Problem
Possible Cause
Suggested Solution
Water dispenser
is leaking
Small pin hole or crack in the bottle, (common with
recycled water bottles).
Conduct water bottle leak test outlined
on page 4.
Ensure drain caps are secure.
Drain by pressing dispenser buttons.
Drain caps are not secure.
Water was poured directly into bottle support collar
and overflowed.
Water is not hot
or cold enough
Possible air pocket.
Press several times to relieve air pocket and release
to re-set valve.
All the water in the tank has been used.
Replace with full bottle and wait; 60 minutes for water
to cool, 3 minutes for water to heat (after activating
Insta-HOT* feature button).
The unit is unplugged.
Plug it into the outlet.
Insta-HOT* Feature was not activated.
Activate Insta-HOT* Feature by pressing the button.
The circuit breaker in your home is tripped or the fuse Reset the breaker or replace the fuse.
has blown.
Water dispenser
is not dispensing
water
Water dispenser
is noisy
Empty water bottle.
Replace with full bottle and wait; 60 minutes for water
to cool, 3 minutes for water to heat (after activating
Insta-HOT* feature button).
Mineral deposits clogging tanks.
See Cleaning the Inside of the Dispenser.
Possible air pocket.
Push down on the dispenser buttons to prime the
unit.
Bottle making a gurgling noise as it fills the tank.
This is normal.
Water dispenser is uneven.
Make sure the dispenser is on an even surface that
can support its full weight.
Attention: Do not return this product to the store. For questions on operation, assembly or parts,
please contact us at www.greenwayhp.com or 1-866-253-0447.
8
Frequently Asked Questions
Q: Why is my water dispenser leaking?
A: Many times a leak is caused by a defective water bottle with a small crack or pinhole
(see Important Notice About Leaking Bottles, pg 4).
IMPORTANT: To avoid water overflow while cleaning the dispenser, always remove the bottle support collar before pouring water or cleaning solution into the reservoir (see Figure A, pg 3).
Q: Why is my water not cold?
A: The cooling of the countertop, multi-fin semi-conductor dispenser is factory set and cannot be adjusted. Multi-fin semi-conductor fan cooling technology is designed to chill water to 6˚C / 43˚F at approximately 2-4 glasses per hour. Due to the cooling technology incorporated in these units, multi-fin semi-conductor units are designed for 1-2 person usage only.
Q: Why do I get a plastic taste from my dispenser?
A:As with most new appliances such as coffee makers and kettle's, there is often a plastic taste
upon initial start-up of the unit. To remove this taste, simply follow the cleaning instructions out
lined in Cleaning the Inside of the Dispenser on page 7.
Q: What is the spike that goes into the bottle?
A: vitapur® water dispensers feature a “piercing valve” as part of the bottle support collar, providing
added convenience for water bottle installation. Depending on the water bottle supplier, some
water bottles incorporate a self-piercing membrane in the bottle cap for this specific purpose (ask
your water bottle supplier if your water bottle incorporates this feature). If your water bottle does
not incorporate this feature, the entire bottle cap must then be removed to eliminate possible
damage to the piercing valve.
9