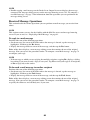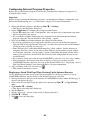
1
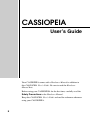
CASSIOPEIA
User’s Guide
Your CASSIOPEIA comes with a Hardware Manual in addition to
this CASSIOPEIA User’s Guide. Be sure to read the Hardware
Manual first.
Before using your CASSIOPEIA for the first time, carefully read the
Safety Precautions in the Hardware Manual.
Keep this CASSIOPEIA User’s Guide on hand for reference whenever
using your CASSIOPEIA.
E
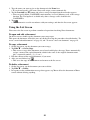
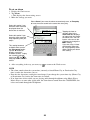
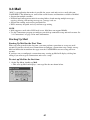
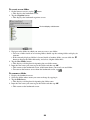
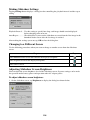
Resetting the CASSIOPEIA
If your CASSIOPEIA responds slowly, stops responding as expected, or “freezes,” try
resetting it. A reset causes the CASSIOPEIA to restart and re-adjust memory allocation.
Unsaved data in open windows may be lost.
To reset the CASSIOPEIA, use the stylus to press and hold the Reset button for about two
seconds.
• CASIO COMPUTER CO., LTD. assumes no responsibility for any damage or loss resulting
from the use of this manual.
• CASIO COMPUTER CO., LTD. assumes no responsibility for any loss or claims by third
parties that may arise through the use of this product.
• CASIO COMPUTER CO., LTD. assumes no responsibility for any damage or loss caused by
deletion of data as a result of malfunction, repairs, or battery replacement. Be sure to back up
all important data on other media to protect against its loss.
• Data can be uploaded from this unit to a computer for storage on a hard disk, floppy diskette, or
other storage medium. Be sure to make multiple copies of all important data to protect against
its accidental loss.
• The contents of this manual are subject to change without notice.
• No part of this manual may be reproduced in any form without the express written consent of
the manufacturer.
• Sample displays shown in this manual may differ somewhat from the displays actually
produced by the product.
• Specifications, peripherals, and other items can change suddenly to meet market needs. Such
changes can cause the contents of this manual to become inaccurate.
©2001 CASIO COMPUTER CO., LTD. All rights reserved.
Copyright Information
• Microsoft, Outlook, Windows, Windows NT, and the Windows logo are either registered
trademarks or trademarks of Microsoft Corporation in the United States and/or other countries.
Microsoft products are licensed to OEMs by Microsoft Licensing, Inc., a wholly owned
subsidiary of Microsoft Corporation.
• PC Connect uses Intellisync for CASSIOPEIA.
• Intellisync for CASSIOPEIA is trademark of Pumatech, Inc.
• All other product and company names mentioned herein may be the trademarks of their
respective owners.
2
Contents
Chapter 1 Getting Started ...................................................... 8
1-1 Starting Up Your CASSIOPEIA .................................................................. 8
To start up your CASSIOPEIA ............................................................. 8
1-2 Programs ...................................................................................................... 9
Starting Up Programs Using the Icon Menu ....................................... 10
1-3 Top Menu ................................................................................................... 11
To start up a program from the Top Menu .......................................... 11
Uninstalling Programs ......................................................................... 11
Assigning a Program to the Icon Menu ............................................... 12
1-4 Common Program Operations ................................................................... 13
System Tray ......................................................................................... 13
Using the Command Bar ..................................................................... 14
1-5 Inputting Text ............................................................................................. 15
Switching Between Input Panels ......................................................... 15
Typing with the Keyboard ................................................................... 16
Writing with Character Recognizer ..................................................... 17
1-6 Notes .......................................................................................................... 17
Creating a New Freehand Document .................................................. 18
Creating a New Text Document .......................................................... 19
Creating a New E-mail Message Using a Text Document .................. 20
Naming a Document ............................................................................ 20
Using the List Screen .......................................................................... 21
Renaming and Moving Documents ..................................................... 22
1-7 Using Clock ............................................................................................... 23
Setting the Clock ................................................................................. 23
Specifying the Date and Time Formats ............................................... 26
1-8 Using Calculator ........................................................................................ 27
Key Functions ...................................................................................... 27
Using the COPY Key .......................................................................... 28
Exiting Calculator ............................................................................... 28
About Calculation Errors .................................................................... 28
Calculation Examples .......................................................................... 29
Chapter 2 Using the PIM Programs ...................................... 30
2-1 What is a PIM program? ............................................................................ 30
PIM Program Data Synchronization ................................................... 30
2-2 Calendar ..................................................................................................... 31
2-2-1 Inputting Calendar data .................................................................... 31
Inputting New Calendar data ............................................................... 31
Editing a Repeat Pattern ...................................................................... 33
Editing Appointments .......................................................................... 34
Transferring Calendar Data to Another Program ................................ 35
3
2-2-2 Viewing Calendar data ..................................................................... 36
Daily View ........................................................................................... 36
Weekly View ........................................................................................ 37
3-Month View ...................................................................................... 39
2-2-3 Making Calendar Settings ................................................................ 40
Coloring a Date ................................................................................... 40
Setting a Reminder Alarm ................................................................... 42
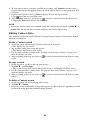
2-3 Contacts ..................................................................................................... 43
2-3-1 Inputting Contacts Data ................................................................... 43
Inputting New Data ............................................................................. 43
Editing Contacts Data .......................................................................... 44
2-3-2 Viewing Contacts Data ..................................................................... 45
List Screen ........................................................................................... 45
Changing the List Screen Fields .......................................................... 45
Data Screen ......................................................................................... 47
Searching for Data ............................................................................... 47
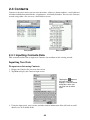
2-4 Tasks .......................................................................................................... 49
Working with Tasks ............................................................................. 49
Transferring Tasks Data to Another Program ...................................... 51
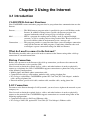
Chapter 3 Using the Internet ................................................ 53
3-1 Introduction ............................................................................................... 53
CASSIOPEIA Internet Functions ........................................................ 53
What do I need to connect to the Internet? .......................................... 53
Dial-up Connection ............................................................................. 53
LAN Connection ................................................................................. 53
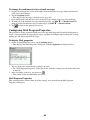
3-2 Connections ............................................................................................... 54
Communication Setups ....................................................................... 54
Dial-up Connection Setup ................................................................... 54
LAN Connection Setup ....................................................................... 54
Configuring a Dial-up Connection ...................................................... 55
Configuring a LAN Connection .......................................................... 63
Editing a Connection Setup ................................................................. 65
Copying a Connection Setup ............................................................... 65
Deleting a Connection Setup ............................................................... 66
3-3 Mail ............................................................................................................ 67
Starting Up Mail .................................................................................. 67
Using the Account/Folder List ............................................................ 69
Account/folder list ............................................................................... 69
Managing Accounts ............................................................................. 70
Sending and Receiving Mail ............................................................... 72
Creating an Outgoing Mail Message ................................................... 74
Using Phrase Memory ......................................................................... 78
Inputting Schedule Format Data Into a Mail Message ........................ 80
Displaying a Mail Message ................................................................. 81
Received Message Operations ............................................................. 82
Creating Folders and Managing Mail Messages ................................. 87
Configuring Mail Program Properties ................................................. 90
4
3-4 Internet ....................................................................................................... 93
Using the Browser Screen ................................................................... 93
Configuring Internet Program Properties ............................................ 95
Displaying a Web Page ........................................................................ 96
Using Bookmarks ................................................................................ 97
Managing Your Bookmarks ................................................................. 98
Saving a Web Page ............................................................................ 101
Managing Saved Pages ...................................................................... 102
Saving Web Page Graphic Elements ................................................. 103
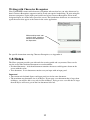
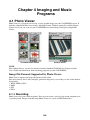
Chapter 4 Imaging and Music Programs ......................... 104
4-1 Photo Viewer ............................................................................................ 104
Image File Formats Supported by Photo Viewer ............................... 104
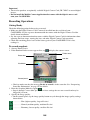
4-1-1 Recording ....................................................................................... 104
Recording Operations ........................................................................ 105
Adjusting Camera Screen Brightness ................................................ 108
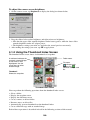
4-1-2 Using the Thumbnail Index Screen ................................................ 109
Selecting the Thumbnail Index Screen Folder .................................. 110
Refreshing a Thumbnail Index .......................................................... 110
Creating a Mail Message with an Attached Image ............................ 110
Changing to a Different Screen ......................................................... 111
4-1-3 Playing Back Images using Snapshot Screen ................................ 111
Displaying a Specific Snapshot ......................................................... 111
Using the Snapshot Screen ................................................................ 112
Changing the Snapshot Screen View ................................................. 113
Scrolling Images on the Snapshot Screen ......................................... 113
Displaying the File Properties of a Snapshot .................................... 113
Changing to a Different Screen ......................................................... 114
4-1-4 Playing Back Images using Slideshow Screen .............................. 114
Displaying the Slideshow Screen ...................................................... 114
Using the Slideshow Screen .............................................................. 115
Making Slideshow Settings ............................................................... 116
Changing to a Different Screen ......................................................... 116
Adjusting Slideshow Screen Brightness ............................................ 116
4-1-5 Folder and File Operations ............................................................. 117
Folder Operations .............................................................................. 117
File Operations .................................................................................. 118
4-2 Movie Player ............................................................................................ 119
4-2-1 Using the Movie Player Thumbnail Index Screen ......................... 119
Thumbnail Index Screen Operations ................................................. 120
Selecting the Thumbnail Index Screen Folder .................................. 120
Refreshing a Thumbnail Index .......................................................... 121
Creating a Mail Message with an Attached Movie ........................... 121
Thumbnail Index Screen Folder and File Operations ....................... 121
4-2-2 Using Movie Playback Screen ....................................................... 122
Playing Back Movies ........................................................................ 122
Controlling Playback Using CASSIOPEIA Buttons ......................... 123
Capturing a Still Image from a Movie .............................................. 124
5
Displaying the File Properties of a Movie ........................................ 124
Making Playback Speed and Repeat Settings ................................... 125
Adjusting Playback Screen Brightness ............................................. 125
4-3 Music Player ............................................................................................ 126
Playback Screen Operations .............................................................. 126
Controlling Playback Using CASSIOPEIA Buttons ......................... 127
Using Repeat ..................................................................................... 128
Turning Off the Display .................................................................... 128
Enabling Cursor Button Operation while the Display is off ............. 128
Using Background Playback ............................................................. 128
Play List Screen Operations .............................................................. 128
Chapter 5 Utilities ................................................................ 131
5-1 Backup ..................................................................................................... 131
Backing Up Data ............................................................................... 131
Restoring Data ................................................................................... 133
Deleting a Backup File ...................................................................... 134
5-2 File Manager ............................................................................................ 135
File Manager Screen and Basic Operation ........................................ 135
File and Folder Operations ................................................................ 135
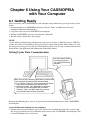
Chapter 6 Using Your CASSIOPEIA with Your Computer .. 138
6-1 Getting Ready .......................................................................................... 138
Setting Up for Data Communication ................................................. 138
Communication Properties ................................................................ 139
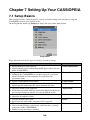
Chapter 7 Setting Up Your CASSIOPEIA ............................. 140
7-1 Setup Basics ............................................................................................. 140
Selecting a Setup Menu Item ............................................................ 141
7-2 Using the Setup Screens .......................................................................... 141
Owner Information ............................................................................ 141
Password ............................................................................................ 142
Color Scheme .................................................................................... 142
Brightness .......................................................................................... 143
Align Screen ...................................................................................... 144
Volume & Sounds .............................................................................. 145
Power ................................................................................................. 146
Memory ............................................................................................. 146
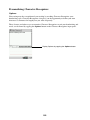
Appendix A: Character Recognizer ................................. 148
Start using Character Recognizer ...................................................... 149
Personalizing Character Recognizer ................................................. 152
Troubleshooting ................................................................................. 154
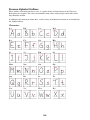
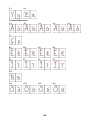
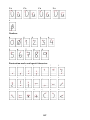
Decuma Alphabet Outlines ................................................................ 155
Appendix B: Troubleshooting ............................................. 159
Resetting the CASSIOPEIA .............................................................. 159
Batteries lose power .......................................................................... 159
If you forget your password .............................................................. 159
6
If you run out of CASSIOPEIA memory .......................................... 160
Screen freezes or responds slowly ..................................................... 160
Screen is blank .................................................................................. 161
Screen is dark .................................................................................... 161
Inaccurate response to stylus taps ..................................................... 161
Slow or no response .......................................................................... 161
Modem connection problems ............................................................ 161
Network connection problems .......................................................... 162
Cable and cradle connection problems .............................................. 162
Storage card error message ............................................................... 162
7
Chapter 1 Getting Started
1-1 Starting Up Your CASSIOPEIA
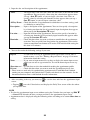
NOTE
When you start up your CASSIOPEIA for the first time, you must perform an Initial Setup
procedure to configure the system. See the separate Hardware Manual for details about the initial
setup procedure. The following assumes that you have already performed the initial setup
procedure for your CASSIOPEIA.
To start up your CASSIOPEIA
1. Open the CASSIOPEIA’s cover.
2. Press the power button.
• The screen that appears first is the one that was on the display when you last turned off your
CASSIOPEIA.
8
1-2 Programs
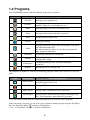
Your CASSIOPEIA comes with the following programs pre-installed.
Icon
Program Name
This is an program for:
Calendar
Managing your appointments
Contacts
Managing your contact information (names, phone
numbers, addresses, e-mail addresses, etc.)
Tasks
Managing things you need to remember to do
Notes
Creating memos using freehand or typed text
Mail
Sending and receiving e-mail
Internet
Clock
Calculator
Settings
Connections
Backup
Surfing the Internet
Keeping track of the current time in your Home City and in
one other Destination City
The time kept by the clock is used as the system time for
other programs and utilities.
Performing mathematical calculations
Calibrating the stylus and changing other CASSIOPEIA
configuration settings
Configuring dial-up, LAN, and cable connection
parameters
Backing up data to a storage card
The bundled CD-ROM also contains the following programs, which you can install as you need
them.
Icon
Program Name
This is an program for:
Photo Viewer
Viewing still images and recording with the optionally
available digital camera card
Music Player
Playing MP3 files
Movie Player
Playing CMF (CASIO Movie File) movie files
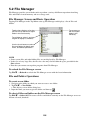
File Manager
Displaying the contents of main memory and storage card
files, and performing various other file operations
• See PC Connect online help for information about how to install the above programs.
After you install a program, you can start it up or switch to another program using the Top Menu.
to display the Top Menu.
Press the Top Menu button
• See “1-3 Top Menu” on page 11 for more information.
9
About “myCasio introduction”
on the Top Menu displays a “myCasio introduction” screen that describes a portal for
Tapping
a wide range of contents services. In order to use myCasio, you must first register as a user from
your computer. For details, visit “http://www.mycasio.com”.
Starting Up Programs Using the Icon Menu
You can start up certain programs by tapping their icons in the icon menu located under the
CASSIOPEIA display screen.
Icon
Program
Calendar
Contacts
Tasks
Notes
Mail
Internet
User key: You can assign the program you want to this icon (page 12).
The initial default assignment to this key is Settings.
10
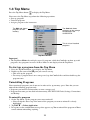
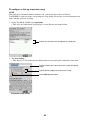
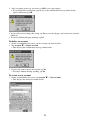
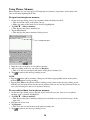
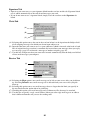
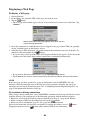
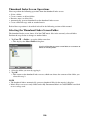
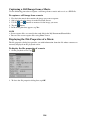
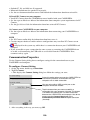
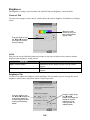
1-3 Top Menu
Press the Top Menu button
to display the Top Menu.
You can use the Top Menu to perform the following operations.
• Start up programs
• Uninstall programs
• Assign a program to the icon menu
The Main tab shows
programs in main
memory.
The Card tab shows
programs on the storage
card loaded in the
CASSIOPEIA.
This is a list of installed
programs.
Top Menu Screen
Important!
• The Top Menu Main tab can display up to 32 programs, while the Card tab can show up to 64
programs. Any programs in excess of these limits are not displayed on the Top Menu.
To start up a program from the Top Menu
1. Press the Top Menu button
to display the Top Menu.
2. Double-tap the name of the program you want to start up.
• This starts up the program.
• To start up a program that is on a storage card, tap the Card tab first and then double-tap the
program name.
Uninstalling Programs
You can uninstall programs you do not use in order to free up memory space. Note that you can
uninstall the following programs only.
• Programs you install in main memory or onto a storage card
• Programs that come pre-installed in main memory, EXCEPT FOR Clock, Settings, Connections
and Backup
To uninstall a program
1. On the Top Menu, tap the program you want to uninstall.
• You can skip the above step if the name of the program you want to uninstall is already
highlighted.
2. Tap Edit L → Delete Application.
3. In response to the confirmation message that appears, tap Yes to uninstall the program or No to
cancel without uninstalling anything.
11
NOTE
• If you later need a program, you can re-install it from the bundled CD-ROM. See PC Connect
online help for more information.
Assigning a Program to the Icon Menu
You can use the following procedure to assign a program to the far right icon menu icon.
To assign a program to the icon menu
1. On the Top Menu, tap the program you want to assign to the icon.
• You can skip the above step if the name of the program you want to assign is already
highlighted.
2. Tap User Key.
3. In response to the confirmation message that appears, tap Yes to assign the program or No to
leave the current assignment as it is.
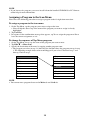
To change the sequence of Top Menu programs
1. On the Top Menu screen, tap the name of the program you want to move.
2. Tap Edit L → Move Icon.
3. Specify the destination of the move by tapping another program name.
• The program you select in step 1 is moved to the location above the program you tap in step
3. The following example shows what would happen if you select Calendar in step 1 and
then tap Clock in step 3.
L
Calendar
Contacts
To Do
Mail
Internet
Clock
Calculator
Setup
Connections
Contacts
To Do
Mail
Internet
Calendar
Clock
Calculator
Setup
Connections
NOTE
• You cannot move programs between the Main tab and Card tab.
12
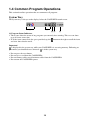
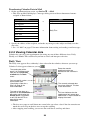
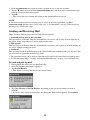
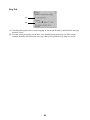
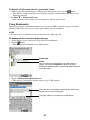
1-4 Common Program Operations
This section describes operations that are common to all programs.
System Tray
The System tray is always on the display, below the CASSIOPEIA touch screen.
(1)
(2)
(3) (4)
(5)
(1) Program Status Indicators
• These icons show the status of any programs you currently have running. This area can show
up to 30 icons at one time.
• If all the icons cannot fit in the space provided, tap the button on the right to scroll the icons
and view those that do not fit.
Important!
is displayed in the system tray while your CASSIOPEIA is accessing memory. Following are
is in the system tray.
precautions you should observe whenever
•
•
•
•
Do not press the reset button.
Do not eject a card from the CASSIOPEIA.
Do not connect cables to or disconnect cables from the CASSIOPEIA
Do not turn off CASSIOPEIA power.
13
(2) System Status Indicators
These icons provide information about the system. Tapping an icon displays one of the setting
screens described below.
This icon:
Means this:
And displays this screen when tapped:
The card slot contains a card.
This icon appears when the PC Card
Unit is attached to your CASSIOPEIA.
CF Slot Information dialog box
Dial up connection is in progress.
Current dial up connection status
CASSIOPEIA is running under
external power.
Power Management screen
(page 146)
Built-in battery is being charged.
Built-in battery is fully charged.
Built-in battery is sufficiently
charged.
Built-in battery is low.
Built-in battery is extremely low.
The system is checking the power
supply status. This icon appears only for
a few seconds after you turn on power.
(3) Input panel button
Tap to display or hide the input panel (page 15).
(4) Input panel switch
Tap to display a list of input methods (page 15).
(5) Clock
Displays the current time (Home City time or Destination city time). Tapping the time displays
the Clock screen (page 23).
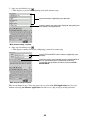
Using the Command Bar
The Command Bar is located at the top of the screen in all programs. Though the menus and
buttons that appear in the Command Bar depend on the program you are using, there are a number
of basic operations that are common to all programs.
Command Bar
.................... Tap to back step to the screen that was on the display prior to the current screen.
.................... Tap to display help about operations you can perform on the current screen.
.................... Tap to quit the currently displayed program and display the Top Menu.
............... The L symbol indicates a menu. Tapping a menu displays its commands, which
you can execute by tapping the one you want.
14
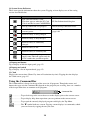
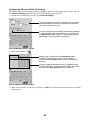
1-5 Inputting Text
Use one of the on-screen input panels to input text. There are two types of input panels: a
keyboard and a character recognizer.
Keyboard: Tap the keys of the onscreen keyboard to input text.
Character Recognizer: Use the stylus to write characters on
the touch screen. Character Recognizer converts your
characters into typed text.
Important!
• Use only unaccented English characters, numbers, and spaces, and the following symbol
characters in file and folder names.
!#$%&’()+,-.;=@[]^_‘{}~
Any other character or symbol may become corrupted and lead to problems with system operation.
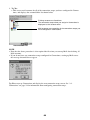
Switching Between Input Panels
Use the buttons shown in the figure below to switch between input panels, and to show and hide
the input panel.
(1) (2)
(1) Input panel button
Tap to display or hide the input panel.
(2) Input panel switch
Tap this button to display a menu of available input panel types (Keyboard or Character
Recognizer). Tap the name of the input panel you want to use.
15
NOTE
• The currently selected input panel appears automatically whenever you encounter a situation
that requires text input. You can temporarily hide the input panel and view the screen beneath it
by tapping the input panel button.
Typing with the Keyboard
To type with the on-screen keyboard, tap the input panel switch and select Keyboard. Next, use
the stylus to tap the keyboard keys.
Characters appear as you type them.
The keyboard has the input options described below.
• Tap the URLL key to display a menu of
commonly used URL elements (http://, www.,
etc.) Tap the element you want to input.
• Tap AXNT to shift the keyboard to its accented
character mode.
• Tap SYM1 or SYM2 to shift the keyboard to its
symbol input mode.
• You can also use the following procedure to input an upper-case alphabetic character without
shifting the keyboard.
To input upper-case alphabetic characters without shifting the keyboard
1. When the keyboard is on the display, use the stylus to press and hold the key of the letter you
want to input.
2. Slide the stylus up on the key and then release it.
• This inputs the upper-case character for the key you pressed.
16
Writing with Character Recognizer
Your CASSIOPEIA comes with character recognition software that lets you write characters by
hand. Character Recognizer supports word-by-word, non-cursive handwriting. To write using the
character recognizer, tap the input panel switch and select Character Recognizer. Write in the
designated input area in the lower part of the screen. The handwritten characters are converted to
typed characters that appear at the cursor in the active application.
Write word-by-word, noncursively here, using the
waistline and baseline of
the input area.
For specific instructions on using Character Recognizer, see Appendix A.
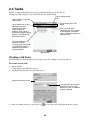
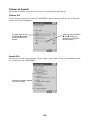
1-6 Notes
The Notes program provides you with tools for creating quick and easy memos. Notes can be
used to create either freehand documents or text documents.
• Freehand document: A freehand document contains characters and diagrams drawn on the
screen with the stylus.
• Text document: A text document contains text you input with an input panel.
Important!
• You cannot mix freehand figures and input panel text in the same document.
• The maximum text document size is 64 kbytes. If you open a text document that is larger than
64 kbytes, you will be able to see only its first 64 kbytes. Trying to save a text file that is larger
than 64 kbytes will cause part of the text document to be lost.
17
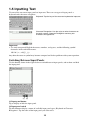
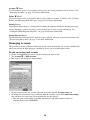
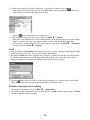
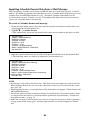
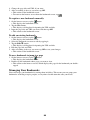
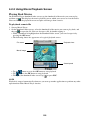
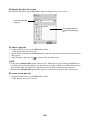
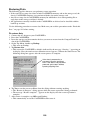
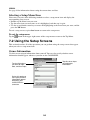
Starting up Notes displays a list screen like the one shown below.
Tap to display a screen for
creating a new freehand
text document.
Tap to display a screen for creating
a new typed text document.
Tap to return to the Top
Menu.
The Main tab shows
Notes documents in
main memory, while the
Card tab shows Notes
documents on the
storage card loaded in
the CASSIOPEIA.
This is a list of stored files.
Tapping a file name once
selects it, and tapping a
selected file name a
second time opens the file.
Tap a header title to sort
documents by their names,
creation dates, sizes, or
types. Each tap of a
header title toggles sorting
between ascending and
descending order.
List screen
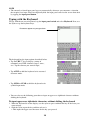
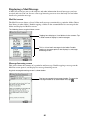
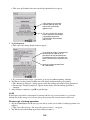
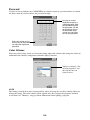
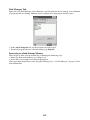
Creating a New Freehand Document
Perform the steps below to create a new document that contains freehand figures.
To create a new freehand document
1. On the list screen, tap New Handwriting.
• This displays a blank freehand document screen.
2. Use the stylus to draw and write the figures you want.
• The operations you can perform on the freehand document screen are described below.
Tap a pen color to select it.
Tap to display a menu of the
following commands.
Tap to save the document
and return to the Top
Menu.
Pen thickness: Select Fine,
Normal, or Bold as the pen
thickness.
Tap to save the document
and return to the list
screen.
Undo: Undoes the last action.
Only one undo is allowed.
All Clear: Clears everything
from the screen.
Rename/Move: Saves a
document under a specified
name.
Delete Note: Deletes the
currently selected document.
Cancel: Cancels input.
3. After everything is the way you want, tap
to save your document and return to the list screen.
• Notes automatically assigns a name to the new document.
18
NOTE
• If you want to change the name of a document or move it to another location (in main memory
or on a card), tap Edit L → Rename/Move. See “Naming a Document” on page 20 for more
information.
Creating a New Text Document
Perform the steps below to create a new text document.
To create a new text document
1. On the list screen, tap New Text.
• This displays a blank text document screen.
2. Use the input panel to input the text you want.
• See “1-5 Inputting Text” on page 15 for more information about the input panel.
• The operations you can perform on the text document screen are described below.
Tap to create a new e-mail message that contains
the displayed text (page 20).
Tap to save the document
and return to the list
screen.
Tap to save the document
and return to the Top
Menu.
Tap to display a menu of the following commands.
Undo: Undoes the last action. Only one undo is allowed.
Cut: Cuts the selected text and places it on the clipboard.
Copy: Copies the selected text and places it on the clipboard.
Paste: Pastes the clipboard contents at the current cursor location.
Clear: Clears the selected text.
Select All: Selects everything on the screen.
Rename/Move: Saves a document under a specified name.
Delete Note: Deletes the currently selected document.
Cancel: Cancels input.
19
3. After everything is the way you want, tap
to save your document and return to the list
screen.
• Notes automatically assigns a name to the new document.
NOTE
• If you want to change the name of a document or move it to another location (in main memory
or on a card), tap Edit L → Rename/Move. See “Naming a Document” on page 20 for more
information.
Creating a New E-mail Message Using a Text Document
A simple operation creates a new e-mail message using the contents of the displayed Notes text
document.
To create a new e-mail message using a text document
1. On the text document screen, tap Send to L → Mail.
• This saves the text document in Notes, starts up Mail, and displays a message editing screen
with text elements assigned as shown below.
Notes
File Name
Body Text
→
Mail
Subject
Body Text
2. Specify the address of the recipient, and make any changes to the subject and body text that
you want.
• See “3-3 Mail” on page 67 for more information about writing and sending e-mail messages.
Naming a Document
You can assign a new name to a freehand or text document using the procedure below. You can
also specify the location where you want to save the new document file.
1. On a document screen, tap Edit L → Rename/Move.
• This displays the Rename/Move dialog box.
20
2. Type the name you want to give to the document in the Name box.
• If you do not specify a file name, Notes will assign a name automatically.
3. Tap the Location box L button and select a storage location from the menu that appears.
• You can specify Main (CASSIOPEIA main memory) or Card (Memory card) as the storage
location. The Card option is available only when a storage card is loaded in the
CASSIOPEIA.
.
4. Tap
• The document is saved in accordance with your settings, and then the list screen appears.
Using the List Screen
You can use the list screen to perform a number of operations involving Notes documents.
To open and edit a document
On the list screen, double-tap the document you want to open.
This opens the document. After this you can edit the file using the procedures described under “To
create a new freehand document” on page 18, and “To create a new text document” on page 19.
To copy a document
1. On the list screen, tap the document you want to copy.
2. Tap Edit L → Create Copy.
• This creates a copy of the document you selected and displays the copy. Notes automatically
assigns a name to the copied document, which is the same as the original document name
plus a sequential number ((1), (2), etc.).
3. Edit the contents of the copied document, if you want.
.
4. After you are finished, tap
• This saves the copy of the document and returns to the list screen.
To delete a document
1. On the list screen, tap the document you want to delete.
2. Tap Edit L → Delete.
3. In response to the confirmation message that appears, tap Yes to delete the document or No to
cancel without deleting anything.
21
Renaming and Moving Documents
You can use the Rename/Move dialog box to both rename and move a document.
To rename or move a document
1. On the list screen, tap the name of the document you want to rename or move to select it.
2. Tap Edit L → Rename/Move.
• This displays the Rename/Move dialog box.
3. Type the name you want to give to the document in the Name box.
• You can leave the current name as it is, if you want.
4. Tap the Location box L button and select a storage location from the menu that appears.
• You can specify Main (CASSIOPEIA main memory) or Card (Memory card) as the storage
location. The Card option is available only when a storage card is loaded in the
CASSIOPEIA.
• You can leave the location as it is, if you want.
.
5. After you are finished, tap
• This performs the rename or move operation in accordance with your specifications, and
returns to the list screen.
22
1-7 Using Clock
You can display the Clock screen by tapping Clock on the Top Menu (page 11) or by tapping the
clock on the System Tray (page 13).
You can perform the following operations with the Clock program.
• You can make time and date settings, which are used by the CASSIOPEIA system.
• You can specify two cities, one as your Home City and one as your Destination City, and
display the current time in each on the Clock screen. You can select either your Home City or
Destination City as the system time, which means you can easily change to a different time
zone when traveling.
Tap to exit the
Clock screen.
Tap either of these buttons
to select whether your
Home City time or
Destination City time
should be used as the
system time.
The System Tray shows
either the Home City time
or Destination City time.
In this example, Home
City time would be
displayed.
Clock screen
• You can set an alarm.
• You can specify the date and time formats, which are applied to all other programs.
Setting the Clock
You can make the following settings for both your Home City and Destination City.
• City
• Date and time
The Home City time and Destination City time are linked, which means that setting one
automatically changes the other.
• Summer time (Daylight Saving Time)
23
To make Clock settings
1. Display the Clock screen.
2. Select either Home City or Destination City.
• Tap the button next to Home City or Destination city to select it.
3. Tap Time setting.
• This displays the setting screen for the city you selected in step 2.
4. Make the settings you want.
Tapping the L button displays a list of cities
(and their GMT differentials) from which you can
select the one you want.
Tapping the hour,
minutes, or seconds
digits in the Time box
displays an input panel
for setting the time. You
can input a value or use
the
buttons to
change the time setting.
If you are using 12-hour
timekeeping (page 26),
be sure to specify either
AM or PM for your
alarm time setting.
Tapping the L button
displays a calendar,
which you can use to
specify a date.
Select this option when you want to change to
summer time (Daylight Saving Time).
NOTE
• If the Home City and Destination City times do not match, it may mean that the Destination
City is in an area that uses summer time. If this is the case, select the Summer time check box,
which causes the time in the Destination City to advance one hour.
• To ensure correct time readings for Calendar Reminder records, make sure you select the
correct summer time on/off setting for the city.
.
5. After everything is the way you want, tap
6. In response to the confirmation message that appears, tap Yes to apply your settings or No to
cancel without changing anything.
• If you want to clear the message and return to the time setting screen at this point, tap
Cancel.
24
To set an alarm
1. Display the Clock screen.
2. Tap Alarm.
• This displays the alarm setting screen.
3. Make the settings you want.
Select Once if you want the alarm to sound only once, or Everyday
to have the alarm sound at the same time every day.
Select this option if you
want the alarm sound to
be played when the
alarm time is reached.
Tapping the hour or
minutes digits in the
alarm time box displays
an input panel for setting
the alarm time. You can
input a value or use the
buttons to change the
alarm setting.
If you are using 12-hour
timekeeping (page 26),
be sure to specify either
AM or PM for your alarm
time setting.
Select this option if you
want the alarm sound to
keep repeating until you
stop it.
This setting becomes
available when turn on
the Play sound option.
Tap the L button to
display a menu of
available sounds. To play
the currently selected
to
sound, tap . Tap
stop play of the selected
sound.
4. After everything is the way you want, tap
to return to the Clock screen.
NOTE
• The alarm sounds when the system time (currently selected Home City or Destination City
time) reaches the alarm time you set.
• Note that the alarm time setting does not change if you change the system time city (Home City
or Destination City) before the alarm time is reached.
• If an alarm time arrives while you are playing audio through headphone using Music Player,
Movie Player, or some other application, the alarm buzzer sounds from the CASSIOPEIA, but
it does not sound through the headphones.
25
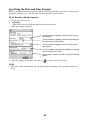
Specifying the Date and Time Formats
The date and time formats you specify with the following procedure are used on setting screens,
programs (Calendar, etc.), and any other operation that uses a date or time.
To set the date and time formats
1. Display the Clock screen.
2. Tap Display.
• This displays the date and time format specification screen.
3. Make the settings you want.
Click this button to display a menu of short version
date formats.
Click this button to display a menu of separators for
the short version date formats.
Click this button to display a menu of long version
date formats.
Click this button to specify either Monday or Sunday
as the first day of the week.
Select either 12-hour or 24-hour as the timekeeping
format.
4. After the settings are the way you want, tap
to return to the Clock screen.
NOTE
• The short version date formats you can specify differ according to the separator symbol you
select.
26
1-8 Using Calculator
Calculator provides you basic arithmetic, percent, and square root calculation capabilities. To
display the Calculator screen, tap Calculator on the Top Menu (page 11).
Calculator screen
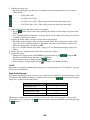
Key Functions
When you want to do this:
Input values
Input arithmetic operations
Execute a calculation and display its results
Clear the calculator, except for calculator memory
Clear the calculator display, without clearing calculator memory
Perform square root calculations
Perform percent calculations
Clear calculator memory
Recall calculator memory contents
Subtract the currently displayed value from memory contents
Subtract a calculation result from memory contents
Add the currently displayed value to memory contents
Add a calculation result to memory contents
27
Use:
The number keys
!, @, #, $
=
AC
C
`
%
MC
MR
MM– (in place of =)
M+
M+ (in place of =)
Using the COPY Key
Tapping the COPY key copies the calculation result on the calculator screen to the clipboard. You
can then paste the copied result into any program that supports pasting (Notes, Mail, etc.)
Exiting Calculator
Tap the
icon in the upper right corner of the Calculator screen to exit the calculator.
About Calculation Errors
An error indicator appears on the display and further calculation becomes impossible whenever an
error occurs.
Any of the following conditions produces an error.
• Whenever the number of digits in the mantissa of an intermediate or final result exceeds 12
• Whenever the number of digits in the mantissa of a value in calculator memory exceeds 12
digits. In this case, the unit automatically retains the previous value stored.
• Division by zero
• Attempting to calculate the square root of a negative value
To clear an error
Tap C to clear an error and continue with the same calculation from the point immediately before
the error occurred.
To clear the entire calculation and start again, tap AC.
To perform constant calculations
1. On the calculator screen, input the first value of the operation, tap an arithmetic operator key
twice, and then input the second value of the operation.
• You can perform a constant calculation using !, @, #, or $.
• The first value you input (the one to the left of the arithmetic operator) is the one that will be
used as the constant.
• Tapping an arithmetic operator key twice causes the indicator K to appear on the display to
indicate that a constant calculation is being performed.
2. Tap = to display the result of the operation.
• Inputting 4 # # 2 = would produce a result of 8.
3. Tap = again to multiply the result by the constant.
• Tapping = again with the example shown under step 2 would produce a result of 32 (8 # 4).
• Each subsequent tap of = multiplies the last result obtained by the constant. Continuing with
the above example, tapping = would produce the following results: = 128 (32 # 4), = 512
(128 # 4), = 2048 (512 # 4), and so on.
To correct entries during calculations
• If you enter a wrong value, tap C to clear the value and then input the correct one.
• If you tap the wrong arithmetic key (!, @, #, or $), simply tap the correct arithmetic key
before inputting anything else.
28
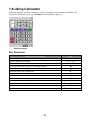
Calculation Examples
The following shows a number of examples that illustrate how to use Calculator.
0.
113.
–31’779.
V
53 + 123 – 63 =
963 × (23 – 56) =
(56 × 3 – 89) ÷ 5.2 + 63 =
1234567890 × 741852 =
53 : 123 ; 63 >
23 ; 56 < 963 >
56 < 3 ; 89 = 5.2
: 63 >
1234567890 < 741852 >
E
i
V
3×5=
3S<5>
78.1923076923
915.866658332
915.866658332
0.
8.6602540378
12 + 23 =
45 + 23 =
78 + 23 =
23 : : 12 >
45 >
78 >
K+
K+
K+
35
68.
101.
7 – 5.6 =
2 – 5.6 =
5.6 ; ; 7 >
2>
K–
K–
1.4
–3.6
2.3 × 12 =
4.5 × 12 =
12 < < 2.3 >
4.5 >
K×
K×
27.6
54.
45 ÷ 9.6 =
78 ÷ 9.6 =
9.6 = = 45 >
78 >
K+
K+
4.6875
8.125
12% of 1500
1500 < 12 .
180.
Percentage of 660 against 880
660 = 880 .
75.
15% add-on of 2500
2500 < 15 . :
2’875.
25% discount of 3500
3500 < 25 . ;
2’625.
What will the selling price and
profit be when the purchasing
price of an item is $480 and the
profit rate to the selling price is
25%?
480 : 25 .
;
640.
160.
If you made $80 last week and
$100 this week, what is the
percent increase?
100 ; 80 .
25.
80 × 9 = 720
–) 50 × 6 = 300
20 × 3 = 60
480
80 < 9
50 < 6
20 < 3
29
M720.
M420.
M480.
M480.
720.
300.
60.
480.
Chapter 2 Using the PIM Programs
2-1 What is a PIM program?
The letters “PIM” stand for “Personal Information Manager,” which is a collection of programs
that help keep your personal information in order. Your CASSIOPEIA comes with Calendar,
Contacts, and Tasks PIM programs built in.
Calendar ........... Calendar is a program for managing your appointments. Information about
appointments, meetings, and other commitments you input into Calendar can be
displayed in a variety of different formats. You can even set alarms to keep you
reminded of appointments.
Contacts ........... Contacts is the place where you can store the names, addresses, phone numbers,
e-mail addresses and other information about friends, acquaintances, and family
members.
Tasks ................ Tasks is a program that helps you keep track of things you need to remember to
do.
PIM Program Data Synchronization
You can connect your CASSIOPEIA to a computer and synchronize Calendar, Contacts, Tasks,
and Mail data with Microsoft Outlook data.
• See the separate Hardware Manual for information about connecting your CASSIOPEIA to a
computer.
• Note that you must have PC Connect installed on your computer before it can exchange data
with your CASSIOPEIA. See the Quick Start Guide for information about how to install PC
Connect, and PC Connect online help for information about how to use it.
• See the Outlook online help for information about using it.
30
2-2 Calendar
Calendar is a program for managing your appointments. Information about appointments,
meetings, and other commitments you input into Calendar, can be displayed in a variety of
different formats. You can even set alarms to keep you reminded of appointments.
Daily View
Weekly View
You can view Calendar data using a Daily View, Weekly View, or 3-Month View. See “2-2-2
Viewing Calendar Data” on page 36 for more information about the various views.
2-2-1 Inputting Calendar data
Inputting New Calendar data
Each Calendar record can contain an appointment time and description, as well as an alarm time
and other additional information.
To input new Calendar data
1. Start up Calendar.
2. Tap New to display the appointment input screen.
31
3. Input the date and description of the appointment.
Times ................. The upper time is the start time, while the lower time is the end time of the
appointment. You can specify a date using the calendar that appears when
you tap a date L button, or you can input a date into a box. You can
specify a time by selecting one from the list that appears when you tap a
time L button, or you can input a time into a box.
All Day Event .... Check this box for an appointment for which there is no time setting (such
as a birthday or anniversary).
Description ........ Input a description of the appointment. You can also specify a description
by selecting one from the list of previously input descriptions that appears
when you tap the Descriptions L button.
Location ............. Input the location of the appointment. You can also specify a location by
selecting one from the list of previously input locations that appears when
you tap the Location L button.
Reminder ........... Check this box when you want an alarm to sound before the appointment
start time. You can specify how long before the appointment you want the
alarm to sound from one minute to 99 weeks. The initial default setting for
this item is 15 minutes.
4. You can also make the following settings if you want.
Repeat ................ Use this item to set up an appointment that repeats once a week, once a
month or once a year. See “Editing a Repeat Pattern” on page 33 for more
information about this setting.
Notes .................. If you want to input memo text, tap here to display the memo input screen,
which you can use to type memo text. To exit the memo input screen, tap
.
Show time as* ... Use this box to select the method for making the appointment public.
Private* ............. Check this box when you want to make the appointment private data.
* These items are used only for synchronizing appointment data with Microsoft Outlook
running on your computer and Outlook data is public and shared over the network. See the
documentation that comes with Outlook for more information.
5. After everything is the way you want, tap
screen.
to save the data and close the appointment input
saves the Calendar data and displays the Daily View screen of the date where
• Tapping
you input the data.
NOTE
• To close the appointment input screen without saving the Calendar data you input, tap Edit L
→ Cancel. This discards the data you input and closes the appointment input screen.
• Appointment data is displayed using the following colors according to its current Show time as
setting.
32
Show time as
Free
Tentative
Busy
Out of Office
Data Color
Turquoise
Pink
Blue
Green
• An appointment for which the Private option is selected is always displayed in red.
Editing a Repeat Pattern
You can use the Repeat box to specify an appointment that repeats on the same day of the week
each week, on the same day of month each month, etc.
■ To edit a repeat pattern
This shows the appointment
data in accordance with the
repeat type you select.
Tap L and then select the
repeat type you want.
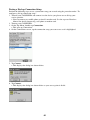
1. On the appointment input screen, tap the Repeat box L button and then select the Edit
Pattern item from the list of options that appears.
• This causes the dialog box shown below to appear.
This dialog box operates as a
kind of wizard. Make settings in
accordance with the instructions
that appear on the display.
2. Make the repeat pattern settings you want.
33
3. After you are finished making the settings you want, tap Finish.
• This returns to the appointment input screen.
Editing Appointments
This section describes how to edit and delete existing Calendar data. It also explains how to cut,
copy, and paste existing data.
To edit an appointment
1. On the Daily View or Weekly View screen, double-tap the appointment you want to edit.
• This displays the appointment input screen.
2. Use the same procedure as those under “Inputting New Calendar data” on page 31 to make the
changes you want.
to save the appointment and close the
3. After everything is the way you want, tap
appointment input screen.
To delete an appointment
1. On the Daily View or Weekly View screen, tap the appointment you want to delete so it is
highlighted (selected).
2. Tap Edit L → Delete.
3. In response to the confirmation message that appears, tap Yes to delete the appointment or No
to cancel the delete operation without deleting anything.
NOTE
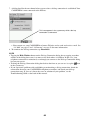
If the appointment you are deleting is a repeat appointment, tapping Delete in step 2 causes the
message shown below to appear.
Tap Yes to delete all of the applicable repeat appointments, or No if you want to delete only the
currently selected appointment, which is part of a repeat series. Tapping Cancel returns to step 1
of the procedure without doing anything.
To copy and paste an appointment
1. On the Daily View or Weekly View screen, tap the appointment you want to copy so it is
highlighted (selected).
2. Tap Edit L → Copy to copy the appointment to the clipboard.
3. Display the Daily View screen for the date where you want to paste the appointment that is on
the clipboard.
• You can select a date using either the Weekly View or 3-Month View screen.
4. Tap Edit L → Paste to paste the appointment data from the clipboard to the currently
displayed Daily View.
• You could now use the procedures under “To edit an appointment” on page 34 to edit the
pasted appointment, if you want.
NOTE
Copying a repeat appointment copies only the one single appointment that you select for copying.
34
To cut and paste an appointment
1. On the Daily View or Weekly View screen, tap the appointment you want to cut so it is
highlighted (selected).
2. Tap Edit L → Cut to cut the appointment and place it onto the clipboard.
3. Display the Daily View screen for the date where you want to paste the appointment that is on
the clipboard.
• You can select a date using either the Weekly View or 3-Month View screen.
4. Tap Edit L → Paste to paste the appointment data from the clipboard to the currently
displayed Daily View.
• You could now use the procedures under “To edit an appointment” on page 34 to edit the
pasted appointment, if you want.
NOTE
Cutting a repeat appointment (see “Editing a Repeat Pattern” on page 33) cuts only the one single
appointment that you select for cutting.
Transferring Calendar Data to Another Program
You can transfer data you are editing on the appointment input screen to the Notes, Tasks, or Mail
program.
To transfer Calendar data to Notes
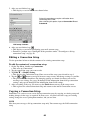
1. On the appointment input screen, tap Send to L → Notes.
• This starts up Notes and displays an input screen with appointment elements assigned as
shown below.
Calendar
Description
Description
Start Date
Start Time
End Data
End Time
Location
Notes
Note
→
File Name
→
Body Text
2. Edit the contents of the transferred text, if you want.
• See “Creating a New Text Document” on page 19 for information about working with a
Notes text document.
To transfer Calendar data to Tasks
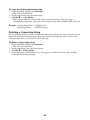
1. On the appointment input screen, tap Send to L → Tasks.
• This starts up Tasks and displays an input screen with appointment elements assigned as
shown below.
Calendar
Description
→
Tasks
Subject
2. Make task priority and other settings, if you want.
• See “2-4 Tasks” on page 49 for information about inputting Tasks data.
35
Transferring Calendar Data to Mail
1. On the appointment input screen, tap Send to L → Mail.
• This starts up Mail and displays a message editing screen with text document elements
assigned as shown below.
Calendar
Description
Description
Start Date
Start Time
End Date
End Time
Location
Notes
Mail
→
Subject
→
Body Text
2. Specify the address of the recipient, and make any changes to the subject and body text that
you want.
• See “3-3 Mail” on page 67 for more information about writing and sending e-mail messages.
2-2-2 Viewing Calendar data
Calendar lets you view your appointment data using any one of three different views: Daily,
Weekly, or 3-Month. This section tells you how to select and interpret each view.
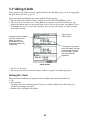
Daily View
The Daily view appears first, with today’s date selected in the calendar, whenever you start up
.
Calendar. It also appears whenever you tap
Dates that contain
appointment data are
indicated on the calendar in
bold.
The starting day of the
week is in accordance with
how you set up First day
of week with the Tools
menu.
You can specify a color
for each date. See
“Specifying a Color for a
Date” on page 32 for
more information.
The currently selected date
has a box around it. This box
is the date cursor.
The color of the data
depends on the Show time
as setting and whether the
Private option is turned on
or off. See the NOTE on
page 32 for more
information.
This icon indicates that the
appointment has memo data
attached to it. Tap this button to
display the memo.
• The data area starts to scroll about one second after you select a date if the date contains too
much data to fit. Tap on the data area to stop the scrolling.
• After stopping auto scrolling, you can use the scroll bar to scroll up and down.
36
Daily View Operations
• Tapping a date in the calendar selects that date and displays its Calendar data.
• Tap the
button above the calendar to change to the previous month’s calendar, or
change to the next month’s calendar.
to
for the Weekly view or
for the 3-Month view. These views all include the date
• Tap
where the date cursor is currently located in the Daily view.
• Tap
to jump to today’s date.
• A Note icon (
) is shown on the Daily view when there is a note attached to the appointment.
Weekly View
Display the Weekly view by tapping
schedule for a specific week.
. This view shows a graphic representation of your
Week number of the week where the
date cursor is located
Tapping an appointment
selects it, which is indicated
by triangular handles at
either end.
• Drag the handles to
change the start time and
end time of the
appointment.
• You can also drag the
appointment on the screen
to another day or time.
The starting day of the
week is in accordance with
how you set up First day
of week with the Tools
menu.
Date cursor, indicating
the currently selected
date.
Scroll buttons appear
overlapped appointments
cannot fit in two lines. Use
the scroll buttons to scroll
the data on the screen.
An all-day appointment is
indicated by “*”.
The color of the data depends on the
Show time as setting and whether
the Private option is turned on or off.
See the NOTE on page 32 for more
information.
37
Weekly View Operations
• Tapping a date selects it.
• Tap the
button to change to the previous week or
to change to the next week.
• Double-tap an appointment’s data to display an editing screen for that appointment.
for the Daily view or
for the 3-Month view. These views all include the date
• Tap
where the date cursor is currently located in the Weekly view.
to jump to today’s date.
• Tap
• You can input a new appointment by dragging the start and end boundaries of the appointment
time and then tap New.
Dragging a time boundary causes the area between the
two boundaries to become highlighted in light blue.
Tapping New creates a new appointment with the start
time and the end time in accordance with the boundary
locations.
• Tapping an appointment selects it, which is indicated by triangular handles at either end.
Drag the handles to change the start time and end
time of the appointment.
L
You can also drag the appointment on the screen to
another day or time.
L
38
Switching the Time between 12-hour and 24-hour Formats
You can switch between 12-hour and 24-hour timekeeping using Clock (see “1-7 Using Clock”
on page 23). The setting you select affects the time and timetable display on the Calendar Weekly
View as shown below.
• The current time display examples below show what appears at 9:00am and 3:00pm.
12-hour format
24-hour format
Current Time
9:00A/3:00P
9:00/15:00
Timetable
12, 1, 2, ... 11, 12, 1, 2, ... 10, 11
0, 1, 2, ... 11, 12, 13, 14, ... 22, 23
3-Month View
Display the 3-Month view by tapping
.
The starting day of the
week is in accordance with
how you set up First day of
week with the Tools menu.
Dates that contain
appointment data are
indicated in bold.
You can specify a color for
each date. See “Specifying a
Color for a Date” on page 32
for more information.
The currently selected date
has a box around it. This box
is the date cursor.
3-Month View Operations
• Tapping a date selects it. You can also use the cursor button to move the date cursor. Right or
down moves forward, while left or up moves back.
• Tap the
button to scroll one month the back or
• Tap the
button to scroll three months forward or
to scroll one month forward.
to scroll three months back.
• Tap
for the Daily view or
for the Weekly view. These views all include the date
where the date cursor is currently located in the 3-Month view.
• Tap
date.
to jump to today’s date. This operation jumps to the calendar that contains today’s
39
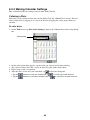
2-2-3 Making Calendar Settings
This section describes the settings you can make with Calendar.
Coloring a Date
You can use seven colors to color dates on the Daily View and 3-Month View screens. You can
color a single date by tapping it, or a series of dates by dragging the stylus across them on a
calendar.
To color dates
1. On the Tools menu, tap Date Color Setting to display the 3-Month date color setting dialog
box.
Color palette
2.
3.
4.
5.
On the color palette that appears, tap the color you want to use for date coloring.
Tap a date to color it. To color a series of dates, drag the stylus across them.
Repeat steps 2 and 3 as required.
to close the dialog box.
After the dates are the way you want them, tap
• Tap the
button to scroll one month back or
• Tap the
button to scroll three months back or
40
to scroll one month forward.
to scroll three months forward.
To restore date color defaults for a specific period
1. From the 3-Month date color setting dialog box, tap All Reset to display the All Reset dialog
box.
2. Specify the start month and end month of the period for which you want to restore date color
defaults.
3. After the settings are the way you want, tap OK to return to the 3-Month date color setting
dialog box.
• The above procedure restores date colors to the following defaults.
Day of the Week
Sunday
Saturday
Monday, Tuesday, Wednesday, Thursday, Friday
Default Color
Red
Blue
Black
Specifying the First Day of the Week
Use the following procedure to specify either Sunday or Monday as the first day of the week for
the Daily, Weekly, and 3-Month views.
1. On the Tools menu, tap First day of Week to display the dialog box shown below.
41
2. Select either Sunday or Monday as the first day of the week.
to apply your selection and close the dialog box.
3. After making the setting you want, tap
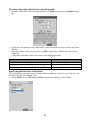
Setting a Reminder Alarm
Reminder alarms help to ensure that you do not miss important appointments.
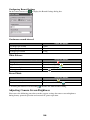
1. On the Tools menu, tap Reminder Setting to display the Reminder Setting dialog box.
Select this option when you
want a message to appear
on the screen when the
alarm time is reached.
This setting becomes
available when you turn on
the Play sound option. Tap
the L button to display a
menu of available sounds. To
play the currently selected
sound, tap J. Tap ■ to stop
play of the selected sound.
Select this option if you want
the alarm sound to be played
when the alarm time is
reached.
Select this option if you want
the alarm sound to keep
repeating until you stop it.
2. After everything is the way you want, tap
to close the reminder alarm setting screen.
NOTE
• If an alarm time arrives while you are playing audio through headphone using Music Player,
Movie Player, or some other application, the alarm buzzer sounds from the CASSIOPEIA,
but it does not sound through the headphones.
Important!
• Calendar is preset with time differentials for a number of cities around the globe. It also
includes information about whether each city uses summer time (DST), and about the period
when summer time is in effect in each city (from what week of what month, to what week of
what month).
• When you use the Clock to change to a different city, the times of currently registered
Calendar appointments are automatically adjusted in accordance with the time differential
and summer time information preset for the newly selected city.
42
2-3 Contacts
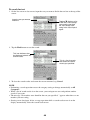
Contacts is the place where you can store the names, addresses, phone numbers, e-mail addresses
and other information about friends, acquaintances, and family members. You can view Contacts
records using either a list screen or a detailed data screen.
List screen
Data screen
2-3-1 Inputting Contacts Data
This section describes how to input new Contacts data and how to edit existing records.
Inputting New Data
To input new data using Contacts
1. Display the Contacts list screen or data screen.
2. Tap New to display the Contacts input screen.
Tapping the
button to
the right of this box
displays a Confirm Name
dialog box, which you
can also use for name
input.
3. Using the input panel, enter a name and other contact information. You will need to scroll
down to see all available fields.
43
4. To assign the record to a category, scroll the screen down, tap Categories and then select a
category from the list that appears. Later you will be able to display records grouped by their
categories.
5. If you want to input note text, tap Notes to display the note text input screen.
to exit the note text input screen.
• Tap
to save the record and close the input screen.
6. After everything is the way you want, tap
• Tapping the List button displays the list screen.
NOTE
• To close the contacts input screen without saving the Contacts data you input, tap Edit L →
Cancel. This discards the data you input and closes the Contacts input screen.
Editing Contacts Data
This section describes how to edit and delete existing Contacts records. It also explains how to
duplicate existing data.
To edit a Contacts record
1. On the list screen, double-tap the Contacts record you want to edit.
• This displays the data screen.
2. Tap anywhere on the data screen that appears.
• This displays the Contacts input screen.
3. Use the same procedure as those under “To input new data using Contacts” on page 43 to
make the changes you want.
to save the record and close the Contacts input
4. After everything is the way you want, tap
screen.
To copy a record
1. On the list screen, tap the record you want to copy.
2. Tap Edit L → Create Copy.
• This creates a copy of the record you selected in step 1, and displays its editing screen.
3. Use the same procedure as those under “To input new data using Contacts” on page 43 to
make the changes you want.
to save the record and close the Contacts input
4. After everything is the way you want, tap
screen.
To delete a Contacts record
1. On the list screen, tap the record you want to copy.
2. Tap Edit L → Delete.
3. In response to the confirmation message that appears, tap Yes to delete the appointment or No
to cancel the delete operation without deleting anything.
44
2-3-2 Viewing Contacts Data
You can view Contacts records using either a list screen or a data screen.
List Screen
The list screen provides an abbreviated list of Contacts records. The records that appear depend
on the category or categories that are specified.
This Notes icon is shown when the currently selected record includes data in its Notes field.
Tapping this icon displays the contents of the Notes field.
In addition to the name,
you can specify display
of Company, Work, Tel,
E-mail, or other
information using the
procedure below.
Tapping here displays a
list of categories. Select
a category to display its
contents on the list
screen.
Tapping a record once
highlights it, indicating it
is selected. Tapping a
selected record displays
the data screen of the
record.
Changing the List Screen Fields
The field on the left of the list screen is always Name. Initially, the field on the right is Company,
but you can use the following procedure to change to another field, if you want.
To change the list screen fields
1. Display the list screen.
2. Tap Tools L → Changing the Content.
• This displays the field selection dialog box.
3. Tap the field name to which you want to change.
to close the field selection dialog box.
4. Tap
To change the record category
1. On the list screen, tap here to display the categories menu.
45
2. Tap the category whose records you want to view.
• This displays the contents of the category you select in
the list screen.
• If you want to display the records for more than one
category, tap Multiple Categories. This causes a dialog
box like the one shown here to appear. Put a check mark
into each of the categories whose records you want to
.
include, and then tap
To create a new category
1. On the list screen, display the categories menu (see “To change the record category” on
page 45), and then tap Multiple Categories.
• This displays the Multiple Categories dialog box.
2. Tap Add/Delete.
• This displays the Add/Delete dialog box.
3. Input the name of the category you want to create.
4. Tap Add.
• This creates a new category with the name you specified in step 3.
to close the Add/Delete dialog box.
• After you are finished creating categories, tap
To delete a category
1. On the list screen, display the categories menu (see “To change the record category” on page
45), and then tap Multiple Categories.
• This displays the Multiple Categories dialog box.
2. Tap Add/Delete.
• This displays the Add/Delete dialog box.
3. Tap the category you want to delete, and then tap Delete.
• This deletes the selected category.
to close the Add/Delete dialog box.
4. After you are finished deleting categories, tap
46
Data Screen
The data screen shows the details of each Contacts record. You can transfer data from the Contacts
data screen to Mail as e-mail text, or to Notes as a text document.
To display the data screen
On the list screen, double-tap the Contacts record whose data screen you want to view.
Tap to return to the list
screen.
Tap here to scroll to the
previous record.
Tap here to scroll to the
next record.
To transfer Contacts data to Mail
1. On the data screen of the record you want to transfer, tap Send to L → Mail.
• This starts up Mail and displays a message editing screen with the contents of the Contacts
record in the body text.
2. Specify the address of the recipient and subject, and make any changes to the body text that
you want.
• See “3-3 Mail” on page 67 for more information about writing and sending e-mail messages.
To transfer Contacts data to Notes
1. On the data screen of the record you want to transfer, tap Send to L → Notes.
• This starts up Notes and creates a text document that contains all the contents of the
Contacts record data screen you displayed in step 1.
2. Edit the Notes text document, if you want.
• See “Creating a New Text Document” on page 19 for information about working with a
Notes text document.
Searching for Data
Use the procedure below to search for Contacts records that match a string of text you specify.
• The search function checks all fields for the text you specify.
47
To search for text
1. On the list screen or data screen, input the text you want to find in the text box at the top of the
screen.
Input the text you want to
find here.
Tapping L displays a list
of the last 10 text strings
you recently searched
for. You can tap a text
string in the list to input it
again.
2. Tap the Find button to start the search.
This icon indicates that
the displayed records are
search results.
This is a list of records
that match the search
criteria you specified.
3. To clear the search results and return the screen to normal, tap Cancel.
NOTE
• Performing a search operation causes the category setting to change automatically to All
Categories.
• While a list of search results is on the screen, you can input new text and perform another
search, if you want.
• The message “No matches were found for the text you specified. ” appears when there are no
matches your text string.
• Starting a new data input, delete, or copy operation while a search result screen is on the
display automatically clears the search result screen.
48
2-4 Tasks
Tasks is a program that helps to keep you reminded of things you need to do.
Starting up Tasks displays a list screen like the one shown below.
Tap to display online
help.
Tap to display a new task
input screen.
Tap to return to the Top
Menu
Tap a header title to sort
documents by their
checked/unchecked
status, names, or
priorities. Each tap of a
header title toggles sorting
between ascending and
descending order.
This is a list of tasks.
Tapping a task once selects
it, and tapping a selected
task a second time opens its
editing screen.
This icon indicates a
Microsoft Outlook
recurrent task transferred
to CASSIOPEIA from a
computer during data
synchronization.
List screen
Working with Tasks
The following are the procedures for creating a new task, editing an existing task, etc.
To create a new task
1. Start up Tasks.
• This displays the Tasks list screen.
2. Tap New to display the new task input screen.
Input a name for the task.
You can select one of three
priorities for a task: High,
Normal, or Low. The default
priority is Normal.
3. After everything is the way you want, tap
to save your task and return to the list screen.
49
NOTE
• To close the task input screen without saving the data you input, tap Edit L→ Cancel. This
saves the task and returns to the list screen.
To check and uncheck a task
You can use the Tasks list screen to check a task after you perform it.
Tap a check box to
toggle it between being
checked and unchecked.
NOTE
next to the check box) creates a checked task for
• Checking a recurrent task (indicated by
the currently scheduled task only. The recurrent task remains in effect.
• The sort order of the tasks on the list screen does not change automatically when you check or
uncheck a task, even if the list is currently sorted on the check box column. To resort the tasks,
tap one of the header titles.
• You can also check and uncheck tasks on the task input screen.
To edit a task
1. On the list screen, double-tap the task you want to edit.
• This displays the task input screen.
2. Edit the Subject, Priority, and Completed fields as you wish.
to save your task and return to the list screen.
3. After everything is the way you want, tap
To delete a task
1. On the list screen, tap the task you want to delete.
2. Tap Edit L→ Delete.
3. In response to the confirmation dialog box that appears, tap Yes to delete the task or No to
cancel without deleting anything.
50
NOTE
• The confirmation message shown below appears when you perform step 2 of the above
operation when the task you selected is a recurrent task.
Tap Yes to delete all of the tasks in the recurrent series, or No to delete only the currently
scheduled task of the series. To cancel without deleting anything, tap Cancel.
Transferring Tasks Data to Another Program
You can transfer task data from the Tasks list screen to Notes, Calendar, or Mail.
To transfer Tasks data to Notes
1. On the Tasks list screen, tap the task you want to transfer.
2. Tap Send to L → Notes.
• This starts up Notes and displays an input screen with Tasks elements assigned as shown
below.
Tasks
Subject
Completed
Subject
Priority
Notes
→
File Name
→
Body Text
3. Edit the contents of the transferred text, if you want.
• See “Creating a New Text Document” on page 19 for information about working with a
Notes text document.
To transfer Tasks data to Calendar
1. On the Tasks list screen, tap the task you want to transfer.
2. Tap Send to L → Calendar.
• This starts up Calendar and displays a new appointment screen with task elements assigned
as shown below.
Tasks
Subject
→
Calendar
Description
3. Input data for the other appointment fields as required.
• See “Inputting New Calendar data” on page 31 for more information about creating a new
appointment record.
51
To transfer Tasks data to Mail
1. On the Tasks list screen, tap the task you want to transfer.
2. Tap Send to L → Mail.
• This starts up Mail and displays a message editing screen with task elements assigned as
shown below.
Tasks
Subject
Completed
Subject
Priority
Mail
→
Subject
→
Body Text
3. Specify the address of the recipient, and make any changes to the subject and body text that
you want.
• See “3-3 Mail” on page 67 for more information about writing and sending e-mail messages.
52
Chapter 3 Using the Internet
3-1 Introduction
CASSIOPEIA Internet Functions
Your CASSIOPEIA comes with three programs that let you perform data communication over the
Internet.
Internet ................... This Web browser program makes it possible for you to visit Websites on the
Internet. In addition to being frames-capable, the Internet program also
supports bookmarks and the saving of pages of off-line viewing.
Mail ....................... Mail is a program for sending and receiving e-mail. It supports multiple
accounts, as well as sending and receiving attached files. Received mail can
be saved to folders either in main memory or on a storage card.
Connections ........... This program provides a central location where you can configure connection
setups for the Internet and Mail programs. Connections eliminates the need
to configure separate connection settings for Mail and Internet.
What do I need to connect to the Internet?
The following describes what you need in order to connect to the Internet using either a dial-up
connection or a network connection.
Dial-up Connection
Before you can connect to the Internet with a dial-up connection, you first need to contract the
services of an Internet service provider (ISP).
You also need to obtain the required devices, cables, and other hardware in order to physically
connect to a telephone line. Your CASSIOPEIA supports connection to a phone line using any one
of the following configurations.
• Mobile phone and mobile phone connection cable
• CompactFlash card type card modem, modular cable, analog telephone line
• PC card type card modem, CASSIOPEIA optional PC Card Unit (PC Card Adapter), modular
cable, analog telephone line
• External modem, special serial cable, modem cable, modular cable, analog phone line
LAN Connection
To connect to the Internet through a LAN (network), you need access rights to the network at your
company, etc.
You also need to obtain the required devices, cables, and other hardware in order to physically
connect to the network. Your CASSIOPEIA supports connection to a network using either of the
following configurations.
• CompactFlash card type LAN card, Ethernet cable
• PC card type LAN card, optional PC Card Unit (PC Card Adapter), Ethernet cable
53
3-2 Connections
Connections is a program that lets you configure various settings to enable data communication
between your CASSIOPEIA and a computer. You can use Connections to configure the following
settings.
• Parameters (including mail server parameters) for connecting to the Internet using dial-up
connection and LAN connections
• Parameters for cable connection with a computer
This section covers Internet connections only. For information about cable connection with a
computer, see Chapter 6 of this manual.
Communication Setups
One set of Connections parameters for a particular setup is called a “connection setup.”
Connections supports two types of connection setups: dial-up connection setups and LAN
connection setups.
Dial-up Connection Setup
A dial-up setup is used when you plug into a telephone line and dial up a server to connect to the
Internet, normally through your provider. The following are some of the parameters you need to
configure when creating a dial-up connection setup.
• Connection name
• Server settings (phone number, connection ID, password, etc.)
• Modem settings (for configuring the modem you are using)
• Mail account settings (mail address, user ID, password, and other settings for using Mail)
• Proxy server settings
You can store more than one dial-up connection setup in Connections and select the one you need
when you need it.
LAN Connection Setup
A LAN setup is used when connect to the Internet through a LAN (network) at your office, etc.
The following are some of the parameters you need to configure when creating a LAN connection
setup.
• Setup name
• LAN card adapter information
• LAN parameters (IP address, domain name, DNS, etc.)
• Mail account settings (mail address, user ID, password, and other settings for using Mail)
• Proxy server settings
You store only one LAN connection setup in Connections.
54
Configuring a Dial-up Connection
Basically, you configure a dial-up setup by inputting information given to you by your Internet
Service Provider. Make sure you get the following information from your provider.
Telephone number ..... This is the phone number you need to dial to connect to your provider’s
computer. Normally it is called the “access point.” You need to select an
access point that supports the type of phone (mobile, analog, etc.) you are
using.
Connection ID ........... This is the name by which your provider’s computer recognizes you when
you dial it up. Depending on your provider, the connection ID may be
called a “log in ID,” “log in name,” or something similar. It is important to
remember that your connection ID is for dial up only, and it is different
from the user name you use when connecting to your provider’s mail
server.
Password .................... The password is used to help ensure that the person using your connection
ID is really you. Depending on your provider, the password may be called
a “authorization password,” “log in password,” “connection password,” or
something similar. It is important to note that this password may be
different from the password you need when connecting to your provider’s
mail server.
Name server ............... This is a kind of address that indicates where on the Internet your
provider’s computer is located. Normally a provider will have two name
server addresses, a “primary DNS” (DNS 1) and a “secondary DNS”
(DNS 2). A name server address is a number in the format
000.000.000.000.
POP server ................. This is the server name used for receiving mail.
SMTP server .............. This is the server name used for sending mail.
User ID ...................... This is your user name for connecting to your provider’s mail server.
Normally, your user ID is the part of your mail address to the left of @.
Password .................... This is your password for connecting to your provider’s mail server.
NOTE
• The information described above is the bare minimum that you would normally need to connect
to the Internet through a provider. Contact your provider’s customer support if you need to
configure other settings that are not described above.
55
To configure a dial-up connection setup
NOTE
With some data communication or modem cards, you need to insert the card into the
CASSIOPEIA’s card slot before you perform the steps below. For details, see the instructions that
come with the card you are using.
1. On the Top Menu, double-tap Connections.
• This starts up Connections and displays a screen like the one shown below.
Setups you already have configured are listed here.
2. Tap New Setting....
• This displays a screen like the one shown below for specifying the connection setup name.
Input the name you want to give to the new connection
setup.
Specify which program should use this setup.
Select Dial-up connection
Connection setup screen
56
3. After you are finished, tap .
• This displays a screen for configuring the access point setup.
Input the access point phone number, and your
connection ID and password as supplied to you by your
provider.
You can tap here to display a screen for configuring the
number of tries when dialing, security protocol, and IP
address. See “Configuring Advanced Dial-up Settings” on
page 60 for more information.
Access point setup screen
4. After you are finished, tap .
• This displays a screen for configuring the modem you are using.
Tap here to display a list of supported modems.
Set the speed (data rate) in accordance with your access
point and modem speeds.
Normally you can leave these settings at their initial
defaults. Change them only if your provided specifically
tells you to do so.
Modem setup screen
• The screens shown in steps 5 and 6 below do not appear if you selected An Internet
Application only in step 2 without selecting A Mail Application. In such a case, skip to
step 7 of this procedure.
57
5. After you are finished, tap .
• This displays a screen for configuring your mail account setup.
Input information supplied by your provider.
Input the name you want to be displayed along with your
mail address in outgoing mail.
Mail account setup 1 screen
6. After you are finished, tap .
• This displays another screen for configuring your mail account setup.
Input POP3 and SMTP server names supplied by your
provider.
Select this item if your provider requires authorization to
pick up mail before you are allowed to send mail.
Check with your provider to find out if you need POP
before SMTP.
Mail account setup 2 screen
The screen shown in step 7 does not appear if you selected A Mail Application only in step 2
without selecting An Internet Application. In such a case, skip to step 8 of this procedure.
58
7. After you are finished, tap .
• This displays a screen for configuring you Web browser settings.
If your connection uses a proxy server for Web browsing,
select this option and input the required information
below. Check with your service provider for information
about whether or not you can use a proxy server.
Input the IP address and port number.
Browser setup screen
8. If necessary, tap the
button to backtrack through setting screens to check that settings are
correct.
9. After confirming that all the settings are correct, tap Finish.
• This registers your new connection setup and returns to the initial Connections screen.
Check the list to confirm that the name of the connection
setup you just configured is included.
59
Configuring Advanced Dial-Up Settings
The following procedure describes how to configure advanced settings that appear when you tap
the Advanced settings button on the Access Point Setup screen (page 57).
1. On the Access Point Setup screen, tap Advanced Settings.
Use these settings to specify the number of tries and the
interval between tries when a connection fails because
your access point line is busy.
Use this setting to specify whether authorization protocol
is required when connecting. Normally you should leave
the Do not use option selected. Trying changing to the
Use option if you have trouble connecting.
Dial-up advanced setup 1 screen
2. After you finished, tap
.
Normally you should leave the Auto detect option
selected. If your provider uses a fixed IP address,
uncheck the Auto detect option and input the fixed IP
address.
Input the required information here as supplied by your
provider. Normally, you should specify DNS1 and DNS2
only when the Auto detect option is unchecked.
Dial-up advanced setup 2 screen
3. After all the settings are the way you want, tap OK to save them and return to the Access Point
Setup screen.
60
Testing a Dial-up Connection Setup
Perform the following steps to test a connection setup you created using the procedure under “To
configure a dial-up connection setup”.
1. Turn off your CASSIOPEIA and connect it to the device you plan to use to dial-up your
service provider.
• You can connect to a mobile phone or install a modem card. See the separate Hardware
Manual for details about using a cell phone or modem card.
2. Turn on your CASSIOPEIA.
3. On the Top Menu, double-tap Connections.
• This starts up Connections.
4. On the Connections screen, tap the connection setup you want to use so it is highlighted.
5. Tap Connect.
• This displays the dialog box shown below.
6. Tap Connect.
• This displays the dialog box shown below as your access point is dialed.
61
7. A dialog box like the one shown below appears when a dial-up connection is established. Your
CASSIOPEIA is now connected to the Internet.
This icon appears in the system tray while a dial-up
connection is connected.
• You can now use your CASSIOPEIA to browse Websites and to send and receive e-mail. See
“3-3 Mail” on page 67 and “3-4 Internet” on page 93 for more information.
8. To terminate the dial-up connection, tap Disconnect.
NOTE
• Tapping the Hide Window button on the Dial-up Connection dialog box or tapping anywhere
outside of the dialog box causes it to move to the back where it is hidden. In this case, your
telephone connection is maintained, even though you cannot see the Dial-up Connection dialog
box on your screen.
icon
• To bring the Dial-up Connection dialog box back to the front so you can see it, tap the
in the system tray.
• If you experience problems with establishing or maintaining a dial-up connection, check the
connections between your CASSIOPEIA and phone or modem, and check your dial-up
connection setup. If you can’t locate the cause or solution of your problem, see the
Troubleshooting Guide at the back of this manual.
62
Configuring a LAN Connection
Use the LAN connection setup when you want to connect to the Internet through a LAN
(network) at your office, etc. Note that you should contact the system administrator of the network
to which you are connecting for the information you need when configuring the setup.
To configure a LAN connection setup
1. On the Top Menu, double-tap Connections.
• This starts up Connections and displays a screen like the one shown below.
Dial-up setups you already have configured are listed
here.
2. Tap New Settings....
• This displays a screen like the one shown below for specifying the connection setup name.
Input the name you want to give to the new connection
setup.
Specify which program should use this setup.
Select LAN connection here.
Connection setup screen
63
3. After you are finished, tap .
• This displays a screen like the one shown below.
Tap here and then select the LAN card you are using for
your LAN connection.
If you want to use a fixed LAN IP address for the
CASSIOPEIA, specify the address here. If you want the
IP address detected automatically, select the Auto detect
option.
LAN setup 1 screen
4. After you are finished, tap .
• This displays a screen like the one shown below.
Input a domain name and DNS address.
If you want the DNS address detected automatically,
select the Auto detect option.
LAN setup 2 screen
64
5. After you are finished, tap .
• This displays a screen like the one shown below.
Select this operation to require verification when
connecting to the LAN.
After selecting this option, input a Connection ID and
Password.
LAN setup 3 screen
6. After you are finished, tap .
• This displays a screen for configuring your mail account setup.
• From here, perform steps 5 through 9 of the procedure under “To configure a dial-up
connection setup” on page 56.
Editing a Connection Setup
Use the procedure below to edit the contents of an existing connection setup.
To edit the contents of a connection setup
1. On the Top Menu, double-tap Connections.
• This starts up Connections.
2. Tap the connection setup you want to edit.
3. Tap Edit L → Modify Setting.
• This displays the Connection Setup Name screen of the setup you selected in step 2.
and
buttons to navigate between setup screens and change settings as you like.
4. Tap the
• The procedures you should use for changing settings are identical to those you use for
creating a new setting. See pages 56 through 59 for information about dial-up connection
settings, and page 63 through 65 for information about LAN settings.
5. After everything is the way you want, tap the Finish button on any of the setup screen.
• This registers the edited connection setup and returns to the initial Connections screen.
Copying a Connection Setup
Sometimes it is easier to create a new dial-up connection setup by copying an existing setup and
making changes in the copy as required. In many cases, all you need to do is copy an existing
setting, change the access point phone number, and you are done.
NOTE
Note that you can copy a dial-up connection setup only. You cannot copy the LAN connection
setup.
65
To copy an existing connection setup
1. On the Top Menu, double-tap Connections.
• This starts up Connections.
2. Tap the connection setup you want to copy.
3. Tap Edit L → Copy Setting.
• This creates a copy of the connection setup you selected in step 2. The setup copy is
automatically assigned the same name as the original setup, with a number added at the end.
Example: Original Setup Name: CASIO Dial-up
Setup Copy Name:
CASIO Dial-up (2)
Deleting a Connection Setup
Use the procedure below to delete a connection setup you no longer need. Note that since you can
have only one LAN connection setup registered, you need to use this procedure to delete your
existing setup before you can create a new LAN setup.
To delete a connection setup
1. On the Top Menu, double-tap Connections.
• This starts up Connections.
2. Tap the connection setup you want to delete.
3. Tap Edit L → Delete Setting.
4. In response to the confirmation message that appears, tap Yes to delete the setup, or No to
cancel without deleting anything.
66
3-3 Mail
“Mail” is an application that makes it possible for you to send and receive e-mail with your
CASSIOPEIA. The following are some of the useful features and functions available with Mail.
• Support for multiple accounts
• Powerful mail management tools for creating folders, batch moving multiple messages,
copying, deleting, and moving messages to a storage card, etc.
• Support for sending and receiving attached files
• Phrase memory for quick and easy mail message writing
NOTE
• Mail supports e-mail with a POP3 mail server. Mail does not support IMAP4.
• Use the Connections program to configure your dial-up connection setup and mail account. See
“3-2 Connections” on page 54 for more information.
Starting Up Mail
Starting Up Mail for the First Time
When you start up mail for the first time, you must perform a procedure to set up new mail
account. If you have already used Connections to configure a connection setup, simply start up
Mail and follow the instructions that appear on the CASSIOPEIA screen to setup your new
account.
If you have not yet configured a connection setup, starting up Mail will display a dialog box
asking if you want to go to Connections and create a setup.
To start up Mail for the first time
1. On the Top Menu, double-tap Mail.
• This starts up Mail and displays a message like the one shown below.
67
2. Tap Yes.
• This creates mail accounts for all of the connection setups you have configured in Connections, and displays the account/folder list shown below.
Existing accounts are listed here.
The connection setup name you assign in Connections is
displayed as the account name.
Mail accounts are created for all the connection setups you
have configured in Connections.
Account/folder list
NOTE
• Note that the above procedure is also required the first time you start up Mail after deleting all
Mail accounts.
• If you do not have any connection setups configured in Connections, starting up Mail causes
the message shown below to appear.
Tap Yes to start up Connections and display the new connection setup screen. See “3-2
Connections” on page 54 for information about configuring connection setups.
68
Starting Up Mail After Setting Up an Account
After you set up one or more mail account the first time you start up Mail, starting it up again
displays the account/folder list. Note, however, that if you added a new connection setup with
Connections since the last time you used Mail, starting it up causes a message like the one shown
below to appear.
Tap Yes to configure a mail account for the new connection setup.
Using the Account/Folder List
The account/file list that appears when you start up Mail provides you with a central location for
performing a variety of Mail message management tasks. The following shows a sample account/
file list that contains two accounts.
Account (1)
Folders
Account/folder list
Account (2)
Card
The examples in the following explanations are all based on the above sample list screen.
Account/folder list
• The account/file list shows all of the accounts that currently exist in Mail. Tapping the + to the
left of an account name expands the account to show its contents.
• Each account has four permanent default folders named Inbox, Drafts, Queue, and Sent. Note
that these folders are created automatically for each account, and they cannot be deleted.
• Tapping an account or folder highlights it, which means the account or folder is selected. The
currently selected account or the account that contains the currently selected folder is the
account your CASSIOPEIA will use for sending and receiving Mail messages.
• A card icon is displayed in the account/folder list if your CASSIOPEIA has a storage card in its
slot. Though you cannot configure an account and store it on a storage card, you can move mail
messages to folders on the card. See “Creating Folders and Managing Mail Messages” on page
87 for more information.
69
Account L Menu
Use this menu to create a new account, and to select an existing account to edit or delete it. See
“Managing Accounts” on page 70 for more information.
Folder L Menu
Use this menu to create a new folder, and to select a folder to rename or delete it. See “Creating
Folders and Managing Mail Messages” on page 87 for more information.
Settings Button
Tapping this button displays a dialog box for editing the signature block for outgoing messages,
and for changing a variety of settings related to message creation, receipt, and display. See
“Configuring Mail Program Properties” on page 90 for more information.
Send & Receive Button
Tap this button to send and receive mail messages using the currently selected mail account. See
“To send and pick up mail” on page 72 for more information.
Managing Accounts
The procedures in this section describe how to edit a mail account that was created automatically
when you start up the Mail program, and how to create a new account from scratch.
To edit an existing mail account
1. On the account/folder list screen, tap the account you want to edit.
2. Tap AccountL → Edit Account.
• This displays the dialog box shown below.
3. If you want to rename the account, input the new name into the Account name box.
4. To change the connection setup associated with the account, tap the Use connection setting
box and then select the setup you want from the list that appears.
• Note that you cannot chance to another connection setup when you have only one
configured on your CASSIOPEIA.
70
5. After everything is the way you want, tap OK to save your changes.
• If you changed the connection setup in step 4, the confirmation message shown below
appears when you tap OK.
• If you really want to change the setting, tap Yes to save the changes and return to the account/
folder list.
• To cancel without changing anything, tap No.
To delete an account
1. On the account/folder list screen, tap the account you want to delete.
2. Tap Account L → Delete Account.
• This displays the confirmation message shown below.
3. If you really want to delete the account, tap Yes.
• To cancel without deleting anything, tap No.
To create a new account
1. On the account/folder list screen, tap Account L → New Account.
• This displays the dialog box shown below.
71
2. In the Account name box, input the name you want to give to the new account.
3. Tap the L button next to the Use connection setting box, and then select a connection setup
from the list of providers that appears.
4. Tap OK.
• This creates the new account and returns to the account/folder list screen.
NOTE
If you do not want to select an existing setup in step 3 of the above procedure, tap New
connection setup and then create a new setup. See “3-2 Connections” on page 54 for details on
creating a new connection setup.
Sending and Receiving Mail
There are three different ways you can send and pick up mail.
• Send and pick up mail at the same time
This operation is performed from the account/folder list screen, and it sends all mail currently in
the Queue folder and picks up all mail waiting on the server.
• Pick up mail
This operation is performed from the account/folder list screen, and it picks up all mail waiting on
the server, without sending any mail.
• Send mail
This operation sends all mail currently in the Queue folder only, without picking up any mail. You
can also send one particular mail message alone.
• The procedure below can be used to send and receive mail at the same time or to pick up mail.
• Use the procedure under “Creating an Outgoing Mail Message” on page 74 to send mail only.
To send and pick up mail
1. Start up Mail and display the account/folder list.
2. Select the account you want by tapping it.
3. Tap Send & Receive.
• This displays a dialog box like the one shown below.
4. Tap either Receive or Send & Receive, depending on the type of operation you want to
perform.
• If you are using a dial-up connection, the dialog box shown below appears. Tap Connect.
72
5. Your CASSIOPEIA connects to the server and displays a dialog box like the one shown below.
The receive operation is performed first, followed by send.
6. A dialog box showing the results of the session appears after the send/receive operation is
complete.
• The actual contents of the dialog box depends on the results of your session.
7. Tap OK.
• If you are using a dial-up connection, the dialog box shown below appears. If you do not do
anything, the time counts down and the connection is terminated automatically.
• If you want to disconnect immediately, tap the Disconnect Now button.
• Tap Cancel if you want to remain connected to the Internet without automatic disconnect.
73
Creating an Outgoing Mail Message
This section tells you how to compose and send a Mail message, and how to edit an existing Mail
message.
To compose a new Mail message
1. Start up Mail and display the account/folder list.
2. Open a folder under the account you want to use to send the message by double-tapping it.
• This displays a list of mail messages in the folder. The Queue folder will be used here as an
example.
3. Tap New.
• This displays the message editing screen.
Input the subject of
the message.
Tapping here expands
the message header so
your can input Cc and
Bcc recipients
Input an addressee.
Input body text here.
4. Input a subject, addressee, and the body text of the message.
• You can input an addressee from Contacts, if you want. See “To input a mail address from
Contacts” on page 76 for more information.
• You can input body text using text and expressions you saved in phrase memory, if you
want. See “Using Phrase Memory” on page 78 for more information.
• You can attach files to your mail message, if you want. See “To attach a file to a message”
on page 76 for more information.
74
5. If you want to include Cc or Bcc addressees as recipients of the message, tap
.
• This expands the mail header. Tap the Cc or Bcc button and then input the applicable mail
address in the text box to the right of the buttons.
• Tapping
returns the header to its original size.
6. After your Mail message is the way you want, tap Send L → Queue.
• This stores your Mail message in the Outbox folder. All of the mail messages in the Outbox
folder is sent the next time you perform a Mail send (or send and pick up) operation.
• If you want to send the Mail message you just wrote right away, tap Send L → Send Now
in step 5 instead of Send L → Queue.
NOTE
• You can also use the Signature tab on the setup screen to create a signature block that is added
to the end of your messages. See page 91 for more information.
• Tapping the From field in the screen in step 4 displays a dialog box like the one shown below.
If you have more than one mail account configured in Mail, you can use this dialog box to
change to another mail account for sending the message you are creating.
• Tapping
before you reach step 5 in the above procedure saves your message in the Drafts
folder. You can recall a message in the Drafts folder to work on it later.
To delete a message you are editing
1. On the message editing screen, tap Edit L → Delete Mail.
2. In response to the confirmation message that appears, tap OK to delete the message or Cancel
to cancel without deleting anything.
75
To input a mail address from Contacts
1. On the message editing screen, tap the Contacts button.
• This displays the screen shown below.
2. Put a check mark next to all of the people you want to include as addressees of the message.
.
3. Tap
• This inputs all of the addresses you checked into the text box at the bottom of the screen.
4. If you want, tap the Cc and/or Bcc buttons and repeat steps 2 and 3 for Cc and Bcc mail
addresses.
.
5. After everything is the way you want, tap
• This returns to the message editing screen.
To attach a file to a message
1. On the message editing screen of the message to which you want to attach the file, tap
Edit L → Attach Files.
• This displays a file selection screen.
76
2. Tap the + next to the folder that contains the file you want to attach to expand the folder.
3. Tap the file you want to attach.
displayed, which
• This attaches the file and returns to the message editing screen with the
indicates that a file is attached.
4. If you want to attach more files, tap
.
• This displays the attached file screen, which shows the names and sizes of any files you have
attached up to this point.
5. Tap Add.
• This displays a file selection screen
6. As in step 2, tap the + next to the folder that contains the file you want to attach to expand the
folder.
7. Tap the file you want to attach.
• This attaches the file and returns to the message editing screen.
8. Repeat steps 5 through 7 to attach more files, if you want.
] button on the
9. After you are finished selecting all the attached files you want, tap the [
attached file screen.
• This returns to the message editing screen.
NOTE
• If you have a storage card inserted in the CASSIOPEIA’s card slot, you can click the Card tab
on the file selection screen and select a card file for attachment.
• To remove a file you selected for attachment, tap its name on the attached file screen and then
tap the Remove button.
77
Using Phrase Memory
Phrase memory lets you store up to 255 frequently used words, expressions, and sentences for
later recall when inputting Mail Text.
To input text into phrase memory
1. On the message editing screen, tap anywhere inside the body text field.
• This locates the cursor at the point you tap.
• Make sure none of the body text is selected (highlighted).
2. Tap Edit L → Phrase memory.
• This displays the phrase memory list.
3. Tap the New button.
• This displays the phrase memory editing screen.
Input text here.
4. Input the text you want to save in phrase memory.
5. After everything is the way you want, tap Register.
• This saves the text you input and returns to the phrase memory list.
to return to the message editing screen.
6. Tap
NOTE
• Tapping
on the phrase memory editing screen before tapping Save returns to the phrase
memory list without saving anything.
• Tapping Use This on the phrase memory editing screen returns to the message editing screen
with the text you input inserted at the cursor position. You can also use the procedure below to
save select existing text and save it in phrase memory.
To save selected body text in phrase memory
1. On the message editing screen, drag the stylus across the text you want to save in phrase
memory so it is selected (highlighted).
2. Tap Edit L → Phrase memory.
• This displays the phrase memory editing screen with the text you selected in step 1 in the
input area.
3. Edit the text if you want.
4. Tap Register.
• This saves the text and returns to the phrase memory list.
to return to the message editing screen.
5. Tap
78
To insert phrase memory text into Mail body text
1. On the message editing screen, move the cursor the location where you want to input the
phrase memory text.
• Make sure none of the body text is selected (highlighted).
2. Tap Edit L → Phrase memory.
• This displays the phrase memory list.
3. Tap the phrase memory text you want to insert.
4. Tap the Use This button.
• This returns to the message editing screen and inserts phrase memory text you selected at the
cursor position.
To delete phrase memory text
1. On the message editing screen, tap anywhere inside the body text field.
2. Tap Edit L → Phrase memory.
• This displays the phrase memory list.
3. Tap the phrase memory text you want to delete.
4. Tap the Delete button.
• This deletes the selected text from phrase memory.
To edit phrase memory text
1. On the message editing screen, tap anywhere inside the body text field.
2. Tap Edit L → Phrase memory.
• This displays the phrase memory list.
3. Double-tap the phrase memory text you want to edit.
• This displays the phrase memory editing screen.
4. Edit the text.
5. After everything is the way you want, tap Register.
• This saves the edited text and returns to the phrase memory list.
to return to the message editing screen.
6. Tap
79
Inputting Schedule Format Data Into a Mail Message
You can exchange Calendar data between two BE-300 units by e-mail using a special “Calendar
format.” The following procedure describes how to create a Calendar format mail message to send
Calendar data to another BE-300 unit user. See “To transfer Calendar format body text of a
received mail message to Calendar” on page 87 for information about what you need to do after
you receive a Calendar format mail message.
To create a Calendar format mail message
1. On the message editing screen, move the cursor the location in the body text field where you
want to input the Calendar format text.
2. Tap Edit L → Calendar Format.
• This automatically inserts the text shown below at the cursor position in the body text field.
* Schedule Start
* Subject : SubjectSentence
* StartDate: 9/2/2001
* EndDate: 9/2/2001
* StartTime : 13:00
* EndTime : 15:00
* Location : LocationSentence
* Notice : NoticeSentence : NoticeEnd
* Schedule End
3. Input the required information for all of the fields between Schedule Start and Schedule End.
• The following shows an example of completed Calendar format text.
* Schedule Start
* Subject : Market Research Meeting
* StartDate: 9/2/2001
* EndDate: 9/2/2001
* StartTime : 13:00
* EndTime : 15:00
* Location : Center Meeting Room
* Notice : Please submit materials for researching
business trends : NoticeEnd
* Schedule End
NOTE
• Do not input a day of the week for the date. This format does not support day of the week data.
When inputting the date, be sure to use the same format as the one you selected for the system
date (page 26).
• When inputting the time, use 24-hour format. This format does not support 12-hour format with
AM and PM indications.
• You can use phrase memory to input text into the text fields of the Calendar data format. To do
so, simply locate the cursor in a text field and then perform the operation under “To input text
into phrase memory” on page 78.
• Make sure you input Calendar format data correctly. Using an incorrect date format, inputting a
carriage return on the wrong place, and other input mistakes can result in improper Calendar
data.
80
Displaying a Mail Message
A Mail list screen lets you see the subjects and other information for mail messages you have
received and sent. You can also use a message browsing screen to view the body text and other
details of a particular message
Mail list screen
The Mail list screen shows a list of all the mail messages contained in a particular folder (Inbox,
Sent Items, or other folder). Double-tapping a folder on the account/folder list screen opens the
folder and displays its Mail list screen.
The following shows a typical Inbox screen.
Tapping here displays a list of folders in the account. Tap
a folder name to display its mail messages.
This is a list of mail messages in the folder. Doubletapping a message opens it and displays its message
browsing screen.
Message browsing screen
This screen shows the contents of a particular mail message. Double-tapping a message on the
Mail list screen opens it and displays its message browsing screen.
A typical message browsing screen is shown below.
Tap here to expand the message header. To return the
message header to its abbreviated view, tap
.
81
NOTE
• Double-tapping a mail message on the Drafts list or Output list screen displays the message
contents in the message editing screen, not the message browsing screen. See “To compose a
new Mail message” on page 74 for information about the operations you can perform on the
message editing screen.
Received Message Operations
This section details the various operations you can perform on mail messages you receive from
others.
NOTE
This section assumes you are already familiar with the Mail list screen and message browsing
screen. If you are not, see “Displaying a Mail Message” on page 81.
To reply to a mail message
Perform either one of the following operations.
• On the message list screen of the folder where the message is located, tap the message to
highlight it, and then tap the Re: button.
• Display the message browser screen of the message, and then tap the Re: button.
Either of the above displays a new message editing screen that contains the text of the original
message. Now you can use the procedures under “To compose a new Mail message” on page 74
to compose your reply.
NOTE
• If the message to which you are replying has multiple recipients, tapping Re: displays a dialog
box asking if you want to send a reply to every one. Tap Yes to send your reply to all recipients,
or No to reply only to the sender.
To forward a mail message to another recipient
Perform either one of the following operations.
• On the message list screen of the folder where the message is located, tap the message to
highlight it, and then tap the Fwd: button.
• Display the message browser screen of the message, and then tap the Fwd: button.
Either of the above displays a new message editing screen that contains the text of the original
message. Now you can use the procedures under “To compose a new Mail message” on page 74
to specify the addressee and add body text, if you want.
82
To view the contents of an attached file
A message that has a file attached to it is indicated by an attachment icon that appears on the
message browser screen.
Attachment icon
1. On the message browser screen, tap
.
• This displays the attached file screen.
83
2. Double-tap the attachment file whose contents you want to view.
• If the attached file is an image file (JPG, BMP, GIF, etc.), a screen like the one shown below
appears on your display.
Tap
to return to the attached file screen.
NOTE
• If the attached file is not an image file, double-tapping it causes the program associated with the
file to start up, and then the file opens.
• Your CASSIOPEIA cannot open any attached file that is not associated with a currently
installed program.
To save an attached file to main memory or to a storage card
1. On the message browser screen, tap
.
• This displays the attached file screen.
2. Tap the file you want to save.
3. Tap the Save button.
• This displays a dialog box like the one shown below.
4. Input a file name and specify the location (main memory or card) where you want to save the file.
• You must have a storage card inserted in your CASSIOPEIA’s slot in order to select card as
the storage location.
5. Tap the Save button.
NOTE
• The above procedure always stores files to default folders that are determined according to the
file type. Image files, for example, are always stored to the \My Documents\Photo folder.
84
Displaying an HTML Mail Message
The message browser screen of HTML format mail messages have an html Mail button. Tapping
the html Mail button starts up the Internet program (page 93), and displays the contents of the
message in HTML format.
To add a received message header address to Contacts
1. On the message browser screen header field (From, To, or CC), drag the stylus across the
address you want to add to Contacts so it is highlighted.
2. Tap Edit L → Register in Contacts.
• This displays the screen shown below.
3. In the Name field, input the name of the person whose mail address you are adding.
4. Tap OK.
• This creates a new Contacts record containing mail address under the name you input.
NOTE
• To add other information to the record, start up Contacts.
• Inputting special symbols or other characters not normally used in a name may cause the name
characters to become garbled.
85
To list the hyperlinks in a received mail message
1. On the message browser screen of the message whose hyperlinks you want to list, tap Edit L
→ Hyperlinks.
• This displays the hyperlink list screen like the one shown below, which shows all mail
address and URLs contained in the mail message.
2. Tap
to return to the message browser screen.
To add a mail address inside of body text to Contacts
1. Display the hyperlink list for the message that contains the address.
2. Tap the Register in Contacts button.
• This displays the add address screen.
3. In the Name field, input the name of the person whose mail address you are adding.
4. Tap OK.
• This creates a new Contacts record containing the mail address under the name you input.
NOTE
• To add other information to the record, start up Contacts.
To transfer the body text of a received mail message to Notes
1. On the message browser screen of the message you want to transfer, tap Send to L → Notes.
• This starts up Notes and displays an input screen with the body text of the mail message as
shown below.
Notes
Mail
Message Header
→
Body text
Body text
2. Edit the contents of the transferred text, if you want.
• See “Creating a New Text Document” on page 19 for information about working with a
Notes text document.
86
To transfer Calendar format body text of a received mail message to Calendar
1. On the message browser screen of the message you want to transfer, tap Send to L →
Calendar.
• This starts up Calendar and displays a new appointment screen with Calendar format text
elements assigned as shown below.
Schedule Format Mail Message
Calendar
#Subject
Subject
#Start Date
Start Date
#End Date
#Start Time
End Date
→
Start Time
#End Time
End Time
#Location
Location
#Description
Description
• See “Inputting Schedule Format Data Into a Mail Message” on page 80 for information
about the how to format mail body text as Calendar data.
2. Input data for the other appointment fields, if you want.
• See “Inputting New Calendar data” on page 31 for more information.
NOTE
• If your CASSIOPEIA is unable to interpret the information contained in the mail message, it
displays an alert message when you tap Send to L → Calendar in step 1.
• Note that you cannot transfer Calendar format text to Calendar if the text includes e-mail quote
characters (page 91).
Creating Folders and Managing Mail Messages
In addition to the four permanent default folders (Inbox, Drafts, Outbox, Sent Items) created by
Mail, you can also create your own folders and build a filing system that suits your needs. You can
also create folders on a storage card and save mail messages there, which frees up valuable main
memory space.
To create a new folder
1. Start up Mail and display the account/folder list.
2. Select the account where you want to create the folder by tapping it in the account/folder list.
3. Tap Folder L → New.
• This displays a dialog box for inputting the folder name.
4. Input the name you want to give the folder and then tap OK.
To rename a folder
1. On the Mail account/folder list screen, tap the folder whose name you want to change.
2. Tap Folder L → Rename.
• This displays a dialog box for inputting the folder name.
3. Input the new name you want to give the folder and then tap OK.
87
To delete a folder
Warning!
Deleting a folder also deletes all mail messages inside of it.
1. On the Mail account/folder list screen, tap the folder you want to delete.
2. Tap Folder L → Delete.
3. In response to the confirmation message that appears, tap Yes to delete the folder or No to
cancel without deleting anything.
To move mail messages from one folder to another
1. Display the message list screen of the folder that contains the message you want to move.
• To move a message from the Inbox folder to another folder, for example, display the
account/folder list screen and then double-tap the Inbox folder.
2. Tap the Organize button.
• This displays a message selection screen like the one shown below.
88
3. Place check marks into the boxes next to all the messages you want to move.
• To check all of the messages in the folder, tap Edit L → Check All. To uncheck all of the
messages, tap Edit L → Uncheck All.
4. Tap Edit L → Move to.
• This displays a dialog box for selecting the destination folder.
5. Double-tap the folder to which you want to move the selected messages.
• As soon as you do, all of the selected mail messages are moved to the destination folder.
• After the move operation is complete, the display returns to the message selection screen in
step 2.
to return to the message list screen.
6. Tap
To copy mail messages from one folder to another
1. Display the message list screen of the folder that contains the messages you want to copy.
2. Tap the Organize button.
• This displays the message selection screen (page 88).
3. Place check marks into the boxes next to all the messages you want to copy.
4. Tap Edit L → Copy to.
• This displays a dialog box for selecting the destination folder.
5. Double-tap the folder to which you want to copy the selected messages.
• As soon as you do, all of the selected mail messages are copied to the destination folder.
• After the copy operation is complete, the display returns to the message selection screen in
step 2.
to return to the message list screen.
6. Tap
To delete mail messages
1. Display the message list screen of the folder that contains the messages you want to delete.
2. Tap the Organize button.
• This displays the message selection screen (page 88).
3. Place check marks into the boxes next to all the messages you want to delete.
4. Tap Edit L → Delete.
5. In response to the confirmation message that appears, tap OK to delete the messages or
Cancel to cancel without deleting anything.
to return to the message list screen.
6. Tap
89
To change the read/unread status of mail messages
1. Display the message list screen of the folder that contains the messages whose read/unread
status you want to change.
2. Tap the Organize button.
• This displays the message selection screen (page 88).
3. Place check marks into the boxes next to the messages whose status you want to change.
4. To make all of the checked messages unread messages, tap Edit L → Mark Unread. To
make all of the checked messages read messages, tap Edit L → Mark as Read
to return to the message list screen.
5. Tap
Configuring Mail Program Properties
The procedures in this section describe how to use the Mail program’s Properties dialog box to
create a signature block for outgoing messages, and how to configure other settings for creating,
picking up, and displaying mail messages.
To display Mail properties
1. On the account/folder list screen, tap the Settings button.
• This displays the Mail Properties dialog box, with the Signature tab displayed first.
2. Tap one of the tabs and makes the settings you want.
• See “Mail Program Properties” below for details about the settings you can make with each
of the tabs.
.
3. After everything is the way you want, tap
• This returns to the account/folder list screen.
Mail Program Properties
This section provides details about all of the settings you can make on the Mail program
Properties dialog box.
90
Signature Tab
• Input text you want to use as your signature block into the text box on this tab. Signature block
text is added automatically to the end of mail messages you send.
• If you do not want to use a signature block, simply leave the text box on the Signature tab
blank.
Write Tab
(A)
(B)
(C)
(A) Selecting this option causes the text in the text box below it to be input into the Subject field
of all outgoing messages for which you do not input subject text.
(B) Input the character you want to use as a quote character, which is inserted at the head of each
line of original message text that is automatically inserted into your message when you reply
to a message (page 82) or forward a message to another recipient (page 82).
(C) Use this box to input text that you want to be inserted automatically into the body text field of
all new mail messages you compose.
Receive Tab
(A)
(B)
(C)
(D)
(A) Selecting the Kept option causes mail messages to be left on your server after you pick them
up. Selecting Deleted causes mail messages to be deleted from your server after you pick
them up.
(B) Selecting this option causes any mail messages that are larger than the limit you specify in
the text box below the option not to be picked up.
(C) Checking this option saves mail messages only, without any files that may be attached.
(D) Use this box to specify a reply e-mail address when you want reply mail to go to an address
that is different from the one you use for sending mail.
91
Disp Tab
(A)
(B)
(A) Checking this option causes word wrapping of text inside the body text field of the message
browser screen.
(B) Use this setting to specify one of three sizes for Mail program display text. This setting
controls the body text field of the message editing screen and message browser screen.
92
3-4 Internet
Internet is a Web browser program that lets you view Web pages on the Internet. The following
are the functions available with the Internet program.
•
•
•
•
•
•
•
•
Support for frames
Full-screen display of a particular frame
50% reduction of a page display image
Web page save to main memory or a storage card for off-line viewing
Saving of specific Web page images
Bookmarks with arrange function
20-record historical log
On-screen manual disconnect/connect button
NOTE
• Use the Connections program to configure your dial-up connection setup and proxy server
settings. See “3-2 Connections” on page 54 for more information.
• Accessing a very large page can cause the Internet application to shut down suddenly. If this
happens, restart the Internet application and try accessing the page again.
Using the Browser Screen
Starting up Internet displays a browser screen like the one shown below.
Address bar
Page contents
The following are brief descriptions of the buttons and menus that are available on the browser
screen.
Address bar
When you want to display a specific page, input its URL (Website address) into the address bar,
.
and then tap
Button
Returns to the page you were viewing before the current page.
Button
After returning to a previous page using the
through the pages.
button, tap the
93
button to move back forward
(STOP) Button
Tap this button to stop loading of a page that is not fully loaded yet. Note that tapping this button
does not disconnect you from your server, if you are connected.
(Reload) Button
Reloads the currently displayed page.
(Bookmark) Button
Displays the bookmark screen (page 97).
/ (Connect/Disconnect) Button
Connects to or disconnects from the access point specified on the Internet Properties dialog box
(page 95).
(Frame) Button
When viewing a page that contains frames, tap this button when you want to select a different
frame.
Button
Quits the Internet program.
Func L Menu
This menu contains commands that let you perform the operations described below.
To do this:
Save the currently displayed page (page 101)
Save an image on the currently displayed page (page 103)
Open a previously saved page (page 102)
Toggle display of the page URL on and off
Toggle display of page images on and off
Toggle the page size between normal (100%) and small (50%)
Select the display font size (large, medium, small)
Select display character encoding (ISO8859-1, ISO8859-2)
Expand the selected frame to fill the entire screen
Copy selected text to the clipboard
Display program properties (page 95)
Display program version information
94
Select this command:
Save Web Page
Save Parts
Open Web Page
Show URL
Show Graphics
Small Display
Font
Encoding
Full-screen Frame
Copy Selected Area
Setting
Version
Configuring Internet Program Properties
Before you use the Internet program to surf the Net, you must first configure its properties as
described in this section.
Important!
Before trying to perform the following procedure, you should first configure a connection setup
for Internet Web browsing. See “3-2 Connections” on page 54 for more information.
1. Start up the Internet program, and then tap Func L → Settings
• This displays the Properties dialog box.
2. On the Connection tab, configure the settings described below.
• Tap the L button next to the “Configuration” box, and then select a connection setup from
the list of providers that appears.
• If you want the telephone connection to be maintained even when you quit the Internet
program, select the “Do not disconnect after quitting. ” option.
3. Next, tap the Web tab and then configure the settings described below.
• If you want a particular page to appear first whenever you start up the Internet program,
input the URL of the page into the “Start page” text box. You can leave the text box blank if
you do not want to specify any start page.
• Some Websites place verification information files, called “cookies” into the memory of
computers that access them. If you want to allow Websites to put cookies on your computer’s hard disk, check the “Accept cookies” option. Unchecking this option will not allow
cookies to be placed on your hard disk, but it can also make it impossible for you to visit
certain Websites.
• If you want to enable Java script on your CASSIOPEIA, select the “Use Java script” option.
• You can configure the Internet program so it displays a Web page you have saved in
CASSIOPEIA memory whenever you start up the Internet browser. See “Displaying a Saved
Web Page When Starting Up the Internet Browser” for more information.
.
4. After everything is the way you want, tap
• This returns to the browser screen.
Displaying a Saved Web Page When Starting Up the Internet Browser
Use the following procedure to set up the Internet program so a Web page you have saved in
CASSIOPEIA memory appears whenever the Internet browser is started up.
1. Start up the browser, navigate to the location in CASSIOPEIA memory where the Web page is
located, and display the page.
2. Select all of the text displayed in the address bar, and then tap Func L → Copy Selected
Area.
3. Tap Function L → Setting.
• This displays the Properties dialog box.
4. Tap the Web tab.
5. Tap the “Start page” text box so the cursor is displayed inside it.
6. Tap Edit L → Paste.
to close the dialog box.
7. Tap
95
Displaying a Web Page
To display a Web page
1. Start up Internet.
2. In the address bar, input the URL of the page you want to view.
button.
3. Tap the
• The message shown below appears if you are not connected to your server at this time. Tap
Connect.
Note that the above message appears only when you are
using a dial-up connection.
3. Once the connection is established and you are logged in, the page whose URL you specified
in step 2 should appear on the browser screen.
4. After the page is fully displayed, you could terminate the connection and view it off-line. To
button.
terminate your connection, tap the
• If you are using a dial-up connection, the dialog box shown below appears. If you do not do
anything, the time counts down and the connection is terminated automatically.
• If you want to disconnect immediately, tap the Disconnect Now button.
• Tap Cancel if you want to remain connected to the Internet without automatic disconnect.
NOTE
If the start page you have specified is a page on the Internet, your CASSIOPEIA uses the
currently selected connection setup to dial up your service provider to display the start page
whenever you start up the Internet program. See “Configuring Internet Program Properties” on
page 95 for information about the start page.
To terminate a dial-up connection
When using a dial-up connection, your CASSIOPEIA automatically dials up your Internet service
provider whenever you perform any of the following operations with the Internet program.
• Whenever you start up the Internet program when the Start Page is a page on the Internet
button
• When you input a URL into the address bar and tap the
• When you select a bookmark (page 97) for a page that is on the Internet
button.
You can also launch the dial-up process manually by tapping the browser screen’s
button while connected breaks the connection.
Tapping the browser screen’s
96
To display a full-screen view of a particular frame
1. When a page that contains frames is displayed on the browser screen, tap the
button.
• This displays a frame selection screen with the currently selected frame indicated by a red
boundary around it.
2. Tap Func L → Full-screen Frame.
• This causes the selected frame to be enlarged so it fills the entire screen.
Using Bookmarks
The Internet program’s bookmark function lets you save the URL’s and titles of pages for future
reference. When you need to visit a page again, simply select its bookmark.
NOTE
• Do not use special symbols or accented characters in a Web page title.
To bookmark the currently displayed page
1. On the browser screen, display the page you want to bookmark.
button.
2. Tap the
• This displays the bookmark screen shown below.
Bookmarks
Folder
You can manage your bookmarks by storing them in
folders. You can use Organize at any time to move
bookmarks between folders and to delete bookmarks you
no longer need.
3. Tap the Add Page Being Browsed button.
• This displays a dialog box with the current page’s URL and title.
The page title is inserted here automatically. With some
pages, this box may remain blank.
The page address is inserted here automatically.
97
4. Change the page title and URL, if you want.
5. After everything is the way you want, tap OK.
• This returns to the bookmark screen.
• To return to the browser screen from the bookmark screen, tap
.
To register a new bookmark manually
1. On the browser screen, tap the
button.
• This displays the bookmark screen.
2. Tap the New button.
• This displays a dialog box for inputting the URL and title.
3. Input the page title and URL you want, and then tap OK.
• This returns to the bookmark screen.
To edit an existing bookmark
1. On the browser screen, tap the
button.
• This displays the bookmark screen.
2. Select the bookmark you want to edit by tapping it.
3. Tap the Edit L button.
• This displays a dialog box for inputting the URL and title.
4. Edit the page title and URL.
5. After everything is the way you want, tap OK to save your changes.
• This returns to the bookmark screen.
To use a bookmark to jump to a page
1. On the browser screen, tap the
button.
• This displays the bookmark screen.
2. Double-tap the bookmark whose page you want to view.
• This returns to the browser screen, which displays the page for the bookmark you doubletapped.
Managing Your Bookmarks
You can manage your bookmarks by storing them in folders. This means you can group your
bookmarks according to topic, purpose, or any other classification that suits your needs.
98
To create a new folder
1. On the browser screen, tap the
button.
• This displays the bookmark screen.
2. Tap the Organize button.
• This displays the bookmark organizer screen.
Click to display a folder tree.
3. Navigate to the folder in which you want to create a new folder.
• To create a folder inside of an existing folder, double-tap the existing folder to display its
contents.
• If the currently displayed folder is located inside of another folder, you can click the L
button to display the folder hierarchy, and select a higher folder there.
4. Tap the New Folder button.
• This displays a dialog box for inputting the new folder name.
5. Input the new name you want to give the folder and then tap OK.
• This returns to the bookmark screen, which now shows your newly created folder.
.
• To return to the browser screen from the bookmark screen, tap
To rename a folder
1. Display the bookmark screen.
2. Select the folder whose name you want to change by tapping it.
3. Tap the Edit button.
• This displays a dialog box for inputting the folder name.
4. Input the new name you want to give the folder and then tap OK.
• This returns to the bookmark screen.
99
To move a bookmarks and folders to another folder
1. On the browser screen, tap the
button.
• This displays the bookmark screen.
2. Tap the Organize button.
• This displays the bookmark organizer screen.
3. Place check marks into the boxes next to all the bookmarks and folders you want to move.
• Tapping Edit L → Check All checks all the bookmarks and folders. Tapping Edit L →
Uncheck All unchecks all the bookmarks and folders.
4. Tap Edit L → Move to.
• This displays a dialog box for selecting the destination folder.
5. Select the folder you want by tapping it.
• Tapping the destination folder moves all the checked bookmarks and folders there.
100
To delete bookmarks and folders
1. On the browser screen, tap the
button.
• This displays the bookmark screen.
2. Tap the Organize button.
• This displays the bookmark organizer screen.
3. Place check marks into the boxes next to all the bookmarks and folders you want to delete.
4. Tap Edit L → Delete.
5. In response to the confirmation message that appears, tap OK to delete the selected bookmarks
and folders, or Cancel to cancel without deleting anything.
NOTE
Note that deleting a folder also deletes all bookmarks and folders inside of it.
Saving a Web Page
You can use the following procedure to save a page to main memory or a storage card and view it
later off-line.
To save a Web page
1. On the browser screen, display the page you want to save.
2. Tap Function L → Save Web Page.
• This displays the Save Page dialog box.
3. Input a file name and specify the location (main memory or card) where you want to save the
page.
• You must have a storage card inserted in your CASSIOPEIA’s slot in order to select card as
the storage location.
4. After you are finished, tap Save.
• This starts the save operation, which is indicated by the message “Saving...” appearing on
the display. To cancel the save operation part way through, tap the Cancel button on the
message dialog box.
• The message dialog box disappears when the page save operation is complete.
NOTE
• Do not terminate a connection while a save operation is in progress.
• Pages saved using the above procedure are always stored in \My Documents\WebPage, either in
main memory or on a storage card.
• Saving a Web page causes the displayed page to be reloaded. This means you need to be
connected to the Internet in order to save a Web page.
• You may not be able to save or display a Web page correctly if you use special characters or
accented characters in a Web page name.
• You cannot save a Web page you are browsing off line.
101
To open a saved Web page
1. On the browser screen, tap Function L → Open Web Page.
• This displays a dialog box like the one shown below.
To open a page you have saved on a storage card, tap
Card.
2. Double-tap the page you want to open.
• This displays the page.
Managing Saved Pages
You can move and copy saved pages between main memory and a storage card. You can also
rename and delete pages as required.
To move saved pages between main memory and a storage card
1. On the browser screen, tap Function L → Open Web Page.
• This displays a dialog box for opening a Web page.
2. Tap the Organize button.
• This displays a web page organizer screen.
3. Tap the Main tap or Card tab to select the location of the pages you want to move.
4. Place a check mark into the boxes next to all of the pages you want to move.
• Tapping EditL → Check All checks all the pages. Tapping Edit L → Uncheck All
unchecks all the pages.
5. Tap EditL → Move to Card or Move to Main.
• This moves the pages you selected in step 4.
twice.
6. To return to the browser screen, tap
To copy saved pages between main memory and a storage card
1. On the browser screen, tap Function L → Open Web Page.
• This displays a dialog box for opening a Web page.
2. Tap the Organize button.
• This displays a web page organizer screen.
3. Tap the Main tap or Card tab to select the location of the pages you want to copy.
4. Place a check mark into the boxes next to all of the pages you want to copy.
5. Tap EditL → Copy to Card or Copy to Main.
• This copies the pages you selected in step 4.
twice.
6. To return to the browser screen, tap
102
To delete Web pages
1. On the browser screen, tap Function L → Open Web Page.
• This displays a dialog box for opening a Web page.
2. Tap the Organize button.
• This displays a web page organizer screen.
3. Place a check mark into the boxes next to all of the pages you want to delete.
4. Tap Edit L → Delete.
5. In response to the confirmation message that appears, tap OK to delete the selected pages, or
Cancel to cancel without deleting anything.
twice.
6. To return to the browser screen, tap
Saving Web Page Graphic Elements
You can use the following procedure to select a particular graphic element on a page and save it as
a graphic file.
NOTE
• Do not use special symbols or accented characters in a part name.
To save a Web page graphic element
1. On the browser screen, display the page that contains the graphic element you want to save.
2. Tap Function L → Save Parts.
• This causes a screen for selecting graphic elements like the one shown below to appear.
3. On the browser screen, tap the graphic element you want to save.
• This displays a dialog box for saving graphic elements.
4. Change the file name if you want, and then tap Save.
• This starts the save operation, which is indicated by the message “Saving...” appearing on
the display. To cancel the save operation part way through, tap the Cancel button on the
message dialog box.
• The message dialog box disappears when the save operation is complete.
103
Chapter 4 Imaging and Music
Programs
4-1 Photo Viewer
Photo Viewer is a program you can use to view graphic images on your CASSIOPEIA screen. It
includes a thumbnail index screen and a slideshow feature. With an optionally available Digital
Camera Card, you can even use your CASSIOPEIA to record images for display using Photo
Viewer
Thumbnail index screen
Camera screen
NOTE
To use Photo Viewer, you need to install it from the bundled CD-ROM. See Chapter 6 of this
User’s Guide for information about installing programs on your CASSIOPEIA.
Image File Formats Supported by Photo Viewer
Photo Viewer supports the image file formats listed below.
Note that you may not be able to display particular image files, even if they are one of the formats
listed below.
• JPEG (JPEG or JPG )
• BMP
• GIF
• PNG
4-1-1 Recording
Photo Viewer lets you record snapshots. You can also record a series of stop action snapshots over
a specific period. Images recorded using Photo Viewer are saved as JPEG format files.
104
Important!
• You need to purchase an optionally available Digital Camera Card (JK-710DC) to record digital
images.
• Do not install the Mobile Camera Application that comes with the digital camera card
onto your CASSIOPEIA.
Recording Operations
Getting Ready
Check the following points before trying to record.
• Make sure the Digital Camera Card is correctly installed into the card slot of your
CASSIOPEIA. See the separate documentation that comes with the Digital Camera Card for
details about installation.
• See the separate documentation that comes with the Digital Camera Card for information about
adjusting the focus range, rotating the lens, and other Digital Camera Card operations.
• Check the remaining power levels of the battery pack of your CASSIOPEIA. If it is low,
recharge it.
To record snapshots
1. Start up Photo Viewer.
2. If the thumbnail index screen appears first, tap
to display the camera screen.
Folder name
Status bar
Icon bar
Viewfinder
Control panel
• Check to make sure that the message Ready to record is in the status bar. See “Interpreting
Status Bar Information” on page 107 for details.
.
3. Enter the Snapshot Mode by tapping
• Steps 4 through 7 cover other pre-shutter release settings that are not essential and may be
skipped if you want.
4. Specify the image quality.
• On the control panel, tap the image quality button to cycle through the image quality settings
shown below.
.................. Fine (highest quality, largest file size)
.................. Normal (medium quality, medium file size)
.................. Economy (lowest quality, smallest file size)
105
5. Specify the image size.
• On the control panel, tap the image size button to cycle through the image size settings
shown below.
................... VGA (640 × 480)
................... 1/4 VGA (320 × 240)
................... 1/9 VGA (212 × 160) : This setting can be used for stop action only.
................... 1/16 VGA (160 × 120) : This setting can be used for stop action only.
6. Make white balance and other settings as required.
button. This causes icons showing the current record settings to appear in the
• Tap the
icon bar.
• See “Configuring Record Settings” on page 108 for details about the meaning of each icon
and how to make these settings.
7. Specify the folder where you want to store the recorded image.
• The folder name box shows the currently selected folder where image you record will be
stored. To select a different folder, tap the folder name box, tap the folder’s name on the
dialog box that appears, and then tap OK.
• See “4-1-5 Folder and File Operations” on page 117 for information about creating new
folders.
8. Rotate the focus adjustment dial of the lens to focus the subject.
9. Record the image.
button or OK
• Compose the image on the CASSIOPEIA screen and then tap the
button to record the image and store it as a JPEG file.
again.
• To record more images, simply tap the
to change to the thumbnail index.
• To view images you just recorded, tap
NOTE
File names are assigned automatically to images as you record them. See “File Names” on page
107 for more information.
Stop Action Images
Stop Action recording lets you record a series of images that effectively break action into a series
button depends on the
of segments. The number of images recorded when you press the
image size, as shown in the table below.
Image Size
VGA (640 × 480)
1/4VGA (320 × 240)
1/9VGA (212 × 160)
1/16VGA (160 × 120)
Number of Images
2
8
12
32
The image recording procedure is identical to that under “To record snapshots” on page 105,
button to enter the Stop Action Mode, instead of pressing
except that in step 3 you press the
button.
the
106
NOTE
• In the Stop Action Mode, recording continues and the image on the display remains unchanged
until all the images are recorded.
• After image recording is complete, a dialog appears telling you that the images are being stored
in memory.
• You can specify how many images are recorded per second. See “Configuring Record Settings”
on page 108 for details.
Using Timer Recording
You can set a timer for snapshot and stop action recording so the record operation starts after 10
button on the control panel. This enables the
seconds have passed. To use the timer, tap the
.
timer, which is indicated by the timer button changing to
• The timer time counts down on the display.
button or by changing to another
• You can interrupt the timer countdown by tapping the
screen.
button so it changes to
.
• To cancel timer operation, tap the
Interpreting Status Bar Information
The status bar shows the status of Photo Viewer, and the number of snapshots you can store under
current settings.
“Ready to record”
Press the SHUTTER button to record.
“Setup failed”
Recording cannot be performed because the Digital
Camera Card is not installed in the CASSIOPEIA
correctly, etc.
Shows the number of snapshots you can
store under current settings.
File Names
File names are assigned to image files using the following formats.
Snapshots
Example:
PIC
06
23
0001
.jpg
Indicates snapshot
Month
Day
Number
Extension
Stop Action Images
Example: CON 06 23 0001 .jpg - CON
Indicates stop action image
107
06
23
0008
.jpg
Month
Day
Number
Extension
Configuring Record Settings
On the camera screen, tap
to display the Record Settings dialog box.
Continuous record interval
For this interval:
15 images per second
10 images per second
5 images per second
Select this option:
Short
Normal
Long
White Balance
When shooting under this type of lighting:
Sunlight
Light bulbs
Fluorescent light
Any type
Select this option:
Outdoor daylight ( )
Incandescent lighting ( )
Fluorescent lighting ( )
Auto ( )
Record Mode
For this type of shot:
Portraits, scenery, etc.
Business cards
• Selecting the business card recording(
Select this option:
Normal recording ( )
Business card recording ( )
) disables the white balance setting.
Adjusting Camera Screen Brightness
You can use the following procedure to make separate settings for camera screen brightness
during battery-powered operation and external AC power operation.
108
To adjust the camera screen brightness
1. On the camera screen, tap Brightness to display the dialog box shown below.
2. Drag the sliders left to reduce brightness and right to increase brightness.
• Note that the upper slider controls brightness under battery power, while the lower slider
controls brightness under AC adapter power.
• The brightness settings you make are applied to the record preview screen only.
3. After making the settings you want, tap OK to apply them.
4-1-2 Using the Thumbnail Index Screen
The thumbnail index screen shows six thumbnails of snapshots.
Folder name
A red frame indicates the
currently selected image.
Its file name is also
highlighted. Use the
cursor keys to select
another image.
File name
indicates main
memory file,
indicates storage card
file.
Thumbnail
Shows the snapshot.
Thumbnail index screen
You can perform the following operations from the thumbnail index screen.
•
•
•
•
•
•
•
Select a folder
Display the snapshot screen
Display the slideshow screen
Create, rename, or delete folders
Rename, move, or delete files
Automatically generate thumbnails on the thumbnail index
Create a Mail message with an attached image
Each of these operations is described in detail in the following sections of this manual.
109
Selecting the Thumbnail Index Screen Folder
The thumbnail index screen shows all of the snapshots in the currently selected folder. To change
to another folder, follow the steps below.
1. Tap Function L → Folder... or tap Folder name box.
• This displays the Select Folder dialog box.
Use this dialog box to create a new folder, or to rename or
delete an existing folder. See “Folder Operations” on page
117 for more information.
2. Select the folder you want by tapping it.
3. Tap OK.
• This returns to the thumbnail index screen, which now shows the contents of the folder you
selected in step 2.
NOTE
• The thumbnail index automatically generates thumbnail files for the images it displays.
• Photo Viewer can access only folders under My Documents\Photo in CASSIOPEIA nand disk
or on a storage card.
Refreshing a Thumbnail Index
You should refresh the thumbnail index when the File Manager screen does not accurately show
the image file contents of a folder. The thumbnail index screens show only files for which
thumbnails have been generated. Note that thumbnails are not displayed for image files you move
to the current thumbnail index screen folder using File Manager (page 135) or some other
program. You can make such files appear by performing the thumbnail index refresh operation
below.
To refresh a thumbnail index
While the thumbnail index you want to refresh is on the screen, tap the Func L menu and then
tap Refresh Thumbnails.
Creating a Mail Message with an Attached Image
The following procedure creates a new Mail message with the image currently selected on the
Photo Viewer thumbnail index screen attached.
To create a Mail message with an attached image
1. On the Photo Viewer thumbnail index screen, select the image want to attach to the Mail
button.
message and then tap the
• This starts up Mail and displays a message input screen with the image you selected attached.
2. Specify the address of the recipient, and make any changes to the subject and body text that
you want.
• See “3-3 Mail” on page 67 for more information about writing and sending e-mail messages.
110
NOTE
In step 1 of the above procedure, you could also display the snapshot screen of the image you
want to attach and then tap .
Changing to a Different Screen
Use the following procedures when you want to change to another screen from the thumbnail
index screen.
To go to:
Tap:
The snapshot screen for the selected snapshot
The slideshow of the folder that contains the selected snapshot
The camera screen
4-1-3 Playing Back Images using Snapshot Screen
Displaying a Specific Snapshot
You can select one of the thumbnails on the thumbnail index screen and then display a large-size
image in the snapshot screen.
Thumbnail index screen
Snapshot Screen
You can display the large-size image of a thumbnail using any of the following methods.
• Double-tap the thumbnail of the image you want to display.
• Tap the thumbnail of the image you want to display so its name is highlighted, and then tap .
• Tap the thumbnail of the image you want to display so its name is highlighted, and then press
the CASSIOPEIA’s OK button.
To return to the thumbnail index screen from the snapshot screen, tap the
111
button.
Using the Snapshot Screen
There are four different snapshot screen views: compressed, uncompressed, zoom, and fullscreen.
Compressed View
Uncompressed View
Zoom View
Full-screen View
Compressed View ......... This view displays the entire image so it appears like a photograph.
Uncompressed View ..... This view displays the image in actual-size. In this view, you have to
scroll the image to view the parts that do not fit on the screen.
Zoom View ................... This view enlarges the image to twice its normal size.
Full-screen View ........... This view rotates the image and adjusts its size so it fits within the screen
area.
112
Changing the Snapshot Screen View
Use either of the following procedures to select compressed, uncompressed, zoom, or full-screen
as the snapshot screen view.
To change the snapshot screen view
• On the Size menu, tap Compressed, Uncompressed, Zoom, or Full Screen.
• Press the CASSIOPEIA’s OK button to cycle through the four views in the sequence:
compressed - uncompressed - zoom - full screen.
• Tapping the display while the full screen view is being used switches to the compressed view.
About the Snapshot Screen Status Bar
File name
Total number of index files
File number (in the thumbnail index screen)
Scrolling Images on the Snapshot Screen
Use the following procedure to scroll through images on the snapshot screen, without returning to
the list screen. Images are scrolled in the sequence they are listed on the thumbnail index screen.
To change the snapshot screen image
To do this:
Scroll back
Scroll forward
Press this CASSIOPEIA cursor button:
Up or left
Down or right
Displaying the File Properties of a Snapshot
The file properties dialog box provides you with information about the file whose image is
currently displayed on the snapshot screen.
113
To display the file properties of a snapshot
1. On the snapshot screen, tap
.
2. To close the file properties dialog box, tap OK.
Changing to a Different Screen
Use the following procedures when you want to change to another screen from the snapshot screen.
To go to:
Tap:
The thumbnail index screen that contains the displayed snapshot
A slideshow of the folder that contains the displayed snapshot
The camera screen
4-1-4 Playing Back Images using Slideshow Screen
Displaying the Slideshow Screen
The slideshow screen lets you sequentially play back snapshots in the condensed view.
Thumbnail index screen
Slideshow Screen
114
To display the slideshow screen
On the thumbnail index screen or snapshot screen, tap .
To return to the snapshot index from the slideshow screen, tap the
button.
Using the Slideshow Screen
Status bar
Control panel
To control image playback with the on-screen control panel
To do this:
Do this:
Start the slide show
Images appear in the same sequence they are arranged on the
thumbnail index screen, for the amount of time you set using the
slideshow settings dialog box described on page 116.
Tap
.
Stop the slideshow
Tap
.
Toggle the slideshow direction between forward and reverse
Tap
.
Jump to a specific image.
Slide
To control image playback with CASSIOPEIA buttons
To do this:
Start the slide show
Stop the slideshow
Scroll forward to the next image
Scroll back to the previous image
Press this button:
OK
ESC
Down or right cursor button
Up or left cursor button
NOTE
Status bar information is identical to that described under “About the Snapshot Screen Status Bar”
on page 113.
115
Making Slideshow Settings
Tapping Settings button displays a dialog box for controlling the playback interval and the repeat
setting.
Playback Interval ... Use this setting to specify how long each image should remain displayed
before changing to the next one.
Auto Repeat ........... Check this box if you want the slideshow to restart from the first image in the
thumbnail index screen after the last image is reached.
After making the settings you want, tap OK to close the dialog box.
Changing to a Different Screen
Use the following procedures when you want to change to another screen from the slideshow
screen.
To go to:
Tap:
The thumbnail index screen that contains the displayed snapshot
The snapshot screen for the displayed snapshot
The camera screen
Adjusting Slideshow Screen Brightness
You can adjust the screen brightness level of the slideshow screen. Separate settings can be made
for operation under battery power and operation under AC adapter power.
To adjust slideshow screen brightness
1. On the slideshow screen, tap Brightness to display the dialog box shown below.
116
2. Drag the sliders left to reduce brightness and right to increase brightness.
• Note that the upper slider controls brightness under battery power, while the lower slider
controls brightness under AC adapter power.
• The brightness settings you make are used during slideshow playback only.
3. When the settings are the way you want, tap OK to apply them and close the dialog box.
NOTE
The brightness settings you make here do not affect the brightness of the preview screen during
recording. See page 108 for information about recording screen brightness.
4-1-5 Folder and File Operations
You should perform all Photo Viewer folder and file operations on the thumbnail index screen.
Folder Operations
On the thumbnail index screen, tap Func L → Folder.... This displays the Select Folder dialog
box, which is the screen from which you should start all folder operations.
Select Folder Dialog Box
To create a new folder
1. Display the Select Folder dialog box.
2. Tap New.
• This displays the New Folder dialog box.
3. Input the name you want to give to the folder into the Input Name box, and then tap the OK
button.
To rename a folder
1. Display the Select Folder dialog box.
2. Tap the folder whose name you want to change.
3. Tap Rename.
• This displays the Rename dialog box.
4. Input the new name you want to give the folder and then tap OK.
To delete a folder
1.
2.
3.
4.
Display the Select Folder dialog box.
Tap the folder you want to delete.
Tap Delete.
In response to the confirmation message that appears, tap OK to delete the folder or Cancel to
cancel without deleting anything.
117
File Operations
Use the commands on the thumbnail index screen Func L to perform operations on image files
whose formats are supported by Photo Viewer.
To rename a file
1. On the thumbnail index screen, tap the thumbnail of the image whose file name you want to
change.
2. Tap Func L → Rename.
• This displays the Rename dialog box.
3. Input the new name you want to give to the file and then tap OK.
To move a file
1. On the thumbnail index screen, tap the thumbnail of the image you want to move.
2. Tap Func L → Move....
• This displays the Move dialog box.
3. Select the folder to which you want to move the file, and then tap OK.
To move all image files from one folder to another
1. Display the thumbnail index screen for the folder that contains the image files you want to
move.
• See “Selecting the Thmubnail Index Screen Folder” on page 110.
2. Tap Func L → Batch Move....
• This displays the Batch Move dialog box.
3. Select the folder to which you want to move all the image files, and then tap OK.
• This moves all the image files displayed on the thumbnail index screen of the folder you
selected in step 1 to the folder you specified in step 3.
To delete a file
1. On the thumbnail index screen, select the thumbnail of the image whose image file you want
to delete.
2. Tap Func L → Delete....
3. In response to the confirmation message that appears, tap OK to delete the image file or
Cancel to cancel without deleting anything.
To delete all image files in a folder
1. Display the thumbnail index screen for the folder that contains the image files you want to
delete.
• See “Selecting the Thumbnail Index Screen Folder” on page 110.
2. Tap Func L → Batch Delete....
3. Specify whether or not you also want to delete read-only image files checking or unchecking
the option on the confirmation dialog box that appears.
4. Tap OK to delete all the image files in the folder you selected in step 1, or Cancel to cancel
without deleting anything.
118
4-2 Movie Player
Movie Player makes it possible for you to play movie files on the screen of your CASSIOPEIA.
Thumbnail index screen
Movie Playback Screen
NOTE
• To use Movie Player, you need to install it from the bundled CD-ROM. See Chapter 6 of this
User’s Guide for information about installing programs on your CASSIOPEIA.
• Movie Player makes it possible for you to play back CASIO original format CMF files on your
CASSIOPEIA. The bundled CD-ROM also includes a program called “Mobile Video
Converter,” which converts AVI and other video file formats to CMF.
To start up Movie Player
1. Turn on your CASSIOPEIA.
2. On the Top Menu, double-tap Movie Player.
• This starts up Movie Player and displays its thumbnail index screen.
4-2-1 Using the Movie Player Thumbnail Index Screen
The thumbnail index screen shows thumbnails for six movies.
Folder name
Thumbnail
Shows an image from
the movie.
File name
indicates main
memory file,
indicates
storage card file.
A red frame indicates the
currently selected movie.
Its file name is also
highlighted. Use the
cursor keys to select
another movie.
Thumbnail index screen
119
Thumbnail Index Screen Operations
You can perform the following operations from the thumbnail index screen.
•
•
•
•
•
Select a folder
Create, rename, or delete folders
Rename, move, or delete files
Automatically generate thumbnails on the thumbnail index screen
Create a Mail message with an attached movie
Each of these operations is described in detail in the following sections of this manual.
Selecting the Thumbnail Index Screen Folder
The thumbnail index screen shows all of the CMF movie files in the currently selected folder.
Perform the steps below to change to another folder.
1. Tap Func L → Folder... or tap the folder name box.
• This displays the Select Folder dialog box.
Use this dialog box to create a new folder, or to rename or
delete an existing folder.
2. Select the folder you want by tapping it.
3. Tap OK.
• This returns to the thumbnail index screen, which now shows the contents of the folder you
selected in step 2.
NOTE
• The thumbnail index automatically generates thumbnail files for the movies it displays.
• Movie Player can access only folders under My Documents\Movie in CASSIOPEIA nand disk
or on a storage card.
120
Refreshing a Thumbnail Index
You should refresh the thumbnail index when the File Manager screen does not accurately show
the movie file contents of a folder. The thumbnail index screens show only files for which
thumbnails have been generated. Note that thumbnails are not displayed for movie files you move
to the current thumbnail index screen folder using File Manager (page 135) or some other
program. You can make such files appear by performing the thumbnail index refresh operation
below.
To refresh a thumbnail index
While the thumbnail index you want to refresh is on the screen, tap the Func L menu and then
tap Refresh Thumbnails.
Creating a Mail Message with an Attached Movie
The following procedure creates a new Mail message with the movie currently selected on the
Movie Player thumbnail index screen attached.
To create a Mail message with an attached movie
1. On the Movie Player thumbnail index screen, select the movie you want to attach to the Mail
button.
message and then tap the
• This starts up Mail and displays a message input screen with the movie you selected
attached.
2. Specify the address of the recipient, and make any changes to the subject and body text that
you want.
• See “3-3 Mail” on page 67 for more information about writing and sending e-mail messages.
NOTE
In step 1 of the above procedure, you could also display the movie playback screen of the movie
you want to attach and then tap .
Thumbnail Index Screen Folder and File Operations
The folder and file operations you can perform on the Movie Player thumbnail index screen are
identical to those for the Photo Viewer thumbnail index screen. See “Folder and File Operations”
on page 117 for information about creating, renaming and deleting folders, and about renaming,
moving, and deleting files.
121
4-2-2 Using Movie Playback Screen
Playing Back Movies
On the Movie Player thumbnail index screen, tap the thumbnail of the movie you want to play,
and then tap . This displays the movie playback screen, which you can use to view the movie.
You can also use the playback screen to capture still images from a movie.
To playback a movie file
1. Start up Movie Player.
2. On the thumbnail index screen, select the thumbnail of the movie you want to play back, and
to open the file. You can also open a file by double-tapping it.
then tap
• While a thumbnail is highlighted on the thumbnail index screen, you can also open it by
pressing the OK button.
• The following shows the appearance of a typical playback screen.
File name
Playback timer
Movie image
Control panel
• Tap the
button or press the OK button to start playback.
or press the OK button to stop playback.
• Tap
or press ESC.
• To display the thumbnail index screen, tap
NOTE
Playback is stopped automatically whenever you start up another application or perform any other
operation that makes Movie Player inactive.
122
Playback Screen Control Panel
The following describes the functions of the buttons and sliders of the Playback Screen’s control
panel.
Volume slider
Position slider
Volume slider ......... Drag right to increase volume and left to decrease it.
.......................... Jumps to the beginning of the movie during forward play or the end of the
movie during reverse play.
/
.................. Toggles between forward play
and reverse play
. This button is
disabled if the movie file does not allow reverse playback.
.......................... High-speed or slow-speed movie playback in accordance with the settings
you make with the procedure under “Making Playback Speed and Repeat
Settings” on page 125. This button is disabled if the movie file does not
allow changes in playback speed.
.......................... Plays back a movie at normal speed.
.......................... Stops playback.
Position Slider ....... Drag this slider left or right to move to a specific location in a movie.
.......................... Moves the playback position back.
.......................... Moves the playback position forward.
.......................... Saves the currently displayed frame as a still image. See “Capturing a Still
Image from a Movie” on page 124 for details.
Controlling Playback Using CASSIOPEIA Buttons
The following describes CASSIOPEIA button operations that you can use while the Playback
Screen is on the display.
During Playback
• Press the OK button to stop playback.
While Playback is Stopped
• Press the OK button to start normal speed playback.
Anytime
• Press the right cursor button to close the current file and display the playback screen of the next
file (in thumbnail index screen sequence).
• Press the left cursor button to close the current file and open the previous file in the thumbnail
index screen.
• Press the down cursor button for forward playback.
• Press the up cursor button for reverse playback.
123
Capturing a Still Image from a Movie
Use the following procedure to capture a still image from a movie and save it as a JPEG file.
To capture a still image from a movie
1. Play back the movie that contains the image you want to capture.
2. Stop playback so the image is on the Playback Screen.
and
buttons to maneuver to the image you want.
3. Use the
4. Tap the
button.
5. In the dialog box that appears, tap Yes.
NOTE
• Screen capture files are stored in the nand disk in the My Documents\Photo folder.
• You can view screen capture files using Photo Viewer.
Displaying the File Properties of a Movie
The file properties dialog box provides you with information about the file whose contents are
currently displayed on the playback screen.
To display the file properties of a movie
1. On the playback screen, tap
.
2. To close the file properties dialog box, tap OK.
124
Making Playback Speed and Repeat Settings
Playback speed and repeat settings are made using the Options dialog box that appears when you
tap Options.
Playback Speed ............. Use this list box to select a faster or slower speed for movie playback.
The speeds available depend on the type of file you currently have open.
The message Disabled appears here if the file you currently have opened
does not allow its playback speed to be changed.
Auto Repeat .................. Check this option to have the file you are playing back automatically
repeat until you stop it.
Streams ......................... A stream is similar to the track of a tape recording. These list boxes show
the streams contained in the currently open file. If a file has multiple
streams, you can select one of them here.
When all the settings are the way you want, tap OK to close the dialog box and apply them.
Adjusting Playback Screen Brightness
Use the Brightness dialog box to adjust the brightness of the Playback Screen. To display the
dialog box, tap Brightness.
• Drag the sliders left and right to specify the brightness of the screen.
• Use the Battery Power slider to set the level to be applied when you are running your
CASSIOPEIA under battery power.
• Use the AC Adapter slider to set the brightness level when you are powering your
CASSIOPEIA with its AC adapter.
• Two sliders are provided to let you set different brightness levels for operation under battery
power and operation under AC adapter power.
When the settings are the way you want, tap OK to close the dialog box and apply them.
125
4-3 Music Player
Music Player makes it possible for you to play MP3 files on your CASSIOPEIA. Playback can be
output through the CASSIOPEIA’s headphones plugged into the audio output jack.
NOTE
• Music Player can play only files stored in the nand disk My Documents\Music folder or a
storage card My Documents\Music folder. It will not play files located in any other folder.
• To use Music Player, you need to install it from the bundled CD-ROM. See Chapter 6 of this
User’s Guide for information about installing programs on your CASSIOPEIA.
• You may not be able to play back certain MP3 formats.
Playback Screen Operations
To playback audio files
1. Start up Music Player, which causes the Playback Screen to appear.
• The following shows the appearance of a typical playback screen.
Position of current file in the Play List
Number of files in the
Play List
File name
Playback time
Playback progress bar
Control panel
MP3 file properties
2. Tap
or press the OK button.
• This starts playback of the currently selected play list.
• See “Play List Screen Operations” on page 128 for information about selecting and editing a
play list.
or press the ESC button to stop playback.
3. Tap
126
Playback Screen Control Panel
The following describes the functions of the buttons and sliders of the Playback Screen’s control
panel.
.......................... Starts playback.
.......................... Stops playback.
................................ Pauses playback. Tapping this button again resumes playback from
where it was originally paused.
................................ Skips back to the beginning of the previous file and resumes playback.
................................ Skips forward to the beginning of the file following the currently playing
file and resumes playback.
................................. Mutes audio output. Tapping this button again unmutes audio output.
................................. Reduces volume.
................................. Increases volume.
..... This graphic sound level meter shows the current volume setting.
Controlling Playback Using CASSIOPEIA Buttons
The following describes the OK button and ESC button operations you can use while the
playback screen is on the display.
During Playback
• Press the OK button to pause playback.
• Press the ESC button to stop playback.
While Playback is Paused
• Press the OK button to resume playback.
While Playback is Stopped
• Press the OK button to start playback.
Anytime
• Press the top of the cursor button to increase volume, or the bottom of the cursor button to
decrease it.
• Press the right side of the cursor button to skip forward to the beginning of the file following
the currently playing file.
• Press the left side of the cursor button to skip back to the previous file.
127
Using Repeat
Turning on repeat causes the currently selected play list to play in an endless loop, until you stop
playback.
On the playback screen, display the Settings menu and then tap Repeat to toggle repeat on and
off. A check mark is next to the Repeat item on the Settings menu while repeat is turned on.
NOTE
• To turn off repeat, tap Settings and then Repeat again to uncheck it.
Turning Off the Display
You can conserve battery power during audio file playback by turning off the CASSIOPEIA’s
display.
On the playback screen, display the Settings menu and then tap Display Off to turn off the
display.
NOTE
• When the Display Off option of the Settings menu is checked, the display automatically goes
blank whenever an audio file is playing back. Display power is restored when you press the OK
button or the ESC button to stop playback.
• Display power is also restored automatically when the end of playback is reached. If repeat
playback is turned on, the display remains blank until you manually stop playback.
• To turn off the Display Off option, tap Settings and then Display Off to uncheck the option.
Enabling Cursor Button Operation while the Display is off
You can perform certain operations (control audio volume, skip between files) while the display is
turned off. To do so, you must use the following procedure to enable cursor button operation
while the display is turned off.
To enable cursor button operation while the display is turned off
On the Settings menu, select the Enable Up/Down Key option.
Using Background Playback
You can set up Music Player so it continues to run and play back music in the background while
icon in the system tray tells you that Music Player is
you are running other programs. A
indicates that Music Player is stopped.
playing in the background, while the
or
makes Music Player the active program, which allows you to operate its
Tapping
buttons and other controls.
Play List Screen Operations
You can create a play list of MP3 files that are in nand disk or on a storage card. This way you can
play back the files you want in the sequence you want. A play list can contain up to 100 files.
128
To display the play list screen
On the playback screen, tap the Play List... button to display the play list screen.
Currently selected
play list
Files contained in the
currently selected play
list
To select a play list
1. On the playback screen, tap the Play List... button.
• This displays the play list screen.
2. Tap the down arrow next to the Play List box, and select the play list from the menu of options
that appears.
to return to the playback screen.
3. After selecting a play list, tap
NOTE
• If you select All music files on the menu in step 2, Music Player plays back all the MP3 files it
can find, starting from the smallest one first. If you are using a storage card, Music Player plays
back all files in the nand disk first, and then plays back all files on the storage card next.
• Note that the All music files option only appears on the menu if you have only one play list.
To create a new play list
1. On the playback screen, tap the Play List... button.
• This displays the play list screen.
129
2. Tap the New button.
• This displays the play list editing screen.
All playable MP3 files in main memory and on the storage
card My Documents folders
Tap to select (check) all the tracks in the Total Tracks list.
Tap to deselect (uncheck) all the tracks in the Total Tracks
list.
3. Input the name you want to assign to the play list into the Play List Name box.
4. In the Total Tracks list, select the files you want to include in your play list. Next, tap the Add
button.
• This adds the checked files to the Tracks List.
5. Use Tracks List to arrange the sequence of the files.
• Tap the name of the file you want to move, and then use the Up and Down buttons to move
the file up or down.
• Tapping the Delete button deletes the currently selected file from Tracks List.
.
6. After everything is the way you want, tap
• This returns to the play list screen with the name of your newly created play list selected.
NOTE
• Taping the Cancel button during step 6 discards the play list you are creating and returns to the
play list screen.
To edit an existing play list
1. On the playback screen, tap the Play List... button.
• This displays the play list screen.
2. Tap the down arrow next to the Play List box, and select the play list you want to edit from the
menu of options that appears.
3. Tap the Edit button.
• This displays the play list editing screen.
• Now you can perform the steps starting from step 3 under “To create a new play list” on
page 129 to edit the play list.
To delete an existing play list
1. On the playback screen, tap the Play List... button.
• This displays the play list screen.
2. Tap the down arrow next to the Play List box, and select the play list you want to delete from
the menu of options that appears.
3. Tap the Delete button.
• This deletes the selected play list.
130
Chapter 5 Utilities
5-1 Backup
The Backup program lets you quickly and easily back up all data (Calendar, Contacts, Tasks, and
Mail data, files, installed programs, setup information) in your CASSIOPEIA main memory data
to a storage card.
Backed up data can be used to restore your system should it start to malfunction due to some data
error.
Read this first!
• Always reset your CASSIOPEIA before backing up or restoring data. Make sure you perform a
reset operation. See the separate Hardware Manual for information about how to reset your
CASSIOPEA.
• Be sure to power your CASSIOPEIA with the AC adapter whenever performing a backup or
restore operation.
• Do not perform any button or screen operations on the CASSIOPEIA while a backup or restore
operation is in progress. Do not touch the CASSIOPEIA at all until the backup or restore
operation is complete.
• Make sure the storage card you are using for backup has enough unused space to store the data.
• As a general rule, you need about 10MB of free space on a storage card to store backup data.
Time Required for Backup
The backup operation always takes a fixed amount of time, regardless of the amount of data you
are backing up.
Backing Up Data
Use the following procedure to back up data. Make sure you read the precautions under “Read
this first!” on page 131 before starting.
To back up data
1. Connect the AC adapter to your CASSIOPEIA.
2. Reset the CASSIOPEIA.
3. Insert a storage card with sufficient free space to store the backup data into the CompactFlash
Card slot of the CASSIOPEIA.
4. On the Top Menu, double-tap Backup.
131
• This starts up Backup and causes the dialog shown below to appear.
If the storage card already
contains backup data, the
date of the last backup
appears here.
This area shows the amount
of free space on the storage
card and the amount of
CASSIOPEIA data memory
that is used.
5. Tap Backup now.
• This causes the dialog shown below to appear.
If you want to assign a password to
the backup file, input up to 10
characters for the password here.
For added security, each letter you
input is shown as an asterisk in this
box.
Input the same password here
for confirmation.
• If you do not wish to assign a password, go to step 6 without inputting anything.
6. Tap Yes to start the backup or No to close the dialog without backing up anything.
• The “Backup in Progress” dialog appears while the backup operation is being performed.
• The message “Backup completed:” appears on the display after the backup operation is
complete.
7. After backup is complete, tap OK to quit Backup.
NOTE
If the backup operation is interrupted or unsuccessful for any reason and there is a previous
backup file on the storage card you are using, the previous file remains intact on the card.
To interrupt a backup operation
1. Tap the Cancel button on the message box that is on the screen while a backup operation is in
progress.
• This causes the message “Do you really want to cancel? ” to appear.
2. Tap Yes to cancel the backup operation or No to resume it.
132
Restoring Data
The following applies whenever you perform a restore operation.
• If the same file or setup data exists in both CASSIOPEIA memory and on the storage card, the
data in CASSIOPEIA memory is overwritten with the data on the storage card.
• Any file or setup data in CASSIOPEIA memory for which there is no corresponding file or
setup data on the storage card data is deleted.
• All applications currently installed on the CASSIOPEIA are deleted and re-installed with the
backed up versions.
Use the following procedure to restore data. Make sure you read the precautions under “Read this
first! ” on page 131 before starting.
To restore data
1. Connect the AC adapter to your CASSIOPEIA.
2. Reset the CASSIOPEIA.
3. Insert the storage card that contains the data you want to restore into the CompactFlash Card
slot of the CASSIOPEIA.
4. On the Top Menu, double-tap Backup.
• This starts up Backup.
5. Tap Restore now.
• This restarts the CASSIOPEIA, which is indicated by the message “Starting...” appearing on
its display. Next, the touch screen calibration screen appears. Calibrate the touch screen. The
following dialog box appears after the restart process is complete.
If the data is protected by a
password, input the password
here. If the data is not password
protected, go to step 6 without
inputting anything here.
6. Tap Yes to start the restore or No to close the dialog without restoring anything.
• The “Restore in Progress” dialog appears while the restore operation is being performed.
• The message “Restore complete! ” appears on the display after the restore operation is
complete.
7. After restore is complete, tap OK to quit Backup.
• This automatically resets the CASSIOPEIA and restarts it.
133
Deleting a Backup File
You can use the following procedure to delete the backup files you created using Backup. Delete a
file when you no longer need it, when you want to free up space on a storage card, etc.
Important!
Deleting a back up file cannot be undone. Make sure you really do not need a file before you
delete it.
To delete a backup file
1. Insert the storage card that contains the backup file you want to delete into the CompactFlash
Card slot of the CASSIOPEIA.
2. On the Top Menu, double-tap Backup.
• This starts up Backup.
3. Tap Backup File Delete.
• This causes the dialog shown below to appear.
4. Tap Yes to delete the backup file or No to close the dialog without deleting anything.
134
5-2 File Manager
File Manager provides you with the tools to perform a variety of different operations involving
files and folders in main memory and on a storage card.
File Manager Screen and Basic Operation
Tapping File Manager on the Top Menu starts up File Manager and displays a list of files and
folders.
Tap to move to
the next higher
folder in the
hierarchy.
Tapping here displays a list that
you can use to move to a higher
folder in the file hierarchy.
Tap a folder to select it, and tap
it again to display its contents.
Use the check boxes to select
files and folders for batch copy,
move, and delete operations.
NOTE
• Some system files and other hidden files are not displayed by File Manager.
• In the case of very large files, the file size value may not fit within the space provided for the
Size column.
• Note that you cannot start up other programs from File Manager.
To refresh the File Manager screen
Tap FileL → Refresh to refresh the File Manager screen with the latest information.
File and Folder Operations
To create a new folder
1. Navigate to the folder in which you want to create a new folder.
2. Tap FileL → New Folder.
• This displays a new folder dialog box.
.
3. Input the name you want to give the folder and then tap
To select all files and folders on the File Manager screen
Tap EditL → Select All. This causes all files and folders currently on the File Manager screen to
become selected (checked).
135
To copy a file or folder
NOTE
You can use the same procedure to copy a file or a folder. The following shows the procedure for
copying a file.
1. Select the file you want to copy by putting a check mark next to it.
• You can select multiple files and copy them.
2. Tap EditL → Copy.
• This specifies the currently selected file as the original file.
3. Display the folder to which you want to copy the file.
4. Tap EditL → Paste.
• This copies the source file into the currently displayed folder.
NOTE
• If you tap Paste while the source file folder is on the display, a copy of the file is created in the
same folder. In this case, the new file is given the same name as the original, but with “Copy
of” automatically added to the beginning of the name.
• Once you tap the Copy button, the original files remain selected until you perform another
copy operation or a cut operation. This means you can make multiple copies of the original file
by tapping the Paste button again.
To move a file or folder
You can use the same procedure to move a file or a folder. The following shows the procedure for
moving a file.
1. Select the file you want to move by putting a check mark next to it.
• You can select multiple files and move them.
2. Tap EditL → Cut.
3. Display the folder to which you want to move the file.
4. Tap EditL → Paste.
• This moves the file from its original folder to the displayed folder.
NOTE
• Moving a folder also moves all of the files and sub-folders inside it.
• Note that you can perform only one paste operation following a cut. You cannot perform
multiple paste operations like you can with copy.
To rename a file or folder
1. Select the file or folder you want to rename by tapping it.
2. Tap FileL → Rename.
• This displays a rename dialog box.
.
3. Input the new name and then tap
• You cannot change the extension of a file.
To delete a file or folder
1. Select the file you want to delete by putting a check mark next to it.
• You can select multiple files and delete them.
2. Tap FileL → Delete.
136
Important!
• Deleting a folder also deletes all files and folder inside it.
• A file or folder delete operation cannot be undone.
3. In response to the confirmation message that appears, tap Yes to delete the file or folder, or No
to cancel without deleting anything.
Important!
• Performing the reset operation causes all user files and folders that are not contained in the My
Device\Nand Disk folder to be deleted. To keep a file or folder from being deleted by the reset
operation, store it in the My Device\Nand Disk folder or on a storage card.
137
Chapter 6 Using Your CASSIOPEIA
with Your Computer
6-1 Getting Ready
You can connect your CASSIOPEIA to your computer and perform the types of operations listed
below.
• Synchronization of CASSIOPEIA Calendar, Contacts, Tasks, and Mail data with your
computer’s Microsoft Outlook data
• Copy files between your CASSIOPEIA and computer
• Backup CASSIOPEIA data on your computer’s hard disk
• Restore factory default data and settings
NOTE
Use the folder synchronization function when you want to transfer an MP3 file, image, CMF file,
or other data file to a Nand disk or storage card. Preset application-specific folder names are used
for storage of each type of data file on a Nand disk or storage card. See the sections of this manual
that describe each application for information about folder names.
Setting Up for Data Communication
Use the bundled cradle
and cable to connect
your CASSIOPEIA and
computer.
You must have the following applications installed on
your computer to perform data communication.
PC Connect: Install PC Connect from the CD-ROM
that comes bundled with your CASSIOPEIA.
Microsoft Outlook: This application is required if
you want to synchronize data with Calendar,
Contacts, Tasks, and Mail. Note that you must
purchase Microsoft Outlook separately.
Perform the following three steps to set up for data communication between your CASSIOPEIA
and computer.
(1) Install Microsoft Outlook on your computer.
• You do not need to perform this step if you already have Outlook installed. Also, you can skip
this step if you do not need to synchronize data between your CASSIOPEIA and computer. You
can install Outlook later, if you want.
138
• Outlook 97, 98, and 2000 are all supported.
• Microsoft Outlook must be purchased separately.
• See the user documentation that comes with Outlook for information about how to install it.
(2) Install PC Connect on your computer.
• Install PC Connect from the CD-ROM that comes bundled with your CASSIOPEIA.
• See the separate Hardware Manual for information about computer system requirements for PC
Connect.
• See the Quick Start Guide for information about how to install PC Connect.
(3) Connect your CASSIOPEIA to your computer.
• See the separate Hardware Manual for information about connecting your CASSIOPEIA to a
computer.
NOTE
• See PC Connect online help for information about how to use it.
• Certain computer hardware and/or software configurations may not allow PC Connect to run
properly.
is displayed in the system tray while there is a connection between your CASSIOPEIA and
•
computer.
• If you are unable to open a connection for some reason, try removing the CASSIOPEIA from
its cradle, or disconnecting the USB cable or serial cable from the CASSIOPEIA. Next,
reconnect and try again.
Communication Properties
Use the Connect Setting dialog box to configure settings for the connection between your
CASSIOPEIA and computer.
To configure Connect Setting
1. On the Top menu, double-tap Connections.
2. Tap PC Connect.
• This displays the Connect Setting dialog box. Make the settings you want.
Select this option when you want the CASSIOPEIA to
automatically establish a connection with your
computer over a cable connection.
You can select either USB or serial port as the
computer connection method.
Tap this button when you want to establish a
connection with your computer right now. This button
is available only when there is a cable connection
between the CASSIOPEIA and computer. You do not
need to tap the Connect Now button if the
Automatically connects with PC option turned on
(checked).
3. After everything is the way you want, tap OK.
139
Chapter 7 Setting Up Your CASSIOPEIA
7-1 Setup Basics
This section describes various hardware, system, and other settings you can make to setup the
CASSIOPEIA to meet your specific needs.
On the Top Menu, double-tap Settings to display the setup menu shown below.
Setup Menu
Select the menu item for the type of settings you want to change.
To do this:
• Input information about yourself.
• Specify whether owner information should appear when you turn
on the CASSIOPEIA.
• Register a 4-digit numeric password.
• Configure the CASSIOPEIA so it requires input of a password
when it is turned on. Data cannot be accessed unless the
password is input.
• Specify CASSIOPEIA screen colors.
• Adjust screen contrast and brightness.
• Specify the idle time before the screen automatically dims.
• Adjust the touch screen alignment.
• Perform this procedure whenever you feel the figures on the screen
are not aligned properly with the area you tap with the stylus.
• Turn touch screen tap sounds on and off.
• Adjust the headphone volume.
• View the current battery pack .
• Specify the idle time before auto power off is triggered.
• View remaining program memory and storage memory capacity.
• View remaining storage card capacity (when you have a storage
card loaded in the CASSIOPEIA).
• Shutdown programs that are running.
140
Select this menu item:
Owner Information
Password
Color Scheme
Brightness
Align Screen
Volume & Sounds
Power
Memory
MEMO
See page 24 for information about setting the current time and date.
Selecting a Setup Menu Item
You can use any one of the following methods to select a setup menu item and display the
corresponding setup screen.
• Double-tap the menu item you want.
• Tap the menu item you want once so it is highlighted, and then tap it again.
• Use the up and down cursor keys to move the highlighting to the menu item you want, and the
press the OK button.
To exit a setup screen, tap its close button to return to the setup menu.
To exit the setup menu
Tap the
button in the upper right corner of the setup menu to return to the Top Menu.
7-2 Using the Setup Screens
This section describes all of the operations you can perform using the setup screens that appear
when you select a setup menu item.
Owner Information
Use this screen to input information about yourself. You can also specify whether owner
information should appear whenever you turn on the CASSIOPEIA.
Tap this tab to input
miscellaneous
information.
Tap the field where
you want to input
data, and then input.
Select this option to
have your personal
information appear
whenever your
CASSIOPEIA is
turned on.
141
Password
Use this screen to configure the CASSIOPEIA so it requires input of a password when it is turned
on. Data cannot be accessed unless the password is input.
Use the on-screen
keyboard to specify a
4-digit password. After
you tap OK to register
the password, you will
not be able to access
the password setup
screen until you input
the current password.
Select this option to limit
access only to those who
can input the registered
password.
Color Scheme
You can use this setting screen to select from among eight color schemes that change the colors of
command bards, buttons, background, and other display elements.
Tap here to display a list
of color properties, and
then tap the one you
want to select.
NOTE
The setting you make here does not immediately affect any programs you have running when you
change the setting. The color scheme will be applied only after you quit the programs and then
restart them. See “Memory” on page 146 for information about quitting a program.
142
Brightness
The brightness setting screen has three tabs named Contrast, Brightness, and Auto-Dim.
Contrast Tab
Use this tab to change screen contrast, which affects the relative lightness and darkness of display
colors.
Watch this color
sample to see how
your setting affects
display colors.
Drag this slider or tap
the H and J buttons
to change the screen
contrast setting.
NOTE
You can also use the following button operations at any time to adjust screen contrast without
displaying the brightness setting screen.
To do this:
Make contrast darker
Make contrast lighter
Perform this button operation:
Hold down Power button and press the up cursor
button.
Hold down Power button and press the down cursor
button.
Brightness Tab
Use this tab to adjust the brightness of the backlight. You can make separate settings for screen
brightness under battery operation and AC adaptor operation.
Drag this slider or tap
the H and J
buttons to change the
setting for screen
brightness when
running under AC
adaptor power.
Drag this slider or tap
the H and J buttons to
change the setting for
screen brightness when
running under battery
power.
143
NOTE
You can also use the following button operations at any time to adjust screen brightness without
displaying the brightness setting screen.
To do this:
Make the screen brighter
Make the screen dimmer
Perform this button operation:
Hold down Power button and press the right cursor
button.
Hold down Power button and press the left cursor
button.
Auto-Dim Tab
You can use this tab to set up the CASSIOPEIA so its screen dims automatically whenever it is
left idle for a specific amount of time. This helps to extend battery life.
Select this option to
enable auto dim when
you are running under
battery power.
Use these boxes to
specify the idle time
before auto dim is
triggered.
Select this option to
enable auto dim when
you are running under
AC adaptor power.
Align Screen
Use this setup screen to align the touch screen whenever you feel the figures on the screen are not
aligned properly with the area you tap with the stylus.
Tap here to start the
touch screen alignment
procedure.
NOTE
• You can also start a screen alignment operation at any time without going through the setup
menu by holding down the power button as you press the OK button.
144
Volume & Sounds
The Volume & Sounds setup screen has two tabs, named Volume and Sounds.
Volume Tab
Use the settings on this tab to turn the CASSIOPEIA’s buzzer sound on and off, and to adjust the
volume level of the headphones.
Drag this slider or tap
the H and J buttons
to turn the buzzer on
and off.
Drag this slider or tap the
H and J buttons to
change the headphone
volume setting.
Sounds Tab
Use this tab to enable and disable the various sounds (alarm sound, screen tap confirmation sound,
etc.) produced by the CASSIOPEIA.
Checking an option
turns on its sound.
145
Power
The Power setup screen shows you remaining battery capacity. You can also use it to configure
auto power off, which turns off the CASSIOPEIA if it is left idle for a specific amount of time.
Select this option to
enable auto power
off when you are
running under battery
power.
Use these boxes to
specify the idle time
before auto power
off is triggered.
Select this option to
enable auto power
off when you are
running under
external power.
Memory
The Memory setup screen has two tabs named Memory and Task Manager.
Memory Tab
The Memory tab shows you current memory usage.
This bar indicates
current program
memory usage.
This bar indicates
current storage
memory usage.
This bar indicates current
storage card usage
(when a card is loaded in
the CASSIOPEIA).
146
Task Manager Tab
You can use the Task Manager tab to shutdown a specific program that is running, or to shutdown
all programs that are running. Shutting down a program frees up program memory space.
• In the Active Programs list, tap the program you want to end.
• To end all programs that are currently running, tap Stop All.
Increasing Available Storage Memory
You can free up more storage memory by performing the following steps.
• Move files from main memory to a storage card.
• Delete files you no longer need from main memory.
You can perform both of these tasks using File Manager. See “5-2 File Manager” on page 135 for
more information.
147
Appendix A: Character Recognizer
Your CASSIOPEIA uses Decuma Character Recognizer developed by Decuma AB. The Decuma
Character Recognizer supports word-by-word, non-cursive handwriting.
Copyright © 2001 by Decuma AB. All rights reserved.
Start using Character Recognizer
Introduction
How to write with Character Recognizer
Pen gestures
Personalizing Character Recognizer
Options
Personalize
Settings
Version
Troubleshooting
Decuma Alphabet Outlines
148
Start using Character Recognizer
Introduction
Character Recognizer converts your handwriting into typed text and can be used with any
application to input text.
Instead of pen and paper, you use the Stylus and the Touch Screen. Simply write in the designated
input area in the lower part of the screen and the typed characters appear at the cursor in the active
application.
To select Character Recognizer, tap the Input panel switch and select Character Recognizer from
the menu of available input panel types.
How to write with Character Recognizer
Character Recognizer supports word-by-word, non-cursive handwriting. Write word-by-word as
you normally would, using the waistline and baseline of the input area. Writing neat characters
that clearly ascend and descend along the waistline and baseline area makes them easier to
recognize correctly. If you reach the end of the input area, simply continue at the beginning again.
This causes the input area to clear automatically.
When using Character Recognizer, your handwriting can be recognized in three different modes:
as general characters, as numbers, and as punctuation marks and special characters.
These different modes help you avoid conflicts between characters that are similar in shape, and
improve character recognition. To change between modes, simply tap the desired tab and write
your characters.
149
General characters
Select the tab marked A a to write letters and accented letters.
A B C D E F G H I J K L M N O P Q R S T UV W XY Z
abcdefghijklmnopqrstuvwxyz
ÀÂÁÄÅÇÈÊÉËÌÎÍÏÑÒÔÓÖÙÛÚÜ
àâáäåçèêéëìîíïñòôóöùûúüß
The numbers, punctuation marks, and special characters shown below are also supported in this
mode if written with care.
The number ‘0’ has to be written with a diagonal stroke, as shown in the Decuma Alphabet
Outline below. This will distinguish the number ‘0’ from the letter ‘o’. To be able to write ‘-‘, ‘_’
and ‘~’ without any conflicts with the gesture for ‘Space’, you have to disable this gesture using
Settings.
Ø123456789
.,:;‘“?!-_~/\=@&%¢$+£§©®
Accented characters are disabled by default. You can enable them using Settings.
Numbers
Select the tab marked 1 2 3 to write numbers.
0123456789
The punctuation marks and special characters shown below are also supported in this mode if
written with care.
150
.,:;‘“-*+=()/<>[]{}%#¢$+£¥
Punctuation marks and special characters
Select the tab marked @ & to write punctuation marks and special characters.
.,:;‘“?¿!¡-_~/\=*+()<>[]{}|#@&%¢$+£¥§©®°
Pen gestures
You can insert a space or a carriage return, or delete a character by tapping the corresponding
button on the Character Recognizer input panel. The same actions can also be performed using
gestures. Gestures help you keep your focus on the input area and maintain the natural flow of
your handwriting.
Form gestures as shown by the figures below. The arrow at the end of the stroke indicates the
direction the stroke should be drawn, and is not actually written.
Space
Backspace
Carriage return
You can enable or disable individual gestures with Settings.
151
Personalizing Character Recognizer
Options
You can improve the recognition of your writing by teaching Character Recognizer your
handwriting style. Character Recognizer also gives you the opportunity to define your own
characters as shortcuts for lengthy text you write frequently.
These features and other ways to customize Character Recognizer to suit your handwriting and
needs, can be found by tapping the Options button on the Character Recognizer input panel.
Display Options by tapping the Options button
152
Personalize
Character Recognizer allows you to define personal characters you want to use as shortcuts. You
might want to add a star to represent your e-mail address or a heart to represent the name of a
close friend. Add your character by tapping the Personalize tab in Recognizer Options.
You can add up to 15 personal characters.
Write your character in the box representing the input
area and write the interpretaiton in the text box next
to it.
The interpretation can contain up to 35 characters.
Your character can contain up to 5 strokes.
You can also use this feature to compensate for frequently misinterpreted characters. Let us
presume that the Character Recognizer mistakes your ‘B’ for a ‘D’. Enter Personalize and write
the letter ‘B’ the way you always write it in the box representing the input area. Then write ‘B’ in
the interpretation field. In this way you can avoid a misinterpretation of your handwritten
characters.
You can enable or disable your personal characters using Settings.
153
Settings
The Recognizer Options Settings tab allows you to customize Character Recognizer features. All
the features can be enabled or disabled to suit you and your way of writing.
Version
The Recognizer Options Version tab shows version of the Character Recognizer application on
your CASSIOPEIA.
Troubleshooting
Since every style of handwriting is unique, you might experience problems with your way of
writing.
If the recognition problem is limited to a few characters, you should begin by looking at the
Decuma Alphabet Outlines. Compare the way these characters are written with your own
handwriting to determine the problem. Once you determine the cause, you can either adapt your
own handwriting to suit Character Recognizer or teach Character Recognizer to recognize your
characters. See Personalize for further information.
You may experience problems when writing characters in some input fields, such as fields for
numbers, date or time, where you are allowed to input only limited kinds of characters. You will
avoid this problem by changing the input panel to Keyboard. To select Keyboard, tap the Input
panel switch and select Keyboard from the menu.
154
Decuma Alphabet Outlines
These outlines of written characters serve as a guide of how to form characters for Character
Recognizer to recognize. The circles and numbers show where strokes begin and in what order
they should be written.
In addition to the characters shown here, a wide variety of handwritten characters are included in
the alphabet library.
Characters
Aa
Bb
Cc
Dd
Ee
Ff
Gg
Hh
Ii
Jj
Kk
Ll
Mm
Nn
Oo
Pp
Qq
Rr
Ss
Tt
Uu
Vv
Ww
Xx
155
Yy
Zz
Accented characters
Àà
Ââ
Áá
Ää
Èè
Êê
Éé
Ëë
Ìì
Îî
Íí
Ïï
Ôô
Óó
Öö
Çç
Ññ
Òò
156
Åå
Ùù
Ûû
Úú
Üü
ß
Numbers
0
5
1
6
2
7
3
8
4
9
Punctuation marks and special characters
.
,
:
;
'
"
?
¿
!
¡
-
_
~
/
\
=
*
+
(
)
<
157
>
[
]
{
}
|
#
@
&
%
¢
$
+
£
¥
§
©
®
°
158
Appendix B: Troubleshooting
Resetting the CASSIOPEIA
If your CASSIOPEIA responds slowly, stops responding as expected, or “freezes,” try resetting it.
A reset causes the CASSIOPEIA to restart and re-adjust memory allocation. Note that unsaved
data in open windows may be lost when you reset.
To reset the CASSIOPEIA
Use the stylus to hold down the Reset button for about two seconds.
See the Hardware Manual for details.
Batteries lose power
An icon in the system tray shows your current battery capacity. Be sure to recharge the battery as
soon as possible after it goes low.
Under normal conditions, you can get many hours of use from a full charge. Here are a few tips to
help you get the most from the battery.
Use external power whenever possible
Use the AC adapter to plug your CASSIOPEIA into external power whenever possible, especially
when:
• Establishing a remote connection (some modems use a lot of power).
• Connecting to a computer.
Shorten auto power off time
While on battery power, your CASSIOPEIA automatically turns off if you do not operate its
buttons or use the stylus for a specified period. You can maximize battery life by keeping this auto
power off trigger time short. See “Power” on page 146 for information about setting the auto
power off trigger time.
Turn off sounds you do not need
The CASSIOPEIA produces sounds in response to a number of events, such as warnings,
appointments, screen taps, and hardware button presses. To optimize battery life, turn off any
sounds you do not need. See “Volume & Sounds” on page 145 for information about turning off
sounds.
If you forget your password
It is impossible to access any of the data stored in CASSIOPEIA memory without inputting the
proper password. If you forget your password, you will have to use the procedure under
“Restoring Factory Defaults” in the Hardware Manual to return the CASSIOPEIA to its initial
factory default settings. Note, however, that this also deletes all data stored in CASSIOPEIA
memory and all programs you have installed, and also initializes all CASSIOPEIA settings.
159
If you run out of CASSIOPEIA memory
Memory on your CASSIOPEIA is shared between storage memory and program memory. Storage
memory is used to store the information you create and programs you install. Program memory is
used to run programs on your CASSIOPEIA. The CASSIOPEIA automatically manages the
allocation between storage and program memory. However, in some situations, such as when
memory is low, the CASSIOPEIA may not be able to automatically adjust the allocation. If you
receive a message stating that storage or program memory is unavailable, try the following
solutions.
Storage memory
• Move data to a storage card.
• Insert a storage card into the CASSIOPEIA, start up File Manager (page 135), and move
files you do not need on a regular basis from the main memory file (My
Device\NandDisk\file) to the storage card.
• Move received mail messages you normally do not need from the Inbox folder to the storage
card. To move files, use Mail to create a new folder on the storage card and then move the
messages to that folder. See “To move mail messages from one folder to another” on page 88
for more information.
• Delete unnecessary files. Use File Manager (page 135) to delete files you no longer need from
main memory.
• Delete Web pages you saved from the Internet that you no longer need. See “To delete Web
pages” on page 103 for more information.
• Delete installed programs that you no longer need. See “To uninstall a program” on page 11 for
more information.
Program memory
• Stop programs you are not currently using. Display the Top Menu and then double-tap
Settings. On the Settings menu, double tap Memory and then tap the Task Manager tab. This
displays a list of programs that are currently running. Tap the programs you want to quit and
then tap Stop. If you want to quit all programs that are currently running, tap Stop All.
• Clear storage memory as described in the preceding section. This will free some storage
memory so that it can be allocated to program memory.
• Reset the CASSIOPEIA using the procedure under “To reset your CASSIOPEIA” in the
Hardware Manual.
Screen freezes or responds slowly
Reset your CASSIOPEIA. See “To reset your CASSIOPEIA” in the Hardware Manual.
160
Screen is blank
If the CASSIOPEIA does not respond when you briefly press the Power button, press and hold the
button for a full second. If that does not work, try the following steps, performing the next step
only if the one you just performed did not solve the problem.
1. Plug the CASSIOPEIA into AC power.
2. Recharge the battery.
3. Adjust display brightness. While holding down the Power button, press the right or left cursor
buttons to adjust brightness.
4. Adjust display contrast. While holding down the Power button, press the up or down cursor
buttons to adjust contrast.
5. Reset the CASSIOPEIA. See “To reset your CASSIOPEIA” in the Hardware Manual.
Screen is dark
Prolonged exposure to direct sunlight may cause your CASSIOPEIA screen to temporarily
darken. This is normal for LCD screens and is not permanent.
Inaccurate response to stylus taps
Adjust the touch screen alignment. You can launch the touch screen alignment procedure by
holding down the Power button and pressing the OK button.
Slow or no response
Reset the CASSIOPEIA. See “To reset your CASSIOPEIA” in the Hardware Manual.
Modem connection problems
You may encounter the following problems when using a modem.
Cannot dial out
• Remove your CASSIOPEIA from the cradle or disconnect the cable. You cannot connect using
a modem if your CASSIOPEIA has an active connection with the computer.
• Verify that the modem is firmly seated and connected to your CASSIOPEIA and the telephone
jack.
• Make sure the telephone line is analog. (Analog telephone lines transmit data in analog instead
of digital form. Your home telephone line is most likely analog, while office telephone lines are
often digital.)
• If you create a modem connection for an external modem, select Hayes Compatible on COM1
as your modem. If you are using a modem card, select the modem card as your modem.
• To use an external modem, you need to use a NULL modem cable and appropriate adapters to
connect the external modem to your CASSIOPEIA.
• Make sure the modem is waiting for a dial tone. Make sure the “Wait for tone” option is
selected on the Modem Setup screen of the modem you are using. See “To configure a dial-up
connection setup” on page 56 for more information.
161
Can dial out but cannot make a proper connection
• Make sure the network to which you are trying to connect supports the Point-to-Point Protocol
(PPP). Your Internet service provider or network administrator can verify this.
• Verify that you are using the right phone number for the modem you are trying to reach.
• Make sure the “Wait for tone” option is selected on the Modem Setup screen of the modem you
are using. See “To configure a dial-up connection setup” on page 56 for more information.
Connection is unreliable
• Make sure the modem is firmly seated and connected to your CASSIOPEIA and the telephone
jack.
Network connection problems
The following solutions may help if you encounter problems when using a network card for
network connections.
• Verify that you have an Ethernet card that is compatible with your CASSIOPEIA.
• Make sure that the proper drivers for your card are installed on the CASSIOPEIA. For more
information, see the owner’s manual for the network card.
• Verify with your network administrator that your user name and password are correct.
• Verify with your network administrator that the network you are trying to connect to is
available, or try to connect to it from another computer.
• Verify that you have added necessary server information.
Cable and cradle connection problems
The following solutions may help if you encounter problems when connecting to your computer.
• Ensure the CASSIOPEIA is turned on.
• If a modem or Ethernet card is inserted into your CASSIOPEIA, remove it.
• Ensure that you do not have any other active connections.
• Ensure the cable is securely plugged into the COM port or USB port on your computer. Use the
cable that came with the CASSIOPEIA, without any extra cables or extenders attached.
• Plug the other end of the cable securely into the correct port on your CASSIOPEIA. If you are
using a cradle, push your CASSIOPEIA securely into the cradle.
Storage card error messages
“Error! (READ/WRITE)
See your User’s Guide for details.”
• This error can occur after the CASSIOPEIA is subjected to strong impact, electrostatic charge,
or electrical noise. Try performing the operation again.
• Check the battery level and recharge it if it is low.
• Check if the storage card is loaded correctly. If it is, there may be a problem with the storage
card.
162
CASIO COMPUTER CO., LTD.
6-2, Hon-machi 1-chome
Shibuya-ku, Tokyo 151-8543, Japan
PN411571-001
MO0108-A