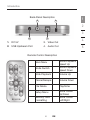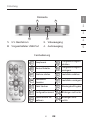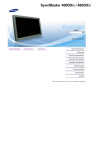
1
Slideshow
Viewer
Display your digital pictures on your TV—to share
easily with friends and family
User Manual
Manuel de l’utilisateur
Benutzerhandbuch
Handleiding
Manual del usuario
Manuale d’uso
F5U229ea
EN
FR
DE
NL
ES
IT
Table of Contents
Table of Contents
1.
Introduction .........................................................................1
Features ...............................................................................2
System Requirements ..........................................................2
Package Contents ................................................................2
2.
Hardware Installation (TV) ..................................................5
3.
Using your Slideshow Viewer ..............................................6
4.
Hardware Installation (Computer) ......................................9
5.
Information ........................................................................11
EN
FR
DE
NL
ES
IT
Introduction
1
2
3
4
5
Congratulations and thank you for purchasing the Slideshow
Viewer from Belkin. This innovative device allows you to easily
watch digital pictures and video clips on your television, from the
convenience of your favorite family-room chair. Included photoediting software lets you create professional-looking slideshows
on your PC, complete with transitions and special effects. When
you’ve completed your slideshow, save it onto your media card
and pop the card into the Slideshow Viewer. Then, just connect
the Viewer to your TV and you’re ready to treat your friends
and family to your own photo show in comfort, right on your TV
screen. Slideshow Viewer’s remote lets you advance and rotate
images. Lightweight and easy to set up, the Viewer requires no
drivers or computer to operate.
Please review this User Manual carefully to ensure that you get
the most from this high-quality product.
Slideshow Viewer offers compatibility with the following
media cards:
• CompactFlash® Type I and Type II
• IBM® Microdrive™
• SmartMedia™ (SM)
• Secure Digital/Mini SD
• MultiMediaCard (MMC)
• Memory Stick® (MS)
• Memory Stick Pro™ (MS PRO)
1
EN
Introduction
Features
Display Interface
• Features embedded TV encoder (NTSC/PAL)
• Supports OSD function on TV
• Provides several image-display functions: Slide Show, Auto
Slide Show, Preview, Zoom, Rotate, and Delete
JPEG/Motion JPEG
• Provides built-in JPEG decoder by 4:4:4, 4:2:2, and 4:2:0
• Supports movie files (*.mov and *.avi) by 320x240x25
• Supports thumbnail-picture decompression
• Supports still-picture resolution up to 6M pixels
System Requirements
• TV with RCA video (NTSC or PAL) and 3.5mm audio connection
• Computer with available USB port (USB 2.0 port for Hi-Speed
Mode)
− Windows® 98 SE, Me, 2000, XP
− Mac OS® 9.x, X v10.2 or higher
Package Contents
• Slideshow Viewer
• Remote Control
• CD Driver
• User Manual
• Power Supply
• Audio Video Cable
• USB Cable
2
EN
1
2
3
4
5
Introduction
Front-Panel Description
1
1
2
3
4
5
2
1. Infrared Receiver
2. Media Card Access Port
Top View/Button Description
5
1
6
2
7
3
8
4
1. Up Key
2. Down Key
3. Left Key/Turn
Counterclockwise
4. Right Key/Turn Clockwise
3
5.
6.
7.
8.
EN
Play/Enter Key
ESC Key
Setup Key
Mode Key
Introduction
Back-Panel Description
3
1
1
2
3
4
1. DC 5V
2. USB Upstream Port
2
4
3. Video Out
4. Audio Out
5
Remote Control Description
Movie Playback
Speed Up
Movie Playback
Speed Down
Main Menu
Mode Switch
Slide Playback
Volume Up
Cancel/Escape
Volume Down
File Delete
Play/Enter
Move Cursor
Up/Down
Move Cursor
Left/Right
Setup Menu
Memory Card
Formatting
4
EN
Hardware Installation (TV)
1
2
3
4
5
1. Plug the AC adapter into the wall outlet or surge protector.
Plug the DC connector into the DC power jack on the rear of
the Slideshow Viewer.
2. Connect the audio video cable to the TV and or audio
system. Connect the yellow plug on the TV to the “Video In”
port; and the 3.5mm plug to your “Audio In” port. (If your
TV does not have a 3.5mm audio in port, you may require a
3.5mm-to-RCA audio adapter.)
3. Connect the audio video cables to the back of the
Slideshow Viewer.
4. Turn on the TV and change the input source on the TV to
the desired input channel (consult your TV manual for more
information on selecting the right source). When the correct
source is selected, a message prompting you to insert a
memory card will appear.
5. The Slideshow Viewer is now ready for use.
5
EN
Using your Slideshow Viewer
1. Insert your flash memory card into the corresponding media
slot. When a card is inserted properly, the LED will blink and
the Slideshow Viewer will read your media.
2. The memory-style menu will appear on your TV and display
your media type.
3. Choose the media you wish to show using the Slideshow
Viewer’s directional arrows. Once you have selected the
correct media, press the “Play” button.
4. Press the “Setup” button, which will switch you to the
“Setup” menu.
5. Press the “Format” button to format the selected media
for viewing.
6. After doing so, you will see the “Photo/Movie” menu on
the screen.
7. Press the up and down arrows to select “Photo” mode or
“Video” mode, then press “Play” to enter.
6
EN
1
2
3
4
5
Using your Slideshow Viewer
1
2
3
4
5
Photo Mode
1. In “Photo” mode, you can preview all the photos in the
selected memory card. Use the up, down, left, and right
arrows to navigate to the picture you wish to view.
2. Press “Play” once you have moved to the picture of
your choice.
• You can zoom in and out of a picture with the “Z+” or
“Z-” buttons.
3. You can press “Slide” to view a slideshow of all the pictures
in the current directory.
4. Press “ESC” to return to the previous menu and cancel
current action.
Movie Mode
1. In “Movie” mode, you can preview all the movies in the
selected memory card. Use the up, down, left, and right
arrows to navigate to the movie you wish to view.
2. Press “Play” once you have moved to the picture of
your choice.
• You can use the “Mode” button to switch from “Photo”
or “Movie” mode.
3. Use the “Speed Up” or “Speed Dn” buttons to adjust play
speed. Press “Play” to resume to normal speed.
4. Press “ESC” to return to the previous menu and cancel
current action
7
EN
Using your Slideshow Viewer
Delete Function
1. Use the up, down, left, and right arrows to navigate to the
photo or movie you wish to delete.
2. Press “Delete” to mark the picture or movie you want
to delete.
3. Press “ESC”.
4. A dialogue window will appear for you to confirm deletion.
Press “Play” to confirm. If you wish to cancel deletion,
press “ESC” again.
Setup Menu
1. Press the “Setup” button.
2. There are four functions for you to choose from in the
setup menu:
• TV system: NTSC (Taiwan, Japan, USA)/PAL (Hong Kong,
China, Europe)
• Slide: Allows you to adjust the speed of slide playback.
• Sound: Allows you to adjust the volume of movie.
• Language: Multi-language selection.
8
EN
1
2
3
4
5
Hardware Installation (Computer)
1
2
3
4
5
1. Connect the Slideshow Viewer’s USB plug to the USB port
on your computer or USB hub.
2. Windows will now detect your Slideshow Viewer and install
the required driver support. (The Windows “Install New
Hardware Wizard” may prompt you to provide your Windows
Installation CD to complete the driver installation process.
Some Windows 98 SE base computers will require extra
drivers, which are on the included CD.)
3. The Slideshow Viewer will be recognized as two individual
removable disk drives. To access the new drive(s), click the
“My Computer” icon found on your Windows desktop display.
When the “My Computer” window opens, you will see the
two new removable disk icons.
9
EN
About your Belkin Software | Product Features
Accessing Files and Data
1. Double-click the drive assigned to your media reader. A
window will open displaying the contents of the current
installed media card.
2. To move files to and from your disk, simply drag the file to
the alternate location or use other file-transfer methods that
are standard in your computer’s operating system.
Note: To avoid losing data or corrupting the card, NEVER
remove the card or disconnect the Slideshow Viewer when
the “Activity” LED is flashing or blinking.
1
2
3
4
5
6
7
8
9
10
10
EN
Information
1
2
3
4
5
FCC Statement
DECLARATION OF CONFORMITY WITH FCC RULES FOR
ELECTROMAGNETIC COMPATIBILITY
We, Belkin Corporation, of 501 West Walnut Street, Compton, CA 90220, declare
under our sole responsibility that the product,
F5U229ea
to which this declaration relates,
Complies with Part 15 of the FCC Rules. Operation is subject to the following two
conditions: (1) this device may not cause harmful interference, and (2) this device
must accept any interference received, including interference that may cause
undesired operation.
CE Declaration of Conformity
We, Belkin Corporation, declare under our sole responsibility that the F5U229, to which
this declaration relates, is in conformity with Generic Emissions Standard EN55022:1998
Class B, EN50081-1, and with Generic Immunity Standard EN50082-1:1992.
Belkin Corporation Limited Lifetime Product Warranty
What this warranty covers.
Belkin Corporation warrants to the original purchaser of this Belkin product that the
product shall be free of defects in design, assembly, material, or workmanship.
What the period of coverage is.
Belkin Corporation warrants the Belkin product for the lifetime of the product.
What will we do to correct problems?
Product Warranty.
Belkin will repair or replace, at its option, any defective product free of charge (except for
shipping charges for the product).
What is not covered by this warranty?
All above warranties are null and void if the Belkin product is not provided to Belkin
Corporation for inspection upon Belkin’s request at the sole expense of the purchaser,
or if Belkin Corporation determines that the Belkin product has been improperly installed,
altered in any way, or tampered with. The Belkin Product Warranty does not protect
against acts of God (other than lightning) such as flood, earthquake, war, vandalism,
theft, normal-use wear and tear, erosion, depletion, obsolescence, abuse, damage due
to low voltage disturbances (i.e. brownouts or sags), non-authorized program, or system
equipment modification or alteration.
11
EN
Information
How to get service.
To get service for your Belkin product you must take the following steps:
1.
Contact Belkin Corporation at 501 W. Walnut St., Compton CA 90220, Attn:
Customer Service, or call (800)-223-5546, within 15 days of the Occurrence.
Be prepared to provide the following information:
1
2
a. The part number of the Belkin product.
3
b. Where you purchased the product.
c. When you purchased the product.
d. Copy of original receipt.
2.
Your Belkin Customer Service Representative will then instruct you on how to
forward your receipt and Belkin product and how to proceed with your claim.
Belkin Corporation reserves the right to review the damaged Belkin product. All costs of
shipping the Belkin product to Belkin Corporation for inspection shall be borne solely by
the purchaser. If Belkin determines, in its sole discretion, that it is impractical to ship the
damaged equipment to Belkin Corporation, Belkin may designate, in its sole discretion,
an equipment repair facility to inspect and estimate the cost to repair such equipment.
The cost, if any, of shipping the equipment to and from such repair facility and of such
estimate shall be borne solely by the purchaser. Damaged equipment must remain
available for inspection until the claim is finalized. Whenever claims are settled, Belkin
Corporation reserves the right to be subrogated under any existing insurance policies the
purchaser may have.
How state law relates to the warranty.
THIS WARRANTY CONTAINS THE SOLE WARRANTY OF BELKIN CORPORATION,
THERE ARE NO OTHER WARRANTIES, EXPRESSED OR, EXCEPT AS REQUIRED BY
LAW, IMPLIED, INCLUDING THE IMPLIED WARRANTY OR CONDITION OF QUALITY,
MERCHANTABILITY OR FITNESS FOR A PARTICULAR PURPOSE, AND SUCH
IMPLIED WARRANTIES, IF ANY, ARE LIMITED IN DURATION TO THE TERM OF THIS
WARRANTY.
Some states do not allow limitations on how long an implied warranty lasts, so the above
limitations may not apply to you.
IN NO EVENT SHALL BELKIN CORPORATION BE LIABLE FOR INCIDENTAL, SPECIAL,
DIRECT, INDIRECT, CONSEQUENTIAL OR MULTIPLE DAMAGES SUCH AS, BUT NOT
LIMITED TO, LOST BUSINESS OR PROFITS ARISING OUT OF THE SALE OR USE OF
ANY BELKIN PRODUCT, EVEN IF ADVISED OF THE POSSIBILITY OF SUCH DAMAGES.
This warranty gives you specific legal rights, and you may also have other rights,
which may vary from state to state. Some states do not allow the exclusion or limitation
of incidental, consequential, or other damages, so the above limitations may not apply
to you.
12
EN
4
5
Slideshow
Viewer
Belkin Tech Support
US: 800-223-5546, ext. 2263
310-898-1100, ext. 2263
Europe: 00 800 223 55 460
Australia: 1800 235 546
New Zealand: 0800 235 546
Belkin Corporation
501 West Walnut Street
Los Angeles, CA 90220, USA
310-898-1100
310-898-1111 fax
Belkin B.V.
Boeing Avenue 333
1119 PH Schiphol-Rijk, The Netherlands
+31 (0) 20 654 7300
+31 (0) 20 654 7349 fax
Belkin Ltd.
7 Bowen Crescent, West Gosford
NSW 2250, Australia
+61 (0) 2 4372 8600
+61 (0) 2 4372 8603 fax
Belkin Ltd.
Express Business Park, Shipton Way
Rushden, NN10 6GL, United Kingdom
+44 (0) 1933 35 2000
+44 (0) 1933 31 2000 fax
© 2006 Belkin Corporation. All rights reserved. All trade names are registered trademarks of
respective manufacturers listed. Mac OS is a trademark of Apple Computer, Inc., registered in
the U.S. and other countries.
P75149uk
Lecteur
Multimédia avec
sortie TV/Audio
Affichez vos photos numériques sur votre téléviseur et partagez-les
avec vos proches
Manuel de l’utilisateur
F5U229ea
EN
FR
DE
NL
ES
IT
Table des matières
Table des matières
1.
Introduction .........................................................................1
Caractéristiques ...................................................................2
Configuration requise ...........................................................2
Contenu de l’emballage .......................................................2
2.
Installation du matériel (TV) ...............................................5
3.
Utilisation du Lecteur multimédia ......................................6
4.
Installation du matériel (ordinateur) ..................................9
5.
Information ........................................................................11
EN
FR
DE
NL
ES
IT
Introduction
1
2
3
4
5
Félicitations et merci d’avoir choisi le Lecteur Multimédia avec
sortie TV/Audio de Belkin. Ce produit innovateur vous permet
d’afficher vos photos numériques et clips vidéo sur votre
téléviseur en toute simplicité, sans devoir quitter votre fauteuil
favori. Le logiciel d’édition photo inclus vous permet de créer
des montages photo de qualité professionnelle sur votre PC,
transitions et effets spéciaux compris. Lorsque vous avez terminé
votre montage photo, enregistrez-le sur votre carte multimédia et
insérez celle-ci dans le Lecteur Multimédia avec sortie TV/Audio.
Ensuite, il vous suffit de brancher le projecteur à votre téléviseur
pour partager votre chef d’œuvre avec vos proches, dans le
confort de votre foyer et de votre propre écran de téléviseur.
La télécommande du projecteur vous permet de faire défiler les
images et de les faire pivoter. Léger, le projecteur est simple à
installer : aucun pilote ni ordinateur n’est nécessaire pour l’utiliser.
Veuillez prendre le temps lire ce manuel afin de tirer le maximum
de votre nouvel achat.
Le Lecteur Multimédia avec sortie TV/Audio est compatible avec
les cartes multimédia suivantes :
• CompactFlash® Type I et Type II
• IBM® Microdrive™
• SmartMedia™ (SM)
• Secure Digital/Mini SD
• MultiMediaCard (MMC)
• Memory Stick® (MS)
• Memory Stick Pro™ (MS PRO)
1
FR
Introduction
Caractéristiques
Interface d’affichage
• Encodeur télé intégré (NTSC/PAL)
• Prise en charge de l’affichage à l’écran sur téléviseurs
• Fonctions variées d’affichage des images : Slide Show
[montage photo], Auto Slide Show [montage photo
automatique], Preview [prévisualiser], Zoom, Rotate [pivoter] et
Delete [supprimer]
JPEG/Motion JPEG
• Décodeur JPEG intégré, 4:4:4, 4:2:2 et 4:2:0
• Prise en charge de fichiers vidéo (*.mov and *.avi) de 320 x 240
x 25
• Prise en charge de la décompression des vignettes
• Prise en charge d’une résolution de 6 millions de pixels pour les
images fixes
Configuration requise
• Téléviseur avec connexion vidéo RCA (NTSC ou PAL) et audio
3,5 mm
• Ordinateur possédant un port USB libre (USB 2.0 pour mode
Haut Débit)
– Windows® 98 SE, Me, 2000, XP
− Mac OS® 9.x, X v10.2 ou version ultérieure
Contenu de l’emballage
• Lecteur multimédia avec sortie TV/audio
• Télécommande
• CD avec pilotes
• Manuel de l’utilisateur
• Bloc d’alimentation
• Câble audio/vidéo
• Câble USB
2
FR
1
2
3
4
5
Introduction
Face avant
1
1
2
3
4
5
2
1. Récepteur infrarouge
2. Port d’accès pour cartes multimédia
Face supérieure/boutons
5
1
6
2
7
3
8
4
1. Bouton Haut
2. Bouton Bas
3. Bouton Gauche/Pivot
antihoraire
4. Bouton Droit/Pivot horaire
3
5.
6.
7.
8.
FR
Bouton
Bouton
Bouton
Bouton
Lecture/Entrer
Échap
Configuration
Mode
Introduction
Face arrière
3
1
1
2
3
4
1. 5 VCC
2. Port USB en amont
2
3. Sortie vidéo
4. Sortie audio
Remote Control Description
Menu principal
Lecture rapide
Commutateur
de mode
Lecture des
diapositives
Lecture au
ralenti
Augmenter
volume
Annuler/Échap
Baisser volume
Supprimer le
fichier
Lecture/entrer
Déplacer le
curseur haut/
bas
Déplacer le
curseur gauche/
droite
Menu de
configuration
Formattage
de la carte
mémoire
4
FR
4
5
Installation du matériel (TV)
1
2
3
4
5
1. Branchez l’adaptateur de courant sur une prise murale
ou sur un parafoudre. Branchez la fiche CC sur la prise
d’alimentation CC à l’arrière du Lecteur Multimédia.
2. Branchez le câble audio/vidéo au téléviseur ou à la chaîne
audio. Branchez le connecteur jaune à la prise « Video In » du
téléviseur, et le connecteur 3,5 mm à la prise « Audio In ». (Si
votre téléviseur ne possède pas de prise audio 3,5 mm, il se
peut qu’un adaptateur 3,5 mm/RCA soit requis.)
3. Branchez les câbles audio/vidéo à l’arrière du Lecteur
multimédia.
4. Allumez le téléviseur et changez la source du téléviseur
en allant au canal désiré (consultez la documentation
accompagnant votre téléviseur pour en savoir plus sur
la sélection de la source). Après avoir choisi la source
appropriée, un message vous invitant à insérer une carte
mémoire apparaît.
5. Le Lecteur multimédia est maintenant prêt à l’emploi.
5
FR
Utilisation du Lecteur multimédia
1. Insérez votre carte mémoire dans la fente correspondante.
Si la carte est inséré correctement, le témoin clignote et le
Lecteur multimédia lit votre carte.
2. Le menu apparaît sur votre téléviseur et affiche le type de
média.
3. Choisissez le média que vous désirez afficher à l’aide
des flèches directionnelles du Lecteur multimédia. Après
avoir choisi votre média, appuyez sur le bouton de lecture
(« Play »).
4. Appuyez sur le bouton « Setup », qui fera apparaître le menu
de configuration.
5. Appuyez sur le bouton « Format » pour formatter le média
choisi afin de le visionner.
6. Ensuite, vous verrez le menu « Photo/Movie » apparaître à
l’écran.
7. Appuyez sur les flèches vers le haut et vers le bas pour
sélectionner le mode « Photo » ou « Video », puis appuyez sur
« Play » pour confirmer.
6
FR
1
2
3
4
5
Utilisation du Lecteur multimédia
1
2
3
4
5
Mode Photo
1. En mode « Photo », vous pouvez voir un aperçu des photos
se trouvant sur la carte mémoire sélectionnée. Servez-vous
des flèches directionnelles pour vous déplacer d’une photo à
l’autre.
2. Appuyez sur « Play » lorsque vous avez choisi une photo à
afficher.
• Vous pouvez faire un zoom avant ou arrière sur une photo à
l’aide des boutons « Z+ » et « Z- ».
3. Vous pouvez appuyer sur « Slide » pour voir une montage des
photos qui se trouvent dans le répertoire.
4. Appuyez sur « ESC » pour revenir au menu précédent et
annuler l’action en cours.
Mode « Movie »
1. En mode « Movie », vous pouvez voir un aperçu des clips
vidéo se trouvant sur la carte mémoire sélectionnée. Servezvous des flèches directionnelles pour vous déplacer d’un
fichier à l’autre.
2. Appuyez sur « Play » lorsque vous avez choisi un vidéo à
afficher.
• Vous pouvez vous servir du bouton « Mode » pour passer
du mode « Photo » au mode « Movie ».
3. Servez-vous des boutons « Speed Up » ou « Speed Dn »
pour régler la vitesse de lecture. Appuyez sur « Play » pour
reprendre la lecture à vitesse normale.
4. Appuyez sur « ESC » pour revenir au menu précédent et
annuler l’action en cours.
7
FR
Utilisation du Lecteur multimédia
Fonction de suppression
1. Servez-vous des flèches directionnelles pour vous déplacer
vers le fichier que vous désirez supprimer.
2. Appuyez sur « Delete » pour sélectionner le fichier à
supprimer.
3. Appuyez sur « ESC ».
4. Une fenêtre de dialogue apparaît, confirmant la suppression.
Appuyez sur « Play » pour confirmer. Si vous désirez annuler
la suppression, appuyez de nouveau sur « ESC ».
Menu de configuration
1. Cliquez sur le bouton « Setup ».
2. Le menu de configuration vous présente quatre options :
• TV system [téléviseur] : NTSC (Taïwan, Japon, États-Unis)/
PAL (Hong Kong, Chine, Europe)
• Slide [montage] : Permet de régler la vitesse de lecture
• Sound [son] : Permet de régler le volume du flm.
• Language [langue] : Sélection de la langue.
8
FR
1
2
3
4
5
Installation du matériel (ordinateur)
1
2
3
4
5
1. Branchez un câble USB entre le Lecteur multimédia et le port
USB de votre ordinateur ou un hub USB.
2. Windows détecte le Lecteur et installe les pilotes appropriés.
(Il se peut que l’assistant d’installation de nouveaux
périphériques de Windows vous demande d’insérer le
CD d’installation de Windows pour terminer la procédure
d’installation du pilote. Certains ordinateurs sous Windows
88 SE requièrent des pilotes supplémentaires ; ceux-ci se
trouvent sur le CD.)
3. Le Lecteur multimédia est reconnu en tant que deux lecteurs
de disques amovibles. Pour accéder aux nouveaux lecteurs,
cliquez sur l’icône« Poste de travail » qui se trouve sur le
bureau de Windows. À la fenêtre « Poste de travail », vous
verrez deux icônes représentant les lecteurs de disques
amovibles.
9
FR
Installation du matériel (ordinateur)
Accès aux fichiers et aux données
1
1. Cliquez deux dois sur le lecteur assigné à votre lecteur
multimédia. Une fenêtre apparaît. Elle affiche le contenu de la
carte actuellement installée.
2
2. Pour déplacer les fichiers depuis le disque ou vers ce dernier,
faites glisser le fichier vers un autre emplacement ou utilisez
d’autres méthodes de transfert de fichier acceptées par votre
système d’exploitation.
Remarque : Afin d’éviter toute perte ou corruption des
données, ne retirez JAMAIS la carte et ne débranchez
JAMAIS le Lecteur lorsque le témoin d’activité clignote.
10
FR
3
4
5
Information
1
2
3
4
5
Déclaration FCC
DÉCLARATION DE CONFORMITÉ À LA RÉGLEMENTATION FCC
EN MATIÈRE DE COMPATIBILITÉ ÉLECTROMAGNÉTIQUE
Nous, Belkin Corporation, sis au 501 West Walnut Street, Compton CA, 90220,
États-Unis, déclarons sous notre seule responsabilité que le produit
F5U229ea
auquel se réfère la présente déclaration,
est conforme aux normes énoncées à l’alinéa 15 de la réglementation FCC. Le
fonctionnement est assujetti aux deux conditions suivantes : (1) cet appareil ne peut
pas provoquer d’interférence nuisible et (2) cet appareil doit accepter toute interférence
reçue, y compris des interférences pouvant entraîner un fonctionnement non désiré.
Déclaration de conformité CE
Nous, Belkin Components, déclarons sous notre seule responsabilité que le produit
F5U229, auquel se rapporte la présente déclaration, a été élaboré dans le respect
des normes d’émissions EN 55022:1998 Classe B, EN50081-1, ainsi que des normes
d’immunité EN50082-1 1992 en vigueur.
Garantie limitée à vie du produit de Belkin Corporation
Couverture offerte par la garantie.
Belkin Corporation garantit à l’acheteur initial de ce produit Belkin que le produit est exempt
de défauts de conception, de montage, de matériau et de fabrication.
Période de garantie.
Belkin Corporation garantit le produit Belkin pour toute la durée de vie du produit.
Mesures correctives.
Garantie du produit.
Belkin s’engage à réparer ou à remplacer gratuitement, à sa convenance, tout produit
défectueux (à l’exception des frais d’expédition du produit).
Limites de la couverture offerte par la garantie.
Toutes les garanties susmentionnées sont caduques si le produit Belkin n’est pas retourné
à Belkin Corporation à la demande expresse de celui-ci, l’acheteur étant responsable de
l’acquittement des frais d’expédition, ou si Belkin Corporation détermine que le produit
Belkin a été installé de façon inadéquate, a été modifié d’une quelconque façon ou falsifié.
La garantie du produit Belkin ne protège pas contre des calamités naturelles (autre que
la foudre) comme les inondations, les tremblements de terre ou la guerre, le vandalisme,
le vol, l’usure normale, l’érosion, l’épuisement, l’obsolescence, l’abus, les dommages
provoqués par des perturbations de basse tension (baisses ou affaissements de tension,
par exemple), un programme non autorisé ou une modification de l’équipement du système.
11
FR
Information
Entretien et réparation.
Vous devez prendre les mesures suivantes pour faire réparer ou entretenir votre produit
Belkin :
1.
2.
1
Écrivez à Belkin Corporation au 501 W. Walnut St., Compton CA 90220, États-Unis, à
l’attention de : Customer Service (service client) ou appelez le (800)-223-5546, dans les
15 jours suivant l’événement.
Préparez-vous à fournir les informations suivantes :
2
a. Référence du produit Belkin.
b. Lieu d’achat du produit.
c. Date de l’achat du produit.
d. Une copie du reçu original.
Le représentant du service client Belkin vous donnera alors toutes les instructions sur
la façon d’expédier votre facture et le produit Belkin et la façon de présenter votre
réclamation.
4
Belkin Corporation se réserve le droit d’examiner le produit Belkin endommagé. Tous les
frais d’expédition du produit Belkin à Belkin Corporation pour inspection seront entièrement
à la charge de l’acheteur. Si Belkin détermine, à son entière discrétion, qu’il est peu
pratique d’expédier l’équipement endommagé à Belkin Corporation, elle peut désigner, à
son entière discrétion, un atelier de réparation pour inspecter l’équipement et évaluer le coût
des réparations. Les coûts, s’il en est, pour l’expédition de l’équipement jusqu’à l’atelier
de réparation et le retour, et pour l’estimation, seront entièrement assumés par l’acheteur.
L’équipement endommagé doit être disponible pour inspection jusqu’à ce que la demande
de réclamation soit réglée. Lorsqu’un règlement intervient, Belkin Corporation se réserve le
droit d’être subrogé en vertu de quelque police d’assurance que l’acheteur pourrait avoir.
Relation entre le Droit national et la garantie.
BELKIN REJETTE PAR LE PRÉSENT DOCUMENT TOUTES LES AUTRES GARANTIES,
EXPLICITES OU IMPLICITES, Y COMPRIS MAIS SANS S’Y LIMITER, LES GARANTIES
IMPLICITES AFFÉRENTES À LA QUALITÉ LOYALE ET MARCHANDE ET À L’ADÉQUATION
À UNE FIN DONNÉE, ET CES GARANTIES IMPLICITES, S’IL Y A LIEU, SONT D’UNE
DURÉE LIMITÉE AU CONDITIONS DE LA PRÉSENTE GARANTIE.
Certains pays ne permettent pas d’imposer de limite à la durée de validité des garanties
implicites. Il se peut donc que les limites ci-dessus ne s’appliquent pas dans votre cas.
BELKIN COMPONENTS NE PEUT EN AUCUN CAS ÊTRE TENU RESPONSABLE DE
DOMMAGES ACCESSOIRES, DIRECTS, INDIRECTS OU MULTIPLES, Y COMPRIS, MAIS
SANS S’Y LIMITER, LA PERTE DE REVENUS OU D’AFFAIRES DÉCOULANT DE LA VENTE
OU DE L’UTILISATION DE TOUT PRODUIT BELKIN, MÊME LORSQU’IL A ÉTÉ AVISÉ DE
LA PROBABILITÉ DES DITS DOMMAGES.
La garantie vous confère des droits légaux spécifiques. Vous pouvez également bénéficier
d’autres droits qui varient d’un pays à l’autre. Certains états ne permettent pas l’exclusion
ou la limitation des dommages-intérêts pour une cause indirecte, fortuite ou de tous autres
dommages; il se pourrait donc que les limites indiquées ci-dessus ne s’appliquent pas dans
votre cas..
12
FR
3
5
Lecteur
Multimédia avec
sortie TV/Audio
Assistance Technique Belkin
États-Unis : 800-223-5546, poste 2263
310-898-1100 poste 2263
Europe : 00 800 223 55 460
Australie : 1800 235 546
Nouvelle-Zélande : 0800 235 546
Belkin Corporation
501 West Walnut Street
Los Angeles, CA 90220. USA
310-898-1100
310-898-1111 Fax
Belkin B.V.
Boeing Avenue 333
1119 PH Schiphol-Rijk, Pays-Bas
+31 (0) 20 654 7300
+31 (0) 20 654 7349 Fax
Belkin Ltd.
7 Bowen Crescent, West Gosford
NSW 2250, Australie
+61 (0) 2 4372 8600
+61 (0) 2 4372 8603 Fax
Belkin Ltd.
Express Business Park, Shipton Way
Rushden, NN10 6GL, Royaume-Uni
+44 (0) 1933 35 2000
+44 (0) 1933 31 2000 Fax
© 2006 Belkin Corporation. Tous droits réservés. Toutes les raisons commerciales sont des
marques déposées de leurs fabricants respectifs. Mac OS est une marque de commerce d’Apple
Computer, Inc., déposée aux États-Unis et dans d’autres pays.
P75149fr
Media Viewer
Zeigen Sie Freunden und Familie Ihre digitalen Fotos auf dem
Fernseher
Benutzerhandbuch
F5U229ea
EN
FR
DE
NL
ES
IT
Inhaltsverzeichnis
Inhaltsverzeichnis
1.
Einleitung .............................................................................1
Merkmale..............................................................................2
Systemanforderungen ..........................................................2
Verpackungsinhalt ................................................................2
2.
Hardware-Installation (TV) ..................................................5
3.
Verwenden des Media Viewer 6
4.
Hardware-Installation (Computer) ......................................9
5.
Hinweise ............................................................................11
EN
FR
DE
NL
ES
IT
Einleitung
1
2
3
4
5
Wir gratulieren Ihnen zum Kauf des innovativen Media Viewer von
Belkin. Mit diesem Gerät können Sie leicht und einfach digitale
Bilder und Videos auf Ihrem Fernseher betrachten, während
Sie komfortabel in Ihrem Lieblingssessel sitzen. Die beigefügte
Fotobearbeitungs-Software ermöglicht Ihnen die Erstellung einer
professionellen Diashow auf Ihrem PC, mit allen Übergängen und
Effekten. Nach Erstellung der Diashow speichern Sie sie auf Ihrer
Speicherkarte und stecken diese in den Media Viewer. Verbinden
Sie dann den Viewer mit Ihrem Fernsehgerät und schon können
Sie Ihren Freunden und der Familie Ihre Fotos bequem über Ihren
eigenen Fernsehbildschirm zeigen. Mit der Fernbedienung des
Viewers können Sie Bilder überspringen oder drehen. Federleicht
und einfach zu installieren; für den Viewer sind keine Treiber oder
Computer nötig.
Bitte lesen Sie diese Gebrauchsanweisung aufmerksam durch,
damit Sie Ihr Produkt optimal nutzen können.
Der Media Viewer ist mit den folgenden Speicherkarten
kompatibel:
• CompactFlash® Typ I und Typ II
• IBM® Microdrive™
• SmartMedia™ (SM)
• Secure Digital/Mini SD
• MultiMediaCard (MMC)
• MemoryStick® (MS)
• MemoryStick Pro™ (MS PRO)
1
DE
Einleitung
Merkmale
Benutzeroberfläche
• Mit integriertem TV-Codierer (NTSC/PAL)
• Unterstützt OSD-Funktion auf dem Fernseher
• Zahlreiche Anzeige-Funktionen: Diashow, Automatische
Diashow, Vorschau, Vergrößern, Drehen und Löschen
JPEG/Motion JPEG
• Integrierter JPEG-Decodierer für 4:4:4, 4:2:2 und 4:2:0
• Unterstützt Filmdateien (*.mov und *.avi) mit 320 x 240 x 25
• Unterstützt Miniaturbild-Dekomprimierung
• Unterstützt Standbildauflösung bis zu 6 Megapixel
Systemvoraussetzungen
• Fernseher mit Cinch-Video- (NTSC oder PAL) und 3,5-mmKlinkenaudioanschluss
• Computer mit freier USB-Schnittstelle (USB 2.0-Schnittstelle für
Hi-Speed Modus)
− Windows® 98 SE, ME, 2000 oder XP
− Mac OS® 9.x, X v10.2 oder höher
Verpackungsinhalt
• Media Viewer
• Fernbedienung
• Treiber-CD
• Benutzerhandbuch
• Netzteil
• Audio-/Videokabel
• USB-Kabel
2
DE
1
2
3
4
5
Einleitung
Vorderseite
1
1
2
3
4
5
2
1. Infrarot-Empfänger
2. Speicherkarten-Port
Ansicht von oben/Schaltflächen
5
1
6
2
7
3
8
4
1. Bild rauf
2. Bild runter
3. Bild links/drehen gegen
den Uhrzeigersinn
4. Bild rechts/drehen im
Uhrzeigersinn
5.
6.
7.
8.
3
DE
Wiedergabe/Eingabe
ESC-Taste
Einstellungen
Modus
Einleitung
Rückseite
3
1
1
2
3
4
2
1. 5 V Gleichstrom
2. Vorgeschalteter USB-Port
3. Videoausgang
4. Audioausgang
Fernbedienung
Hauptmenü
Filmgeschwindigkeit
erhöhen
Modus-Schalter
Filmgeschwindigkeit
verringern
Diashow starten
Lautstärke erhöhen
Abbrechen/
Beenden
Lautstärke verringern
Datei löschen
Wiedergabe/Eingabe
Konfigurationsmenü
Bildzeiger rauf/runter
Speicherkarte formatieren
Bildzeiger links/
rechts
4
DE
4
5
Hardware-Installation (TV)
1
2
3
4
5
1. Schließen Sie das Netzteil an eine nahe gelegene Steckdose
oder einen Überspannungsschutz an. Schließen Sie den
Netzstecker hinten an den Netzanschluss des Media Viewer
an.
2. Verbinden Sie das Audio-/Videokabel mit dem Fernseher oder
dem Audio-System. Verbinden Sie den gelben Stecker mit
dem Videoeingang und den 3,5-mm-Klinkenstecker mit dem
Audioeingang des Fernsehers. (Sollte Ihr Fernsehgerät nicht
über einen 3,5-mm-Klinkeneingang verfügen, benötigen Sie u.
U. einen 3,5-mm-Klinken/Cinch-Audioadapter.)
3. Schließen Sie das Audio-/Videokabel an die Rückseite des
Media Viewer an.
4. Schalten Sie das Fernsehgerät an und wählen Sie den
richtigen Eingangskanal aus (beachten Sie für die Auswahl
des richtigen Kanals bitte das Handbuch zu Ihrem
Fernsehgerät). Nach der Auswahl des richtigen Kanals
wird eine Mitteilung angezeigt, die Sie auffordert, eine
Speicherkarte einzulegen.
5. Der Media Viewer kann nun verwendet werden.
5
DE
Verwenden des Media Viewer
1. Legen Sie eine Speicherkarte in den entsprechenden
Steckplatz ein. Wenn die Karte ordnungsgemäß eingesteckt
ist, blinkt die LED-Anzeige. Der Viewer liest dann die Daten
auf der Karte aus.
2. Das Menü für die Speicherkarten-Typen wird auf dem
Fernsehbildschirm angezeigt.
3. Wählen Sie den Typ aus, den Sie verwenden. Verwenden Sie
dazu die Richtungspfeile auf dem Viewer. Nach der Auswahl
des richtigen Mediums, drücken Sie auf die Eingabetaste
(Wiedergabe).
4. Drücken Sie auf die Taste „Einstellungen” (Setup). Das
Einstellungs-Menü wird geöffnet.
5. Drücken Sie auf die Taste „Formatieren” (Format). Die
ausgewählte Karte kann formatiert werden.
6. Danach wird das Menü „Foto/Film” (Photo/Movie) angezeigt.
7. Verwenden Sie die Pfeiltasten, um den Modus „Foto”
(Photo) oder „Film” (Video) auszuwählen und drücken Sie
anschließend die Eingabetaste (Wiedergabe).
6
DE
1
2
3
4
5
Verwenden des Viewers
1
2
3
4
5
Foto-Modus
1. Im Foto-Modus können alle Fotos auf der ausgewählten
Speicherkarte in einer Vorschau betrachtet werden.
Verwenden Sie die Pfeiltasten, um das gewünschte Bild
auszuwählen.
2. Drücken Sie einmal die Eingabetaste (Wiedergabe), wenn Sie
ein Bild ausgewählt haben.
• Sie können die Bildansicht mit den Schalflächen „Z+” oder
„Z-” vergrößern oder verkleinern.
3. Drücken Sie auf die Schaltfläche „Slide” (Dia), um eine
Diashow aller Bilder im geöffneten Verzeichnis anzuzeigen.
4. Drücken Sie auf „ESC”, um zur vorherigen Menüanzeige
zurückzukehren und den aktuellen Vorgang abzubrechen.
Film-Modus
1. Im Film-Modus (Movie) können alle Filme auf der
ausgewählten Speicherkarte in einer Vorschau betrachtet
werden. Verwenden Sie die Pfeiltasten (hoch, runter, links,
rechts), um den gewünschten Film auszuwählen.
2. Drücken Sie einmal die Eingabetaste (Wiedergabe), wenn Sie
ein Bild ausgewählt haben.
• Sie können die Schaltfläche „Modus” (Mode) verwenden,
um zwischen den Modi „Foto” (Photo) oder „Film” (Movie)
zu wechseln.
3. Mit den Schaltflächen „Schneller” (Speed Up)
oder „Langsamer” (Speed down) können Sie die
Abspielgeschwindigkeit einstellen. Drücken Sie
die Eingabetaste (Wiedergabe), um wieder zur
Normalgeschwindigkeit zurückzukehren.
4. Drücken Sie auf „ESC”, um zur vorherigen Menüanzeige
zurückzukehren und den aktuellen Vorgang abzubrechen.
7
DE
Verwenden des Viewers
Löschen
1. Verwenden Sie die Pfeiltasten, um das Foto auszuwählen,
das gelöscht werden soll.
2. Drücken Sie auf „Löschen” (Delete), um das Bild, das
gelöscht werden soll, zu markieren.
3. Drücken Sie die ESC-Taste.
4. Es wird ein Dialogfeld angezeigt, auf dem Sie den
Löschvorgang bestätigen müssen. Drücken Sie zur
Bestätigung die Eingabetaste (Wiedergabe). Wenn Sie den
Löschvorgang nicht ausführen möchten, drücken Sie erneut
auf „ESC”.
Einstellungen
1. Drücken Sie auf die Schaltfläche „Einstellungen” (Setup).
2. Im Einstellungsmenü können Sie aus vier Funktionen
auswählen:
• TV-System: NTSC (Taiwan, Japan, USA)/PAL (Hongkong,
China, Europa)
• Dia (Slide): Einstellung der Bildanzeigedauer bei einer
Diashow.
• Klang (Sound): Einstellung der Filmlautstärke.
• Sprache (Language): Auswahl mehrerer Sprachen.
8
DE
1
2
3
4
5
Hardware-Installation (Computer)
1
2
3
4
5
1. Stecken Sie den USB-Stecker des Viewers in die USBBuchse Ihres Computers oder USB-Hubs.
2. Windows erkennt den Viewer automatisch und installiert
die benötigten Treiber. (Möglicherweise werden Sie vom
Hardware-Assistenten aufgefordert, die Windows CD-ROM
einzulegen, um die Treiberinstallation abzuschließen. Einige
Computer mit Windows 98 SE erforden die Installation eines
weiteren Treibers. Dieser ist auf der mitgelieferten CD-Rom
enthalten.)
3. Der Viewer wird als zwei einzelne Wechseldatenträger
erkannt. Sie greifen auf die neuen Laufwerke zu, indem Sie
auf dem Windows Desktop auf „Arbeitsplatz” klicken. Wenn
das Fenster „Arbeitsplatz” geöffnet wird, werden die Symbole
für zwei neue Wechseldatenträger angezeigt.
9
DE
Hardware-Installation (Computer)
Zugriff auf Dateien und Daten
1
1. Klicken Sie doppelt auf das Symbol für den
Speicherkartenleser. In einem Fenster wird der Inhalt der
eingelegten Speicherkarte angezeigt.
2
2. Sie können Dateien von der Karte oder auf die Karte kopieren,
indem Sie die Dateien mit der Maus in den Zielordner ziehen
oder eine andere standardmäßige Übertragungsmethode
verwenden, die Sie von Ihrem Betriebssystem kennen.
Hinweis: Um Datenverluste zu vermeiden, entnehmen Sie
NIEMALS die Karte und entfernen Sie den Viewer nicht, wenn
die Anzeige „Aktiv” (Activity) leuchtet oder blinkt.
10
DE
3
4
5
Hinweise
1
2
3
4
5
FCC-Erklärung
KONFORMITÄTSERKLÄRUNG ZUR EINHALTUNG DER FCC-BESTIMMUNGEN
ÜBER ELEKTROMAGNETISCHE VERTRÄGLICHKEIT
Wir, Belkin Corporation, eine Gesellschaft mit Sitz in 501 West Walnut Street,
Compton, CA 90220, USA, erklären hiermit in alleiniger Verantwortung, dass dieser
Artikel, Nr.
F5U229ea
auf den sich diese Erklärung bezieht:
in Einklang mit Teil 15 der FCC-Regelungen steht. Der Betrieb unterliegt den beiden
folgenden Bedingungen: (1) Dieses Gerät darf schädigende Störungen nicht verursachen,
und (2) dieses Gerät muss jedwede Störung annehmen, einschließlich der Störungen, die
einen unerwünschten Betrieb verursachen könnten.
CE-Konformitätserklärung
Wir, Belkin Corporation, erklären alleinverantwortlich, dass das Produkt F5U229, auf das
sich diese Erklärung bezieht, der Europanorm für die elektromagnetische Verträglichkeit
EN55022:1998 (Klasse B) und EN50081-1 und außerdem der Europanorm für die
Störfestigkeit EN50082-1:1992 entspricht.
Eingeschränkte lebenslange Produktgarantie von Belkin
Garantieleistung.
Belkin Corporation garantiert dem ursprünglichen Käufer dieses Belkin-Produkts, dass
dieses Produkt frei von Material-, Verarbeitungs-, und Konstruktionsfehlern ist.
Garantiedauer.
Belkin Corporation gewährt für dieses Belkin-Produkt eine lebenslange Garantie.
Problembehebung.
Produktgarantie.
Belkin wird das Produkt nach eigenem Ermessen entweder kostenlos (abgesehen von den
Versandkosten) reparieren oder austauschen.
Garantieausschluss.
Alle oben genannten Garantien verlieren ihre Gültigkeit, wenn das Belkin-Produkt der Belkin
Corporation auf Anfrage nicht auf Kosten des Käufers zur Überprüfung zur Verfügung
gestellt wird oder wenn die Belkin Corporation feststellt, dass das Belkin-Produkt
nicht ordnungsgemäß installiert worden ist, und dass unerlaubte Änderungen daran
vorgenommen worden sind. Die Produktgarantie von Belkin gilt nicht für (Natur)gewalten
(mit Ausnahme von Blitzeinschlägen) wie Überschwemmungen und Erdbeben sowie Krieg,
Vandalismus, Diebstahl, normalem Verschleiß, Erosion, Wertminderung, Veralterung,
schlechte Behandlung, Beschädigung durch Störungen aufgrund von Unterspannung (z. B.
Spannungsabfall oder -Senkung) oder nicht erlaubten Programm- oder Systemänderungen.
11
DE
Hinweise
Service.
Um Unterstützung von Belkin zu bekommen, befolgen Sie die folgenden Schritte:
1. Wenden Sie sich an die Belkin Corporation, 501 W. Walnut St., Compton CA 90220, Zu
Hdn.: Customer Service, oder rufen Sie bis 15 Tage nach Auftreten des Schadens an:
Tel. (800) -223-5546. Halten Sie die folgenden Informationen bereit:
a. Die Artikelnummer des Belkin-Produkts.
b. Wo Sie das Produkt erworben haben.
c. Wann Sie das Produkt erworben haben.
d. Eine Kopie der Originalquittung.
1
2
3
2.
Die entsprechenden Mitarbeiter/innen informieren Sie darüber, wie Sie Ihre Rechnung und
das Belkin-Produkt versenden müssen und wie Sie fortfahren müssen, um Ihre Ansprüche
geltend zu machen.
Belkin Corporation behält sich vor, das beschädigte Belkin-Produkt zu überprüfen. Alle Kosten,
die beim Versand des Belkin-Produkts an die Belkin Corporation zum Zweck der Überprüfung
entstehen, sind vollständig durch den Käufer zu tragen. Wenn Belkin nach eigenem Ermessen
entscheidet, dass es unpraktisch ist, das beschädigte Gerät an die Belkin Corporation zu
schicken, kann Belkin nach eigenem Ermessen eine Reparaturstelle damit beauftragen, das
Gerät zu überprüfen und einen Kostenvoranschlag für die Reparaturkosten des Gerätes zu
machen. Die Kosten für den Versand zu einer solchen Reparaturstelle und die eventuellen
Kosten für einen Kostenvoranschlag gehen vollständig zu Lasten des Käufers. Beschädigte
Geräte müssen zur Überprüfung zur Verfügung stehen, bis das Reklamationsverfahren
abgeschlossen ist. Wenn Ansprüche beglichen werden, behält sich die Belkin Corporation das
Recht vor, Ersatzansprüche an eine bestehende Versicherung des Käufers zu übertragen.
Garantiegesetze.
DIE GARANTIE IST DIE ALLEINIGE GARANTIE VON BELKIN. ES GIBT KEINE ANDERE
GARANTIE, EXPLIZIT ERWÄHNT ODER IMPLIZIERT, AUSSER WENN DIES VOM GESETZ
VORGESCHRIEBEN IST, EINSCHLIESSLICH DER IMPLIZIERTEN GARANTIE ODER DES
QUALITÄTSZUSTANDS, DER ALLGEMEINEN GEBRAUCHSTAUGLICHKEIT ODER EIGNUNG
FÜR EINEN BESTIMMTEN ZWECK, UND SOLCHE IMPLIZIERTEN GARANTIEN, WENN
ES SOLCHE GIBT, BEZIEHEN SICH AUSSCHLIESSLICH AUF DIE DAUER, DIE IN DIESER
GARANTIE ZUGRUNDE GELEGT WIRD.
In manchen Staaten sind Einschränkungen bezüglich der Dauer der Garantie nicht erlaubt.
Die oben erwähnten Einschränkungen treffen für Sie dementsprechend nicht zu.
UNTER KEINEN UMSTÄNDEN HAFTET DIE BELKIN CORPORATION FÜR ZUFÄLLIGEN,
BESONDEREN, DIREKTEN, INDIREKTEN, MEHRFACHEN SCHADEN ODER
FOLGESCHÄDEN WIE, ABER NICHT AUSSCHLIESSLICH, ENTGANGENES GESCHÄFT
ODER PROFITE, DIE IHNEN DURCH DEN VERKAUF ODER DIE BENUTZUNG VON
EINEM BELKIN-PRODUKT ENTGANGEN SIND, AUCH WENN SIE AUF DIE MÖGLICHKEIT
SOLCHER BESCHÄDIGUNGEN AUFMERKSAM GEMACHT WORDEN SIND.
Diese Garantie räumt Ihnen spezifische Rechte ein, die von Land zu Land unterschiedlich
ausgestaltet sein können. Da in manchen Ländern der Ausschluss oder die Beschränkung
der Haftung für durch Zufall eingetretene oder Folgeschäden nicht zulässig ist, haben die
vorstehenden Beschränkungen und Ausschlussregelungen für Sie möglicherweise keine
Gültigkeit.
12
DE
4
5
Media Viewer
Belkin Technischer Support
USA: 800-223-5546, Durchwahl 2263
310-898-1100, Durchwahl 2263
Europa: 00 800 223 55 460
Australien: 1800 235 546
Neuseeland: 0800 235 546
Belkin Corporation
501 West Walnut Street
Los Angeles, CA 90220, USA
310-898-1100
310-898-1111 Fax
Belkin B.V.
Boeing Avenue 333
1119 PH Schiphol-Rijk, Niederlande
+31 (0) 20 654 7300
+31 (0) 20 654 7349 Fax
Belkin Ltd.
7 Bowen Crescent, West Gosford
NSW 2250, Australien
+61 (0) 2 4372 8600
+61 (0) 2 4372 8603 Fax
Belkin Ltd.
Express Business Park, Shipton Way
Rushden, NN10 6GL, Großbritannien
+44 (0) 1933 35 2000
+44 (0) 1933 31 2000 Fax
© 2006 Belkin Corporation. Alle Rechte vorbehalten. Alle Produktnamen sind eingetragene Marken
der angegebenen Hersteller. Mac OS ist ein Warenzeichen der Apple Computer, Inc.,
das in den USA und anderen Ländern eingetragen ist.
P75149de
Media Viewer
voor TV
Bekijk uw digitale foto’s via uw TV
Handleiding
F5U229ea
EN
FR
DE
NL
ES
IT
Inhoud
Inhoud
1.
Inleiding ...............................................................................1
Productkenmerken ...............................................................2
Systeemvereisten .................................................................2
Inhoud van de verpakking....................................................2
2.
Hardware installeren (TV) ...................................................5
3.
Gebruik maken van uw Media Viewer voor TV ....................6
4.
Hardware installeren (computer)........................................9
5.
Informatie ..........................................................................11
EN
FR
DE
NL
ES
IT
Inleiding
1
2
3
4
5
Gefeliciteerd en bedankt voor het kopen van de Media
Viewer voor TV van Belkin. Dit innovatieve apparaat stelt u
op eenvoudige wijze in staat uw digitale foto’s en videoclips
op uw televisie af te beelden. Met de meegeleverde
fotobewerkingssoftware kunt u professionele fotopresentaties op
uw PC creëren, compleet met overgangen en speciale effecten.
Zodra u klaar bent met het creëren van uw fotopresentatie,
bewaart u deze op uw mediakaart en steekt u de kaart in de
Media Viewer voor TV. Vervolgens sluit u de Media Viewer op uw
televisie aan en bent u klaar om uw familie en vrienden vanuit uw
luie stoel op een fotoshow te trakteren. De afstandbediening van
de Media Viewer stelt u in staat in te zoomen en foto’s te draaien.
De Media Viewer voor TV is licht van gewicht en bijzonder
eenvoudig in het gebruik aangezien er geen stuurprogramma’s
geïnstalleerd hoeven te worden en u geen computer nodig hebt.
Lees deze handleiding aandachtig door zodat u optimaal gebruik
kunt maken van dit kwaliteitsproduct.
De Media Viewer voor TV is compatible met de volgende
mediakaarten:
• CompactFlash® Type I en Type II
• IBM® Microdrive™
• SmartMedia™ (SM)
• Secure Digital/Mini SD
• MultiMediaCard (MMC)
• Memory Stick® (MS)
• Memory Stick Pro™ (MS PRO)
1
NL
Inleiding
Productkenmerken
Display-interface
• Is voorzien van een TV-encoder (NTSC/PAL)
• Ondersteunt OSD-functionaliteit op TV
• Biedt u verschillende fotodisplayfuncties: Slide Show
(Fotopresentatie), Auto Slide Show (Automatische
fotopresentatie), Preview, Zoom, Rotate (Draaien), and Delete
(Verwijderen)
JPEG/Motion JPEG
• Heeft een ingebouwde JPEG-decoder
(bemonsteringsverhouding 4:4:4, 4:2:2 en 4:2:0)
• Ondersteunt movie-bestanden (*.mov en *.avi) - 320x240x25
• Ondersteunt decompressie thumbnail-plaatjes
• Ondersteunt resolutie van tot 6 megapixels bij stilstaand beeld
Systeemvereisten
• TV met een RCA-video- (NTSC of PAL) en een 3,5mm-audioaansluiting
• Computer met een vrije USB-poort (USB 2.0-poort voor highspeed modus)
− Windows® 98 SE, Me, 2000, XP
− Mac OS® 9.x, X v10.2 of hoger
Inhoud van de verpakking
• Media Viewer voor TV
• Afstandbediening
• Cd met stuurprogramma
• Handleiding
• Voedingsadapter
• Audio/videokabel
• USB-kabel
2
NL
1
2
3
4
5
Inleiding
Beschrijving van het frontpaneel
1
1
2
3
4
5
2
1. Infrarood-ontvanger
2. Poort voor mediakaart
Bovenaanzicht/Beschrijving van de knoppen
5
1
6
2
7
3
8
4
1.
2.
3.
4.
5.
“Omhoog”-knop
“Omlaag”-knop
“Links”-knop/Tegen de klok in
draaien
“Rechts”-knop/Met de klok
mee draaien
‘’Play/Enter”-knop
3
6.
7.
8.
NL
“ESC”-knop
“Setup”-knop
“Modus”-knop
Inleiding
Beschrijving van het achterpaneel
3
1
1
2
3
4
1. 5 V DC
2. USB-upstreampoort
2
3. Video-uitgang
4. Audio-uitgang
Beschrijving afstandbediening
Hoofdmenu
Film versneld
afspelen
Modusschakelaar
Film vertraagd
afspelen
Foto afbeelden
Geluid harder
Annuleren/Escape
Geluid zachter
Bestand verwijderen
Play/Enter
Setupmenu
Cursur omhoog/
omlaag
Geheugenkaart
formatteren
Cursor naar links/
rechts
4
NL
4
5
Hardware installeren (TV)
1
2
3
4
5
1. Sluit de netvoedingsadapter aan op een stopcontact of een
spanningsbeveiliger. Sluit vervolgens de gelijkstroomstekker
aan op de daarvoor bestemde aansluiting aan de achterkant
van de Media Viewer voor TV.
2. Sluit de audio/videokabel aan op de TV en uw audiosysteem
(optioneel). Sluit de gele stekker aan op de “Video In”-poort
van uw TV en de 3,5mm-stekker op de “Audio In”-poort.
(Indien uw TV niet is voorzien van een 3,5mm-audio-ingang,
dient u mogelijk een 3,5mm-naar-RCA-audioadapter te
kopen.)
3. Sluit de audio/videokabels aan op de achterzijde van de
Media Viewer voor TV.
4. Zet uw TV aan en wijzig de input-bron op de TV in het
gewenste input-kanaal (raadpleeg de handleiding van uw tv
voor meer informatie). Zodra de juist bron is geselecteerd,
krijgt u een melding waarin u verzocht wordt een
geheugenkaart in de Media Viewer voor TV te steken.
5. De Media Viewer voor TV is nu klaar voor gebruik.
5
NL
Gebruik maken van de Media Viewer voor TV
1. Steek uw flash-geheugenkaart in de corresponderende
mediasleuf. Zodra er een kaart correct in de Media Viewer
voor TV is geplaatst, zal de LED gaan knipperen en zal de
Viewer uw media beginnen te lezen.
2. Er zal een menu op uw TV verschijnen, waarin het mediatype
getoond wordt.
3. Selecteer met behulp van de richtingsknoppen op de Media
Viewer het type mediakaart dat u voor het vertonen van
uw foto’s gebruiken wilt. Zodra u de juiste mediakaart hebt
geselecteerd, drukt u op de “Play”-knop.
4. Druk op de “Setup”-knop. Zo komt u in het “Setup”-menu
terecht.
5. Druk op de “Format” knop om de geselecteerde mediakaart
geschikt te maken voor het afbeelden van beeldmateriaal op
uw TV.
6. Als u dit gedaan hebt, zal het “Photo/Movie”-menu op het
scherm verschijnen.
7. Druk op de knoppen voor omhoog en omlaag om de “Photo”modus of de “Video”-modus te selecteren. Druk vervolgens
op “Play” om uw keuze te bevestigen.
6
NL
1
2
3
4
5
Gebruik maken van de Media Viewer voor TV
1
2
3
4
5
Photo-modus
1. In “Photo”-modus kunt u een preview krijgen van alle foto’s
die op de geselecteerde geheugenkaart staan. Maak gebruik
van de knoppen voor omhoog, omlaag, links en rechts om
naar de foto te gaan die u wilt bekijken.
2. Druk op “Play” als de foto die u wilt bekijken, is geselecteerd.
• U kunt in- en uitzoomen met behulp van de knoppen “Z+”
of “Z-”.
3. U kunt op “Slide” drukken om alle foto’s in de gekozen
directory te bekijken.
4. Druk op “ESC” om terug te gaan naar het vorige menu en te
annuleren.
Movie-modus
1. In “Movie”-modus kunt u een preview krijgen van alle films
die op de geselecteerde geheugenkaart staan. Maak gebruik
van de knoppen voor omhoog, omlaag, links en rechts om
naar de film te gaan die u wilt bekijken.
2. Druk op “Play” als de film die u wilt bekijken, is geselecteerd.
• U kunt de “Mode”-knop gebruiken om van modus te
veranderen.
3. Maak gebruik van de knoppen “Speed Up” (Sneller) of
“Speed Dn” (Langzamer) om de afspeelsnelheid aan te
passen. Druk op “Play” om weer met normale snelheid af te
spelen.
4. Druk op “ESC” om terug te gaan naar het vorige menu en te
annuleren.
7
NL
Gebruik maken van de Media Viewer voor TV
Verwijder-functie
1. Maak gebruik van de knoppen voor omhoog, omlaag, links en
rechts om naar de foto of film te gaan die u wilt verwijderen.
2. Druk op “Delete” (Verwijderen) om de foto of film die u wilt
verwijderen, te selecteren.
3. Druk op “ESC”.
4. Er zal een dialoogvenster verschijnen waarin u de verwijdering
dient te bevestigen. Klik op “Play” om te bevestigen. Indien u
de verwijderingsopdracht wilt annuleren, drukt u op “ESC”.
Setupmenu
1. Druk op de “Setup”-knop.
2. U kunt in het setupmenu uit vier functies kiezen:
• TV-system: NTSC (Taiwan, Japan, USA)/PAL (Hong Kong,
China, Europa)
• Slide: Stelt u in staat de snelheid waarmee de foto’s elkaar
opvolgen te wijzigen.
• Sound: Stelt u in staat het volume van de film te wijzigen.
• Language: Stelt u in staat een taalkeuze te maken.
8
NL
1
2
3
4
5
Hardware installeren (Computer)
1
2
3
4
5
1. Sluit de USB-stekker van de Media Viewer voor TV aan op de
USB-poort van uw computer of USB-hub.
2. Windows herkent nu uw Media Viewer voor TV en installeert
vervolgens de benodigde stuurprogramma’s. (In sommige
gevallen vraagt de Windows “Install New Hardware
Wizard” om de Windows installatie-cd om de installatie
van het stuurprogramma te voltooien.) Voor sommige
computers die draaien onder Windows 98 SE heeft u extra
stuurprogramma’s nodig. Deze stuurprogramma’s vindt u op
de meegeleverd cd.)
3. De Media Viewer voor TV zal worden herkend als twee
individuele verwisselbare schijfstations. Klik op het pictogram
“My Computer” (Deze computer) op uw Windows-bureaublad
om toegang te krijgen tot de nieuwe stations. Als het venster
voor “My Computer” (Deze computer) verschijnt, zult u twee
nieuwe pictogrammen voor deze verwisselbare schijfstations
aantreffen.
9
NL
Hardware installeren (Computer)
Toegang tot bestanden en gegevens
1
1. Dubbelklik op het station van uw medialezer. Er gaat
een venster open waarin de inhoud van de momenteel
geïnstalleerde mediakaart getoond wordt.
2
2. Om bestanden naar de schijf te verplaatsen of van de
schijf te halen, versleept u het bestand eenvoudig naar
een andere locatie of gebruikt u een andere manier van
bestandsoverdracht die door het besturingssysteem van uw
computer mogelijk wordt gemaakt.
Let op: Als de LED voor activiteit knippert mag u IN GEEN
GEVAL de kaart verwijderen of de Media Viewer voor TV
ontkoppelen. Dit zou namelijk dataverlies of beschadiging van
de kaart kunnen veroorzaken.
10
NL
3
4
5
Informatie
1
2
3
4
5
FCC-verklaring
VERKLARING VAN CONFORMITEIT MET DE FCC-VOORSCHRIFTEN VOOR
ELEKTROMAGNETISCHE COMPATIBILITEIT
Wij, Belkin Corporation, gevestigd 501 West Walnut Street, Compton, CA
90220, Verenigde Staten van Amerika, verklaren hierbij dat wij de volledige
verantwoordelijkheid aanvaarden dat het product met het artikelnummer:
F5U229ea
waarop deze verklaring betrekking heeft,
voldoet aan paragraaf 15 van de FCC-regelgeving. Het gebruik ervan is onderworpen
aan de beide volgende voorwaarden: (1) het apparaat mag geen schadelijke storingen
opwekken en (2) het apparaat moet elke ontvangen interferentie accepteren, waaronder
storingen die een ongewenste werking kunnen veroorzaken.
CE-verklaring van overeenstemming
Wij, Belkin Corporation, verklaren dat ons product F5U229, waar deze verklaring betrekking
op heeft, voldoet aan de algemene emissienormen conform EN55022:1998 Klasse B,
EN50081-1 en aan de algemene immuniteitsnormen conform EN50082-1:1992.
Beperkte levenslange productgarantie van Belkin Corporation
Deze garantie dekt het volgende.
Belkin garandeert de oorspronkelijke koper van dit Belkin product dat het product vrij is van
ontwerp-, assemblage-, materiaal- en fabricagefouten.
De geldigheidsduur van de dekking is als volgt.
Belkin Corporation garandeert het Belkin product voor de levensduur van het product.
Hoe worden problemen opgelost?
Productgarantie.
Belkin zal het product dat een defect vertoont naar eigen keus kosteloos (met uitzondering
van transportkosten) repareren of vervangen.
Wat valt buiten deze garantie?
Alle hierin versterkte garanties zijn niet van toepassing als het product van Belkin op
verzoek van Belkin niet op kosten van de koper voor onderzoek aan Belkin Corporation
ter beschikking is gesteld of als Belkin Corporation besluit dat het product van Belkin
verkeerd is geïnstalleerd, op enige wijze is veranderd of vervalst. De Belkin productgarantie
biedt geen bescherming tegen van buiten komend onheil (anders dan blikseminslag),
zoals overstromingen, aardbevingen en oorlogsmolest, vandalisme, diefstal, normale
slijtage, afslijting, depletie, veroudering, misbruik, beschadiging door netspanningsdalingen
(z.g. “brown-outs” en “sags”), ongeoorloofde programmering en/of wijziging van de
systeemapparatuur
11
NL
Informatie
Hoe wordt service verleend?
Om voor serviceverlening door Belkin in aanmerking te komen, moet u het volgende doen:
1.
Neem binnen 15 dagen na het voorval contact op met de afdeling Customer Service,
Belkin Corporation, 501 W. Walnut St., Compton CA 90220, of bel +1 (800)-223-5546.
Zorg ervoor dat u de volgende informatie bij de hand hebt.
a. Het artikelnummer van het Belkin-product.
b. Waar u het product hebt gekocht.
c. Wanneer u het product hebt gekocht.
d. Een kopie van de aankoopbon.
2.
2
3
De medewerker/ster van de klantenservice van Belkin zal u vervolgens instrueren hoe
u het aankoopbewijs en het product moet verzenden en hoe u de claim verder af moet
wikkelen.
Belkin Corporation behoudt zich het recht voor het defecte Belkin-product te onderzoeken.
De kosten voor verzending van het Belkin-product naar Belkin Corporation komen volledig
voor rekening van de koper. Als Belkin naar eigen bevinding tot de conclusie komt dat het
onpraktisch is de beschadigde apparatuur naar Belkin Corporation te verzenden, kan Belkin
naar eigen goeddunken een deskundige reparatie-inrichting aanwijzen en deze opdragen
de betreffende apparatuur te inspecteren en de reparatiekosten ervan te begroten. De
eventuele verzendkosten van het product naar de reparatie-inrichting en van de terugzending
naar de koper en van de kostenbegroting komen geheel voor rekening van de koper.
Het beschadigde product moet voor onderzoek beschikbaar blijven totdat de claim is
afgehandeld. Belkin Corporation behoudt zich bij de vereffening van claims het recht voor tot
in-de-plaatstreding bij alle geldige verzekeringspolissen waarover de koper van het product
beschikt.
De garantie en de wet.
DEZE GARANTIE OMVAT DE ENIGE GARANTIE VAN BELKIN CORPORATION EN ER
ZIJN GEEN ANDERE GARANTIES, NADRUKKELIJK OF TENZIJ WETTELIJK BEPAALD
IMPLICIET, MET INBEGRIP VAN IMPLICIETE GARANTIES OF VOORZIENINGEN VAN
VERHANDELBAARHEID OF GESCHIKTHEID VOOR EEN BEPAALD DOEL, EN ZULKE
IMPLICIETE GARANTIES, MITS VAN TOEPASSING, ZIJN WAT HUN GELDIGHEID BETREFT
TOT DE DUUR VAN DEZE GARANTIE BEPERKT.
In sommige staten of landen is het niet toegestaan de duur van impliciete garanties te
beperken in welk geval de bovenstaande garantiebeperkingen wellicht niet voor u gelden.
Onder toepasselijk recht is Belkin Corporation niet aansprakelijk voor incidentele, bijzondere,
directe, indirecte, bijkomende of meervoudige schade waartoe zonder enige beperking te
rekenen schade ten gevolge van gederfde winst en/of gemiste opbrengsten voortkomend
uit de verkoop of het gebruik van Belkin producten, zelfs als de betrokkene van mogelijkheid
van zulke schade tevoren op de hoogte was gesteld.
Deze garantie verleent u specifieke wettelijke rechten en wellicht hebt u andere rechten die
van staat tot staat kunnen verschillen. In sommige staten en landen is het niet toegestaan
incidentele, gevolg- en andere schade uit te sluiten, reden waarom de bovenstaande
garantiebeperkingen wellicht niet voor u gelden.
12
1
NL
4
5
Media Viewer
voor TV
Technische ondersteuning
Verenigde Staten: 800-223-5546, toestel
2263
310-898-1100, toestel
2263
Europa: 00 800 223 55 460
Australië: 1800 235 546
Nieuw-Zeeland: 0800 235 546
Belkin Corporation
501 West Walnut Street
Los Angeles, CA 90220, USA
310-898-1100
310-898-1111 fax
Belkin B.V.
Boeing Avenue 333
1119 PH Schiphol-Rijk, Nederland
+31 (0) 20 654 7300
+31 (0) 20 654 7349 fax
Belkin Ltd.
7 Bowen Crescent, West Gosford
NSW 2250, Australië
+61 (0) 2 4372 8600
+61 (0) 2 4372 8603 fax
Belkin Ltd.
Express Business Park, Shipton Way
Rushden, NN10 6GL, Verenigd Koninkrijk
+44 (0) 1933 35 2000
+44 (0) 1933 31 2000 fax
© 2006 Belkin Corporation. Alle rechten voorbehouden. Alle handelsnamen zijn gedeponeerde
handelsmerken van de betreffende rechthebbenden. Mac OS is een in de Verenigde Staten en in
andere landen geregistreerd handelsmerk van Apple Computer, Inc.
P75149nl
Reproductor
multimedia para
el televisor
Vea sus fotos digitales en el televisor, para compartirlas
de forma sencilla con su familia y amigos
Manual del usuario
F5U229ea
EN
FR
DE
NL
ES
IT
Índice de contenidos
Índice de contenidos
1.
Introducción .........................................................................1
Características .....................................................................2
Requisitos del sistema .........................................................2
Contenido del paquete ........................................................2
2.
Instalación del hardware (televisión) ..................................5
3.
6
Utilización de su Reproductor multimedia para el televisor
4.
Instalación del hardware (ordenador) ................................9
5.
Información ........................................................................11
EN
FR
DE
NL
ES
IT
Introducción
1
2
3
4
5
Enhorabuena y gracias por haber adquirido el Reproductor
multimedia para el televisor de Belkin. Este innovador dispositivo
le permite de manera sencilla ver en el televisor sus fotos
digitales y videoclips, cómodamente, desde el sillón favorito
del salón de su casa. Incluye software de edición de fotos
que le permite crear con el ordenador exhibiciones para lograr
un aspecto profesional, completo con transiciones y efectos
especiales. Cuando haya terminado de crear la presentación de
sus imágenes, sólo tiene que guardarla en su tarjeta multimedia e
introducir la tarjeta en el Reproductor multimedia para el televisor.
A continuación, conecte el Reproductor a su televisor, y ya puede
invitar a su familia y amigos para que disfruten viendo sus fotos
en la pantalla del televisor. El mando a distancia del Reproductor
multimedia para el televisor le permite avanzar y rotar las
imágenes. Ligero y fácil de utilizar, el Reproductor multimedia no
necesita controladores ni un ordenador para su funcionamiento.
Por favor, lea este Manual del usuario con atención para
asegurarse de que obtiene el máximo rendimiento de este
producto de gran calidad.
El Reproductor multimedia para el televisor es compatible con las
siguientes tarjetas
multimedia:
• CompactFlash® Tipo I y II
• IBM® Microdrive™
• SmartMedia™ (SM)
• Secure Digital/Mini SD
• MultiMediaCard (MMC)
• Memory Stick® (MS)
• Memory Stick Pro™ (MS PRO)
1
ES
Introducción
Características
Interfaz de visualización
• Dispone de codificador de televisión (NTSC/PAL) integrado
• Ofrece la función OSD (Visualización en pantalla) en el televisor
• Ofrece varias funciones de visualización de imágenes:
Visionado, visionado automático, vista previa, zoom, rotar y
borrar
JPEG/Motion JPEG
• Dispone de decodificador integrado JPEG de 4:4:4, 4:2:2, y
4:2:0
• Admite archivos de vídeo (*.mov y *.avi) de 320x240x25
• Admite descompresión de imágenes en formato reducido
• Ofrece una resolución de imágenes fijas de hasta 6 millones de
píxeles
Requisitos del sistema
• Televisor con conexión de audio de 3,5 mm y vídeo RCA (NTSC
o PAL)
• Ordenador con puerto USB disponible (puerto USB 2.0 para el
modo de alta velocidad)
− Windows® 98 SE, Me, 2000, XP
− Mac OS® 9.x, X v10.2 o superior
Contenido del paquete
• Reproductor multimedia para el televisor
• Mando a distancia
• Controlador en CD
• Manual del usuario
•Fuente de alimentación
• Cable de audio-vídeo
• Cable USB
2
ES
1
2
3
4
5
Introducción
Descripción del panel frontal
1
1
2
3
4
5
2
1. Receptor infrarrojos
2. Puerto de acceso para tarjeta multimedia
Descripción de la parte superior/botones
5
1
6
2
7
3
8
4
1. Tecla superior
2. Tecla inferior
3. Tecla izquierda/Girar hacia
la izquierda
4. Tecla derecha/Girar hacia
la derecha
3
5.
6.
7.
8.
ES
Tecla
Tecla
Tecla
Tecla
reproducir/aceptar
ESC
de configuración
de modo
Introducción
Descripción del panel trasero
3
1
1
2
3
4
1. 5V, CC
2. Puerto de salida USB
2
3. Salida de vídeo
4. Salida de audio
Descripción del mando a distancia
Acelerar la velocidad
de reproducción
Ralentizar la
velocidad de
reproducción
Menú principal
Botón de modo
Visualizar
presentación
Subir volumen
Cancelar/Anular
Bajar volumen
Borrar archivo
Reproducir/Aceptar
Menú de
configuración
Mover cursor hacia
arriba/hacia abajo
Mover cursor hacia
la izquierda/hacia la
derecha
Formato de tarjeta
de memoria
4
ES
4
5
Instalación del hardware (televisión)
1
2
3
4
5
1. Enchufe el adaptador CA a una toma de pared o a un
protector contra aumentos de tensión. Enchufe el conector
CC a la toma de alimentación CC que se encuentra en la
parte trasera del Reproductor multimedia.
2. Conecte el cable de audio-vídeo al televisor y si es necesario,
al sistema de audio. Conecte la toma amarilla en el puerto
de entrada de vídeo de la televisión, y el la toma de audio de
3,5 mm en el puerto de entrada de audio. (Si su televisor no
dispone de un puerto de entrada de audio para tomas de 3,5
mm, necesitará un adaptador de audio de 3,5 mm a RCA).
3. Conecte los cables de audio-vídeo a la parte trasera del
Reproductor multimedia para el televisor.
4. Encienda el televisor y cambie la fuente de entrada de la
televisión al canal de entrada que desee (consulte el manual
de su televisor para más información acerca de la elección
del canal correcto). Cuando se ha seleccionado la fuente
correcta, aparecerá un mensaje que le pedirá que inserte la
tarjeta de memoria.
5. El Reproductor multimedia para el televisor está listo para ser
utilizado.
5
ES
Utilización de su Reproductor multimedia para el televisor
1. Introduzca su tarjeta de memoria flash en la ranura
correspondiente. Cuando la tarjeta se ha introducido
correctamente, el indicador LED se iluminará de forma
intermitente y el Reproductor multimedia leerá sus archivos.
2. El menú de estilo de memoria aparecerá en su televisor e
indicará el tipo de archivo.
3. Elija el archivo que desea ver utilizando las flechas
direccionales del Reproductor multimedia. Cuando haya
seleccionado el archivo correcto, pulse el botón de “Play”.
4. Pulse el botón “Setup”, que le conducirá al menú de
configuración.
5. Pulse el botón “Format” para dar formato al archivo
seleccionado
para su visualización.
6. Después de esto, verá el menú “Photo/Movie” en
la pantalla.
7. Pulse las flechas que indican arriba o abajo para seleccionar
la modalidad “Photo” o “Video” y pulse “Play” para aceptar.
6
ES
1
2
3
4
5
Utilización de su Reproductor multimedia para el televisor
1
2
3
4
5
Modalidad fotos (Photo)
1. En la modalidad “Photo”, puede ver todas las fotos de la
tarjeta de memoria en una vista previa general. Utilice las
flechas que indican arriba, abajo, izquierda y derecha para
seleccionar la foto que desea ver.
2. Pulse “Play” cuando haya movido el cursor a la foto
seleccionada.
• Puede ampliar o reducir una imagen con los botones “Z+” o
“Z-”.
3. Puede pulsar “Slide” para ver sucesivamente todas las fotos
del directorio en el que se encuentra.
4. Pulse “ESC” para volver al menú anterior y cancelar la
selección realizada.
Modalidad vídeos (Movie)
1. En la modalidad “Movie”, puede ver todos los vídeos de la
tarjeta de memoria en una vista previa general. Utilice las
flechas que indican arriba, abajo, izquierda y derecha para
seleccionar el vídeo que desea ver.
2. Pulse “Play” cuando haya movido el cursor a la imagen
seleccionada.
• Puede utilizar el botón “Mode” para seleccionar la
modalidad “Photo”
o “Movie”.
3. Utilice los botones “Speed Up” o “Speed Dn” para ajustar
la velocidad de reproducción. Pulse “Play” para volver a la
velocidad normal.
4. Pulse “ESC” para volver al menú anterior y cancelar la
selección realizada.
7
ES
Utilización de su Reproductor multimedia para el televisor
Función de borrado (Delete)
1. Utilice las flechas que indican arriba, abajo, izquierda y
derecha para seleccionar la foto o el vídeo que desea borrar.
2. Pulse “Delete” para marcar la foto o el vídeo que desea
borrar.
3. Pulse “ESC”.
4. Aparece una ventana para que confirme si desea borrar.
Pulse “Play” para confirmar. Si desea cancelar el borrado,
pulse “ESC” de nuevo.
Menú de configuración (Setup Menu)
1. Pulse el botón “Setup”.
2. Existen cuatro funciones que puede seleccionar en el
menú de configuración:
• TV system: Sistema de televisión, NTSC (Taiwán, Japón,
EE.UU.)/PAL (Hong Kong, China, Europa)
• Slide: Le permite ajustar la velocidad de reproducción de
las imágenes.
• Sound: Le permite ajustar el volumen de los vídeos.
• Language: Le permite seleccionar entre múltiples idiomas.
8
ES
1
2
3
4
5
Instalación del hardware (ordenador)
1
2
3
4
5
1. Conecte la toma USB del Reproductor multimedia en el
puerto USB de su ordenador o hub USB.
2. Windows detectará su Reproductor multimedia para el
televisor e instalará el controlador necesario. (Puede que
el asistente de instalación de nuevo hardware de Windows
le pida el CD de instalación de Windows para finalizar el
proceso de instalación del controlador. Algunos ordenadores
con Windows 98 SE necesitarán controladores adicionales,
que se encuentran en el CD incluido).
3. El Reproductor multimedia para el televisor será reconocido
como si se tratase de dos unidades de disco extraíbles
individuales. Para acceder a las nuevas unidades, haga clic
en el icono de “Mi PC” situado en el escritorio de Windows.
Cuando la ventana de “Mi PC” se abra, verá los dos nuevos
iconos de los discos extraíbles.
9
ES
Instalación del hardware (ordenador)
Acceso a los archivos y los datos
1
1. Haga doble clic en la unidad asignada a su lector multimedia.
Aparecerá una ventana que muestra los contenidos de la
tarjeta multimedia actualmente instalada.
2
2. Para desplazar archivos hacia o desde el disco, simplemente
deberá arrastrarlos hacia la ubicación de destino o emplear
otros métodos de transferencia de archivos disponibles en el
sistema operativo de su ordenador.
Nota: Para impedir que se pierdan datos o la tarjeta
resulte afectada, NUNCA retire la tarjeta ni el Reproductor
multimedia para el televisor cuando el indicador LED de
actividad esté iluminado de forma intermitente.
10
ES
3
4
5
Información
1
2
3
4
5
Regulación de la Comisión Federal de Comunicaciones de
Estados Unidos (FCC)
DECLARACIÓN DE CONFORMIDAD CON LAS NORMATIVAS DE LA FCC SOBRE
COMPATIBILIDAD ELECTROMAGNÉTICA
Nosotros, Belkin Corporation, con sede en 501 West Walnut Street, Compton, CA
90220, EE.UU., declaramos bajo nuestra sola responsabilidad que el producto
F5U229ea
al que hace referencia la presente declaración,
cumple con la sección 15 de las normativas de la FCC. Su utilización está sujeta a
las siguientes dos condiciones: (1) este dispositivo no debe provocar interferencias
nocivas y (2) este dispositivo debe aceptar cualquier interferencia recibida, incluidas las
interferencias que puedan provocar un funcionamiento no deseado.
Declaración de conformidad CE
Nosotros, Belkin Components, declaramos bajo nuestra sola responsabilidad que el
producto F5U229, al que hace referencia la presente declaración, está en conformidad con
el estándar genérico de emisiones EN 55022:1998 Clase B, EN 50081-1 y con el estándar
genérico de inmunidad EN 50082-1:1992.
Garantía limitada para toda la vida para los productos de Belkin Corporation
Cobertura de la presente garantía.
Belkin Corporation otorga una garantía al comprador original según la cual el producto no
tendrá defectos en cuanto a diseño, montaje, materiales o mano de obra.
El período de cobertura.
Belkin Corporation otorga una garantía a su producto durante toda su vida útil.
¿Qué haremos para solventar los problemas?
Garantía del producto.
Belkin reparará o sustituirá, según decida, cualquier producto defectuoso, sin ningún tipo
de cargo (excepto los gastos de envío del producto).
¿Qué excluye la presente garantía?
Todas las garantías mencionadas anteriormente resultarán nulas y sin valor alguno si
el producto Belkin no se le proporciona a Belkin Corporation para su inspección bajo
requerimiento de Belkin con cargo al comprador únicamente, o si Belkin Corporation
determina que el producto Belkin se ha instalado de un modo inadecuado, alterado
de algún modo o forzado. La garantía del producto de Belkin no lo protege de los
desastres naturales (que no sean relámpagos) tales como inundaciones, terremotos,
guerras, vandalismo, robos, mal uso, erosión, agotamiento, desuso o daño a causa de
interrupciones en la alimentación (p. ej. apagones) modificación o alteración no autorizadas
de programas o sistemas.
11
ES
Información
Cómo obtener asistencia.
Para obtener asistencia sobre algún producto de Belkin, debe seguir los siguientes pasos:
1.
Póngase en contacto con Belkin Corporation en 501 W. Walnut St., Compton CA 90220,
A la atención de Servicio de Atención al Cliente, o llame al (800)-223-5546, en un plazo
de 15 días desde el momento de la anomalía. Tenga preparada la siguiente información,
ya que se la solicitaremos:
a. El número de artículo del producto Belkin.
b. El lugar de compra del producto.
c. El lugar de compra del producto.
d. Copia de la factura original.
2.
El servicio de atención al cliente de Belkin le informará sobre cómo
enviar el recibo y el producto Belkin y sobre cómo proceder con su reclamación.
Belkin Corporation se reserva el derecho de revisar el producto Belkin dañado. Todos
los costes de envío del producto Belkin a Belkin Corporation para su inspección correrán
a cargo del comprador exclusivamente. Si Belkin determina, según su propio criterio,
que resulta poco práctico el envío de los equipos dañados a Belkin Corporation, Belkin
podrá designar, según su propio criterio, una empresa de reparación de equipos para que
inspeccione y estime el coste de la reparación de dichos equipos. El coste, si existe, del
envío de los equipos hacia y desde dicha empresa de reparaciones, y de la estimación
correspondiente, correrá exclusivamente a cargo del comprador. Los equipos dañados
deberán permanecer disponibles para su inspección hasta que haya finalizado la demanda.
Siempre que se solucionen las demandas por negociación, Belkin Corporation se reserva
el derecho de ser subrogada en cualquier póliza de seguros existente de la que pueda
disponer el comprador.
Relación de la garantía con la legislación estatal.
ESTA GARANTÍA CONTIENE LA GARANTÍA EXCLUSIVA DE BELKIN CORPORATION, NO
EXISTE NINGÚN OTRO TIPO DE GARANTÍAS, EXPRESAS O, EXCEPTO LAS REQUERIDAS
POR LA LEY, IMPLÍCITAS, INCLUYENDO LA GARANTÍA O CONDICIÓN IMPLÍCITA DE
CALIDAD, COMERCIABILIDAD E IDONEIDAD PARA UN FIN PARTICULAR, Y TALES
GARANTÍAS, EN CASO DE EXISTIR, ESTÁN LIMITADAS EN DURACIÓN A LOS TÉRMINOS
DE LA PRESENTE GARANTÍA.
Algunas jurisdicciones no permiten la limitación de la duración de las garantías implícitas,
por lo que cabe la posibilidad de que las anteriores limitaciones no le afecten.
EN NINGÚN CASO BELKIN CORPORATION SERÁ RESPONSABLE DE LOS DAÑOS
IMPREVISTOS, ESPECIALES, DIRECTOS, INDIRECTOS, CONSECUENTES O MÚLTIPLES,
INCLUYENDO, AUNQUE NO EXCLUSIVAMENTE, LA PÉRDIDA DE NEGOCIO O
BENEFICIOS QUE PUEDA SURGIR DE LA VENTA O EL EMPLEO DE CUALQUIER
PRODUCTO BELKIN, INCLUSO SI BELKIN HA SIDO INFORMADA DE LA POSIBILIDAD DE
DICHOS DAÑOS.
Esta garantía le proporciona derechos legales específicos y también podría beneficiarse de
otros derechos, que pueden variar entre las distintas jurisdicciones. Algunas jurisdicciones
no permiten la exclusión o limitación de los daños fortuitos, consecuentes, o de otro tipo,
por lo que puede que las limitaciones mencionadas anteriormente no le afecten.
12
ES
1
2
3
4
5
Reproductor
multimedia para
el televisor
Asistencia técnica de Belkin
EE.UU.: 800-223-5546, ext. 2263
310-898-1100, ext. 2263
Europa: 00 800 223 55 460
Australia: 1800 235 546
Nueva Zelanda: 0800 235 546
Belkin Corporation
501 West Walnut Street
Los Angeles, CA 90220, EE.UU.
310-898-1100
310-898-1111 fax
Belkin B.V.
Boeing Avenue 333
1119 PH Schiphol-Rijk, Países Bajos
+31 (0) 20 654 7300
+31 (0) 20 654 7349 fax
Belkin Ltd.
7 Bowen Crescent, West Gosford
NSW 2250, Australia
+61 (0) 2 4372 8600
+61 (0) 2 4372 8603 fax
Belkin Ltd.
Express Business Park, Shipton Way
Rushden, NN10 6GL, Reino Unido
+44 (0) 1933 35 2000
+44 (0) 1933 31 2000 fax
© 2006 Belkin Corporation. Todos los derechos reservados. Todos los nombres comerciales son
marcas registradas de los respectivos fabricantes enumerados. Mac OS es una marca registrada de
Apple Computer, Inc., registrada en los EE.UU. y en otros países.
P75149es
Lettore
multimediale
per TV
Per scaricare sulla TV le fotografie in formato digitale e
vederle in compagnia di amici o parenti
Manuale d’uso
F5U229ea
EN
FR
DE
NL
ES
IT
Indice
Indice
1.
Introduzione .........................................................................1
Caratteristiche ......................................................................2
Requisiti del sistema ............................................................2
Contenuto della confezione .................................................2
2.
Installazione dell’hardware (TV) .........................................5
3.
Come usare il lettore multimediale per TV .........................6
4.
Installazione dell’hardware (Computer) .............................9
5.
Informazioni .......................................................................11
EN
FR
DE
NL
ES
IT
Introduzione
1
2
3
4
5
Grazie per aver acquistato il lettore multimediale per TV di
Belkin. Questo innovativo prodotto consente di visualizzare
sullo schermo della TV le fotografie o i filmati in formato digitale
e di poterli osservare comodamente dal divano di casa. Il lettore
dispone di un software di photo-editing con cui è possibile
realizzare delle presentazioni su PC in modo professionale
e creando anche degli effetti speciali. Una volta terminata la
presentazione, basta salvarla sulla scheda di memoria e inserire
quest’ultima nel lettore multimediale. Dopodiché, bisogna
collegare il lettore alla TV e tutto sarà pronto per mostrare le foto
agli amici o ai parenti seduti comodamente davanti al televisore.
Il telecomando a distanza consente di far scorrere le immagini e
di farle ruotare. Leggero e semplice da installare, questo lettore
multimediale non richiede alcun software né computer.
Vi preghiamo di leggere attentamente il manuale d’uso per
utilizzare in modo corretto tutte le funzioni di questo prodotto di
alta qualità.
Questo lettore multimediale è compatibile con le
seguenti schede di memoria:
• CompactFlash® Tipo I e tipo II
• IBM® Microdrive™
• SmartMedia™ (SM)
• Secure Digital/Mini SD
• MultiMediaCard (MMC)
• Memory Stick® (MS)
• Memory Stick Pro™ (MS PRO)
1
IT
Introduzione
Caratteristiche
Interfaccia display
• Sistema di codifica TV incluso (NTSC/PAL)
• Funzione On Screen Display su TV
• Funzioni di visualizzazione delle immagini: Avvia presentazione,
Avvia presentazione automaticamente, Anteprima, Zoom, Ruota
ed Elimina
JPEG/Motion JPEG
• Decodificatore per formati JPEG da 4:4:4, 4:2:2, e 4:2:0
• Supporta film in formato *.mov e *.avi da 320x240x25
• Supporta la decompressione dell’anteprima delle immagini
• Supporta risoluzioni per immagini fisse fino a 6M pixel
Requisiti del sistema
• TV con video RCA (NTSC o PAL) e connessione audio da
3,5mm
• Computer con una porta USB libera (porta USB 2.0 Hi-Speed)
− Windows® 98 SE, Me, 2000, XP
− Mac OS® 9.x, X v10.2 o successive
Contenuto della confezione
• Lettore multimediale per TV
• Telecomando
• CD-ROM con software d’installazione
• Manuale d’uso
• Alimentatore
• Cavo audio/video
• Cavo USB
2
IT
1
2
3
4
5
Introduzione
Pannello anteriore
1
1
2
3
4
5
2
1. Ricevitore a infrarossi
2. Porta per la scheda di memoria
Parte superiore
5
1
6
2
7
3
8
4
1. Pulsante Su
2. Pulsante Giù
3. Pulsante Sinistra/Ruota in
senso antiorario
4. Pulsante Destra/Ruota in
senso orario
3
5.
6.
7.
8.
IT
Play/Enter
Pulsante ESC
Configurazione
Modalità
Introduzione
Pannello posteriore
3
1
1
2
3
4
2
1. 5V CC
2. Porta USB dati in uscita
4
3. Presa video
4. Presa audio
5
Telecomando
Riproduzione
rapida
Riproduzione
rallentata
Menu principale
Selezione del
formato
Riproduzione
immagini
Volume Su
Annulla/Esci
Volume Giù
Elimina file
Play/Enter
Menu di
configurazione
Formattazione
della scheda
4
Cursore Su/Giù
Cursore a sinistra/
destra
IT
Installazione dell’hardware (TV)
1
2
3
4
5
1. Inserire l’adattatore CA in una presa a muro o in una
presa filtrata. Inserire il connettore CC nella presa jack di
alimentazione CC sul retro del dispositivo.
2. Collegare il cavo audio/video alla TV o all’impianto audio.
Inserire il connettore giallo alla presa video della TV e il
connettore da 3,5mm alla presa audio. (Se la TV non ha
una presa audio da 3,5mm, sarà necessario procurarsi un
adattatore RCA/jack da 3,5mm).
3. Collegare i cavi audio/video alla parte posteriore del
lettore multimediale.
4. Accendere la TV e cambiare la sorgente del televisore
selezionando il canale desiderato (consultare il manuale
della TV per maggiori informazioni sulla scelta della sorgente
giusta). Una volta selezionata la sorgente corretta, vi sarà
richiesto di inserire la scheda di memoria.
5. Il lettore multimediale è pronto per l’uso.
5
IT
Come utilizzare il lettore multimediale per TV
1. Inserire la scheda di memoria nell’apposito slot. Se la
scheda è stata inserita correttamente, il led lampeggerà e il
dispositivo rileverà la scheda.
2. Sullo schermo della TV comparirà il menu che visualizzerà il
contenuto.
3. Scegliere i file che si desidera visualizzare servendosi
delle frecce direzionali. Una volta selezionato i file corretti,
premere il pulsante “Play”.
4. Premere il pulsante “Setup” per passare al menu di
configurazione.
5. Premere il pulsante “Format” per formattare i file selezionati
per la visione.
6. Dopodiché sullo schermo comparirà il menu
“Photo/Movie”.
7. Utilizzare il cursore per selezionare la modalità “Photo” o
“Video”
6
IT
1
2
3
4
5
Come utilizzare il lettore multimediale per TV
1
2
3
4
5
e premere su Play per confermare.
1. Nella modalità “Photo” è possibile vedere un’anteprima di
tutte le foto nella scheda di memoria selezionata. Utilizzare
le frecce direzionali per cercare l’immagine che si desidera
visualizzare.
2. Premere “Play” dopo avere scelto il film
che si desidera vedere.
• È possibile usare la funzione di zoom in/out con i pulsanti
“Z+” o “Z-”
per ingrandire o rimpicciolire le immagini.
3. Premere “Slide” per visualizzare una presentazione di tutte le
immagini presenti nel file.
4. Premere “ESC” per ritornare al menu precedente e annullare
l’operazione.
Modalità “Movie”
1. Nella modalità “Movie” è possibile vedere un’anteprima di
tutti i film presenti nella scheda di memoria selezionata.
Utilizzare le frecce direzionali per cercare il film che si
desidera visualizzare.
2. Premere “Play” dopo avere scelto il film
che si desidera vedere.
• Utilizzare il pulsante “Mode” per
cambiare modalità.
3. Utilizzare i pulsanti “Speed Up” o “Speed Dn” per regolare
la velocità di riproduzione. Premere “Play” per ripristinare la
velocità normale.
4. Premere “ESC” per ritornare al menu precedente e annullare
l’azione.
7
IT
Come utilizzare il lettore multimediale per TV
Eliminazione file
1. Utilizzare le frecce direzionali per cercare le foto o i film che si
desidera eliminare.
2. Premere “Delete” per eliminare l’immagine o
il film.
3. Premere “ESC”.
4. Una finestra di dialogo confermerà l’eliminazione dei file.
Premere “Play” per confermare. Per annullare l’operazione,
premere di nuovo “ESC”.
Menu di configurazione
1. Premere il pulsante “Setup”.
2. Nel menu di configurazione è possibile scegliere
tra 4 funzioni:
• TV system: NTSC (Taiwan, Giappone, USA)/PAL (Hong
Kong, Cina, Europa)
• Slide: consente di regolare la velocità di riproduzione delle
immagini.
• Sound: consente di regolare il volume del film.
• Language: consente di impostare la lingua.
8
IT
1
2
3
4
5
Installazione dell’hardware (Computer)
1
2
3
4
5
1. Collegare lo spinotto USB del dispositivo alla porta USB del
computer o di un hub USB.
2. Windows rileverà il lettore multimediale e installerà i driver
corretti. (Il programma di installazione guidata potrebbe
richiedere l’inserimento del CD di installazione per completare
il processo di installazione dei driver). Alcuni computer con
Windows 98 SE potrebbere richidere ulteriori driver che non
sono presenti sul CD-ROM).
3. Il lettore multimediale sarà rilevato come due periferiche con
archivi rimovibili. Per accedere alla nuova periferica, fare clic
sull’icona “Risorse del Computer” sul desktop di Windows.
Nella finestra “Risorse del computer” saranno visualizzate le
due icone dei nuovi dischi rimovibili.
9
IT
Installazione dell’hardware (Computer)
Accesso a file e dati
1
1. Fare doppio clic sull’icona corrispondente al lettore
multimediale. Apparirà una finestra che visualizza il contenuto
della scheda di memoria installata.
2
2. Per spostare i file del disco, è sufficiente trascinare il file nella
posizione scelta o usare i sistemi di trasferimento file previsti
dal proprio sistema operativo.
Nota bene: per evitare di perdere dati o danneggiare la
scheda, non rimuovere mai la scheda né scollegare il lettore
multimediale quando il led di attività lampeggia.
10
IT
3
4
5
Informazioni
1
2
3
4
5
Dichiarazione FCC
DICHIARAZIONE DI CONFORMITÀ ALLE NORMATIVE FCC PER LA
COMPATIBILITÀ ELETTROMAGNETICA
Noi sottoscritti, Belkin Corporation, con sede al 501 West Walnut Street, Compton,
CA 90220, dichiariamo sotto la nostra piena responsabilità che il prodotto,
F5U229ea
al quale questa dichiarazione fa riferimento,
è conforme alla Parte 15 delle norme FCC. Le due condizioni fondamentali per il
funzionamento sono le seguenti: (1) il dispositivo non deve causare interferenze dannose
e (2) il dispositivo deve accettare qualsiasi interferenza ricevuta, comprese eventuali
interferenze che possano causare un funzionamento anomalo.
Dichiarazione di conformità CE
Noi sottoscritti, Belkin Corporation, dichiariamo sotto la nostra piena responsabilità che
il prodotto F5U229, cui questa dichiarazione fa riferimento, è realizzato in conformità allo
Standard sulle Emissioni Generiche di classe B EN 55022:1998, EN50082-1:1992 e alla
Norma di Immunità Generica EN50082-1 1992.
Garanzia limitata a vita sul prodotto di Belkin Corporation
What this warranty covers.
Belkin Corporation garantisce al primo acquirente di qualsiasi adattatore di corrente Belkin
è esente da difetti di montaggio, materiale e lavorazione.
Indipendentemente dal periodo di copertura,
Belkin Corporation offre una garanzia a vita sul prodotto.
Cosa facciamo per risolvere i problemi?
Garanzia sul prodotto.
Belkin provvederà a riparare o sostituire gratuitamente, a sua discrezione, qualsiasi prodotto
che dovesse risultare difettoso (escluse le spese di trasporto).
Che cosa non è coperto dalla garanzia?
Tutte le garanzie di cui sopra saranno rese nulle qualora il prodotto Belkin non fosse fornito
alla Belkin Corporation per essere sottoposto alle necessarie verifiche dietro espressa
richiesta di Belkin e a spese del cliente, oppure nel caso la Belkin Corporation dovesse
stabilire che il prodotto non è stato correttamente installato o che sia stato in qualche
modo alterato o manomesso. La garanzia sul prodotto Belkin non copre danni da imputarsi
a calamità naturali (tranne i fulmini), tra cui allagamenti o terremoti, da guerre, atti di
vandalismo, furti, usura, erosione, assottigliamento, obsolescenza, abusi, danni dovuti ad
interferenze di bassa tensione (tra cui parziali oscuramenti o abbassamenti di tensione),
programmazione non autorizzata oppure modifiche o alterazioni all’apparecchiatura
dell’impianto.
11
IT
Informazioni
Come richiedere il servizio.
Per usufruire dell’assistenza per il proprio prodotto Belkin, è necessario:
1.
Contattare la Belkin Corporation all’indirizzo 501 W. Walnut St., Compton CA 90220,
att.: Customer Service, oppure chiamare il numero (800)-223-5546, entro 15 giorni
dall’evento.
È necessario conoscere le seguenti informazioni:
a. Il codice del prodotto Belkin.
1
2
3
b. Il luogo di acquisto del prodotto.
c. La data di acquisto del prodotto.
d. Copia originale della ricevuta.
2.
Il rappresentante del Servizio Clienti Belkin vi spiegherà come inviare la ricevuta e il
prodotto Belkin e come procedere con il reclamo.
Belkin Corporation si riserva il diritto di riesaminare il prodotto Belkin danneggiato. Tutte
le spese di spedizione per il prodotto Belkin restituito alla Belkin Corporation sono a
carico dell’acquirente. Se Belkin determina, a sua discrezione, che inviare l’apparecchio
danneggiato non è pratico, Belkin potrebbe decidere, a sua discrezione di farlo ispezionare e
determinare il costo della riparazione. In caso ci fossero delle spese di spedizione per inviare
e ricevere l’apparecchio dopo l’ispezione, queste saranno a carico dell’acquirente. Eventuali
apparecchi danneggiati dovranno essere mantenuti disponibili per eventuali verifiche fino alla
risoluzione della richiesta di indennizzo. Al raggiungimento dell’accordo, Belkin Corporation si
riserva il diritto di essere surrogato da eventuali polizze assicurative dell’acquirente.
La garanzia e le leggi vigenti in materia.
LA PRESENTE GARANZIA COSTITUISCE L’UNICA GARANZIA, ESPLICITA O IMPLICITA,
DELLA BELKIN CORPORATION. SI ESCLUDE QUALSIASI GARANZIA IMPLICITA, DI
COMMERCIABILITÀ E DI ATTITUDINE PER SCOPI PARTICOLARI CHE VADANO OLTRE LA
PRESENTE GARANZIA ESPLICITA SCRITTA.
Alcune giurisdizioni non consentono l’esclusione o la limitazione delle garanzie implicite
o della responsabilità per i danni accidentali, pertanto i limiti di esclusione di cui sopra
potrebbero non fare al caso vostro.
IN NESSUN CASO BELKIN CORPORATION POTRÀ ESSERE CONSIDERATA
RESPONSABILE DI ALCUN DANNO DIRETTO, INDIRETTO, ACCIDENTALE, SPECIFICO O
DANNI MULTIPLI TRA I QUALI, MA NON SOLO, EVENTUALI DANNI DI MANCATI AFFARI
O MANCATO GUADAGNO DERIVATI DALLA VENDITA O UTILIZZO DELL’ADATTATORE
DI CORRENTE BELKIN, ANCHE NEL CASO IN CUI BELKIN FOSSE STATA INFORMATA
DELLA POSSIBILITÀ DI TALI DANNI.
Questa garanzia consente di godere di diritti legali specifici e di eventuali altri diritti che
possono variare di stato in stato. Alcune giurisdizioni non consentono l’esclusione o la
limitazione delle garanzie implicite o della responsabilità per i danni accidentali, pertanto i
limiti di esclusione di cui sopra potrebbero non fare al caso vostro.
12
IT
4
5
Lettore
multimediale
per TV
Assistenza tecnica Belkin
USA: 800-223-5546, int. 2263
310-898-1100, int. 2263
Europa: 00 800 223 55 460
Australia: 1800 235 546
Nuova Zelanda: 0800 235 546
Belkin Corporation
501 West Walnut Street
Los Angeles, CA 90220, USA
310-898-1100
310-898-1111 Fax
Belkin B.V.
Boeing Avenue 333
1119 PH Schiphol-Rijk, Paesi Bassi
+31 (0) 20 654 7300
+31 (0) 20 654 7349 Fax
Belkin Ltd.
7 Bowen Crescent, West Gosford
NSW 2250, Australia
+61 (0) 2 4372 8600
+61 (0) 2 4372 8603 Fax
Belkin Ltd.
Express Business Park, Shipton Way
Rushden, NN10 6GL, Regno Unito
+44 (0) 1933 35 2000
+44 (0) 1933 31 2000 Fax
© 2006 Belkin Corporation. Tutti i diritti riservati. Tutti i nomi commerciali sono marchi registrati dai
rispettivi produttori. Mac OS è un marchio registrato da Apple Computer, Inc., registrate negli
USA e in altri paesi.
P75149it
Slideshow
Viewer
Belkin Tech Support
US: 800-223-5546, ext. 2263
310-898-1100, ext. 2263
Europe: 00 800 223 55 460
Australia: 1800 235 546
New Zealand: 0800 235 546
Belkin Corporation
501 West Walnut Street
Los Angeles, CA 90220, USA
310-898-1100
310-898-1111 fax
Belkin B.V.
Boeing Avenue 333
1119 PH Schiphol-Rijk, The Netherlands
+31 (0) 20 654 7300
+31 (0) 20 654 7349 fax
Belkin Ltd.
7 Bowen Crescent, West Gosford
NSW 2250, Australia
+61 (0) 2 4372 8600
+61 (0) 2 4372 8603 fax
Belkin Ltd.
Express Business Park, Shipton Way
Rushden, NN10 6GL, United Kingdom
+44 (0) 1933 35 2000
+44 (0) 1933 31 2000 fax
© 2006 Belkin Corporation. All rights reserved. All trade names are registered trademarks of
respective manufacturers listed. Mac OS is a trademark of Apple Computer, Inc., registered in
the U.S. and other countries.
P75149ea