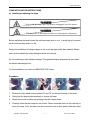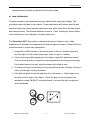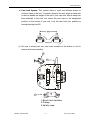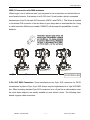
1
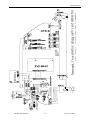
FOCUS SPOT 250
Elation Professional
4295 Charter Street
Los Angeles, Ca 90058
www.elationlighting.com
Rev 03/05
Focus Spot 250™
INTRODUCTION: Congratulations, you have just purchased one of the most innovative
and reliable lighting fixtures on the market today! The Focus Spot 250™, has been
designed to perform reliably for years when the guidelines in this booklet are followed.
Please read and understand the instructions in this manual carefully and thoroughly before
attempting to operate this unit. These instructions contain important information regarding
safety during use and maintenance.
UNPACKING: Thank you for purchasing the Focus Spot 250™ by Elation Professional®.
Every Focus Spot 250™ has been thoroughly tested and has been shipped in perfect
operating condition. Carefully check the shipping carton for damage that may have occurred
during shipping. If the carton appears to be damaged, carefully inspect your unit for damage
and be sure all accessories necessary to operate the unit have arrived intact. In the event
damage has been found or parts are missing, please contact our customer support team for
further instructions. Please do not return this unit to your dealer without first contacting
customer support at the number listed below.
CUSTOMER SUPPORT: Elation Professional® provides a customer support line, to provide
set up help and to answer any question should you encounter problems during your set up
or initial operation. You may also visit us on the web at www.elationlighting.com for any
comments or suggestions. For service related issue please contact Elation Professional®.
Service Hours are Monday through Friday 9:00 a.m. to 5:00 p.m. Pacific Standard Time.
Voice:
(323) 582-3322
Fax:
(323) 582-3108
E-mail:
[email protected]
Forum:
www.ElationLighting.com/forum/
Warning! To prevent or reduce the risk of electrical shock or fire, do not expose this unit to
rain or moisture.
Caution! There are no user serviceable parts inside this unit. Do not attempt any repairs
©Elation Professional®
- 1 –
Focus Spot 250™
Focus Spot 250™
yourself, doing so will void your manufactures warranty.
Please do not discard the shipping carton in the trash. Please recycle whenever possible.
WARRANTY REGISTRATION: The Focus Spot 250™ carries a two year (730 days) limited
warranty. Please fill out the enclosed warranty card to validate your purchase. All returned
service items whether under warranty or not, must be freight pre-paid and accompany a
return authorization (R.A.) number. The R.A. number must be clearly written on the outside
of the return package. A brief description of the problem as well as the R.A. number must
also be written down on a piece of paper and included in the shipping container. If the unit is
under warranty, you must provide a copy of your proof of purchase invoice. Items returned
without a R.A. number clearly marked on the outside of the package will be refused and
returned at customers expanse. You may obtain a R.A. number by contacting customer
support at (323) 582-3322.
DISCHARGE LAMP WARNING: This fixture is fitted with a discharge
lamp, which is highly susceptible to damage if improperly handled. Never
touch the lamp with your bare hands, as the oil from your hands will
shorten lamp life. Also, never move the fixture until the lamps have had
ample time to cool. Remember, lamps are not covered under warranty
conditions.
This fixture emits intense UV radiation, which is harmful to the eyes and skin. The intense
luminance of the lamp can cause severe damage to the retina. Never operate this fixture
with the protective covers removed, these covers have been specially designed to shield
against UV radiation.
Epileptic Warning: Those suffering from epilepsy should avoid looking directly into the
lamp at all times.
Avoid switching the fixture on and off repeatedly in short intervals, as this will reduce lamp
life and intensity.
To achieve the intensity associated with discharge lamps, these lamps use a gas sealed in a
high-pressure environment to emit a brilliant output. Due to the high pressure involved with
©Elation Professional®
- 2 –
Focus Spot 250™
Focus Spot 250™
the construction of the lamp, the lamp may explode during prolonged extensive use. This
risk is increased with age; added care is encouraged when dealing with older lamps. Thus,
lamp should always be replaced at the end of their recommended duty cycle. Extreme
caution should be used when operated this or any fixture fitted with a gas discharge lamp.
Never open this fixture while in use!
During the initial operation of this fixture, a light smoke or smell may emit from the interior of
the fixture. This is a normal process and is caused by excess paint in the interior of the
casing burning off from the heat associated with the lamp.
©Elation Professional®
- 3 –
Focus Spot 250™
Focus Spot 250™
Safety Instructions
The Focus Spot 250™ is an extremely sophisticated piece of
electronic equipment. To guarantee a smooth operation, it is
important to follow the guidelines in this manual. The
manufacturer of this device will not accept responsibility for
damages resulting from the misuse of this fixture due to the
disregard of the information printed in this manual.
1. Always be sure that the fan and the air inlets remain clean and are never blocked.
Allow about 6” (15cm) between this fixture and other devices or a wall to allow for
proper cooling.
2. Never touch the fixture during normal operation. This can cause severe personal
injuries and/or damage to the fixture.
3. Be sure to unplug the FOCUS SPOT 250™ from the power outlet before
performing any service related issues.
4. Lamp Replacement; Allow at least 30 minutes after disconnecting main power
before you open the FOCUS SPOT 250™. To prevent personal injury, never touch
the lamp if you are not absolutely sure it has cooled.
5. Never look directly into the lamp beam. You risk injury to your retina, which may
induce blindness.
6. Be sure to track and record the lamp running time. The lamp should be changed at
the end of the specified lamp life, regardless of lamp output. You may also have to
change the lamp if it shows any deformations or damage. The same is with all
glass components, color filters, lenses and mirrors.
7. For safe operation, follow the Installation guide described in chapter two of this
manual. Operating the FOCUS SPOT 250™ without suited safety aids such as
safety cables or clamps can increase the risk of damage and/or personal injury.
8. Installation should only be performed by qualified and certified personal.
9. When mounting this fixture, use only the original rigging parts included with this
fixture. Any structural modification will void the original manufactures warranty and
©Elation Professional®
- 4 –
Focus Spot 250™
Focus Spot 250™
may increase the risk of damage and/or personal injury.
10. To reduce the risk of fire or shock, do not expose this unit to rain or moisture.
11. Do not attempt to operate this fixture if the power cord is frayed or damaged.
©Elation Professional®
- 5 –
Focus Spot 250™
Focus Spot 250™
Features
g Pan 630° / Tilt 265°
g 17° Beam Angle
g 8 Dichroic color plus spot, for a total of 9 colors
g 7 Rotating Gobos
g Strobe: 0~10Hz
g Electronic Focus via DMX
g Sound Active – Master/Slave Operation
g 4 Segment Digital LED
g High speed pan & tilt movements
g Reversible Display (Can be turned 180°)
g Bright MSD 250 Discharge Lamp
g Lamp switches ON/OFF locally
g Glass Dischoric Reflector for Even Lamp Dispersement
g Switchable Power Supply (Internal)
g Internal Program:
edit and save programs to the incorporated EEPROM through the front control panel or
external controller; you can save a maximum of 48 scenes, and run the saved programs
by using the “run” menu on the front control panel
This device falls under protection-class I. Therefore it is essential that the device be
grounded properly.
All electrical connections must carried out by qualified person.
Be sure the available voltage matches the voltage requirements of the unit..
Be sure the power cord is never crimped or damaged. If the power cord is damaged, replace
it immediately with a new one of similar power rating.
Always disconnect from the mains, when the device is not in use or before performing any
service or cleaning procedure.
Only handle the power cord by the plug. Never pull out the plug by tugging the wire portion of
the cord.
During initial start-up some smoke or smell may arise. This is a normal process and does not
necessarily mean that the device is defective, it should decrease gradually over time.
©Elation Professional®
- 6 –
Focus Spot 250™
Focus Spot 250™
Never touch the device during operation!
The housing may heat up
Never look directly into the light source,
as sensitive persons may suffer an epileptic shock.
Please be aware that damages caused by manual modifications to the device are not
subject to warranty.
Keep away from children and non-professionals.
GENERAL GUIDELINES
This device is a lighting effect for professional use on stages, in discotheques, theatres, etc.
This fixture is only allowed to be operated with the max alternating current which is stated in
the technical specifications in the last page of this manual. This device was designed for
indoor use only.
Consistent operation breaks may ensure that the device will serve you for a long time
without defects.
Do not shake the device. Avoid brute force when installing or operating the device.
While choosing the installation-spot, please make sure that the device is not exposed to
extreme heat, moisture or dust. The minimum distance between light-output from the
projector and the illuminated surface must be more than 0,5 meter.
Always fix the fixture with an appropriate safety cable if you use the clamp to hang up the
fixture. When fixing the device on a raised-from-the- ground support, be sure to use no less
than screws and nuts of M10 x 25 mm and insert them in the pre-arranged screw holes in
the base of the fixture.
If you use the quick lock cam in hanging up the fixture, please make sure the 4 quick lock
fasteners turned in the quick lock holes correctly.
Operate the device only after having familiarized with its functions. Do not permit operation
©Elation Professional®
- 7 –
Focus Spot 250™
Focus Spot 250™
by persons not qualified for operating the device. Most damages are the result of
unprofessional operation.
Please use the original packaging if the device is to be transported.
For safety reasons, please be aware that all modifications on the device are forbidden.
If this device will be operated in any way different to the one described in this manual, the
product may suffer damages and the guarantee becomes void. Furthermore, any other
operation may lead to short-circuit, burns, electric shock, lamp explosion, crash, etc.
©Elation Professional®
- 8 –
Focus Spot 250™
Focus Spot 250™
LAMP INSTALLATION INSTRUCTIONS
a) Installing or replacing the lamp
Only install the lamp with the device unplugged from the mains.
The lamp has to be replaced when it is damaged or deformed.
Before replacing the lamp be sure the unit has ample time to cool, to avoid injury to yourself
never touch the lamp when it is hot.
During the installation of halogen lamps do not touch the glass bulbs bare handed. Always
use a cloth to handle the lamps during insertion and removal.
Do not install lamps with a higher wattage. They generate higher temperatures than which
the device was designed for.
For the installation, you need one MSD250/2 GY9.5 lamp ;
Procedure :
1. Remove the two thumb screws labeled “A” and “B” on the rear housing of the head.
2. Gently pull the lamp/socket assembly to access the lamp.
3. Gently remove the old lamp by grasping it by the ceramic base.
4. Carefully insert the new lamp into the socket. Please remember there is only one way to
insert the lamp. Once the lamp has be inserted into the socket, gently slide the socket
©Elation Professional®
- 9 –
Focus Spot 250™
Focus Spot 250™
assembly back into place and fasten the two thumb screws.
b) Lamp Optimization
The lamp orientation and optimization must be adjusted after every lamp change. This
procedure centers the lamp in the reflector. Proper optimization will increase lamp life and
ensure a bright crisp output. Improper optimization may add a yellow tint to the lamp output
and reduce intensity. The minimum deviation amount is 1.0mm. Running the fixture within a
lower deviation can cause damage to the lamp and/or lens.
The Focus Spot 250™ lamp holder is aligned at the factory. However, due to slight
imperfections in all lamps, fine adjustments will improve light performance. Please follow the
procedure below for proper lamp optimization:
1. Using either a DMX controller or the control panel on the unit, strike the lamp and
focus the light on a flat surface (beam open, white, no gobo, no effects).
2. Center the hot-spot (the brightest part of the beam) using the 3 adjustment screws.
Turn one screw at a time to drag the hot-spot diagonally across the projected image.
If you cannot detect a hot-spot, adjust the lamp until the light is even.
3. To reduce a hot-spot, pull the lamp in by turning all three screws clockwise 1/4-turn at
a time until the light is evenly distributed.
4. If the light is brighter around the edge than it is in the center, or if light output is low,
the lamp is too far back in the reflector. "Push” the lamp out by turning each the
adjustment screws ("A, B, C”) counterclockwise ¼-turn until the light is bright and
evenly distributed.
©Elation Professional®
- 10 –
Focus Spot 250™
Focus Spot 250™
Do not operate this device with open cover
Please remember the lamp is not a hot-restrike type, you must wait approximately 10
minutes after having turned the lamp off before you can turn it back on again.
©Elation Professional®
- 11 –
Focus Spot 250™
Focus Spot 250™
Preparation and Installation
Mounting
The FOCUS SPOT 250™ is fully operational in two different mounting positions, hanging
upside-down from a ceiling or set on a flat level surface. To avoid internal damage to the unit,
never mount the unit on its side as illustrated below. Be sure this fixture is kept at least 0.5m
away from any flammable materials (decoration etc.). Install a safety cable that can hold at
least 10 times the weight of the fixture. Never use the carrying handles for secondary
attachment.
Refer to regulations BGV C1 (formerly VBG 70) and DIN VDE
0711-217 for proper installation in Europe
To ensure proper installation, only qualified staff should
attempt installation.
Clamps
The FOCUS SPOT 250™ has been designed to hold multiple clamps to the bottom of the
unit in several different orientations. Always use an appropriately rated clamp to mount this
unit to truss. Refer to the printed instructions on the bottom of the fixture for proper clamp
installation.
©Elation Professional®
- 12 –
Focus Spot 250™
Focus Spot 250™
a) Cam lock System: This system allows a quick and efficient means to
secure a clamp to the unit. To attach a clamp to the unit, attach a clamp that
is rated to handle the weight of the unit to your cam lock. After a clamp has
been attached to the cam lock, attach the cam locks to the designated
position on the bottom of your unit. Lock the cam locks into position by
turning the wing nuts 90°.
90°
b) Be sure to always use two cam locks mounted to the bottom of unit to
ensure safe truss mounting.
2
3
1
1.Quick-lock fastener
2.Clamp
3.Safety-rope
©Elation Professional®
- 13 –
Focus Spot 250™
Focus Spot 250™
Secure the FOCUS SPOT 250™
Regardless of the rigging option you choose for your FOCUS SPOT 250™ always
be sure to secure your fixture with a safety cable. The fixture provides a built-in
rigging point for a safety cable on the underside of the fixture, be sure to use this
point and never secure a safety cable to a carrying handle.
©Elation Professional®
- 14 –
Focus Spot 250™
Focus Spot 250™
Connections
Data Cable (DMX Cable) Requirements (For DMX and Master/Slave Operation):
Your fixture and your DMX controller require a standard 3-pin XLR connector for data
input and data output (Figure Below). If you are making your own cables, be sure to
use standard two conductor shielded cable (This cable may be purchased at almost all
professional sound and lighting stores). Your cables should be made with a male and
female XLR connector on either end of the cable. Also remember that DMX cable must
be daisy chained and can not be split.
Be sure to follow the above figure when making your own cables. Do not use the ground
lug on the XLR connector. Do not connect the cable’s shield conductor to the ground lug
or allow the shield conductor to come in contact with the XLR’s outer casing. Grounding
the shield could cause a short circuit and erratic behavior.
DMX-512 control connection
Connect the provided XLR cable to the female 3-pin XLR output of your controller and the
other side to the male 3-pin XLR input of the moving head. You can chain multiple
Moving head together through serial linking. The cable needed should be two core,
screened cable with XLR input and output connectors. Please refer to the diagram below.
©Elation Professional®
- 15 –
Focus Spot 250™
Focus Spot 250™
DMX-512 connection with DMX terminator
When longer runs of cable are used, you may need to use a terminator on the last fixture to
avoid erratic behavior. A terminator is a 90-120 ohm 1/4 watt resistor which is connected
between pins 2 and 3 of a male XLR connector (DATA + and DATA -). This fixture is inserted
in the female XLR connector of the last fixture in your daisy chain to terminate the line. Using
a cable terminator (Elation part number Z-DMX/T) will decrease the possibilities of erratic
behavior.
CONTROLLER
5-Pin XLR DMX Connectors. Some manufactures use 5-pin XLR connectors for DATA
transmission in place of 3-pin. 5-pin XLR fixtures may be implemented in a 3-pin XLR DMX
line. When inserting standard 5-pin XLR connectors in to a 3-pin line a cable adaptor must
be used, these adaptors are readily available at most electric stores. The following chart
details a proper cable conversion.
©Elation Professional®
- 16 –
Focus Spot 250™
Focus Spot 250™
Fixture DMX address;
All fixtures should be given a DMX starting address when using a DMX signal, so that the
correct fixture responds to the correct control signals. This digital starting address is the
channel number from which the fixture starts to “listen” to the digital control information sent
out from the DMX controller. The allocation of this starting address is achieved by setting the
correct number on the display located on the base of the device.
You can set the same starting address for all fixtures or a group of fixtures , or make different
address for each fixture individually.
If you set the same address, all the units will start to “listen” to the same control signal from
the same channel number. In other words, changing the settings of one channel will affect all
the fixtures simultaneously.
If you set a different address, each unit will start to “listen” to the channel number you have
set, based on the quantity of control channels of the unit. That means changing the settings
of one channel will affect only the selected fixture.
In the case of the Focus Spot 250™, which is a 11 channel fixture, you should set the
starting address of the first unit to 1, the second unit to 12 (11 + 1), the third to 23 (12 + 11),
and so on.
©Elation Professional®
- 17 –
Focus Spot 250™
Focus Spot 250™
Note:
After switching on, the Focus Spot 250™ will automatically detect whether DMX 512 data is
received or not. If the data is received, the display will show "A.XXX" (XXX representing the
actual DMX address). If the fixture is not receiving DMX signal the display will flash "A.XXX"
(XXX representing the actual DMX address). This situation can occur if:
- the 3 PIN XLR plug (cable with DMX signal from controller) is not connected with the input
of the machine.
- the controller is switched off or defective, if the cable or connector is defective or the signal
wires are swap in the input connector.
©Elation Professional®
- 18 –
Focus Spot 250™
Focus Spot 250™
Control Board
The control panel located on the top of the fixture allows you to access the main menu and
make all necessary adjustments to the Focus Spot 250™. During normal operation, tapping
the “MODE” key once will access the fixture’s main menu. Once in the main menu you can
navigate through the different functions and access the sub-menus with the Up and Down
buttons. Once you reach a field that requires adjusting, tap the ENTER button to activate
that field and use the UP and Down button to adjust the field. Tapping the Enter button once
more will confirm your setting. Once a setting is saved the LED will briefly readout PASS to
confirm a new setting has been made and locked into memory. You may exit the main menu
at any time without making any adjustments by tapping the EXIT button.
Default settings shaded.
1
ADDR
A001~A511
2
3
TEST
AUDI
T-01~T-XX
MSTR
ALON
4
5
LAMP
RESE
ON/OFF
ALL
ON/OFF
SCAN
COLR
ON/OFF
ON/OFF
GOBO
ON/OFF
SHTR
ON/OFF
OTHR
ON/OFF
Reset only motors for gobo and
rotation
Reset only motors for shutter and/or
dimmer
Reset other motors
LIFE
LAMP
0000~9999
0000~9999
Displays the total fixture running time
Displays a lamps running time
CLMP
ON/OFF
Clear lamp running time
6
7
8
9
10
11
TIME
RPAN
RTLT
FINE
DISP
SPEC
Indicate the staring DMX address
A001 also is the setting for slave
Automatically test the function
Runs fixture as “master” for audio
Runs fixture as “alone” for audio
Manually switches lamp “on” and “off”
Reset all motors and returns fixture to
home
Reset only motors for pan/tilt
Reset only motors for colors
ON/OFF
ON/OFF
ON/OFF
VALU
D–XX
D ON
FLIP
ON/OFF
ON/OFF
LAAU
ON/OFF
Reverses the pan movements
Reverses the tilt movements
Switch between 16 bit/8 bit
Display the DMX512 value of each
channel
Display turn off after 2mins
This function will reverse the display
180
Automatic lamp start with power
DLOF
ON/OFF
Switch lamp via DMX
©Elation Professional®
D-00 (DXXX)
- 19 –
Focus Spot 250™
Focus Spot 250™
12
EDIT
DLAY
SPOT
DFSE
D–XX D-15
ON/OFF
ON/OFF
VER
STEP
V1.0~V9.9
SCXX
RUN
S–01 ~S–48
C–01
:
C–30
TIME
CEDT
ON/OFF
Lamp on delay time
Lamp optimization
Resets all the fixture functions to
default
Software version
Set the amount of your
program
0 1 XX(00~FFH)
:
3 0 XX(00~FFH)
T – XX(01~FFH)
ON/OFF
Program test
Main Menu Functions
1.
ADDRESS MENU -
AOO1 - A511 (Value) - This is where you set the fixtures DMX address.
2.
TEST MENU -
T-01 - T-XX (Test) - Tests the functions of each channel. There are eleven DMX channels,
but only channels 1,2,3,4, and 6 can be tested.
3.
AUDI MENU -
MAST (Master) - Runs the unit as master in sound active mode.
ALON (Alone) - Runs the unit stand alone, sound active mode.
4.
LAMP MENU -
ON/OFF Manually switches the lamp on and off.
5.
RESE (RESET) MENU -
ALL - Resets all the motors in the unit.
SCAN - Resets the Pan and Tilt motors.
COLR (Color) - Resets the color motors.
GOBO - Resets the gobo motors.
©Elation Professional®
- 20 –
Focus Spot 250™
Focus Spot 250™
SHTR - Resets the shutter motors.
OTHR - Reset all other motors
6.
TIME MENU -
LIFE - Displays the fixtures total running time.
LAMP - Displays the lamp running time.
CLMP - Clears the lamp running time.
7.
RPAN MENU -
This menu setting reverses the Pan movements.
8.
RTLT MENU -
This menu setting reverses the Tilt movements.
9.
FINE MENU -
This menu setting switch between 16 bit (fine) and 8 bit (coarse) modes. When this function
is turned on the fixture will operate in 16 bit (fine) mode. When functioning in 16 bit mode the
fixture will use 11 DMX channels, when the 16bit function is turned off the fixture will use
nine DMX channels.
10.
DISPLAY MENU -
VALU (DMX-512 Value) - Display the DMX-512 value of each channel.
D ON (Display On) - Turns digital display on or off.
FLIP - “Flips” the digital display 180 degree
11.
SPEC MENU –
LAAU-Automatic lamp start with power
DLOF-Switch lamp via DMX controller
DLAY-Lamp delay on time
SPOT - This provides a spot beam for better lamp optimization.
DFSE (Default) - Resets the unit to default.
©Elation Professional®
- 21 –
Focus Spot 250™
Focus Spot 250™
VER (Version) - Displays the software version
12.
EDIT MENU -
RUN - This will run your own custom program.
STEP (S-01 - S-48) - These are the steps slots that you write your programs into. There are
at total of 48 steps.
SCXX (SC01 - SC30) - These are the scenes that are stored in your program. There are a
total of 30 scenes. C-01 - C-08 (Channel 1 - Channel 08) - The channels of each scene that
can be edited.
TIME (Time) - Running time of the entire program.
CEDT - Edit program using a external controller.
©Elation Professional®
- 22 –
Focus Spot 250™
Focus Spot 250™
On-Board System Menu. The FOCUS SPOT 250. comes with an easy to navigate system
menu. This next section will detail the functions of each command in the system menu.
Enter Button - To access the main menu locate the MODE/ENTER button on the front of
the unit. Press this button to activate the system menu. Tap the UP button until you reach
function you wish to change. When you reach the function you wish to change tap the
MODE/ENTER button. When a function is selected the menu will begin to .ash, use the UP
button to change the function. Once your changes are made tap the MODE/ENTER button
again to lock the change in the system. To exit without making any changes tap the EXIT
button.
1.
Setting/Changing the DMX Address
After applying power to the CMY ZOOM 250™ the LED will display the fixture’s current
DMX address immediately after the reset sequence. If the fixture is not receiving a
DMX signal the display will flash continuously.
To set or adjust a DMX address, please follow the procedure below:
1. Switch on the CMY ZOOM 250™ and wait for the fixture reset process to finished.
2. Press the Mode button to access the main menu. Toggle through the menu by
pressing the Up and Down buttons until the display shows A001 . Tap the enter
button to make changes to the address, the current three digit address will
immediately begin to flash.
3. While the current three-digit address is flashing, use the Up and Down buttons to
select adjust the address. Lock your new address into the unit’s memory by
pressing the Enter button. After the new address has been successfully stored into
the fixture’s memory the LED will briefly readout PASS .
The DMX address is non-destructible and will remain in the fixture’s memory even
when the power has been switched off. Memory is backed-up and retained by an
internal power source with a five year shelf life.
2.
TEST MAIN MENU
©Elation Professional®
- 23 –
Focus Spot 250™
Focus Spot 250™
TEST - This will test the functions of each channel.
1. Access the main menu.
2. Tap the UP button until “TEST” is displayed, press ENTER.
3. The display will show T-01. You can now press the up button and test the different
channels. For example: If you press the up button until “T-03” is displayed, the unit will
test the color channel, changing the color one by one and show the rainbow effect with
different speeds. There are eight channels, but only channels 1,2,3,4, and 6 can be
tested.
4. Press MODE/ENTER or EXIT to exit.
3.
AUDI MAIN MENU
MSTR Define the unit as the master, in master/slave mode1. Access the main menu.
2. Tap the UP button until“AUDI”is displayed, press MODE/ENTER.
3. Tap the UP button until“MSTR”is displayed, press MODE/ENTER.
4. Press EXIT to return to the main menu.
ALON Define the unit as a stand alone unit 1. Access the main menu.
2. Tap the UP button until“NODE”is displayed, press ENTER.
3. Tap the UP button until “ ALON” is displayed, press MODE/ENTER to confirm.
4. Press EXIT to return to the main menu.
4.
LAMP MENU -
LAMP – This menu function will manually turn the lamp on and off.
1. Access the main menu.
2. Tap the UP button until“LAMP”is displayed, press MODE/ENTER.
©Elation Professional®
- 24 –
Focus Spot 250™
Focus Spot 250™
4. The display will show“ON/OFF”.
5. Press the UP button to select “ON” to activate this function, or “OFF” to deactivate
this function.
6. Press MODE/ENTER to confirm.
7. Press EXIT to return to the main menu.
5. RESE MAIN MENU
ALL - When you activate the reset function, the fixture will begin to reset all motors.
1. Access the main menu.
2. Tap the UP button until “RESE” is displayed, press MODE/ENTER.
3. Tap the UP button until “ALL” is displayed, press MODE/ENTER.
4. The display will show “ON/OFF”. Press the UP button to select “ON” to reset the
color motor.
5. Press MODE/ENTER to confirm
6. Press EXIT/DN to return to the main menu.
SCAN - When you activate this reset function, the fixture will only reset the Pan and Tilt
mirror motor.
1. Access the main menu.
2. Tap the UP button until “RESE” is displayed, press MODE/ENTER.
3. Tap the UP button until “SCAN” is displayed, press MODE/ENTER to confirm.
4. The display will show “ON/OFF”. Press the UP button to select “ON” to reset the
color motor. Press MODE/ENTER
5. Press EXIT/DN to return to the main menu.
COLR - When you activate this reset function, the fixture will only reset the color wheel
motor.
1. Access the main menu.
2. Tap the UP button until “RESE” is displayed, press MODE/ENTER.
©Elation Professional®
- 25 –
Focus Spot 250™
Focus Spot 250™
3. Tap the UP button until “COLR” is displayed, press MODE/ENTER to confirm.
4. The display will show “ON/OFF”. Press the UP button to select “ON” to reset the
color motor. Press MODE/ENTER
5. Press EXIT/DN to return to the main menu.
SHTR - When you activate this reset function, the fixture will only reset the
shutter/dimmer motor.
1. Access the main menu.
2. Tap the UP button until “RESE” is displayed, press MODE/ENTER.
3. Tap the UP button until “SHTR” is displayed, press MODE/ENTER to confirm.
4. The display will show “ON/OFF”. Press the UP button to select “ON” to restart the
shutter/dimmer motor. Press MODE/ENTER to confirm.
5. Press EXIT/DN to return to the main menu.
OTHR - When you activate this reset function, the fixture will only reset any motor not
specified in the other reset commands previously listed.
1. Access the main menu.
2. Tap the UP button until “RESE” is displayed, press MODE/ENTER.
3. Tap the UP button until “OTHR” is displayed, press MODE/ENTER to confirm.
4. The display will show “ON/OFF”. Press the UP button to select “ON” to reset the
color motor. Press MODE/ENTER
5. Press EXIT/DN to return to the main menu.
6.
TIME MAIN MENU
LIFE - With this function you can display the total running time of the unit.
1. Access the main menu.
2. Tap the UP button until“TIME”is displayed, press MODE/ENTER.
3. Tap the UP button until“LIFE”is displayed, press MODE/ENTER.
4. Press EXIT to return to the main menu.
©Elation Professional®
- 26 –
Focus Spot 250™
Focus Spot 250™
LAMP - With this function you can display the running time of the lamp.
1. Access the main menu.
2. Tap the UP button until“TIME”is displayed, press MODE/ENTER.
3. Tap the UP button until“LAMP”is displayed, press MODE/ENTER.
4. Press EXIT to return to the main menu.
CLMP - With this function you can clear the running time of the lamp. Note
Very Important: Please clear the lamp time every time you replace the lamp.
1. Access the main menu.
2. Tap the UP button until “TIME” is displayed, press MODE/ENTER.
3. Tap the UP button until “CLMP” is displayed, press MODE/ENTER.
4. Press MODE/ ENTER, the display will show “ON/OFF”.
5. Press the UP button to select “ON” to activate this function, or “OFF” to
deactivate this function.
6. Press MODE/ENTER to confirm.
7. Press EXIT/DN to return to the main menu.
7.
RPAN MENU -
RPAN – This menu function will reverse the mirror PAN movements.
1. Access the main menu.
2. Tap the UP button until“RPAN”is displayed, press MODE/ENTER.
4. The display will show“ON/OFF”.
5. Press the UP button to select “ON” to activate this function, or “OFF” to deactivate
this function.
6. Press MODE/ENTER to confirm.
7. Press EXIT to return to the main menu.
©Elation Professional®
- 27 –
Focus Spot 250™
Focus Spot 250™
8.
RTLT MENU -
RTLT – This menu function will reverse the mirror TILT movements.
1. Access the main menu.
2. Tap the UP button until“RTLT”is displayed, press MODE/ENTER.
4. The display will show“ON/OFF”.
5. Press the UP button to select “ON” to activate this function, or “OFF” to deactivate
this function.
6. Press MODE/ENTER to confirm.
7. Press EXIT to return to the main menu.
9.
FINE MENU FINE – This menu function will toggle between the 16bit and 8bit operating modes. In
16bit mode the unit will have 11 DMX channels which includes two pan movement
channels and two tilt movements channels. In 8bit mode the fixture will only have one
pan and one tilt movement channel for a total of nine DMX channels.
1. Access the main menu.
2. Tap the UP button until“FINE”is displayed, press MODE/ENTER.
4. The display will show“ON/OFF”.
5. Press the UP button to select “ON” to activate this function, or “OFF” to deactivate
this function.
6. Press MODE/ENTER to confirm.
7. Press EXIT to return to the main menu.
10.
DISP MENU -
This menu function will control the various on-board display features.
VALU – This function will display the DMX value of each channel as it is change with a
DMX console
©Elation Professional®
- 28 –
Focus Spot 250™
Focus Spot 250™
1. Access the main menu.
2. Tap the UP button until “DISP” is displayed.
3. Press MODE/ENTER, the display will show“VALU”.
4. Press MODE/ENTER, once again “d-00” will be displayed.
5. Press MODE/ENTER to confirm.
6. Press EXIT to return to the main menu.
D ON – This function will turn the display off after the unit has gone two
seconds without
any activity.
1. Access the main menu.
2. Tap the UP button until “DISP” is displayed.
3. Press MODE/ENTER, the display will show“VALU”.
4. Tap the UP button until “”D-ON” is displayed and tap the MODE/ENTER button.
4. Press the UP button to select “ON” to activate this function, or “OFF” to deactivate
this function.
5. Press MODE/ENTER to confirm.
6. Press EXIT to return to the main menu.
FLIP – This function will reverse the display readout buy 180˚.
1. Access the main menu.
2. Tap the UP button until “DISP” is displayed.
3. Press MODE/ENTER, the display will show“VALU”.
4. Tap the UP button until ”FLIP” is displayed and tap the MODE/ENTER button.
4. Press the UP button to select “ON” to activate this function, or “OFF” to deactivate
this function.
5. Press MODE/ENTER to confirm.
6. Press EXIT to return to the main menu.
11.
SPEC MAIN MENU LAAU – This function control the automatic lamp start feature. By default the unit will
©Elation Professional®
- 29 –
Focus Spot 250™
Focus Spot 250™
automatically ignite the lamp when unit is turned on. Use this function to turn this feature
on and off.
1. Access the main menu.
2. Tap the UP button until “SPEC” is displayed, press MODE/ENTER.
3. Tap the UP button until “LAAU” is displayed, press MODE/ENTER.
4. The display will show “ON/OFF”.
5. Press the UP button to display “ON” to activate this function, or “OFF” to
deactivate this function.
6. Press MODE/ENTER to confirm.
7. Press EXIT to return to the main menu.
DLOF – This feature allow you to control the lamp via DMX.
1. Access the main menu.
2. Tap the UP button until “SPEC” is displayed, press MODE/ENTER.
3. Tap the UP button until “DLOF” is displayed, press MODE/ENTER.
4. The display will show “ON/OFF”.
5. Press the UP button to display “ON” to activate this function, or “OFF” to
deactivate this function.
6. Press MODE/ENTER to confirm.
7. Press EXIT to return to the main menu.
DLAY – This function allow the user to set a lamp “strike” delay time.
1. Access the main menu.
2. Tap the UP button until “SPEC” is displayed, press MODE/ENTER.
3. Tap the UP button until “DLAY” is displayed, press MODE/ENTER.
4. The display will show “D-XX”.
5. Press the UP and DOWN buttons to adjust the delay time.
6. When completed press MODE/ENTER to confirm.
7. Press EXIT to return to the main menu.
©Elation Professional®
- 30 –
Focus Spot 250™
Focus Spot 250™
SPOT – This function allows you to optimize the lamp without the use of an external
DMX controller. In this mode, the device will not react to any control signal.
1. Access the main menu.
2. Tap the UP button until “SPEC” is displayed, press MODE/ENTER.
3. Tap the UP button until “DFSE” is displayed, press MODE/ENTER.
4. The display will show “ON/OFF”.
5. Press the UP button to display “ON” to activate this function, or “OFF” to
deactivate this function.
6. Press MODE/ENTER to confirm.
7. Press EXIT to return to the main menu.
DFSE - With this function you can restore the factory settings of the device. All
settings will be set back to the default values. Any edited scenes will be lost. When
restoring the factory settings the unit must be set to the address that the unit was in
when you started editing. When you exit this function, the unit will begin to reload
data.
1. Access the main menu.
2. Tap the UP button until “SPEC” is displayed, press MODE/ENTER.
3. Tap the UP button until “DFSE” is displayed, press MODE/ENTER.
4. The display will show “ON/OFF”.
5. Press the UP button to display “ON” to activate this function, or “OFF” to
deactivate this function.
6. Press MODE/ENTER to confirm.
7. Press EXIT to return to the main menu.
VER - Use this function to display the Software version of the unit.
1. Access the main menu.
2. Tap the UP button until “SPEC” is displayed, press MODE/ENTER.
3. Tap the UP button until “VER” is displayed, press MODE/ENTER.
4. The display will show“V-1.0”, the display may also show,“V-2.0”,“V-9.9”etc.
©Elation Professional®
- 31 –
Focus Spot 250™
Focus Spot 250™
5. Press ENTER or EXIT/DN to exit. EDIT - This menu item allows you to write a
program into the memory (EEPROM) via the control panel or via the external
controller.
12.
EDIT MENU -
This features allows you to enter and store a preset show in to the fixtures internal
memory. This show can then be recalled at anytime without a controller.
RUN - With the function “RUN”, you can run your pre-made program. You can
set the number of steps under Step (S-01- S-48). You can edit the individual scenes
under Edit.
1. Access the main menu.
2. Tap the UP button until “EDIT” is displayed, press MODE/ENTER.
3. Tap the UP button until “RUN” is displayed, press MODE/ENTER.
4. “AUTO”is displayed. If you press the UP button it will show “SOUN”. Select
which one you want to activate, and press ENTER.
5. Press UP, to select “ALON” or “NAST”. Which mean stand alone, and
master/slave mode.
6. Select a mode, and press ENTER to confirm.
7. Press EXIT/DN to return to the main menu.
STEP - With this function you can program the number of steps in your
individual Program.
1. Access the main menu.
2. Tap the UP button until “EDIT” is displayed, press ENTER.
3. Tap the UP button until “STEP” is displayed, press ENTER.
4. The display shows “S-01”, this stands for the first step of your program. You can
©Elation Professional®
- 32 –
Focus Spot 250™
Focus Spot 250™
call up to 48 scenes in “Run”. For example, if “S-05” is displayed, it means that
“Run” will run the first 5 scenes you saved in “Edit”.
5. Press ENTER to save and exit.
SC01 - With this function you can choose the number of scenes in your
Program.
1. Access the main menu.
2. Tap the UP button until “EDIT” is displayed, press MODE/ENTER.
3. Tap the UP button until “SC01” is displayed.
4. The display shows “SC01”, this stands for the first scene of your program. You
can call up to 30 scenes. For example, if “SC05”, it means that “Run” will run
the first 5 scenes you saved in “Edit”.
5. Press ENTER to save and exit.
Editing procedure 1: Using the control board only.
1. Access the main menu.
2. Tap the UP button until “EDIT” is displayed. Press MODE/ENTER.
3. The display will show “SC-01”, this stands for the scene number. For example,
“SC-01” is displayed, it means you will be editing scene 1, press MODE/ENTER.
You can change the scene number by pressing the UP button.
4. Press MODE/ENTER, the display will show “C-1”, this stands for the channel
number. If “C-01” is displayed, you will be editing channel 1 of your selected scene,
press MODE/ENTER. You can change the channel number by pressing the UP
button.
5. The display will show the DMX value for the channel that is being edited. It will be
displayed as “11XX”, it stands for Channel 11 of the editing scene, the DMX value
is “XX”.
6. Adjust the DMX value by pressing the UP button, until you get the expected effect
for this channel.
7. Press MODE/ENTER to enter the editing of the other channels of the scene.
©Elation Professional®
- 33 –
Focus Spot 250™
Focus Spot 250™
8. Repeat steps 5-8, until you finish setting all the DMX values for all the channels of
this scene, each scene can have 15 channels maximum.
9. Once all the channels are completed, the display will .ash “TIME”, this stands for
the time needed to run this scene.
10. Press MODE/ENTER to edit the time needed, the display shows “T-XX”, “XX”
stands for the time needed to run this scene. For example, “T-02” means scene 1
needs 6 seconds to run, “T-15” means this scene needs 45 seconds to run.
Note: “XX” is always three seconds not one second.
11. Adjust the time needed by pressing the UP button.
12. Press MODE/ENTER to save the settings for the scene you are editing, the
display will change to the next scene automatically.
13. Repeat steps 3-12 to edit other scenes, you can edit and save 48 scenes
maximum.
14. Press EXIT to exit, now you have edited and saved scenes using the control
board. The number of steps can be defined under “EDIT” and the scenes can be
called up under “Run”. To run the scenes see page 26.
Editing procedure 2: Using an external controller.
1. Access the main menu.
2. Tap the UP button until “EDIT” is displayed. Press MODE/ENTER.
3. The display will show “SC01”, this stands for the first scene number to be edited.
For example: If “SC01” is displayed, you will be editing scene 1.
4. Change the scene number by pressing the UP button.
5. Press MODE/ENTER, the display will show “C-01”, the “1”stands for the
channel number 1.
6. Press the UP button until “CEDT” is displayed, press MODE/ENTER.
7. The display will show “OFF”, press the UP button so that “ON”is displayed,
press MODE/ENTER.
8. The display shows “SC02”. You have successfully downloaded the .rst scene.
©Elation Professional®
- 34 –
Focus Spot 250™
Focus Spot 250™
9. Adjust the Step-time. needed by pressing the UP button.
10. Call up the second scene in your controller now.
11. Repeat steps 3-6 until all desired scenes are downloaded.
12. Press EXIT to exit. The number of steps can be defined under “Step” and the
scenes can be called up under “Run”.
©Elation Professional®
- 35 –
Focus Spot 250™
Focus Spot 250™
INSTRUCTIONS ON USE:
The chart below show the channel layout for 11 DMX channels (default). In 8bit mode the
“pan Fine” and “Tilt Fine” channels are not used.
CHANNEL 1 : Pan movement (max. 630°)
CHANNEL 2 : 16 bit pan movement (pan fine)
CHANNEL 3 : Tilt movement (max. 265°)
CHANNEL 4 : 16 bit tilt movement (tilt fine)
CHANNEL 5 : Select one of the 9 colors, color cycle or rainbow effect
CHANNEL 6 : Select one of the 6 gobo’s + open or gobo cycle+ gobo shake
CHANNEL 7 : Select gobo rotation speed and direction + gobo index
CHANNEL 8 : Strobe (0-10Hz), dimming and shutter close/open function + random strobe
CHANNEL 9 : Electronic focus
CHANNEL 10 : Speed pan/tilt movement, blackout selection
CHANNEL 11 : Auto program control + lamp on, motor reset, lamp switch off
©Elation Professional®
- 36 –
Focus Spot 250™
Focus Spot 250™
DMX channel function and values:
Channel 1 – PAN Coarse 8bit :
Channel 2 – PAN Fine 16bit
Channel 3 – TILT Coarse 8bit
Channel 4 – TILT Fine 16bit
Channel 5 - Color Wheel :
0-13 Open (White)
14-27 RED
28-41 BLUE
42-55 GREEN
56-69 YELLOW
70-83 MAGENTA
84-97 ORANGE
98-111 UV FILTER
112-128 PINK
128-187 Clockwise Color Scroll (fast to slow)
188-193 No Rotation
194-255 Counter-Clockwise Color Scroll (slow to fast)
Channel 6 - Gobo
0-9
Open
10-19 Gobo 1
20-29 Gobo 2
30-39 Gobo 3
40-49 Gobo 4
50-59 Gobo 5
60-69 Gobo 6
70-89 Gobo 1 Shake (slow to fast)
90-109 Gobo 2 Shake (slow to fast)
110-129 Gobo 3 Shake (slow to fast)
130-149 Gobo 4 Shake (slow to fast)
150-169 Gobo 5 Shake (slow to fast)
170-189 Gobo 6 Shake (slow to fast)
190-255 Gobo Wheel Continuous Rotation (slow to fast)
Channel 7 - Gobo indexing, Gobo rotation
0-127 Gobo Indexing
©Elation Professional®
- 37 –
Focus Spot 250™
Focus Spot 250™
128-187 Clockwise Gobo Rotation (fast to slow)
188-193 No rotation
194-255 Counter-Clockwise Gobo Rotation (slow to fast)
Channel 8 - Shutter, Strobe:
0-31 Shutter Closed
32-63 Dimmer (close to open)
64-95 Strobe Effect (slow to fast)
96-127 No function (shutter open)
128-159 Pulse-effect in sequences
160-191 No function (shutter open)
192-223 Random strobe effect slow to fast
224-255 No function (shutter open)
Channel 9 - Focus
0-255 Continuous adjustment from near to far
Channel 10 – Pan/Tilt Motor Speed
0-4
Max speed
5-225 Max to min speed
226-235 Blackout by movement
236-245 Blackout by all wheel changing
246-255 No function
Channel 11 – Special Functions
0-19 Color change normal
40-59 Lamp on
60-79 Lamp switch off
80-99 Motor reset
100-119 Internal program 1
120-139 Internal program 2
140-159 Internal program 3
160-179 Internal program 4
180-199 Internal program 5
200-219 Internal program 6
220-239 Internal program 7
240-255 Internal program 8
©Elation Professional®
- 38 –
Focus Spot 250™
Focus Spot 250™
ERROR CODES:
When power is applied, the unit will automatically enter a “reset” mode. This mode brings all
the motors to a home position. If there is an internal problems with one or more of the motors
an error code may flash in the LCD. “XXer” may appear in the LCD where “XX” represents a
channel (1,2,3,5,6,7) with a possible alignment problem.
For example, when the display shows “02Er”, it means there is some error in channel 2. If
there are some errors on channel 1, channel 2, channel 5 at the same time, you may see the
error message “01Er”, “02Er”,”05Er” flash repeated for 5 times, and then the fixture will
generate a reset signal, all the stepper reset. If the fixture remain error message after
performing reset more than 3 times, it will detect whether the fixture has more than 3 errors.
If the fixture has more than 3 errors (including 3 errors), all the channels can not work
properly; but if the fixture has less than 3 errors, only the channels which have errors can not
work properly, others can work as usual.
01Er
(PAN-yoke movement error) This message will appear after the reset of the fixture if the
yoke’s magnetic-indexing circuit malfunction (sensor failed or magnet missing) or the
stepping-motor is defective ( or its driving IC on the main PCB). The yoke is not located in
the default position after the reset.
02Er:
(TILT-head movement error) This message will appear after the reset of the fixture if the
head’s magnetic-indexing circuit malfunctions (sensor failed or magnet missing) or the
stepping-motor is defective (or its driving IC on the main PCB). The head is not located in the
default position after the reset.
03Er:
(Color-wheel error) This message will appear after the reset of the fixture if the
magnetic-indexing circuit malfunctions (sensor failed or magnet missing) or the
©Elation Professional®
- 39 –
Focus Spot 250™
Focus Spot 250™
stepping-motor is defective (or its drive circuit on the main PCB). The color wheel is not
located in the default position after the reset.
04Er:
(Rotating gobo-wheel error ) This message will appear after the reset of the fixture if the
magnetic-indexing
circuit
malfunctions(sensor
failed
or
magnet
missing)
or
the
stepping-motor is defective (or its drive circuit on the main PCB). The rotating gobo-wheel is
not located in the default position after the reset.
05Er
(Rotating gobo indexing error) This message will appear after the reset of the fixture and if
the magnetic-indexing circuit malfunctions (sensor failed or magnet missing) or the
stepping-motor is defective (or its driver circuit on the main PCB). The rotating gobo is not
located in the default position after the reset.
©Elation Professional®
- 40 –
Focus Spot 250™
Focus Spot 250™
CLEANING AND MAINTENANCE
The following points have to be considered during the inspection:
1. All screws for installing the devices or parts of the device have to be tightly connected
and must not be corroded.
2. There must not be any deformations on the housing, color lenses, fixations and
installation spots (ceiling, suspension, trussing).
3. Mechanically moved parts must not show any traces of wearing and must not rotate
with unbalances.
4. The electric power supply cables must not show any damage, material fatigue or
sediments.
Further instructions depending on the installation spot and usage have to be adhered by a
skilled installer and any safety problems have to be removed.
Disconnect from mains before starting maintenance operation.
We recommend a frequent cleaning of the device. Please use a moist, lint- free cloth. Never
use alcohol or solvents.
There are no serviceable parts inside the device except for the lamp. Please refer to the
instructions under “Installation instructions”.
Should you need any spare parts, please order genuine parts from your local dealer.
©Elation Professional®
- 41 –
Focus Spot 250™
Focus Spot 250™
2-YEAR LIMITED WARRANTY
A.
Elation Professional® hereby warrants, to the original purchaser, Elation Professional®
products to be free of manufacturing defects in material and workmanship for a period of two
years, (730 days) from the date of purchase. This warranty shall be valid only if the product
is purchased within the United States of America, including possessions and territories. It is
the owner’s responsibility to establish the date and place of purchase by acceptable
evidence, at the time service is sought.
B.
For warranty service, send the product only to the Elation Professional® factory. All
shipping charges must be pre-paid. If the requested repairs or service (including parts
replacement) are within the terms of this warranty, Elation Professional® will pay return
shipping charges only to a designated point within the United States. If the entire instrument
is sent, it must be shipped in its original package. No accessories should be shipped with the
product. If any accessories are shipped with the product, Elation Professional® shall have
no liability whatsoever for loss of or damage to any such accessories, nor for the safe return
thereof.
C.
This warranty is void if the serial number has been altered or removed; if the product is
modified in any manner which Elation Professional® concludes, after inspection, affects the
reliability of the product; if the product has been repaired or serviced by anyone other than
the Elation Professional® factory unless prior written authorization was issued to purchaser
by Elation Professional®; if the product is damaged because not properly maintained as set
forth in the instruction manual.
D.
This is not a service contract, and this warranty does not include maintenance, cleaning
or periodic check-up. During the period specified above, Elation Professional® will replace
defective parts at its expense, and will absorb all expenses for warranty service and repair
labor by reason of defects in material or workmanship.
The sole responsibility of Elation
Professional® under this warranty shall be limited to the repair of the product, or
replacement thereof, including parts, at the sole discretion of Elation Professional®. All
©Elation Professional®
- 42 –
Focus Spot 250™
Focus Spot 250™
products covered by this warranty were manufactured after January 1, 1990, and bear
identifying marks to that effect.
E.
Elation Professional® reserves the right to make changes in design and/or
improvements upon its products without any obligation to include these changes in any
products theretofore manufactured.
F.
No warranty, whether expressed or implied, is given or made with respect to any
accessory supplied with products described above. Except to the extent prohibited by
applicable law, all implied warranties made by Elation Professional® in connection with this
product, including warranties of merchantability or fitness, are limited in duration to the
warranty period set forth above. And no warranties, whether expressed or implied, including
warranties of merchantability or fitness, shall apply to this product after said period has
expired. The consumer’s and or Dealer’s sole remedy shall be such repair or replacement as
is expressly provided above; and under no circumstances shall Elation Professional® be
liable for any loss or damage, direct or consequential, arising out of the use of, or inability to
use, this product.
G.
This warranty is the only written warranty applicable to Elation Professional® Products
and supersedes all prior warranties and written descriptions of warranty terms and
conditions heretofore published.
©Elation Professional®
- 43 –
Focus Spot 250™
Focus Spot 250™
TECHNICAL SPECIFICATIONS
Power supply :
□110VAC,50Hz;□120VAC, 50Hz;□220VAC,50Hz;□230VAC,50Hz;□240VAC, 50Hz;
□110VAC,60Hz;□120VAC,60Hz; □220VAC,60Hz;□230VAC,60Hz;□240VAC,60Hz;
Power consumption : max. □300W □400W:
Lamp :
□ CDMT-150 G12 socket, Metal Halide;
□ MSD250 GY9.5 socket, Metal Halide;
Motors : 7 micro motors
Packing dimensions : 58 x 42 x 46 cm
Net weight :
□13 KGS; □14 KGS; □16 KGS;
Gross weight: □16 KGS; □17 KGS; □19 KGS;
Remark : errors and omissions for every information given in this manual excepted. All
information is subject to change without prior notice.
©Elation Professional®
- 44 –
Focus Spot 250™
Rem ark:Th is eletr ic diag ram syuta ble for
AC 110V ~120 V pow er supp ly
Focus Spot 250™
©Elation Professional®
- 45 –
Focus Spot 250™
Rem ark:T his eletri c diag ram syut able for
AC 220V ~240 V pow er supp ly
Focus Spot 250™
©Elation Professional®
- 46 –
Focus Spot 250™
Focus Spot 250™
Elation Professional
4295 Charter Street
Los Angeles, CA. 90058
323-582-3322 / 323-582-3108 fax
www.ElationLighting.com /
[email protected]
©Elation Professional®
- 47 –
Focus Spot 250™