1
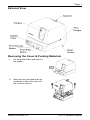
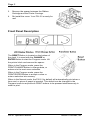
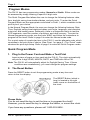
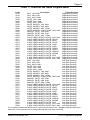
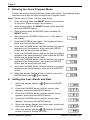
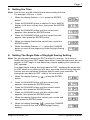
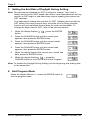
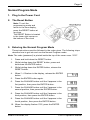
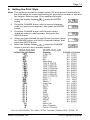
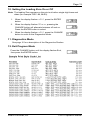
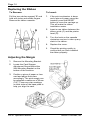
®
AMANO
PIX-21
Electronic Time Recorder
Operation Manual
Thank you…
for purchasing another fine product from
Amano Cincinnati, Inc.
Important
Note that the government standard for Daylight Saving Time (DST) is
subject to change. Your clock is factory-set for correct DST based upon
when it was manufactured, but any revision to DST begin or end dates
may require updating the system-set DST calendar.
If you live in Arizona, Hawaii, parts of Indiana, or any other area that
does not use DST, refer to this document’s DST settings instruction for
details regarding disabling the DST function.
Do not return this clock to the retailer. If you have any questions or need
assistance, please call us toll free at:
1-800-253-9836
Proprietary Notice
This document contains proprietary information and such information
may not be reproduced in whole or part without the written permission
from Amano Cincinnati, Inc. 140 Harrison Ave., Roseland, New Jersey
07068. Amano Cincinnati, Inc. reserves the right to make equipment
changes and improvements, which may not be reflected in this
document.
We recommend that this document be read in its entirety before any
attempt is made to operate the equipment.
Need Ribbons, Keys and Accessories?
Visit
www.amano.com
or
Call - (800)-253-9836
Page 1
External View
Removing the Cover & Packing Materials
1.
Lift the printer block and remove
the spacer.
2.
Insert the key provided and turn
clockwise to open the case. Lift
the cover to remove
Amano Cincinnati, Inc.
PIX-21 Operation Manual
Page 2
3.
Remove the spacer between the Ribbon
Cartridge and the Printer Carriage.
4.
Re-install the cover. Your PIX-21 is ready for
use!
Front Panel Description
The RESET Button is located on the bottom of
the clock. It is used with the CHANGE or
ENTER Button to start the Program mode. Lift
the printer block and remove the spacer.
When in the Program mode, press the
PRINT/CHANGE Button to change data, or
advance to the next menu selection.
When in the Program mode, press the
PRINT/ENTER Button to accept a value or
enter a selection into memory.
When in the Normal mode, the PIX-21 by default will automatically print when a
time card, or piece of paper is inserted. This default can be changed in the
Program mode to require both PRINT buttons to be pressed simultaneously in
order to print.
PIX-21 Operation Manual
Amano Cincinnati, Inc.
Page 3
Mounting the Clock
1.
Remove the mounting bracket from the clock by pushing forward on the top
tabs “A” and then pushing the tabs down “B” (See below).
2.
If you are using the Mobile
Mounting Unit gooseneck and
special mounting bracket (P/N
AJR-208800), mount the
gooseneck to the vehicle in
the desired location first.
Mount the special mounting
bracket to the gooseneck
using the three #M5 acorn
nuts and washers provided.
You may discard the original
PIX mounting bracket if you
wish.
3.
If you are not using the Mobile Mounting Unit, securely mount the PIX
mounting bracket on the wall using three #10 wood screws or equivalent.
4. Refer to the illustration below to plug the appropriate power cord into the
bottom rear of the clock.
If you are using the DC power cord, locate the rubber grommet on the power
cord and install the grommet into the notch in the housing. The power cord
will exit the clock through the opening on the bottom. Refer to page 15 for
more information about using the DC power cord.
Amano Cincinnati, Inc.
PIX-21 Operation Manual
Page 4
Program Modes
The PIX-21 has two programming modes, Normal and Quick. Either mode can
be accessed by simply entering a specific 4-digit code.
The Quick Program Mod allows the user to change the following features: date,
time, daylight saving time start/end dates, and print style. To enter the Quick
Program Mode use the appropriate code listed in Chart 1, which correlates to the
print style of your choice.
In the Normal Program Mode, the user can change the following features: Date,
Time, Daylight saving time begin/end dates, print style, language, print direction,
auto print, and leading zeros. Addionally, there is a diagnostic menu to test the
LCD segments, reset the number of punches, and clear memory. To enter the
Normal programming mode, use the code “8088” and follow the instructions to
program all the items. Refer to page 9 to enter the Normal mode code.
For a quick setup of a particular item in the PIX-21, use the alternate code, which
correlates to the print style of choice. (See Chart 1 on page 5.) The “Quick” mode
shortens the print style setup. Refer to page 6 to enter the Quick Program mode.
Quick Program Mode
1. Plug In the Power Cord and Make a Test Print
Insert a piece of paper or time card into the PIX-21. The clock automatically
will print a 4-digit YEAR, MONTH, DATE, and TIME with AM or PM.
Note: The PIX-21 will automatically adjust for Daylight Saving Time. If these
conditions are unsatisfactory, you must change the program settings.
2. The Reset Button
Press the RESET button to exit the programming mode at any time and
return to the time display.
The RESET Button (which is
long) is located in the right
lower corner on the bottom of
the clock.
Please Note:
You do not need the key to set the time or to program the clock!!
However, you do need the key to change the ribbon, or mount the clock.
If you have any questions, please call 1-800-253-9836.
PIX-21 Operation Manual
Amano Cincinnati, Inc.
Page 5
Chart 1 - Codes for the Quick Program Mode
Code
Print Style
Print Direction
6510
DAY, 12H, 60th
Right Side Printing
6210
DAY, 24H, 10th
Right Side Printing
6810
DAY, 24H, 100th
Right Side Printing
6520
DATE, 12H, 60th
Right Side Printing
6620
DATE, 24H, 60th
Right Side Printing
6820
DATE, 24H, 100th
Right Side Printing
6540
DATE, MONTH, 12H, 60th
Right Side Printing
6640
DATE, MONTH, 24H, 60th
Right Side Printing
6840
DATE, MONTH, 24H, 100th
Right Side Printing
6680
DATE, MONTH, 2-digit YEAR, 24H, 60th Right Side Printing
6530
MONTH, DATE, 12H, 60th
Right Side Printing
6630
MONTH, DATE, 24H, 60th
Right Side Printing
6830
MONTH, DATE, 24H, 100th
Right Side Printing
6570
2-digit YEAR, MONTH, DATE, 12H, 60th Right Side Printing
6071
2-digit YEAR, MONTH, DATE, RCV’D
Right Side Printing
6072
2-digit YEAR, MONTH, DATE, SENT
Right Side Printing
6073
2-digit YEAR, MONTH, DATE, FAX’D
Right Side Printing
6074
2-digit YEAR, MONTH, DATE, VOID
Right Side Printing
6075
2-digit YEAR, MONTH, DATE, PAID
Right Side Printing
6076
2-digit YEAR, MONTH, DATE, CFM’D
Right Side Printing
6077
2-digit YEAR, MONTH, DATE, APR’D
Right Side Printing
6078
2-digit YEAR, MONTH, DATE, CMPL’D
Right Side Printing
6079
2-digit YEAR, MONTH, DATE, ORIGN
Right Side Printing
6070
2-digit YEAR, MONTH, DATE, FILE
Right Side Printing
6910
4 digit YEAR, MONTH, DATE, 12H, 60th Right Side Printing
6920
4 digit YEAR, MONTH, DATE, 24H, 60th Right Side Printing
5510
DAY, 12H, 60th
Left Side Printing
5210
DAY, 24H, 10th
Left Side Printing
5810
DAY, 24H, 100th
Left Side Printing
5520
DATE, 12H, 60th
Left Side Printing
5620
DATE, 24H, 60th
Left Side Printing
5820
DATE, 24H, 100th
Left Side Printing
5540
DATE, MONTH, 12H, 60th
Left Side Printing
5640
DATE, MONTH, 24H, 60th
Left Side Printing
5840
DATE, MONTH, 24H, 100th
Left Side Printing
5680
DATE, MONTH, 2-digit YEAR, 24H, 60th Left Side Printing
5530
MONTH, DATE, 12H, 60th
Left Side Printing
5630
MONTH, DATE, 24H, 60th
Left Side Printing
5830
MONTH, DATE, 24H, 100th
Left Side Printing
5570
2-digit YEAR, MONTH, DATE, 12H, 60th Left Side Printing
5071
2-digit YEAR, MONTH, DATE, RCV’D
Left Side Printing
5072
2-digit YEAR, MONTH, DATE, SENT
Left Side Printing
5073
2-digit YEAR, MONTH, DATE, FAX’D
Left Side Printing
5074
2-digit YEAR, MONTH, DATE, VOID
Left Side Printing
5075
2-digit YEAR, MONTH, DATE, PAID
Left Side Printing
5076
2-digit YEAR, MONTH, DATE, CFM’D
Left Side Printing
5077
2-digit YEAR, MONTH, DATE, APR’D
Left Side Printing
5078
2-digit YEAR, MONTH, DATE, CMPL’D
Left Side Printing
5079
2-digit YEAR, MONTH, DATE, ORIGN
Left Side Printing
5070
2-digit YEAR, MONTH, DATE, FILE
Left Side Printing
5910
4 digit YEAR, MONTH, DATE, 12H, 60th Left Side Printing
5920
4 digit YEAR, MONTH, DATE, 24H, 60th Left Side Printing
If you cannot locate the desired print style from the above list, change to the Normal mode
and refer to the instructions for programming the print style manually.
Amano Cincinnati, Inc.
PIX-21 Operation Manual
Page 6
3. Entering the Quick Program Mode
These instructions must be followed in the order given. The following steps
describe how to get into and use the Quick Program mode.
Note: Please refer to Chart 1 for the code listing.
1.
Press and hold down the RESET button on the bottom
of the clock. (Refer to page 3 for location.)
2.
While holding down the RESET button, press and hold
down the ENTER button.
While holding down the ENTER button, release the
RESET button.
3.
4.
Next release the ENTER button, and Pro9 will flash in
the display,
5.
Press the ENTER button again. The display will show
0000, and the first digit will flash.
6. Press the CHANGE button until the number you desire
appears in the first position, then press the ENTER
button and the second digit will flash.
7. Press the CHANGE button until the number you desire
appears in the second position, then press the ENTER
button and the third digit will flash.
8. Press the CHANGE button until the number you desire
appears in the third position, then press the ENTER
button and the fourth digit will flash.
9. Press the CHANGE button until the number you desire
appears in the fourth position, then press the ENTER
button.
10. When the display flashes all four numbers, press the
ENTER button and
will display.
4. Setting the Year, Month and Date
1.
When the display flashes
button.
2.
Press the CHANGE button until the correct year
appears, then press the ENTER button.
3.
Press the CHANGE button until the correct month
appears, then press the ENTER button.
4.
Press the CHANGE button until the correct date
appears, then press the ENTER button
5.
When the display flashes the correct year, month and
date, press the ENTER button.
6.
When the display flashes
, press the CHANGE
button to move to Setting the Time.
PIX-21 Operation Manual
, press the ENTER
Amano Cincinnati, Inc.
Page 7
5. Setting the Time
Note: Use 24 hour and 60 minute format when setting the time.
For example: 2:00 pm = 14:00.
1.
When the display flashes P2 Clock, press the ENTER
button.
2.
Press the CHANGE button to choose 12 hour AM/PM
display or 24 hour military time, then press the ENTER
button.
3.
Press the CHANGE button until the correct hour
appears, then press the ENTER button.
4.
Press the CHANGE button until the correct minutes
appear, then press the ENTER button.
5.
When the display flashes the correct time, press the
ENTER button.
6.
When the display flashes P2 CLoc, press the CHANGE
button to move to the beginning of the Daylight Saving
Setting.
6. Setting The Begin Date of Daylight Saving Setting
Note: The government standard for DST is subject to change. Your clock is
factory-set for correct DST based upon when it was manufactured, but any
revision to DST begin or end dates may require updating the system-set
DST calendar.
The steps below change the begin date for DST. Updating the begin date
for DST needs to be done just one time, since the clock’s rolling calendar
function will auto-calculate the begin date for each year thereafter. To
change the end date for DST, refer to the next section.
1.
When the display flashes
button
2.
Press the CHANGE button until the correct year
appears, then press the ENTER button
3.
Press the CHANGE button until the correct month
appears, then press the ENTER button.
4.
Press the CHANGE button until the correct date
appears, then press the ENTER button.
5.
When the display flashes the correct year, month and
date, press the ENTER button
6.
When the display flashes
, press the CHANGE
button to move to the end of the Daylight Saving
Setting.
Amano Cincinnati, Inc.
, press the ENTER
PIX-21 Operation Manual
Page 8
7. Setting the End Date of Daylight Saving Setting
Note: The government standard for DST is subject to change. Your clock is
factory set for correct DST based upon when it was manufactured, but any
revision to DST begin or end dates may require updating the system-set
DST calendar.
The steps below change the end date for DST. Updating the end date for
DST needs to be done just one time, since the clock’s rolling calendar
function will auto-calculate the end date for each year thereafter. To
change the begin date for DST, refer to the previous section.
, press the ENTER
1.
When the display flashes
button.
2.
Press the CHANGE button until the correct year
appears, then press the ENTER button.
3.
Press the CHANGE button until the correct month
appears, then press the ENTER button.
4.
Press the CHANGE button until the correct date
appears, then press the ENTER button.
5.
When the display flashes the correct year, month and
date, press the ENTER button.
6.
, press the
When the display flashes
CHANGE button to move to the end of the Program
Note: To disable the Daylight Saving Setting, set the beginning and ending date
to the same date.
8. Exit Program Mode
When the display flashes End, press the ENTER button to
exit the program mode.
PIX-21 Operation Manual
Amano Cincinnati, Inc.
Page 9
Normal Program Mode
1. Plug In the Power Cord
2. The Reset Button
Note: To exit the
programming mode and
return to the time display,
press the RESET button at
any time.
The RESET Button is located
in the lower right corner on
the bottom of the clock
3. Entering the Normal Program Mode
These instructions must be followed in the order given. The following steps
describe how to get into and use the Normal Program mode.
Note: The code (password) is printed inside the top of the cover case: “8088”.
1.
Press and hold down the RESET button.
2.
While holding down the RESET button, press and
hold down the ENTER button.
3.
While holding down the ENTER button, release the
RESET button.
4.
When Pro9 flashes in the display, release the ENTER
button
5.
Press the ENTER button again.
6.
Press the CHANGE button until the 8 appears in the
first position, then press the ENTER button.
7.
Press the CHANGE button until the 0 appears in the
second position, then press the ENTER button.
8.
Press the CHANGE button until the 8 appears in the
third position, then press the ENTER button.
9.
Press the CHANGE button until the 8 appears in the
fourth position, then press the ENTER button.
10. When the display flashes 8088, press the ENTER
button.
Amano Cincinnati, Inc.
PIX-21 Operation Manual
Page 10
4. Setting the Year, Month and Date
1. When the display flashes
, press the ENTER
button.
2.
Press the CHANGE button until the correct year
appears, then press the ENTER button.
3.
Press the CHANGE button until the correct month
appears, then press the ENTER button.
4.
Press the CHANGE button until the correct date
appears, then press the ENTER button.
5.
When the display flashes the correct year, month and
date, press the ENTER button.
6.
When the display flashes
, press the CHANGE
button to move to Setting the Time.
5. Setting the Time
Note: Use 24 hour and regular 60 minute format when setting the time.
For example: 2:00 PM = 14:00.
1. When the display flashes P2 CLoc, press the ENTER
button.
2.
Press the CHANGE button to choose 12 hour AM/PM
display or 24 hour military time, then press the ENTER
button.
3.
Press the CHANGE button until the correct hour
appears, then press the ENTER button.
4.
Press the CHANGE button until the correct minutes
appear, then press the ENTER button.
5.
When the display flashes the correct time, press the
ENTER button.
6.
When the display flashes P2 CLoc, press the CHANGE
button to move to the beginning of the Daylight Saving
Setting.
PIX-21 Operation Manual
Amano Cincinnati, Inc.
Page 11
6. Setting the Print Style
Note: The maximum printed line length equals 152 dots across. Please refer to
the chart below for codes representing the print styles, number of dots and
line lengths. Refer to page 13 for sample print styles.
, press the ENTER
1.
When the display flashes
button.
2.
Press the CHANGE button until the correct character
code you want to print appears, then press the ENTER
button.
3.
Press the CHANGE button until the next correct
character code you want appears, then press the
ENTER button.
4.
When you have entered the print format you want, press
the CHANGE button until the En character flashes, then
press the ENTER button.
5.
When the display flashes
, press the CHANGE
button to move to the Language Setting.
Amano Cincinnati, Inc.
PIX-21 Operation Manual
Page 12
7. Setting the Language
1. When the display flashes P6 LAn9, press the ENTER
button
2.
Press the CHANGE button until the correct language
appears, then press the ENTER button. Please refer
to the Language Table for selections.
3.
When the display flashes P6 LAn9, press the CHANGE
button to move to the Print Direction.
Language Table
Language
English
Spanish
French
German
Italian
Portuguese
Roman
Japanese
Common
Code
8. Setting the Print Direction
1. When the display flashes P7 Prdr, press the ENTER
2.
3.
button.
Press the CHANGE button until the correct direction
appears, then press the ENTER button.
When the display flashes P7 Prdr, press the
CHANGE button to move to the Auto Print Setting
9. Setting the Auto Print
1. When the display flashes
2.
, press the ENTER
button.
Press the CHANGE button until the correct printing
mode appears, then press the ENTER button.
onP (Auto Print) allows you to print automatically by activating the paper detect
switch.
OFF (Manual Print) allows you to print whenever the PRINT buttons are pushed.
on P:5 (Precision Print) requires you to activate the paper detect switch while
pressing the PRINT buttons.
3.
, press the
When the display flashes
CHANGE button to move to the Leading Zero
Setting.
PIX-21 Operation Manual
Amano Cincinnati, Inc.
Page 13
10. Setting the Leading Zero On or Off
Note: The leading Zero appears on the print out before single digit times and
dates (for example: DEC. 06, 08:00).
1.
When the display flashes P9 2ErO, press the ENTER
button.
2.
When the display flashes OFF or on, pressing the
CHANGE button will alternate between off and on.
Press the ENTER button to select.
3.
When the display flashes P9 2ErO, press the CHANGE
button to move to the Diagnostics Mode.
11. Diagnostics Mode
See page 15 for a description of the Diagnostics Routine.
12. Exit Program Mode
Press the CHANGE button until the display flashes End,
then press the ENTER button.
Amano Cincinnati, Inc.
PIX-21 Operation Manual
Page 14
Replacing the Ribbon
To Remove:
To Insert:
Pull the two catches upward “B” and
hold with index and middle fingers.
Remove the ribbon cassette.
1. If the print mechanism is down
and a piece of paper cannot be
inserted, press the RESET
button to move the carriage up.
This will make the ribbon
installation easier.
2. Insert a new ribbon between the
ribbon guide (C) and the printer
head (D).
3. Turn the knob on the cassette
clockwise one turn to take up any
slack in the ribbon.
4. Replace the cover.
5.
Check the printing quality to
confirm that you have installed
the ribbon properly.
Adjusting the Margin
1. Remove the Mounting Bracket.
2. Locate the Card Stopper
Adjustment Screw behind the
Wall Mounting Bracket on the
bottom of the machine.
3. Position a piece of paper or time
card and adjust the screw
accordingly. The print margin can
be adjusted a maximum of 22mm
(7/8”). There are ruler markings
on both sides of the base plate to
help you align the card.
PIX-21 Operation Manual
Amano Cincinnati, Inc.
Page 15
Using the DC Power Cord
1.
The DC version of the PIX-21 is meant to be used only in motor vehicles
with a 12-volt negative ground electrical system
2.
Power to the cigarette lighter should be present with the ignition key in the
“Off” position. If this is not known, it can easily be determined by plugging in
the PIX-21 power cord and observing the LED in the cigarette lighter plug. If
power is not present, the internal lithium battery will be prematurely
depleted.
3.
If the vehicle will not be used for more than one week, we recommend that
the PIX-21 be removed from the vehicle and powered using the optional AC
adapter. Use with the AC adapter will prevent premature depletion of the
internal lithium battery. The lithium battery maintains the PIX-21 memory
only for brief periods, such as a power failure or during relocation of the unit.
Using the Diagnostic Routine
The diagnostic routine checks the LCD segments, the number of prints,
and clears the memory (Print Style, Language, Leading Zero Suppress,
Right/Left Print, and Daylight Saving Time features).
Note: clearing the memory will restore the factory default settings for date, time,
print style, DST begin and end dates, and etc.
1. When the display flashes P 0 d l A 9, press the ENTER
button.
2.
When the display flashes d l L C d (LCD segments check),
press the ENTER button.
3.
When all of the LCD segments are turned on, press the
ENTER button to advance to the next step.
4.
When the display flashes d 2 n P r (total number of
prints), press the ENTER button.
5.
The number of prints counted will be displayed. Press
the ENTER, then CHANGE button to advance to the
next step.
6.
When the display flashes
press the ENTER button.
7.
To clear the memory and reset the defaults, press the
CHANGE button until the number 3 appears, then
press the ENTER button. Press the CHANGE button
until the number 2 appears, then press the ENTER
button.
8.
When the display flashes 3 2, press the ENTER button.
9.
Press the CHANGE button until the display flashes
E n d, then press ENTER.
Amano Cincinnati, Inc.
(memory clear),
PIX-21 Operation Manual
Page 16
Error Messages
Possible Error Messages
Display
Error
Home sensor, motor carriage
stuck
Timing sensor, carriage stuck
Home sensor
Carriage stuck
General Print Error
Daylight saving time program
For error messages E1 through E4, turn off the power before checking to see
that the carriage is not stuck or jammed. Also, check to see that the ribbon
cables are in good condition. After clearing any jams, restore the power and
press the RESET button.
The
error message signifies that an attempt was made to get into the
Program mode during the daylight saving changeover one-hour lockout. Wait one
hour and you will be able to program the clock.
Resetting the Clock After Extended Loss of Power
If there has been a power interruption of duration sufficient to drain the internal
lithium battery, the date setting, the clock setting and the Daylight Saving Time
setting will each need to be reset.
Maintenance
To keep your PIX-21 operating smoothly, periodically clean the printer shafts with
alcohol and a cotton swab. Clean the outside of the PIX-21 using a soft cloth, if
necessary.
Specifications
Power Requirements:
Ambient Temperature:
Ambient Humidity:
Dimensions:
Weight:
Environment:
For PIX-21 Input: AC16.5V, 60Hz, 0.6A (Max.)
For AC Adapter:
AC120V ± 10%, 60Hz
AC230V ± 10%, 50Hz
AC240V ± 10%, 50Hz
-10°C~45°C (14°F~113°F)
10%~90% (no condensation)
140 mm (5-1/2”) W X 150 mm (6”) H X 165 mm (51/2”) D
1.8kg (4.2 lbs.)
Indoor use only; dust-free environment
Keep out of direct sunlight
For PIX-21 with 120V AC Adapter:
Listed and Certified by Underwriters Laboratories, Inc.
E50230
PIX-21 Operation Manual
Amano Cincinnati, Inc.
AJR-209003 • Copyright © 2007 • Printed in U.S.A. • 8/07/00