1
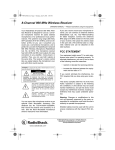
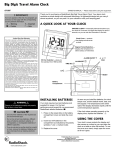
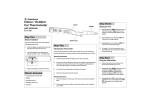
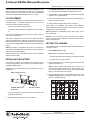
8-Channel 900 MHz Wireless Microphone
OWNER’S MANUAL — Please read before using this equipment.
Your RadioShack 8-Channel 900 MHz Wireless Microphone is designed for use as a public address microphone or for professional
music performances, and is perfect for use with the RadioShack
8-Channel 900 MHz Wireless Receiver (Cat. No. 32-1250).
FCC STATEMENT
Your equipment might cause TV or radio interference even when it is
operating properly. To eliminate interference, you can try one or
more of the following corrective measures:
• reorient or relocate the receiving antenna
• increase the distance between the equipment and the radio or
TV
If you cannot eliminate the interference, the FCC requires that you
stop using your microphone.
This device complies with Part 15 of the FCC Rules. Operation is
subject to the following two conditions: (1) this device may not cause
harmful interference, and (2) this device must accept any interference received, including interference that may cause undesired operation.
Warning: Changes or modifications to this unit not expressly approved by the party responsible for compliance could void the user’s
authority to operate the equipment.
3. Set CHANNEL SELECTOR to the desired channel while the battery compartment is accessible (see “Setting the Channel”).
4. Snap the battery in the compartment as indicated by the polarity
symbols (+ and –) marked inside.
5. Insert the compartment cover’s tabs into the recesses first, then
set the cover back into place.
6. Gently screw the ball grille back onto the microphone.
When power is on, LOW BATT lights. When the sound becomes
weak or distorted, LOW BATT flashes, or the microphone stops operating properly, replace the battery.
Warning: Dispose of old batteries promptly and properly. Do not
burn or bury them.
Caution: If you do not plan to use the microphone for a week or
longer, remove the battery. Batteries can leak chemicals that can
destroy electronic parts.
SETTING THE CHANNEL
Your wireless microphone has eight channels. Follow these steps to
the set the channel.
1. Slide STANDBY ON/OFF to OFF.
Shielded cables must be used with the unit to ensure compliance
with the Class FCC limit.
Notes: Both the microphone and the receiver:
INSTALLING THE BATTERY
• should be set to the same channel
Your microphone requires one 9V battery (not supplied) for power.
For the best performance and longest life, we recommend using a
RadioShack alkaline battery.
Caution: Use only a fresh battery of the required size and recommended type.
Battery Compartment Cover
• should be powered off before setting or changing the channel
2. Hold the microphone in one hand and gently unscrew the ball
grille with the other hand.
Caution: Static electricity can damage your microphone. To
avoid possible damage, discharge any static electricity from
your body by touching a faucet or other grounded metal object
before you set the microphone’s channel.
3. Use a pointed-object (such as a straightened paperclip) to set
CHANNEL SELECTOR (dip switches) according to the chart
below for the desired channel.
CHANNEL SELECTOR
Dip Switches
Ball Grille Assembly
1. Hold the microphone in one hand and gently unscrew the ball
grille with the other hand.
2. Grasp the battery compartment cover and lift it off.
© 2001 RadioShack Corporation.
All Rights Reserved.
RadioShack and RadioShack.com are trademarks used by RadioShack Corporation.
4. Insert the compartment cover’s tabs into the recesses first, then
set the cover back into place.
5. Gently screw the ball grille back onto the microphone.
Modifying or tampering with the microphone’s internal components
can cause a malfunction and might invalidate its warranty and void
your FCC authorization to operate it. If your microphone is not performing as it should, take it to your local RadioShack store for assistance.
USING THE MICROPHONE
1. Follow the directions in the receiver’s owner’s manual to set up
and power on the receiver.
SPECIFICATIONS
Sensitivity at ±33 KHz deviation ................................................... 103 dB spl
2. Turn on your amplifier, tape recorder, mixing board, and other
necessary components of you audio system. Set the components’ volume control (or input level controls) to moderate settings.
Total Harmonic Distortion ......................................................................... 2%
3. Set the receiver and microphone’s channels to the same settings (see “Setting the Channel”).
Power Requirements (DC) ............................ 1 DC 9V Battery (not supplied)
4. Slide STANDBY ON/OFF on the microphone to ON. (When power
is on and the battery is good, LOW BATT lights.)
Channel
Frequency
A
910.0 MHz
B ........................................................................................... 910.5 MHz
C ........................................................................................... 911.5 MHz
D ........................................................................................... 913.5 MHz
E ........................................................................................... 918.0 MHz
F ........................................................................................... 918.5 MHz
G ........................................................................................... 919.5 MHz
H ........................................................................................... 921.5 MHz
5. Set TALK/MUTE to TALK. Begin to talk into the microphone and
adjust the receiver’s volume control as desired.
Note: Experiment with the receiver’s volume and the settings of
other components in your audio system to obtain the best
results.
6. When you finish, slide STANDBY ON/OFF to OFF.
RF Output Power at 50 Ohms ............................................................. 3 dBm
Harmonic and Spurious Radiation Suppression ................................... 40 dB
Minimum Operation Voltage ................................................................. =< 5V
Operating Frequencies
Dimensions ............................................................................. 23/16 × 101/4 in
(55 × 260 mm)
Weight (without battery) ........................................................................ 12 oz
(340 g)
USING MUTE
Slide TALK/MUTE to MUTE to temporarily turn off the microphone’s
sound without turning off its power.
Specifications are typical; individual units might vary. Specifications are subject to change and improvement without notice.
If you turn off the microphone (slide STANDBY ON/OFF from ON to
OFF) while the amplifier is on, the speakers emit a loud pop. When
you use MUTE, there is no pop.
CARE
Keep the microphone dry; if it gets wet, wipe it dry immediately. Use
and store the microphone only in normal temperature environments.
Handle the microphone carefully; do not drop it. Keep the microphone away from dust and dirt, and wipe it with a damp cloth occasionally to keep it looking new.
Limited One-Year Warranty
This product is warranted by RadioShack against manufacturing defects in material and workmanship under normal use for one (1) year from the date of purchase from RadioShack company-owned stores and authorized RadioShack franchisees and dealers. EXCEPT AS PROVIDED HEREIN, RadioShack MAKES NO EXPRESS WARRANTIES AND ANY IMPLIED WARRANTIES, INCLUDING THOSE OF MERCHANTABILITY AND FITNESS FOR A PARTICULAR PURPOSE, ARE LIMITED IN DURATION TO
THE DURATION OF THE WRITTEN LIMITED WARRANTIES CONTAINED HEREIN. EXCEPT AS PROVIDED HEREIN, RadioShack SHALL HAVE NO LIABILITY OR RESPONSIBILITY TO CUSTOMER OR ANY OTHER PERSON OR ENTITY WITH RESPECT TO ANY LIABILITY, LOSS OR DAMAGE CAUSED DIRECTLY OR INDIRECTLY
BY USE OR PERFORMANCE OF THE PRODUCT OR ARISING OUT OF ANY BREACH OF THIS WARRANTY, INCLUDING, BUT NOT LIMITED TO, ANY DAMAGES RESULTING FROM INCONVENIENCE, LOSS OF TIME, DATA, PROPERTY, REVENUE, OR PROFIT OR ANY INDIRECT, SPECIAL, INCIDENTAL, OR CONSEQUENTIAL
DAMAGES, EVEN IF RadioShack HAS BEEN ADVISED OF THE POSSIBILITY OF SUCH DAMAGES.
Some states do not allow limitations on how long an implied warranty lasts or the exclusion or limitation of incidental or consequential damages, so the above limitations or
exclusions may not apply to you.
In the event of a product defect during the warranty period, take the product and the RadioShack sales receipt as proof of purchase date to any RadioShack store. RadioShack will, at its option, unless otherwise provided by law: (a) correct the defect by product repair without charge for parts and labor; (b) replace the product with one of the
same or similar design; or (c) refund the purchase price. All replaced parts and products, and products on which a refund is made, become the property of RadioShack. New
or reconditioned parts and products may be used in the performance of warranty service. Repaired or replaced parts and products are warranted for the remainder of the
original warranty period. You will be charged for repair or replacement of the product made after the expiration of the warranty period.
This warranty does not cover: (a) damage or failure caused by or attributable to acts of God, abuse, accident, misuse, improper or abnormal usage, failure to follow instructions, improper installation or maintenance, alteration, lightning or other incidence of excess voltage or current; (b) any repairs other than those provided by a RadioShack
Authorized Service Facility; (c) consumables such as fuses or batteries; (d) cosmetic damage; (e) transportation, shipping or insurance costs; or (f) costs of product removal,
installation, set-up service adjustment or reinstallation.
This warranty gives you specific legal rights, and you may also have other rights which vary from state to state.
RadioShack Customer Relations, 200 Taylor Street, 6th Floor, Fort Worth, TX 76102
We Service What We Sell
RadioShack Corporation
Fort Worth, Texas 76102
12/99
32-1251
AO0033ABA1
07A01