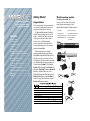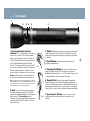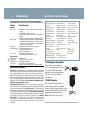
1
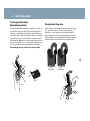
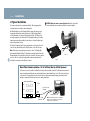
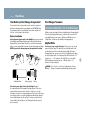
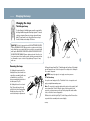
(NiCad)
Systéme Rechargeable
(NiCad)
Sistema Recargable (NiCad)
Owner’s Manual • Guide d’Utilisation • Manual del Propietario
Rechargeable System
For Your Safety Please Read
WARNING:
Always read and understand all of the warnings and safety instructions contained in this
manual before attempting to use the Mag-Lite® Rechargeable Flashlight System™ to help
avoid potential hazards that could result in bodily injury or property damage.
Always keep this manual conveniently available for future reference, as it contains important
information that will help effect the safe operation and maintenance of this instrument.
Any battery may leak harmful chemicals which may damage skin, clothing, or the inside of the
flashlight. TO AVOID RISK OF INJURY, DO NOT LET ANY MATERIAL LEAKED FROM A
BATTERY COME IN CONTACT WITH EYES OR SKIN. Any battery may rupture or explode if put
in a fire or otherwise exposed to excessive heat. TO AVOID RISK OF INJURY, DO NOT EXPOSE
BATTERIES TO EXCESSIVE HEAT. To reduce the risk of personal injury or harm to your
flashlight, take the following precautions:
.
• Do not use non-rechargeable batteries in your Mag-Lite® Rechargeable Flashlight System™
• Use only a MAG® rechargeable battery pack (Model No. ARXX075) with this flashlight.
• Always install the battery pack with the positive (+) end facing the head end of the
flashlight and the negative (-) end facing the tailcap end of the flashlight .
• When storing your flashlight for long periods of time, remove the battery pack and store
it separately.
• Carefully follow the steps listed under “Inspection and Maintenance” in this manual.
• This product is not recommended for use by children.
The safety instructions have been classified according to the seriousness of the risk,
as follows:
DANGER:
“Danger” indicates the existence of a hazard that could result in death or catastrophic bodily
injury, if the safety instruction is not observed.
WARNING:
“Warning” indicates the existence of a hazard that could result in serious bodily injury, if the
safety instruction is not observed.
CAUTION:
“Caution” indicates the existence of a hazard that could result in minor bodily injury or
property damage, if the safety instruction is not observed.
NOTICE:
“Notice” contains general information that relates to the safe operation of the flashlight
system.
PROTECTION OF CHILDREN
• Never allow children to play with your flashlight, as they might hurt themselves or others.
• Always keep all accessories and components out of the reach of small children. Small parts,
in particular, might present a choking hazard to children.
• Do not allow children to handle or operate this flashlight.
BATTERY DISPOSAL
• Never discard a used battery pack with ordinary solid wastes, since it
contains toxic substances.
• Always dispose of a used battery pack in accordance with prevailing
community regulations relating to the disposal of household toxic wastes.
• Always cover the metal terminals with insulating tape first, to prevent accidental
short-circuiting whenever transporting outside of flashlight.
• The sealed battery stick contains nickel-cadmium and must be recycled or disposed of
properly. Contact your local county solid waste authority for proper recycling or disposal
information.
• Mag Instrument, Inc. is a proud participant in the RBRC (Rechargeable Battery Recycling
Corporation). By recycling NiCad rechargeable batteries, you are helping to keep NiCad
batteries out of the solid waste stream. When you throw away a NiCad battery, it eventually
ends up in a landfill or municipal incinerator. By recycling your used NiCad batteries through
Mag Instrument’s Battery Recycling Program, you are helping to create a cleaner and safer
environment for generations to come. For more information about the RBRC visit
www.rbrc.com
DANGER:
• To prevent serious damage to eyesight, never look into flashlight when light is on. Do not
shine light into the face of someone else.
• Never attempt to disassemble or repair the AC adapter or charging cradle as exposure to
electric shock hazards may result. Always contact a Mag Authorized Warranty Service
Center, if repair or replacement is required.
• Never alter the AC cord or plug on your AC adapter or charging cradle. If the plug will not fit
into the available outlet, have a proper outlet installed by a qualified electrician. Improper
connection can result in the risk of electric shock.
WARNING:
• Never attempt to disassemble the flashlight or any of its components and or accessories.
If service or repair is required, return the unit to a Mag Authorized Warranty Service Center.
• Always use genuine Mag-Lite® replacement parts and accessories when operating this
flashlight system, as the use of incompatible auxiliary equipment could result in fire, electric
shock or other bodily injury. Never connect this flashlight to any unauthorized or incompatible
auxiliary product that has not been expressly approved by Mag Instrument, Inc. The use of
unauthorized accessories will also void your warranty.
• Never store or transport flammable liquids, gases or explosive materials in the same
compartment as the flashlight or any of its accessories, as possible sparking in the equipment
could ignite a fire or explosion.
• Always secure this flashlight in its charging cradle, when it is not in use. Never place
the flashlight on the passenger seat or anyplace else in the car where it can become a
projectile during a collision or sudden stop.
• Never short-circuit a battery pack by either accidentally or intentionally bringing the
terminals in contact with another metal object. That could result in burns, other bodily injury
or a fire, and could also damage the battery pack.
• Never expose the terminals of the battery pack to any other metal object. Always wrap
it or place it in a plastic bag, whenever transporting it.
• Never heat and never attempt to disassemble the battery pack, as that could cause leakage
of the caustic electrolyte. If the battery is accidentally broken, avoid skin contact with the
contents. In the event of skin contact, wash the affected area immediately and obtain prompt
medical attention.
• Never attempt to dispose of a battery pack by throwing it into a fire. That can cause the
battery pack to explode.
• In order to avoid any risk of bodily injury or property damage never attempt to use an
unauthorized battery pack with your flashlight.
• Never allow any liquids or water to spill on the AC adapter or charging cradle. There is a risk
of fire or electric shock.
• Always use the authorized Mag-Lite® AC adapter and charging cradle to avoid any risk of
fire or damage to your flashlight or battery. Bodily injury or property damage may occur as a
result of the use of an unauthorized and incompatible AC adapter or charger.
• Never use an AC adapter or charging cradle if it has a damaged or worn power cord or plug.
The use of damaged or worn power cords or plugs could result in electric shock, burns or fire.
Contact a Mag authorized warranty service center immediately to obtain a suitable
replacement.
• Do not attempt to charge this flashlight if cords, adapters, battery, bulb or any part of the
flashlight or charger is damaged or corroded.
• Always unplug the AC adapter or charging cradle from the power source before attempting
any cleaning in order to avoid the risk of electric shock.
CAUTION:
• Always confirm that the power cord is located so that it will not be stepped on, tripped over,
or otherwise subjected to damage or stress.
• Never place heavy objects on a power cord, as this could result in damage to the cord.
• Never bend or twist a power cord, and never pull on a power cord in a attempt to remove an
AC adapter or accessory plug from a socket. Always grasp the AC adapter or the accessory
plug directly when unplugging the device in order to avoid damaging the cord.
• Always disconnect the AC adapter or charging cradle from the power source when it is not
in use.
NOTICE:
• Do not use this product for other than its intended use.
• Do not use an outdoor AC outlet to recharge battery.
• Never expose this flashlight system to high temperatures, such as those found near a heater
or in a closed car parked in the sun. This can cause heat-damage to the plastic parts, the
electronic components and the battery.
• Dropping this flashlight or subjecting it to violent impact or shock can cause mechanical
damage.
• Do not charge or operate in close proximity of combustible or flammable materials.
• Do not charge battery in gas tight enclosures.
• Never store this flashlight in cold areas. When the flashlight warms up (to its normal
operating temperature), moisture can form inside the flashlight, which may damage the
flashlight’s electronic components.
• Never paint this flashlight. This can clog the moving parts.
• System 1, 3, and 6: The AC Adapter requires the use of a standard 120 V AC power source
for its operation. Or, 12 V DC with the optional Cigarette Lighter Adapter
• System 4, and 5: The AC Adapter requires the use of a standard 230 V AC power source for
its operation. Or, 12 V DC with the optional Cigarette Lighter Adapter
• Discontinue use immediately should you notice any changes in the battery, such as
discoloration or malformation
• Recharge the Battery at room temperatures: 68˚ƒ to 86°ƒ (20°c to 30°c) to prevent hazardous
gas venting from the battery cells and potentially reduced battery capacity
• After extended and /or high temperature storage, all NiCad batteries may only accept a
partial charge even with full recharging time. The capacity returns to normal after I to 3
charge/discharge cycles.
www.maglite.com
Getting Started
What this package contains:
(see chart for your system, 1-7)
Rechargeable System (NiCad)
Systéme Rechargeable (NiCad)
Sistema Recargable (NiCad)
Contents
Getting Started. . . . . . . . . . . . . . . . . . . . 4
The Flashlight. . . . . . . . . . . . . . . . . . . . . 5
The Charging Cradle . . . . . . . . . . . . . . . . 6
Installation. . . . . . . . . . . . . . . . . . . . . . . . 8
The Battery . . . . . . . . . . . . . . . . . . . . . . . 9
Operation - Getting the Most out of
Your Mag-Lite® Rechargeable Flashlight
System™. . . . . . . . . . . . . . . . . . . . . . . . . . 10
Frequently Asked Questions . . . . . . . . 10
Changing the Lamp . . . . . . . . . . . . . . . . . 11
Troubleshooting, Specifications . . . . . 12
Warranty . . . . . . . . . . . . . . . . . . . . . . . . 13
Inspection and Maintenance. . . . . . . . . 13
Other Mag Products and Accessories 38
Français . . . . . . . . . . . . . . . . . . . 14
Español . . . . . . . . . . . . . . . . . . . 26
Congratulations
You have just made a life-long investment in
one of the most highly-advanced precision
instruments in illumination technology.
The Mag-Lite® Rechargeable Flashlight
System™ was formulated on precision and
quality — derived from ”Mag’s“ many years
of experience in the precise world of fine
machine tools, our flashlights quickly
became recognized for form and function
and most importantly, to you the consumer,
quality and dependability.
Taking a few moments to read this
manual and familiarizing yourself with the
Mag-Lite® Rechargeable Flashlight System™
will help to insure years of superior service
and satisfaction. To help acquaint yourself with
your new flashlight this manual is composed
of eight sections: Section 1) The Flashlight,
Section 2) The Charging Cradle, Section 3)
Installation, Section 4) The Battery, Section 5)
Operation - Getting the Most out of Your
Mag-Lite® Rechargeable Flashlight System™ ,
Section 6) Changing the Lamp, Section 7)
Trouble shooting, Specifications, Accessories
Section 8) Warranty Information.
Great care has been taken in the design,
manufacturing and packaging of your
Mag-Lite® Rechargeable Flashlight System™.
1. Flashlight
5. 120 Volt Converter (US)
2. Charging Cradle
6. 12 Volt Adapter (Automobile)
3. Rechargeable Battery (NiCad)
7. 230 Volt Converter (Euro)
4. Mounting Brackets (x2)
8. 12 Volt Straight Wire
(Automobile)
1
3
2
5
4
6
7
1
Rechargeable Flashlight
2
Charging Cradle
3
Rechargeable Battery (NiCad)
4
Mounting Brackets (x2)
5
120 Volt Converter (US)
6
12 Volt Adapter (Automobile)
7
230 Volt Converter (Euro)
8
12 Volt Straight Wire (Automobile)
8
Section 1
The Flashlight
1
2
3
4
6
5
1. Face Cap Assembly (lens and
reflector) The Face Cap Assembly is removable for
replacement of lamp only. The reflector assembly is
factory sealed and should not be removed from face
cap (Fig. 1). Lens: The high-efficiency tempered glass
lens on the Mag-Lite® Rechargeable Flashlight
System™ is an integral part of the optical system. It is
precision cut, ground and tempered for its application.
Besides its high transmittance of light, the lens has
greater resistance to temperature, acids and solvents.
Reflector: Highly-polished, scientifically-designed,
metallic reflector withstands extreme temperatures.
3. Switch A Mag Instrument advanced concept that is patented and
already considered one of the best in its field. The switch is a sealed,
rotating, self-cleaning unit and its button is designed to be cleanly flush
to the barrel.
4. Serial Number Permanently stamped serial number for
registration and identification.
Fig. 1
5. Charging Ring Module This unique circular ring concept
allows for a positive contact of 360°. No matter how you place the
flashlight in the Charging Cradle … it’s on. This module is factory sealed;
no attempt should be made to disassemble this module.
6. Durable Finish The barrel, head assembly, Charging Ring
Module and tail cap are of Hard Type III anodized aircraft aluminum
inside and out. With minimum care, your flashlight will maintain its rich
black appearance indefinitely. (Direct constant exposure to sunlight will
fade any color.) The barrel features the ultimate in diamond knurl design.
Note: The heat tempered lens can suffer breakage if misused. 1. DO NOT
USE AS AN IMPACT TOOL! 2. Do not operate flashlight with the face cap off
and the lamp on and exposed. Personal injury or damage to heat sensitive
materials may result, e.g. plastics, rubber, cloth fabrics, etc.
2. Head
The head is not removable; any attempt to
do so will only damage its function. The head can be
lowered to the Charging Ring Module for replacement of
lamp (see page 11). Focusing Beam: patented
cam-action focusing mechanism by Mag Instrument has
been further enhanced (Fig. 2) to allow for continuous
rotation of the head.
7
7. Spare Lamp in Tail Cap For your convenience a spare
Fig. 2
halogen bulb resides in the tail cap should your lamp ever need
replacing.
%
Section 2
The Charging Cradle
Charging Cradle
Clamps
Red
LED
Power Cord
Fig. 3 Flashlight in the Charging Cradle
^
If you have received your system with the flashlight mounted in the
Charging Cradle (Fig. 3) the first thing to do is
to remove the flashlight.
Note A: Since the Charging Cradle was
designed to hold the flashlight securely you’ll
find that before the unit is mounted,
considerable pressure is necessary to release the
flashlight from the clamps. It is really quite
easy: 1. Holding the Charging Cradle firmly in
one hand (Fig. 4), grasp the flashlight with the
other. 2. A firm downward pressure with the
thumb on one clamp while pulling up on the
barrel with the other four fingers will quickly
snap it free.
Note B: By its unique design, returning the
flashlight to the Charging Cradle takes less than
1/10 the force of removing it. Little more than
its own weight is sufficient. And, once it is
mounted to a wall or in a vehicle, you’ll find that
the designed leverage takes no effort at all.
Mounting
Brackets
Auto
Home
Fig. 4
Charging Cradle
Constructed of super-strong, resilient material, this Charging Cradle unit
has many features. Solid-state electronics provide a constant charge rate;
from an input from 12–14 volts (automotive installations) or 120 volts AC,
when used with a converter, in-house. A unique clamp design holds the
flashlight securely in a vehicle under rough conditions and its quick release
mounting bracket allows easy removal of system.
Note: All electrical components are designed for 12–14 volts DC circuits.
DO NOT USE IN 24-VOLT DC CIRCUITS. Doing so creates excessive heat
and may result in a fire or melted components.
Section 2
The Charging Cradle
The Charging Cradle’s Quick
Release Mounting Bracket
Charging Cradle Clamp Arms
Turning the Charging Cradle upside down, you will see a release pin on
the same side as the power cord (Fig. 5). Depressing this pin with the
index finger or (closed) ballpoint pen will release the mounting bracket
for installation. When locating and mounting the bracket, be sure that the
release pin (Fig. 6) faces in the same direction as you want the head of
the flashlight to be. Note: Because of the innumerable places that can be
chosen for mounting, there are no screws or fasteners supplied. Be sure
to use fasteners that give maximum holding power for repeated use.
Two mounting brackets are included for location versatility.
Note the difference, in the following illustrations, between the “clamps
open” position (Fig. 7) and the “clamps closed” position (Fig. 8).
Sometimes one or both clamps (they work independently) will be
inadvertently pushed to the closed position, making it very difficult to
return the flashlight to the recharger/cradle. If this happens, simply take
thumb and forefinger and snap it back to the open position (Fig. 9).
&
Fig. 7
Clamps Open
Fig. 8
Clamps Closed
Fig. 6
Fig. 5
Fig. 9
Section 3
Installation
A Typical Installation
CAUTION: Make sure wires cannot be pinched. If wire is pinched it
can cause immediate short and wires will get hot and melt plastic.
1. Locate and mount the mounting bracket (Fig. 10) using appropriate
screw and anchors for that location and material.
2. With flashlight out of the Charging Cradle, engage the two prongs of
mounting bracket with matching slots at base of the Charging Cradle …
roll it forward and over the spring-loaded pin lock (Fig. 11). Make sure it
has fully engaged the pin. Removal of the Charging Cradle is achieved by
simply depressing this pin with the index finger or (closed) ballpoint pen
and reversing the procedure.
3. Plug the Charging Cradle’s 2-pronged, vibration-resistant, friction-lock
connector into the matching end of the DC power cord or AC converter.
*
Note: When disconnecting plugs, never pull on wires. The Mag-Lite®
Rechargeable Flashlight System™ detachable mounting bracket allows the
Charging Cradle to be removed from the vehicle, taken to the home, station
house or office for continued charging. One extra mounting bracket is
included for mounting in two different locations.
Fig. 11
Fig. 10
Direct Wire–Vehicle Installation 12–14 Volt Only (Not for 24-Volt Systems)
A 4’ power accessory cord is available to facilitate the direct-wiring of the rechargeable system (Fig. 19). Mag Instrument recommends
using only an ignition-switched (fused) circuit, and preferably the lowest output available (5 amps or less). This is most often the radio
or accessory fuse. The striped (positive) lead is connected to the fuse output, and the unmarked (negative) ground wire should be
attached to a metal part of the chassis, which serves as a battery ground return.
Charging Cradle
Ignition-Switched Fuses
Radio
Fig. 19
Positive (+) lead
(striped)
Heater
1 AMP
(See Note)
Accessory
Ground Side of Fuse
Charging Cradle Cord
Black (–) lead
to ground
Note: For maximum protection of recharging
unit, it is recommended that a 1-amp fuse be
installed in the (+) striped lead.
Section 4
The Battery
Your Battery’s First Charge Is Important!
To assure the freshness of your battery and to avoid any operational
problems in shipping, it has been packaged in an UNCHARGED state.
For optimum operation of your flashlight, it should be charged a full
16 hours … before using for the first time.
Battery Installation
If the battery was shipped outside of the flashlight: After you have removed
the flashlight from the Charging Cradle unscrew the tail cap (Fig. 12) and insert
battery pack (Fig. 13) into the barrel. The positive (+) end—this is the end with a
button—goes into the barrel first. Now screw on the tail cap and make sure it’s tight.
NOTE: Large end of the battery spring must be snapped into the tailcap.
Fig. 12
Fig. 13
First Charge Procedure
Do Not Have Flashlight Switch in ”On“ Position While Charging
1. Make sure tail cap is tight 2. Place the flashlight into the Charging Cradle.
3. Connect the Charging Cradle power cord into the AC converter or DC
cord, and 4. Plug into power source. 5. Make sure LED light is on. See
“Helpful Hints” to make sure the flashlight is charging properly.
Helpful Hints
Your battery is presently discharged. There may not be enough
power to light the lamp. To be absolutely sure flashlight switch is off,
use this simple test. 1. Remove battery from flashlight. 2. Plug the
Charging Cradle into a power source. 3. Place flashlight barrel (empty)
into the Charging Cradle… the Charging Cradle LED (red) will be “on”
if switch is on … “off” if switch is off. 4. If LED is on, press switch.
5. Reload battery and tighten tail cap … LED will return to “on”
indication. Continue charging.
WARNING: Do not “short” or “ground out” battery pack to “deeply
discharge”. Doing so is hazardous and will damage the battery pack.
Flashlight Barrel
Battery Spring
Tailcap
If the battery was shipped inside the flashlight: Except for
the complete Mag-Lite® Rechargeable Flashlight System™ kits, some
systems will be already loaded in the barrel. In this case, you will
note that the tail cap is not completely tightened. This is done at the factory
as a safety precaution, to keep the flashlight inoperable during shipment.
You must firmly tighten the tail cap (Fig. 12) to assure positive electrical
contact. Neither the flashlight nor the Charging Cradle will operate if
this is neglected.
(
Section 5
Operation - Getting the most out of Your Mag-Lite® Rechargeable Flashlight System™
Switch Operation
The flashlight utilizes a self-cleaning 3-position rotary switch; on, off, and
signal (manual, momentary on-off). When the flashlight is off depressing
the switch until it clicks on will provide a sustained beam. Depressing
fully again will turn it off. The signal feature can be used by partially
depressing the switch until the beam comes on and releasing it for off.
NOTICE: To avoid deeply discharging the rechargeable NiCad battery,
always turn the flashlight off when the flashlight beam starts to dim or
turn yellow. A dim or yellow beam is an indication that the battery needs
to be fully recharged. Always recharge the battery for 16 hours to obtain
a full charge.
Spot-to-Flood Beam
BL
Patented “continuous cam-action” allows you to change the flashlight
from a spot-focus to a flood beam. Operates with a simple quarter turn
of the flashlight head assembly.
Frequently Asked Questions
Q. How long can I leave the flashlight in the Charging Cradle (on charge)
without using?
A. Indefinitely … but beyond 30 days of non-use, no purpose is served. When not in use,
good practice would dictate disconnecting the units power plug. Battery self-discharge
would be less than 1% per day.
Q. If dust occurs inside my reflector, how do I clean it without damage to the
reflector?
A. Use a camel hair brush lightly or blow with dry air. Use the same care that you would
give a precision camera lens.
Q. Will the lens break?
A. Yes; however, due to the type of composition and seal, it is much stronger than a
regular glass lens.
Q. How do I get a fingerprint off my reflector?
A. Use a camera lens cleaner and a lint-free cloth.
Q. If the small red light in the Charging Cradle does not light, how do I know
whether it’s the flashlight or the Charging Cradle that’s at fault?
A. With the Charging Cradle plugged in and the flashlight not in the Charging Cradle, place
a coin, paper clip or metal object across the pins in the Charging Cradle. If the Charging
Cradle is OK, the red light will go on. Otherwise, the fault is in the flashlight.
Optimizing Spot Beam with the Light off
To obtain the best “spot pattern” and beam focus it is important to center the
bulb in the bottom opening in the parabolic reflector. The bulb has two pins
which allow for this adjustment. After inserting the bulb in the receptacle, apply
a slight pressure on the bulb with your thumb and index finger to obtain
alignment (Fig. 14). Place the reflector over the bulb and look through the clear
lens to visually inspect for proper centering. Re-adjust as required. Gently wipe
bulb surface with a clean, soft cloth to remove fingerprints.
WARNING: Do not look at lamp when flashlight is on. Do not
touch the lamp until it has cooled for at least two minutes.
Q. How long can I expect my lamp (bulb) to last?
A. 50–60* hours, not counting mechanical shock abuse. Lamps become more fragile
toward end of lamp life.
Q. Why is there a dark spot in the beam when light is adjusted to flood?
A. The Mag-Lite® Rechargeable Flashlight System™ reflector is designed for the best spot
possible. What you see in the flood position of the reflector is a redistribution of the light to
the widest part of the reflector.
Q. Can I touch the glass of the lamp with hands, and if so, will the oils cause
lamp damage?
A. You can touch the glass when it’s off/cool without fear of lamp damage. However,
it is always good practice to wipe lamp with a soft cloth or tissue after handling.
Fig. 14
Section 6
Changing the Lamp
Changing the Lamp
The Halogen Lamp
For the ultimate in flashlight power as well as practicality,
the Mag-Lite® Rechargeable Flashlight System™ features
a halogen, tungsten filament, pin-type replaceable lamp
(bulb). Though small in size, its specifications are large:
6 volts, 8.4 watts and a rating of 50 hours.*
CAUTION: This bulb is pressurized and CAN SHATTER OR EXPLODE,
causing PERSONAL INJURY. Wear protective eyeglasses and clothing
when handling; never scratch bulb’s glass envelope; never splash bulb
with liquids. Bulb BURNS VERY HOT and CAN CAUSE BURN INJURY
OR HEAT OR FIRE DAMAGE. Remove battery pack and let bulb cool at
least two minutes before handling; avoid operating near materials that
are flammable or prone to heat or drying damage. Dispose of lamp
with care.
Removing the Lamp
Fig. 17
3. Grasp the lamp firmly (Fig. 17) with thumb and forefinger. Pull straight
up until lamp’s pins are clear of receptacle. Do not dispose of old lamp in
fire or trash compactor.
1. Holding the largest part of the
flashlight’s head, unscrew the face
cap/reflector assembly. It will come
out with the face cap. This is
factory assembled and should not
be taken apart (Fig. 15).
2. Holding the barrel in one hand
(Fig. 16), gently lower the head
until it touches the Charging Ring
Module (two silver rings). This
reveals the lamp for replacement.
Fig. 16
CAUTION: Lamp is pin-type; do not apply excessive pressure.
4. The New Lamp
Line up the new lamp’s pins (Fig. 17) with the 2 holes in receptacle and
apply a straight downward pressure.
Fig. 15
Note: The receptacle is spring-loaded and the entire unit (receptacle) will
move down about 1/4 inch. When the glass of the lamp touches the
receptacle, release pressure and let go. Gently wipe bulb surface with a
clean, soft cloth to remove fingerprints.
5. Raise the head of the light (Fig. 15) to its full up position. Reinsert face
cap and reflector assembly and screw on tightly.
*Lamp life may vary.
BM
Section 7
Troubleshooting
If you have questions or need assistance, please call our warranty/repair
facility at (800) 283-5562, in the U.S.A. only, or (909) 947-1006 outside the U.S.A.
Problem
Flashlight:
Does not light
Battery charged?
Switch sticks
Works intermittently
Poor or no spot
BN
Recharger/Cradle:
LED indicator does
not light when
flashlight switch is
in off position.
Cause/Correction
1. Tighten tail cap – make sure unplated area of tail cap and barrel
are clean.
2. Check if battery is installed … see page 9.
3. Check if battery is installed with (+) positive end toward head of
flashlight.
4. Make sure large end of battery spring is snapped into tailcap.
1. Check battery charge: Place flashlight in recharger/cradle. Make
sure LED lights up with flashlight switch off (see page 9). Charge
for 15 minutes … check for light. If it lights (even momentarily)
charge it, if not, replace it (battery).
1. Return flashlight to Mag Instrument (see warranty).
1. Check for damage to battery casing.
2. Foreign particles inside barrel.
3. Lamp not seated properly.
1. Lamp needs centering (see page 10).
2. Damaged lamp (filament off-center) — replace.
1. Tighten tail cap.
2. Check plug connection to converter.
3. Check plug to power source.
4. Check Switch-off procedure (see page 9).
5. Make sure large end of battery spring is snapped into tailcap.
Inspection and Maintenance
Battery Pack – See Warnings Section for more information. Periodically (approximately
every month) remove the battery pack from the flashlight and visually inspect for signs of
gas or chemical leakage. Indications of leakage are discoloration of the plastic sleeve or
white fuzzy material near the top (positive side button) of each cell. Another indication
would be a bulging deformation of the bottom (negative flat end) of the cell can. If these
signs are observed the battery pack should be removed from service to prevent chemical
damage to the inside of the flashlight. See One Year Battery Pack Warranty for more
information concerning warranty coverage.
Fully Charged Battery Storage – If you do not use your flashlight for long periods of
time (four months or more) we suggest you remove the battery pack from the flashlight
to prevent chemical damage (acid leaks). Electrical Contacts – The bare (bright) metal
surfaces between the tailcap and barrel must be cleaned periodically to ensure a good
electrical contact. Also keep the tailcap spring clean. O-ring Seals and Screw Threads
– To keep seals from drying out and the threads operating smoothly, apply several drops
of clean petroleum oil or jelly to these surfaces two or three times a year. Anodized
Exterior Finish – The protective finish on the flashlight is very durable; however,
constant exposure to sunlight, water, chemicals, gases, etc., will dull, discolor and
eventually destroy the protective finish. Care should be taken to avoid any harsh
environment.
Specifications and Accessories
Flashlight
• Tempered aluminum alloy external
components
• Finish: hard, type III, aircraft
anodized (inside and out)
• Length: 12-19/32" (319.79 mm)
• Weight, with battery pack: 32 oz.
(907.18 grams)
• Weight, without battery pack:
18 oz.(510.29 grams)
• Head diameter: 2-5/16" (58.72 mm)
• Barrel diameter: 1-9/16" (39.67 mm)
• Permanently stamped serial
number for registration and
identification
• O-ring sealed throughout
• Corrosion resistant, rotating
(self-cleaning) push-button switch
• High intensity halogen lamp (50*
hour rating) Easy replaceable lamp
• 40,000 peak beam candlepower
• 6.00 Volt Ni-Cad Battery Pack
Rechargeable up to 1000 times
• High-Quality Tempered Glass Lens
• Highly-polished, scientificallydesigned, metallic reflector
withstands extreme temperatures
• Diamond knurl design
• Cam-action adjustable beam from
spot to flood with 1/4 turn of head
• Corrosion resistant metal
springs throughout
• Spare Halogen lamp included in
tailcap
• Up to 2 hours* flashlight on-time
per charge
Charging Cradle
• Universal: Accepts 12–14 volts DC
(not for use with 24-volt systems)
• Constant current solid-state
integrated circuit regulator
• Charge rate: 230 mA continuous
• 360° positive charge contact allows
charging in any position
• Reverse voltage protected
(batteries in backwards) Input and
Output
• Red light emitting diode (LED)
charge indicator
• Mounts in any position
• Includes (2) detachable mounting
bracket
Converter
• Input 120 volts AC 60Hz
• Output 12–14 volts DC
• Double insulated
12 Volt Adapter (Automobile)
Plug the DC power cord’s adapter into
the 12–14 volt cigarette lighter receptacle
of the vehicle. DO NOT leave adapter
plugged in for any extended period while
the engine is “off” to avoid draining
vehicle battery.
120-Volt Converter
After mounting the Charging Cradle in a
proper location, plug the special matching
electrical connectors together at the wire ends of
the Cradle and Converter. Plug the Converter into
an appropriate 120 volt wall receptacle.
Note: Total usable wire length is 8 feet.
*Due to improved lamp, first announced early 2002. Candlepower and battery on-time can vary due to manufacturing variations in lamps and batteries. (PBC) Peak Beam Candlepower. Lamp life may vary.
Section 8
Warranty Information
Limited Lifetime Flashlight System Warranty/ One
Year Battery Pack Warranty
MAG INSTRUMENT, INC. (“Mag”) warrants to the original owner that this
MAG-LITE® RECHARGEABLE FLASHLIGHT SYSTEM™ (the “SYSTEM”) is
free from defects in parts and workmanship. As to the flashlight and
other components of the SYSTEM, except the rechargeable NiCad battery
supplied herewith, this warranty lasts for the life of the original
owner. As to the NiCad battery, this warranty lasts for one year from date
of purchase. Registration is not required for warranty coverage. Mag or an
authorized Mag Warranty Service Center will repair the flashlight or other
SYSTEM component or, at its option, replace a defective flashlight or other
SYSTEM component free of charge. This warranty is in lieu of all other
warranties and conditions, express or implied. Exclusions: This warranty
does not cover bulb burnout or damage to or failure of the SYSTEM or any
component thereof due to alteration, product misuse, lack of maintenance or
leakage of a NiCad battery more than one year after date of
purchase. (Product misuse includes, but is not limited to, installing any nonrechargeable battery or any rechargeable battery pack other than a
Mag® battery pack or its technical equivalent.)
Mag disclaims any responsibility for incidental or consequential
damages. Some jurisdictions in Canada and the United States do not allow
exclusion or limitation of implied warranties, incidental or consequential
damages and/or limitations on transferability, so the above limitations and
exclusions may not apply to you.
How and when to make a warranty claim: Before returning the
flashlight or other system component for service, be sure you have followed
the steps outlined in the Troubleshooting Guide section of your
MAG-LITE® RECHARGEABLEFLASHLIGHT SYSTEM™ Owner’s Manual. If
you have followed all of these steps and the flashlight or other SYSTEM
component fails to operate properly, proceed as follows: 1. In case of bulb
burnout, or in case of NiCad rechargeable battery failure more than one
year after purchase date, do not return the flashlight or other system
component to Mag but replace the bulb or NiCad battery. You can buy
replacement bulbs and NiCad batteries directly from Mag or from most retail
outlets where Mag flashlights are sold. 2. For warranty returns: Send the
flashlight or other system component (postage or shipping prepaid) to
Mag Instrument, 1721 East Locust Street - 51453, Ontario, California, USA
91761-7769, Attention: Warranty/Repair Department, or to an authorized
Mag Warranty Service Center. For the location of an authorized Mag
Warranty Service Center in your area, consult the retailer where you
purchased the flashlight. For your protection and to expedite handling
and/or postal claims, we recommend that all returns be insured and sent
Certified and/or Return Receipt Requested.
In Canada and the United States this warranty gives you specific
legal rights, and you may have other rights which vary from state
to state and from province to province. Where any term of this
warranty is prohibited by the law of any jurisdiction, such term shall there
be null and void, but the remainder of this warranty shall remain in full force
and effect. To register your new Mag® flashlight visit our website at
www.maglite.com. From our home page just go to “Register
Your Flashlight.“
BO
www.maglite.com
CORPORATE OFFICE
MAG INSTRUMENT, INC.
1635 South Sacramento Ave.
P.O. Box 50600
Ontario, California U.S.A.
91761-1083
Warranty: (800) 283-5562 or
(909) 947-1006 fax: (909) 947-5041
e-mail: [email protected]
Sales & Parts: (800) 289-6241
or (909) 947-1006
email: [email protected]
©2004 Mag Instrument, Inc.
• Recharges on either AC or DC current.
• Limited Lifetime Warranty (warranty
and owners manual enclosed).
• Individually serial numbered
for identification.
• Charging cradle mounts securely
in any position within minimal
space allocation.
• 360° degree electrical contact rings
allow the flashlight to be charged
in any position.
• Water resistant seals throughout
the flashlight protect all internal
components from harsh
environmental conditions.
• Precision machined high-strength
aluminum alloy flashlight case.
Hard anodized inside and out
for improved corrosion resistance
and durability.
• High quality tempered glass lens.
• Highly polished metallic reflector,
withstands extreme temperatures
and delivers superior optical
performance.
• Self-cleaning rotary switch,
3 position, on, off, and signal
(manual, momentary on-off)
• Patented “continuous cam-action”
quick focusing spot-to-flood beam.
Operates with a simple quarter turn
of the flashlight head assembly.
• Halogen lamp produces one of
the brightest, whitest, far-reaching
light beams available.
• Se recarga ya sea en corriente alterna o
directa.
• Garantía Vitalicia Limitada (se incluyen
la garantía y el manual del propietario).
• Número de serie individual para facilitar
la identificación.
The Mag-Lite® Rechargeable Flashlight System™ is covered by one
or more pending patent applications and U.S. Patent Nos. 4,286,311;
4,388,673; 4,527,223; and Des. 263,170; and by foreign patents.
The distinctive shapes, styles and overall appearances of all Mag®
flashlights, and the circumferential inscriptions extending around the
heads of all Mag® flashlights are trademarks of Mag Instrument, Inc.
The circumferential inscription on the head of every flashlight signifies
that it is an original Mag® flashlight and part of the Mag® family of
flashlights. U.S. Trademark Registrations for the shape, style and
overall appearance trademarks of Mag® flashlights and for
circumferential inscription trademarks of Mag® flashlights include
Nos. 1,808,998; 2,074,795; 2,687,693; 2,745,460; 2,765,978 and 2,765,979.
• Lampes rechargeables par courant
secteur ou courant continu.
• Garantie à vie limitée (l’emballage
comprend la formule de garantie et le
guide d’utilisation).
• Numéros de série individuels pour
identifier les modèles de lampes
• La base de carga se monta con
seguridad en cualquier posición usando
un mínimo de espacio.
• Anillos de contacto eléctrico de 360º que
permiten que la linterna se cargue en
cualquier posición.
• Bagues de contact électrique réglables
sur 360 degrés pour permettre de
charger la lampe-torche dans
n'importe quelle position.
• Berceau de charge montable en toute
sécurité,dans n'importe quelle position
et dans un minimum d'espace.
• Sellos resistentes al agua a todo lo largo
de la linterna para proteger todos los
componentes internos de condiciones
ambientales severas.
• Estuche para la linterna de aleación de
aluminio de gran fortaleza y maquinado
a precisión. Con aluminio duro
anodizado por dentro y por fuera para
una mejor resistencia a la corrosión y
una mayor duración.
• Scellages d'étanchéité pour protéger
tous les composants internes de la
lampe-torche contre les intempéries.
• Boîtier de lampe usiné avec précision,
en alliage d'aluminium très résistant.
Intérieur et extérieur anodisés de
grande dureté, pour une meilleure
résistance à la corrosion et pour une
plus grande durabilité.
• L'ampoule à halogène produit l'un des • La bombilla de halógeno produce uno
faisceaux blancs les plus brillants et les de los haces de luz más brillantes, más
blancos y de más alcance que están
plus longs.
disponibles.
• Faisceau breveté à réglage rapide par
•
Un haz patentado que enfoca con
cames, de large à faible diffusion.
rapidez de proyección a punto con
Fonctionne par rotation de la tête de
"acción de levas continua". Opera con un
lampe sur un quart de tour.
sencillo movimiento de un cuarto del
• Interrupteur rotatif autonettoyant à 3
ensamble de la cabeza de la linterna.
positions : marche (ON), arrêt (OFF) et
• Interruptor rotatorio con auto-limpieza
signal (manuel, marche-arrêt
de 3 posiciones, encendido, apagado y
momentané)
señal (encendido y apagado
momentáneo manual).
• Réflecteur métallique de haute
précision; supporte des températures
• Reflector metálico altamente pulido que
extrêmes et offre un rendement
soporta temperaturas extremas y brinda
optique supérieur.
un rendimiento óptico superior.
• Lentille en verre trempé de grande
•
Lente
de vidrio templado de alta calidad.
qualité.
• la batterie au nickel-cadmium NiCad
de grande capacité présente une durée • Pila de NiCad de alta capacidad que
ofrece más de 1000 horas de operación
utile de plus de 1000 heures
(equivalente a cientos de pilas alcalinas
(l'équivalent de plusieurs centaines de
de larga duración).
piles alcalines de longue durée).
• High capacity rechargeable NiCad
battery provides over 1,000 hours
of operational life (equivalent to
several hundred alkaline long life
batteries).
Mag-Lite® Rechargable
Flashlight System™ (Sistema de
linterna recargable de Mag-Lite®)
Système de lampe-torche
Mag-Lite® Rechargeable™
Mag-Lite® Rechargeable
Flashlight System™
Owner’s Manual • Guide d’Utilisation • Manual del Propietario