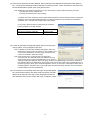
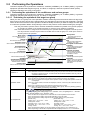
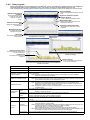
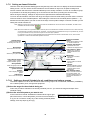
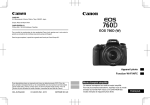
1
Air-conditioner Control System
Centralized Controller
AG-150A
AG-150A-A
GB-50ADA-A
GB-50ADA-J
Instruction Book
(Web browser for System maintenance engineer)
Contents
1 Introduction ........................................................................... 2
1-1 Terms Used in This Manual.................................................... 2
1-2 Computer Requirements ........................................................ 2
1-3 Notes on using AG-150A with the integrated centralized
control software (TG-2000A) .................................................. 2
2 Setting the Operating Environment ....................................... 3
2-1 Setting the PC IP Address...................................................... 3
2-2 Setting the Web Browser........................................................ 5
2-3 Setting the Java Execution Environment................................ 7
3 Performing Operations .......................................................... 8
3-1 Logging in on the AG-150A .................................................... 8
3-2 Checking the Operation Condition........................................ 12
3-3 Performing the Operations ................................................... 17
3-4 Checking the Measurement Condition ................................. 21
3-5 Checking the List of Malfunctioning Units............................. 24
3-6 Checking the List of Units with a Triggered Filter Sign ......... 26
3-7 Setting Schedules................................................................. 27
3-8 Checking the Malfunction Log .............................................. 41
3-9 Setting the Current Date and Time....................................... 42
3-10 Registering Users ............................................................... 43
3-11 Checking the Send Mail Log............................................... 45
3-12 Checking the Gas Amount.................................................. 46
4 Registering a License for Optional Functions ..................... 47
Before using the controller, please read this Instruction Book carefully to ensure proper operation.
Retain this manual for future reference.
WT05490X15
Ver. 3.00
1 Introduction
Special features of Mitsubishi Electric Corporation’s “Centralized Controller AG-150A,” “Centralized Controller
AG-150A-A,” “Centralized Controller GB-50ADA-A,” and “Centralized Controller GB-50ADA-J” are that a PC
connected to a LAN can be used to monitor the operation condition of air conditioners and perform air
conditioner operations.
In this manual, the procedures to monitor the status of and to operate the centralized controller on the Web
browser are described. Refer to “Web browser for initial settings” for details about the settings.
Hereinafter, Centralized controller AG-150A, AG-150A-A, GB-50ADA-A, and GB-50ADA-J, unless otherwise
specified, will be called “AG-150A”.
Note: License of “Web Monitor” or “Basic License Pack” is necessary to use the web browser (to operate or monitor
the air conditioners). Some licenses are necessary depending on the functions to be used. Register the
license key on the LCD screen or on the registration screen.
Note: A one-day license key can be registered on the LCD screen that allows the user to use the “Web Monitor” only
on the day of the registration (not applicable to GB-50ADA-A and GB-50ADA-J). Use this license key to use
the initial setting browser, or in any other situations when a temporary license key “Web Monitor” is necessary.
Note: Use a security device such as a VPN router when connecting the AG-150A to the Internet to prevent
unauthorized access.
Note: “Booster unit” and “Water HEX unit” are referred to as “Air To Water (PWFY)”.
Note: GB-50ADA-A and GB-50ADA-J cannot be connected to the Expansion Controller (PAC-YG50ECA). Settings
or displays of the Expansion Controller cannot be made on the GB-50ADA-A and GB-50ADA-J.
Note: “GB-50ADA-A” and “GB-50ADA-J” are referred to as “GB-50ADA”.
1-1
Terms Used in This Manual
- “Click” refers to the action of positioning the mouse cursor on the object (such as button or folder), pressing
down, and releasing the left mouse button once.
- Unless otherwise specified, the example screen images used in this manual are Windows® XP and Internet
Explorer 6.0 screen images.
1-2
Note: Windows is a registered trademark or trademark of Microsoft Corporation USA in the United States and other
countries.
Computer Requirements
To monitor and operate air conditioners by web browser, computer must include the following requirements.
Table 1-1 Computer Requirements
Item
CPU
Pentium 300MHz or faster
Memory
64M Bytes or more (128M Bytes or more recommended)
Screen resolution
1024 x 768 or higher recommended
On-board LAN port or LAN card
Microsoft® Internet Explorer 6.0
Microsoft® Internet Explorer 7.0
Microsoft® Internet Explorer 8.0
Microsoft® Internet Explorer 9.0
Note: You must have a Java execution environment
(Oracle® Java Plug-in Ver.1.6.0_02–Ver.1.6.0_33,
Ver.1.7.0_07, 09)
Note: You can check the Oracle® Java Plug-in version in “Java” in a
control panel.
Note: Install Oracle® Java Plug-in that is appropriate for your
operating system. When using 64-bit Internet Explorer, install
64-bit Java Plug-in.
Note: When using Oracle® Java Plug-in Ver. 1.6.0_10 or later, set
the Java execution environment according to the instructions
in section 2-3 “Setting the Java Execution Environment.”
One connector (100BASE-TX)
Other
Pointing device such as a mouse
Recommended browser
1-3
Requirement
Note: Microsoft is a registered trademark or trademark of Microsoft Corporation USA in the United States and other
countries. Oracle and Java are trademarks or registered trademarks of Oracle Inc. in the United States and/or
other countries.
Notes on using AG-150A with the integrated centralized
control software (TG-2000A)
If the system is connected to the integrated centralized control software (referred to as TG-2000A hereafter),
make all settings and changes from the TG-2000A so that the data in TG-2000A and AG-150A will match.
When using weekly schedules 3 through 5 by connecting TG-2000A, use a TG-2000A version 6.38 or later.
2
2 Setting the Operating Environment
PC settings and web browser settings required for using a web browser to monitor air conditioner units and
perform operations are explained in the following pages.
2-1
Setting the PC IP Address
Set an IP address on the PC that enables AG-150A to connect via a web browser. For instance, if the AG150A IP address is [192.168.1.1], the PC IP address will need to belong to the same system [192.168.1.101].
If the AG-150A is connected to an existing LAN, ask the LAN administrator to decide what PC IP address to
use.
Note: When using a AG-150A dedicated LAN, it is recommended that the AG-150A main unit be given an IP
address within the range [192.168.1.1] - [192.168.1.40] and the PCs that will be connected to the AG-150A be
given an IP address within the range [192.168.1.101] - [192.168.1.150]
(1) Click on [Control Panel] under [Start] to open the Control Panel.
(2) In the Control Panel window, double click [Network and Dial-up
Connections] and the Network and Dial-up Connections window will
open. Double click on [Local Area Setting] and the [Local Area
Connection Status] dialog will open. Click [Properties].
(3) In the [Local Area Connection Properties] dialog, click [Internet
Protocol] to select it and click the [Properties] button.
3
(4) In the [Internet Protocol (TCP/IP) Properties] dialog, click [Use the
following IP address] and enter the IP address (for example,
“192.168.1.101”) that you want to set in the IP address field.
You normally set [255.255.255.0] as the subnet mask.
Note: Ask your LAN administrator to provide the IP addresses and subnet
mask.
(5) Click the [OK] button to close this dialog, and then close the other open
dialogs to complete the network setting.
4
2-2
Setting the Web Browser
Use a security device such as a VPN router when connecting the AG-150A to the Internet to prevent
unauthorized access.
If no security devices are installed, the operation settings may be changed by an unauthorized person
without the knowledge of the user.
Necessary web browser settings must be performed to enable the web browser to connect to the AG-150A.
Note: The settings and screen images used as examples in this manual are based on Internet Explorer 6.0.
2-2-1 No Internet Connection
Follow the instructions below to make the web browser environment settings when using the PC with no
Internet connection for monitoring and operating the air conditioners.
(1) Click the web browser menu item [Tools] and then click [Internet
Options…] to select.
(2) In the [Internet Options] tabbed dialog, click the [Connections] tab to
display.
(3) Select [Never dial a connection] in the Dial-up settings section and click
the [OK] button to close the dialog.
2-2-2 Internet Connection Using a Dial-Up
If the PC used for monitoring air conditioners and performing operations is going to connect to the Internet via
a dial-up connection, use the procedure given below to set the web browser environment settings.
By performing these settings, a message will appear asking whether or not to use a dial-up connection when
an Internet connection is necessary. When connecting to the Internet, follow the directions below.
(1) Click the web browser menu item [Tools] and then click [Internet
Options…] to select.
(2) In the [Internet Options] tabbed dialog, click the [Connections] tab to
display.
(3) Select [Dial whenever a network connection is not present] in the Dialup settings section and click the [OK] button to close the dialog.
5
2-2-3 Connecting to the Internet using a proxy server (Using an existing LAN)
If the PC you use for monitoring air conditioners and performing operations is going to access the Internet via
proxy server by connecting to an existing LAN such as a LAN within your company, use the procedure given
below to set the web browser environment settings.
By performing these settings, your PC will connect to a proxy server only when connecting to the Internet.
(1) Click the web browser menu item [Tools] and then click [Internet
Options…] to select.
(2) In the [Internet Options] tabbed dialog, click the [Connections] tab to
display.
(3) Select [Never dial a connection] in the Dial-up setting section.
(4) Click the [LAN Setting ...] button in the Local Area Network (LAN)
settings section to display the Local Area Network (LAN) Settings
dialog.
(5) In the Local Area Network (LAN) Settings dialog, check [Bypass proxy
server for local addresses] and click the [Advanced...] button.
(6) Enter the IP address for the AG-150A (e.g. 192.168.1.1) in the
Exceptions field of the Proxy Setting dialog and click the [OK] button to
close the dialog and then close the other open dialogs to complete the
setting.
Note: If connecting to more than one AG-150A, you can specify multiple IP
addresses like [192.168.1.1; 192.168.1.2], however, it is also possible
to use the asterisk (*) and specify [192.168.1*].
6
2-3
Setting the Java Execution Environment
When using Java Plug-in version 1.6.0_10 or later, make the following environment settings (not required for
version 1.6.0_09 or earlier).
Note: The setting samples and screenshots used in this manual are those of Java Plug-in version 1.6.0_11.
2-3-1 Disabling the next-generation Java Plug-in
(1) Open Java Control Panel by double-clicking Java in the
Control Panel.
(2) In the [Advanced] tab under the [Java Control Panel]
screen, click the plus next to [Java Plug-in] to expand the
list, and uncheck the checkbox next to [Enable the nextgeneration Java Plug-in (requires browser restart.)].
*The checkbox cannot be unchecked depending on your
PC environment. In this case, update the version of Java
Plug-in to 1.6.0_30 or later.
*The above steps must be taken every time Java version is
updated.
7
3 Performing Operations
Text below explains how to connect to the AG-150A and how to monitor and adjust the operation condition of
air conditioners. Follow the directions given here when performing operations.
Note: If the AG-150A is restarted due to a power interruption etc., wait until the screen on the AG-150A main unit
displays the normal operation screen (it takes several minutes before the normal operation screen is
displayed) before using a web browser to access the AG-150A. If access is attempted while the AG-150A is
still starting up, the most recent data might not be displayed or communication errors could occur.
Note: Default IP address of AG-150A is "192.168.1.1". (Factory setting)
3-1
Logging in on the AG-150A
3-1-1 Logging in on the AG-150A
(1) Enter the web page address in the address field of the web
browser as follows:
http://[IP address of the AG-150A]/administrator.html
Press the [Enter] key on the keyboard. A screen appears for login.
Note: For example, type “http://192.168.1.1/administrator.html” if the
AG-150A IP address is [192.168.1.1].
*If the login screen does not appear then take the steps below to
delete the temporary files as it may help with the problem.
<Internet Explorer>
1. Open Internet Explorer and click on Tools.
2. Click on Internet Options.
3. On the General Tab, in the middle of the screen, click on
Delete Files.
<Java>
1. Click Start > Control Panel.
2. Double-click the Java icon in the control panel to launch the Java Control Panel.
3. On the General Tab, click on Settings under Temporary Internet Files.
4. Click on Delete Files.
(2) To make connection easier for the next time, click the web browser
menu item [Favorites], click [Add to Favorites] then add the
address to the Favorites folder. Once this address is added to the
Favorites folder, it is not necessary to input the address of (1).
Simply select it from your Favorites folder and the AG-150A page
will appear.
(3) Enter the user name and the password in the login screen, and click the [Login] button. The screen for
monitoring the operation condition will appear. An explanation on how to perform operations in the normal
operation screen begins from the next page.
The table below shows the web page address for public users and managers, their respective default the
user names and passwords, and accessible functions. If there are public users who will only operate the air
conditioners, provide them with the appropriate web page address and password.
User
Web page address
Default user
name
Default
password
Available functions
Monitor / Operation
Building
manager
http:// [IP address of the
AG-150A]/
administrator
administrator.html
Schedule settings
admin
Malfunction log
System Settings
Maintenance
Public user
http:// [IP address of the
guest
AG-150A]/index.html
guest
8
Monitor / Operation
Condition List
Measurement List
Malfunction List
Filter Sign List
Today's Schedule
Weekly Schedule1
Weekly Schedule2
Weekly Schedule3
Weekly Schedule4
Weekly Schedule5
Annual Schedule
Unit Error
Communication Error
Date/Time Settings
User Registration
Send Mail Log
Gas Amount Check
Condition List
Note: You can register a maximum of 50 public users and it is possible to individually specify which air conditioners
can be operated by each user. (The use of this function requires a license registration.)
Note: It is recommended to change the user name and password so users other than the manager are not permitted
to operate.
Note: The Web page is displayed in the same language as the computer uses and it is also possible to display the
Web page in other languages by entering the following Web page addresses.
Chinese
English
French
German
Italian
Japanese
Portuguese
Russian
Spanish
: http://[IP address of the AG-150A]/zh/administrator.html
: http://[IP address of the AG-150A]/en/administrator.html
: http://[IP address of the AG-150A]/fr/administrator.html
: http://[IP address of the AG-150A]/de/administrator.html
: http://[IP address of the AG-150A]/it/administrator.html
: http://[IP address of the AG-150A]/ja/administrator.html
: http://[IP address of the AG-150A]/pt/administrator.html
: http://[IP address of the AG-150A]/ru/administrator.html
: http://[IP address of the AG-150A]/es/administrator.html
The above addresses are for administrators. For user’s use, change [administrator.html] to [index.html].
Note: When the license of “Web Monitor” is not registered, the following message will appear when the [Login]
button is clicked.
9
3-1-2 Encrypting the communication data and login on the AG-150A
AG-150A can encrypt communication data using HTTPS (SSL).
When connecting the AG-150A to the LAN that can be accessed by the general public, it is recommended that
the following settings be made so that the units are monitored and controlled on the encrypted Web page.
Note: Depending on the operating system or the version of Java, HTTPS encrypted messages may not be handled
correctly. If this happens, use a HTTP connection to monitor and control the units as noted in the section
above.
(1) Go to [Tools]->[Internet Options]->[Advanced], and make the
following settings.
Item
Use SSL 2.0
Checkbox setting
Uncheck the box.
Use SSL 3.0
Check the box.
Use TLS 1.0
Uncheck the box.
Do not save encrypted pages to disk
Check the box.
Note: Some of the settings may have different names depending on
the Web browser version.
(2) Click on [Java] in the Control Panel, and make the settings for the
items under [Security] in the [Advanced] tab.
Item
Checkbox setting
Use SSL 2.0 compatible Client Hello format
Uncheck the box.
Use SSL 3.0
Check the box.
Use TLS 1.0
Uncheck the box.
Note: Some of the settings may have different names depending on
the Java version.
(3) Prefix the Web address with [https], enter the address, and hit the
[Enter] (Return) key on the keyboard.
https://[IP Address of the AG-150A]/administrator.html
Note: For example, type “https://192.168.1.1/administrator.html” if the
AG-150A IP address is [192.168.1.1].
If the security alert is disabled as described in the note in the following
and the subsequent sections, encrypted date communication will
begin, and the Login screen will appear. If the security alert has not
been disabled, take the following procedures.
10
(4) If the security alert has not been disabled, after entering the web address and hitting the Enter (Return)
key, a security alert message will alert asking if you want to proceed . This is because the AG-150A uses
the self-authentication system. Click [Yes] and proceed.
Note: Disable the security alert that appears every time the browser is opened, take the following two steps:
1) Register the security certificate and
2) Change the Web browser's option settings
To register the security certificate, click the [View Certificate] button on the security alert window to display the
certificate, click on the [Install Certificate] button, and add the certificate to the Trusted Root Certification
Authorities store. Just follow the prompts of the Import Wizard.
Go to [Tools]->[Internet Options]->[Advanced], and make the
following settings for the Web browser.
Item
Warn about invalid site certificates
Checkbox setting
Uncheck the box.
(5) A Java security alert message will appear after you click [Yes] in
step (4) above, click [Yes] again to proceed.
Note: To disable the security alert message that appears every time
the browser is opened, check the check box next to [Always trust
content from this publisher], and click [Yes]. The browser may
need to be restarted to reflect the change.
Note: If the window shown on the right does not appear and
connection fails, the certificate needs to be added to the Java
certificate list. Click the [View Certificate] button on the screen in
step (4) to display the certificate, click on the [Copy to File] on the [Details] page, and save the certificate in
any desired location in the DER format. Open [Java] in the Control Panel, click on the [Certificates] button on
the [Security] page to bring up the certificate registration screen. On the screen, select [Secure Site], click on
the [Import] button, change the File of type to [All Files], and select the saved certificate. Now the certificate
has been added to the Java certificate list.
(6) If a connection is successfully made, the login window will appear.
All communication with the AG-150A will be encrypted. The Web
addresses for general users and in each language will have the
web address in the previous section with "http" changed to "https".
11
3-2
Checking the Operation Condition
Text below explains how to monitor the operation condition of a list of all groups, or of groups in block units.
When a correct user name and password is entered on the password entry screen, the screen used to monitor
the operation condition of air conditioner and general equipment and Air To Water (PWFY) groups will appear.
3-2-1 Checking the operation condition on Overview/Floor layout display
Click the menu item [Monitor/Operation], or click [Condition List] in the sub menu to display a list of the
operation condition of all the air conditioner, Ventilator (LOSSNAY), Air To Water (PWFY) groups, and general
equipment. Layout of the selected floor can be displayed when floor layout setting is performed on AG-150A.
(not applicable to GB-50ADA-A and GB-50ADA-J)
This screen allows the operator to view a list of all the groups to monitor for malfunctions and prevent units
being left on by mistake.
Weekly schedule
number
Menu
Indicates the weekly
schedule that is currently
effective.
Sub menu
Block display
Update to most recent
condition
Click to display the
operation condition of
groups in block
units.
Click to update the screen
so that the most recent
operation condition is
shown.
Group icons
These icons are used to
indicate the operation
condition of an air
conditioner or a general
Equipment groups.
The group name is
displayed by pointing to
the icon with the mouse
cursor.
Switch to the operation
screen by clicking the
icon.
Floor selection
Choose the floor to be
displayed.
Batch operation
Click when you want to
perform an operation on all
groups at once.
Item
Block display
Update to most recent
condition
Batch operation
Description
Switches to the screen where you can check the operation condition according to block units.
Click [Update] to ensure the displayed items reflect the most recent operation condition.
When [Auto] is selected, information is updated automatically every minute to reflect the latest
information.
Click [Batch Operation] when you want to perform an operation on all groups at once.
Note: If a PAC-YG50ECA Expansion Controller is connected, a batch operation will be
performed on the groups in the system that is currently displayed. To perform an
operation on all units, switch to other Expansion Controller and perform a batch
operation on each system.
If one or more PAC-YG50ECA Expansion Controllers are connected to control more than 50 air
conditioning units, Expansion Controller system selection buttons will appear on the screen.
Click the button that corresponds to the desired system to see the operation status of the units
in the selected system.
Note: [EC1] stands for the first Expansion Controller system, [EC2] stands for the second,
and [EC3] stands for the third.
Note: Expansion Controller system selection button will not appear if the flat view option is
selected or if no Expansion Controllers are connected.
Expansion Controller
system selection
Expansion Controller
system selection button
Click to display the operation
status of the Expansion
Controller system.
Weekly schedule
number
Indicates the weekly schedule that is currently effective.
“Weekly * in period”
Note: The schedule number (1 through 5) that is currently effective is displayed in “ * ”.
12
Item
Description
When floor layout setting is performed on AG-150A (not applicable to GB-50ADA-A and GB50ADA-J), preset floors are selectable besides [Overview] . When a floor is selected, a window
that shows group icons will be displayed on the floor layout.
Note: Floor layout can be set only on the liquid crystal display on this unit. Refer to the AG150A Instruction Book for the floor layout setting or to see how to read layouts. If floor
layout is changed on this unit, restart the browser. New layout will be displayed after
restarting.
Note: On high resolution display, the whole floor can be displayed by increasing the browser
display size.
Note: After clicking a group icon, the operation area will be displayed at the left top of the
layout display screen. Scroll up to the left top of the screen for the operation of air
conditioning unit or general equipment.
Floor selection
Font color change
Changes the font color of group
name to either black or white.
Floor layout display area
Click to display floor layout.
The operation condition is indicated by the icon that is displayed. When you point to a group
icon with the mouse cursor, the group name is displayed. To switch to the operation screen,
click on the icon. The icons used to indicate the operation condition are shown below.
(1) Air conditioner group operation condition
ON
OFF
Error
Filter sign
Interlocked
LOSSNAY ON
Interlocked
LOSSNAY OFF
Schedule set
Schedule
Not Available
Energy saving
Setback ON
Unknown (during
initial startup)
The room
temperature
Group icon
Note: Other than 4-aiflow icons, 2-airflow or ceiling-suspended icons are also available. Select
the icon type on Initial Setting Web.
Note: Whether to display the filter sign can be set on Initial Setting Web.
Note: The energy saving icon is displayed while the energy-saving control is performed in a
group of indoor units and in the outdoor unit belonged to that group.
Note: If a given LOSSNAY unit is interlocked with multiple indoor unit groups, the LOSSNAY unit
may be in operation even when the display shows that the unit is stopped.
Note: When setting LOSSNAY interlock with Mr. Slim units (M-series units, P-series units), the
air conditioning and interlocked LOSSNAY icon will display ON even when the interlocked
LOSSNAY is operating by itself. (This will occur when used with the following M-NET
adapter:PAC-SF48/50/60/70/80/81MA-E)
Note: When connecting multiple AG-150A controllers by connecting an Expansion Controller to
the system, “Schedule set,” “Schedule Not Available,” “Energy saving,” and “Setback ON”
will be displayed only on the AG-150A controller that is executing these functions.
Note: The room temperature icon can be displayed only in the floor layout screen. (It cannot be
displayed in the all group list screen.) Dispay/Non-display of the room temperature can be
selected on the initial setting browser.
13
Item
Description
(2) Ventilator (Lossnay) group operation condition
ON
OFF
Error
Filter sign
Schedule set
Schedule
Not Available
Energy saving
Unknown (during
initial startup)
Note: Whether to display the filter sign can be set on Initial Setting Web.
Note: The energy saving icon is displayed while the energy-saving control is performed in a group
of ventilator units.
Note: When connecting multiple AG-150A controllers by connecting an Expansion Controller to
the system, “Schedule set,” “Schedule Not Available,” and “Energy saving” will be
displayed only on the AG-150A controller that is executing these functions.
(3) Air To Water (PWFY) group operation condition
ON
OFF
Error
Check water
Schedule set
Schedule
Not Available
Energy saving
Unknown (during
initial startup)
Group icon
Note: The energy saving icon is displayed while the energy-saving control is performed in a group
of Air To Water (PWFY) units.
Note: When connecting multiple AG-150A controllers by connecting an Expansion Controller to
the system, “Schedule set,” “Schedule Not Available,” and “Energy saving” will be
displayed only on the AG-150A controller that is executing these functions.
(4) General equipment group operation condition
ON
OFF
Error
Schedule set
Schedule
Not Available
Note: Other than lighting icons, pump or card key icons are also available.
Note: When connecting multiple AG-150A controllers by connecting an Expansion Controller to
the system, “Schedule set” and “Schedule Not Available” will be displayed only on the AG150A controller that is executing these functions.
Note: If the prohibition setting is enabled for the DIDO controllers that are on scheduled
operation, the Schedule set icon will appear, but the scheduled operation will not run.
Up to 8 letters are displayed under the icon.
Note: Whether to display the group names can be set on Initial Setting Web.
Note: To display all letters, move the cursor to the icon.
Group name
With the display of group names
14
Without the display of group names
3-2-2 Checking the operation condition of groups in different blocks
Click [Block] in the Overview/Floor layout screen to display the operation condition of air conditioner, Ventilator
(LOSSNAY), Air To Water (PWFY) groups, and general equipment for each block.
Use this screen if you want to check data not included in the List screen such as operation mode and set
temperature or if you want to check operation condition for each block.
Overview/Floor Layout
display
Click to display operation
condition of groups in
Overview or Floor layout
display.
Batch operation
Click when you want to
perform an operation on all
groups at once.
Weekly schedule
number
Update to most recent
condition
Indicates the weekly
schedule number that is
currently effective.
Click to update the screen so
that the most recent operation
condition is shown.
Set temperature display
The set temperature is
displayed here.
Select block
Use this to select which block to
display.
Room temperature
display
Group icons
These icons are used to indicate
the operation condition of
an air conditioner, LOSSNAY,
Air To Water (PWFY),
or a general equipment group.
Switch to the operation screen
by clicking the icon.
The temperature of the
indoor unit’s intake is
displayed here.
Operation mode display
The operation mode is
displayed here.
Group name
Group names are displayed.
Item
Overview / Floor
Layout display
Update to most recent
condition
Batch operation
Description
Switches to the screen where you can check the operation condition of all the groups or floor
layout.
Click [Update] to ensure the displayed items reflect the most recent operation condition.
When [Auto] is selected, information is updated automatically every minute to reflect the latest
information.
Click [Batch operations] when you want to perform an operation on all groups in the block at
once.
Select block
Use this to select which block to display and perform operations on.
Group icons
The operation condition is indicated by the icon that is displayed. To switch to the operation
screen, click on the icon.
Group name
Group names are displayed.
Operation mode
display
The operation mode is displayed.
Set temperature
display
Room temperature
display
Weekly schedule
number
The set temperature is displayed.
Note: The water temperature setting will be displayed for the Air To Water (PWFY) group.
Note: Depending on the model, temperatures will be displayed in 0.5°C or 1°C increments.
The temperature of the indoor unit’s intake is displayed.
Note: Dispay/Non-display of the room temperature can be selected on the initial setting
browser.
Note: Because the temperature displayed here is of the indoor unit’s intake, it could be
different from the actual room temperature.
Note: The set temperature and room temperature will not be displayed for the Ventilator
(LOSSNAY) group.
Note: The operation mode, set temperature, and room temperature will not be displayed for
the general equipment group.
Note: The current water temperature will be displayed for the Air To Water (PWFY) group.
Note: The temperature display can be set to display in either Celsius (°C) or Fahrenheit
(°F).
Note: Depending on the model, temperatures will be displayed in 0.5°C or 1°C increments.
Indicates the weekly schedule that is currently effective.
“Weekly * in period”
Note: The schedule number (1 through 5) that is currently effective is displayed in “ * ”.
15
3-2-3 Checking the operation status of the HWHP (CAHV) groups
Click [HWHP] on the "Overview/Floor layout" window to display a list of operation status of the HWHP (CAHV)
groups only. The [HWHP] button will not appear if no HWHP (CAHV) units have been registered to any group.
Batch operation
Block display
Click when you want to
perform an operation on all
groups at once.
Click to display the
operation condition of
groups in block.
Update to most recent
condition
Overview/Floor Layout
display
Click to update the screen so
that the most recent operation
condition is shown.
Click to display operation
condition of groups in
Overview or Floor layout
display.
HWHP icon
Weekly schedule
number
Operation status of the units in
the HWHP groups will appear
here. Click to access the
Operation Control window.
Indicates the weekly
schedule number that is
currently effective.
Group name
Fan mode
Group names are displayed.
Fan mode is displayed
here.
Operation mode
The operation mode is displayed
here.
Temperature
Temperature is displayed
here.
Set temperature
The set temperature is displayed
here.
Item
Description
Block display
Switches to the screen where you can check the operation condition according to block units.
Overview / Floor
Layout display
Switches to the screen where you can check the operation condition of all the groups or floor
layout.
Click [Update] to ensure the displayed items reflect the most recent operation condition.
When [Auto] is selected, information is updated automatically every minute to reflect the latest
information.
Update to most recent
condition
Batch operation
Click [Batch operations] when you want to perform an operation on all HWHP groups at once.
Operation status will appear as icons. Click to access the Operation Control window.
.
Group icon
ON
OFF
Error
Schedule set
Schedule
Not Available
Unknown (during
initial startup)
Note: When connecting multiple AG-150A controllers by connecting an Expansion Controller to
the system, “Schedule set” and “Schedule Not Available” will be displayed only on the
AG-150A controller that is executing this function.
Group name display
Operation mode
display
Set temperature
display
The group names are displayed.
The operation mode is displayed.
The set temperature is displayed.
Temperature display
The representative water temperature, inlet water temperature, outlet water temperature, and
outdoor temperature are displayed.
Note: When there is a communication error, “ - - ” will be displayed.
Fan mode display
The fan mode is displayed.
Weekly schedule
number
Indicates the weekly schedule that is currently effective.
“Weekly * in period”
Note: The schedule number (1 through 5) that is currently effective is displayed in “ * ”.
16
3-3
Performing the Operations
Text below explains how to perform air conditioner, Ventilator (LOSSNAY), Air To Water (PWFY), or general
equipment operations that target one group, one block, or all groups, and how to perform HWHP (CAHV)
operations that target one group or all groups.
3-3-1 Performing the operations of air conditioners and various groups
Text below explains how to perform air conditioner, Ventilator (LOSSNAY), Air To Water (PWFY), or general
equipment operations that target one group, one block, or all groups.
3-3-1-1 Performing the operations that target one group
When you click on a group icon in the operation condition monitoring screen that shows the list of all groups,
floor layout or the list of groups in the selected block, the operation screen for that group will appear. The items
shown in this screen are the current operation conditions. Modify the items you want to change and click [OK]
to confirm the operation details. Click [Cancel] to return to the previous screen without making any changes.
Note: Only the ON/OFF operation and the Schedule Available/Not Available are possible on the general equipment.
No operation is possible on the general equipment on which the group operation is prohibited.
Note: If the Web browser is configured to block Java Script, the operation window will appear at the left top of the
floor layout screen. If the floor layout window is scrolled down to click the group icon, scroll up the screen to
the left to perform an operation.
Group name
Block name
The name of the group is
displayed here.
The name of the block is
displayed here.
Interlocked ventilator ON/
OFF
ON/OFF
Click to switch to ON or OFF.
Click to switch interlocked
ventilator ON or OFF.
Operation mode
Click to switch the operation mode.
Fan speed of interlocked
ventilator
Click to adjust the fan speed
of the interlocked ventilator.
Set temperature
Click to adjust the set
temperature.
Prohibit remote
controller operation
Click to select the items
you do not want the remote
controller to control.
Air direction
Click to adjust the air direction.
Filter sign
Fan speed
Schedule
Available/Not Available
OK button
Click to reset the filter sign.
Click to adjust the fan speed.
Click to confirm the operation
details. You must press the
OK button for the operation to
take effect.
Click to switch the schedule
Available or Not Available.
Cancel button
Click to cancel all operations.
Item
Description
Click [ON] or [OFF] to switch to ON or OFF.
ON/OFF *1
Note: Ventilation units that are interlocked with a given group of indoor units will turn on and off when
this switch is turned on and off. To switch on/off the interlocked ventilation units only, use the
“Ventilation ON/OFF” button.
Click [Cool], [Dry], [Fan], [Heat] or [Auto] to switch the operation mode.
Operation mode
Note: This item will not appear if the operation mode switching function is not available.
Note: Some unit models do not support certain operation modes. Unsupported operation modes are
not displayed.
Note: For K control models, all modes are displayed, however, choose only the modes that can be
operated.
Note: If it is a ventilator group, select [Bypass], [Heat Recovery] or [Auto].
Note: When making the settings for the Air To Water (PWFY) group, elect from [Heating], [Heating
ECO], [Hot Water], [Anti-freeze], and [Cooling].
Click
to adjust the set temperature.
For [Cool] and [Dry], the setting range is 19 ~ 30°C/67 ~ 87°F, for [Heat] it is 17 ~ 28°C/63
~83°F, and for [Auto] it is 19 ~ 28°C/67 ~ 83°F.
Set temperature
Note: This item will not appear for the model that has no set temperature switch function.
Note: The temperature setting range varies depending on the unit model.
Note: The temperature setting range for the Air To Water (PWFY) group is as follows:
[Booster unit]
[Water HEX unit]
Heating: 30°C ~ 50°C / 87°F ~ 122°F
Heating: 30°C ~ 45°C / 87°F ~ 113°F
Heating ECO: Invalid
Heating ECO: Invalid
Hot Water: 30°C ~ 70°C / 87°F ~ 158°F
Hot Water: Invalid
Anti-freeze: 10°C ~ 45°C / 50°F ~ 113°F
Anti-freeze: 10°C ~ 45°C / 50°F ~ 113°F
Cooling: Invalid
Cooling: 10°C ~ 30°C / 50°F ~ 87°F
Note: The temperature display can be set to display in either Celsius (°C) or Fahrenheit (°F).
Note: Depending on the model, temperatures will be displayed in 0.5°C or 1°C increments.
17
Item
Description
Click
to adjust the air direction.
(Mid3)
(Mid 2)
(Mid 1)
(Mid 0)
(Horizontal)
(Swing)
(Auto)
Air direction
Note: If it is a model that does not support air direction adjustment, this item is not displayed.
Note: Available functions vary depending on the unit model.
Click
to adjust the fan speed.
(Low)
(Mid 2)
(Mid 1)
(High)
(Auto)
Fan speed
Note: If it is a model that does not support fan speed adjustment, this item is not displayed.
Note: Available functions vary depending on the unit model.
Select the items you do not want the remote controller to control. Click the word part of [ON/
OFF], [Mode], [Set Temp] or [Filter Sign] and switch to prohibit
Prohibit remote
controller
operation
or enable
.
Note: For K control models, it is only possible to prohibit all items or enable all items.
Note: For K control models, there is no [Filter Sign] item.
Note: For ventilator models, there are no [Mode] item or [Set Temp] item.
Note: For the Air To Water (PWFY) groups, the "[Check Water Circuit] (circulating water
replacement sign reset) " function can be enabled or disabled, instead of the [Filter
Sign] reset function.
Schedule
Click the button to select Available or Not Available for the schedule settings.
Available/Not Available
Click [Reset] to specify whether to reset the filter sign. It is set to reset when a green indicator is
Filter sign
displayed on the left of Reset ([ Reset]).
Note: If filter signs are not triggered in the group, then this item is not displayed.
Click [Reset] to specify whether to reset the check water circuit.
It is set to reset when a green indicator is displayed on the left of Reset ([ Reset]).
Check water circuit
Note: If check water circuit signs are not triggered in the group, then this item is not
displayed.
Note: Only when Air To Water (PWFY) is connected, this item is displayed.
Click [ON] or [OFF] to switch interlocked ventilator ON or OFF.
Interlocked ventilator
Note: For groups that are not connected to an interlocked ventilator, the items related to
ON/OFF *1
interlocked ventilators are not displayed.
Fan speed of
interlocked
ventilator
Click
to adjust the fan speed of the interlocked ventilator.
Note: For groups that are not connected to an interlocked ventilator, the items related to
interlocked ventilators are not displayed.
*1: The change on the interlock setting between the indoor and LOSSNAY units made on the indoor unit side will
not be reflected on the LOSSNAY unit side on the screen until the OK is pressed and the change is saved. The
actual interlock setting, however, is immediately effective, so as soon as the interlock setting on the indoor unit
side is set to ON, the LOSSNAY unit will go into operation when one or more indoor units go into operation
regardless of the display on the screen.
18
3-3-1-2 Performing the operations that target one block
(1) Select the block you want to operate as an entire block from the
operation condition monitoring screen for block lists and click
[Batch Operation]. When air conditioner groups, ventilator
(LOSSNAY) groups, and general equipment groups exist together
in the selected block, a new screen will appear to select the group.
Click one of the [All Air-conditioners in this block], [All LOSSNAY
in this block], [All Air To Water in this block], or [Other Equipment]
and the screen to set the batch operation will appear.
If the block that was selected has only air conditioner groups or
only LOSSNAY groups or only Air To Water (PWFY) groups or
only general equipment groups, this selection screen will not
appear.
(2) After you have made the settings on the screen for batch
operation, click [OK] and the operation settings for only the
adjusted items will be sent to all the air conditioner, ventilator
(LOSSNAY) groups, Air To Water (PWFY) groups, or general
equipment groups contained in the selected block.
To return to the previous screen without performing any
operations, click [Cancel].
Note: When resetting the filter sign as part of a one-block batch
operation, the accumulated ON time used to trigger the filter sign
will be reset in all units belonging to the selected block,
irrespective of whether or not the filter sign was triggered. Use
the reset filter sign operation in a batch operation in a case such
as when all the unit filters in the same batch are cleaned at once.
Note: When allowing remote controller operation under K control, all prohibit remote controller operation items must
be set enable.
3-3-1-3 Performing the operations that target all groups
(1) Click [Batch Operation] from the operation condition monitoring
screen that displays all groups in a list. When air conditioner
groups, ventilator (LOSSNAY) groups, and general equipment
groups exist together in the system, a new screen will appear to
select the group. Click one of the [All Air-conditioners],
[All LOSSNAY], [All Air To Water], or [Other Equipment] and the
screen to set the batch operation will appear.
If the system has only air conditioner groups or only LOSSNAY
groups or only Air To Water (PWFY) groups or only general
equipment groups, this selection screen will not appear.
(2) After you have made the settings on the screen for batch
operation, click [OK] and the operation settings for only the
adjusted items will be sent to all the air conditioner, ventilator
(LOSSNAY) groups, Air To Water (PWFY) groups or general
equipment groups.
To return to the previous screen without performing any
operations, click [Cancel].
Note: When resetting the filter sign as part of an all-groups batch
operation, the accumulated ON time used to trigger the filter sign
will be reset in all units, irrespective of whether or not the filter
sign was triggered. Use the reset filter sign operation in a batch
operation in a case such as when all the unit filters are cleaned at
once.
Note: When allowing remote controller operation under K control, all prohibit remote controller operation items must
be set enable.
19
3-3-2 Performing the operations of HWHP (CAHV)
Text below explains how to perform HWHP (CAHV) operations that target one group or all groups.
3-3-2-1 Performing the operations that target one group
When you click on a group icon in the operation condition monitoring screen that shows the list of all groups,
the operation screen for that group will appear. The items shown in this screen are the current operation
conditions. Modify the items you want to change and click [OK] to confirm the operation details. Click [Cancel]
to return to the previous screen without making any changes.
Note: If the Web browser is configured to block Java Script, the operation window will appear at the left top of the
floor layout screen. If the floor layout window is scrolled down to click the group icon, scroll up the screen to
the left to perform an operation.
Group name
The name of the group is
displayed here.
ON/OFF
Click to switch to ON or OFF.
Operation mode
Fan mode
Click to switch the operation mode.
Click to switch the fan mode.
Set temperature
Click to adjust the set
temperature.
Prohibit remote
controller operation
Click to select the items
you do not want the remote
controller to control.
Schedule
Available/Not Available
Click to switch the schedule
Available or Not Available.
OK button
Click to confirm the operation
details. You must press the
OK button for the operation
to take effect.
Cancel button
Click to cancel all operations.
Item
Description
ON/OFF
Click [ON] or [OFF] to switch to ON or OFF.
Operation mode
Click [Heating], [Heating ECO], [Hot Water] or [Anti-freeze] to switch the operation mode.
Click
Set temperature
Fan mode
to adjust the set temperature.
Note: The temperature setting range is as follows:
Heating: 25-70ºC/77-158ºF
Heating ECO: Invalid
Hot Water: 25-70ºC/77-158ºF
Anti-freeze: Invalid
Click [Normal] or [Snow] to switch the fan mode.
Prohibit remote
Select the items you do not want the remote controller to control. Click the word part of [ON/
controller operation
OFF], [Mode], [Set Temp] and switch to prohibit or enable.
Schedule Available/Not
Click the button to select Available or Not Available for the schedule settings.
Available
3-3-2-2 Performing the operations that target all groups
Click [Batch Operation] from the operation condition monitoring screen, and the screen to set the batch
operation will appear.
After you have made settings on the screen for batch operation, click [OK] and the operation settings for only
the adjusted items will be sent to all the HWHP (CAHV) groups.
20
3-4
Checking the Measurement Condition
Text below explains how to check the measurement condition either by list or graph.
Note: An AI controller (PAC-YG63MCA) and a commercially available temperature sensor and humidity sensor are
required to measure the temperature and humidity.
Note: A PI controller (PAC-YG60MCA) and a commercially available pulse output meter are required to measure
the electric, water, heat, and gas consumptions.
3-4-1 Using a measurement list
Click [Monitor/Operation] in the menu, and click [Measurement List] in the sub menu to display a list of the
measurement condition.
Update to most recent
condition
Trend graph
Click to display the trend
graph for each
measurement value.
Click to update the screen so
that the most recent operation
condition is shown.
Measured item
The measured item is
displayed here.
Expansion Controller
system selection button
Click to display the desired
system.
Measurement value
The measurement value is
displayed here.
Item
Trend graph
Update to most recent
condition
Expansion Controller
system selection
buttons
Description
Switches to the screen where the measurement value can be checked by graph.
Click [Update] to ensure the displayed items reflect the most recent operation condition.
When [Auto] is selected, information is updated automatically every minute to reflect the latest
information.
Click the button that corresponds to the desired Expansion Controller system to display the
measuring units in the system.
Note: Expansion Controller system selection buttons will not appear if no PAC-YG50ECA
Expansion Controllers are connected.
The present value is displayed.
Note: The following icons are used to indicate the measuring devices. The icon is displayed
in orange when the measured value exceeds the upper limit alarm value or the lower
limit alarm value that is set on Initial Setting Web.
Normal
Temperature
sensor
Upper/lower limit
alarm
Communication
error
*1
Measurement value
Humidity sensor
*1
Drop meter
*2
*1 When there is a communication error or a sensor error, the temperature and humidity
sensors’ readings will be “- -”.
*2 When there is a communication error, the drop meter’s reading will be the measured
value immediately before the error detection.
21
3-4-2 Using a graph
Click [Trend Graph] on the measurement condition list screen, and select the measured item to be displayed.
The measured value can be checked by graph. The graph can also be downloaded as a CSV file.
Note: [Temperature], [Humidity], [Electric power for peak cut control], and [electric power] can be displayed in the trend graph.
Overview display
Click to display the measurement value as
a list.
Update to most recent
condition
Click to update the screen
so that the most recent
operation condition is
shown.
Expansion Controller system
selection buttons
Click to display the desired system.
Measurement date
Select the date when the value to be
displayed is measured.
Selection of measured
item
Select the measured item to
be displayed.
Upper/lower limit alarm value
The Upper/lower limit alarm value is
displayed.
Measurement value
The measured value is
displayed as a graph.
Download
Click to download the graph
in CSV format.
Temperature / Humidity
Average electric power
The average electric power for 30
minutes is displayed.
Electric Energy
Control level
The change in control level is
displayed.
Electric Energy
Power consumptions are displayed
in 30-minute increments.
Peak cut control
Item
Description
Overview
Switches to the screen where the measurement value can be checked as a list.
Update to most recent condition
Click [Update] to ensure the displayed items reflect the most recent operation condition.
Expansion Controller system
selection buttons
Click the button that corresponds to the desired Expansion Controller system to display the measuring
units in the system.
Note: Expansion Controller system selection buttons will not appear if no PAC-YG50ECA
Expansion Controllers are connected.
Selection of measured item
Click the [Selection of measured item], and select the measured item to be displayed from the list.
Note: When the peak cut function is used, selecting [Peak cut control] is possible, and the electric
power and the control level can be displayed as a graph.
Measurement date
Select the date when the value to be displayed is measured.
Note: The period of time that the graph for temperature/humidity can be displayed varies
depending on the data saving interval. When the interval is 5 minutes, the graph can be
displayed for 10 days, when 1 minutes, for 2 days.
Note: The graph for peak cut control can be displayed for 3 days, the previous, the current, and
the following day.
Temperature,
humidity
Measurement
value
The measured item is displayed as a graph.
Note: The temperature/humidity data saving interval can be set on Initial Setting Web. (Select
between 1 min./2 min./5 min.)
Upper/lower
limit alarm
value
Upper/lower limit alarm value that is set on Initial Setting Web is displayed.
When the measurement value exceeds the upper/lower limit alarm value, the area that is above/below
than the upper/lower limit alarm value is displayed in yellow.
of
Electric energy Amount
electricity
Peak cut
control
Amount of electricity are displayed in 30-minute increments.
*Power consumption data is stored every five minutes. The data cannot be stored during a power
failure.
Average
electric power
The average electric power (kW) is displayed every 30 minutes.
Note: The electric power is saved every hour and the half. When a power failure occurs, the data
cannot be saved for a power failure.
Note: The electric power is displayed in [kW]. When the graph is displayed in the unit of 0.5h, use
the following formula to calculate the amount of electricity (kWh).
Electric power [kW] = 2 x amount of electricity [kWh]
(When 20kWh of electricity is used for 30 minutes, the average will be 40kW.)
Note: When a method other than Electric Amount Count PLC Method and PI Controller Method is used
for the peak cut method, the average electric power will not be displayed.
Control level
The control level while the peak cut control is performed is displayed in minute increments.
22
Item
Description
Click [Download] to download the graph in CSV format.
The data format of the downloaded data is as follows.
Item
First line
Second line
Third line
Fourth line
Format
121: Temperature data
122: Humidity data
123: Peak cut control data
125: Electric energy
yyyy/mm/dd
Date
Note: The date format set on Initial Setting Web.will be
applied.
Temperature: "Address" + M-NET address*1 + "-" + Sensor No.
Humidity: "Address" + M-NET address*1 + "-" + Sensor No.
Trend target
Peak cut control: "Peakcut energy"
Electric energy: "Address" + M-NET address + "-" + Sensor No.
Temperature: "Time,Temperature(deg C)"
Measured item Humidity: "Time,Humidity(%)"
Peak cut control: " Time,Power(kW),Control level "
File type
Electric energy: "Time, Electric energy (kWh)"
Fifth line or
later
Data
Temperature: hh:MM*2, Temperature
Humidity: hh:MM*2, Humidity
Note: Upper/lower limit alarm value of temperature/
humidity data is not output to the file.
Peak cut control: hh:MM (1-minute intervals), Average electric
power, Control level
Note: The power (kW) displayed remains unchanged for
30 minutes.
Electric energy: hh: MM (5-minute intervals), electric power
*1 When an Expansion controller (PAC-YG50ECA) is connected to the controller, Expansion
controller number and "-" are added before the M-NET address.
*2 Temperature/humidity data is output at the trend interval that was set using the initial setting
browser. (1-minute, 2-minute, or 5-minute intervals)
Download
Example of temperature data
121
01/04/2007
Address 50-1
Time,Temperature(deg C)
00:00,20.3
00:05,20.1
00:10,19.8
:
23:50,18.8
23:55,18.5
Example of peak cut control data
123
01/04/2007
Peakcut energy
Time,Power(kW),Control level
00:00,8,1
00:01,8,0
00:02,8,0
:
23:58,6,0
23:59,6,0
Example of electric energy(kWh)
125
2007/04/01
Address 01-2
Time, Electric energy (kWh)
00:00,8
00:05,8
00:10,8
00:15,8
:
23:50,6
23:55,6
Note: When the data cannot be downloaded
properly, uncheck the "Use Passive FTP (for
firewall and DSL modem compatibility) "
checkbox. (Refer to the image.)
23
3-5
Checking the List of Malfunctioning Units
Click the menu item [Monitor/Operation] and then click the sub menu [Malfunction List]. A list of units that are
currently malfunctioning appears.
All reset
Click to reset errors on all
units as one batch
operation.
Expansion Controller
system selection buttons
Update to most recent
condition
Click to display the desired
system.
Click to update the screen
so that the most recent
operation condition is
shown.
Number of
malfunctioning units
The number of
malfunctioning units is
displayed here.
Group name
The name of the group is
displayed here.
Error code
The error code is displayed
here.
Unit address
The unit address is
displayed here.
Item
Description
Click [Update] to ensure the displayed items reflect the most recent operation condition.
Update to most recent
When [Auto] is selected, information is updated automatically every minute to reflect the latest
condition
information.
Click the button that corresponds to the desired Expansion Controller system to display the
units in error in the selected system.
Expansion Controller
Note: Expansion Controller system selection buttons will not appear if no PAC-YG50ECA
system selection buttons
Expansion Controllers are connected.
Note: The system in error will appear in green.
Click [All Reset] when you want to reset the errors on all the malfunctioning units at once.
All reset
Note: If Expansion Controllers are connected, the errors on all units in the selected
Expansion Controller system will be reset at once.
The number of malfunctioning units is displayed.
Number of malfunctioning
Note: If Expansion Controllers are connected, the number of malfunctioning units in the
units
selected Expansion Controller system will appear.
The name of the group is displayed.
Group Name
Note: If a unit, such as an outdoor unit or system controller, has not been registered in a
group that is the object of the operation, this area will be blank.
Unit address
The unit address is displayed.
Error code
The error code of the error that is causing the malfunction is displayed.
24
• Extent of the error reset
When an error is reset, units other than the ones in error may come to a stop.
Types of units in error and the affected units that will stop
Units in error
Units that stop
AG-150A (EC), GB-50ADA
None
Outdoor unit
All indoor units that are connected to the outdoor unit in error
Indoor unit
Indoor unit in error and all other indoor units in the same group
ME (MA) remote controller
All indoor units that are connected to the remote controller in error
System controller
All indoor units that are connected to the system controller in error
Interlocked LOSSNAY
Indoor units with which the LOSSNAY unit experiencing the problem is
interlocked
Air To Water (PWFY)
Air To Water (PWFY) unit in error and all other Air To Water (PWFY) units in the
same group
DIDO controller (PAC-YG66DCA)
None
HWHP (CAHV)
None
Shown below is a diagram showing the extent to which an error of a unit will affect.
AG-150A (EC)
GB-50ADA
(0)
Indoor unit
(2)
Group 1
Outdoor unit
(51)
Indoor unit
(1)
Outdoor unit
(53)
Indoor unitt
(3)
ME remote controller
(101)
System controller
(201)
Indoor unit
(4)
Group 2
Outdoor unit
(55)
Indoor unit
(5)
Outdoor unit
(57)
LOSSNAY
(6)
Air To Water (PWFY)
(7)
DIDO controller (PAC-YG66DCA)
(8)
HWHP (CAHV)
main (9) sub (59)
Units in error
Units that stop
AG-150A (EC), GB-50ADA
None
Outdoor unit (51)
Indoor unit (1), Indoor unit (2)
Outdoor unit (53)
Indoor unit (3), Indoor unit (4), Indoor unit (5)
Outdoor unit (57)
Air To Water (PWFY) (7)
Indoor unit (1)
Indoor unit (1), Indoor unit (2)
Indoor unit (3)
Indoor unit (3)
Indoor unit (5)
Indoor unit (4), Indoor unit (5)
LOSSNAY (6)
Indoor unit (5)
Air To Water (PWFY) (7)
Air To Water (PWFY) (7)
ME remote controller (101)
Indoor unit (1)
System controller (201)
Indoor unit (1), Indoor unit (3), Indoor unit (4)
DIDO controller (PAC-YG66DCA) (8)
None
HWHP (CAHV)
None
25
3-6
Checking the List of Units with a Triggered Filter Sign
Click the menu item [Monitor/Operation] and click the sub menu [Filter Sign List]. A list of the units with a
triggered filter sign appears.
All reset
Click to reset the filter sign on
all units with triggered filter
signs.
Update to most recent
condition
Expansion Controller
system selection buttons
Click to update the screen so
that the most recent operation
condition is shown.
Click to display the desired
system.
Number of units with
triggered filter signs
Group name
The number of units with
currently triggered filter
signs is displayed here.
Unit address
Reset units individually
The name of the group is
displayed here.
Click to reset the filter sign
for the group the units belong
to.
The unit address is displayed
here.
Item
Update to most recent
condition
Expansion Controller
system selection buttons
All reset
Number of units with
triggered filter signs
Description
Click [Update] to ensure the displayed items reflect the most recent operation condition.
When [Auto] is selected, information is updated automatically every minute to reflect the
latest information.
Click the button that corresponds to the desired Expansion Controller system to display the
units in the system whose filter sigh is turned on.
Note: Expansion Controller system selection buttons will not appear if no PAC-YG50ECA
Expansion Controllers are connected.
Note: The system in which the filter sign on one or more units is turned on will appear in
green.
Click [All Reset] when you want to reset the filter sign on all units with a triggered filter sign at
once.
Note: If Expansion Controllers are connected, the errors on all units in the selected
Expansion Controller system will be reset at once.
The number of units with currently triggered filter signs is displayed.
Note: If Expansion Controllers are connected, the number of units in the Expansion
Controller system will appear whose filter sign is turned on.
Group name
The group name is displayed.
Unit address
The unit address is displayed.
Reset units individually
Click [Reset] when you want to reset the filter sign for the group the units belong to.
26
3-7
Setting Schedules
When a license is registered for [Annual schedule / Weekly schedule], it is possible to use the annual
schedule, weekly schedule 1, weekly schedule 2, weekly schedule 3, weekly schedule 4, weekly schedule 5
and today’s schedule. If a license has not been acquired, only the weekly schedule 1 functions available can
be used.
Note: The same schedule settings that are made via the Web browser can be made on the AG-150A LCD screen.
Note: When connecting multiple AG-150A controllers by connecting an Expansion Controller to the system,
schedule settings for the groups should be made only on one of the AG-150A controllers.
Without the registered license
With the registered license
Weekly schedule 1
Weekly schedule 5
(1) Frequency of operations per day
24 operations
(2) Operation items
[1] ON/OFF/Optimized Start
[2] Operation mode
[3] Temperature setting
[4] Fan direction
[5] Fan speed
[6] Prohibit/enable remote controller
operation
Note: Settable items vary according to
model.
Note: The CITY MULTI model supports a
temperature setting range of 12-28°C
/ 53-83°F when in Heat mode.
(3) Time setting unit
1 minutes
(4) Season settings
No (The same schedule is followed
throughout the year.)
Priority
Low
Seasonal schedule
setting is possible.
(1) to (3)
Same as the left under "Without the
registered license"
(4) Season settings
Yes (The effective dates for Weekly schedule
5 are set.)
Weekly schedule 4
(1) to (3)
Same as the left under "Without the
registered license"
(4) Season settings
Yes (The effective dates for Weekly schedule
4 are set.)
Weekly schedule 3
(1) to (3)
Same as the left under "Without the
registered license"
(4) Season settings
Yes (The effective dates for Weekly schedule
3 are set.)
Weekly schedule 2
(1) to (3)
Same as the left under "Without the
registered license"
(4) Season settings
Yes (The effective dates for Weekly schedule
2 are set.)
Weekly schedule 1
(1) to (3)
Same as the left under "Without the
registered license"
(4) Season settings
Yes (The effective dates for Weekly schedule
1 are set.)
Annual schedule
Can set for public holidays.
Up to 50 days per year, such as public holidays and
summer vacation can be scheduled as days that do
not comply with the weekly schedule.
Today’s schedule
The current day’s schedule can be modified.
A schedule for that day can be modified without
modifying the weekly schedule or annual schedule.
27
High
It is possible to set different weekly/annual/today’s schedules for each air conditioner group. Moreover, for any
weekly/annual/today’s schedule run for a particular day, the priority in which it is run will be from the highest
and the order will be [Today’s], [Annual], [Weekly].
Group 1
August, 2008
MON
SUN
TUE
WED
SUN
Group 2
THU
MON
FRI
8
SAT
TUE1 WED2
Group 3
FRI
SAT
8
TUE1 WED2
FRI
SAT
8
9
12 3 13 414 5 15 6 16 7
6
19 1020 1121 12223 1323414 5 15 16 7
1
2
8
9
26 1727 1828 19291020301121 1222 1323 14
24
25 26 1727 1828 1929 2030 21
31
24
25 26 27 28
31
15
16
22
23
29
30
3
4
5
10
11
17
18
24
31
25
6
7
8SUN 9MON
Days run by Weekly Schedule
Days run by Annual Schedule
Day run by Today’s Schedule
If the [Annual schedule/Weekly schedule] license has been registered, five sets of weekly schedules can be
set .
Jan.
Feb.
Mar.
Apr.
May
Jun.
Jul.
Aug.
Sep.
Oct.
Nov.
Dec.
Weekly
schedule 1
(special)
Weekly schedule 2
(summer)
Weekly
schedule 3
(winter)
Weekly
schedule 3
(winter)
Weekly schedule 4
(spring)
Weekly
schedule 5
(autumn)
Note: This example shows that the period for each schedule is set to the followings.
Weekly schedule 1: Aug. 1 - Aug. 20
Weekly schedule 2: Jun. 16 - Sep. 15
Weekly schedule 3: Nov. 16 - Mar. 15
Weekly schedule 4: Mar. 16 - Jun. 15
Weekly schedule 5: Sep. 16 - Nov. 15
Note: If the periods for Weekly schedule 1, 2, 3, 4 and 5 overlap, the higher priority schedule will be executed in the
order of Weekly schedule 1, Weekly schedule 2, Weekly schedule 3, Weekly schedule 4 and Weekly
schedule 5.
28
3-7-1 Setting the Weekly Schedule
Click the menu item [Schedule Settings] and click [Weekly 1], [Weekly 2], [Weekly 3], [Weekly 4] or [Weekly 5]
in the sub menu to display the each Weekly Schedule setting screen. To set a weekly schedule, you first must
select what will be the target of this schedule and then set the schedule details from Sunday right through to
Saturday.
Note: If the [Annual schedule/Weekly schedule] license has not been registered, only the settings for Weekly schedule 1 can be
set.
Note: When the contents of an operation are executed as part of a schedule these contents will continue to be in effect until they
are changed by a schedule or browser etc. Therefore, if you are setting a schedule that is only for a particular day, be sure
to set your schedule in a way that will not impact on the next day’s operation.
For example, if you wish to prohibit operations being performed from the remote controller after 17:00, set a Prohibit
operation for 17:00 and set an Enable operation for 23:59.
Note: Settings for the groups whose schedules have been Not Available from the control screen are settable, but their weekly
schedules will not be executed.
Note: In the system with TG-2000A of version 6.36 or earlier, only [Weekly Schedule 1] and [Weekly Schedule 2] can be used.
Select a day of the week
Seasonal settings
Select which day to set the
schedule for.
Set the starting and ending
dates for each season.
Setting Range
Select the range that
scheduling will be set for.
Copy (Day of the week) /
Paste
Click to copy or paste a
schedule between each day of
the week.
Block Name
Select the block to be set.
Contents of Schedule
Operations set for the schedule
are displayed here.
Group Name
Select the group to be set.
Edit button
Click to set a schedule
operation.
Group Number
Select the group to be set.
Delete button
Click to delete a schedule
operation.
Copy (Group) / Paste
Click to copy or paste a
schedule between groups.
Save Settings button
Expansion Controller system
selection buttons
Click to save the contents of the
schedule setting. The schedule
settings will not be saved
unless this button is pressed.
Click to select the system to be set.
Undo button
Click to undo the changed.
3-7-1-1 Setting the Weekly Schedule for air conditioner and various groups
Text below explains how to set the weekly schedule for the group of air conditioners, Ventilators (LOSSNAY),
Air-To-Water (PWFY) units, and general equipment.
(1)Select the target for the schedule being set
(1-1)Select a particular group
If you wish to set a schedule for a particular group, select [Group] from
the Setting Range box.
29
Select the name of the block that the group belongs to, and then
select the group name in the Setting Object box.
Alternatively it is possible to just select the group name and the group
number. Once the group is selected, the contents of the schedule
saved for that group will be displayed in the Contents of Schedule box.
Note: If Expansion Controllers are connected, Expansion Controller system
selection buttons will appear. Select the button that corresponds to the
desired system (EC1, EC2, or EC3), and then select the groups in the
system.
In the Group Name field, all groups in all Expansion Controller systems
are available for selection. (If no name is assigned to a given group, it will
appear in the [Expansion Controller number + Group number] format
(e.g., Group 1-35)).
(1-2)Select all groups in a block
If you want to set a schedule to be used by all groups in a block, select
[Block] from the Setting Range box.
Select the name of the block that the groups belong to from the
Setting Object box. Alternatively, if you click on a group number, the
block that the group belongs to gets selected (groups cannot be
selected unless they belong to a block).
Note: If Expansion Controllers are connected, Expansion Controller
system selection buttons will appear. Select the button that
corresponds to the desired system (EC1, EC2, or EC3), and then
select the groups in the system.
When air conditioner groups, ventilator (LOSSNAY) groups, Air To
Water (PWFY) groups, and general equipment groups exist together
in the selected block, a new screen will appear to select the group.
Click one of the [All Air-conditioners in this block], [All LOSSNAY in
this block], [All Air To Water in this block], or [Other Equipment] and
the screen to set the batch operation will appear.
If the system has only air conditioner groups or only LOSSNAY
groups or only Air To Water (PWFY) groups or only general
equipment groups, this selection screen will not appear.
Next a screen to select the schedule setup method will appear. Select
either [New settings] or [Based on the following group settings]. If you
plan to add to an existing setting, and then choose to base it on an
existing setting and select the name of the group you want to base the
setting on and click the [OK] button.
If you chose to make a new setting, the Contents of Schedule box will
appear completely blank. If you chose to base your setting on an
existing group, the contents of the schedule set for that group will appear in the Contents of Schedule box.
30
(1-3)Select all groups
When you want to set a schedule that will apply to all groups, select
[All Group] in the Setting Range box.
When air conditioner groups, ventilator (LOSSNAY) groups, Air To
Water (PWFY) groups, and general equipment groups exist together
in the system, a new screen will appear to select the group. Click one
of the [All Air-conditioners], [All LOSSNAY], [All Air To Water], or
[Other Equipment] and the screen to set the batch operation will
appear.
If the system has only air conditioner groups or only LOSSNAY
groups or only Air To Water (PWFY) groups or only general
equipment groups, this selection screen will not appear.
Next a screen to select the schedule setup method will appear. Select
either [New settings] or [Based on the following group settings]. If you
plan to add to an existing setting, and then choose to base it on an
existing setting and select the name of the group you want to base the
setting on and click the [OK] button.
If you chose to make a new setting, the Contents of Schedule box will
appear completely blank. If you chose to base your setting on an
existing group, the contents of the schedule set for that group will
appear in the Contents of Schedule box.
(2)Set the starting and ending dates for each schedule type.
Check the checkbox to
enable the weekly
schedule.
Click the [Edit] button on the right top corner of the Seasonal setting
window, and set the starting and ending dates for Weekly schedule 1 ,
2, 3, 4 and 5.
Note: When the season setting is set to “Not Available” on the Basic
System screen, [Edit] button will not be displayed.
Note: If the [Annual schedule/Weekly schedule] license has not been registered, the same schedule is followed
throughout the year, and the starting or ending dates cannot be set.
Note: These dates are common to all groups.
Note: If the periods for Weekly schedule 1, 2, 3, 4 and 5 overlap, the higher priority schedule will be executed in the
order of Weekly schedule 1, Weekly schedule 2, Weekly schedule 3, Weekly schedule 4 and Weekly
schedule 5.
(3)Select the day of the week
Click the day of the week listed in the Contents of Weekly Schedule
box you want to set the schedule for. You can select from Sunday
through to Saturday.
31
(4)Set the contents of the schedule
When one of the [Edit] buttons in the Contents of Schedule box is
clicked, a screen to set a schedule operation will appear. Use this
screen to set when to run an operation and set the type of schedule
operation (ON/OFF, operation mode, temperature setting, fan
direction, fan speed, prohibit remote controller operation) and then
press the [OK] button.
It is possible to schedule operation by specifying the settings for
selected items (e.g., operation mode only or preset temperature only).
Note: When [Optimized start] is selected, the unit starts 5 - 60 minutes
before the scheduled time based on the operation data history in
order to reach the scheduled temperature at the scheduled time.
OK Button
(When the unit starts the first time after power reset, the
operation starts 30 minutes before the scheduled time.) When
using this function, also set the operation mode and setting
temperature. If "Prohibit Remote Controller" is set at the same time, remote controller is prohibited at its
setting time.
If the room temperature is measured by the air-conditioner's suction temperature sensor, the temperature
may not be correct when the air-conditioner is inactive and the air is not fresh. When the temperature is not
measured correctly, switch the sensor to external temperature sensor (PAC-SE40TSA) or remote control
sensor.
Note: Only air conditioner units can set [Optimized start].
Note: The CITY MULTI model supports a temperature setting range of 12-28°C / 53-83°F when in Heat mode.
(When S series (PUMY) is used, set the temperature at 17°C-28°C / 63-83°F in heat mode.)
Note: When setting a schedule for all groups or for a block, it is possible to set all operation modes such as Auto
mode etc, but if some targeted air conditioner units do not have such a function, then those units will not run in
the specified mode. When setting the schedule, consider what functions are supported by the air conditioner
units.
Note: When setting a schedule for all groups or for a block, it is possible to set prohibit remote controller items
individually. When allowing remote controller operation under K control, however, all items must be set
enable.
Note: When setting a schedule for ventilator units, the temperature setting and fan direction setting are not
displayed. Moreover, the prohibit remote controller operation is simply [ON/OFF].
Note: Only the ON/OFF operation is possible on the general equipment.
(5)Copy a schedule to another day of the week or to another
group
Copy (Day of the week) / Paste
When copying a schedule between each day of the week, click [Copy
(Day of the week)] button. The color of the button turns to green
(which means the button is selected). Select the desired day, and click
[Paste] button.
When copying the entire week's schedule between groups, click
[Copy (Group)] button. Select the desired group, and click [Paste]
button.
Note: Copied schedule cannot be pasted to different type of
equipment. For example, schedule copied on the air conditioner
cannot be pasted to the ventilator equipment.
Note: The operation mode that can be pasted and the temperature
setting range vary depending on the unit type.
Copy (Group) / Paste
(6)Save the contents of schedule
After you have finished setting the contents of the schedule, save the
schedule setting by clicking the [Save Settings] button.
If the contents of the schedule setting have changed since the
previous save, you can click the [Undo] button to restore the setting
contents back to the saved settings.
Save Settings button
32
3-7-1-2 Setting the Weekly Schedule for HWHP (CAHV) group
If a HWHP (CAHV) group has been registered, the [Air Conditioners] and [HWHP] buttons will appear as
shown in the figure below. Click [HWHP] to access the window for setting the weekly schedule for HWHP
(CAHV) units. Click [Air Conditioners] to access the window for setting the weekly schedule for air conditioning
unit, ventilator (LOSSNAY), Air To Water (PWFY) unit, and general equipment groups.
[Air Conditioners] and
[HWHP] buttons
(1)Select the target for the schedule being set
(1-1)Select a particular group
If you wish to set a schedule for a particular group, select [Group] from
the Setting Range box.
Once the group is selected, the contents of the schedule saved for
that group wil be displayed in the Contents of Schedule box.
Note: If Expansion Controllers are connected, Expansion Controller system
selection buttons will appear. Select the button that corresponds to the
desired system (EC1, EC2, or EC3), and then select the groups in the
system.
In the Group Name field, all groups in all Expansion Controller systems
are available for selection. (If no name is assigned to a given group, it
will appear in the [Expansion Controller number + Group number]
format (e.g., Group 1-35)).
33
(1-2)Select all groups
When you want to set a schedule that will apply to all groups, select
[All Group] in the Setting Range box.
Next a screen to select the schedule setup method will appear. Select
either [New settings] or [Based on the following group settings]. If you
plan to add to an existing setting, and then choose to base it on an
existing setting and select the name of the group you want to base the
setting on and click the [OK] button.
If you chose to make a new setting, the Contents of Schedule box will
appear completely blank. If you chose to base your setting on an
existing group, the contents of the schedule set for that group will
appear in the Contents of Schedule box.
(2)Set the starting and ending dates for each scheduled type.
Follow the same procedures as outlined in section 3-7-1-1(2).
(3)Select the day of the week.
Follow the same procedures as outlined in section 3-7-1-1(3).
(4)Set the contents of the schedule
When one of the [Edit] buttons in the Contents of Schedule box is
clicked, a screen to set a schedule operation will appear. Use this
screen to set when to run an operation and set the type of schedule
operation (ON/OFF, operation mode, temperature setting, prohibit
remote controller operation) and then press the [OK] button.
It is possible to schedule operation by specifying the settings for
selected items (e.g., operation mode only or preset temperature only).
(5)Copy a schedule to another day of the week or to another group.
Follow the same procedures as outlined in section 3-7-1-1(5).
(6)Save the contents of schedule.
Follow the same procedures as outlined in section 3-7-1-1(6).
34
3-7-2 Setting an Annual Schedule
Click the menu item [Schedule Settings] and click [Annual] in the sub menu to display the Annual Schedule
setting screen. You can use the annual schedule to set schedules for days such as public holidays and
summer vacation that need to be scheduled differently to the weekly schedule. For each air conditioner group,
it is possible to set 50 day-long settings up to 24 months into the future (including the current month).
When saving the settings, settings for days that have passed will be deleted automatically.
To set an annual schedule, first select the range and object of the schedule setting and then set the contents
of the schedule for each schedule pattern. After setting the contents of the schedule pattern (Pattern 1 – 5),
allocate the schedule pattern you wish to use for the days such as public holidays or summer vacation you are
setting the annual schedule for.
Note: Settings for the groups whose schedules have been Not Available from the control screen are settable, but their annual
schedules will not be executed.
Note: When the contents of an operation are executed as part of a schedule these contents will continue to be in effect until they
are changed by a schedule or browser etc. Therefore, if you are setting a schedule that is only for a particular day, be sure
to set your schedule in a way that will not impact on the next day’s operation.
For example, if you wish to prohibit operations being performed from the remote controller after 17:00, set a Prohibit
operation for 17:00 and set an Enable operation for 23:59.
Select the schedule
pattern
Setting Range
Select which pattern you wish
to set the schedule for.
Select the range that
scheduling will be set for.
Contents of Schedule
Operations set for the
schedule are displayed here.
Block Name
Select the block to be set.
Copy (Pattern) / Paste
Click to copy or paste a
schedule between each
pattern.
Group Name
Select the group to be set.
Edit button
Click to set a schedule
operation.
Copy (Group) / Paste
Delete button
Click to copy or paste a
schedule between groups.
Click to delete a schedule
operation.
Group Number
Calendar
Select the group to be set.
Use the calendar to specify
the days that the selected
schedule pattern will be
allocated for.
Expansion Controller
system selection
buttons
Save Settings button
Click to display the desired
system.
Click to save the contents of
the schedule setting. The
schedule settings will not be
saved unless this button is
pressed.
Undo button
Click to undo the changed.
3-7-2-1 Setting an Annual Schedule for air conditioner and various groups
Text below explains how to set the annual schedule for the groups of air conditioners, Ventilators (LOSSNAY),
Air-To-Water (PWFY) units, and general equipment.
(1)Select the target for the schedule being set
Follow the procedure outlined for the weekly schedule (see 3-7-1) to select the range and object of the
schedule setting.
(2)Select the schedule pattern you want to set
In the Contents of Annual Schedule box situated at the upper right
part of the screen, choose the pattern you wish to set from Pattern 1 5. (If you do not need to modify any of the existing schedule pattern
settings, then skip steps (2) and (3).)
35
(3)Set the contents of the schedule setting
When one of the [Edit] buttons in the Contents of Schedule box is
clicked, a screen to set a schedule operation will appear. Use this
screen to set when to run an operation and set the type of schedule
operation (ON/OFF, operation mode, temperature setting,fan
direction, fan speed, prohibit remote controller operation) and then
press the [OK] button.
It is possible to schedule operation by specifying the settings for
selected items (e.g., operation mode only or preset temperature only).
OK Button
Note: When [Optimized start] is selected, the unit starts 5 - 60 minutes before the scheduled time based on the
operation data history in order to reach the scheduled temperature at the scheduled time. (When the unit
starts the first time after power reset, the operation starts 30 minutes before the scheduled time.) When using
this function, also set the operation mode and setting temperature. If "Prohibit Remote Controller" is set at the
same time, remote controller is prohibited at its setting time.
If the room temperature is measured by the air-conditioner's suction temperature sensor, the temperature
may not be correct when the air-conditioner is inactive and the air is not fresh. When the temperature is not
measured correctly, switch the sensor to external temperature sensor (PAC-SE40TSA) or remote control
sensor.
Note: Only air conditioner units can set [Optimized start].
Note: The CITY MULTI model supports a temperature setting range of 12-28°C / 53-83°F when in Heat mode.
(When S series (PUMY) is used, set the temperature at 17°C-28°C / 63-83°F in heat mode.)
Note: When setting a schedule for all groups or for a block, it is possible to set all operation modes such as Auto
mode etc, but if some targeted air conditioner units do not have such a function, then those units will not run in
the specified mode. When setting the schedule, consider what functions are supported by the air conditioner
units.
Note: When setting a schedule for all groups or for a block, it is possible to set prohibit remote controller items
individually. When allowing remote controller operation under K control, however, all items must be set
enable.
Note: When setting a schedule for ventilator units, the temperature setting and fan direction setting are not
displayed. Moreover, the prohibit remote controller operation is simply [ON/OFF].
Note: When setting a schedule for Air To Water (PWFY) units, the fan direction setting and fan speed setting is are
not displayed.
Note: Only the ON/OFF operation is possible on the general equipment.
(4)Specify the day(s) for pattern allocation
Allocate the set schedule pattern for days such as public holidays or
summer vacation that has scheduling requirements different to the
weekly schedule.
To allocate a schedule pattern to a day, first click the pattern you wish
to allocate to select it and then select the day in the calendar by
clicking on the rectangle corresponding to the day. When selected, the
day will display the number of the pattern that has been allocated.
If you wish to remove a pattern allocation from a day, select [Pattern Cancel] and then click on that day’s
rectangle.
(5)Copy a schedule to another pattern or to another group
Copy (Pattern) / Paste
When copying a schedule between each pattern, click [Copy (Pattern)]
button. The color of the button turns to green (which means the button
is selected). Select the desired pattern, and click [Paste] button.
When copying all patterns of schedules or an allocated day of the
pattern between each group, click [Copy (Group)] button. Select the
desired group, and click [Paste] button.
Note: Copied schedule cannot be pasted to different type of
equipment. For example, schedule copied on the air conditioner
cannot be pasted to the ventilator equipment.
Note: The operation mode that can be pasted and the temperature
setting range vary depending on the unit type.
Copy (Group) / Paste
36
(6)Save the contents of schedule
After you finished setting the contents of the schedule, save the
schedule setting by clicking the [Save Settings] button.
If the contents of the schedule setting have changed since the
previous save, you can click the [Undo] button to restore the setting
contents back to the saved settings.
Save Settings button
3-7-2-2 Setting an Annual Schedule for HWHP (CAHV) group
If a HWHP (CAHV) group has been registered, the [Air Conditioners] and [HWHP] buttons will appear as
shown in the figure below. Click [HWHP] to access the window for setting the annual schedule for HWHP
(CAHV) units. Click [Air Conditioners] to access the window for setting the annual schedule for air conditioning
unit, ventilator (LOSSNAY), Air To Water (PWFY) unit, and general equipment groups.
[Air Conditioners] and
[HWHP] buttons
(1)Select the target for the schedule being set
Follow the procedure outlined for the weekly schedule (see 3-7-1-2) to select the range and object of the
schedule setting.
(2)Select the schedule pattern you want to set
Follow the same procedures as outlined in section 3-7-2-1(2).
(3)Set the contents of the schedule setting
When one of the [Edit] buttons in the Contents of Schedule box is
clicked, a screen to set a schedule operation will appear. Use this
screen to set when to run an operation and set the type of schedule
operation (ON/OFF, operation mode, temperature setting, prohibit
remote controller operation) and then press the [OK] button.
It is possible to schedule operation by specifying the settings for
selected items (e.g., operation mode only or preset temperature only).
37
(4)Specify the day(s) for pattern allocation
Follow the same procedures as outlined in section 3-7-2-1(4).
(5)Copy a schedule to another pattern or to another group
Follow the same procedures as outlined in section 3-7-2-1(5).
(6)Save the contents of schedule
Follow the same procedures as outlined in section 3-7-2-1(6).
3-7-3 Modifying Today's Schedule
Click the menu item [Schedule Settings], or click [Today] in the sub menu to display the Today’s Schedule
setting screen. Today’s Schedule can be used to set a valid schedule for just the current day without modifying
the weekly or annual schedule.
To set Today’s Schedule, first select the range and object of the setting and then set the contents of the
schedule.
Note: Settings for the groups whose schedules have been Not Available from the control screen are settable, but Today's
schedules will not be executed.
Note: When the contents of an operation are executed as part of a schedule these contents will continue to be in effect until they
are changed by a schedule or browser etc. Therefore, if you are setting a schedule that is only for a particular day, be sure
to set your schedule in a way that will not impact on the next day’s operation.
For example, if you wish to prohibit operations being performed from the remote controller after 17:00, set a Prohibit
operation for 17:00 and set an Enable operation for 23:59.
Setting Range
Select the range that
scheduling will be set for.
Block Name
Select the block to be set.
Contents of Schedule
Operations set for the
schedule are displayed here.
Group Name
Select the group to be set.
Edit button
Group Number
Click to set a schedule
operation.
Select the group to be set.
Delete button
Copy (Group) / Paste
Click to delete a schedule
operation.
Click to copy or paste a
schedule between groups.
Expansion Controller
system selection buttons
Save Settings button
Click to save the contents
of the schedule setting. The
schedule settings will not
be saved unless this button
is pressed.
Click to display the desired
system.
Undo button
Click to undo the changed.
3-7-3-1 Modifying Today's Schedule for air conditioner and various groups
Text below explains how to modify the today's schedule for the groups of air conditioners, Ventilators
(LOSSNAY), Air-To-Water (PWFY) units, and general equipment.
(1)Select the target for the schedule being set
Follow the procedure outlined for the weekly schedule (see 3-7-1) to select the range and object of the
schedule setting.
(2)Set the contents of the schedule setting
When one of the [Edit] buttons in the Contents of Schedule box is
clicked, a screen to set a schedule operation will appear. Use this
screen to set when to run an operation and set the type of schedule
operation (ON/OFF, operation mode, temperature setting, fan
direction, fan speed, prohibit remote controller operation) and then
press the [OK] button.
It is possible to schedule operation by specifying the settings for
selected items (e.g., operation mode only or preset temperature only).
Note: When [Optimized start] is selected, the unit starts 5 - 60 minutes
before the scheduled time based on the operation data history in
38
OK Button
order to reach the scheduled temperature at the scheduled time. (When the unit starts the first time after
power reset, the operation starts 30 minutes before the scheduled time.) When using this function, also set
the operation mode and setting temperature. If "Prohibit Remote Controller" is set at the same time, remote
controller is prohibited at its setting time.
If the room temperature is measured by the air-conditioner's suction temperature sensor, the temperature
may not be correct when the air-conditioner is inactive and the air is not fresh. When the temperature is not
measured correctly, switch the sensor to external temperature sensor (PAC-SE40TSA) or remote control
sensor.
Note: Only air conditioner units can set [Optimized start].
Note: The CITY MULTI model supports a temperature setting range of 12-28°C / 53-83°F when in Heat mode.
(When S series (PUMY) is used, set the temperature at 17°C-28°C / 63-83°F in heat mode.)
Note: When setting a schedule for all groups or for a block, it is possible to set all operation modes such as Auto mode
etc, but if some targeted air conditioner units do not have such a function, then those units will not run in the
specified mode. When setting the schedule, consider what functions are supported by the air conditioner units.
Note: When setting a schedule for all groups or for a block, it is possible to set prohibit remote controller items
individually. When allowing remote controller operation under K control, however, all items must be set
enable.
Note: When setting a schedule for ventilator units, the temperature setting and fan direction is not displayed.
Moreover, the prohibit remote controller operation is simply [ON/OFF].
Note: When setting a schedule for Air To Water (PWFY) units, the fan direction setting and fan speed setting is are
not displayed.
Note: Only the ON/OFF operation is possible on the general equipment.
(3)Copy a schedule to another group
When copying a schedule of the day between each group, click [Copy
(Group)]. The color of the button turns to green (which means the
button is selected). Select the desired group, and click [Paste] button.
Note: Copied schedule cannot be pasted to different type of
equipment. For example, schedule copied on the air conditioner
cannot be pasted to the ventilator equipment.
Note: The operation mode that can be pasted and the temperature
setting range vary depending on the unit type.
Copy (Group) / Paste
(4)Save the contents of schedule
After you have finished setting the contents of the schedule, save the
schedule setting by clicking the [Save Settings] button.
If the contents of the schedule setting have changed since the
previous save, you can click the [Undo] button to restore the setting
contents back to the saved settings.
Save Settings button
39
3-7-3-2 Modifying Today's Schedule for HWHP (CAHV) group
If a HWHP (CAHV) group has been registered, the [Air Conditioners] and [HWHP] buttons will appear as
shown in the figure below. Click [HWHP] to access the window for setting the today's schedule for HWHP
(CAHV) units. Click [Air Conditioners] to access the window for setting the today's schedule for air conditioning
unit, ventilator (LOSSNAY), Air To Water (PWFY) unit, and general equipment groups.
[Air Conditioners] and
[HWHP] buttons
(1)Select the target for the schedule being set
Follow the procedure outlined for the weekly schedule (see 3-7-1-2) to select the range and object of the
schedule setting.
(2)Set the contents of the schedule setting
When one of the [Edit] buttons in the Contents of Schedule box is
clicked, a screen to set a schedule operation will appear. Use this
screen to set when to run an operation and set the type of schedule
operation (ON/OFF, operation mode, temperature setting, prohibit
remote controller operation) and then press the [OK] button.
It is possible to schedule operation by specifying the settings for
selected items (e.g., operation mode only or preset temperature only).
(3)Copy a schedule to another group
Follow the same procedures as outlined in section 3-7-3-1(3).
(4)Save the contents of schedule
Follow the same procedures as outlined in section 3-7-3-1(4).
40
3-8
Checking the Malfunction Log
Click the menu item [Malfunction Log] to display a log of unit errors (the last 64 errors). Click the sub menu
[Communication Error] to display, the M-NET communication error log.
Note: If Expansion Controllers are connected, the latest 64 errors for each Expansion Controller system (EC1, EC2, or EC3) will
appear.
Communication error log
Unit error log
Click to display the
communication error log.
Click to display the unit
error log.
Expansion Controller
system selection buttons
Click to display the desired
system.
Error code list
Clear log
Click to display a list of error
cord definition.
Click to clear the error log.
Error source address
The unit address of where
the error occurred is
displayed here.
Update to most recent
condition
Click to update the screen
so that the most recent
operation condition is
shown.
Error detection source
address
The unit address of where
the error was detected is
displayed here.
Occurred time
Error code
The date and time of error
is displayed here.
The error code of the error is
displayed here.
Error recovery date and
time
The date and time of the error
recovery is displayed here.
Item
Unit error log
Description
Click [Unit Error] to display the unit error log.
Communication error log Click [Communication Error] to display the M-NET communication error log.
Click [Update] to ensure the displayed items reflect the most recent condition.
When [Auto] is selected, information is updated automatically every minute to reflect the latest
information.
Click the button that corresponds to the desired Expansion Controller system to display the
Expansion Controller
error history of the selected system.
system selection buttons
Note: Expansion Controller system selection buttons will not appear if no PAC-YG50ECA
Expansion Controllers are connected.
Click [Clear Log] to clear the error log that is being displayed.
Clear log
Note: If Expansion Controllers are connected, the error history of the selected Expansion
Controller system will be cleared.
Click to display a list of error cord definition.
Update to most recent
condition
Error code list
Time Occurred
The date and time of when the error occurred is displayed.
Error source address
The unit address of where the error occurred is displayed.
Error detection source
address
The unit address of where the error was detected is displayed.
Error code
The error code of the error is displayed.
Time Recovered
The date and time of the error recovery is displayed.
41
3-9
Setting the Current Date and Time
Click the menu item [System Settings] and the Date/Time Setting screen will appear. Enter the current date
and time and then press the [Save settings] to set it.
Note: The clock setting made on the screen below will be reflected on the clocks on other units that are connected
to the M-NET line, on the Expansion Controllers (PAC-YG50ECA), and on the AG-150A controller whose
“Time master setting” is set to Sub (with someexceptions).
Note: In the system with TG-2000A, make the settings on TG-2000A.
CAUTION
Date and clock settings on Expansion Controllers (PAC-YG50ECA), when connected, must be made
with the Expansion Controller properly connected to ensure proper settings.
Current date/time
Enter the current date and time
here.
Summer time
setting
Click to set the daylight
saving time.
Save settings
Click to set the current date and
time.
Refresh
Acquires the current
Date and Time from
AG-150A.
Item
Current date/time
Description
Enter the current date and time.
Save Settings
Click the [Save Settings] to set the current date and time.
Refresh
Acquires the current Date and Time from AG-150A.
Click and tick the "Automatically adjust clock for daylight saving changes" box to adjust the
daylight saving time automatically, and select the applicable country.
Note: If the applicable country is not in the selection bar, select "Custom Settings". Click
"Custom Settings" button that will appear on the right to set the daylight saving time.
Daylight saving
date and time
Summer time setting
Set the daylight
saving time.
Custom Setting Screen
42
3-10 Registering Users
Click the menu item [System Settings] and then click [User Registration] to display the User Registration
screen.
Please use this screen to add or modify a user name and password to login to the AG-150A, and to register a
group that can be operated by a public user. If the groups that can be operated have been specified, when a
public user logs in, that user will only be able to view and operate the groups that were specified.
Note: Managers: User who logs in from [../administrator.html].
Public Users: User who logs in from [../index.html].
(Public users can monitor and operate the groups that have been registered under the "For
Public Users" section.)
Note: To enable public users to operate groups, it is necessary to register the [Personal Web] license.
Note: User name must contain only alphanumeric characters (upper/lower case letters and numbers).
User information for
managers
The manager’s user name
and the groups that can
be used are displayed
here.
Available groups
The groups that can be
operated are displayed here.
When you position the cursor
over an icon, the group name
is displayed.
Public user
information
The user names of the
public users and the
groups that each user can
use are displayed here.
Edit button
Click to set the user
information.
Delete button
User name
Click to delete the user
information.
The user’s name is
displayed here.
Save Settings button
Undo button
Click to save the user
information.
The setting will not be saved
unless you click this button.
Click to undo any
changes.
If PAC-YG50ECA Expansion Controllers are connected, up to 150 groups will be displayed in the “For
Managers” and “For Public Users” sections. (See figure below.)
Expansion Controller
system 1
Groups in the Expansion
Controller system 1 will appear
here.
Expansion Controller
system 2
Groups in the Expansion
Controller system 2 will appear
here.
Expansion Controller
system 3
Groups in the Expansion
Controller system 3 will appear
here.
43
(1)Add or edit user information
Click an [Edit] button in the User Information display to display the
screen for setting user information. Enter the user name, password
and select the groups available to that user and click [OK].
Expansion Controller system selection buttons
Note: When a public user logs in, only the groups specified here will
be available to that user.
Note: Because managers can always operate all groups, you cannot
select available air conditioners for the manager.
Note: If Expansion Controllers are connected, Expansion Controller
system selection buttons will appear. Select the button that
corresponds to the desired system (EC1, EC2, or EC3), and
then select the groups in the system.
(2)Save user information
OK button
When you have completed the user information setting, click the
[Save Settings] button to save the user information.
If you want to undo the settings you have just made, click the [Undo]
button.
Note: If you make changes to user information but move to another
page without clicking the [Save Settings] button, the changes you
made will not be reflected. Always save your settings by clicking
the [Save Settings] button.
Save Settings button
44
3-11 Checking the Send Mail Log
Click the menu item [Maintenance] to display the log of mail sent when an error occurred and after error
recovery. In order for a mail to be sent when an error occurs, the date related to sending the mail must be to
set using Initial Setting Web.
Error source address
The unit address of where
the error occurred is
displayed here.
Clear log
Click to clear the send mail
log.
Update to most recent
condition
Error code
The error code is
displayed here.
Click to update the screen so
that the most recent condition
is shown.
Send mail status
This indicates whether the
mail was successfully sent
by displaying [OK] or [NG].
Send date/time
The date and time when the
mail was sent is displayed
here.
Error status
This indicates whether
mail was sent when error
[Occurred] or after error
[recovery].
Item
Description
Update to most recent
condition
Click [Update] to ensure the displayed items reflect the most recent condition.
When [Auto] is selected, information is updated automatically every minute to reflect the
latest information.
Clear log
Click [Clear Log] to clear the send mail log.
Send date/time
The date and time of when the error occurred is displayed.
Error source address
The unit address of where the error occurred is displayed.
Note: When an error occurs on the general equipment that is connected via PLC, PLC
number for General Equipment (row number 1 to 20 that PLC error mail setting is
made on initial setting Web) and General Equipment number (up to 32 pieces of
general equipment that are controlled by PLC for general equipment) will be
displayed. (Example: PLC1-32)
Note: When an error occurs on the general equipment that is connected via DIDO
controller, M-NET address of the DIDO controller will be displayed. (Which means
an error occurs on one of the general equipment that is connected to the DIDO
controller)
Note: If PAC-YG50ECA Expansion Controllers are connected, Expansion Controller
systems (1-3) and M-NET addresses (000-250) will appear (e.g., 1-053).
Error code
The error code of the error is displayed.
Error status
This indicates whether mail was sent when error occurred or after error recovery.
Send mail status
This indicates whether the mail was successfully sent by displaying [OK] or [NG].
45
3-12 Checking the Gas Amount
Click [Maintenance] on the menu and then [Gas Amount Check], a screen will appear that allows the user to
check the gas amount.
Use this option to check for refrigerant leak from the outdoor unit.
Note: Those outdoor units that do not support the gas amount checking function via the remote command will not
appear on this screen.
Note: This check will be performed in a specific operation mode and takes from 30 minutes to 1 hour.
Check all outdoor units
Expansion Controller
system selection
buttons
Click to start checking the
gas amount on all outdoor
units.
Click to display the
desired system.
Check Start
Click to start checking the
gas amount.
Outdoor unit address
Log
Outdoor unit address is
displayed here.
Up to 10 results can be
displayed here.
Check results
Check results are displayed
here.
(1)Start the gas amount check
Click the [Check all outdoor units] button to check all outdoor units, and click the [Check Start] button to check
an individual unit.
Click the [Check cancel] button to stop checking.
Note: When the [Check Start] button is clicked, it will change to the [Check cancel] button.
Note: If Expansion Controllers are connected, Expansion Controller system selection buttons will appear. Select the
desired Expansion Controller (EC1, EC2, or EC3), and perform a check on outdoor units.
(2)Check the results
This check will be completed in 30 minutes to 1 hour, and upon completion check results will be displayed.
When the amount of refrigerant charge is normal, [Normal] will appear on the screen, and if the outdoor units
are low on refrigerant due to leaks, [Lo] will appear.
Note: It is not necessary to keep this page open until checking is completed. Even if the browser is closed, the
check results and the log will be displayed next time this page is opened.
Note: The time in the log field shows the check end time.
46
4 Registering a License for Optional Functions
Text below explains how to register a license for optional functions. In the Login screen for managers (see 31), click [Registration of Optional Functions] and the Registration of Optional Functions screen will appear.
Please ask the dealer you purchased the product from for more details on the optional functions and how to
purchase a license number.
Note: License of "Web Monitor" or "Basic License Pack" is necessary to use the web browser (to
operate or monitor the air conditioners). Some licenses are necessary depending on the functions
to be used. Register the license key on the LCD screen or on the registration screen.
Note: A one-day license key can be registered on the LCD screen that allows the user to use the "Web
Monitor" only on the day of the registration (not applicable to GB-50ADA-A and GB-50ADA-J). Use
this license key to use the initial setting browser, or in any other situations when a temporary
license key "Web Monitor" is necessary.
Note: When multiple AG-150A controllers are connected by connecting an Expansion Controller to the
system, the license to use the optional functions is required only for the AG-150A controller on
which the functions are actually used.
Sub menu
Click to return to the Login
Page.
Current Status
Optional function
selection box
This indicates whether the
optional function is available
for use.
Select the optional function
you want to register.
License number entry
field
Software version
Enter the license number
required for registration.
Software version is
displayed.
Registration of license
button
Click to register your license.
(1)Open the Registration of Optional Function screen
Enter the web page address in the web browser address field, click
the Enter key on the keyboard to display the Login screen (see 3-1).
Click on this screen’s menu item [Registration of Optional Functions]
to open the Registration of Optional Functions screen.
Registration of Optional Functions
(2)Register an Optional Function
First select the optional function you wish to register from the
selection box in the Selecting Optional Function section. When an
optional function is selected, the Current Status section will indicate
whether it is available for use.
Next enter the license number you purchased for the optional
function in the license number entry field and click the [Registration of
license] button. Once this is done, the optional function will be
available for use.
If you were unsuccessful in registering an optional function, check that you did not enter the wrong license
number by mistake, that the correct optional function was selected from the selection box, and that the date
and time are set correctly.
Note: Alphabet "O" and "I" are not used for license number.
Note: After registering the license, make sure that the "Current Status" of the license says "Available."
47
[Modification list]
Ver.
Category
Page/Section
Increased Weekly
schedule patterns
Five types of weekly schedule patterns are available
instead of two.
P8 Section 3-1-1
P27 Section 3-7
P29 Section 3-7-1
New
Function
Weekly schedule
number display
The Monitor/Operation screen was modified to display
the weekly schedule number that is currently effective.
P12 Section 3-2-1
P15 Section 3-2-2
Note about Java
execution
environment
A note about Java Plug-in execution environment was
added.
P7
Section 2-3-1
Modification
“Web Monitor”
license: unregistered
error message
An explanation of new error message, which appears
when the license of “Web Monitor” is not registered, was
added.
P9
Section 3-1
Modification
Extent of the error
reset
“DIDO controller” was added in the extent to which an
error of a unit will affect.
P24 Section 3-5
New
Function
Group Schedule
Available/Not
Available
An item "Schedule Available/Not Available" has been
added to the Group control screen.
P12 Section 3-2-1
P17 Section 3-3-1-1
Modification
Note about Java
execution
environment
The company name Sun Microsystems was changed to
Oracle.
Information about compatible versions of Java Plug-in
was added.
P2
Section 1-2
Modification
Note about Schedule
TG-2000A version requirement for using schedules 3
through 5 has been added.
P2
Section 1-3
Modification
Note about Java
execution
environment
A note about Java Plug-in execution environment was
added.
P7
Section 2-3-1
Modification
Notes about the type
of public-user
accessible units
The type of units that are accessible to public users
have been modified.
P43 Section 3-10
P16
P20
P24
P33
P37
P40
Section 3-2-3
Section 3-3-2-1
Section 3-5
Section 3-7-1-2
Section 3-7-2-2
Section 3-7-3-2
New
Function
Monitoring function of
HWHP (CAHV)
HWHP (CAHV) was added.
• HWHP (CAHV) monitor screen
• HWHP (CAHV) control screen
Modification
Note about
Recommended
Browser
Internet Explorer and Java Plug-in versions were added. P2
Modification
The structure of
Section 3-3 was
changed.
Modification
The structure of
Section 3-7 was
changed.
New
Function
Display of
temperatures in
0.5ºC increments
A new function was added that displays temperatures in
0.5ºC increments.
P15 Section 3-2-2
P17 Section 3-3-1-1
Modification
HWHP (CAHV)
description
Explanations on the HWHP (CAHV) were added and
revised.
P16
P17
P20
P24
Modification
Air To Water (PWFY)
Set temperature
The function to set the temperature setting for the
Heating ECO mode was disabled.
P17 Section 3-3-1-1
X14
X15
Contents
New
Function
X12 Modification
X13
Item
The structure of the table of contents was changed to
accommodate the addition of HWHP (CAHV) control
screen.
The structure of the table of contents was changed to
accommodate the addition of HWHP (CAHV) control
screen.
48
Section 1-2
P17 Section 3-3
P27 Section 3-7
Section 3-2-3
Section 3-3
Section 3-3-2-1
Section 3-5
This product is designed and intended for use in the residential,
commercial and light-industrial environment.
The product at hand is
based on the following
EU regulations:
• Low Voltage Directive 2006/95/EC
• Electromagnetic Compatibility Directive
2004/108/EC
• Restriction of Hazardous Substances
2011/65/EU
Please be sure to put the contact address/telephone number on
this manual before handing it to the customer.
HEAD OFFICE: TOKYO BLDG., 2-7-3, MARUNOUCHI, CHIYODA-KU, TOKYO 100-8310, JAPAN
WT05490X15