1
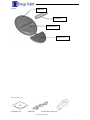
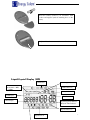
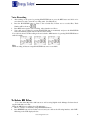
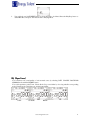
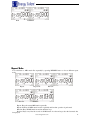
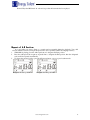
V.2.0
Notice
1.
2.
3.
Please use provided format tool to format your MP3 player, it will not work if you use Windows format
Tool. If you haven’t installed the provided Digital Audio Management System, please use the “delete”
command to the erase files in your player. The MP3 player will be damage if formatted under
Window’s format tool.
When transferring files between your MP3 player and PC, please note the MP3 player’s LCD display.
The transferring rate is displayed on your screen. The transmission is completed when the LCD stops
displaying the moving note.
The “Plug and Play” function is only for Win2000/winXP operating system or higher. User needs to
install driver under Win98/win98SE that is build into the Digital Audio Management System. If still
can not find the device, please refer to the CD-ROM and install the files of Win98 driver folder from
the driver CD.
Table of Contents
Table of Contents .....................................................................................................................
Operational Notes ..................................................................................................................3
Player overview ......................................................................................................................3
Accessories..............................................................................................................................5
Battery Replacement .............................................................................................................6
Liquid Crystal Display ..........................................................................................................7
Turning the power on/off.......................................................................................................8
Playing MP3 music ................................................................................................................9
Voice Recording ...................................................................................................................10
To Delete MP3 Files .............................................................................................................11
EQ (Equalizer)......................................................................................................................12
www.energysistem.com
2
Repeat Mode.........................................................................................................................13
Repeat of A-B Section..........................................................................................................14
MMC card ............................................................................................................................15
USB Connection ...................................................................................................................16
System Requirements ..........................................................................................................17
Installation of Manager Software.......................................................................................18
How to use Digital Audio Manager Software ....................................................................19
Sending Files to Digital Audio ............................................................................................20
Sending Files from Digital Audio .......................................................................................21
Formatting the memory of Digital Audio ..........................................................................22
To delete files ........................................................................................................................23
To refresh USB connection..................................................................................................24
Internal Memory Display....................................................................................................25
Pre-listen…………………………………………………………………………………... 26
Trouble diagnosis………………………………………………………………………… 27
Operational Notes
If the Mp3 player will not be operated for a prolonged period, remove the batteries to avoid possible
damage caused by electrical leakage.
The Mp3 player should be kept in areas free from extreme temperature changes, moisture and dust.
Set the HOLD switch to the release position before operation.
Do not drop the player, which probably cause MMC card fall off or damage its surface.
Battery Status
(Time unit: hour)
Digital Audio
Battery
Alkaline battery
Size AAA 1
12
*Battery life may vary with different using condition, manufacturer and manufacture date.
*Please replace the battery under following conditions:
Indicator
appears.
All buttons make no response and are not workable even after the battery is taken out and reinstalled.
www.energysistem.com
3
Note:
To avoid static electricity, please
If possible, avoid operating the player in extremely dry environment.
If the player stops running under proper operation, please replace the battery.
♦ Front
LCD (Liquid Crystal Display)
Equalizer/Recording
Repeat/Del
A-B Repeat button
USB Port
- Volume Control
+ Volume Control
www.energysistem.com
FF/Play ( Stop/POWER)/REW
4
♦ Back
MMC Slot
AAA Battery
AAA Battery Slot
Battery Cover
Installation CD
USB Cable
Portable Stereo Earphone
www.energysistem.com
5
Battery AAA 1
Manual/ Maintenance Certificate
Insert the battery
Slide the back cover down toward the arrow direction
www.energysistem.com
6
Insert the battery (AAA 1) in accordance with
positive and negative symbols matching those of the
battery
Replace the back cover toward the arrow direction.
Volume Icon
Music
mode(AAC
WMA)
Recording Status Icon
USB status Icon
MP3
Battery Indicator
A-B Repeat
Hold Icon
Title Display
Operating Status Indicator
Playback Time Indicator
Repeat Status Icon
www.energysistem.com
Equalizer
Icon
7
Repeat modes include Repeat, Repeat All, Random, Preview and Normal (Normal mode isn’t illustrated in
the figure.)
Equalizer modes include Jazz, Classic, Rock, Pop and Normal
The power will be turned on when PLAY/STOP button is pressed momentarily. In 3 seconds, “F3310”
will be presented on the screen, and then a glorious picture with blue backlight appears. The backlight will
be turned on and last 8 seconds if some button is pressed; if not, the background light will be automatically
turned down after 8 seconds.
Pressing PLAY/STOP button for more than2 seconds until “OFF” appears on the screen, then it’s
safe to turn the power off.
www.energysistem.com
8
1.
Turning on the power by pressing PLAY/STOP button momentarily, you could see the following
interfaces:
2.
3.
When you press PLAY/STOP button again, the current track will be played as shown above.
If you want to select previous/next piece, turn the rolling wheel up and down to get the track. The
music will pause if you shortly press PLAY/STOP.
4. By pressing the PLAY/STOP button for 3 seconds, you could turn the power off.
5. By pressing VOL+/VOL- button, you could control the volume under either PLAY or PAUSE status.
The volume steps (see illustration) will increase or decrease when the VOL+/VOL- button is double
pressed correspondingly. There are 12 volume steps
and the volume level ranges from 0 to 20.
Note:
The battery status indicator may flicker while MP3 is playing, which results from battery supply vibration
while different power is consumed.
www.energysistem.com
9
Voice Recording
1.
2.
After turning on the power by pressing PLAY/STOP button, press the REC button and hold on for
more than 2 seconds to enter into recording status. (See illustration.)
Press the PLAY/STOP button to listen to the recorded files. If there are no recorded files, Track
Number will be shown as
.
Press REC button again to start recording, whose interface as follows.
You could stop recording by pressing PLAY/STOP button momentarily and press the PLAY/STOP
button momentarily again to listen to the recorded contents.
You could exit from Voice Recording mode and switch to MP3 function by pressing PLAY/STOP button
and hold a while.
3.
4.
Note:
While recording, all buttons except PLAY/STOP button are not workable.
You could delete Mp3 files with buttons as well as using Digital Audio Manager Software that is
supplied with this set for free.
Delete the MP3 files according to the following steps:
1. Move to a track to be deleted by using NEXT/LAST button.
2. Press REP/DEL button for more than a second, and you could see the following interface, with “DEL”
flickering on the LCD display window.
www.energysistem.com
10
3.
You could also use LAST/NEXT button to select the track to be deleted. Press the Play/Stop button to
delete MP3 files, and press other button back to Playing Mode.
You could have real sound quality of various music tones by selecting JAZZ CLASSIC ROCK POP
NORMAL mode with the EQ/REC button.
You could experience perfect Jazz, Classic, Rock, Pop sound effect by choosing suitable corresponding
mode. Normal mode could bring you original sound effect.
JAZZ
CLASSIC
ROCK
www.energysistem.com
11
POP
NORMAL
You could listen to MP3 music files repeatedly by pressing REP/DEL button to choose different repeat
mode.
Repeat
Preview
Repeat All
Random
Normal
Repeat: Plays the current MP3 music repeatedly.
Repeat All: Plays all MP3 music in order repeatedly until another operation is performed.
Random: Plays all MP3 music at random and then stops.
Preview: Plays every first 10 seconds of all MP3 music in order and stops after the last music has
been played.
www.energysistem.com
12
Normal: Plays the MP3 music in order and stops after the last music has been played.
It is used when you want to listen to a certain section repeatedly during the playback. You could
select an intended section by using A-B repeat button. (It is especially suitable for language learner.)
1. While MP3 is playing, press the A-B repeat button to designate the Start position.
2. Press the A-B repeat button again at expected time to designate the End position; then the designated
section will be repeated automatically.
3. To release the repeated section, press the A-B repeat button or move to previous/next track.
Designate the Start position A
Designate the End position B
www.energysistem.com
13
You could use MMC card to store more mp3 files.
The player has to be turned off before inserting or removing an MMC card.
Inserting an MMC card:
1 Turn the power off.
2 Pull the card cover out.
3 Insert the MMC card into the slot
following the arrow direction illus
trated on the player.
4 Turning the power on, you could
operate on the MMC card.
Caution: To assure the
compatibility, MMC card of
SANDISK or SCANDISK is
recommended.
Card cover
Card slot
You could transmit MP3 files through USB port of your PC.
1. Make sure your PC support USB devices. (Refer to the manual of your PC for the information about
www.energysistem.com
14
2.
3.
4.
hardware).
Connect the bigger end of the cable to a USB Port of your PC, the smaller to the USB port of the
DIGITAL AUDIO player.
LCD Display Window will show “USB” Icon and PC Icon if connection is finished.
If you have installed the attached software, the PC will automatically find the device when the
DIGITAL AUDIO player is connected to the PC at the first time. If not, please install the manager
software first.
System Requirements
It is important to install Digital Audio manager software before connecting Digital Audio player to PC.
After putting the Installation CD into CD-ROM Drive, USB Driver is installed automatically.
The Digital Audio manager software requires the following systems:
IBM compatible personal computer
Pentium 166 MHz MMX or faster
Windows 98 SE, Windows ME, Windows 2000 or Windows XP
USB Port
32MB RAM or more (64MB is recommended for Windows 2000)
20MB free hard-disk space or more
4 CD-ROM drive or more
Sound Card (Optional)
Accessible to Internet (Recommended)
www.energysistem.com
15
Put the Installation CD into CD-ROM Drive and then it will be installed automatically. You should
click the “Next” button on installation screens, and the Digital Audio Manager Software and USB Driver
will be installed. It will remind you of restarting your PC when installation is finished. At last,
“/Start/Program/Digital Audio Manager Software” is created in the Windows Menu, and the Digital Audio
icon is also created on the Desktop window.
www.energysistem.com
16
First connect the Digital Audio and your PC with the USB cable. Insert the bigger end of the cable to
a USB Port of PC, the smaller to the USB port of the Digital Audio. LCD display window will show
“USB” Icon if connection is finished.
Click the icon on the Desktop, then the interface of Digital Audio manage system will be shown..
www.energysistem.com
17
1.
2.
Before sending, please turn on the Digital Audio and connect it to your PC with presented USB cable.
Double click the icon on the desktop.
Select files. First, select the folder that includes the files to be transmitted from the left Program
Manager. Then the files in the folder will be displayed in right column automatically. You could also
select the files type in the menu on the top left corner to make your operation easier
3.
4.
5.
Click the Download button or select the ownload option in the tool menu.
An interface of Copy will appear.
System will set up an EDISK directory automatically and place the non-audio files to EDISK in the
removable disk of the Digital Audio after you download the non-MP3 or WMA files.
6. The management system will examine the Digital Audio automatically. When the USB cable is pulled
out from the Digital Audio, the management system won work.
Caution:
1) Do not pull out the USB cable or memory card while a file is being downloaded. It will do harm
to your Digital Audio.
2) If the Digital Audio cannot work by accident, take out the battery and reinsert it after 3 seconds.
Reconnect Digital Audio to PC.
3) If you couldn find the downloaded non-audio files in the removable disk of Digital Audio,
please look into EDISK directory.
www.energysistem.com
18
Digital Audio can also act as a removable electronic disk. You could send files in the disk to your PC
with the management system but the audio files are not permitted to send due to copyright protection. Only
files in the EDISK are allowed.
1. Connect the Digital Audio and PC with USB cable.
2. Select the files to be sent.
3. Click the Send button in the manager software.
4. The interface of transmission would be displayed.
Caution:
Do not pull out the USB cable or memory card while a file is being downloaded. Otherwise it will do
harm to your Digital Audio.
If the Digital Audio cannot work by accident, take out the battery and reinsert it after 3 seconds.
Reconnect Digital Audio to PC.
It is not permitted to transmit music files for copyright protection. System would warn you t cannot be
send if you select MP3 or WMA files.
Before formatting, be sure that the Digital Audio is turned on and connected to PC.
1. Run the management system of Digital Audio on the desktop.
2. Click Format icon, the dialog box of format will pop up.
www.energysistem.com
19
Select the disk symbol to be formatted from the Drive column. There are only two disk symbols. One
represents the internal capacity
of Digital Audio and the other represents the external MMC card. The first is your internal memory
and the second your external disk l.
3. Click Start button after finish selecting the driver and it begins to format Digital Audio memory.
Note:
If there is no external MMC card, please don’t select the second disk symbol. Otherwise you will be told
“No Media”.
Caution:
♦All the files will be deleted by formatting the memory.
♦Do not disconnect while formatting. Or your Digital Audio may lose system files and cannot be started
up.
Besides deleting files directly by Digital Audio, you could also achieve this by using the management
system of Digital Audio.
1. Connect the Digital Audio and PC; turn on the Digital Audio and run management system.
www.energysistem.com
20
2. Select the files to be deleted.
3. Click the Delete and “Yes” button.
You could also use the option of Deletion in the menu.
Note:
1 Once a file is deleted, it won’t be restored.
2 This operation cannot be used to delete the files in PC.
For safer use while connecting Digital Audio and PC, you could click the Connection button in the
management system of Digital Audio to refresh the USB connection.
www.energysistem.com
21
The management system of Digital Audio can display the internal memory by numbers and figures.
Figure
Number
In the above figure, yellow represents used memory while green available memory.
Click MMC to see the capacity of MMC card as the figure shown.
www.energysistem.com
22
After selecting a song in your PC, you could listen to it by using Digital Audio manage system.
1. Choose the song to be listened.
2.
Click the Pre-listen button on the top right corner, and then you could enjoy pleasant music pieces from
PC. Now, the Pre-listen button changes into Stop button. Music will stop by clicking it again. If you
want to listen to another song, you have to stop the current piece first and then go on to the next.
www.energysistem.com
23
1. The LCD display window shows nothing after turning on Digital Audio.
•Check to see if the battery has been inserted.
•Check to see if the battery needs replacement.
•Try reinserting the battery or replace it.
•Take out the battery and insert it correctly after 5 seconds.
2. The buttons are not workable.
•Check to see if the “Hold” button is on.
•Release the Hold button.
3. No sound could be heard while playing MP3 files.
• Check to see if the volume is too low and turn it up.
• Check to see if the Digital Audio is being connected with computer.
• Check to see if there is any music file in the memory.
4. I can’t download music files after connection.
• Check to see if Manager Software is setup.
• Check to see if the software is working properly.
• Check to see if your Mother Board supports the USB devices and needs upgrade.
5. Playing status is unstable after pulling up the MMC card.
•You may pull up the MMC card without shutting down the Digital Audio.
•You have to restart your Digital Audio to get steady playing status.
6. The MMC card cannot be identified.
• Because there are so many types of MMC cards that sometimes they are not compatible. You ‘d better
choose the MMC card produced by SANDISK or SCANDISK.
• Insert the MMC card when Power is on and restart your Digital Audio.
7. Why show the memory size not same as the standard size?
For we put our firmware in the flash and make FAT partition in the flash, so it need some size in the flash.
8.Some songs show the playback time not continuous
Now some MP3 or WMA songs use VBR format to compress, so the player can not show the playback time
normally. You can try to compress again by selecting normal ratting.
9.Some MP3 songs can not play in the player
Now some MP3 songs use the MepgI Layer1 or Layer2 format compressing, but the player only support the
MepgI Layer3 and WMA songs, the other songs maybe play natural but will exist some problem in it.So
you try to compress the songs by Mepg I Layer3 format.
MMC card when Power is on and restart your Digital Audio.
www.energysistem.com
24
Fixtool User Manual
We strongly recommend user do not format their Mp3 player under the Window’s formatting system without installing
our audio management software. This is because it’ll lead the player halted or unable to function normally. However, if the
above situation occurs, this fixtool is for users to solve the problem.
Please follow the steps for the installation and manual (Under Window XP):
1.After installing the Fixtool in the system, restart the PC.
2.Take out the battery in the halted player and connect the player to PC with USB cable, then put in a new battery into
the player.
3.Press the “Play” button for 5 seconds, the PC will automatically detect a “Recovery Device”
.
click “Next”:
Choose the option of installing the system automatically, and the system should be able to detect a “Player Recovery
Device”. If not, follow the installation window and click “next”:
Click “Next”:
If system need you choose directory for installation, please select the directory such as “C:\program
files\digital\AudioMS”.
After installing the hardware, click “Format AudioMS” in the “Digital AudioMS Player” menu (as shown below):
The system should be able to detect the device this time, click “next” to continue:
Click “next” the system will select device automatically, if the system can not be able to run automatically,please choose
the your installation path. Installation path as below “C:\program files\digital\AudioMS”
After finding the device, run the “Format AudioMS” in the “Digital AudioMS Player” menu and click “start” to start
formatting. The player should be able to function normally after the formatting process.(only if the start button show effective
, and the media option and capacity option show correctly number, it proves you get correctly device.)
www.energysistem.com
25
Choose “unplug or eject hardware” in the toolbar, then remove your player safely. The player should be able to function
normally now.
Note: Please refer to the above instructions for Window 2000 and 98.
Technical Spec
Memory Size
64MB/128MB
Memory Card
MMC
LCD
28*18Segment
Size
79*62*18.5(mm)
SNR
90dB
Output Frequence
20HZ-20KHZ
Record Format
Bit Rate
Supported
ADPCM
32Kbps-256Kbps
MPEG I layer III
www.energysistem.com
26
Music format
WMA
www.energysistem.com
27