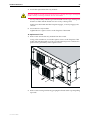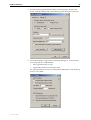
1
Rapier Series Switch
Hardware Reference
Rapier 16fi
Rapier 24i
Rapier 48i
Rapier 48w
Rapier Series Switch Hardware Reference
Document Number C613-03020-00 REV K
© 1999-2007 Allied Telesis, Inc. All rights reserved. No part of this publication may be
reproduced without prior written permission from Allied Telesis, Inc.
Allied Telesis, Inc. reserves the right to change specifications and other information in
this document without prior written notice. The information provided herein is subject
to change without notice. In no event shall Allied Telesis, Inc. be liable for any
incidental, special, indirect, or consequential damages whatsoever, including but not
limited to lost profits, arising out of or related to this manual or the information
contained herein, even if Allied Telesis, Inc. has been advised of, known, or should have
known, the possibility of such damages.
All company names, logos, and product designs that are trademarks or registered
trademarks are the property of their respective owners.
Hardware Reference
3
Contents
Models Covered by this Document .................................................................... 4
Why You Should Read this Document ............................................................... 4
Hardware Overview .......................................................................................... 5
Rapier Switch Models ................................................................................. 8
Rapier G6 ................................................................................................... 8
Rapier G6F-LX/SC ....................................................................................... 8
Rapier G6F-SX/SC ....................................................................................... 9
Rapier G6F-SX/MT-RJ .................................................................................. 9
Rapier 8/8MT ............................................................................................. 9
Rapier 8/8SC ............................................................................................ 10
Rapier 16F-FX/MT-RJ ................................................................................. 10
Rapier 16Fi-FX/MT-RJ ................................................................................ 10
Rapier 16F-FX/SC ...................................................................................... 11
Rapier 16Fi-FX/SC ..................................................................................... 11
Rapier 24 ................................................................................................. 12
Rapier 24i ................................................................................................. 13
Rapier 48 ................................................................................................. 13
Rapier 48i ................................................................................................. 13
Rapier 48w ............................................................................................... 14
AT-TFTP Server ................................................................................................. 15
Switch Startup ................................................................................................ 17
To Log In .................................................................................................. 17
To access help files ................................................................................... 18
Startup Procedures ................................................................................... 18
Switch Interfaces ............................................................................................ 21
Asynchronous Console Port ...................................................................... 21
Switch RJ-45 Ports .................................................................................... 22
Redundant Power Supply ......................................................................... 24
Fans and Filters on the Rapier 48w .................................................................. 25
Switch Cables and Loopback Plugs ................................................................. 29
Terminal and Modem Cables .................................................................... 29
Loopback Plugs for Testing Switch Interfaces ............................................ 31
Test Facility ..................................................................................................... 31
10/100 Ethernet LAN Port Tests ................................................................ 32
Other Interface Tests ................................................................................. 33
LEDs and What They Mean ............................................................................. 34
Troubleshooting .............................................................................................. 43
Expansion Options .......................................................................................... 45
Uplink Modules ........................................................................................ 45
Network Service Modules ......................................................................... 45
Port Interface Cards (PICs) ........................................................................ 46
PCI Accelerator Cards (PACs) .................................................................... 47
Port, Connector, and Cable Combinations ...................................................... 50
Using Windows Terminal and Windows Hyperterminal .................................... 51
Restricted Procedures ...................................................................................... 54
Diagnostics ............................................................................................... 54
Installing a PAC ........................................................................................ 56
Replacing Boot EPROMs ........................................................................... 61
Troubleshooting EPROM Installation ......................................................... 63
For More Information ...................................................................................... 64
C613-03020-00 REV K
4
Rapier Series Switch
Models Covered by this Document
This Hardware Reference includes information on the following models:
■
Rapier G6 6-port 100BASE-TX/1000BASE-T (RJ-45 connectors)
■
Rapier G6F-LX/SC 6-port 1000BASE-LX (SC fibre connectors)
■
Rapier G6F-SX/SC 6-port 1000BASE-SX (SC fibre connectors)
■
Rapier G6F-SX/MT-RJ 6-port 1000BASE-SX (MT-RJ fibre connectors)
■
Rapier 8/8MT 8-port 10BASE-T/100BASE-TX (RJ-45 connectors)
plus 8-port 100BASE-FX (MT-RJ fibre connectors)
■
Rapier 8/8SC 8-port 10BASE-T/100BASE-TX (RJ-45 connectors)
plus 8-port 100BASE-FX (SC fibre connectors)
■
Rapier 16F-FX/MT-RJ 16-port 100BASE-FX (MT-RJ fibre connectors)
■
Rapier 16Fi-FX/MT-RJ 16-port 100BASE-FX (MT-RJ fibre connectors)
■
Rapier 16F-FX/SC 16-port 100BASE-FX (SC fibre connectors)
■
Rapier 16Fi-FX/SC 16-port 100BASE-FX (SC fibre connectors)
■
Rapier 24 24-port 10BASE-T/100BASE-TX (RJ-45 connectors)
■
Rapier 24i 24-port 10BASE-T/100BASE-TX (RJ-45 connectors)
■
Rapier 48 48-port 10BASE-T/100BASE-TX (RJ-45 connectors)
■
Rapier 48i 48-port 10BASE-T/100BASE-TX (RJ-45 connectors)
■
Rapier 48w 48-port 10BASE-T/100BASE-TX (RJ-45 connectors), 1 NSM bay
You can download updates to this Hardware Reference from
www.alliedtelesis.com/support/software.
Why You Should Read this Document
Use this document to familiarise yourself with Rapier switches and their
hardware features. This reference can also help you with installation and
maintenance. However, refer to the Software Reference for information about
software configuration and installation procedures.
This document also introduces uplink modules, Network Service Modules
(NSM), and Port Interface Card (PIC) expansion options. See “For More
Information” on page 64 for where to find details about these options.
Keep this document or its CD in a safe place; it will be helpful if you purchase
expansion options for the switch.
C613-03020-00 REV K
Hardware Reference
5
Hardware Overview
This section provides an overview of the hardware features of Rapier Series
Switches. Hardware descriptions for Uplink Modules, NSMs, and PICs can be
found in their respective hardware references. These references can be found
on the CD-ROM bundled with your switch, or can be downloaded from
www.alliedtelesis.com/support/software.
Rapier switches combine wire-speed Layer 2 and 3 switching with full
multiprotocol routing capabilities to deliver low-latency high-bandwidth
traffic capabilities to the desktop. Ethernet, fast Ethernet and gigabit Ethernet
connectivity with both copper and fibre optic interfaces make the Rapier Series
a versatile and powerful switching solution.
Dimensions
All models except Rapier 48w
■
Height: 66 mm, plus 5.5 mm if the rubber feet are used
■
Width: 440 mm, excluding rack-mounting brackets
■
Depth: 360 mm
■
Weight: Not more than 7 kg, depending on model and excluding NSMs,
PICs, and power cord
Rapier 48w
Mounting System
■
Height: 110 mm
■
Width: 440 mm, excluding rack-mounting brackets
■
Depth: 230 mm
■
Weight: Not more than 8 kg, excluding NSMs, PICs, and power cord
All models except Rapier 48w
■
1.5U rack mounting
Rapier 48w
■
Environmental
Conditions
2.5U rack mounting
All models except Rapier 48w
■
Operating temperature range: 0 to 40º C (32 to 104º F)
■
Storage temperature range: -25 to 70º C (-13 to 158º F)
■
Relative humidity range: 5 to 95% non-condensing
Rapier 48w
C613-03020-00 REV K
■
Operating temperature range: 0 to 50º C (32 to 122º F)
■
Storage temperature range: -25 to 70º C (-13 to 158º F)
■
Operating relative humidity range: 5 to 95% non-condensing
■
Operating altitude: maximum 3,050 metres (10,000 feet)
6
Rapier Series Switch
Regulatory
Standards
All models except Rapier 48w
■
EMC: CISPR22 class A, FCC class A, and VCCI class A
■
Immunity: EN50082 levels 2 (ESD), 3 (susceptibility), 4 (fast transients), 5
(power surge), and 6 (RF immunity)
■
Safety: UL1950, CSA22.2, EN60950
Rapier 48w
LEDs
NEBS
Power Supply Unit
■
EMC: EN55022 class A, and FCC class A
■
Safety: UL60950-1, CAN/CSA22.2 No. 60950-1-03, 21 CFR 1040
■
NEBS: GR-1089-Core Issue 4, GR-63-Core Issue 3
■
Ethernet port and System status LEDs
■
“Find Me” LED display feature (Rapier 48w only)
■
For a complete list of LEDs and their functions, see ““LEDs and What They
Mean” on page 34” on page 24
Rapier 48w
■
Meets the electrical criteria for NEBS certification
■
Meets the physical and air filtering criteria for NEBS certification
AC models
■
Universal 110–240VAC, 50–60Hz input
■
Redundant DC Power connection
DC models except Rapier 48w
■
Input voltage 48VDC nominal, 39–60VDC is acceptable
■
4Amps
■
Positive or negative earthing (grounding)
Rapier 48w
Switching Core
■
Input voltage 48VDC nominal, 40–60VDC is acceptable
■
4Amps
■
Positive or negative earthing (grounding).
■
100W
■
Fuse rating of fuses F1 and F2 on the DC ORing/PEM board: 125VDC, 4A
(e.g. Littelfuse 0451.004)
Rapier 16Fi-FX/MT, 16Fi-FX/SC, 24i, 48i, 48w
■
Advanced ASIC switch chip
■
Non-blocking L2 and L3 IP Switching
Rapier 8/8MT, 8/8SC, 16F-FX/MT, 16F-FX/SC, 24, 48
■
ASIC switch chip
■
Non-blocking L2 and L3 IP Switching
C613-03020-00 REV K
Hardware Reference
7
Rapier G6, G6F/LX, G6F/SX, G6F/MT
Processing Core
■
Gigabit ASIC switch chip
■
Non-blocking L2 and L3 IP Switching
All models except Rapier 48w
■
200MHz RISC processor (250 MHz for Rapier 24i models with revision N
or higher PCBs)
■
32MBytes Synchronous DRAM
■
6MBytes flash memory (16MBytes for Rapier i models)
■
128KBytes Non-volatile Storage (battery backed SRAM)
Rapier 48w
Asynchronous Serial
Port
■
350MHz processor
■
64MBytes Synchronous DRAM
■
32MBytes flash memory
■
512KBytes Non-volatile Storage (battery backed SRAM)
■
Up to 115 kbps
■
Standard DB9 female RS-232 connector
■
Hardware-flow control
■
Two ports on Rapier 48w, one port on all other models
PCI Accelerator Card
(PAC) Slot
All models except Rapier 48, 48i, 48w, G6, and G6F
Uplink Module Bays
All models except Rapier 48w
Network Service
Module (NSM) Bay
SFP Ports
■
■
Two very high performance bays
■
Support for 1000BASE-T Ethernet uplink modules on all models
■
Support for 10BASE-T/100BASE-TX Ethernet uplink modules on
Rapier G6 and Rapier i switches
All models except Rapier 48, 48i, G6, G6F/SX, and G6F/LX
■
Support for one 32-bit PCI based WAN module
Rapier 48w
■
C613-03020-00 REV K
Accepts an optional 32-bit PCI-based hardware encryption and/or
compression card
Two 1000BASE-X SFP ports
8
Rapier Series Switch
Rapier Switch Models
This section provides hardware descriptions for individual switch models.
Rapier G6
(Figure 1)
■
6-port 100BASE-TX/1000BASE-T (RJ-45 connectors)
■
Two 10/100/1000BASE uplink bays
■
Layer 3 Managed Switch
Figure 1: Front panel of the Rapier G6
1
2
3
4
5
6
Rapier G6F-LX/SC
(Figure 2)
■
6-port 1000BASE-LX (SC fibre connectors)
■
Two 10/100/1000BASE uplink bays
■
Layer 3 Managed Switch
Figure 2: Front panel of the Rapier G6F/LX
C613-03020-00 REV K
Hardware Reference
9
Rapier G6F-SX/SC
(Figure 3)
■
6-port 1000BASE-SX (SC fibre connectors)
■
Two 10/100/1000BASE uplink bays
■
Layer 3 Managed Switch
Figure 3: Front panel of the Rapier G6F/SX
Rapier G6F-SX/MT-RJ
(Figure 4)
■
6-port 1000BASE-SX (MT-RJ fibre connectors)
■
Two 10/100/1000BASE uplink bays
■
Layer 3 Managed Switch
Figure 4: Front panel of the Rapier G6F/MT
Rapier G6f
Layer 3 Gigabit Ethernet Switch
7
RS-232
TERMINAL PORT
PORT ACTIVITY
1000BASE-SX / MT-RJ
ASYN0
1
L/A
2
L/A
3
L/A
4
L/A
5
L/A
6
8
D/C
D/C
D/C
D/C
D/C
STATUS
FAULT
L/A
CLASS 1
LASER PRODUCT
DO NOT STARE
INTO BEAM
L/A
LINK
D/C
FULL DUP
ACTIVITY
HALF DUP
RPS
COL
PWR
RESET
D/C
Rapier 8/8MT
(Figure 5)
■
8-port 10BASE-T/100BASE-TX (RJ-45 connectors)
■
8-port 100BASE-FX (MT-RJ fibre connectors)
■
Two 1000BASE uplink bays
■
One Network Service Module bay, with support for various WAN interface
cards
■
One PCI Accelerator Card (PAC) Slot
■
Layer 3 Managed Switch
Figure 5: Font panel of the Rapier 8/8MT
1
C613-03020-00 REV K
2
3
4
5
6
7
8
10
Rapier Series Switch
Rapier 8/8SC
(Figure 6)
■
8-port 10BASE-T/100BASE-TX (RJ-45 connectors)
■
8-port 100BASE-FX (SC fibre connectors)
■
Two 1000BASE uplink bays
■
One Network Service Module bay, with support for various WAN interface
cards
■
One PCI Accelerator Card (PAC) Slot
■
Layer 3 Managed Switch
Figure 6: Front panel of the Rapier 8/8SC
1
2
3
L /A
4
L /A
5
L /A
6
L /A
7
L /A
Rapier 8/8
8
L /A
L /A
L /A
17
PORT ACTIVITY
L /A
D/C
D/C
D/C
D/C
D/C
D/C
D/C
D/C
9
10
L /A
11
L /A
12
L /A
RX
D/C
TX
RX
D/C
TX
RX
D/C
TX
RX
D/C
HALF DUP
COL
RS-232
TERMINAL PORT
ASYN0
14
L /A
15
L /A
16
L /A
L /A
L /A
18
TX
ACTIVITY
ACTIVITY
13
L /A
FULL DUP
10M LINK
10/100BASE-TX
100BASE-FX / SC
Layer 3 Fast Ethernet Switch
D/C
100M LINK
TX
RX
D/C
TX
RX
D/C
TX
RX
D/C
TX
RX
STATUS
FAULT
D/C
LINK
FULL DUP
ACTIVITY
HALF DUP
RPS
COL
PWR
RESET
D/C
Rapier 16F-FX/MT-RJ
(Figure 7)
■
16-port 100BASE-FX (MT-RJ fibre connectors)
■
Two 1000BASE uplink bays
■
One Network Service Module bay, with support for various WAN interface
cards
■
One PCI Accelerator Card (PAC) Slot
■
Layer 3 Managed Switch
Figure 7: Front panel of the Rapier16F-FX/MT
1
L /A
2
L /A
3
L /A
4
L /A
5
L /A
6
L /A
7
L /A
8
Rapier 16f
L /A
Layer 3 Fast Ethernet Switch
17
D/C
D/C
D/C
D/C
D/C
D/C
D/C
D/C
PORT ACTIVITY
100BASE-FX / MT-RJ
9
L /A
10
L /A
11
L /A
12
L /A
L /A
13
L /A
14
L /A
15
L /A
16
D/C
RS-232
TERMINAL PORT
ASYN0
LINK
FULL DUP
ACTIVITY
HALF DUP
STATUS
FAULT
L /A
18
COL
RPS
PWR
D/C
D/C
D/C
D/C
D/C
D/C
D/C
RESET
D/C
Rapier 16Fi-FX/MT-RJ
(Figure 8 on page 11)
■
16-port 100BASE-FX (MT-RJ fibre connectors)
■
Two 1000BASE uplink bays
■
One Network Service Module bay, with support for various WAN interface
cards
■
One PCI Accelerator Card (PAC) Slot
■
Layer 3 Managed Switch
■
Enhanced switching core
C613-03020-00 REV K
Hardware Reference
11
Figure 8: Front panel of the Rapier16Fi-FX/MT.
1
2
L /A
3
L /A
4
L /A
5
L /A
6
L /A
7
L /A
8
L /A
Rapier 16fi
L /A
Layer 3 Fast Ethernet Switch
17
D/C
D/C
D/C
D/C
D/C
D/C
D/C
D/C
PORT ACTIVITY
100BASE-FX / MT-RJ
9
10
L /A
11
L /A
12
L /A
L /A
13
L /A
14
L /A
15
L /A
16
L /A
D/C
RS-232
TERMINAL PORT
ASYN0
LINK
FULL DUP
ACTIVITY
HALF DUP
STATUS
FAULT
L /A
18
RPS
COL
PWR
D/C
D/C
D/C
D/C
D/C
D/C
RESET
D/C
D/C
Rapier 16F-FX/SC
(Figure 9)
■
16-port 100BASE-FX (SC fibre connectors)
■
Two 1000BASE uplink bays
■
One Network Service Module bay, with support for various WAN interface
cards
■
One PCI Accelerator Card (PAC) Slot
■
Layer 3 Managed Switch
Figure 9: Front panel of the Rapier16F-FX/SC
1
2
L /A
3
L /A
4
L /A
5
L /A
6
L /A
7
L /A
8
L /A
Rapier 16f
L /A
Layer 3 Fast Ethernet Switch
17
TX
RX
D/C
TX
RX
D/C
TX
RX
D/C
TX
RX
D/C
TX
RX
D/C
TX
RX
D/C
TX
RX
D/C
TX
RX
D/C
PORT ACTIVITY
100BASE-FX / SC
9
10
L /A
11
L /A
12
L /A
L /A
13
L /A
14
L /A
15
L /A
16
L /A
D/C
RS-232
TERMINAL PORT
ASYN0
LINK
FULL DUP
ACTIVITY
HALF DUP
STATUS
FAULT
L /A
18
RPS
COL
PWR
TX
RX
D/C
TX
RX
D/C
TX
RX
D/C
TX
RX
D/C
TX
RX
D/C
TX
RX
D/C
TX
RX
D/C
TX
RX
RESET
D/C
Rapier 16Fi-FX/SC
(Figure 10)
■
16-port 100BASE-FX (SC fibre connectors)
■
Two 1000BASE uplink bays
■
One Network Service Module bay, with support for various WAN interface
cards
■
One PCI Accelerator Card (PAC) Slot
■
Layer 3 Managed Switch
■
Enhanced switching core
Figure 10: Front panel of the Rapier 16Fi-FX/SC
1
2
L /A
3
L /A
4
L /A
5
L /A
6
L /A
7
L /A
8
L /A
Rapier 16fi
L /A
Layer 3 Fast Ethernet Switch
17
TX
RX
D/C
TX
RX
D/C
TX
RX
D/C
TX
RX
D/C
TX
RX
D/C
TX
RX
D/C
TX
RX
D/C
TX
RX
D/C
PORT ACTIVITY
100BASE-FX / SC
9
10
L /A
11
L /A
12
L /A
L /A
13
L /A
14
L /A
15
L /A
16
L /A
D/C
RS-232
TERMINAL PORT
ASYN0
LINK
FULL DUP
ACTIVITY
HALF DUP
STATUS
FAULT
L /A
18
COL
RPS
PWR
TX
C613-03020-00 REV K
RX
D/C
TX
RX
D/C
TX
RX
D/C
TX
RX
D/C
TX
RX
D/C
TX
RX
D/C
TX
RX
D/C
TX
RX
D/C
RESET
12
Rapier Series Switch
Rapier 24
(Figure 11)
■
24-port 10BASE-T/100BASE-TX (RJ-45 connectors)
■
Two 1000BASE uplink bays
■
One Network Service Module bay, with support for various WAN interface
cards
■
One PCI Accelerator Card (PAC) Slot
■
Auto-negotiating Layer 3 Managed Switch
Figure 11: Front and rear panels of the Rapier 24 (AC model)
Front panel
Layer 3 Fast Ethernet Switch
25
10BASE-T / 100BASE-TX
1X
3X
5X
7X
9X
11X
13X
PORT ACTIVITY
15X
17X
19X
21X
23X
L /A
100M LINK /
D/C
FULL DUP
1
3
5
ACTIVITY
7
9
11
13
RS-232
TERMINAL PORT
10M LINK /
ACTIVITY
HALF DUP/
COL
15
17
19
21
23
STATUS
ASYN0
FAULT
L /A
D/C
26
RPS
L /A
PWR
D/C
2
2X
Uplink Module Bays
4X
6X
8X
10X
12X
14X
16X
10/100 BASE Ports
18X
20X
22X
4
6
8
10
12
14
16
18
20
22
RESET
24
24X
Port LEDs
System
LEDs
RS-232 Terminal Port
Rear panel
NSM 0
Swap
In Use
100-240 VAC
Power Inlet
RPS Inlet for
AT-PWR8000
NSM BAY
Hot Swap
NSM Hot Swap
Button and LEDs
C613-03020-00 REV K
Hardware Reference
13
Rapier 24i
(Figure 12)
■
24-port 10BASE-T/100BASE-TX (RJ-45 connectors)
■
Two 10/100/1000BASE uplink bays
■
One Network Service Module bay, with support for various WAN interface
cards)
■
One PCI Accelerator Card (PAC) Slot
■
Auto-negotiating Layer 3 Managed Switch
■
Enhanced switching core
Figure 12: Front panel of the Rapier 24i.
Rapier 24i
Layer 3 Fast Ethernet Switch
25
10BASE-T / 100BASE-TX
1X
3X
5X
7X
9X
11X
13X
PORT ACTIVITY
15X
17X
19X
21X
23X
L /A
100M LINK /
D/C
FULL DUP
1
3
5
ACTIVITY
7
9
11
RS-232
TERMINAL PORT
10M LINK /
ACTIVITY
HALF DUP/
COL
13
15
17
19
21
STATUS
ASYN0
23
FAULT
L /A
D/C
26
RPS
L /A
PWR
D/C
2
2X
4X
6X
8X
10X
12X
14X
16X
18X
20X
22X
4
6
8
10
12
14
16
18
20
22
24
RESET
24X
Rapier 48
(Figure 13)
■
48-port 10BASE-T/100BASE-TX (RJ-45 connectors)
■
Two 1000BASE uplink bays
■
Auto-negotiating Layer 3 Managed Switch
Figure 13: Front panel of the Rapier 48.
25X
35X
37X
47X
25
27
29
31
33
35
37
39
41
43
45
47
26
28
30
32
34
36
38
40
42
44
46
48
L /A
Layer 3 Fast Ethernet Switch
D/C
49
PORT ACTIVITY
L /A
26X
36X
38X
48X
D/C
10BASE-T / 100BASE-TX
1
3
5
7
9
11
13
15
17
19
21
23
L /A
1X
11X
13X
23X
2X
12X
14X
24X
L /A
100M LINK /
D/C
FULL DUP
ACT
HALF DUP
COL
STATUS
FAULT
RPS
PWR
D/C
2
4
6
8
Rapier 48i
(Figure 14)
C613-03020-00 REV K
10M LINK /
D/C
L /A
50
ACT
RS-232
TERMINAL PORT
■
48-port 10BASE-T/100BASE-TX (RJ-45 connectors)
■
Two 10/100/1000BASE uplink bays
■
Auto-negotiating Layer 3 Managed Switch
■
Enhanced switching core
10
12
14
16
18
20
22
24
ASYN0
RESET
14
Rapier Series Switch
Figure 14: Front panel of the Rapier 48i.
25
25X
35X
37X
47X
27
29
31
33
35
37
39
41
43
45
Rapier 48i
47
Layer 3 Fast Ethernet Switch
L /A
D/C
49
PORT ACTIVITY
L /A
26X
36X
38X
48X
D/C
26
28
30
32
34
36
38
40
42
44
46
1
3
5
7
9
11
13
15
17
19
21
11X
13X
23X
2X
12X
14X
24X
100M LINK /
FULL DUP
ACT
10M LINK /
ACT
HALF DUP
COL
RS-232
TERMINAL PORT
23
L /A
1X
L /A
D/C
48
10BASE-T / 100BASE-TX
STATUS
FAULT
D/C
RPS
L /A
50
RESET
PWR
D/C
2
4
6
8
10
12
14
16
18
20
22
24
ASYN0
Rapier 48w
(Figure 15, Figure 16)
■
48-port 10BASE-T/100BASE-TX (RJ-45 connectors)
■
Two 1000BASE SFP ports
■
Two asynchronous serial console ports with DB9 connectors
■
One Network Service Module bay, with support for various WAN interface
cards
■
Auto-negotiating Layer 3 Managed Switch
■
Enhanced switching core
■
Replaceable air filters and fan-only modules (FOMs) for NEBS applications
Figure 15: Front panel of the Rapier 48w
Rapier 48w L3 Fast Ethernet Switch
FAN 1
FAN 2
NSM
PORTS 49-50
L/A
1000M LINK
ACT
SFP
INSTALLED
FAULT
PORTS 1-48
LINK 100M
L/A
ACT
LINK 10M
ACT
D/C
FULL DUP
HALF DUP
CLASS 1
LASER PRODUCT
DO NOT STARE
INTO BEAM
COL
STATUS
ASYN0
FAULT
POWER
SWAP
RESET
IN
USE
ASYN1
1
2
3
4
5
6
7
8
9
10
11
12
13
14
15
16
17
18
19
20
21
22
23
24
25
26
27
28
29
30
31
32
33
34
35
36
37
38
39
40
41
42
43
44
45
46
47
48
49
50
HOT
SWAP
NSM
Figure 16: Rear panel of the Rapier 48w
WARNING
This unit might have more
than one power input. To
reduce the risk of electric
shock, disconnect all power
inputs before servicing unit.
FOR CENTRALIZED DC
POWER CONNECTION,
40-60VDC
4.5A MAX
DUAL INPUTS
INSTALL ONLY IN A
RESTRICTED AREA.
C613-03020-00 REV K
Hardware Reference
15
AT-TFTP Server
This section explains how to access and use the AT-TFTP Server. You can
transfer configuration files as well as download software upgrades with
AT-TFTP Server.
1.
If AT-TFTP Server has not been installed, install it from the Documentation
and Tools CD-ROM shipped with your switch. You can also download it
from www.alliedtelesis.com/support/software/.
Select AT-TFTP Server from the Start > Programs > Allied Telesis >
AT-TFTP Server menu.
2.
C613-03020-00 REV K
To set preferences for the AT-TFTP Server, select Options from the File
menu to display the Set Options dialog box.
•
In the “Default file transfer directories” field, enter the directory that
AT-TFTP Server will read from or write to, for file requests that do not
include a directory specification. You can specify multiple directories,
separated by semi-colons (“;”).
•
To prevent unauthorised access to private directories, enter a directory
in the “Restrict to directory” field. The AT-TFTP Server will only use the
specified directory, even if file requests explicitly reference other
directories. You can specify multiple directories, separated by semicolons (“;”).
•
For added security, selecting the “Read only” option ensures that files
can be read from the PC but not written to the PC. If you wish to use the
PC to archive scripts created using the create config command, you
must enable the “Read Write” option.
16
Rapier Series Switch
3.
•
Check “Diagnostics Messages” to display additional diagnostic
messages in the AT-TFTP window when debugging file transfers.
•
Choose whether AT-TFTP Server should respond to TFTP requests
received via IPv4 only, IPv6 only, or both IPv4 and IPv6.
•
Click the OK button when you finish.
To download a file from AT-TFTP Server to your switch, at the switch’s
command line interface type the following command:
load method=tftp file=filename server=ipadd dest=flash
where filename is the name of the file to download and ipadd is the IP
address of the PC running AT-TFTP Server.
4.
TFTP requests are logged to the AT-TFTP Server main window. To save a
TFTP Server log, select Save As from the File menu.
C613-03020-00 REV K
Hardware Reference
17
Switch Startup
This section outlines the log in and start-up procedures for your switch.
Although the switch will perform basic switching operations without being
configured, you will need to go through these log in and start-up procedures if
you wish to configure the switch and access its full layer 3 switching
capabilities.
To Log In
Using the supplied RS-232 DB9 straight-through cable, connect your
terminal or PC to the RS-232 Terminal Port on the switch’s front panel.
Set the communication parameters on your terminal or terminal emulation
program to:
•
Baud rate: 9600
•
Data bits: 8
•
Parity: None
•
Stop bits: 1
•
Flow control: Hardware
See “Using Windows Terminal and Windows Hyperterminal” on page 37
for more information on configuring emulation software.
After the switch has booted, the log in prompt appears. If the log in prompt
does not appear, press [Enter] two or three times.
When the switch boots for the first time it automatically creates an account
with manager privileges. The account has the log in name “manager” and
the password is “friend”.
At the log in prompt, enter the log in name and password.
Log in: manager
Password: friend
The switch’s command prompt appears and you can now configure the
switch using the command line interface.
Change the password as soon as possible. Leaving the manager account with
the default password is a serious security risk. Make sure that you remember
the new password as there is no way to retrieve it if it is lost.
Use the following command to change the account password:
set password
See the Rapier Series Switch AlliedWare™ Operating System Software Reference
for more information on configuring the switch.
C613-03020-00 REV K
18
Rapier Series Switch
To access help files
To display a list of help topics, enter:
help
To display help on a specific topic, enter:
help topic
Alternatively, type a question mark (?) at the end of a partially completed
command to see a list of valid options.
Startup Procedures
When the switch starts up following either a power cycle or an operatorinitiated reboot (using the Reset button or RESTART command), a series of
start-up messages is sent to the RS-232 Terminal Port (Figure 17).
Figure 17: Switch start-up messages
INFO:
INFO:
PASS:
INFO:
PASS:
INFO:
INFO:
Force
INFO:
INFO:
INFO:
Self tests beginning.
RAM test beginning.
RAM test, 32768k bytes found.
BBR tests beginning.
BBR test, 128k bytes found.
Self tests complete
Downloading switch software.
EPROM download (Y) ?
Initial download succeeded
Executing configuration script <boot.cfg>
Switch startup complete
Manager >
After the self tests are complete, the manager is given the option of forcing a
mandatory boot from the EPROM release. The message:
Force EPROM download (Y)?
is displayed on the terminal connected to the RS-232 Terminal Port and the
switch pauses. If a key is not pressed within a few seconds, the start-up process
will continue and all steps in the sequence will be executed. Pressing selected
keys on the terminal immediately after the “Force EPROM download” message
is displayed will change the switch start-up process (Table 1).
Table 1: Switch start-up sequence keystrokes
Pressing key...
Forces the switch to...
[Y]
Load the EPROM release, with no patch.
[S]
Start with the default configuration. Any boot script is ignored.
[Ctrl/D]
Enter diagnostics mode.
C613-03020-00 REV K
Hardware Reference
19
During the start-up process the switch will generate four different types of
messages. All messages are preceded by one of the words INFO, PASS, FAIL,
or ERROR. The significance of these words is shown in Table 2.
Table 2: Switch start-up message classes
Message
Meaning
INFO
An action will be taken by the system.
PASS
A test has been completed successfully.
ERROR
An error message that a test has failed, but the system will continue to
operate.
FAIL
An error message that a fatal error condition has caused the system to
halt in an unrecoverable fashion.
The possible messages and their meanings are:
INFO: Self tests beginning.
The code loader tests are about to begin.
INFO: RAM test beginning.
The RAM tests are about to begin.
PASS: RAM test, 32768k bytes found.
The RAM test passed, and the indicated amount of memory was found
and will be used in the switch.
ERROR: RAM test 5. Error address = 00345678.
A RAM test failed, at the given address. In the example, it was the fifth
test run. The RAM test repeats until it passes, so a number of messages
like this may appear. This fault means that the memory system is faulty.
If the fault continues, contact your Authorised Allied Telesis distributor
or reseller immediately.
INFO: BBR tests beginning.
The BBR battery tests are about to begin.
PASS: BBR test. Battery OK.
The BBR battery tests passed.
ERROR: BBR Battery low.
The BBR battery test failed, indicating that the battery is running low.
The BBR battery will need to be replaced. Contact your Authorised
Allied Telesis distributor or reseller.
PASS: BBR test, 256k bytes found.
The BBR size/location test passed, with the indicated amount of BBR
found.
FAIL: BBR test. Error address = 12345678.
The BBR size/location test failed at the given location. The test at this
location failed, indicating the end of memory, but a valid location was
discovered in the 255 long words following this location. The BBR
system will need to be replaced. Contact your Authorised Allied Telesis
distributor or reseller.
FAIL: BBR test, only 16k bytes found.
The BBR size/location test completed, but only the displayed amount
of memory was found. This amount is less than the minimum required
to run the switch software.
C613-03020-00 REV K
20
Rapier Series Switch
INFO: Self tests complete.
The start-up tests have finished.
INFO: Downloading switch software.
The process of downloading the switch software and vector table from
ROM is about to begin.
ERROR: Code load retried.
FAIL: Code load failed.
The load of the code from ROM to RAM failed. The load is retried a
number of times. Each time a failure occurs, the ERROR message is
displayed. If the maximum number of attempts is reached, the FAIL
message is displayed.
INFO: Initial download succeeded.
The start-up tests and download are complete, and the switch software
is about to be started. If the default install is a compressed release, the
release will now be decompressed. This may take a few seconds.
INFO: Downloading compressed release. This may take up to 1
minute...
INFO: Loading software into memory. This may take up to 1
minute...
The main switch software is about to be loaded into RAM. If the version
is a compressed release, the release will be decompressed.
INFO: Executing configuration script <script-name>
The configuration commands stored in <script-name> are being
executed. If an error is found in the script, one or more ERROR
messages will be displayed.
INFO: Switch startup complete.
The start-up process is complete and the switch will now perform basic
switching operations. Further configuration will be necessary if you wish to
access the switch’s full layer 3 switching capabilities. See the Rapier Series
Switch AlliedWare™ Operating System Software Reference for detailed information
on configuring the switch.
C613-03020-00 REV K
Hardware Reference
21
Switch Interfaces
This section provides pin assignments for the asynchronous console ports,
RJ-45 switch ports, and the Redundant Power Supply (RPS) connector.
If you have installed a Port Interface Card (PIC), pin assignments for these can
be found in the Port Interface Card Hardware Reference (which is included on the
Documentation and Tools CD-ROM bundled with your switch, or can be
downloaded from www.alliedtelesis.com/support/software).
Asynchronous Console Port
All Rapier switches except the Rapier 48w have a single asynchronous serial
RS-232 console port, labelled “RS-232 Terminal Port /asyn0”. The Rapier 48w
switch has two asynchronous serial RS-232 console ports, labelled “asyn0” and
“asyn1”.
The RS-232 console ports are used to connect the switch to a management
device. For management purposes the switch’s software can be accessed from a
terminal, a PC running terminal emulation software, or from a remote location
via a modem connection. You can also use the RS-232 console ports to establish
a network connection from a remote site using SLIP and a modem.
The console ports have a DCE female connector. This allows the use of a
straight-through cable when connecting the switch to a terminal or PC. Output
from the show asyn command will, however, still have a DTE perspective. The
internal DTE pin roles are listed in Table 3.
Figure 18: RS-232 Terminal Port Pin Numbers
Pin 5
Pin 9
Pin 1
Pin 6
DB9 Female Pin View
Table 3: Internal DTE pin roles
Pin
Role
2
TXD
3
RXD
4
CD
5
GND
6
DTR
7
CTS
8
RTS
See “Terminal and Modem Cables” on page 29 for more information on
connection options for the RS-232 console ports.
C613-03020-00 REV K
22
Rapier Series Switch
NEBS Compatibility
The management/asyn intra-building ports of the Rapier 48w are suitable for
connection to intra-building or unexposed wiring or cabling only. The
management/asyn intra-building ports of the Rapier 48w must not be
metallically connected to interfaces that connect to the OSP or its wiring. These
interfaces are designed for use as intra-building interfaces only (Type 2 or Type
4 ports as described in GR-1089-CORE, Issue 4) and require isolation from the
exposed OSP cabling. The addition of Primary Protectors is not sufficient
protection in order to connect these interfaces metallically to OSP wiring.
The management/asyn intra-building ports can only be directly connected to
equipment within the same frame, cabinet or line-up and where the equipment
is separated by a distance of 6m or less. The exception to this is when intrabuilding wiring (cabling) is used for maintenance purposes only and is not
connected during normal operation.
Switch RJ-45 Ports
Caution. Do not plug a phone jack into any RJ-45 port. Doing so could damage
the switch. Use only twisted pair cables with RJ-45 connectors.
For 10BASE-T/100BASE-TX connections, a twisted pair cable must be used.
Each pair is identified by two different colours. For example, one wire might be
red, and the other red with a white stripe. An RJ-45 connector must be fitted to
both ends of the cable. Figure 19 illustrates the pin layout for RJ-45 connectors.
Figure 19: RJ-45 Pin layout
8
1
8
1
RJPIN
With 10BASE-T/100BASE-TX cables, pins 1 and 2 are used for transmitting
data, while pins 3 and 6 are used for receiving data. Table 4 lists the RJ-45 Pin
assignments.
Table 4: RJ-45 Pin assignments
Pin Number
Assignment1
1
TX+
2
TX-
3
RX+
6
RX-
1. The “+” and “-” signs represent the polarity of the wires that make up each wire pair.
C613-03020-00 REV K
Hardware Reference
23
If a twisted pair cable is to join two ports and only one of the ports has an
internal crossover, the two pairs must be straight through, as listed in Table 5.
Table 5: RJ-45 Pin assignments, straight through cable
End 1
End 2
1 (TX+)
1 (TX+)
2 (TX-)
2 (TX-)
3 (RX+)
3 (RX+)
6 (RX-)
6 (RX-)
If a twisted pair cable is used to join two ports and either both ports are
labelled with an “X” or neither port is labelled with an “X”, a crossover must be
included in the wiring. Table 6 lists the RJ-45 crossover wiring pin assignments.
Table 6: RJ-45 Pin assignments, crossover cable
End 1
End 2
1 (TX+)
3 (TX+)
2 (TX-)
6 (TX-)
3 (RX+)
1 (RX+)
6 (RX-)
2 (RX-)
For 1000BASE-T RJ-45 cables, all four pairs are used and the cable is wired in a
straight-through configuration. Table 7 lists the pin assignments.
Table 7: Pin assignments, 1000BASE-T RJ-45 cable
End 1
End 2
1 Pair 1+
1 Pair 1+
2 Pair 1-
2 Pair 1-
3 Pair 2+
3 Pair 2+
6 Pair 2-
6 Pair 2-
4 Pair 3+
4 Pair 3+
5 Pair 3-
5 Pair 3-
7 Pair 4+
7 Pair 4+
8 Pair 4-
8 Pair 4-
NEBS Compatibility
The Ethernet intra-building ports of the Rapier 48w are suitable for connection
to intra-building or unexposed wiring or cabling only. The Ethernet intrabuilding ports of the Rapier 48w must not be metallically connected to
interfaces that connect to the OSP or its wiring. These interfaces are designed
for use as intra-building interfaces only (Type 2 or Type 4 ports as described in
GR-1089-CORE, Issue 4) and require isolation from the exposed OSP cabling.
The addition of Primary Protectors is not sufficient protection in order to
connect these interfaces metallically to OSP wiring.
C613-03020-00 REV K
24
Rapier Series Switch
Redundant Power Supply
AC models of Rapier Switches have a Redundant Power Supply (RPS)
connector on their rear panel. Table 8 lists the connector’s pin numbers and pin
functions.
Table 8: RPS Connector Pin Numbers and Functions
Pin Number
Function
1
+12 VDC
2
Remote Sense (RS) +5 VDC
3
Remote Sense (RS) Ground
4
Remote Sense (RS) +3.3 VDC
5
Redundant Power Supply (RPS) Present
6
Ground (+3.3 VDC Return)
7
Ground (+5 VDC Return)
8
+5 VDC
9
Ground (+12 VDC Return)
10
+3.3 VDC
11
Ground (+3.3 VDC Return)
12
+3.3 VDC
13
Ground (+3.3 VDC Return)
14
+3.3 VDC
15
+5 VDC
16
Ground (+5 VDC Return)
Table 9 illustrates the connector’s pin layout.
Table 9: RPS Connector’s Pin Layout
16
15
14
13
12
11
10
9
8
7
6
5
4
3
2
1
Pin 16 is at the connector’s top left, while pin 1 is at its lower right.
C613-03020-00 REV K
Hardware Reference
25
Fans and Filters on the Rapier 48w
The Rapier 48w has two fan-only modules (FOMs) located on the front. Each
FOM contains an air filter which should be changed periodically. The efficiency
period of the air filter will depend on the air quality in which the switch is
operated, but for a normal office environment, we recommend replacing the air
filters every 3 months.
The following procedures describe how to replace FOMs and air filters.
Replacement FOMs (part number AT-FAN-04) and air filters must be
purchased separately from your authorised Allied Telesis distributor or
reseller.
You do not need to power down the switch to change a FOM or air filter, but
you should replace them one at a time.
Before you begin
■
Read the safety information for the switch.
Safety information is available in the Rapier 48w Switch Installation and Safety
Guide bundled with every Rapier 48w switch. You can also download this
document from www.alliedtelesis.com/support/software.
■
Gather necessary tools and equipment.
You will need a flat screwdriver to adjust the captive screws on the FOM.
We recommend installing new air filters when you replace a FOM.
To replace a FOM
1.
Unpack the fan-only module.
Follow correct anti-static procedures when installing a FOM. Failure to do so
could damage the FOM or the switch. If you are unsure about correct
procedures, contact your authorised distributor or reseller.
While observing Electrostatic Discharge (ESD) precautions, remove the
FOM from its packing material in an anti-static environment.
2.
Remove the current fan-only module from the switch.
Using a flat screwdriver, loosen the captive screws on the faceplate of the
FOM, and slide the FOM out of its cage. The internal power connection is
quite solid so pull firmly on the captive screws.
C613-03020-00 REV K
26
Rapier Series Switch
.
3.
Install filters in the replacement fan-only module.
Install an air filter in the replacement FOM. Insert the air filter into the
narrow slot between the faceplate of the FOM and the fan. Position the air
filter with the plastic frame towards the fan, the quadrafoam towards the
faceplate, and the flextab to the top. The air filter should fit snugly.
C613-03020-00 REV K
Hardware Reference
27
4.
Install the replacement fan-only module.
Keep the FOM in straight alignment and insert it slowly. Forcing a misaligned
FOM is likely to damage both the chassis and FOM.
Slowly and carefully slide the replacement FOM into the cage, making sure
that the air filter and the flextab are clear of any contact points.
Firmly press the FOM until the faceplate engages, or nearly engages, the
chassis.
5.
Secure the fan-only module.
Tighten the two captive screws on the faceplate of the FOM.
To replace an air filter
1.
Remove the current fan-only module from the switch.
Using a flat screwdriver, loosen the captive screws on the faceplate of the
FOM, and slide the FOM out of its cage. The internal power connection is
quite solid so pull firmly on the captive screws.
2.
C613-03020-00 REV K
Remove the existing fan filter by grasping the flextab at the top and pulling
upwards.
28
Rapier Series Switch
3.
Install the replacement air filter in the fan-only module.
Insert the air filter into the narrow slot between the faceplate of the FOM
and the fan. Position the air filter with the plastic frame towards the fan,
the quadrafoam towards the faceplate, and the flextab to the top. The air
filter should fit snugly.
4.
Re-install the fan-only module.
Keep the FOM in straight alignment and insert it slowly. Forcing a misaligned
FOM is likely to damage both the chassis and FOM.
Slowly and carefully slide the FOM into the cage, making sure that the air
filter and the flextab are clear of any contact points.
Firmly press the FOM until the faceplate engages, or nearly engages, the
chassis.
5.
Secure the fan-only module.
Tighten the two captive screws on the faceplate of the FOM.
C613-03020-00 REV K
Hardware Reference
29
Switch Cables and Loopback Plugs
This section describes how to make cables for connecting the switch’s
interfaces to networks, terminals, and printers. How to make loopback plugs
for testing switch interfaces is also described.
Descriptions of cables and loopback plugs for PIC interfaces can be found in
the Port Interface Card Hardware Reference.
Terminal and Modem Cables
Figure 20 shows how to wire cables to connect a standard VT100 compatible
terminal, or a modem, to the switch’s RS-232 Terminal Port.
For NEBS compatibility, the cable must be shielded and grounded at both ends,
especially if permanently connected.
Figure 20: Pin wiring diagram for a standard DB9 male to female terminal cable
DB9 Male
(to switch/DCE)
Not connected
→ (TXD)
← (RXD)
← (CD)
(GND)
→ (DTR)
← (CTS)
→ (RTS)
← (RING)
Pin 1
DB9 Female
(to PC/terminal/DTE)
1
2
3
4
5
6
7
8
9
1
2
3
4
5
6
7
8
9
Pin 5
Pin 5
(DCD)
(RXD)
(TXD)
(DTR)
(GND)
(DSR)
(RTS)
(CTS)
(RING)
Pin 1
Cable
Pin 6
Pin 9
DB9 Male Pin View
Notes:
(1)
(2)
Pin 9
Pin 6
DB9 Female Pin View
→ Output from switch; ← Input to switch.
Cable version 1.0.
DB9MDB9Fsw
C613-03020-00 REV K
30
Rapier Series Switch
Figure 21: Pin wiring diagram for a DCE RS-232 Terminal Port (DB9 female connector) male
to male modem cable
DB9 Male
(to switch/DCE)
Not connected
→ (TXD)
← (RXD)
← (CD)
(GND)
→ (DTR)
← (CTS)
→ (RTS)
(RING)
Pin 1
DB9 Male
(to modem/DCE)
1
2
3
4
5
6
7
8
9
3 (TXD)
2 (RXD)
1 (DCD)
5 (GND)
4 (DTR)
8 (CTS)
7 (RTS)
9
6 Not connected
Pin 5
Pin 5
Pin 1
Cable
Pin 6
Pin 9
Pin 9
DB9 Male Pin View
Notes:
(1)
(2)
Pin 6
DB9 Male Pin View
→ Output from switch; ← Input to switch
Cable version 1.0.
DB9MDB9Fsw
The switch’s RS-232 Terminal Port has a DCE female socket. This allows the use
of a straight-through cable when connecting the switch to a terminal or PC.
Output from the SHOW ASYN command will, however, still have a DTE
perspective. The internal DTE pin roles are listed in Table 10.
Table 10: Internal DTE pin roles
Pin
Role
2
TXD
3
RXD
4
CD
5
GND
6
DTR
7
CTS
8
RTS
C613-03020-00 REV K
Hardware Reference
31
Loopback Plugs for Testing Switch Interfaces
Loopback plugs are used in conjunction with the Test Facility software to test
the physical interfaces on the switch and some PICs (see the “Test Facility”
section beginning on page 22 of this Reference, and the Test Facility chapter of
the Rapier Series Switch AlliedWare™ Operating System Software Reference). The
purpose of a loopback plug is to connect the output pins on the interface to the
input pins so that any data transmitted over the interface is looped back and
received at the same interface.
Gigabit copper interfaces cannot be looped back. Loopback plugs can be used
only in conjunction with 10/100 Ethernet interfaces.
On interfaces with control signals, these are also looped back. The data
received on the interface is compared with the data transmitted to determine
whether or not the interface is functioning correctly. In order to produce a
comprehensive test report for the interface being tested, most tests performed
by the Test Facility require a loopback plug to be inserted.
Some interfaces (e.g. synchronous ports) require a specially built external
testing device (available from your Authorised Allied Telesis distributor or
reseller) to be used in conjunction with the Test Facility.
Figure 22: Ethernet twisted pair (TP) loopback plug
Twisted Pair (TP) Loopback Plug (RJ45 connector)
8 7 6 5 4 3 2 1
TX+
TXRX+
RX-
1
2
3
4
5
6
7
8
Not
connected
Not
connected
•Not
Switch end view
of plug
RTPLOOPsw
Test Facility
This section introduces the Test Facility. The Test Facility is built into all Rapier
Switch software. For detailed information on operating the Test Facility, see the
Test Facility chapter of the Software Reference.
The Test Facility is designed to test the switch’s physical interfaces. Testing
should not be performed while the switch is operational as the presence of a
loopback plug may cause feedback of network traffic. Also, any interfaces
being tested are dedicated to the Test Facility. The Test Facility can be thought
of as a specialised interface module like PPP or Frame Relay.
The Test Facility will not test Ethernet interfaces on AT-AR026 PICs.
C613-03020-00 REV K
32
Rapier Series Switch
Rapier Switches and their expansion options support a wide range of interface
types, including Ethernet, asynchronous, synchronous, Basic Rate ISDN and
Primary Rate ISDN. Each interface type (except Ethernet interfaces on the ATAR026) can be tested independently using the Test Facility software. The
following examples show how to test specific interfaces.
Test results are displayed with the command:
SHOW TEST
This produces a display similar that shown in Figure 23.
Figure 23: Example output from the show test command
Board
ID Bay Board Name
Rev
Serial number
---------------------------------------------------------------------------Base
108
AT-RP24 Rapier 24
M1-1 6845425
Uplink
88
1 AT-A35SX/SC-00
P1-0 14269019
Duration
Details
Interface State
Result
Type (minutes) Data( %OK ) Control
---------------------------------------------------------------------------port1
no test
port2
no test
port3
no test
port4
no test
port5
no test
port6
no test
port7
no test
port8
no test
port9
no test
port10 no test
port11 no test
port12 no test
port13 no test
port14 no test
port15 no test
port16 no test
port17 no test
port18 no test
port19 no test
port20 no test
port21 no test
port22 no test
port23 no test
port24 no test
port26 no test
asyn0
no test
----------------------------------------------------------------------------
10/100 Ethernet LAN Port Tests
A loopback plug is required to run the first part of the Ethernet LAN test. See
“Loopback Plugs for Testing Switch Interfaces” on page 31 for details of how to
make a loopback plug. To start an Ethernet interface test, use the command:
ENABLE TEST INT=PORTn
where n is the Ethernet interface number. The test will run for 4 minutes. Use
the show test command to observe the test progress.
C613-03020-00 REV K
Hardware Reference
33
Other Interface Tests
Refer to the Test Facility chapter of the Software Reference for information on
testing other interfaces. If a test fails, please contact your Authorised Allied
Telesis distributor or reseller.
C613-03020-00 REV K
34
Rapier Series Switch
LEDs and What They Mean
The following tables outline how the Switch, Uplink Module and PIC LEDs
report faults and operational activities. Uplink Modules, NSMs, and PICs are
expansion options and can be purchased separately. Contact an authorised
Allied Telesis distributer or reseller, or visit from www.alliedtelesis.com for
more information on purchasing expansion options.
Switch LEDs
These LEDs are on the front or rear panels of Rapier Switches.
Table 11: System LEDs on all models except Rapier 48w
LED
State
Function
Power
Green
The switch is receiving power and the
voltage is within the acceptable range.
Fault
Red
The switch or manag.ement software is
malfunctioning
1 flash
A switch fan has failed. The LED will not
indicate an RPS fan failure).
3 flashes
If an RPS is connected, the switch’s PSU has
failed.
4 flashes
If RPS monitoring is enabled, the RPS PSU
has failed.
5 flashes
If RPS monitoring is enabled, an RPS is not
connected or is not operational.
RPS1
(Redundant Power
Supply)
Green
An RPS is connected to the switch.
In use2
(Rear panel)
Green
An NSM is installed, is receiving power, and
is operational. The NSM and its PICs are not
ready to be hot swapped.
Off
No NSM is installed, or the switch has not
recognised the NSM.
Green
The NSM and its PICs are ready to be hot
swapped.
Off
The Hot Swap button must be pressed
before the NSM or PICs can be hot swapped,
or the software version does not support hot
swapping3.
Swap2
(Rear panel)
1. DC models do not have an RPS connector and the RPS LED will not function.
2. Not included on the Rapier 48, G6, G6F-SX/SC, G6F-X/SC, or G6F-SX/MT-RJ.
3. Hot swapping is supported by Software Version 2.3.1 or later. AT-AR021(S) BRI S/T, AT-AR021(U)
BRI U, and AT-AR023 SYN PICs can be hot swapped.
C613-03020-00 REV K
Hardware Reference
35
Table 12: System LEDs on the Rapier 48w
LED
State
Function
Power
Green
The switch is receiving power and the
voltage is within the acceptable range.
Fault
Red
The switch or management software is
malfunctioning.
1 flash
A switch fan has failed.
Green
An NSM is installed, is receiving power, and
is operational. The NSM and its PICs are not
ready to be hot swapped.
Off
No NSM is installed, or the switch has not
recognised the NSM.
Green
The NSM and its PICs are ready to be hot
swapped.
Off
The Hot Swap button must be pressed
before the NSM or PICs can be hot swapped,
or the software version does not support hot
swapping1.
In use
(front panel)
Swap
(front panel)
1. Hot swapping is supported by Software Version 2.3.1 or later. AT-AR021(S) BRI S/T, AT-AR021(U)
BRI U, and AT-AR023 SYN PICs can be hot swapped.
Table 13: Switch Port LEDs on the Rapier G6
LED
State
Function
L/A
Green
A 1000 Mbps link is open
Amber
A 10 Mbps or 100 Mbps link is open
Flashing Green
1000 Mbps activity is occurring
Flashing Amber
10 Mbps or 100 Mbps activity is occurring
Green
The port is operating at full-duplex
Amber
The port is operating at half-duplex
Flashing Amber
Collisions are occurring on the line
(Link/Activity)
D/C
(Duplex/Collision)
Table 14: Switch Port LEDs on the Rapier G6F-LX/SC, G6F-SX/SC, and G6F-SX/MT-RJ
LED
State
Function
L/A
Green
A 1000 Mbps link is open
Flashing Green
1000 Mbps activity is occurring
Green
The port is operating at full-duplex
Amber
The port is operating at half-duplex
Flashing Amber
Collisions are occurring on the line
(Link/Activity)
D/C
(Duplex/Collision)
C613-03020-00 REV K
36
Rapier Series Switch
Table 15: Switch Port LEDs on the Rapier 8/8SC, 8/8MT, 24, 24i, 48, 48i, and 48w
LED
State
Function
L/A
Green
A 100 Mbps link is open
Flashing Green
100 Mbps activity is occurring
Amber
A 10 Mbps link is open
Flashing Amber
10 Mbps activity is occurring
Green
The port is operating at full-duplex
Amber
The port is operating at half-duplex
Flashing Amber
Collisions are occurring on the line
(Link/Activity)
D/C
(Duplex/Collision)
Table 16: Switch Port LEDs on the Rapier 16F-FX/SC, 16Fi-FX/SC, 16F-FX/MT-RJ, and
16Fi-FX/MT-RJ
LED
State
Function
L/A
Green
A 100 Mbps link is open
Flashing Green
100 Mbps activity is occurring
Green
The port is operating at full-duplex
Amber
The port is operating at half-duplex
Flashing Amber
Collisions are occurring on the line
(Link/Activity)
D/C
(Duplex/Collision)
Table 17: SFP Port LEDs on the Rapier 48w
LED
State
Function
SFP
Green
A 1000Mbps link is open
Flashing Green
1000Mbps link activity is occurring
Amber
An SPF is installed but the switch has not
recognised the SFP
Flashing Amber
An SPF is installed but a Tx fault has occurred
Off
No SPF installed
C613-03020-00 REV K
Hardware Reference
37
Uplink Module LEDs
The following tables may be helpful when diagnosing possible operational
faults. These LEDs are located on the face-plate of the respective Uplink
Module model. Uplink Modules are expansion options and must be purchased
separately.
Table 18: LEDs on the AT-A35-SX/SC and AT-A35-LX/SC Uplink Modules
LED
State
Function
Link
Green
The port is receiving light
Off
No link is present
Flashing Amber
Frames are being transmitted or received
through the port
Off
No activity is occurring
Activity
Table19: LEDs on the AT-A39-T/RJ-45 Uplink Modules
LED
State
Function
Full Dup/Half Dup/
Col
Green
The port is operating at full-duplex
Amber
The port is operating at half-duplex
Flashing amber
Collisions are occurring
Off
No link is present
Green
A 1000 Mbps link is open
Flashing green
1000 Mbps activity is occurring
Amber1
A 10/100 Mbps link is open
Flashing Amber1
10/100 Mbps activity is occurring
Off
No link is present
Activity
1. Early versions of the AT-A39/T operate at 1000 Mbps only. 10/100/1000 Mbps operation is
available only if the AT-A39/T Uplink Module is installed in a Rapier G6, Rapier G6F or Rapier i
model, otherwise operation is fixed at 1000 Mbps.
C613-03020-00 REV K
38
Rapier Series Switch
Table20: LEDs on the AT-A40/SC, AT-A40/MT, AT-A41/SC and AT-A41/MT Uplink Modules1
LED
State
Function
Activity/Link/Fault
Green
A link is open and the port is enabled
Flashing green
100 Mbps activity is occurring
Flashing amber
(and lower LED is
Off)
The link has failed at the remote end
Off
No link is present
Green
The port is operating at full-duplex
Amber
The port is operating at half-duplex
Flashing amber
Collisions are occurring
Off
No link is present
Alternate flashing
of upper and
lower LED, amber
The switch does not support this model of
uplink module
Full Dup/Half Dup/
Col
Both LEDs
1. AT-A40 and AT-A41 Uplink Modules can be installed in Rapier G6 and G6F switches and all Rapier i
switches.
C613-03020-00 REV K
Hardware Reference
39
Table: 21 LEDs on the AT-A42/GBIC Uplink Module
LED
State
Function
L/A
Green
A 1000 Mbps link is open
Flashing green
1000 Mbps activity is occurring
Flashing amber
(and GBIC LED is
Off)
A TX fault has occurred
Off
No link is present
Green
The switch has recognised the GBIC, the
GBIC is a valid model
Green
(and L/A LED is
flashing GREEN)
The port is operating at full-duplex
Amber
(and L/A LED is
OFF)
The switch has not recognised the GBIC, the
GBIC is not a valid model
Amber
(and L/A LED is
flashing GREEN)
The port is operating at half-duplex
Flashing amber
(and L/A LED is
flashing GREEN)
Collisions are occurring
Off
No GBIC is installed, or a TX fault has
occurred
Slow alternate
flashing of L/A and
GBIC LED, amber
The switch has not recognised the GBIC, or
the GBIC is not a valid model
Link/Activity
GBIC
Both LEDs
C613-03020-00 REV K
40
Rapier Series Switch
NSM LEDs
NSMs are expansion options and must be purchased separately. They can be
used with all Rapier models except the Rapier 48, Rapier 48i, G6, G6F/SX,
G6F/LX, and G6F/MT.
The AT-AR040 NSM unit has no independent LEDs. See Table 11 on page 34 for
information about related LEDs found on the base-unit switch or router.
The LEDs in Table 22 are located on the face-plates of AT-AR041 and AT-AR042
NSMs.
Table 22: LEDs on the AT-AR041 and AT-AR042 NSMs
LED
State
Function
Active
Green
Lit when the BRI has successfully completed
the exchange of INFO 1 and INFO 2 signals,
and INFO 3 and INFO 4 signals are present on
the link. This means the ISDN interface is
correctly connected to a working NT device.
Off
No BRI activity is occurring.
Amber
Pulses when HDLC packets are being
exchanged between the switch or router and
the ISDN switch over the B and D channels.
Off
No data exchange is occurring.
Data
The LEDs in Table 23 are located on the face-plate of AT-AR048 NSMs.
Table 23: LEDs on the AT-AR048 NSM
LED
State
Function
Active
Green
Lit when the Line Interface Unit (LIU) is
receiving a signal
Loop
Green
Lit when any loopback is active
LOS
Amber
Lit when the received signal is lost. This usually
indicates a network disruption, such as a cable
being disconnected or a device failure
LOF
Amber
Lit when the DS3 framer cannot extract valid
frames from the received signal
AIS
Amber
Lit when an Alarm Indication Signal is detected
FERF
Amber
Lit when a Far End Receive Failure signal is
detected. This indicates the far end is receiving
an AIS, LOS, or LOF signal
C613-03020-00 REV K
Hardware Reference
41
PIC LEDs
PICs are expansion options and must be purchased separately. They can only
be used if an AT-AR040 NSM is installed in the switch. NSMs (and therefore
PICs) can be used with all Rapier models except the Rapier 48, Rapier 48i, G6,
G6F/SX, G6F/LX, and G6F/MT.
These LEDs are located on the face-plate of the respective PIC.
Table 24: LEDs on the AT-AR020 PRI E1/T1 PIC
LED
Function
D Data
[ISDN mode only] Lit when HDLC packets are being exchanged between
the switch and the ISDN switch over the D (signalling) channel.
B Data
Lit when HDLC packets are being exchanged between the switch and
another end system device (normally another switch or router) over any
of the B (data) channels.
Active
Lit whenever operational (i.e., no RAI or AIS) frames are being received
from another source.
NT
[ISDN mode only] Lit when the PRI1 is operating in NT mode. This LED
should not be lit during normal operation.
Table 25: LEDs on the AT-AR021(S) BRI-S/T PIC
LED
Function
B1, B2
For on-demand ISDN, lit when there is a call up over the respective B
channel and flashing when data is being exchanged.
For permanent circuits, lit when HDLC packets are being exchanged
between the switch or router and another TE end system device
(normally another switch or router) over the respective B (data) channel.
Active
Lit when the BRI has successfully completed the exchange of INFO 1 and
INFO 2 signals, and INFO 3 and INFO 4 signals are present on the link.
This means that the ISDN interface is correctly connected to a working
NT device.
D
Lit when HDLC packets are being exchanged between the switch and
the ISDN switch over the D (signalling) channel.
Table 26: PIC LEDS on the AT-AR021(U) BRI-U PIC
LED
Function
B1, B2
Lit when HDLC packets are being exchanged between the switch and
another TE end system device (normally another switch or router) over
the respective B (data) channel.
For ISDN, lit when there is a call up over the respective B channel and
flashing when data is being exchanged.
C613-03020-00 REV K
Active
Lit when the U interface is in the Activated state (i.e., it is fully
operational at layer 1).
D
Lit when HDLC packets are being exchanged between the switch and
the ISDN switch over the D (signalling) channel.
42
Rapier Series Switch
Table 27: LEDs on the AT-AR023 SYN PIC
LED
Function
Tx
Lit when data is being transmitted over the synchronous interface.
Rx
Lit when data is being received over the synchronous interface.
Table 28: LEDs on the AT-AR026 4ETH PIC (two LEDs per port)
LED
Function
Left
Lit when the port is operating at 100Mbps and full duplex.
Right
Lit when a link has been established. Flashing when data is being
transmitted through the port.
Table 29: LEDs on the AT-AR027 VoIP-FXS PIC
LED
State
Function
Off Hook/Ring
Off
The port is on-hook
Green
The port is off-hook
Flashing
An incoming call is present on the
port
Off
The PIC is not registered with a
gatekeeper and external phone calls
cannot be made
Flashing
The PIC is registered with a
gatekeeper or gatekeeper has been
set to “None”. External calls can only
be made if the PIC is registered with a
gatekeeper
Off
The PIC is okay
Green
An internal error has occurred. Reset
the PIC using the RESET VOIP
command
PIC Reg
PIC Error
The AT-AR024 ASYN4 PIC does not have LEDs.
C613-03020-00 REV K
Hardware Reference
43
Troubleshooting
This section provides information on how to detect and resolve problems with
the Rapier Switch and its expansion options.
Other sources of useful troubleshooting information are:
■
www.alliedtelesis.com/support/software.
■
The Rapier Series Switch AlliedWare™ Operating System Software Reference.
Performing the following tasks will eliminate the most
common faults.
1.
Make sure the power cord is securely connected.
2.
Check that the power supply voltage is stable.
3.
Check that the correct data cables are being used and that their connections
are secure.
4.
Make sure that other network devices are working properly.
5.
Use the SHOW INSTALL command to check that the latest software version
is loaded. See the Rapier Series Switch AlliedWare™ Operating System Software
Reference for more information about obtaining the latest software version.
6.
If the switch is malfunctioning, reboot it by pressing the recessed Reset
button or entering the command RESTART REBOOT. Alternatively, power
OFF and ON the switch by disconnecting and reconnecting the main power
supply (including, if connected, the RPS power).
Link/Activity LED on any port is off
This can indicate:
■
A loose data cable.
■
The device at the other end of the connection is not working properly or is
turned off.
■
The data cable is not wired correctly.
■
The network administrator has manually disabled the port through the
software.
■
The port’s selected transmission mode does not match that of the attached
device.
Perform the following steps in sequence:
C613-03020-00 REV K
1.
Make sure the data cable connections are secure.
2.
Make sure the device at the other end of the connection is switched on and
working properly.
3.
Check that the data cable is wired correctly.
4.
If you can, log in and check the port status. See “To Log In” on page 12 for
more information on how to log in.
5.
If the port is Enabled, make sure the transmission speed matches that of the
connected device (auto-negotiating, full or half-duplex).
44
Rapier Series Switch
If the port is disabled, someone has used the software to manually disable it. You should
find out why the port was disabled before enabling it.
Power LED is off
This can indicate:
■
A loose power cord or DC power crimp
■
A power supply failure
Perform the following steps in sequence:
1.
Check that the power cord connections are secure.
2.
Check that all switches and circuit protection devices are in the ON position.
3.
Ensure that the supply voltage is within the operational range (110–240VAC
50–60Hz for AC models, 40–60VDC for DC models).
Fault LED is on
This can indicate:
■
There is a problem with the switch or RPS PSU.
■
The switch or management software is malfunctioning.
■
A hardware fault is preventing switch start-up.
Perform the following steps in sequence:
1.
Check Table 11 on page 34 for descriptions and explanations of LED
flashing sequences.
2.
Reset the switch by pressing the recessed RESET button on the front panel.
3.
If you were attempting to download software or manage the switch via the
RS-232 terminal Port, check that connections between the Terminal Port and
local terminal or PC are secure.
If you cannot access the switch’s software because of a faulty RS-232
Terminal Port connection, you can still manage the switch via Telnet or
SNMP until the problem is fixed.
4.
Unplug the switch and then plug it in again. If present, you will also have
to disconnect and reconnect the RPS unit.
5.
Download the latest software version. See the Rapier Series Switch
AlliedWare™ Operating System Software Reference for more information on
how to obtain the latest software version release.
C613-03020-00 REV K
Hardware Reference
45
Expansion Options
This section provides an overview of the expansion options for Rapier
Switches. The following expansion options were available when this Reference
was written. See your authorised Allied Telesis distributer or reseller, or visit
from, www.alliedtelesis.com to see if any new options are available.
Uplink Modules
Uplink Modules increase switching capacity by providing a maximum of two
extra ports and by allowing switches to be linked together in stacks. For the
Rapier series, Uplink Modules with gigabit capacity are available.
Uplink Modules in the following list are the only modules that should be
installed into Rapier Switches. Check with your authorised Allied Telesis
distributor or reseller, or visit from www.alliedtelesis.com to see if any new
Uplink Module models are available.
Uplink Modules currently available include:
■
AT-A35-SX/SC 1-port 1000BASE-SX (SC connector)
■
AT-A35-LX/SC 1-port 1000BASE-LX (SC connector)
■
AT-A39-T/RJ-45 1-port 1000BASE-T (RJ-45 copper connector)
■
AT-A40/SC 1-port 100BASE-FX Multimode Fibre (SC connector)
■
AT-A40/MT 1-port 100BASE-FX Multimode Fibre (MT-RJ connector)
■
AT-A41/SC 1-port 100BASE-FX Singlemode Fibre (SC connector)
■
AT-A41/MT 1-port 100BASE-FX Singlemode Fibre (MT-RJ connector)
■
AT-A42/GBIC 1-port 1000BASE-X (GBIC slot)
AT-A40 and AT-A41 Uplink Modules can only be installed in Rapier G6,
Rapier G6F, and Rapier i Series switches.
For more information on Uplink Modules, contact your Authorised Allied
Telesis distributor or reseller, or see the Uplink Module Hardware Reference. This
and other documentation can be found on the Rapier Switch Documentation
and Tools CD-ROM bundled with your switch, or at www.alliedtelesis.com/
support/software.
Network Service Modules
The following Rapier switches include an NSM expansion bay:
C613-03020-00 REV K
■
Rapier 24
■
Rapier 24i
■
Rapier 16F-FX/SC
■
Rapier 16Fi-FX/SC
■
Rapier 16F-FX/MT
■
Rapier 16Fi-FX/MT
■
Rapier 8/8SC
46
Rapier Series Switch
■
Rapier 8/8MT
■
Rapier 48w
NSMs slot into a base-unit switch and either directly provide additional
interfaces, or provide multiple slots where additional interfaces can be added.
The following NSMs are available:
■
AT-AR040 (4 Port Interface Card (PIC) slots)
■
AT-AR041 (8 BRI S/T WAN Ports)
■
AT-AR042 (4 BRI S/T WAN Ports)
■
AT-AR048 (1 unchannelised DS3 port)
The AT-AR048 can be used only in the Rapier 48w and in Rapier 24i models
whose serial number ends in J or higher (N or higher for maximum
performance). A label with the serial number can be found on the underside of
the switch.
For more information on NSMs, contact your authorised Allied Telesis
distributor or reseller, or see the Network Service Module Hardware Reference.
This and other documentation can be found on the CD-ROM bundled with
your switch, or at www.alliedtelesis.com/support/software.
Port Interface Cards (PICs)
PICs provide a cost effective and flexible mechanism for adding new or
additional WAN network interfaces to the switch. By adding or changing PICs,
the switch’s network interface capabilities can be upgraded without replacing
the switch itself. A PIC can provide additional network interfaces, or can be
replaced with a different PIC to provide alternative interface types.
An AT-AR040 NSM must be installed before PICs can be used with Rapier
Switches.
The following PICs can be used in the AT-AR040 NSM when it is installed in a
Rapier switch (with a maximum of two E1/T1/PRI cards):
■
AT-AR020 PRI E1/T1
■
AT-AR021 (S) BRI S/T
■
AT-AR021 (U) BRI U
■
AT-AR023 SYN
■
AT-AR024 ASYN4
■
AT-AR027 VoIP-FXS
We recommend that AT-AR022 ETH PICs and AT-AR026 4ETH PICs not be
used in the NSM PIC bays because performance of these interfaces is likely to
be reduced and packet loss may occur.
For more information on PICs, contact your Authorised Allied Telesis
distributor or reseller, or see the Port Interface Card Hardware Reference. This and
other documentation can be found on the CD-ROM bundled with your switch,
or at www.alliedtelesis.com/support/software.
C613-03020-00 REV K
Hardware Reference
47
PCI Accelerator Cards (PACs)
PCI Accelerator Cards (PACs) provide additional processing features or
performance, but do not add extra physical interfaces to the switch. A PAC can
be installed in the dedicated PAC slot on all Rapier switches except the Rapier
48, Rapier 48i, Rapier G6, and Rapier G6F.
PACs should only be installed by authorised service personnel. Unauthorised
opening of the switch’s lid may cause danger of injury from electric shock,
damage to the switch, and invalidation of the product warranty.
Two PACs are available:
■
AT-AR060 EPAC, Encryption PAC.
■
AT-AR061 ECPAC, Encryption/Compression PAC.
See “Restricted Procedures” on page 39 for more information on the PAC
installation procedure.
How PACs work
PACs provide Rapier switches with high performance hardware-based
encryption and/or compression services. PACs have a DMA slave processor,
which operates independently of the base system. This processor is responsible
for the transfer of data between the base system and the PAC, and the control
of local high speed encryption and compression data processing devices.
This architecture allows data encoding to be performed off-line without
involving the base switch processor, thereby maximising PAC performance
while at the same time minimising impact on the switch.
The PAC is a single card. Figure 24 shows the layout of the board for an
AT-AR061 ECPAC.
Figure 24: Location of main components on the AT-AR061 ECPAC card.
PAC Connector
Hole for PAC fastner
Holes for PAC fasteners
C613-03020-00 REV K
PAC
48
Rapier Series Switch
Compression
PAC-based compression has the following features:
■
Local 32-bit processor for high speed control and data transfer.
■
Dedicated high performance 32-bit compression hardware.
■
High compression ratio Lempel-Ziv algorithm in hardware.
■
2 MBytes of history memory.
■
Support for up to 127 compression channels.
Compression and decompression operations are performed by a 32-bit data
compression coprocessor specifically designed for high-performance LempelZiv compression applications. The 2 MBytes of history memory allows up to
127 individual data links to use compression concurrently, enabling PACs to
provide compression for complicated network architectures. Figure 25 shows
typical compression ratios achieved by a PAC for a representative set of file
types.
Figure 25: Typical hardware compression ratios by file type
Compression Ratio
7
6
5
4
3
2
1
0
Font
Program Window
Text
Object
Spread C source
sheet
EPS
Bitmap
TIFF
File Type
CMPRATIO
C613-03020-00 REV K
Hardware Reference
49
Encryption
PAC-based encryption has the following features:
■
Local 32-bit processor for high speed control and data transfer.
■
Dedicated high performance 32-bit Data Encryption Standard – DES and
Triple DES (3DES) – hardware.
PAC DES and triple DES encryption are based on a fast 32-bit device that
complies with FIPS PUB 46, ISO DEA-1 and ANSI X3.92 standards.
Dual Mode
Throughput of an encrypted link can be dramatically increased by using data
compression. To support this, ECPACs support both encryption and
compression, providing a dual mode that allows combined compression and
encryption operations. So that the compression phase will have the best
opportunity at finding non-random data, compression occurs before
encryption, in the order:
compression → encryption →//→ decryption → decompression
Adding compression to an encrypted link increases line throughput. Once
compression has been carried out there is less data requiring encryption,
passing back to the base system, and transferring across the network, so less
base system bus and network link bandwidth is required for a given amount of
data. This results in the dual operation being very effective where encryption is
required.
C613-03020-00 REV K
50
Rapier Series Switch
Port, Connector, and Cable Combinations
This section provides cabling guidelines for each switch model.
Table 30: Cable guidelines
Model
Port Type(s)
Connector Type(s)
Cable Type1
Maximum Cable
Length
Rapier 8/8SC
10BASE-T/
100BASE-TX
RJ-45
10BASE-T Category 3 or
better
100m (328ft)
100BASE-TX Category 5
or better
100m (328ft)
50/125 or 62.5/125
micron multimode fibre
Full-duplex 2km
(6,600ft)
Rapier 8/8MT
Rapier 24
Rapier 24i
Rapier 48
Rapier 48i
Rapier 16F-FX/SC
100BASE-FX
SC
Rapier 16Fi-FX/SC
Half-duplex 412m
(1360ft)
Rapier 8/8/SC
Rapier 16F-FX/MT-RJ
100BASE-FX
MT-RJ
Rapier 16Fi-FX/MT-RJ
50/125 or 62.5/125
micron multimode fibre
Full-duplex 2km
(6,600ft)
Half-duplex 412m
(1360ft)
Rapier 8/8MT
Rapier G6
1000BASE-T
RJ-45
CAT5
100 (328ft)
Rapier G6F-LX/SC
1000BASE-LX
SC
9/125 micron
singlemode fibre
3km (1.8mi)
Increasing to 10km
(6mi) if linking two
1000BASE-LX models
50/125 or 62.5/125
micron multimode fibre
550m (1804ft)2
50/125 micron
multimode fibre
550m (1,804ft)2
62.5/125 micron
multimode fibre
275m (902ft)3
50/125 micron
multimode fibre
550m (1,804ft)2
62.5/125 micron
multimode fibre
275m (902ft)3
Refer to documentation
with SFP
Refer to
documentation with
SFP
Rapier G6F-SX/SC
Rapier G6F-SX/MT-RJ
Rapier 48w
1000BASE-SX
1000BASE-SX
1000BASEX
SC
MT-RJ
Varies with SFP
1. Refer to the IEEE 802.3 standards for further cable information
2. Assumes a fibre optic cable rating of 500 Mhz/Km. (Maximum cable length is 500m at a cable rating of 400 Mhz/Km.)
3. Assumes a fibre optic cable rating of 200 Mhz/Km. (Maximum cable length is 220m at a cable rating of160 Mhz/Km.)
C613-03020-00 REV K
Hardware Reference
51
Using Windows Terminal and Windows
Hyperterminal
You can use a PC running terminal emulation software as the manager console,
instead of a terminal. There are many terminal emulation applications
available for PCs, but the most readily available are the Terminal and
HyperTerminal applications included in Microsoft Windows 98, 2000, and
XP Professional. In standard Windows installations, HyperTerminal is
available from the Communications submenu.
The key to successful use of terminal emulation software with the switch is to
configure the software and switch with matching communications parameters.
The following procedure can be applied to most terminal emulation programs.
Dialog boxes in the procedure are from Windows 2000 and XP Professional.
To configure Windows HyperTerminal for 2000 and XP Professional
1.
2.
C613-03020-00 REV K
Start the program in Windows by doing one of the following:
•
Select Programs > Accessories > Communications > HyperTerminal.
•
Double-click the Hypertrm.exe icon.
In the Connection Description dialog box:
•
Enter a name for the connection, such as Admin.
•
Select an icon from the scrollable list and click the OK button.
52
Rapier Series Switch
3.
In the “Connect using” field on the Connect To dialog box, select the COM
port on the PC used to connect to the switch. and click the OK button.
4.
In the COMn Properties dialog box, set port parameters as follows, and click
the OK button.
C613-03020-00 REV K
Hardware Reference
53
5.
From the main HyperTerminal window, select Properties from the File
menu. Click the Settings tab, and set the Properties dialog box as follows.
6.
Click ASCII Setup to display the ASCII Setup dialog box, and ensure the
following options are not selected:
•
Echo typed characters locally
•
Append line feeds to incoming line ends
Set other parameters as necessary and click the OK buttons on both dialog
boxes to close them.
C613-03020-00 REV K
54
Rapier Series Switch
7.
Save the current session by selecting Save from the File menu on the main
HyperTerminal window. This creates a connection icon with the name you
assigned in the HyperTerminal group.
To use the configuration, double-click the connection icon. When the
HyperTerminal window appears, press the Enter key several times; the
switch’s login prompt is then displayed.
Restricted Procedures
This section contains procedures that should only be performed by authorised
service personnel. Unauthorised use of procedures in this section may cause
danger of injury from electric shock, damage to the switch, and invalidation of
the product warranty.
If you would like to know more about the procedures outlined in this section,
please contact your authorised Allied Telesis distributor or reseller.
Diagnostics
The switch software includes a set of diagnostic programs. These programs
perform basic level checks of all system components. They do not run in
conjunction with the normal operating code, and require that the system be
totally dedicated to their use. A detailed knowledge of the way the switch
hardware functions is necessary if diagnostics is to be used effectively.
The switch does not perform switching operations when diagnostics are
running.
Diagnostics will not perform checks on AT-AR026 PICs.
This section is not intended as a guide to the diagnostics software. Diagnostics
are designed to be run by service personnel only. For more information, contact
your Authorised Allied Telesis distributor or reseller.
To enable diagnostics mode:
1.
Connect a terminal to the RS-232 Terminal Port.
Using an RS-232 DB9 straight-through cable, connect a terminal to the
RS-232 Terminal Port on the switch.
Set the terminal communication parameters to the following:
•
Baud rate: 9600
•
Data bits: 8
•
Parity: None
•
Stop bits: 1
•
Flow control: Hardware
C613-03020-00 REV K
Hardware Reference
55
2.
Restart the switch.
Restart the switch, either by using a pen or pencil to operate the recessed
reset button on the front panel, or by using the terminal to log in and enter
the command:
RESTART REBOOT
See “To Log In” on page 12 for more information on how to log in.
3.
Enable diagnostics mode during startup.
During the switch start-up process, at the prompt:
Force EPROM download (Y)?
press [Ctrl/D] on the terminal to enter diagnostics mode. A banner page will
be displayed on the terminal (Figure 26). This can be used to check that the
terminal is correctly connected.
Figure 26: Rapier Switch diagnostics banner page
* * * Diagnostic Mode * * *
version 16-Mar-98
Main Menu:
0. Restart
1. Full RAM test
2. ROM checksum test
3. Full FLASH test
4. Totally Erase FLASH
5. Battery backed RAM test
Enter selection ==>
To run a diagnostic program, enter the corresponding letter or number (or key).
There are several sub-menus to cover all the available options. Table 30 lists the
control keys for diagnostic operations.
Table 31: Basic commands for running the diagnostics
Key
Function
Q
Quits any running tests and displays the banner page.
S
Prints a summary of test results so far.
A reasonable understanding of the system’s structure is needed to operate
diagnostics and interpret the results.
To restore the switch to normal operation, use a pen or pencil to operate the
recessed reset button on the front panel, or press “0” (zero) to restart.
C613-03020-00 REV K
56
Rapier Series Switch
Installing a PAC
PACs can be installed in all Rapier switches except the Rapier 48, Rapier 48i,
Rapier 48w, Rapier G6, and Rapier G6F.
PACs should only be installed by authorised service personnel. Unauthorised
opening of the switch’s lid may cause danger of injury from electric shock,
damage to the switch, and invalidation of the product warranty.
Before you begin
1.
Check that you have the correct tools and equipment.
You will need a medium-sized posidrive screwdriver.
2.
Avoid injury by working in a safe environment.
The workspace should be free of hazards, and there should be sufficient
room to lay out the switch, PAC, and tools.
3.
Unpack the PAC in an antistatic environment.
Do not attempt to install any hardware without observing correct antistatic
procedures. Failure to do so may damage the switch or PAC. If you are unsure
what the ‘correct’ procedures are, contact your authorised Allied Telesis
distributor or reseller.
To install a PAC
1.
If fitted, disconnect the switch’s redundant power supply.
2.
Disconnect the mains power cord.
Before removing the switch’s lid, the power cord and, if connected, RPS power
cord should be disconnected to reduce risk of electrical shock.
3.
Remove all interface cables.
4.
Remove the switch’s lid.
The switch may need to be removed from any rack mounting system
before its lid can be removed.
Using a posidrive screwdriver, remove the 12 screws that secure the
switch’s lid. There are 5 screws located in countersunk holes on each side
of the lid, and 2 screws at the rear.
5.
If not already installed, install the PAC pillars.
Each PAC is shipped with six pillars (three plastic and three metal). If
installing the PAC in a Rapier 24, use the plastic pillars. If installing the
PAC in any other model of Rapier, use the metal pillars.
Carefully screw the appropriate pillars into the three threaded pillar
mounts on the switch’s base board. The pillars should be firm but not
overtight.
Figure 27 on page 57 shows the PAC pillar mounts on a Rapier base board.
C613-03020-00 REV K
Hardware Reference
57
Figure 27: Location of PAC slot and pillar mounts on a Rapier base board
PAC slot
Boot EPROMs
Fan
PAC pillar mounts
8PACslot
6.
Insert the PAC.
Position the PAC over the PAC slot on the switch base card, making sure
that the support pillars located on the switch base card are aligned with the
holes provided on the PAC. This ensures that the connector on the PAC is
correctly aligned with the slot on the switch base card.
Press the connector firmly into place. Secure the PAC to its three pillars
using the fasteners supplied.
Figure 27 above shows the PAC slot on a Rapier base board.
7.
Replace the switch’s lid and the power cord.
Secure the switch’s lid. If you disconnected an RPS supply, reconnect it
now.
8.
If you disconnected interface cables to install the PAC, reconnect them.
The PAC is now ready to test.
Testing a PAC
There are several ways to check that the PAC is installed and operating
correctly. First, check that the switch has recognised the card. Turn on the
switch and enter the following command to display system information
(Figure 28 on page 58):
SHOW SYSTEM
The first part of the display shows details of the cards installed in the switch.
There should be at least two entries, one for the switch base card and one for
the PAC. Both the serial number and the part name should be displayed.
If there is no entry for the PAC then the switch’s boot process has not correctly
detected the PAC’s presence. The most likely cause is that the PAC is not
C613-03020-00 REV K
58
Rapier Series Switch
correctly plugged into the slot on the switch’s base board. Repeat the
installation process, paying particular attention to Step 6.
Use the show system command again, and if the display is still not correct,
contact your authorised Allied Telesis distributor or reseller.
If you have any difficulty with the PAC at any time, contact your authorised
Allied Telesis distributor or reseller and quote the serial numbers of both the
base card on the switch and the PAC. The serial numbers and revision details
can be read using the show system command. It’s a good idea to record this
information for later reference.
Figure 28: Example output from the show system command for a Rapier switch with an
AT-AR061 ECPAC installed
Switch System Status
Time 00:23:04 Date
15-Jun-2001.
Board
ID Bay Board Name
Rev
Serial number
-------------------------------------------------------------------------Base
86
AT-RP24
Rapier 24
M2-1 46690596
NSM 4PIC
87
AT-AR040-00 NSM 4PIC
M3-3 6845206
PIC
38
1 AT-AR023-00 PIC Sync
M1-1 8618528
PAC
153
AR061 ECPAC
P1-16 6844578
-------------------------------------------------------------------------Memory DRAM : 32768 kB
FLASH : 6144 kB
-------------------------------------------------------------------------SysDescription
Allied Telesyn AT-RP24 version 2.2.2-00 18-May-2001
SysContact
SysLocation
SysName
SysDistName
SysUpTime
102398 ( 00:17:03
Software Version:
Release Version :
Release built
:
Patch Installed :
Territory
:
Help File
:
Main PSU
RPS Monitor
)
2.2.2-00 18-May-2001
2.2.2-00 18-May-2001
Jun 15 2001 at 05:03:04
NONE
europe
help.hlp
: On
: Off
Main Fan
: On
Boot configuration file: Not set
Current configuration: None
Security Mode
: Disabled
Warning (248283): No patches found.
C613-03020-00 REV K
Hardware Reference
59
Next, check the PAC’s status using the command:
SHOW LOG
to display a log of PAC events. A typical display is shown in Figure 29.
Figure 29: Example output from the SHOW LOG command for a Rapier switch with an
AT-AR061 ECPAC card installed
Date/Time
S Mod Type SType Message
-------------------------------------------------------------------------15 00:05:50 4 ENCO ENCO PAC
7751 Found. Initialisation started
15 00:05:50 4 ENCO ENCO PAC
7751 Initialisation Successful
15 00:05:50 7 SYS REST NORM Switch startup, ver 2.2.2-00, 18-May-2001,
Clock
Log: 00:04:40 on 15-Jun-2001
15 00:05:53 3 USER USER 00011 manager login failed on port0
15 00:05:58 3 USER USER LON
manager login on port0
15 00:05:59 3 CH
MSG
WARN No patches found
--------------------------------------------------------------------------
If PAC tests fail, check that the PAC is correctly installed in its slot and repeat
the tests. Contact your authorised Allied Telesis distributor or reseller if the
PAC does not operate correctly.
Once the PAC is operating, its functionality can be tested either by using the
Test Facility software, which is built into the switch, or by configuring a
module to use the PAC. For more information about configuring interfaces, see
the “Compression and Encryption Services” chapter of your switch’s Software
Reference.
Using the Test Facility to Verify Operation
The built-in Test Facility software is the easiest way to verify a PAC’s operation.
For more information, see the Test Facility chapter in the Software Reference.
To run the test facility for a PAC, use the command:
ENABLE TEST INTERFACE=PAC
The test runs 4 minutes. To view the results of the test at any time, use the
command:
SHOW TEST
C613-03020-00 REV K
60
Rapier Series Switch
Figure 30 shows a typical output. The status of the test will be shown in the
right-hand column. For further information on the meanings of the other
figures, see the “Test Facility” chapter of your switch’s Software Reference.
Figure 30: Example output from the show test command for a Rapier switch with an
AT-AR061 ECPAC installed
Board
ID Bay Board Name
Rev
Serial number
--------------------------------------------------------------------------Base
86
AT-RP24
Rapier 24
M2-1 46690596
NSM 4PIC
87
AT-AR040-00 NSM 4PIC
M3-3 6845206
PIC
38
1 AT-AR023-00 PIC Sync
M1-1 8618528
PAC
153
AR061 ECPAC
P1-16 6844578
Duration
Details
Interface State
Result
Type (minutes) Data( %OK )
Control
-------------------------------------------------------------------------port1
port2
port3
port4
port5
port6
port7
port8
port9
port10
port11
port12
port13
port14
port15
port16
port17
port18
port19
port20
port21
port22
port23
port24
no
no
no
no
no
no
no
no
no
no
no
no
no
no
no
no
no
no
no
no
no
no
no
no
test
test
test
test
test
test
test
test
test
test
test
test
test
test
test
test
test
test
test
test
test
test
test
test
-
-
-
-
-
-
syn0
no test
-
-
-
-
-
-
asyn0
no test
-
-
-
-
-
-
enco0
testing
wait 4 minutes
DES
< 1
good(100.0)
-
.
enco1
testing
wait 4 minutes
STAC
< 1
good(100.0)
.
---------------------------------------------------------------------------
If you are unsure about running the Test Facility, or have difficulty evaluating
the results then contact your authorised Allied Telesis distributor or reseller.
C613-03020-00 REV K
Hardware Reference
61
Replacing Boot EPROMs
All Rapier switches except the Rapier 48w have two 512 kByte boot EPROMs.
The boot EPROMs contain bootstrap code, which loads the main code from a
software release file in FLASH memory. In rare circumstances the boot
EPROM(s) may need to be changed.
Boot EPROMs should not need to be replaced, except in rare circumstances.
Contact your Authorised Allied Telesis distributor or reseller before replacing
any boot EPROMs.
To change the boot EPROMs
1.
Check that you have the correct tools and equipment available.
You will need a medium-sized posidrive screwdriver and an EPROM
extraction tool (or a small flat-bladed screwdriver). In addition, adequate
antistatic precautions must be used.
EPROMs, like most electronic equipment, are highly sensitive to electrostatic
damage. This can be particularly acute in the dry atmosphere normally
associated with computer rooms and typical offices. Before commencing work,
ensure that you have used an approved antistatic wrist strap to discharge any
buildup of static electricity. Wear the strap at all times during the following
procedure.
2.
Avoid injury by working in a safe environment.
The workspace should be free of hazards, and there should be sufficient
room to lay out the switch, the EPROM, and the tools.
3.
Disconnect the mains power cord.
4.
If fitted, disconnect the redundant power supply.
Do not take risks with mains or backup electricity. Do not attempt to remove
the lid of the switch unless all power cords have been disconnected from the
switch.
5.
Remove the switch’s lid.
Using a posidrive screwdriver, remove the 12 screws that secure the
switch’s lid. There are 5 screws located in countersunk holes on each side
of the lid, and 2 screws at the rear. The switch may need to be removed
from any rack mounting system before its lid can be removed.
6.
Remove the existing boot EPROMs.
The boot EPROM(s) should now be visible.
Figure 31 on page 62 shows the location of boot EPROMs on the CPU
board.
Remove the boot EPROMs using the extraction tool. Alternatively, a small
flat-bladed screwdriver can be used. If using a screwdriver, gently lever
each end of a particular boot EPROM a few millimetres at a time until it
comes free.
C613-03020-00 REV K
62
Rapier Series Switch
Figure 31: EPROM locations
Boot EPROMs
(Rapier 8/8MT, 8/8SC, 16F-FX/MT-RJ,
16Fi-FX/MT-RJ, 16F-FX/SC,
16Fi-FX/SC)
PAC slot
Boot EPROMs
(Rapier G6, G6F-LX/SC,
G6F-SX/SC, and G6F-SX/MT-RJ)
Fan
r24eprom
7.
Insert the new boot EPROMs.
Insert the new boot EPROMs one at a time, using as a reference the location
number printed on the CPU board (e.g., “0” and “1”) and Figure 31 above.
Check that the boot EPROMs are firmly seated.
Install the boot EPROMs the correct way up! Failure to do so will almost certainly
destroy them. The ‘top’ end of the EPROM has a notch. This should be positioned so that
the notched end of the EPROM is orientated as shown in Figure 31.
8.
Replace the switch’s lid and power cord.
Replace the lid and secure it with the 12 posidrive screws. Connect the
power cord and (if disconnected in step 4) the RPS.
9.
Check that the switch is operating correctly.
Check that the switch boots up correctly. Connect the switch’s RS-232
Terminal Port to a terminal (see page 20 for information on connection
cables) and check the start-up messages. See “Switch Start-up” on page 12
for a list of start-up messages. Verify that the new software version is
installed by typing the command:
SHOW INSTALL
which will produce a display like that shown in Figure 32 on page 63. The
boot EPROM software version number is shown in the “Default” field.
Check that it is correct.
C613-03020-00 REV K
Hardware Reference
63
Figure 32: Example output from the SHOW INSTALL command
Install
Release
Patch
-----------------------------------------------------------Temporary
Preferred
flash:load\86s-210.rez
Default
EPROM (86s-2.1.0)
-----------------------------------------------------------Current install
-----------------------------------------------------------Preferred
flash:load\86s-210.rez
-----------------------------------------------------------Install history
-----------------------------------------------------------No Temporary install selected
Preferred install selected
Preferred release successfully installed
------------------------------------------------------------
Troubleshooting EPROM Installation
If the switch fails to reboot or functions incorrectly, then the most likely cause is
that there is a problem with the way the boot EPROMs were installed. Repeat
the installation procedure, checking:
•
That the boot EPROMs are in the correct locations and oriented
correctly (using the relevant location diagram as a guide).
•
For bent pins. These should be carefully straightened.
If the switch still fails to reboot, replace the new boot EPROMs with the
original set and contact your Authorised Allied Telesis distributor or reseller.
C613-03020-00 REV K
64
Rapier Series Switch
For More Information
Document set
The complete document set for Rapier Series switches includes the following:
■
The Rapier i Series Switch Safety and Statutory Information booklet, which
contains safety information for all Rapier switches except the Rapier 48w
■
The Rapier Series Switch Quick Install Guide, which describes how to install
all Rapier switches except the Rapier 48w
■
The Rapier 48w Switch Installation and Safety Guide, which describes how to
install the Rapier 48w switch and includes important safety and statutory
information
■
The Rapier 48w Switch Removable Fan Installation Guide, which describes
how to install AT-FAN04 fan units in the Rapier 48w switch
■
The Rapier Series Switch Hardware Reference, which contains detailed
information on the hardware features of all Rapier Series switches
■
The Rapier Series Switch AlliedWare™ Operating System Software Reference,
which contains detailed information on configuring the switch and its
software
■
The Network Service Module Installation and Safety Guide, which describes
how to install a Network Service Module
■
The Network Service Module Hardware Reference, which contains detailed
information on the hardware features of Network Service Modules
■
The Port Interface Card Installation and Safety Guide, which describes how to
install a Port Interface Card
■
The Port Interface Card Hardware Reference, which contains detailed
information on the hardware features of Port Interface Cards
■
The Uplink Module Installation and Safety Guide, which describes how to
install an uplink module
■
The Uplink Module Hardware Reference, which contains detailed information
on the hardware features of uplink modules
You can download these documents and updates from
www.alliedtelesis.com/support/software.
You need Adobe® Acrobat® Reader® to view, search, or print these
documents. You can download it from www.adobe.com.
Other resources
How-To Notes describe a range of standard Allied Telesis solutions, and
include technical tips and guides to configuring specific hardware and
software features. You can download the latest How-To Notes from
www.alliedtelesis.com/resources/literature/howto.aspx.
MIBs supported by Allied Telesis products can be downloaded from
www.alliedtelesis.com/support/software.
Microsoft® Visio® stencils for Allied Telesis products can be downloaded from
www.alliedtelesis.com/resources/images/visio.aspx.
AT-TFTP Server for Windows is a TFTP (Trivial File Transfer Protocol) server for
transferring software versions, configuration scripts and other files between a
PC and the switch. You download AT-TFTP Server from
www.alliedtelesis.com/support/software.
C613-03020-00 REV K
Hardware Reference
CD-ROM
Contacting us
C613-03020-00 REV K
65
Some products ship with a Documentation and Tools CD-ROM, which
includes:
■
the complete document set
■
Adobe® Acrobat® Reader®
■
AT-TFTP Server
■
Supported MIBs
■
How-To Notes, white papers, Microsoft® Visio® stencils and other
resources
■
Tryouts of networking software
With locations covering all of the established markets in North America, Latin
America, Europe, Asia, and the Pacific, Allied Telesis provides localized sales
and technical support worldwide. To find the representative nearest you, visit
us on the Web at www.alliedtelesis.com.