1
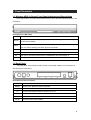
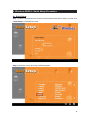
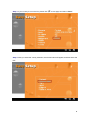
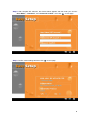
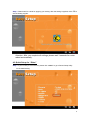
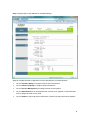
54 Wireless 4-Port
ADSL2+ Modem Router
Quick Installation Guide
.Q
u
a
l
i
t
y
N
e
t
w
o
r
k
s
.
Wireless ADSL2+ Router Installation Guide
1. Panel Illustration ....................................................................................... 2
1.1 Wireless ADSL2+ Router Front Panel Indicators and Descriptions ......2
1.2 Back Panel ..................................................................................................2
2. Package Contains ..................................................................................... 3
3. Hardware Installation ................................................................................ 3
4. Wireless ADSL2+ Quick Setup Procedure .............................................. 4
4.1 Quick Setup ..................................................................................... 4
4.2 Quick Setup for “Other” ................................................................. 7
1
1. Panel Illustration
1.1 Wireless ADSL2+ Router Front Panel Indicators and Descriptions
Place the Router in a location that permits an easy view of the LED indicators shown in the
front panel.
Descriptions of LED status
PWR
WLAN
ADSL
When an active power adapter is connected with router, this LED will light up.
When WLAN card installed properly, this LED will be flashing. When transferring data,
the LED will be steadily.
When connection with Internet (ADSL Connected) is established, this LED will light up.
When this LED is flashing: NO ADSL physical connection
X1
When port 1 connection with end user is established, this LED will light up.
X2
When port 2 connection with end user is established, this LED will light up.
X3
When port 3 connection with end user is established, this LED will light up.
X4
When port 4 connection with end user is established, this LED will light up.
1.2 Back Panel
The back panel of the Router provides access to the power adapter cord connection as
well as the port connections.
Descriptions of All Connectors
LINE
RESET
Connect with phone cable
Reset button. Reset the setting to default.
4x
Connect with Ethernet Cable to Switch Hub or PC
3x
Connect with Ethernet Cable to Switch Hub or PC
2x
Connect with Ethernet Cable to Switch Hub or PC
1x
Connect with Ethernet Cable to Switch Hub or PC
DC IN
Connect to DC Power Adapter
2
2. Package Contains
Open the shipping carton and carefully remove all items. In addition to this quick
installation guide, ascertain that you have:
z
One Wireless ADSL2+ Router
z
One telephone cable (RJ11)
z
One Ethernet cable (RJ45)
z
One CD
z
One power adapter
3. Hardware Installation
This section discusses the cable connections you will need to make in order to use the
router. When selecting the location for the router, allow room to access the router so that you can
see the LED indicators on the front panel.
It may be convenient for you to locate the router near the PC that you intend to use for
initial configuration of the router
1) Connect Router to LINE
Plug the provided RJ-11 phone cable into LINE port on the back panel of the router
and insert the other end into splitter or wall phone jack.
2) Connect Router to LAN
Plug RJ-45 Ethernet Cable into LAN port on the rear panel of the router and insert the
other end of the Ethernet cable on your PC’s Ethernet port or switch / hub.
3) Connect Router to Power Adapter
Plug Power Adapter to DC IN port on the rear panel of the router and the other end to
a power outlet.
Warning! Only use the power adapter provided in the package, otherwise it may cause
hardware damage.
3
4. Wireless ADSL2+ Quick Setup Procedure
4.1 Quick Setup
Step 1: Insert the provided CD into CD drive and the window below will be shown, and then click
“Quick Setup” to configure the router.
Step 2: Select the country when setup window appears.
4
Step 3: If your country is not on the list, please click “*” to next page and select “Other”.
Step 4: After you select the country selection, the window below will appear, and then select the
ISP.
5
Step 5: After complete ISP selection, the window below appears and then enter your account
“User Name”, “Password”, and “Password Confirm”, then click “``” to next page.
Step 6: Confirm router settings and then click “``” to next page.
6
Step 7: Please wait for a while for applying your setting. After the setting is applied, clicks “X” to
exit the Setup program.
Attention: After you complete all settings, please wait 3 seconds for router
reboot automatically.
4.2 Quick Setup for “Other”
Step 1: If your country is not on the list, please click “Other” to go to Router Setup Utility
for the detail setting.
7
Step 2: After you click “Other”, then the windows below will appear and press “OK”.
Step 3: Entry of the User Name & Password will be displayed. Enter the default login User Name
& Password. The default login Name of the administrator is admin, and the default admin login
password is admin.
8
Step 4: Please refer to User Manual for the detail settings.
Steps to navigate the Web configuration from the Site Map are summarized below.
¾
Click on Interface Setup to configure Internet and LAN functions.
¾
Click on Advanced Setup to configure advanced features.
¾
Click on Access Management to manage Internet access options.
¾
Click on Maintenance to set a new password, the time zone, upgrade or reload firmware
and run diagnostic tests on the router
¾
Click on Status to see router device information, system logs and performance statistics.
9