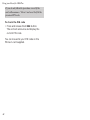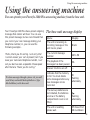
1
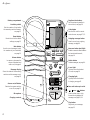
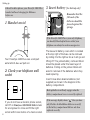
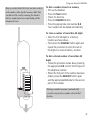
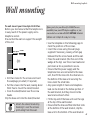
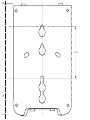
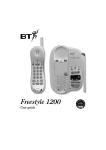
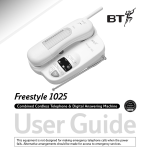
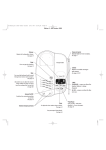
At a glance
Aerial
Does not extend, do not
pull out.
Ring mode switch
Sets the handset ring to
constant or ramped (gradually
increasing) volume, see page 12.
Intercom button
(and light)
Enables communication
between the handset and
base unit, see page 17.
CHANNEL
SEEKER
INTERCOM
ABC
Recall button
For use with PBXs and
Select Services, see page 14.
Secrecy button
When pressed,
it stops the caller from hearing
you, see page 13.
Batt low light
Flashes when the handset
battery is low, see page 13.
Charging contacts
1
DEF
1
2
3
GHI
JKL
MNO
4
5
6
PQRS
TUV
WXYZ
7
8
9
0
SECRECY
Memory button
For storing and dialling
regularly used telephone
numbers, see page 14.
MEMORY
RECALL
REDIAL
SCREEN
TALK
BATT
LOW
Channel seeker button
(and light)
Selects the best alternative
radio frequency if interference
should occur during a call,
see page 11.
Call waiting button
To switch between two callers
when Call Waiting has been
ordered from BT’s Select
Services, see page 27.
Redial button
Redials the last number
dialled, see page 13.
Screen button
For listening to a caller’s
message without answering
the call, see page 22.
Talk standby button
(and light)
For making or receiving a call,
see page 10.
At a glance
Day/hour/min buttons
Sets the answering machine’s
internal clock, see page 20.
Battery compartment
Ans delay switch
Sets the number of rings before
the answering machine answers,
see page 21.
Code button
Sets the PIN code for remote
control access, see page 17, 25.
Reset button
Resets the unit to the default
settings, see page 22.
Note button
Used to record messages (notes)
for members of your household,
see page 22.
Outgoing message button
Used to record your outgoing
message, see page 20.
DAY
TS
HOUR
MIN
6
2
ANS DELAY CODE OUTGOING MESSAGE
Volume button
Increases or decreases the
volume of playback and
audio cues, see page 9.
Message display
Shows the status of the answering
machine and the message count,
see page 19.
RESET
DELETE
VOLUME
IN USE
Answer on/off button
Switches the answer machine
on or off, see page 21.
Microphone
Charging contacts
Delete button
Deletes messages, see page 24.
INTERCOM
NOTE
Intercom button (and light)
Enables communication between
the handset and base unit,
see page 16.
In use light
Lights up when the handset
is in use, see page 10.
Charging light
Lights up when the handset
is charging, see page 11.
CHARGING
Base unit telescopic aerial
STOP
ANSWER
ON/OFF
PLAY
STOP
buttons
Used to review, stop or skip
forward during playback of
messages, see page 23, 24.
Play button
Plays back your messages,
see page 23.
2
In this guide
At a glance
Introduction
Setting up
Using your
Freestyle 1100 Plus
Using the answering
machine
BT’s Select Services
Help
Technical information
Maintenance
Index
Wall mounting
1
4
5
10
19
27
29
33
37
39
41
Customer Helpline
Should you have problems with your Freestyle 1100
Plus, call the BT Helpline between 9.00am to 5.30pm
Monday to Friday on Lo-call 0345 697146. Calls
will be charged at local rate.
Hints and tips boxes
In this user guide, we’ve included helpful tips and
useful notes. They are shown in a grey box.
3
Introduction
Introduction
Your Freestyle 1100 Plus has been designed
for ease of use and made to the very high standards set by BT.
We thank you for making the right choice
and expect that you will have many years of
quality service.
Please read the instructions carefully before
use, and retain this user guide for future
reference.
For your records:
Date of purchase:
Place of purchase:
Emergency Calls
The emergency services can be contacted in the
UK by dialling 999. You may also dial 112 which
is valid in any country that is a member of the
European community. As the Freestyle 1100 Plus
is a mains powered cordless telephone there are
certain situations where you may not be able to
make an emergency call:
• If there is severe radio interference.
• If the handset batteries fail.
• If there is a power cut and there are no back-up
batteries in the base unit.
Serial number
on the underside of base-unit:
Purchase price:
For warranty purposes, proof of purchase is
required, so please keep your receipt.
4
If your Freestyle 1100 Plus is connected to a PBX,
you may have to dial an access number before 999
to contact the emergency services.
Some switchboards are not able to dial out during
a power failure.
Setting up
Setting up
Follow these steps in sequence to completely set
up your Freestyle 1100 Plus ready for use.
As this product is rechargeable, it is normal that
a certain amount of heat will be produced in its
day-to-day operation. Whilst this is entirely safe we
would advise against placing this product on
antique, veneered or wooden surfaces as damage
may occur.
Plan where you will put your Freestyle 1100 Plus.
It should be within two metres of a power socket
and the phone socket.
You need enough room for the base unit’s telescopic
aerial to be fully extended.
For the best operating conditions, try to place
the base unit away from large metal objects and
other electrical appliances.
Check that your Freestyle 1100 Plus is
complete, when you unpack you should
have:
• Cordless handset.
• Base-unit with attached telephone line cord
and telescopic aerial.
• Power adaptor.
• 2 screws + 2 wallplugs for wall mounting.
• Spare memo card.
• Wall bracket.
• Quick reference guide.
• Phone-in card.
Electrical storm warning
Note 1.
Please note that during periods of electrical
storm, you are advised to disconnect your
apparatus because damage may occur.
Note 2.
If a fault occurs during the 12 month warranty
period and it is due to accidental or wilful
damage (including lightning and electrical
damage) BT will not replace or repair free
of charge.
5
Setting up
Like all cordless phones, your Freestyle 1100 Plus
handset will need charging for 24 hours
before use.
1 Handset aerial
✖
Your Freestyle 1100 Plus uses a compact
aerial which does not pull out.
2 Check your telephone wall
socket
3 Insert battery (for back-up only)
Remember that the
f lat ends of the
batteries should be
pressed against the
springs.
If the Freestyle 1100 Plus is your only telephone,
you should fit back-up batteries so that your
telephone can always be used in emergencies.
The base-unit battery cover which is located
at the top right of the base can be removed
by sliding it to the right as far as it will go and
lifting off. The yellow battery removal ribbon
should be placed under the lower layer of
batteries. Pulling on the yellow ribbon will
assist in removal of the batteries when they
need replacing.
Insert 6 new AAA alkaline batteries (not
supplied) as shown in the diagram in the
battery compartment.
Back-up batteries will only engage when the
battery compartment cover is correctly replaced.
6
If you do not have a modern phone socket,
call BT on Freefone 0800 800 150 and ask
for an engineer to come and fit the right
socket within two metres of a mains socket.
If the message display shows “ ” then you have
not fitted 6 x AAA alkaline batteries correctly
or the battery compartment lid has not been
replaced correctly.
Setting up
4 Plug the power cable into the
back of the base unit
RINGER
HI LO OFF
T-TB T-E P-E
TEL MODE
Warnings
1 Do not try to use any power supply other
than the one provided. This may
permanently damage your Freestyle 1100 Plus.
2 Your Freestyle 1100 Plus should not be fitted
in wet or damp conditions, for example in a
bathroom. Also, the handset should not be
left out in the rain.
3 There is a slight chance that your phone
could be damaged by an electrical storm.
We recommend that you unplug the base
unit from the mains during storms.
5 Connect the base-unit
three-pin adaptor to a power
socket
6 Plug the phone into the BT
socket
Plug the power cable into the socket on the
back of the base unit.
You can now use the telephone and store
numbers in the memory.
7
Setting up
7 Extend the base unit
telescopic aerial
8 To wall-mount your product
Extend the base unit telescopic aerial on your
Freestyle 1100 Plus (as shown below) to
ensure the best possible signal and reception.
To plan the location of the base unit
RINGER
HI LO OFF
T-TB T-E P-E
TEL MODE
For the best reception
Try to avoid putting the telescopic aerial near
other electrical appliances, f luorescent lights and
large metallic objects such as cookers, radiators
and garage doors as these may cause interference
and reduce the quality of your calls.
8
(See page 41 section wall-mounting.)
Your Freestyle 1100 Plus works by sending
and receiving radio signals between the
base unit and the handset. The strength of
the signal will depend on where you site the
base unit and how the aerial is deployed.
The higher the base unit is located the
better. An upstairs room is ideal. The
following points should be considered:
• It should be within easy reach of a mains
socket and a telephone socket. A new
style telephone socket is required for this
product. If you do not have one, call us on
Freefone 0800 800 150.
• Try to avoid locations near metallic
obstructions or electrical appliances, such
as: TV sets, fridges, computers, fluorescent
lights, radiators, metal pipes and metal
window frames.
• The Freestyle 1100 Plus can be wall
mounted by using the bracket and screws
supplied, see page 42 for template.
Before you can use your Freestyle 1100 Plus for
the first time, you must charge the handset for
24 hours.
Setting up
To charge the handset
• Insert the power adaptor into the mains
socket and the jack plug into the 12v ac
socket at the back of the base-unit.
• The unit will display “PF” followed by a
countdown from “36.” When the countdown
reaches “00” the unit will beep and announce
the current setting of the ANS DELAY
switch, see page 21.
• Place the handset on the base-unit, the
CHARGING light will come on and the
display will flash “ ”.
• Fully extend the base unit telescopic aerial
vertically.
• Do not plug the Freestyle 1100 Plus into
the telephone socket, leave your existing
telephone connected so that you can still
make and receive calls.
To adjust the volume
VOLUME
When you are listening to your Freestyle 1100
Plus’ voice prompts or messages, you can use
the volume button to adjust the volume.
• Repeatedly press and release the end of the
key with the larger symbol to increase the
volume.
• Repeatedly press and release the end of the
key with the smaller symbol to decrease
the volume.
The Freestyle 1100 Plus must only be used with
the adaptor supplied.
Using any other adaptor will result in noncompliance with EN60950:1992, and will
invalidate the approval given to this apparatus.
• You must now charge the handset for 24
hours before use.
9
Using your Freestyle 1100 Plus
Using your Freestyle1100 Plus
To make a call
TALK
• Pick up the handset.
• Press the TALK button on the handset.
The CHANNEL SEEKER light will flash as
the telephone searches for the best radio
channel. When it goes out, the IN USE
light on the base-unit and the TALK light
will come on.
• Listen for the dialling tone. On some
exchanges there may be a delay of a few
seconds before the dialling tone is heard.
Dial the telephone number. You will hear a
beep each time you press a key.
• After your call, either press the TALK
button again, or replace the handset on the
base unit.
An Inductive Coupler has been built into
the handset to improve sound quality for
people using hearing aids. Switch your
hearing aid to T and adjust the position of the
handset until you get the best reception.
10
To switch from Pulse to Tone signalling
during a call
If you are connected to a pulse dialling
exchange, you can still use services such as
phone banking that require tone signalling.
• Call the telephone number you require in
pulse mode as usual.
• When you have been connected, press the
button on the keypad to set your
telephone to tone signalling for the duration
of the call.
• When you hang up, your Freestyle 1100
Plus will automatically switch back to pulse
dialling.
The Freestyle 1100 Plus handset has a range of
up to 250 metres from the base-unit, depending on
local conditions.
If you move out of range while using the telephone,
you will hear four beeps.
If you do not move back into range the telephone
will repeat the warning a further five times before
cutting off the call.
Using your Freestyle 1100 Plus
To answer a call
TALK
When the handset is on the base unit
When you receive an incoming call, the IN
USE light will flash and the base-unit will
ring.
• Pick up the handset, the CHARGING light
will go off, the IN USE light will remain on
but stop flashing and the TALK light will
come on. Do not press the TALK button.
• After your call, either press the TALK button,
or replace the handset on the base unit.
When the RINGER switch is set to OFF, the
base-unit will not ring .
When the handset is not on the base unit
The handset does not need to be on the base
unit to receive a call. When you receive an
incoming call, the IN USE light will flash and
the CHANNEL SEEKER light on the handset
will flash momentarily, then the handset will
ring and the TALK light will flash.
TALK
• To answer the call, pick up the handset and
press the TALK button. The IN USE light
and the TALK light will remain on but stop
flashing.
• After your call, either press the TALK button
again or replace the handset on the base.
To use the Channel seeker
Your Freestyle 1100 Plus has a back-lit keypad that
will come on or f lash in use, to assist you when
the light is poor.
CHANNEL
SEEKER
C
Your Freestyle 1100 Plus automatically scans
all the available radio channels for quality of
reception, and selects the best one to use.
If you experience interference during your
call, press the CHANNEL SEEKER button to
select a different channel.
The channel seeker light will flash until the
selection has been made, you may then
continue with your call.
11
Using your Freestyle 1100 Plus
To set the ring mode switch
RING MODE
RAMPED
To set the tel mode switch (located at back
of base unit)
CONSTANT
The ring mode switch on the side of the
handset can be set to either:
• RAMPED (gradually increasing volume) or
• CONSTANT (constant volume).
The constant mode should only be used if the
telephone is connected as an extension to a PBX.
Under any other condition the switch ought to be
set to ramped to prevent the possibility of damage
to the user’s hearing if the handset is close to the
ear when it rings. Do not hold the handset to the
ear when in standby mode.
RINGER
HI LO OFF
T-TB T-E P-E
TEL MODE
The tel mode switch (located at back of base
unit) selects tone or pulse dialling and earth
or time break recall:
• T-TB – Your Freestyle 1100 Plus is preset to
this position. Most modern exchanges use
tone dialling and time break recall for faster
dialling, and for services such as BT’s Select
Services and telephone banking.
• P-E – If you dial a number when your
Freestyle 1100 Plus is set to T-TB or T-E
and you continue to hear the dialling tone,
you may be connected to an older pulse
dialling exchange. Set the switch to P-E
(pulse dialling).
• T-E – This setting is for use if you are
connected to a tone dialling PBX (private
branch exchange) that uses earth recall.
To set the ringer switch
There are 3 settings to choose from:
• HI – a loud ring, your Freestyle 1100 Plus is
preset to this position.
• LO – a quiet ring.
• OFF – no ring (the handset will still ring if it
is not on the base-unit).
12
Using your Freestyle 1100 Plus
To recharge the handset
The base-unit must be connected to the mains
supply at all times to recharge the handset,
it will not overcharge if you leave it on the
base-unit. When the handset is not on the
base-unit, it will last for up to 5 hours in use
or 72 hours on standby. Keeping the handset
on the base-unit overnight will keep it
charged for normal use.
To use the Secrecy button
SECRECY
MEMORY
RECALL
REDIAL
SCREEN
In standby mode (the handset is off the base
but not in use)
• The handset BATT LOW light will flash.
During a call you can press the SECRECY
button on the handset to prevent the other
party from hearing a private conversation with
someone else in the room.
• Press and release the SECRECY button.
The TALK light will flash, you can hear the
other caller but they will not be able to
hear you.
• Press and release the SECRECY button
again to continue your call.
If you are making or receiving a call
• The handset will beep.
The SECRECY button does not function when
using the INTERCOM.
To warn you to replace the handset on the
base-unit for recharging:
The handset must be correctly placed on the base
unit and the charging light must be on for the
handset to recharge.
See the maintenance section for instructions on
how to care for the rechargeable battery pack in
the handset, see page 38.
To automatically Redial
Your Freestyle 1100 Plus automatically
remembers the last number dialled.
• Press the TALK button and listen for the
dialling tone.
• Press the REDIAL button. The last number
dialled will be redialled automatically.
13
Using your Freestyle 1100 Plus
To insert a Pause
SECRECY
MEMORY
RECALL
REDIAL
SCREEN
With some switchboards, after dialling the
access code you may have to wait for a
moment while the switchboard picks up an
outside line. If this is the case, press the
REDIAL button before keying in the telephone
number to insert a pause.
To use the Recall button
This button signals either time-break recall or
earth recall depending on the setting of the
TEL MODE switch, see page 12. If you are
connected to a PBX (Private Branch
Exchange), contact your PBX supplier for
further information. The recall button when
set to time-break recall T-TB is also used for
BT’s Select Services. For further information,
see page 27.
To use the Memory functions
The handset can store ten telephone numbers
of up to 20 digits in memory. You can dial any
of these numbers by pressing two buttons.
14
To store a number in a memory
• Pick up the handset and ensure that the
TALK light is not on.
• Press the MEMORY button. The button pad
will light up.
• Press one of the number buttons 0-9. This
gives you the location code under which
your number will be stored.
• Enter the telephone number.
• Press the MEMORY button again. You will
hear a long confirmation beep. The telephone
number is now stored.
Repeat this procedure for any number you
want to store, using a different code number
0-9 for each one.
Stored numbers can include switchboard and
Select Services using ✱ and # buttons as well as
pause and recall.
Using your Freestyle 1100 Plus
Keep a record of which 0-9 code you have used for
each number on the handset memory label. You
can take out the card by removing the handset
battery compartment cover and sliding out the
transparent cover.
To dial a number stored in a memory
• Pick up the handset.
• Press the TALK button.
• Check for dial tone.
• Press the MEMORY button.
• Press the appropriate code number 0-9.
Your number will be dialled automatically.
To store a number of more than 20 digits
• Store the first 20 digits in a memory
location as shown above.
• Then press the MEMORY button again and
repeat the procedure to store the rest of
the digits in a second memory location.
To dial a stored number of more than 20
digits
• Follow the procedure shown above, pressing
the appropriate 0-9 code for the first part of
the telephone number.
• When the first part of the number has been
dialled, press the MEMORY button again
and the appropriate 0-9 code for the second
part of the number.
Storing a number in memory automatically
overwrites any previous number stored in that
location.
15
Using your Freestyle 1100 Plus
To change a number
Any existing number stored in the memory
can be overwritten by entering a new number
under the same location code. Simply follow
the steps shown in “To store a number in the
memory”, see page 14.
The Call Waiting button
Only used if you have subscribed to BT’s
Select Services, see page 27.
To use Call Return
• Pick up the handset.
• Press the TALK button.
• Press the MEMORY button.
• Press the ✱ button, the exchange will
announce the number of the last caller if it
is available.
• If you wish to call this number, press the
3 button, the number will be dialled
automatically.
Call Return is a free BT Select Service (which
may be available in your area) that enables you to
obtain the telephone number of your last caller,
provided they are also BT subscribers.
16
To use the Intercom
INTERCOM
To call the handset from the base-unit
• Press the INTERCOM button on the
base-unit. The base-unit and handset will
beep and the INTERCOM lights on both
will flash.
• To answer the INTERCOM call, press the
INTERCOM button on the handset.
• You can now speak using the handset and
the microphone located next to the
ANSWER ON/OFF key on the base-unit.
• To end the call, press the INTERCOM
button on either the base-unit or the handset.
Both INTERCOM lights will go out.
Pressing the INTERCOM button on the
base-unit is also a useful way of locating a
misplaced handset.
You cannot use the intercom while a telephone call
is in progress.
The intercom will beep for 60 seconds and then
automatically cut off if not answered.
Using your Freestyle 1100 Plus
To call the base-unit from the handset
INTERCOM
• Press the INTERCOM button on the handset.
The base-unit and handset will beep, the
INTERCOM lights on both will flash.
• To answer the INTERCOM call, press the
INTERCOM button on the base-unit.
• You can now speak using the handset and
the microphone located next to the
ANSWER ON/OFF button on the base-unit.
• To end the call, press the INTERCOM
button on either the base-unit or the
handset. Both INTERCOM lights will go out.
You will not miss any incoming calls while the
INTERCOM is in use.
If an incoming call is received, the base-unit
will ring normally and can be heard through
the handset. To answer the call press the
TALK button on the handset, the intercom will
be cut off.
To set the PIN code
Your Freestyle 1100 Plus can be accessed
remotely, by using the preset PIN code of
0,0,0. This allows access to the answering
machine from another telephone, see page 25.
DAY
HOUR
MIN
CODE OUTGOING MESSAGE
If you wish to change this code
• Press and hold the CODE button until the
unit announces, “Code setting… zero”.
• Press and release the HOUR button until
you reach the number you want for the first
digit of your PIN code.
• Press the CODE button. The unit will
announce “Accepted” and then “Zero” for the
next digit.
• Press and release the HOUR button until
you reach the number you want for the
second digit of your PIN code.
• Press the CODE button. The unit will
announce “Accepted” and then “Zero” for the
last digit.
• Press and release the HOUR button until
you reach the number you want for the last
digit of your PIN code.
• Press the CODE button. The unit will
announce “Accepted” and announce and
display the new PIN code.
17
Using your Freestyle 1100 Plus
If you do not follow the procedure correctly the
unit will announce “ Error” and reset itself to the
previous PIN code.
To check the PIN code
• Press and release the CODE button.
The unit will announce and display the
current PIN code.
You can now write your PIN code on the
Phone-in card supplied.
18
Using the answering machine
Using the answering machine
You can operate your Freestyle 1100 Plus answering machine from the base unit.
Your Freestyle 1100 Plus has a preset outgoing
message that callers will hear. You can use
this preset message, but we recommend that
you record your own message stating your
telephone number, or, you can use the
following example:“Hello, thank you for calling. I am sorry that
I cannot answer your call at present, but if you
leave your name and telephone number, I will
call you back as soon as possible. Please speak
after the tone. Thank you for calling.”
To retain messages through a power cut, you will
need to buy and install back-up batteries (type:
AAA alkaline) in the base unit.
The base unit message display
Status
Display
The unit is receiving an
incoming message or the
unit has no power.
Blank
The current message
number.
00 to 59
The playback of the
messages has been paused.
PA
Answer functions are off.
––
Indicates that the memory
is full. You must delete
some messages before any
new messages can be
recorded.
FL
flashing
alternately
The back-up batteries are
not installed, the batteries
are low or the battery
compartment cover is not
fitted.
The unit is resetting,
please wait.
flashing
alternately
PF shown first
36 countdown
19
Using the answering machine
To set the day and time
You do not have to follow the complete
sequence, if for example you only want to
change the hour, you can follow the
instructions for changing the hour and skip
the rest of the instructions.
DAY
HOUR
MIN
• Press and hold the DAY button. The unit will
announce, “The day is… ”, then run through
the days of the week.
• Release the DAY button when you reach the
current day. The unit will repeat the setting
and announce, “Accepted”.
• Press and hold the HOUR button. The unit
will announce “The hour is… ”, then run
through the hours.
• Release the HOUR button when you reach
the current hour. (The unit will announce,
“PM” after twelve mid-day). The unit will
repeat the setting and announce, “Accepted”.
• Press and hold the MIN (minute) button.
The unit will announce, “The minute is… ”,
then run through the minutes.
• Release the MIN button when you reach the
number of minutes past the current hour.
The unit will repeat the setting and
announce, “Accepted”.
20
To check the day and time
DAY
HOUR
MIN
• Press and release the DAY button, the unit
will announce the current time and day.
If you press and hold the
button your
Freestyle 1100 Plus will give you a reminder on
how to set the time/day and how to record a new
outgoing message.
To listen to the outgoing message
OUTGOING MESSAGE
• Press and release the OUTGOING MESSAGE
button.
To record a new outgoing message
• Press and hold the OUTGOING MESSAGE
button. The unit will announce, “Please speak
after the tone, release the button to end
recording.”
• Start your outgoing message after the tone,
speak about 20 cm away from the
microphone which is located next to the
ANSWER ON/OFF button. The display will
countdown from “30” to “00”.
• Continue to hold down the OUTGOING
MESSAGE button until you have finished,
then release the button.
• The unit will announce, “End of recording,
your outgoing message is...” and will play
back your outgoing message.
Using the answering machine
To turn the answer functions on and off
ANSWER
ON/OFF
To set the answer delay
TS
6
2
ANS DELAY
• Press the ANSWER ON/OFF button to turn
the answer functions on or off.
• The unit will announce, “Answer functions
are on” and the display will show “00”
or, “Answer functions are off” and the
display will show “––”.
For a good quality outgoing message record in a
quiet environment so that it is free from
noticeable background noise and speak clearly
and continuously.
If your message exceeds 30 seconds the unit will
announce, “Time out, end of recording. Your
outgoing message is...” and play back the
recorded part of the message.
You can set the number of times the
telephone will ring before the Freestyle 1100
Plus answers the call. The ANS DELAY switch
can be set to 2, 6 or TS (Time Saver), by
moving the switch one step at a time.
• The 2 rings setting will be answered after
approximately 7 seconds. Your Freestyle
1100 Plus is preset to this position.
• The 6 rings setting will be answered after
approximately 19 seconds.
• The TS setting (Time Saver) is used to save
time when accessing your machine
remotely. Your Freestyle 1100 Plus answers
after 2 rings if you have any new messages
or 6 rings if there are none. When you call
to listen to your messages, if the telephone
rings a third time it means there are no
messages, so hang up to save time.
For more information on remote accessing,
see page 25.
Your outgoing message should start playing
within 3 seconds of the call being answered .
Most callers are used to having their calls answered
within 10 seconds and the majority abandon the
call if it is not answered within 45 seconds.
The 2 rings setting is regarded as the normal
setting and is the one we recommend.
21
Using the answering machine
To reset the unit
When the RESET button is pressed and
Messages and notes
released the unit will display “PF” followed by
a count down from “36.” When the
countdown reaches “00” the unit will beep
and announce the current setting of the
answer delay switch.
The Freestyle 1100 Plus has been preset to
the following factory settings:
• The time and day has been preset to
Sunday 12am.
• The outgoing message is, “Please leave a
message after the tone”.
• All incoming messages and notes have
been deleted.
• The PIN code has been reset to “0-0-0”.
To use the Note function
To Screen incoming calls
SCREEN
When the answer functions are on and a
caller is leaving a message, you can listen to
the incoming message from the base-unit or
the handset without answering. If the handset
is on the base-unit adjust the VOLUME control
if necessary, to hear the message. If the
handset is not on the base-unit press the
SCREEN button on the handset to listen to the
message. If you decide to answer the call press
the TALK button. Speak when the CHANNEL
SEEKER light has stopped flashing
22
IN
NOTE
Members of your household can use the
NOTE function on your Freestyle 1100 Plus
to record messages for each other.
These messages are saved with any incoming
messages.
To record a note
• Press and hold the NOTE button. The unit
will announce, “Please speak after the tone,
release the button to end recording”.
• After the tone, speak about 20 cm away
from the microphone (located next to the
ANSWER ON/OFF button).
• Release the NOTE button when you have
finished your message.
The number of messages shown in the display
will increase by one. The note will be saved in
sequential order with any previous incoming
messages or notes.
Using the answering machine
To playback messages and notes
PLAY
To play all the messages and notes
• Press and release the PLAY button.
The unit will announce the number of
messages recorded, then play all the
messages and notes.
To play new messages and notes only
• Press and hold the PLAY button for 1 second.
The unit will announce the number of new
messages recorded since the last time the
messages were played, then play the new
messages and notes.
Before each message or new message is
played, the unit will announce and display the
number of the message, after the message
you will hear the time and day. When all the
messages have been played the unit will
announce, “End of messages”.
If you receive a call during playback, pick up the
handset and press the TALK button. The playback
will stop automatically.
You can adjust the volume of the playback with
the VOLUME button.
To stop playback
• Press the STOP button, the unit will beep
and stop playing your messages. The
messages will not be deleted, unless you
have already pressed DELETE.
To pause messages and notes
• Press the PLAY button, the display will
show “PA”.
• To resume playback press the PLAY button
again. If you do not press the PLAY button
within 30 seconds, playback will switch off.
To skip forward
• The unit will skip forward one message
each time you press and release the
button. The unit will announce “End of
messages”, after it has played the last
message.
If you receive an incoming call during playback,
you can answer the call and playback will be
stopped automatically.
23
Using the answering machine
To review messages or notes
• To repeat or restart a message, press and
release the
button during playback.
To find a specific message or note
• Press and hold down the
button. The
unit will announce the number of each
message.
• Release the
button when you reach the
message you wish to review.
The Freestyle 1100 Plus cannot record an incoming
message during playback.
To delete messages
DELETE
• Press and release the DELETE button.
The unit will beep and announce “Message
deleted”, then play any following messages.
To delete all messages and notes
When all the messages and notes have been
played, the unit will announce “End of
messages” and the message display will count
down from “06” to “00.”
• Press the DELETE button before the count
down has finished. The unit will announce
“All messages deleted” followed by a beep.
24
When the message unit is full
The Freestyle 1100 Plus has a combined
storage capacity of up to 14 minutes including
the outgoing message. When the unit is full,
the message display on the base unit will flash
“FL,” and the answering machine will switch
off. After 20 rings callers will hear the
announcement, “Hello your call cannot be taken
at the moment, so please call later”. To make
room for new messages, or to record a new
outgoing message or note, delete some of
your old messages and notes.
If the unit becomes full while recording a caller’s
message, that caller will hear the unit interrupt,
“Memory is full, answer functions are off,” before
they are cut off. If someone attempts to record a
NOTE when the unit is full, they will hear,
“Memory is full”.
Using the answering machine
To remotely access your Freestyle 1100 Plus
The option menu is as follows:
Your Freestyle 1100 Plus can be accessed
remotely from any TouchTone* telephone, or
any telephone using a Tone Caller available
from BT shops or your supplier.
“For menu press 1,” ✱
• Dial the telephone number to which your
Freestyle 1100 Plus is connected.
• While the answering machine is playing
your outgoing message, enter your PIN
code, see page 17. If the entered PIN code
is correct, the Freestyle 1100 Plus will beep
and announce “Accepted, you have (X) new
messages”, or “You have no new messages”.
(If you do not hear this announcement wait
for a moment and re-enter your PIN code).
• The Freestyle 1100 Plus will announce the
option menu. When the option you require
is announced, press the corresponding button
on the keypad. The Freestyle 1100 Plus will
beep and carry out the command. You do
not have to wait for the end of the menu.
“To play new messages press 2,”
“To set the unit on and off press 3,”
“To play previous message press 4,” ✱
“To play all messages press 5,”
“To skip message press 6,” ✱
“To play outgoing message press 8,”
“To record new outgoing message press 9, to
stop press 9 again,”
“To erase message press 0,” ✱
✱ Playback options announced after messages.
Once a function has been completed, you can
enter another code within 8 seconds or hang
up to end your call.
To skip the menu you can enter the required code at
any time after your PIN code is accepted. If you can’t
remember the codes, refer to your Phone-in card.
A reduced menu of playback options is announced
between messages. To skip this menu press 6.
25
Using the answering machine
• If you enter 1 either during or in between
messages, the unit will return to the main
menu.
• Once your messages have been played back
the unit will announce, “End of messages”.
You have 6 seconds to access another menu
option before the unit ends the call.
To switch on the answering functions by
remote control
If you forgot to turn the answering functions
on before you went out
• Dial the telephone number to which your
Freestyle 1100 Plus is connected.
• After 20 rings the unit will answer the call
and play your outgoing message. You can
now hang up, leave a message or enter
your PIN code to access any of the remote
functions. The answering functions will
remain switched on.
If the unit is switched off because it is full
• Dial the telephone number to which your
Freestyle 1100 Plus is connected.
• After 20 rings the unit will announce, “Hello,
your call cannot be taken at the moment, so
please call later”.
• Enter your PIN code to access any of the
remote functions. You will have to delete
some of your messages if you want the
answering functions to remain on.
26
BTs select services
BT’s Select Services
If you are connected to a digital exchange,
you can subscribe to a range of BT’s Select
Services. If you wish to subscribe to any of
these services contact us on Freefone
0800 800 152 business, 150 residential,
8am to 6pm, Monday to Friday.
Call waiting
If an incoming call arrives while you are
already engaged on a telephone call you
will hear a soft beep every 5 seconds
(This beep is not audible to the person you
are speaking to).
Instead of the engaged tone the second caller
will hear an announcement to hold on as you
are aware that there is a second call.
When you have spoken to the second caller
you can return to the first caller by pressing
the Call Waiting button again. You can
switch back and forth between the two calls
without disconnecting either if you wish.
The second caller will only be charged for
their call from the moment you answer and
not while they are waiting for your initial
contact.
Three Way Calling
Three way calling allows you to hold a
conference with two other telephones, or to
make a second private telephone call without
disconnecting your first call.
It doesn’t matter if the first call is incoming or
outgoing, but the second call must be made
from your telephone.
You can answer the second call, without
disconnecting your first caller, by pressing
the Call Waiting button. The first caller will
be put on hold.
27
BTs select services
Call Diversion
Charge Advice
Call diversion allows you to set up your
telephone to divert calls to another telephone
at a different location. If you are going to be
away from your home or place of work and at
a known location your calls can be forwarded.
There are 3 divert options available:
• All calls.
• Any calls unanswered within 15 seconds.
• Calls that come in when your telephone is
engaged.
You can set up your telephone to advise you
of the charge for an individual call or for all
calls. When you have finished a call, the
exchange rings you back and tells you the
length of the call and the charge. There is no
rental charge for this service but you are
charged for the call back.
When Call Diversion is on, you will hear an
intermittent dialling tone. You can still use
your telephone to make calls.
Call Barring
Call Barring helps prevent unauthorised calls
with a wide range of options available.
You can also stop incoming calls if you do not
want to be disturbed.
Reminder Calls
You can set your telephone like an alarm
clock to wake you up or remind you of an
appointment. There is no rental charge.
Each Reminder costs a few pence, whether
you answer it or not.
28
Help
Help
If you have any problems using your Freestyle 1100 Plus, this
section will give you the most common, easy to follow solutions.
Telephone problems
Possible cause
Solution
• No dialling tone.
Loss of security code.
Replace handset on base unit for 10 seconds
and try again. If this does not work, disconnect
the handset battery from the handset for 30
minutes. Also disconnect the mains power and
back-up batteries. Then reconnect the battery
and reconnect the base unit to the mains, then
replace the handset on the base unit for 10
seconds and try again.
Telephone not connected to telephone line.
Plug the telephone into the telephone line.
Mains disconnected and back-up batteries
are not installed or are flat.
Reconnect and install or replace back-up
batteries.
Power cut and back-up batteries are not
installed or are flat.
Wait until the power is restored and install or
replace back-up batteries.
Handset battery pack is discharged.
Place handset on base unit and recharge for 24
hours ensuring charge light in on.
You may be trying to use tone dialling on a
pulse dialling exchange.
Set mode switch to
You are connected to a PBX and are not
dialling the access code.
Use the PBX access code.
Handset discharged.
Place handset on base unit and recharge for
24 hours.
• Handset does not ring, but lights
show on the handset.
The handset may be set to ramped ringing.
It takes 4 to 6 rings to reach maximum
volume.
This is not a fault. You may change ring mode to
constant.
• Base unit does not ring but lights
show on base unit.
Telephone not connected to the telephone
line.
Plug the telephone into the telephone socket.
The base ringer switch is set to OFF.
Set the base ringer switch to HI or LO
Line fault or faulty socket
Try the telephone on another socket or another
line. If the telephone works contact BT or your
public switched telephone network operator for
repairs to the line or socket.
The ringer switch on the base unit is set to
/ LO
Set the ringer switch on the base unit
accordingly.
• Telephone will not dial out.
• Telephone cannot receive calls.
• Beeps six times and drops calls.
• You have dialling tone but the
telephone will not dial out.
• Handset does not ring.
• No lights on handset.
• The base-unit rings too loudly /
softly
HI
P-E
(pulse dialling).
29
Help
Telephone problems
Possible cause
Check the REN. If you connect too many
telephones or devices to your line they may
not all operate correctly.
If the REN exceeds 4 disconnect 1 or more
telephones or devices.
If your telephone is connected to an extension
socket, it may have been connected
incorrectly.
Check with your telephone engineer that the
extension socket has been installed correctly.
• The handset rings too loudly /
softly.
The handset ring mode switch needs
setting.
TOO LOUD
• Callers are faint.
• Interference.
The base unit telescopic aerial is not fully
extended as high as possible.
Fully extend the base unit telescopic aerial as
high as possible.
• Buzzing.
You are moving out of range.
Move closer to the base unit.
• Whooshing.
Radio channel interference.
• Echoing.
Radio channel interference.
Press the CHANNEL SEEKER button on the
handset, to select a clearer channel.
Press the CHANNEL SEEKER button on the
handset, to select a clearer channel.
• Tinniness.
The base unit or the handset are too close
to electrical equipment or metal
obstructions.
Relocate the base unit or move around with the
handset until reception improves.
• No memory store.
You may be trying to store the number
with the TALK light on.
Ensure that the TALK light is off before storing
the number.
• Batt low light on the handset is
flashing.
The handset needs recharging.
Replace the handset on the base unit, ensuring
that the base unit is plugged in and that the
CHARGING light is on.
(See below).
• No Charging light on the base
unit.
Dirty contacts on base unit or handset.
• The intercom doesn’t work.
You may be pressing the TALK button on
the handset instead of the INTERCOM
button.
Press the INTERCOM button.
The handset is discharged.
Recharge the handset for 24 hours.
The handset is being used to make a call.
Try again later.
• Neither base or handset ring, but
lights show on base and handset.
It is not permitted to interfere with the main BT
socket or wiring. If you have a problem, contact
BT on Freefone 0800 800 151 for residential
or Freefone 0800 800 154 for business lines.
30
Solution
TOO SOFT
- Set to ramped.
- Set to constant.
Clean the contacts with a dry cloth. Heavy
soiling can be removed with a pencil eraser.
The handset must only be set to constant if the
telephone is connected to a suitable PBX.
Help
Answer machine problems
Possible cause
Solution
• General Problems.
None of the answering machine functions
will operate while the telephone is in use.
Ensure that the telephone is not in use before
operating the answering machine.
• Will not record incoming
messages.
The answering machine is switched off.
Switch the answering machine on manually or
by remote control.
The answering machine is full.
Delete some or all of your messages manually
or by remote control, to make room for new
messages.
The answering machine has a very
sensitive microphone. This picks up any
background noise. If you record your
outgoing message too quietly or from too
far away the sensitivity of the microphone
increases to compensate and will pick up
more background noise.
Record your outgoing message at a reasonable
volume 20cm away from the microphone in a
quiet environment.
The volume is set too low.
Press and release the end of the volume control
with the larger symbol until the unit is loud
enough.
No back-up batteries fitted.
Fit back-up batteries.
Back-up batteries are flat.
Replace all back-up batteries.
Back-up batteries are incorrectly fitted.
Remove batteries and refit correctly.
Back-up battery compartment cover off, or
not fitted correctly.
Ensure cover is replaced correctly.
• Will not answer calls.
• Distorted outgoing message.
• Faint outgoing message.
• Noisy outgoing message
• No call screening from the base
unit.
• Cannot hear messages when
played.
• “
” flashing on the base-unit.
• Back-up batteries fail frequently.
Frequent power failures will drain the
back-up batteries.
Unplugging the base unit from the power
supply drains the back-up batteries.
Leave the base unit plugged in, or remove the
back-up batteries before unplugging.
Switching the mains supply off will drain
the back-up batteries.
Do not switch off, or remove the back-up
batteries before switching off.
31
Help
Problems
Possible cause
Solution
• Unit will not respond to any
button press.
Microprocessor lock up.
Press reset and set up the answering machine
again. If this does not work, remove the back-up
batteries unplug from the power supply for 30
seconds then plug back in, refit back-up
batteries and set up the answering machine
again.
You may be calling through a pulse
dialling exchange or the telephone you
are using may be set to pulse dialling.
Check that the telephone you are using is set to
tone dialling. If it is connected to a pulse dialling
exchange, you will need to use a tone caller.
You may be pressing the telephone
buttons too quickly.
Press each key firmly and pause briefly before
pressing the next key.
You may be using an incorrect access
code.
Check your code when you return by pressing
the CODE button.
• No display or display corrupted.
• Unit will not respond to remote
control commands.
Tone callers are available from BT shops or
your supplier.
Helpline
If you are still having problems with your
Freestyle 1100 Plus, call the BT product Helpline
on Lo-call 0345 697146. where fully trained
staff are there to assist you from 9.00am to
5.30pm Monday to Friday.
32
Technical information
Technical Information
Official approval
The Freestyle 1100 Plus is tested and
approved for connection to the BT’s
network, provided that it is used in
accordance with the guidelines
in this booklet.
• Loop Disconnect/Pulse and Multifrequency/Tone signalling.
• Microphone secrecy.
• PBXs providing secondary proceed
indication.
• Memory storage of up to ten numbers.
You may connect it to:
• Intercom.
• Direct exchange lines.
• Mixed mode dialling.
• Extensions with new plug and socket
arrangements provided with these direct
exchange lines.
• Operation in the absence of proceed
indication.
• Compatible switchboards.
• Time/day announcement.
You may not connect it to:
• Selectable answering delay with time saver.
• Shared service (party) lines.
• As an extension to a payphone.
This apparatus has been approved for use
with the following facilities:
• Cordless telephone.
• Register recall.
• Automatic storage of last number dialled.
• Call screening.
This telephone is designed for UK use only. Using
it overseas may violate local radio laws.
Any other usage will invalidate the approval of
the apparatus if as a result it then ceases to
conform to the standards against which
approval was granted.
33
Technical Information
Ringer Equivalence Number (REN)
If you connect too many telephones or other
devices to your telephone line they may not
ring correctly. To determine how many
telephones and devices can be connected to
your line, add together all the RENs of all the
apparatus you wish to connect. If this total
exceeds 4, they may not ring or operate
correctly. The REN of your Freestyle 1100
Plus and the majority of telephones in the UK
(unless otherwise marked) is 1.
Transmission Frequencies
Your Freestyle 1100 Plus can work on any of
the transmission frequencies shown in the
table below.
Channels
34
Base Unit Tx
Frequency/MHz
Handset Tx
Frequency/MHz
1
31.0375
39.9375
2
31.0625
39.9625
3
31.0875
39.9875
4
31.1125
40.0125
5
31.1375
40.0375
6
31.1625
40.0625
7
31.1875
40.0875
8
31.2125
40.1125
Radio Frequencies
This cordless telephone has been designed to
operate on radio frequencies which have been
assigned to the exclusive use of cordless telephones.
As the use of cordless telephones becomes more
widespread, users may experience a reduction in
the quality of the service obtainable from this
apparatus and problems due to radio interference
may increase.
It is possible, though unlikely, that your telephone
conversations may be overheard on domestic radio
receivers.
Where cordless telephones are being operated
near to each other and using the same radio
channel, interference between them may result in
users overhearing each other's calls. For this
reason your Freestyle 1100 Plus can operate on
8 frequencies.
If you experience this type of interference try
changing channels using the CHANNEL SEEKER
button on the handset.
Technical information
Connection information
• Your Freestyle 1100 Plus may be connected
to public networks in the United Kingdom.
• It may also be connected to compatible
switchboards. If in doubt, your switch
supplier or maintainer should be able to
offer help. Advice on connection to BT
switching systems can be obtained by
dialling BT Freefone 0800 800 152.
If you do not have a compatible switchboard,
it cannot be guaranteed that your Freestyle
1100 Plus will operate correctly under all
possible conditions of connection.
The machine cannot be used to answer calls
on PBXs configured for dial 8 night services
unless a suitable adaptor is purchased (not
available from BT).
Safety advice
• Don’t use your Freestyle 1100 Plus in the
open air during thunderstorms. Unplug it
from the telephone line and the mains
socket when there are storms in your area.
• Don’t use your Freestyle 1100 Plus outdoors
in the rain, or handle it with wet hands.
• Don’t install the base unit near a sink, bath
or shower. Electrical appliances can cause
serious injury if used when you are wet or
standing in water.
• Don’t install the base unit where the
various leads can be tripped over or walked
on. This may cause injury, or damage to
the leads and your Freestyle 1100 Plus.
Guarantee
BT guarantee the Freestyle 1100 Plus to be
free of defects in workmanship or materials
for a period of 12 months from the date of
purchase, provided:
• The goods have only been used for their
intended purpose,
and have not been subjected to misuse, or
been wilfully or accidentally damaged.
• The goods have not been tampered with or
repaired by anyone other than BT staff or
agents.
35
Technical Information
If you are having problems with your
Freestyle 1100 Plus, read the Help section on
pages 29-32 of this User guide.
If you are still having problems you can
contact the BT product helpline on
Lo-call 0345 697146 where fully trained
staff are there to assist you from 9.00am to
5.30pm Monday to Friday.
If the unit is faulty within the guarantee
period, return it with proof of purchase to
your supplier, for repair or replacement.
If the Freestyle 1100 Plus should be in need
of repair outside of the guarantee period, take
the complete Freestyle 1100 Plus to any BT
shop for forwarding to the repair department
(there will be a carriage charge for this
service).
Alternatively you can call the repair centres
on 01325 304346 or 01642 564444
between 9.00am and 4.30pm, Monday to
Friday.
The terms of this guarantee do not affect
your statutory rights.
36
Maintenance
Maintenance
Installing handset batteries and recharging
Replacing the handset on the base unit to
recharge over night should keep the Freestyle
1100 Plus operative for normal use. In time
the handset battery pack will no longer hold
a sufficient charge and should be replaced.
To change the handset batteries
The handset battery compartment is located
at the back of the handset at the lower end.
• Firmly hold the handset in both hands with
the back towards you and the bottom end
away from you.
• Push the depression in the battery
compartment cover, inward and away from
you with both thumbs, to remove it.
• Undo the plastic belt securing the battery
pack.
• Remove the old battery pack by unplugging
the small white plug that connects it to the
handset.
• Insert the small white plug of the new
battery pack. (If you look at the shape of the
plug and socket you will see that it can only
be inserted one way).
• Place the battery pack in the recess, secure
it with the plastic belt and refit the
compartment cover.
• Replace the handset on the base unit and
charge for a full 24 hours.
• The battery pack must be recycled or
disposed of properly.
• Do not burn or puncture as it could release
toxic material which may cause injury.
Spare parts for your Freestyle 1100 Plus are
available from your BT shop or supplier, or you
can contact us on Lo-call 0345 697146 from
9.00am to 5.30pm Monday to Friday.
37
Maintenance
In the event of a power failure
General cleaning
During a power failure, if you have fitted fresh
alkaline back-up batteries in the base unit,
your telephone will continue to work for up to
1 hour in use or 7 hours on standby. The
answering machine will not answer incoming
calls, but will retain your outgoing message
and PIN code; it will also keep the day and time
setting and any incoming messages or notes
already recorded. The message display will
remain blank and the charging light will be off.
Clean the cabinet of the handset and the base
with a soft cloth slightly dampened with a mild
solution of water and detergent. Charging
contacts should be cleaned with a dry cloth
or for heavy soiling a pencil eraser can be used.
Once power has been restored, you are
advised to renew the back-up batteries in the
base unit (battery replacement should not be
necessary if the power has only been
disconnected momentarily).
Care of rechargeable battery pack
• When you first install the Freestyle 1100
Plus, or replace the battery pack, the
handset must be fully charged for 24 hours
before use.
• To maintain optimum charge and battery
condition, the handset should be allowed to
fully discharge about every 4 months. Please
note, this will delete the numbers stored in
the handset’s memory.
• Dispose of Ni-Cd battery packs safely. Do
not puncture or burn as they contain toxic
materials which could cause injury.
38
• Do not clean with a wet cloth.
• Do not clean with abrasive materials or
solvents as these may damage the unit.
• Do not spray aerosol cleaners onto the
base or handset.
Do not clean with abrasive materials.
Extended periods of non-use
It is recommended that you:
• Disconnect the base unit from both mains
supply and telephone line.
• Remove the back-up batteries from the base
unit and handset.
• When reconnecting, check that the
CHARGING light on the base unit is on.
Recharge the handset batteries for 24 hours.
Index
Index
At a glance
1
Introduction
4
Emergency calls
4
Setting up
5
6
8
6
6
9
Aerial
Base unit
Handset
Batteries – insert into base unit
Charging the handset
Planning location
Power cable
Telephone wall socket
Volume
Using your
Freestyle 1100 Plus
Answering a call
Automatic redial
Call return
Call waiting
Channel seeker
Intercom
Base unit to handset
8
7
6, 7
9
10
11
13
16
16, 27
11
16
16
Handset to base unit
Making a call
Memory
Change a number
Dial
Dial more than 20 digits
Memory label
Store
Store more than 20 digits
Pause
PIN (Personal Identification Number)
Checking
Setting
Pulse and Tone signalling
Recall button
Recharge the handset
Ringer switch volume
Ring mode switch
Secrecy button
Telephone mode switch
Using the answering
maching
Answer delay
Answer functions On and Off
Check the day and time
17
10
14
16
15
15
15
14
15
14
17
18
17
10
14
13
12
12
13
12
19
21
21
20
39
Index
Message display
Messages and notes
Delete
Note function
Pause
Play all messages/notes
Playback
Play new messages/notes
Record a note
Record outgoing message
Review
Skip forward
Specific message
Stop playback
Preset message
Remote access
Options menu
Resetting the unit
Screening
Set the day and time
Switching On/Off
Select Services
Call barring
Call diversion
Call waiting
Charge advice
Reminder call
Three way calling
40
19
22
24
22
23
23
23
23
22
20
24
23
24
23
19
25
25
22
22
20
26
27
28
28
16, 27
28
28
27
Help
29
Helpline
32
Technical Information
33
Connecting to a switchboard
Guarantee
REN
Safety
35
35
34
35
Maintenance
37
38
37
38
Charging handset batteries
Installing handset batteries
Power failure
Wall mounting
Template
8, 41
42
Wall mounting template
Wall mounting
To wall mount your Freestyle 1100 Plus
Before you start ensure that the telephone is
in easy reach of the power supply and a
telephone socket.
Ensure that the wall can support the weight
of the unit.
WALL PLUG
SCREW
WALL
• Drill two holes for the screws and insert
the wallplugs provided (if required).
• Put the screws into the wall, leaving about
5mm free to mount the stand/bracket.
• Hook the stand/bracket over the screw
heads.
Clip the base unit onto the stand/bracket.
Attach the stand/bracket by
hooking it over the screws
protruding from the wall.
Spare parts for your Freestyle 1100 Plus are
available from your BT shop or supplier, or you
can contact us on Lo-call 0345 697146 between
9.00am and 5.30pm Monday to Friday.
• Use the template on the following page to
mark the positions of the screws.
• Insert the screws using the wall plugs
supplied if necessary, leaving a 5mm gap
between the the screw heads and the wall.
• Place the wall bracket (the thin end of the
wedge at the top) over the screw heads and
pull down as far as possible to secure.
• Ensure that the power supply and the
telephone lines are connected to the base
unit, then fit the lines into the channels on
the bottom of the base unit securing the
lines under the small tabs.
• Any spare length of mains and telephone
lead can be stored in the hollow portion of
the wall bracket, but they should not be
wound around each other.
• Fit the top end of the base unit over the lugs
at the top of the wall bracket.
• Ensure that the lines are fitted into their slots
at the bottom of the wall bracket, clip the
base unit to the bottom of the wall bracket.
41
Wall mounting
✁
77 mm
42
Notes
Notes
43
Notes
44
Offices in Europe, North America,
Japan and Asia Pacific.
The services described in this publication
are not always available and may change from time to time.
We provide services and equipment under a standard contract.
Nothing in this publication forms any part of any contract.
© British Telecommunications plc 1997.
Registered Office: 81 Newgate Street, London EC1A 7AJ.
Registered in England No. 1800000.
Printed in China. Freestyle 1100 Plus Issue 1 (11/97) 5.
Designed by The Art & Design Partnership Limited.
CE compliant to 89/336/EEC
(EMC Directive) & 73/23/EEC (Low
Voltage Directive)
APPROVED for connection to
telecommunication systems specified
in the instructions for use subject to
the conditions set out in them
503680