1
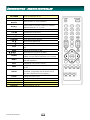
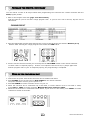
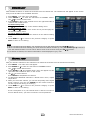
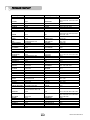
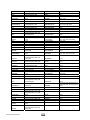
Digital to Analog Converter Box
user manual
CAX-01/CAX-03/CAX-04
Please, read this user manual prior to using this product for the first time.
Call for help…Toll Free Number
Website
☎ 1-877-685-8443
www.casticonverter.com
CAX-01/CAX-03/CAX-04
SAFETY PRECAUTIONS
CAUTION: TO REDUCE THE RISK OF ELECTRIC SHOCK, DO NOT REMOVE COVER (OR BACK).
NO USER SERVICEABLE PARTS INSIDE. REFER TO QUALIFIED SERVICE PERSONNEL.
THE LIGHTNING FLASH WITH ARROWHEAD SYMBOL, WITHIN AN EQUILATERAL TRIANGLE,
IS INTENDED TO ALERT THE USER TO THE PRESENCE OF UNINSULATED “DANGEROUS
VOLTAGE” WITHIN THE PRODUCT’S ENCLOSURE THAT MAY BE OF SUFFICIENT
MAGNITUDE TO CONSTITUTE A RISK OF ELECTRIC SHOCK TO PERSONS.
THE EXCLAMATION POINT WITHIN AN EQUILATERAL TRIANGLE IS INTENDED TO ALERT
THE USER TO THE PRESENCE OF IMPORTANT OPERATING AND MAINTENANCE
(SERVICING) INSTRUCTIONS IN THE LITERATURE ACCOMPANYING THE APPLIANCE.
WARNING
TO PREVENT FIRE OR SHOCK HAZARDS, DO NOT EXPOSE THIS PRODUCT TO RAIN OR MOISTURE.
Apparatus should not be exposed to dripping or splashing and no object filled with liquids, such as vases, shall
be placed on the apparatus.
WARNING: Do not install this equipment in a confined space such as a bookcase or similar unit.
CAUTION: TO PREVENT ELECTRIC SHOCK, MATCH WIDE BLADE OF PLUG TO WIDE SLOT AND FULLY INSERT
ATTENTION: POUR ÉVITER LES CHOC ÉLECTRIQUES, INTRODUIRE LA LAME LA PLUS LARGE DE LA FICHE
DANS LABORNE CORRESPONDANTE DE LA PRISE ET POUSSER JUSQU’AU FOND.
Where the main plug or an appliance coupler is used as the disconnect device, the disconnect device
shall remain readily operable.
The Marking Information is attached on the bottom of this product.
CAUTION: Any changes or modification in construction of this device which are not expressly approved by the
party responsible for compliance could void the user's authority to operate the equipment.
REGULATORY INFORMATION: FCC Part 15
This product has been tested and found to comply with the limits for a Class B digital device, pursuant to Part
15 of the FCC Rules. These limits are designed to provide reasonable protection against harmful interference
when the product is operated in a residential installation. This product generates, uses and can radiate radio
frequency energy and, if not installed and used in accordance with the instruction manual, may cause harmful
interference to radio communications. However, there is no guarantee that interference will not occur in a
particular installation. If this product does cause harmful interference to radio or television reception, which can
be determined by turning the product off and on, the user is encouraged to try to correct the interference by
one or more of the following measures:
• Reorient or relocate the receiving antenna.
• Increase the separation between the product and receiver.
• Connect the product into an outlet on a circuit different from that to which the receiver is connected.
• Consult the dealer or an experienced radio/TV technician for help.
CAX-01/CAX-03/CAX-04
2
IMPORTANT SAFETY INSTRUCTIONS
1. Read these instructions.
2. Keep these instructions.
3. Heed all warnings.
4. Follow all instructions.
5. Do not use this apparatus near water.
6. Clean only with dry cloth.
7. Do not block any ventilation openings. Install in accordance with the manufacturer’s instructions.
8. Do not install near any heat sources such as radiators, heat registers, stoves, or other apparatus (including
amplifiers) that produce heat.
9. Do not defeat the safety purpose of the polarized or grounding-type plug. A polarized plug has two blades
with one wider than the other. A grounding type plug has two blades and a third grounding prong. The wide
blade or the third prong are provided for your safety. If the provided plug does not fit into your outlet, consult
an electrician for replacement of the obsolete outlet.
10. Protect the power cord from being walked on or pinched particularly at plugs, convenience receptacles, and
the point where they exit from the apparatus.
11. Only use attachments/accessories specified by the manufacturer.
12. Use only the cart, stand, tripod, bracket, or table specified by the manufacturer, or sold with the apparatus.
When a cart is used, use caution when moving the cart/ apparatus combination to avoid injury from tip-over.
13. Unplug this apparatus during lightning storms or when unused for long periods of time.
14. Refer all servicing to qualified service personnel. Servicing is required when the apparatus has been
damaged in any way, such as power supply cord or plug is damaged, liquid has been spilled or objects have
fallen into the apparatus, the apparatus has been exposed to rain or moisture, does not operate normally, or
has been dropped.
CAUTION: PLEASE READ AND OBSERVE ALL WARNINGS AND INSTRUCTIONS IN THIS
INSTALLATION AND OPERATING GUIDE AND THOSE MARKED ON THE UNIT. RETAIN THIS GUIDE
FOR FUTURE REFERENCE.
This set has been designed and manufactured to assure personal safety. Improper use can result in electric
shock or fire hazard. The safeguards incorporated in this unit will protect you if you observe the following
procedures for installation, use, and servicing.
This unit does not contain any parts that can be repaired by the user.
DO NOT REMOVE THE CABINET COVER, OR YOU MAY BE EXPOSED TO DANGEROUS VOLTAGE. REFER
SERVICING TO QUALIFIED SERVICE PERSONNEL ONLY.
3
CAX-01/CAX-03/CAX-04
CONTENTS
Product Description................................................................ 5
INTRODUCTION
y Front Panel........................................................................ 5
y Rear Panel......................................................................... 5
Remote Controller................................................................... 6
INSTALLATION
Package Contents....................................................................... 7
Antenna Connections.................................................................. 7
Analog TV (Monitor) Connections.................................................. 8
VCR Connections........................................................................
8
Program the Remote Controller....................................................
9
Turn on the Converter Box.......................................................... 9
Channel.................................................................................. 10
y Channel Scan..................................................................... 10
y Channel Add...................................................................... 10
y Channel Edit...................................................................... 11
y Manual Scan...................................................................... 11
Option.................................................................................... 12
y Clock................................................................................ 12
y Aspect Ratio...................................................................... 12
y Language.......................................................................... 13
y Audio Language..................................................................13
y Caption Select....................................................................13
y DCC Setup.........................................................................14
MENU OPERATION
y Sleep Mode........................................................................14
y Output Channel.................................................................. 15
Lock........................................................................................ 15
y Lock System...................................................................... 15
y Set Password..................................................................... 16
y Block Channel.................................................................... 16
y TV Rating - Children............................................................16
y TV Rating - General............................................................ 17
y Movie - Rating….….............................................................. 17
y Downloadable RRT.............................................................. 18
Electronic Program Guide....................................................... 18
Channel Banner Displays....................................................... 18
Program Information Displays.............................................. 19
Volume Adjustment................................................................... 19
NORMAL OPERATION
Selecting Channels.................................................................... 20
Signal Strength......................................................................... 20
Remote Controller Code Table..................................................... 20
APPENDIX
Program Code List..................................................................... 21
Troubleshooting........................................................................ 23
Product Specifications................................................................ 23
Limited Warranty...................................................................... 24
CAX-01/CAX-03/CAX-04
4
INTRODUCTION – PRODUCT DESCRIPTION
FRONT PANEL
POWER
Turns the Converter Box on or off.
CH UP (▲)
Move up the TV channel.
CH DOWN (▼)
Move down the TV channel.
REMOTE CONTROL SENSOR
Receives signals from Remote Controller.
POWER LED INDICATOR
Red light is displayed when the unit is turned off.
Green light is displayed when the unit is turned on.
REAR PANEL
AC Power Code
Connect the power cord.
VIDEO OUTPUT
Connect to your TV or VCR for Video output.
AUDIO OUPUT (L)
Connect to your TV or VCR for Audio(Left) output.
AUDIO OUTPUT (R)
Connect to your TV or VCR for Audio(Right) output.
RF OUT
Use to connect your TV using RF cable.
※ CAX-03 and CAX-04 have analog pass-through.
~ Standby mode: Analog Pass-Through, Power on: RF Output (CH03/04)
ANTENNA IN
Connect the AIR antenna cable here.
5
CAX-01/CAX-03/CAX-04
INTRODUCTION – REMOTE CONTROLLER
TV POWER
BOX POWER
Number(0~9)
Buttons
Dash(-)
Turns on/off power of TV
Turn on/off power of Converter Box.
Select channel or enter password.
Used to enter a program number for multiple
channels such as 1-1, 1-2, etc.
GUIDE
View Electronic Program Guide.
VOL ▲
Increase the sound level.
VOL ▼
Decrease the sound level.
CAPTION
Select closed caption: Off, CC, TEXT
FLASHBK
Go to the previous channel.
CH ▲
CH ▼
PGM
MUTE
◀▲▼▶
ENTER
MENU
EXIT
INFO
Move the TV channel up.
Move the TV channel down.
Program the remote controller to match your TV
set.
Switch the sound On or Off.
Move between categories in MENU.
Adjust the settings to your preference.
Display current channel and time in TV viewing.
Display the MENU or the previous menu screen
that was displayed.
Completely exit from the menus.
Display information about TV program on the
screen.
Select available Multi tracks depending on the
AUDIO
broadcast. (Languages can be chosen only if
they are included in the TV program.)
RATIO
SIGNAL
INPUT(TV)
Change the picture size.
Display the digital signal strength.
Select TV source (Tuner or AV input)
CH03(TV)
Select channel 3 of TV
CH04(TV)
Selects channel 4 of TV
CAX-01/CAX-03/CAX-04
6
INSTALLATION
PACKAGE CONTENTS
Ensure that the following the Converter Box and accessories are included. If an accessory is missing, please
contact the dealer where you purchased the product.
Converter Box
Remote Controller
Batteries
RF cable
User Manual
Quick Start Guide
ANTENNA CONNECTIONS
1. Connect an antenna cable to the “ANTENNA IN" jack on the rear of the Converter Box.
2. Connect the “RF OUT” jack from the Converter Box to the “ANT IN” jack on your TV using the RF
cable supplied with the Converter Box.
ANT IN
Converter Box’s Rear Panel
Note
• If you connect “RF OUT” of the Converter Box to ANT. IN of your TV, you can watch the video and the
audio of the Converter Box on Ch.3 or Ch.4 of your TV. The RF output channels can be selected in
output channel of menu-option. (Refer to page 15)
※ CAX-03 and CAX-04 have analog pass-through.
~ These models are capable of passing through the analog signal to the TV set in standby mode.
7
CAX-01/CAX-03/CAX-04
ANALOG TV (MONITOR) CONNECTIONS
1. Connect an antenna cable to the “ANTENNA IN" jack on the rear of the Converter Box.
2. Connect the “R-AUDIO-L” jacks and “VIDEO” jack from the Converter Box to the “A/V IN” jacks on
your TV using RCA-type cables.
Converter Box Rear Panel
A/V IN
VCR CONNECTIONS
TV Connection Panel
1. Connect an antenna cable to the “ANTENNA IN" jack on the rear of the Converter Box.
2. Connect the “R-AUDIO-L” jacks and “VIDEO” jack from the Converter Box to the “A/V IN” jacks on
your VCR using RCA-type cables.
Converter Box Rear Panel
A/V IN
VCR Connection Panel
Note
• The VCR will record the onscreen display onto the tape during recording if:
- the channel is changed with CH (▲/▼)
- the sound level is adjusted with VOL (▲/▼)
or by pressing ENTER, etc.
• The caption signal is recorded because the display format is set only 480i.
CAX-01/CAX-03/CAX-04
8
PROGRAM THE REMOTE CONTROLLER
You can control TV sets of all major brands after programming the Converter Box remote controller with the
PGM(Program) button.
1. Refer to the Program Code List (page 21 in this manual).
Find the brand of your TV set and a 3-digit program code. If your TV set is not on the list, skip the rest of
this section.
2. Keep the PGM button pressed while entering the correct 3-digit program code with the Number (0~9)
buttons. After entering the 3-digit program code release the PGM button.
+
3. Aim the remote controller toward your TV and press the TV POWER button on the remote controller
to check if the TV responds properly. If there is no response from the TV set, try step 2 again with
another program code. If your TV responds properly, the programming is completed.
TURN ON THE CONVERTER BOX
1. Connect the AC power cable of the Converter Box to suitable wall outlet.
2. Press POWER on the converter box or BOX POWER in the remote controller.
The power indicator will turn green if power is on.
3. Press TV POWER of remote controller to turn on your TV
4. When the converter box is connected only to RF cable, if current channel of TV is not CH04 or CH03,
press CH04 or CH03 of remote controller. ※ Initial RF output channel is CH04
5. When the converter box is connected to RCA cables, if your TV is in Tuner mode, press INPUT of remote
controller to switch to AV mode.
9
CAX-01/CAX-03/CAX-04
MENU OPERATION - CHANNEL
In the ‘MENU Operation’, there are several ways to customize the menu settings provided. Most menus consist
of three levels to set up the options, but some require greater depth for the variety of settings. If you press
MENU, only the first and second level of the menu system will appear on the TV screen. The third level can be
displayed by pressing ENTER or ▶. If a menu has more than three levels, the pop-up dialogue box will be
displayed as the fourth or fifth level. For navigating the menu levels, you will see ‘▶’ on the right side of the
menu label to help you go to the next level.
To view and remove the Menu:
Press MENU on the Remote Controller to display the menu.
Press MENU again or press EXIT to return to TV viewing.
Enter next level:
Press ENTER or ▶ on the Remote Controller.
Return to the previous level:
Press MENU or ◀ on the Remote Controller.
CHANNEL SCAN
Automatically finds all channels available through antenna or cable input. All of the active channels found from
this scanning process will be stored in the channel list. You can check the list in the ‘Channel Edit’ menu.
1. Press MENU. The main menu will appear.
2. Press ENTER or ▼ to enter the sub-menu of CHANNEL menus.
Use ▲/▼ to select ‘Channel Scan’.
3. Press ENTER or ▶ to start finding available channels. If you want
to stop channel scan in the middle of the scanning process, press
ENTER.
4. After the channel search is completed, the channel which has the
lowest channel number will appear on the TV screen.
5. Press MENU or ◀ to return to the previous category or press
EXIT to return to TV viewing.
※ If the Lock System is on, the ‘Channel Scan’ is locked. In order to
access ‘Channel Scan’, you have to enter the correct password.
Note
• In case inactive or weak channels do not appear on the list, you can add the channel from the ‘Manual
Scan’ menu.
• If a channel is removed from the memory, you can always tune to that channel directly by using the
Number(0~9) buttons on the Remote Controller.
CHANNEL ADD
Automatically finds any additional channel which was not found in ‘Channel Scan’ process.
1. Press MENU. The main menu will appear.
2. Press ENTER or ▼ to enter the sub-menu of CHANNEL menus.
Use ▲/▼ to select ‘Channel Add’.
3. Press ENTER or ▶ to start finding available channels.
If you want to stop channel scan in the middle of the scanning
process, press ENTER.
4. After the channel search is completed, the channel which has the
lowest channel number will appear on the TV screen.
5. Press MENU or ◀ to return to the previous category or press
EXIT to return to TV viewing.
※ If the Lock System is on, the ‘Channel Add’ is locked. In order to
access ‘Channel Add’, you have to enter the correct password.
CAX-01/CAX-03/CAX-04
10
CHANNEL EDIT
Add available channels or delete the channels from the channel list. The Channel list will appear on the screen
and you will be able to see available channels.
1. Press MENU. The main menu will appear.
2. Press ENTER or ▼ to enter the sub-menu of CHANNEL menus.
Use ▲/▼ to select ‘Channel Edit’.
3. Press ENTER or ▶ to view channel list on the right hand side of
‘Channel Edit’ on the screen.
To move one by one:
Use ▲/▼ to move one step on the channel-editing menu.
To move page by page:
Use CH▲ or CH▼ button to move to the next or previous page on
the channel editing menu.
To add or delete a channel:
Press ENTER to add or delete the channel on the channel editing
menu.
4. Press MENU or ◀ to return to the previous category or press
EXIT to return to TV viewing.
Note
• When a channel has been added, you are able to tune to the channel with the CH▲/▼ buttons.
• When a channel has been deleted, you must enter the channel number by using the Number(0~9) buttons to
view the deleted channel. You will not be able to tune to the channel using the CH▲/▼ buttons.
• If a channel is deleted, the channel information will be displayed in grey color.
MANUAL SCAN
Add your favorite channels to the channel list or delete the channels from the channel list manually.
1. Press MENU. The main menu will appear.
2. Press ENTER or ▼ to enter the sub-menu of CHANNEL menus.
Use ▲/▼ to select ‘Manual Scan’.
3. Press ENTER or ▶, and ‘Manual Scan’ menu will appear on the
right hand side of ‘Manual Scan’ on the screen.
4. Use ▲/▼ to select channel.
Press ENTER to add/delete the channel.
5. To add/delete additional channels in ‘Manual Scan’ menu, repeat
steps above.
6. When you select the channel, you can see the quality of the signal
being received. (You can use SIGNAL on the remote control to
see the signal level during TV viewing.)
7. Press MENU or ◀ to return to the previous category or press
EXIT to return to TV viewing.
※ If the Lock System is on, the ‘Manual Scan’ is locked. In order to
access ‘Manual Scan’, you have to enter the correct password.
11
CAX-01/CAX-03/CAX-04
MENU OPERATION - OPTION
CLOCK
Enables the user to set up the time. Normally, your clock is set using signals transmitted by DTV stations.
Choosing your time zone sets the current time automatically. But if the Ant In jack on the connection panel is
connected to a cable service, the clock cannot be set manually.
1.
2.
3.
4.
Press MENU to display the on-screen menu.
Select the OPTION menu using ◀/▶ then press ENTER or ▼.
Use ▲/▼ to select ‘Clock’ then press ▶ or ENTER.
Use ◀/▶ to set Time Zone (Eastern, Central, Mountain, Pacific,
Alaska, Hawaii, New F.land or Atlantic)
5. Press MENU or ◀ to return to the previous category or press
EXIT to return to TV viewing.
Note
• There are cases where the TV station does not send, or sends
wrong date or time information causing the Converter Box to set
an incorrect time.
ASPECT RATIO
Selects the screen format. To view a picture with a wide (16:9) aspect ratio at 480i mode output format. You
can choose Letter Box, Cropped, Squeezed, or Set By Program.
1.
2.
3.
4.
Press MENU to display the on-screen menu.
Select the OPTION menu using ◀/▶ then press ENTER or ▼.
Use ▲/▼ to select ‘Aspect Ratio’ then press ▶ or ENTER.
Use the ▲/▼ buttons to select the desired picture format.
(Set By Program, Letter Box, Cropped, Squeezed)
5. Press MENU or ◀ to return to the previous category or press
EXIT to return to TV viewing.
※ While watching TV, you can change the picture aspect ratio using
RATIO on the Remote Control. Use the RATIO button on the
Remote Control to change the wide mode in the following cycle:
Set By Program, Letterbox, Cropped, Squeezed.
Note
• Set By Program
Select the proper picture proportion to match the source’s image.
• Letter Box
Select this when you want to see the original wide format. Letter Box mode will shrink the picture to fill the
screen, and blank panels will appear at the top and bottom of the screen.
• Cropped
Select this when you want the entire screen to be filled. Left and right portion of the picture will be removed.
• Squeezed
Select this when you want the entire screen to be filled. The picture will be squeezed from the ratio of 16:9 to
the ratio of 4:3
Letter Box
CAX-01/CAX-03/CAX-04
Cropped
Squeezed
12
LANGUAGE
Select the language of the menu.
1.
2.
3.
4.
5.
Press MENU to view the on-screen menu.
Select the OPTION menu using ◀/▶ then press ENTER or ▼.
Use ▲/▼ to select ‘Language’ then press ▶ or ENTER.
Use ▲/▼ to select the desired language then press ENTER.
Press MENU or ◀ to return to the previous category or press
EXIT to return to TV viewing.
AUDIO LANGUAGE
Digital channels sometimes provide multiple audio tracks, often in a different languages. You can set a default
audio language from the audio Language menu.
1.
2.
3.
4.
5.
Press MENU to view the on-screen menu.
Select the OPTION menu using ◀/▶ then press ENTER or ▼.
Use ▲/▼ to select ‘Audio Language’ then press ▶ or ENTER.
Use ▲/▼ to select the desired language then press ENTER.
Press MENU or ◀ to return to the previous category or press
EXIT to return to TV viewing.
※ If multiple audio tracks are available, the audio icon (
) appears
on the Program Information display or Program Guide. You can
select the language with the AUDIO button.
CAPTION SELECT
You can modify and configure how your caption will appear.
1.
2.
3.
4.
5.
Press MENU to display the on-screen menu.
Select the OPTION menu using ◀/▶ then press ENTER or ▼.
Use ▲/▼ to select ‘Caption Select’ then press ▶ or ENTER.
Move between the options using ▲/▼ (ACC, DCC, DCC Service)
Select type of options using ◀/▶ then press ENTER.
ACC (Off, CC1, CC2, CC3, CC4, Text1, Text2, Text3, Text4)
DCC (Off, Standard, Custom)
DCC Service
(Service1, Service2, Service3, Service4, Service5, Service6)
6. Press MENU or ◀ to return to the previous category or press
EXIT to return to TV viewing.
Analog Captions
Allows you to select mode for displaying Analog Caption Data. ( Analog Caption Service : CC 1-4 display
program’s dialog and Text 1-4 display data service information.)
Note
• Off: Analog Caption is not displayed
• CC1 is the primary caption service that synchronizes the captioning language with the sound, used by most
broadcasters. Captioning is displayed in the same language as the program’s dialog.
• CC 2 is the special non-synchronous caption service that does not need to be in sync with the sound and
may provide simplified captioning, which is usually delayed.
• CC 3 serves as an alternate captioning service channel. Captioning is often a secondary language translation
such as French, Spanish, simplified English or displayed at a slower rate.
• CC 4 is another special non-synchronous caption service that does not need to be in sync with the sound
and may provide simplified captioning.
• Text 1-4 usually displays information on the lower portion of the screen and is used for a data service,
generally not program related.
13
CAX-01/CAX-03/CAX-04
Digital Captions
Use caption feature defaults as provided by the program (Standard) or customize caption appearance (Custom)
with the Custom menu options.
Off : Digital Caption is not displayed.
Standard : Caption will appear based on Default text provided by a broadcaster.
Custom : Caption will appear based on the customized text. And if this option is selected, the DCC Setup menu
is activated.
Note
• If Digital and Analog Caption are received simultaneously, you can only select DTV Captions, analog captions
will not appear.
• When DCC is “OFF”, Analog Caption (ACC) is available
• Analog Captions will appear if they are provided by broadcaster
• If available, press CAPTION button to select a analog caption type while viewing TV.
DCC SETUP
In Caption Select, if you select Custom option of digital caption, you can change font size, font type, text color,
text opacity, background color, background opacity edge color, edge type.
1.
2.
3.
4.
Press MENU to view the on-screen menu.
Select the OPTION menu using ◀/▶ then press ENTER or ▼.
Use ▲/▼ to select ‘DCC Setup’ then press ▶ or ENTER.
Select the options using ▲/▼ and select data of options using
◀/▶ then press ENTER.
5. Press MENU or ◀ to return to the previous category or press
EXIT to return to TV viewing.
Note
•
•
•
•
•
•
•
•
Font Size : Selects the font size for captions
Font Type : Selects the font type for captions
Text Color : Selects the font color for captions
Text Opacity : Selects the font opacity for captions
BG Color : Selects the background color for captions
BG Opacity : Selects the background opacity for captions
Edge Color : Selects the edge color for captions
Edge Type : Selects the edge type for captions.
SLEEP MODE
This function allows automatic switching from the On state to the Sleep mode after a period of time without
user input.
1.
2.
3.
4.
5.
Press MENU to display the on-screen menu.
Select the OPTION menu using ◀/▶ then press ENTER or ▼.
Use ▲/▼ to select ‘Sleep Mode’ then press ▶ or ENTER.
Select desired period of time using ▲/▼ then press ENTER.
Press MENU or ◀ to return to the previous category or press
EXIT to return to TV viewing.
※ ‘Off’ option disables the “automatic switching to sleep mode”
function.
※ Initial period of time is 4 hours.
CAX-01/CAX-03/CAX-04
14
OUTPUT CHANNEL
You may select the TV channel for viewing the video and the audio of
the Converter Box on Ch.3 or Ch.4.
1.
2.
3.
4.
Press MENU to display the on-screen menu.
Select the OPTION menu using ◀/▶ then press ENTER or ▼.
Use ▲/▼ to select ‘Output Channel’ then press ▶ or ENTER.
Select desired RF out channel (Ch.3 or Ch.4) using ▲/▼ then
press ENTER.
5. Press MENU or ◀ to return to the previous category or press
EXIT to return to TV viewing.
※ Initial output channel is Ch.4.
MENU OPERATION - LOCK
Set up blocking schemes to block specific channels, ratings, and external viewing sources. Rating guidelines are
provided by broadcasting stations. Most TV programs and TV movies can be blocked by TV Rating and/or
Individual Categories. A password is required to gain access to this menu.
Note
• If you have forgotten your password : Key-in ‘7777’ and then change the password.
• If you have not entered a password yet : Key-in the ‘0000’ password using the Number(0-9) buttons
to create a personal 4-digit security password.
• If you have already entered a password : Key-in the 4-digit password using the Number(0-9) buttons to
confirm the personal 4-digit security password.
• The Rating system does not apply to news programs.
LOCK SYSTEM
Activates or disables the blocking scheme you set up previously.
1. Press MENU. The main menu will appear.
2. Use ◀/▶ to select LOCK then press ▼ or ENTER button to move
to the second level.
3. Use ▲/▼ to select ‘Lock System’ then press ▶ or ENTER.
4. Use ▲/▼ to select an option (On or Off) then press ENTER button
to confirm your selection.
5. Press MENU or ◀ to return to the previous category or press
EXIT to return to TV viewing.
Note
• When the Lock System is on, ‘Channel Scan’, ‘Channel Add’ and
‘Manual Scan’ of menu-channel is locked. In order to access
‘Channel Scan’, ‘Channel Add’ or ‘Manual Scan’, you have to enter
the correct password.
15
CAX-01/CAX-03/CAX-04
SET PASSWORD
Change the password by entering a new password twice.
1. Press MENU. The main menu will appear.
2. Use ◀/▶ to select LOCK then press ▼ or ENTER button to move
to the second level.
3. Use ▲/▼ to select ‘Set Password’ then press ▶ or ENTER.
4. Enter the new 4-digit password.
5. Enter the same password again to confirm.
6. Press MENU or ◀ to return to the previous category or press
EXIT to return to TV viewing.
BLOCK CHANNEL
Blocks any channel that you do not want to view or that you do not want your children to watch. If you select a
blocked channel, a block screen with a pop-up box will appear. Block Channel can override Channel Edit menu
settings.
1. Press MENU. The main menu will appear.
2. Use ◀/▶ to select LOCK then press ▼ or ENTER button to move
to the second level.
3. Use ▲/▼ to select ‘Block Channel’ then press ▶ or ENTER.
The channel list menu will appear.
Use ▲/▼ to move between the channels.
To lock or unlock a channel:
Use ENTER button to block or unblock the channel.
The
mark will appear beside the station name indicating the
blocked channel.
4. Repeat step 3 to block or unblock additional channels on the
channel list menu.
5. Press MENU or ◀ to return to the previous category or press
EXIT to return to TV viewing.
TV RATING - CHILDREN
This option prevents children from watching certain children’s TV programs according to the ratings limit set.
The Rating- Children does not apply to other TV programs. Unless you block certain TV programs intended for
mature audiences in the TV Rating- sub menu, your children can view those programs.
1. Press MENU. The main menu will appear.
2. Use ◀/▶ to select LOCK then press ▼ or ENTER button to move
to the second level.
3. Use ▲/▼ to select ‘TV Rating-Children’ then press ▶ or ENTER.
4. Use ▲/▼ to select ‘Age’ or ‘Fantasy Violence’ then press ▶ or
ENTER button.
Age : Selection applies regardless of content category of rating.
Fantasy Violence : Selection applies if TV programs include
rating for Fantasy Violence.
5. Use ▲/▼ to select a rating then press ENTER to confirm your
` selection.
6. Press MENU or ◀ to return to the previous category or press
EXIT to return to TV viewing.
Note
• TV-Y : All Children.
• TV-Y7 : For children age 7 and older.
CAX-01/CAX-03/CAX-04
16
TV RATING - GENERAL
Blocks TV programs that you and your family may not wish to watch, based on the rating scheme set.
1. Press MENU. The main menu appears.
2. Use ◀/▶ to select LOCK then press ▼ or ENTER button to move
to the second level.
3. Use ▲/▼ to select ‘TV Rating-General’ then press ▶ or ENTER.
4. Use ▲/▼ to select ‘Age’, ‘Dialogue’, ‘Language’, ‘Sex’, or
‘Violence’ then press ▶ or ENTER.
Age: Selection applies regardless of content category rating.
Dialogue: Selection applies if TV programs have rating for
Dialogue.
Language: Selection applies if TV programs have rating for
Language.
Sex: Selection applies if TV programs have rating for Sex.
Violence: Selection applies if TV programs have rating for
Violence.
5. Use ▲/▼ to select a rating then press ENTER to confirm your
selection.
6. Press MENU or ◀ to return to the previous category or press
EXIT to return to TV viewing.
Note
•
•
•
•
TV-G : General Audience.
TV-PG : Parental Guidance Suggested.
TV-14 : Parents Strongly Cautioned.
TV-MA : Mature Audience Only.
MOVIE - RATING
Blocks movies according to the movie rating restrictions so children cannot view certain movies. You can set the
ratings to block out all the movies with ratings above a specified level. Keep in mind that the movie ratings
apply only to movies shown on TV, not TV programs such as soap operas.
1. Press MENU. The main menu will appear.
2. Use ◀/▶ to select LOCK then press ▼ or ENTER button to move
to the second level.
3. Use ▲/▼ to select ‘Movie-Rating’ then press ▶ or ENTER.
4. Use ▲/▼ to select a rating then press ENTER to confirm your
selection.
5. Press MENU or ◀ to return to the previous category or press
EXIT to return to TV viewing.
Note
•
•
•
•
•
•
•
The Rating system doesn’t apply to news programs.
G (General Audiences) : GENERAL AUDIENCES, Suitable for all ages.
PG : PARENTAL GUIDANCE SUGGESTED- Some material may not be suitable for children.
PG-13 : PARENTS STRONGLY CAUTIONED- Some material may be inappropriate for children under 13.
R (Restricted viewing) : RESTRICTED, No one 17 or Under without parent or guardian admitted.
NC-17 (Restricted Viewing) : No one 17 or under admitted.
X (Hard Core Films) : Adults Only.
17
CAX-01/CAX-03/CAX-04
DOWNLOADABLE - RRT
If the broadcasting signal has Region5 rating data, rating data is displayed in the Region Rating Table. The
displayed data has ordinal rating format or categorical rating format. Based on the rating table, your TV's OSD
(On Screen Display) may differ slightly from what is shown in this manual.
1.
2.
3.
4.
Follow steps 1-2 as shown above (Movie Rating).
Use ▲/▼ to select ‘Downloadable-RRT’ then press ▶ or ENTER.
Use ▲/▼ to select rating item then press ▶ or ENTER.
In Categorical rating use ENTER to select rating.
In Ordinal rating use ▲/▼ to select rating.
5. Press MENU or ◀ to return to the previous category or press
EXIT to return to TV viewing.
Note
• This function operates only when converter box has received
Region5 Rating data.
ELECTRONIC PROGRAM GUIDE
The Electronic Program Guide contains schedule and program information of all channels. This guide also
provide local over-the-air channel information including conventional digital channels. Use the Electronic
Program Guide to view schedule and descriptive program information for the channels. The EPG supplies
information, such as program name, start and end time of all available channels. In addition, the detailed
information about the program is often available in the EPG. (The availability and the amount of program
details will vary depending on the broadcaster.)
To Display the Electronic Program Guide
Press GUIDE on the Remote Controller.
To Exit the Electronic Program Guide
Press EXIT or GUIDE to return to the channel you were viewing.
To view the Electronic Program Guide of other channels
Use ◀/▶ on your Remote Controller to navigate the guide screen.
CHANNEL BANNER DISPLAYS
The Channel Banner appears whenever you tune into a new channel or press ENTER while viewing a program.
1. Press ENTER while watching a program.
The Channel Banner appears on the TV screen (channel number,
station name, and current time).
2., Press ENTER to make the Banner disappear.
Note
• Station name and Current time are displayed only if they are provided by the broadcaster.
• If the channel is scrambled, you may not be able to see the program.
• The Channel Banner will contain the following information.
a. Channel Number : Displays current channel number
b. Station Name : Displays the station name of the current channel
c. Time : Displays the current time
d. NO SIGNAL : Displays the NO SIGNAL icon when the channel is invalid or an antenna isn’t connected
e. CH BLOCKED : Displays the CH BLOCKED icon when the channel is locked
f. Volume Mute : Displays the Volume Mute icon when sound is off
CAX-01/CAX-03/CAX-04
18
PROGRAM INFORMATION DISPLAYS
The Program Information Display will appear if you press the INFO button on the Remote Controller while
viewing a program.
1. Press INFO while watching a program : The Program Information will appear on the TV screen.
2. Press INFO or ENTER while the Program Information is displayed : The Program Information will
disappear from the TV screen.
Note
• Station name and Current time are displayed only if they are provided by the broadcaster.
• The Channel Banner will contain the following information.
a. Program Title : Indicates title of current program
b. Date : Displays the current date
c. Start Time, End Time : Displays the start time and end time for the current program
d. Time : Shows current time
e. Channel Number : Displays the current channel number
f. Station Name: Displays the station name of the current channel
g. Extended Text Message Icon ( ) : Indicates that there is an Extended Text Message available
providing detailed description of the program
h. Multiple Audio Icon (
) : Channels sometimes provide multiple audio tracks, often in a different
language. When multiple audio tracks are available, the Multiple Audio Icon will appear and you can select
the audio tracks with the AUDIO button.
i. DTV Caption Icon (
) : Indicates that the current program contains Digital Closed Caption Data Service
j. Wide Icon (
) : Indicates that the current program is shown in wide picture format
k. Content Advisory Icon ( ) : Content Advisory data is used for the parental guide control to block
programs that are beyond pre-defined rating criteria set by users. This icon means that the current
program contains content advisory data, and displays rating of the program
l. Program Details : Displays program information
NORMAL OPERATION
VOLUME ADJUSTMENT
You may adjust the audio volume of the Converter Box.
VOL ▲/▼ buttons (Remote Controller)
Use VOL ▲/▼ on the Remote Controller to adjust the sound level for analog audio output of the Converter Box.
MUTE (Remote Controller)
Press MUTE to turn off the volume for audio output of the Converter Box.
19
CAX-01/CAX-03/CAX-04
SELECTING CHANNELS
You can select channels as described below.
Number and Dash (–) buttons (Remote Controller)
Use Number(0~9) and Dash (-) buttons to select a channel directly.
The Dash (-) button is used to enter a program number for multiple channels such as 1-1, 1-2, etc.
FLASHBK button (Remote Controller)
Press to return to the previous channel you viewed. For example, if the Converter Box is tuned to channel 54
and then you changed to channel 56, pressing FLASHBK will return to channel 54.
CH▲/▼ buttons (Remote Controller or front panel)
Use CH▲/▼ on the Remote Controller to cycle through the channels memorized in the Converter Box..
SIGNAL STRENGTH
Shows the signal strength bar for incoming signal to help you adjust the antenna to the correct position for
your location. You can view the signal strength bar by pressing SIGNAL on the Remote Controller. And a beep
sound will be heard.
APPENDIX
REMOTE CONTROLLER CODE TABLE
※ NEC Format (Carrier frequency=38KHz)
Custom Code: 01FE
FUNCTION
KEY DATA
BOX POWER
00H
MUTE
03H
1
01H
2
02H
3
06H
4
04H
5
05H
6
07H
7
08H
8
0AH
9
0BH
CAX-01/CAX-03/CAX-04
FUNCTION
0
GUIDE
VOL +
VOL CAPTION
FLASHBK
CH UP
CH DOWN
UP
ENTER
20
KEY DATA
19H
0EH
1AH
18H
10H
1EH
0DH
13H
11H
15H
12H
FUNCTION
DOWN
LEFT
RIGHT
MENU
EXIT
INFO
AUDIO
RATIO
SIGNAL
KEY DATA
16H
14H
17H
0CH
0FH
47H
41H
42H
1DH
PROGRAM CODE LIST
MAKER(BRAND)
ADMIRAL
ADVENT
AIKO
AKAI
ALARON
AMARK
AMERICA ACTION
AMPRO
CODE LIST
072 081 160 161 096
MAKER(BRAND)
ELECTROHOME
247
103
006 146 248
028
112 143
043
EMERSON
FISHER
FUJITSU
FUNAI
FUTURETECH
GATEWAY
ANAM
073
043 054 055 056 080
112
AOC
APEX DIGITAL
AUDIOVOX
058 006 004 112
015 226
076 103 043
BAYSONIC
BELL&HOWELL
BRADFORD
043
072
043
GOLDSTAR
GRUNPY
HALL MARK
HARLEY
DAVIDSON
HARMAN KARDON
HARVARD
BROKSONIC
CANDLE
CAPEHART
CARVER
CELEBRITY
CETRONIC
096
006 002 003 004
058
164
001
043
HITACHI
INFINITY
INKEL
INTEQ
JBL
JCB
CINERAL
103
006
103
043
004
043
143
JCPENNEY
CITIZEN
CLASSIC
CONCERTO
CONTEC
CORONADO
CRAIG
CROSLEY
CROWN
GIBRALTER
120
002 003 004 101
143
JENSEN
JVC
KENWOOD
KLOSS
KTV
051
DAEWOO
043
164
043
006
072
043
076
143
120
DAYTRON
DENON
DUMONT
DWIN
DYNASTY
DYNATECH
ELECTROBAND
004 143
011
004 073
161
043
062
001
CURTIS MATHES
CXC
GE
054 028
143
004 101 143 011
081 120 164
CODE LIST
024 076 143
005 028 043
155 004 051
154
007 057
164 028 198
028 043 052
043
242
006 073 144
008 009 034
155 081 120
004
004
127
028
004
028
164
043
163
010
164
129
073
164
001
004
101
LG
LODGENET
LOEWE
013
038
006
002
006
004
127
072
207
LOGIK
LUXMAN
072
004
LXI
007
006
061
160
072
164
164
080
004
004
048 076 096
143 151 153
246
249
160 161 004
056 074 091
073
106 119 110 112 113
143
043
004 007 009 011 072
012 023 075 143 158
006 008 024 030 065
143 156 160
001 034 083 206
001
059
043 143 154
106 119 110 112 113
143
164
103 055 004 127
016 043 044 125
MAGNAVOX
MAJESTIC
MARANTZ
MATSUI
MATSUSHITA
MEGATRON
MEMOREX
21
015
003
063
028
052 081 160 164
004 022 059 060
064 127 164 094
250
006
007 072 028 096
CAX-01/CAX-03/CAX-04
MAKER(BRAND)
METZ
MGA
CODE LIST
088
024 006 004 042
MAKER(BRAND)
SEMIVOX
SEMP
MIDLAND
MINERVA
MINUTZ
073
088
008
109
146
081
006
043
015
006
019
043
SHARP
SIGNATURE
SONY
CODE LIST
043
015
081 014 019 028 004 022
143 175
072
001 126 139
SOUNDESIGN
SPECTRICON
SQUAREVIEW
SSS
STARLITE
003 004 028 043
112
052
004 043
043
SUPRE MACY
SUPREME
002
001
006
127
052
081
056
034
028
MITSUBISHI
MOTOROLA
MTC
MULTITECH
NAD
NEC
NIKEI
NIKKO
NTC
ONKING
ONWA
OPTIMUS
OPTONICA
ORION
PANASONIC
PHILCO
PHILIPS
PIONEER
PORTLAND
PRISM
PROSCAN
PROTON
QUASAR
RADIO SHACK
RCA
REALISTIC
RUNCO
SAMPO
SAMSUNG
SANSEI
SANSUI
SANYO
SCOTCH
SCOTT
SEARS
CAX-01/CAX-03/CAX-04
103
103
043
043
080
019
096
205
034
222
006
059
143
164
006
023
018
004
034
144
004
112
034
004
160
006
074
007
072
006
004
160
229
120
096
007
004
004
143
004
057
052
024 042 004 040
028 081 225
004 062 101
025
134 040 056 007
024 237
SYLVANIA
SYMPHONIC
TANDY
TATUNG
TECHNICS
TECHNOL ACE
081
201 202 203 204
028
056 080 164 208
003
060
164
005
003
025
006
143
TECHWOOD
062
080
TEKNIKA
004
002 003 004 024 028 043
072 101 143 103 164
TELERENT
072
TERA
172
TMK
TNCI
TOSHIBA
TOTEVISION
004
073
015 030 007 040 062 101
143
UNIVERSAL
008 009
146
174 188 164
004 024 056
063 064 127
038
004
135
209
103
093 127
059 210
176 004
234
160 161
058 143 171 173
056
019
161
004
152
003 059 060 063 064
160 164 044 249
249
127 143 043
144 156 065
023 024 056
081
VIDIKRON
VIDTECH
019
073
004 058 242
101 127 133 143
089 105 211 228
053 057 082 020
005 028 043 048
007 015 028 030
082 094 143 160
164
22
WARDS
WESTING HOUSE
YAMAHA
004
004 064 164 008 009 019
028 060 061 063 072 074
143
076
004 006
YORK
YUPITERU
ZENITH
ZONDA
004
043
072 073 095 103 011 096
112
TROUBLESHOOTING
Symptoms
Check Point
• Check whether the power is on
No picture & No sound
or Cannot turn on power
• Check if power cord is firmly connected to the product and the
power outlet
• Test the wall power outlet, plug another product’s power cord into
the outlet
• Check the volume level of the TV and product
Picture OK & No sound
• Check the MUTE state of the TV and product
• Press the Audio button to change the audio type
• Check audio cables are correctly connected to devices
• Check the product in operation mode
No picture
• Check the channel is on air
• Check video cables are correctly connected to devices
• Check the input source setting of TV
• Check the connection between product and TV
No color, or wrong colors
For a 3-wire component connection, match the red, green, and blue
cables from product to your TV
• Check whether the video component cables are connected
No OSD
If you want to display OSD, connect composite cable (Video Out)
instead of video component cables.
• Check the OSD display option in setup menu
• Check to see if there is any object between the TV and the remote
control causing obstruction
The Remote Controller
doesn’t work
• To manipulate the product with remote controller, the remote
controller's emitting part should directly point towards the receiving
part of product's remote controller
• Check the batteries are installed with correct polarity
• Install new batteries
PRODUCT SPECIFICATIONS
General Specifications
Broadcasting Standard
Demodulation Method
Power Requirement
Power Consumption
Dimension (WⅹDⅹH)
Weight
DTV(ATSC)
8-VSB (free channel only)
AC 120V~, 50-60Hz
8 Watts under/ In standby: 1 Watt under
180 x 171.4 x 38(mm)
1.1Kg
RF Specifications
Tuning System Type
Band Coverage
Antenna
F/S
DTV 2~69
75-ohm external antenna terminal
75-ohm F-Type Antenna in (1)
75-ohm F-Type RF Out (1)
Composite Video Out (1)
Analog L/R Audio Out (2)
Input/Output
23
CAX-01/CAX-03/CAX-04
LIMITED WARRANTY
This limited warranty is provided by CAST Information Co., Ltd(CASTi) to the original purchaser and is limited to
non-commercial use of the product.
Labor & Parts Warranty
CASTi products purchased in the United States are warranted to be free from defects in materials or
workmanship for a period of 6 months from date of purchase. If the unit fails to conform to this warranty, we
will service the product free of charge using new or refurbished parts and products, at CASTi’s sole discretion.
This warranty does not apply to products or parts that have been damaged due to abuse, misuse,
accident(including acts of God), unauthorized alteration or modification, negligence, improper operation or
maintenance, use in violation of instructions and precautions provided with the product, or if the product serial
number is removed or changed.
Packaging and shipment instruction
Before sending the defective product for repair or replacement, please contact our Customer
Support Center at 1-877-685-8443(Operation hours : 9am~5pm Pacific Time) to obtain
a RMA number. All returned products without the RMA number will be rejected.
You must retain the original sales receipt to provide proof of purchase.
1. When sending the defective product to our Customer Support Center, you must use the original carton box or
a reasonable substitute packaging to prevent damage.
2. All accessories included with the original product package must be sent along with the main unit.
3. RMA number obtained from our Customer Support Center must be written on the mail package along with
the return address.
4. All costs including transportation, shipping, or insurance costs relative to the return of the product is your
responsibility.
All warranties implied by state law, including the implied warranties of merchantability and fitness for a
particular purpose, are expressly limited to the duration of the limited warranties set forth above. With the
exception of any warranties implied by state law as hereby limited, the foregoing warranty is exclusive and in
lieu of all other warranties, agreements and similar obligations of manufacturer or seller with respect to the
repair or replacement of any parts. In no event shall CASTi be liable for consequential or incidental damages.
No person, agent, distributor, dealer or company is authorized to change, modify or extend the terms of this
warranty in any manner whatsoever.
This warranty gives you specific legal rights and you may also have other rights, which may vary, from state to
state. Some states do not allow limitation on how long an implied warranty lasts, when an action may be
brought, or the exclusion or limitation of incidental or consequential damages, so the above provisions may not
apply to you.
CUSTOMER SUPPORT CENTER
For service and repair please call 1-877-685-8443 or visit our website
www.casticonverter.com.
CAX-01/CAX-03/CAX-04
24