1
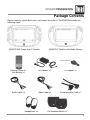
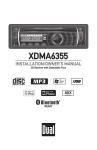
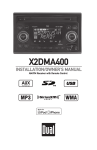
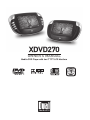
XDVD270 OWNER’S MANUAL Mobile DVD Player with two 7" TFT LCD Monitors XDVD270 PREPARATION Table of Contents Page DVD Region Management . . . . . . . . . . . . . . . . . . . . . . . . . . . . . . . . . . . . . . . . . . . . . . Package Contents . . . . . . . . . . . . . . . . . . . . . . . . . . . . . . . . . . . . . . . . . . . . . . . . . . . . Safety Information/Precautions . . . . . . . . . . . . . . . . . . . . . . . . . . . . . . . . . . . . . . . . . Control Locations - Main Unit . . . . . . . . . . . . . . . . . . . . . . . . . . . . . . . . . . . . . . . . . . . Control Locations - External Monitor . . . . . . . . . . . . . . . . . . . . . . . . . . . . . . . . . . . . . Control Locations - Remote . . . . . . . . . . . . . . . . . . . . . . . . . . . . . . . . . . . . . . . . . . . . Connections - Communication Cable/Power . . . . . . . . . . . . . . . . . . . . . . . . . . . . . . . Connections - External Audio/Video . . . . . . . . . . . . . . . . . . . . . . . . . . . . . . . . . . . . . . Quick-Start Guide . . . . . . . . . . . . . . . . . . . . . . . . . . . . . . . . . . . . . . . . . . . . . . . . . . . . DVD Setup Menu . . . . . . . . . . . . . . . . . . . . . . . . . . . . . . . . . . . . . . . . . . . . . . . . . . . . . DVD Operation . . . . . . . . . . . . . . . . . . . . . . . . . . . . . . . . . . . . . . . . . . . . . . . . . . . . . . . CD Operation . . . . . . . . . . . . . . . . . . . . . . . . . . . . . . . . . . . . . . . . . . . . . . . . . . . . . . . . Using the Headrest Mounts . . . . . . . . . . . . . . . . . . . . . . . . . . . . . . . . . . . . . . . . . . . . . Warranty . . . . . . . . . . . . . . . . . . . . . . . . . . . . . . . . . . . . . . . . . . . . . . . . . . . . . . . . . . . Troubleshooting . . . . . . . . . . . . . . . . . . . . . . . . . . . . . . . . . . . . . . . . . . . . . . . . . . . . . . Specifications . . . . . . . . . . . . . . . . . . . . . . . . . . . . . . . . . . . . . . . . . . . . . . . . . . . . . . . . 2 3 4-5 6 7 8 9 10 11 12-14 15-17 18 19 20 21 22 DVD Region Management Some DVD discs can be played only in certain playback modes according to the intentions of the software products. As this player plays discs according to their intentions, some functions may not work as intended by you. Please be sure to read the instructions provided with each disc. This player has been designed to play DVD software that has been encoded for specific region areas. It cannot play DVD software encoded for other region areas than the region areas for which it has been designed. The XDVD270 will play discs labeled “region 1” or “all”. DVD region codes: 1 - USA, Canada 2 - Japan, Europe, South Africa, Middle East 3 - Asia 4 - Australia, New Zealand, Mexico, South America 5 - Russia, India 6 - China 2 XDVD270 PREPARATION Package Contents Please carefully unpack both units, and inspect all contents. The XDVD270 includes the following items: XDVD270 DVD Player with 7" Monitor XDVD270 7" Monitor with Media Storage Remote Control x 1 Coin Battery x 1 AC Adapter x 1 DC Adapter x 1 Audio Cable x 2 Video Cable x 2 Communication Cable x 1 Headphones x 2 Car Headrest Mount x 2 3 XDVD270 PREPARATION Safety Information CAUTION: Use of controls or adjustments or performance of procedures other than those specified herein may result in hazardous radiation exposure. 1. Read All Instructions - All safety and operating instructions should be read before attempting to operate this product. 2. Heed Warnings - All warnings on the product and in the operating instructions should be adhered to. 3. Cleaning - Disconnect power from this product before cleaning. Do not use liquid cleaners or aerosol cleaners. To prevent scratches, use only a damp cloth for cleaning LCD screen. 4. Water and Moisture - Do not use this product near water - for example, near a bath tub, sink, in a wet basement, or near a swimming pool. 5. Ventilation - Any slots and openings in the cabinet are provided for ventilation and to ensure reliable operation of the product and to protect it from overheating. These openings must not be blocked or covered. The openings should never be blocked by placing the product on a bed, sofa, rug, or other similar surface. 6. Power Sources - This product should be operated only from the type of power source indicated on the marking label. 7. Polarization - This product may be equipped with a polarized alternating-current line plug (a plug having one blade wider than the other). This plug will fit into the power outlet only one way. This is a safety feature. If you are unable to insert the plug fully into the outlet, try reversing the plug. If the plug should still fail to fit, contact your electrician to replace your obsolete outlet. Do not defeat the safety purpose of the polarized plug. 8. Power Cord Protection - Power supply cords should be routed so that they are not likely to be walked on or pinched by items placed upon or against them, paying particular attention to cords at plugs, convenience receptacles, and the point where they exit from the product. 9. Lightning - For added protection for this product during a lightning storm, or when it is left unattended and unused for long periods of time, unplug it from the wall outlet. This will prevent damage to the product due to lightning and power-line surges. 10. Object and Liquid Entry - Never push objects of any kind into this product through openings as they may touch dangerous voltage points or short-out parts that could result in a fire or electric shock. Never spill liquid of any kind on the product. 4 XDVD270 PREPARATION Safety Precautions 1. Servicing - Do not attempt to service this product yourself as opening or removing covers may expose you to dangerous voltage or other hazards. Refer all servicing to qualified service personnel. 2. Damage Requiring Service - Unplug this product from the wall outlet and refer servicing to qualified service personnel under the following conditions: a. When the power-supply cord or plug is damaged. b. If liquid has been spilled, or objects have fallen into the product. c. If the product has been exposed to rain or water. d. If the product does not operate normally by following the operating instructions. e. If the product has been dropped or damaged in any way. f. When the product exhibits a distinct change in performance - this may indicate a need for service. 3. Replacement Parts - When replacement parts are required, be sure the service technician has used replacement parts specified by the manufacturer or have the same characteristics as the original part. Unauthorized substitutions may result in fire, electric shock, or other hazards. This device employs a Laser System. Use of controls or adjustments or performance of procedures other than those specified herein may result in hazardous radiation exposure. Make sure the device is stopped or powered down prior to opening player lid. CAUTION TO REDUCE THE RISK OF ELECTRIC SHOCK, DO NOT ATTEMPT TO DISASSEMBLE OR SERVICE THIS UNIT. NO USER-SERVICEABLE PARTS INSIDE. REFER SERVICING TO QUALIFIED SERVICE PERSONNEL ONLY. This device complies with part 15 of the FCC rules and regulations. Operation is subject to the following two conditions: 1) This device may not cause harmful interference, and 2) This device must accept any interference received, including interference that may cause undesired operation. 5 XDVD270 OPERATION Control Locations - Main Unit 6 1 7 2 8 3 9 4 10 5 11 12 20 6 19 18 17 15 16 14 13 1 Left Speaker 8 Chapter/Track Up 15 External Monitor Connection 2 Chapter/Track Down 9 Play 16 12VDC Input 3 Pause 10 Stop 17 Video In/Out 4 Display 11 Power On/Off 18 Audio In/Out 5 LCD On/Off 12 Open 19 Headphone Out 6 Right Speaker 13 Key Lock On/Off 20 Volume 7 IR Sensor 14 A/V Internal/External XDVD270 OPERATION Control Locations - External Monitor 1 3 2 8 9 7 6 5 4 1 Media Storage Tray 6 Video In 2 Left Speaker 7 Audio In 3 Right Speaker 8 Headphone Out 4 Main Unit Connection 9 Volume 5 A/V Internal/External 7 XDVD270 OPERATION Control Locations - Remote 3 5 7 9 11 13 1 22 2 23 4 25 6 27 8 29 10 30 12 31 14 32 16 34 18 36 19 37 20 38 21 39 24 26 28 15 17 8 33 35 1 Power 14 Key #2 27 Fast Reverse 2 Display 15 Key #1 28 Fast Forward 3 Title 16 Key #6 29 Setup 4 Zoom 17 Key #5 30 4-Way - Right 5 Search 18 Key #9 31 Return 6 Slow 19 Key #0 32 Key #3 7 Audio 20 Angle 33 Key #4 8 4-Way - Up 21 Subtitle 34 Key #7 9 Menu 22 Play 35 Key #8 10 Enter 23 Pause 36 Program 11 4-Way - Left 24 Stop 37 Key #+10 12 4-Way - Down 25 Chapter/Track Down 38 Repeat 13 Cancel 26 Chapter/Track Up 39 Repeat A-B XDVD270 OPERATION Connections - Data Cable /Power 1. Connecting the Main Unit to the External Monitor Note: Power off the XDVD270 main unit and any other A/V equipment before connecting the XDVD270 external monitor or making any external Audio or Video connections. Connect the gray end of the supplied communication cable to the right side of the main unit. The main unit connector is labeled EXTERNAL MONITOR. Plug the black end of the communication cable into the left side of the external monitor. The external monitor connector is labeled MAIN UNIT. Notes: The communication cable connectors include a locating tab allowing them to plug into the main unit and external monitor one way only. Use caution when inserting the connectors to prevent damage to the pins. Make sure the connectors are fully inserted, but do not force the connectors into the main unit or external monitor. 2. Power Connections Home Use Connect the supplied AC power adapter to the 12VDC power connector located on the right side of the main unit. Plug the other end into a standard 110VAC wall outlet. Car Use Connect the supplied DC power adapter to the 12VDC power connector located on the right side of the main unit. Plug the other end into a standard vehicle cigarette outlet. 3. Headphone Connections Connect the supplied headphones to the headphone outputs located on the right side of the main unit or the external monitor. Make sure the volume level is set to its minimum setting before connecting the headphones. 9 XDVD270 OPERATION Connections - External Audio/Video A/V Int/Ext (Internal/External Switch) The A/V INT EXT switch selects between internal and external audio/video sources. Select A/V INT on the main unit and A/V INT on the external monitor to watch a DVD playing in the main unit on both monitors. Audio Connections (Optional) Connect the supplied audio cable to the AUDIO connector located on the right side of the main unit or the AUDIO IN connector on the right side of the external monitor. The audio cable is identified by having a 3.5 mm connector on one end and red/white RCA connectors on the other end. Audio Out (Main Unit Only) Connect the red/white RCA connectors to an audio input on your stereo receiver or TV. Consult your stereo receiver or TV owner's manual for further information. Select A/V INT on the left side of the main unit. Audio In Video Connections (Optional) Connect the red/white RCA connectors to an audio output from an external source such as a game console. Consult your game console owner's manual for further information. Select A/V EXT on the left side of the main unit or the external monitor. Connect the supplied video cable to the VIDEO connector located on the right side of the main unit or the VIDEO IN connector on the right side of the external monitor. The video cable is identified by having a 3.5 mm connector on one end and yellow/orange RCA connectors on the other end. Video Out (Main Unit Only) Connect the yellow RCA connector to a video input on your TV. Consult your TV owner's manual for further information. Select A/V INT on the left side of the main unit. Video In Connect the orange RCA connector to a video output from an external source such as a game console. Consult your game console owner's manual for further information. Select A/V EXT on the left side of the main unit or the external monitor. Note: The yellow RCA connector is not used when using the video cable with the external monitor. 10 XDVD270 OPERATION Quick-Start Guide Inserting a Disc Slide the OPEN button to the right and gently lift the lid. The lid opens to a maximum 90 degrees. Do not open it any further - as severe damage to the unit may occur. Align the center of the disc with the center of the spindle guide. Press gently down on the center of the disc to snap it into place, then gently close the lid until a click is heard. Power On Playback Start Press the POWER button on the main unit for more than 2 seconds to turn the unit on. Press the PLAY button. In general, the DVD will start playing automatically when the power is turned on. The DVD player will immediately start rendering the DVD program. “ “ may appear on the display during operation. “ “ means that feature or operation is not permitted by the DVD player at this time. Playback Stop Power Off Automatic Power Off Press the STOP button momentarily. The unit will return to the start-up logo. When the unit is on, press POWER for more than 2 seconds to turn the unit off. The unit will automatically enter screen saver mode (if activated) after approximately 3-1/2 minutes of no activity. The unit will also automatically power off after approximately 10 minutes of no activity. Note: The unit will resume playback from the beginning of the DVD when POWER is turned on. Using the Remote Control Remove the clear plastic separator from the battery compartment before using the remote control. When replacing the battery, use only a 3 volt Lithium CR2025 or equivalent. Point the remote at the IR sensor located on the front of the main unit. The operating distance is up to 20’ away from the main unit within 30° of the IR sensor. 11 XDVD270 OPERATION General Operation - DVD Setup Menu Access DVD Setup Menu Using the remote, press SETUP to access DVD setup menu. Press or to select between menu pages and /// to adjust settings and or levels. When selectable, the menu item will be highlighted in yellow. The current setting is highlighted in red. Press ENTER to select/confirm each setting. Exit Setup Menu Press SETUP to save settings and exit the setup menu. Notes: Some DVD discs can be played only in certain playback modes according to the intentions of the software products. As this player plays discs according to their intentions, some functions may not work as intended by you. Please be sure to read the instructions provided with each disc. General Setup Page TV Display Press or to select General Setup Page and ENTER to select. Press or to select display as Normal/PS (Pan & Scan), Normal/LB (Letterbox) or Wide (Widescreen). Note: On some DVDs, the TV Display option is only available when the disc the fully stopped. See page 15 for details. Angle Mark OSD Lang (On Screen Display) Language Captions (Closed Caption) Screen Saver 12 Press or to select On/Off. Press or to select ENGLISH, FRENCH or SPANISH OSD (On Screen Display). Press or to select On/Off. Press or to select On/Off. The unit will automatically enter screen saver mode (if activated and with a disc inside) after approximately 3-1/2 minutes of no activity. XDVD270 OPERATION General Operation - DVD Setup Menu Audio Setup Page Speaker Setup Downmix Audio Setup Dual Mono Video Setup Page Press or to select Audio Setup Page and ENTER to select. Press or to select Speaker Setup Page and ENTER to select. Press or to select LT/RT or Stereo. Press or to select Audio Setup and ENTER to select. Press or to select Stereo, L-Mono, R-Mono, Mix-Mono. Press or to select Video Setup Page and ENTER to select. Sharpness Press or to select High, Medium or Low. Brightness Press or to adjust brightness level. (range is -20 minimum/+20 maximum) Contrast Press or to adjust contrast level. (range is -16 minimum/+16 maximum) Tint Press or to adjust tint level. (range is -9 minimum/+9 maximum) Color Press or to adjust color level. (range is -9 minimum/+9 maximum) 13 XDVD270 OPERATION General Operation - DVD Setup Menu Preference Page Press or to select Preference Page and ENTER to select. Note: The DVD must be fully stopped before the Preference Page can be accessed. See page 15 for details. Audio (DVD Title) Press or to select English, French, German, Spanish, Portuguese, Italian, Danish or Swedish. Note: If the disc has a predetermined language or, recorded in a language not listed above, the audio language setting will not be reflected. Subtitle (Language) Press or to select English, French, German, Spanish, Portuguese, Italian, Danish, Swedish or Off. Note: If the disc has a predetermined language or, recorded in a language not listed above, the subtitle language setting will not be reflected. Disc Menu (Language) Press or to select English, French, German, Spanish, Portuguese, Italian, Danish or Swedish. Note: If the disc has a predetermined language or, recorded in a language not listed above, the disc menu language setting will not be reflected. Parental (Control) Default (Restore Factory Settings) Password Setup Page Change Password Press or to select KID SAF, G, PG, PG 13, PGR, R, NC17, or ADULT. A password is required to change the parental control setting. See below for details. Press or to select RESET. Pressing RESET will restore all menu selections to their default setting (except for the password). Press or to select Password Setup Page and ENTER to select. Press or to select CHANGE, then create a new password. The default password is 1234. 14 XDVD270 OPERATION General Operation - DVD Inserting a disc Open lid; insert disc making sure it snaps securely on the spindle mount. Close lid. Power On Press POWER on the main unit for more than 2 seconds to turn the unit on. Power Off When the unit is on, press POWER for more than 2 seconds to turn the unit off. LCD Monitor On/Off Press LCD on the main unit for more than 2 seconds to turn the LCD monitor on/off. The monitor can be turned off when using the main unit with a TV or other video monitor. Key Lock On/Off The key lock function is used to prevent accidental operation of the main unit buttons while using the unit in a portable environment. Select Key Lock ON/OFF on the left side of the main unit. NOTE: The remote control operation is not affected by the Key Lock function. Playback Start In general, pressing PLAY or ENTER will start disc playback. Some discs will play automatically when the power is turned on. The unit will immediately start rendering the disc program. Playback Stop Press STOP momentarily. The unit will return to the startup logo and display “Press Play Key To Continue”. If PLAY is pressed, the unit will resume operation from the last position in memory. Playback Full Stop Pause Chapter Select Press STOP two times. The unit will return to the start-up logo and display . If PLAY is pressed, the unit will resume operation from the beginning of the disc. Press PAUSE to temporarily stop playback. Press PLAY to resume playback. Press I to skip to the beginning of the next chapter. Press I to return to the beginning of the current chapter. Pressing I again skips to the beginning of the previous chapter. 15 XDVD270 OPERATION General Operation - DVD Fast Forward and Reverse Press I or I from the main unit for more than 2 seconds to fast forward or fast reverse in 2x; 4x; 8x; 16x; 32x modes. Press PLAY to cancel fast forward or fast reverse. Step (frame-by-frame) Press or from the remote control to fast forward or fast reverse in 2x; 4x; 8x; 16x; 32x modes. Press PLAY to cancel fast forward or fast reverse. Slow Press PAUSE once from the main unit, II will appear in the display. Press PAUSE to show the next frame, II will appear in the display. Press PLAY to cancel. Press SLOW from the remote control to activate slow playback. Slow playback speed includes I 1/2, 1/4, 1/8 and 1/16 in forward and I 1/2, 1/4, 1/8 and 1/16 in reverse. Press PLAY to resume playback. Note: There is no audio output during fast forward or reverse, step and slow modes of DVD playback. Zoom Repeat Repeat A-B Main Menu (Root) Title Menu 16 Press ZOOM to increase/decrease the image size from 2X, 3X, 4X or 1/2, 1/3, 1/4 size. Press /// while zooming to scroll the image. Press REPEAT once to repeat the current chapter. Press REPEAT twice to repeat the current title. Press REPEAT three times repeat the entire disc. Press REPEAT again to cancel repeat function. Press A-B once to set point “A”, again to set point “B”. The points between “A” and “B” will continually repeat. Press A-B again to cancel repeat A-B. Press MENU to select main menu. Press /// to select between menu settings and ENTER to select/confirm. Press RETURN to resume playback from the last position. Press TITLE to show available titles. Press /// to select between titles and ENTER to select/confirm. Press RETURN to resume playback from the last position. XDVD270 OPERATION General Operation - DVD Selecting DVD Audio Language Selecting DVD Subtitle Language Selecting DVD View Angles Press AUDIO while playing to switch between available languages. Press SUBTITLE while playing to switch between available subtitle languages. Press ANGLE while playing to switch between available viewing angles. Notes: The DVD audio language, subtitle language and view angle features are only available when they are included on the disc. The language and subtitle functions may not work with some discs and they may require some time when selecting between them. Direct Title Access When the disc is stopped, use 0~9 and 10+ on the remote to enter the desired title. Direct Chapter Access When the disc is playing, use 0~9 and 10+ on the remote to enter the desired chapter. Direct Search Mode Program Mode Cancel Program Play Display Status Press SEARCH to access direct search mode. Select the desired search mode using ///. Press PROGRAM to access the program mode. Enter the desired Title and Chapter using 0-9 and 10+ on the remote control. Select Start to begin programmed playback. Up to 20 selections can be programmed. Press CANCEL to stop program play. Press DISPLAY to select between the following: TT --/-- CH ---/--- with elapsed title time TT --/-- CH ---/--- with remaining title time TT --/-- CH ---/--- with elapsed chapter time TT --/-- CH ---/--- with remaining chapter time Display Off DVD Compatibility Some DVDs may be incompatible with this unit, depending on media type and recording method. This model does not support DVD-RAM discs. 17 XDVD270 OPERATION General Operation - CD Play In general, audio discs will play automatically when inserted or the power is turned on. Stop Press STOP momentarily. The unit will return to the startup logo and display “Press Play Key To Continue”. If PLAY is pressed, the unit will resume operation from the last position in memory. Full Stop Pause Track Select Fast Forward and Reverse Track Repeat Repeat A-B Display Status Press STOP two times. The unit will return to the start-up logo and display . If PLAY is pressed, the unit will resume operation from the beginning of the disc. Press PAUSE to temporarily stop playback. Press PLAY to resume playback. Press I to skip to the beginning of the next track. Press I to return to the beginning of the previous track. Press I or I from the main unit for more than 2 seconds to fast forward or fast reverse in 2x; 4x; 8x; 16x; 32x modes. Press PLAY to cancel fast forward or fast reverse. Press REPEAT once to repeat the current track. Press REPEAT twice to repeat the entire disc. Press REPEAT again to cancel repeat function. Press A-B once to set point “A”, again to set point “B”. The points between “A” and “B” will continually repeat. Press A-B again to cancel repeat A-B. Press DISPLAY to select between the following: Track --/-- with elapsed track time Track --/-- with remaining track time Track --/-- with elapsed total time Track --/-- with remaining total time Display Off CD-R/RW Compatibility 18 Some CD-Rs and CD-RWs may be incompatible with this unit, depending on media type and recording method. XDVD270 OPERATION Using the Headrest Mounts The headrest mounts provide the convenience of mounting the main unit and the external monitor to the back of a vehicle’s headrest without any tools or modifications. Note: Power off the XDVD270 main unit and disconnect any external connections before attaching the headrest mounts. Slip main unit and/or external monitor into either side of the car mount. Close top, making sure that Velcro® closure fits snugly. Loop both belts through buckles. Place both belts over headrest; position unit so that screen is at comfortable viewing level, then tighten belts. Note: Be sure that mounting belts are fastened tightly to hold unit securely in case of sudden stops. Home Use Table Top The main unit and external monitor have a built-in easel-style stand to permit viewing in any location in the home. The stand is located on the back of both units. Place your thumb under the indentation, and pull up. The units can now be propped on a tabletop or any other solid, even surface. 19 XDVD270 WARRANTY Limited Warranty 90 Days Parts and Labor, One Year Parts Only This warranty gives you specific legal rights. You may also have other rights which vary from state to state. Dual Electronics Corp. warrants this product to the original purchaser to be free from defects in material and workmanship for a period of 90 days and free from defects in materials for a period of one year from the date of the original purchase. Dual Electronics Corp. agrees, at our option, for 90 days from the date of original purchase, to repair any defect in material or workmanship or to furnish an equal new, renewed or comparable product (whichever is deemed necessary) in exchange without charges, subject to verification of the defect or malfunction and proof of the date of purchase. Subsequent replacement products are warranted for the balance of the original 90 day warranty period. Labor costs apply thereafter. Who is covered? This warranty is extended to the original retail purchaser for products purchased and used in the U.S.A. and Canada. What is covered? This warranty covers all defects in material and workmanship in this product. The following are not covered: installation/removal costs, damage resulting from accident, misuse, abuse, neglect, product modification, improper installation, incorrect line voltage, unauthorized repair or failure to follow instructions supplied with the product, or damage occurring during return shipment of the product. 20 What to do? 1. Before you call for service, check the troubleshooting guide in your owner’s manual. A slight adjustment of any custom controls or connections may save you a service call. 2. If you require service during the warranty period, you must carefully pack the product (preferably in the original package) and ship it by prepaid transportation with a copy of the original receipt from the retailer to an authorized service center. 3. Please describe your problem in writing and include your name, a return UPS shipping address (P.O. Box not acceptable), and a daytime phone number with your shipment. 4. For more information and for the location of the nearest authorized service center please contact us by one of the following methods: Call us toll-free at 1-866-382-5476 Email us at [email protected] Exclusion of Certain Damages: This warranty is exclusive and in lieu of any and all other warranties, expressed or implied, including without limitation the implied warranties of merchantability and fitness for a particular purpose and any obligation, liability, right, claim or remedy in contract or tort, whether or not arising from the company’s negligence, actual or imputed. No person or representative is authorized to assume for the company any other liability in connection with the sale of this product. In no event shall the company be liable for indirect, incidental or consequential damages. XDVD270 OPERATION Troubleshooting Problem Unit will not turn on (no power) Action Connect the AC adapter into the wall outlet securely. Connect the DC adapter into the vehicle cigarette outlet securely. Press the POWER button on the main unit for more than 2 seconds. Unit has power (but no picture) Check the connections from the DVD video output to the TV or A/V receiver video input. Make sure your TV or A/V receiver is set to the correct mode. Refer to your TV or A/V receiver owners manual. Make sure the Key Lock function is set to OFF. Make sure the LCD monitor is turned on. Press and hold the LCD button for 2 seconds to turn the LCD monitor on/off. Check the A/V INT EXT switch settings. Unit has power (but no sound) Check the connections from the DVD audio output to the TV or A/V receiver audio input. Make sure your TV or A/V receiver is set to the correct mode. Refer to your TV or A/V receiver owners manual. Increase volume control on unit. Unplug the headphones to hear sound from the built-in speakers. Check the A/V INT EXT switch settings. Picture has occasional distortion A small amount of picture distortion may appear because of a poor quality video/sound transfer to disc. Brightness is unstable or noises are produced when playing Physical defect in media. Check media for scratches. Connect the DVD player directly to the TV and not through any other source. Avoid connecting the unit to a VCR or TV/VCR combination. The DVD does not start playback Disc is loaded upside down. Place the disc in the unit with the graphics side up. Place the disc on the disc spindle correctly inside the unit. Make sure the disc is free from scratches and fingerprints. Press the SETUP button to turn off the menu screen. Cancel the parental lock function or change the parental lock level. (The default password is 1234.) Turn the power off then disconnect the power plug and reconnect. Use discs labeled "Region 1" or "All" only. The unit turns off by itself This is a function of the unit by design. As a safety feature, the main unit will automatically power off after approx. 10 minutes of no activity. The remote control does not work properly Unit displays "Wrong Region" Remove and discard the clear plastic separator from the battery compartment of the remote control. Check for obstructions in front of the IR sensor on the main unit. Replace the battery. This player has been designed to play DVD software that has been encoded for region 1 only. Make sure the disc is labeled "region 1" or "all". 21 XDVD270 OPERATION Specifications DVD Player Signal-to-noise: >94db Dynamic range: >95db Harmonic distortion: <0.008% Frequency response: 10Hz-20kHz Channel separation @1kHz: >68dB D/A converter: 24 Bit Sampling frequencies: 44.1kHz, 48kHz, 96kHz Electronic Shock Protection: 3 seconds (DVD) 20 seconds (CD) Monitor Panel size: 7” (177.8 mm) diagonal measurement Format: Widescreen 16:9 View area: 6.07” W x 3.43” H (154.1 x 87 mm) Display system: Transparent TFT LCD panel View angle (up/down/left/right): 60/40/60/60 Resolution: 1440 x 234 Brightness (cd/m2): 350 Contrast ratio: 300:1 Elements: 336,960 Backlighting: CCFL General Operating voltage: 12VDC Operating current: 3A Audio line output voltage: >1.75V RMS Video system: NTSC Main unit dimensions: 11.02” W x 7.09” H x 1.77” D (280 x 180 x 45 mm) External monitor dimensions: 11.02” W x 7.09” H x 1.77” D (280 x 180 x 45 mm) Design and specifications subject to change without notice. 22 XDVD270 OPERATION Notes Copyright Notes This product incorporates copyright protection technology that is protected by method claims of certain U.S. patents and other intellectual property rights owned by Macrovision Corporation and other rights owners. Use of this copyright protection technology must be authorized by Macrovision Corporation, and is intended for home and other limited viewing uses only unless otherwise authorized by Macrovision Corporation. Reverse engineering or disassembly is prohibited. Manufactured under license from Dolby Laboratories. “Dolby” and the double-D symbol are trademarks of Dolby Laboratories. Confidential unpublished works. ©1992-1997 Dolby Laboratories, Inc. All rights reserved. 23 www.dualav.com ©2005 Dual Electronics Corp. NSA0805-V01