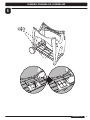
1
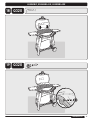
GAS GRILL
LP Gas Grill Owner’s Guide
ESNA
r"TTFNCMZ1H
(VÎBEFM1SPQJFUBSJPEFM"TBEPSEF(BT1SPQBOP-JDVBEP1H
&OTBNCMBKF1H
.PEFEh&NQMPJEV(SJMMÆ(B[1-1H
"TTFNCMBHF1H
PLACE STICKER HERE
#59751
3FHJTUFSZPVSHSJMMPOMJOFBUXXXXFCFSDPN®
:06.6453&"%5)*408/&34(6*%&
#&'03&01&3"5*/(:063("4(3*--
%"/(&3
*GZPVTNFMMHBT
4IVUPGGHBTUPUIFBQQMJBODF
&YUJOHVJTIBOZPQFOGMBNFT
0QFOMJE
*GPEPSDPOUJOVFTLFFQBXBZGSPNUIF
BQQMJBODFBOEJNNFEJBUFMZDBMMZPVSHBT
TVQQMJFSPSZPVSGJSFEFQBSUNFOU
-FBLJOHHBTNBZDBVTFBGJSFPSFYQMPTJPO
XIJDIDBODBVTFTFSJPVTCPEJMZJOKVSZ
EFBUIPSEBNBHFUPQSPQFSUZ
8"3/*/('PMMPXBMMMFBLDIFDL
QSPDFEVSFTDBSFGVMMZJOUIJTNBOVBMQSJPS
UPCBSCFDVFPQFSBUJPO%PUIJTFWFOJGUIF
CBSCFDVFXBTEFBMFSBTTFNCMFE
/05*$&50*/45"--&35IFTFJOTUSVDUJPOT
NVTUCFMFGUXJUIUIFPXOFSBOEUIFPXOFS
TIPVMELFFQUIFNGPSGVUVSFVTF
5)*4("4"11-*"/$&*4%&4*(/&%'03
065%00364&0/-:
8"3/*/(%POPUJHOJUFUIJTBQQMJBODF
XJUIPVUGJSTUSFBEJOHUIF#63/&3
*(/*5*0/TFDUJPOTPGUIJTNBOVBM
8"3/*/(
%POPUTUPSFPSVTFHBTPMJOFPSPUIFS
GMBNNBCMFMJRVJETPSWBQPSTJOUIF
WJDJOJUZPGUIJTPSBOZPUIFSBQQMJBODF
"O-1DZMJOEFSOPUDPOOFDUFEGPSVTF
TIBMMOPUCFTUPSFEJOUIFWJDJOJUZPGUIJT
PSBOZPUIFSBQQMJBODF
59751 09/01/11 LP
US - ENGLISH
WARNINGS
%"/(&3
'BJMVSFUPGPMMPXUIF%BOHFST8BSOJOHTBOE$BVUJPOTDPOUBJOFEJOUIJT0XOFST.BOVBMNBZSFTVMUJOTFSJPVTCPEJMZJOKVSZPS
EFBUIPSJOBGJSFPSBOFYQMPTJPODBVTJOHEBNBHFUPQSPQFSUZ
8"3/*/(4
%POPUTUPSFBTQBSFPSEJTDPOOFDUFEMJRVJEQSPQBOF
DZMJOEFSVOEFSPSOFBSUIJTCBSCFDVF
*NQSPQFSBTTFNCMZNBZCFEBOHFSPVT1MFBTFGPMMPXUIF
BTTFNCMZJOTUSVDUJPOTDBSFGVMMZ
"GUFSBQFSJPEPGTUPSBHFBOEPSOPOVTFUIF8FCFS®HBT
CBSCFDVFTIPVMECFDIFDLFEGPSHBTMFBLTBOECVSOFS
PCTUSVDUJPOTCFGPSFVTF4FFJOTUSVDUJPOTJOUIJTNBOVBMGPS
DPSSFDUQSPDFEVSFT
%POPUPQFSBUFUIF8FCFS®HBTCBSCFDVFJGUIFSFJTBHBT
MFBLQSFTFOU
%POPUVTFBGMBNFUPDIFDLGPSHBTMFBLT
$PNCVTUJCMFNBUFSJBMTTIPVMEOFWFSCFXJUIJOJODIFT
DN
PGUIFCBDLPSTJEFTPGZPVS8FCFS®HBTCBSCFDVF
%POPUQVUBCBSCFDVFDPWFSPSBOZUIJOHGMBNNBCMFPOPSJO
UIFTUPSBHFBSFBVOEFSUIFCBSCFDVF
:PVS8FCFS®HBTCBSCFDVFTIPVMEOFWFSCFVTFECZ
DIJMESFO"DDFTTJCMFQBSUTPGUIFCBSCFDVFNBZCFWFSZIPU
,FFQZPVOHDIJMESFOBXBZXIJMFJUJTJOVTF
:PVTIPVMEFYFSDJTFSFBTPOBCMFDBSFXIFOPQFSBUJOHZPVS
8FCFS®HBTCBSCFDVF*UXJMMCFIPUEVSJOHDPPLJOHPS
DMFBOJOHBOETIPVMEOFWFSCFMFGUVOBUUFOEFEPSNPWFE
XIJMFJOPQFSBUJPO
4IPVMEUIFCVSOFSTHPPVUXIJMFJOPQFSBUJPOUVSOBMM
HBTWBMWFTPGG0QFOUIFMJEBOEXBJUGJWFNJOVUFTCFGPSF
BUUFNQUJOHUPSFMJHIUVTJOHUIFJHOJUJOHJOTUSVDUJPOT
%POPUVTFDIBSDPBMPSMBWBSPDLJOZPVS8FCFS®HBT
CBSCFDVF
/FWFSMFBOPWFSPQFOHSJMMPSQMBDFIBOETPSGJOHFSTPOUIF
GSPOUFEHFPGUIFDPPLCPY
4IPVMEBHSFBTFGJSFPDDVSUVSOPGGBMMCVSOFSTBOEMFBWFMJE
DMPTFEVOUJMGJSFJTPVU
%POPUFOMBSHFWBMWFPSJGJDFTPSCVSOFSQPSUTXIFODMFBOJOH
UIFWBMWFTPSCVSOFST
5IF8FCFS®HBTCBSCFDVFTIPVMECFUIPSPVHIMZDMFBOFEPO
BSFHVMBSCBTJT
-JRVJEQSPQBOFHBTJTOPUOBUVSBMHBT5IFDPOWFSTJPOPS
BUUFNQUFEVTFPGOBUVSBMHBTJOBMJRVJEQSPQBOFVOJUPS
MJRVJEQSPQBOFHBTJOBOBUVSBMHBTVOJUJTEBOHFSPVTBOE
XJMMWPJEZPVSXBSSBOUZ
2
%POPUBUUFNQUUPEJTDPOOFDUBOZHBTGJUUJOHXIJMFZPVS
CBSCFDVFJTJOPQFSBUJPO
6TFIFBUSFTJTUBOUCBSCFDVFNJUUTPSHMPWFTXIFOPQFSBUJOH
CBSCFDVF
,FFQBOZFMFDUSJDBMTVQQMZDPSEBOEUIFGVFMTVQQMZIPTF
BXBZGSPNBOZIFBUFETVSGBDFT
$PNCVTUJPOCZQSPEVDUTQSPEVDFEXIFOVTJOHUIJTQSPEVDU
DPOUBJODIFNJDBMTLOPXOUPUIFTUBUFPG$BMJGPSOJBUPDBVTF
DBODFSCJSUIEFGFDUTPSPUIFSSFQSPEVDUJWFIBSN
%POPUVTFUIJTCBSCFDVFVOMFTTBMMQBSUTBSFJOQMBDF5IF
VOJUNVTUCFQSPQFSMZBTTFNCMFEBDDPSEJOHUPUIFBTTFNCMZ
JOTUSVDUJPOT
%POPUCVJMEUIJTNPEFMPGHSJMMJOBOZCVJMUJOPSTMJEFJO
DPOTUSVDUJPO*HOPSJOHUIJT8BSOJOHDPVMEDBVTFBGJSFPS
BOFYQMPTJPOUIBUDBOEBNBHFQSPQFSUZBOEDBVTFTFSJPVT
CPEJMZJOKVSZPSEFBUI
1SPQPTJUJPO8BSOJOH)BOEMJOHUIFCSBTTNBUFSJBMPO
UIJTQSPEVDUFYQPTFTZPVUPMFBEBDIFNJDBMLOPXOUPUIF
TUBUFPG$BMJGPSOJBUPDBVTFDBODFSCJSUIEFGFDUTPSPUIFS
SFQSPEVDUJWFIBSN
8BTIIBOETBGUFSIBOEMJOHUIJTQSPEVDU
X
-*26*%1301"/&("46/*540/-:
6TFUIFQSFTTVSFSFHVMBUPSBOEIPTFBTTFNCMZUIBUJT
TVQQMJFEXJUIZPVS8FCFS®HBTCBSCFDVF
%POPUBUUFNQUUPEJTDPOOFDUUIFHBTSFHVMBUPSBOEIPTF
BTTFNCMZPSBOZHBTGJUUJOHXIJMFZPVSCBSCFDVFJTJO
PQFSBUJPO
"EFOUFEPSSVTUZMJRVJEQSPQBOFDZMJOEFSNBZCFIB[BSEPVT
BOETIPVMECFDIFDLFECZZPVSMJRVJEQSPQBOFTVQQMJFS%P
OPUVTFBMJRVJEQSPQBOFDZMJOEFSXJUIBEBNBHFEWBMWF
"MUIPVHIZPVSMJRVJEQSPQBOFDZMJOEFSNBZBQQFBSUPCF
FNQUZHBTNBZTUJMMCFQSFTFOUBOEUIFDZMJOEFSTIPVMECF
USBOTQPSUFEBOETUPSFEBDDPSEJOHMZ
*GZPVTFFTNFMMPSIFBSUIFIJTTPGFTDBQJOHHBTGSPNUIF
MJRVJEQSPQBOFDZMJOEFS
.PWFBXBZGSPNMJRVJEQSPQBOFDZMJOEFS
%POPUBUUFNQUUPDPSSFDUUIFQSPCMFNZPVSTFMG
$BMMZPVSGJSFEFQBSUNFOUX
TABLE OF CONTENTS
WARNINGS . . . . . . . . . . . . . . . . . . . . . . . . . . . . . . . . . . . . . . . . . . 2
MAINTENANCE . . . . . . . . . . . . . . . . . . . . . . . . . . . . . . . . . . . . .32
CLEANING . . . . . . . . . . . . . . . . . . . . . . . . . . . . . . . . . . . . . . . . . . . . . . . . . . . . . . 32
TABLE OF CONTENTS . . . . . . . . . . . . . . . . . . . . . . . . . . . . . . . . . 3
WEBER® SPIDER/INSECT SCREENS . . . . . . . . . . . . . . . . . . . . . . . . . . . . . . . . 32
BURNER TUBE CLEANING OR REPLACEMENT . . . . . . . . . . . . . . . . . . . . . . . 33
Q300: EXPLODED VIEW . . . . . . . . . . . . . . . . . . . . . . . . . . . . . . . 4
PUSH-BUTTON IGNITION SYSTEM OPERATIONS (Q300) . . . . . . . . . . . . . . . . 34
ELECTRONIC IGNITION SYSTEM OPERATIONS (Q320) . . . . . . . . . . . . . . . . . 34
Q300: EXPLODED VIEW LIST . . . . . . . . . . . . . . . . . . . . . . . . . . . 5
ANNUAL MAINTENANCE . . . . . . . . . . . . . . . . . . . . . . . . . . . . . . . . . . . . . . . . . . 35
Q320: EXPLODED VIEW . . . . . . . . . . . . . . . . . . . . . . . . . . . . . . . 6
Q320: EXPLODED VIEW LIST . . . . . . . . . . . . . . . . . . . . . . . . . . . 7
PARTS LIST . . . . . . . . . . . . . . . . . . . . . . . . . . . . . . . . . . . . . . . . . 8
ASSEMBLY . . . . . . . . . . . . . . . . . . . . . . . . . . . . . . . . . . . . . . . . . . 9
WARRANTY . . . . . . . . . . . . . . . . . . . . . . . . . . . . . . . . . . . . . . . .22
GENERAL INSTRUCTIONS . . . . . . . . . . . . . . . . . . . . . . . . . . . .22
OPERATING. . . . . . . . . . . . . . . . . . . . . . . . . . . . . . . . . . . . . . . . . . . . . . . . . . . . . 22
STORAGE AND/OR NON-USE . . . . . . . . . . . . . . . . . . . . . . . . . . . . . . . . . . . . . . 22
GAS INSTRUCTIONS . . . . . . . . . . . . . . . . . . . . . . . . . . . . . . . . .23
SAFE HANDLING TIPS FOR LIQUID PROPANE GAS CYLINDERS . . . . . . . . . 23
IMPORTANT LP CYLINDER INFORMATION . . . . . . . . . . . . . . . . . . . . . . . . . . . 24
LIQUID PROPANE CYLINDER CONNECTION . . . . . . . . . . . . . . . . . . . . . . . . . . 25
HOSE TO CYLINDER CONNECTION . . . . . . . . . . . . . . . . . . . . . . . . . . . . . . . . . 25
CHECK FOR GAS LEAKS . . . . . . . . . . . . . . . . . . . . . . . . . . . . . . . . . . . . . . . . . . 25
REFILLING THE LIQUID PROPANE CYLINDER. . . . . . . . . . . . . . . . . . . . . . . . . 26
BEFORE USING THE GRILL . . . . . . . . . . . . . . . . . . . . . . . . . . .27
CATCH PAN AND DISPOSABLE DRIP PAN . . . . . . . . . . . . . . . . . . . . . . . . . . . . 27
IGNITER INSPECTION FOR MODELS WITH
ELECTRONIC IGNITION . . . . . . . . . . . . . . . . . . . . . . . . . . . . . . . . . . . . . . . . . . . 27
HOSE INSPECTION . . . . . . . . . . . . . . . . . . . . . . . . . . . . . . . . . . . . . . . . . . . . . . 27
IGNITION & USAGE . . . . . . . . . . . . . . . . . . . . . . . . . . . . . . . . . .28
IGNITION . . . . . . . . . . . . . . . . . . . . . . . . . . . . . . . . . . . . . . . . . . . . . . . . . . . . . . . 28
TO EXTINGUISH . . . . . . . . . . . . . . . . . . . . . . . . . . . . . . . . . . . . . . . . . . . . . . . . . 28
MANUAL IGNITION . . . . . . . . . . . . . . . . . . . . . . . . . . . . . . . . . . . . . . . . . . . . . . . 29
TO EXTINGUISH . . . . . . . . . . . . . . . . . . . . . . . . . . . . . . . . . . . . . . . . . . . . . . . . . 29
GRILLING TIPS & HELPFUL HINTS . . . . . . . . . . . . . . . . . . . . .30
PREHEATING THE BARBECUE . . . . . . . . . . . . . . . . . . . . . . . . . . . . . . . . . . . . . 30
COOKING METHODS . . . . . . . . . . . . . . . . . . . . . . . . . . . . . . . . . . . . . . . . . . . . . 30
GRILLING BASICS . . . . . . . . . . . . . . . . . . . . . . . . . . . . . . . . . . . . . . . . . . . . . . . 30
TROUBLESHOOTING . . . . . . . . . . . . . . . . . . . . . . . . . . . . . . . . .31
HANDLE LIGHT TROUBLESHOOTING (Q320) . . . . . . . . . . . . .31
WWW.WEBER.COM®
3
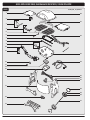
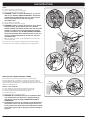
Q300: EXPLODED VIEW, DIAGRAMA DE DESPIECE, VISION ÉCLATÉE
Q300
Q300_US_LP_042411
1
19
2
3
4
5
20
6
7
8
9
10
21
11
12
22
13
14
15
23
24
25
16
26
27
28
17
29
18
4
Q300: EXPLODED VIEW LIST, LISTA DEL DIAGRAMA DE DESPIECE, LISTE DE LA VISION ÉCLATÉE
4XJOH6Q8PSL4VSGBDF
Superficie de Trabajo Basculante
Plan de Travail Rabattable
5BOL#BTF
Base del Tanque
Base du Réservoir
5IFSNPNFUFS"TTFNCMZ
Ensamble del Termómetro
Assemblage du Thermomètre
#PUUPN3BDL
Anaquel Inferior
Grille Inférieure
)BOEMF"TTFNCMZ
Ensamble del Asa
Assemblage de la Poignée
-JE
Tapa
Couvercle
$PPLJOH(SBUF
Parrilla de Cocción
Grille de Cuisson
3FBS$SBEMF
Soporte Posterior
Socle Arrière
8JSF#SBDF
Abrazadera de Alambre
Fil de Renfort
$PPLCPY
Caja de Cocción
Boîtier de Cuisson
0VUTJEF#VSOFS5VCF
Tubo Externo del Quemador
Tube du Brûleur Externe
7BMWFBOE.BOJGPME3FHVMBUPS"TTFNCMZ
Ensamblaje de la Válvula y del Múltiple - Regulador
Assemblage Valve et Collecteur - Régulateur
*OTJEF#VSOFS5VCF
Tubo Interno del Quemador
Tube du Brûleur Interne
#SJEHF1JFDF
Pieza Puente
Pièce d'Assemblage
&MFDUSPEF"TTFNCMZ
Ensamble del Electrodo
Assemblage de l’Electrode
5BOL#SBDLFU"TTFNCMZ
Ensamble del Soporte del Tanque
Assemblage du Support du Réservoir
'SPOU$SBEMF
Soporte Delantero
Socle Avant
3JHIU-FH
Pata Derecha
Pied Droit
*HOJUFS
Encendedor
Allumeur
8IFFM$PWFS
Cubierta de la Rueda
Enjoliveur
-BSHF$POUSPM,OPC
Perilla de Control Grande
Grand Bouton de Commande
)VCDBQ
Tapa del Cubo
Cache-Moyeu
4NBMM$POUSPM,OPC
Perilla de Control Pequeña
Petit Bouton de Commande
8IFFM
Rueda
Roue
%JTQPTBCMF%SJQ1BO
Bandeja de Goteo Desechable
Egouttoir Jetable
"YMF
Eje
Axe
$BUDI1BO
Plato Recolector
Egouttoir
-FGU-FH
Pata Izquierda
Pied Gauche
5BOL4LJSU
Faldón del Tanque
Jupe du Réservoir
WWW.WEBER.COM®
5
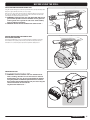
Q320: EXPLODED VIEW, DIAGRAMA DE DESPIECE, VISION ÉCLATÉE
Q320
1
Q320_US_LP_042411
20
2
21
3
4
5
6
22
7
8
9
10
11
23
12
24
13
14
15
16
25
26
27
17
28
29
30
18
31
19
6
Q320: EXPLODED VIEW LIST, LISTA DEL DIAGRAMA DE DESPIECE, LISTE DE LA VISION ÉCLATÉE
4XJOH6Q8PSL4VSGBDF
Superficie de Trabajo Basculante
Plan de Travail Rabattable
5BOL4LJSU
Faldón del Tanque
Jupe du Réservoir
5IFSNPNFUFS"TTFNCMZ
Ensamble del Termómetro
Assemblage du Thermomètre
5BOL#BTF
Base del Tanque
Base du Réservoir
)BOEMF-JHIU"TTFNCMZ
Conjunto de la Lámpara de Asa
Assemblage de l’Eclairage de Poignée
#PUUPN3BDL
Anaquel Inferior
Grille Inférieure
)BOEMF"TTFNCMZ
Ensamble del Asa
Assemblage de la Poignée
-JE
Tapa
Couvercle
$PPLJOH(SBUF
Parrilla de Cocción
Grille de Cuisson
8BSNJOH3BDL
Rejilla de Calentamiento
Grille de Maintien au Chaud
8JSF#SBDF
Abrazadera de Alambre
Fil de Renfort
3FBS$SBEMF
Soporte Posterior
Socle Arrière
0VUTJEF#VSOFS5VCF
Tubo Externo del Quemador
Tube du Brûleur Externe
$PPLCPY
Caja de Cocción
Boîtier de Cuisson
*OTJEF#VSOFS5VCF
Tubo Interno del Quemador
Tube du Brûleur Interne
7BMWFBOE.BOJGPME3FHVMBUPS"TTFNCMZ
Ensamblaje de la Válvula y del Múltiple - Regulador
Assemblage Valve et Collecteur - Régulateur
&MFDUSPEF"TTFNCMZ
Ensamble del Electrodo
Assemblage de l’Electrode
#SJEHF1JFDF
Pieza Puente
Pièce d’Assemblage
'SPOU$SBEMF
Soporte Delantero
Socle Avant
5BOL#SBDLFU"TTFNCMZ
Ensamble del Soporte del Tanque
Assemblage du Support du Réservoir
*HOJUJPO#VUUPO*HOJUJPO.PEVMF
Botón de Encendido/ Módulo de Encendido
Bouton d’Allumage/ Module d’Allumage
3JHIU-FH
Pata Derecha
Pied Droit
-BSHF$POUSPM,OPC
Perilla de Control Grande
Grand Bouton de Commande
8IFFM$PWFS
Cubierta de la Rueda
Enjoliveur
4NBMM$POUSPM,OPC
Perilla de Control Pequeña
Petit Bouton de Commande
)VCDBQ
Tapa del Cubo
Cache-Moyeu
%JTQPTBCMF%SJQ1BO
Bandeja de Goteo Desechable
Egouttoir Jetable
8IFFM
Rueda
Roue
$BUDI1BO
Plato Recolector
Egouttoir
"YMF
Eje
Axe
-FGU-FH
Pata Izquierda
Pied Gauche
WWW.WEBER.COM®
7
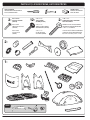
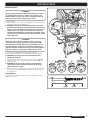
PARTS LIST, LISTA DE PIEZAS, LISTE DES PIÈCES
500-4/&&%&%
HERRAMIENTAS REQUERIDAS:
OUTILS NECESSAIRES:
Q320
8
,9NN
1)*--*144$3&8
#-"$,
800%#-0$,
BLOQUE DE MADERA
BLOC DE BOIS
Y
53644)&"%
4$3&8#-"$,
Y
45"*/-&4445&&-1"/)&"%
1)*--*144$3&8
K50 X 19mm
TORNILLO PHILLIPS
(NEGRO)
¼-20 x 1¼"
TORNILLO DE CABEZA
SEGMENTADA (NEGRO)
TORNILLO PHILLIPS DE CABEZA
ARMADA DE ACERO INOXIDABLE
¼-20 x 1½ PULGADAS
K50 X 19mm
VIS PHILLIPS
(NOIRE)
¼-20 x 1¼"
VIS DE TETE DE
SUPPORT (NOIRE)
VIS PHILLIPS À TÊTE CYLINDRIQUE
LARGE EN ACIER INOXYDABLE DE
0,6 À 50 x 3,81 CM (¼-20 X 1½ PO)
ASSEMBLY, ENSAMBLAJE, ASSEMBLAGE
1
2
WWW.WEBER.COM®
9
ASSEMBLY, ENSAMBLAJE, ASSEMBLAGE
3
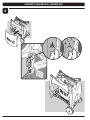
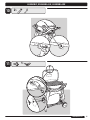
1MBDFXIFFMGSBNFPOUIFSJHIU*HOJUJPOJOTUSVDUJPO
TUJDLFSGBDFTGPSXBSE
&MCBTUJEPSEFMBSVFEBWBBMBEFSFDIB-BFUJRVFUB
EFJOTUSVDDJPOFTEFFODFOEJEPWFIBDJBBEFMBOUF
-FDBESFEFTSPVFTTFQMBDFÆESPJUF-BVUPDPMMBOU
QPVSMFTJOTUSVDUJPOTEBMMVNBHFFTUPSJFOUÊWFST
MBWBOU
4
10
ASSEMBLY, ENSAMBLAJE, ASSEMBLAGE
5
WWW.WEBER.COM®
11
ASSEMBLY, ENSAMBLAJE, ASSEMBLAGE
6
12
ASSEMBLY, ENSAMBLAJE, ASSEMBLAGE
7
WWW.WEBER.COM®
13
ASSEMBLY, ENSAMBLAJE, ASSEMBLAGE
8
9
14
ASSEMBLY, ENSAMBLAJE, ASSEMBLAGE
10
11
WWW.WEBER.COM®
15
ASSEMBLY, ENSAMBLAJE, ASSEMBLAGE
12
13
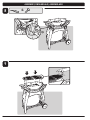
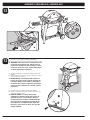
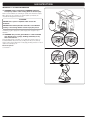
A) Uncoil the hose and regulator of the Weber® Q® 300/320.
B) Remove leg screw then secure hose and retention clip to cart leg.
8"3/*/(5IFIPTFNVTUCFTFDVSFEUPUIFDBSU
MFHCZUIFIPTFSFUFOUJPODMJQ'BJMVSFUPEPTP
DPVMEDBVTFEBNBHFUPIPTFSFTVMUJOHJOBGJSFPS
FYQMPTJPOXIJDIDBODBVTFTFSJPVTCPEJMZJOKVSZ
PSEFBUIBOEEBNBHFUPQSPQFSUZ
A) Desenrolle la manguera y el regulador de la barbacoa Weber® Q®
300/320.
B) Retire el tornillo de la pata y luego asegure la manguera y el clip de
retención a la pata del carro.
"%7&35&/$*"-BNBOHVFSBEFCFTVKFUBSTFB
MBQBUBEFMDBSSPVTBOEPFMDMJQEFSFUFODJÓO&M
OPIBDFSMPQPESÎBDBVTBSEBÒPTBMBNBOHVFSB
PDBTJPOBOEPVOGVFHPPFYQMPTJÓORVFQVFEFO
DBVTBSMFTJPOFTDPSQPSBMFTPMBNVFSUFZEBÒPT
NBUFSJBMFT
A) Déroulez le tuyau et le régulateur du Weber® Q® 300/320.
B) Retirez la vis du pied puis fixez bien le tuyau ainsi que la pince de
rétention au pied du chariot.
.*4&&/("3%&-FUVZBVEPJUËUSFGJYÊ
TPMJEFNFOUBVQJFEEVDIBSJPUQBSMBQJODFEF
SÊUFOUJPOEVUVZBV-FOPOSFTQFDUEFDFUUF
DPOTJHOFQPVSSBJUFOUSBÏOFSMBEÊUÊSJPSBUJPOEV
UVZBVBWFDQPVSDPOTÊRVFODFVOJODFOEJFPV
VOFFYQMPTJPOTVTDFQUJCMFEFQSPWPRVFSEFT
CMFTTVSFTHSBWFTWPJSFVOEÊDÍTBJOTJRVFEFT
EÊHÄUTNBUÊSJFMT
16
1
ASSEMBLY, ENSAMBLAJE, ASSEMBLAGE
14
1
2
3
WWW.WEBER.COM®
17
ASSEMBLY, ENSAMBLAJE, ASSEMBLAGE
15
18
1
2
3
4
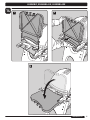
ASSEMBLY, ENSAMBLAJE, ASSEMBLAGE
16 Q320
You may hear a rattle in lightpod. This is normal.
Podría escuchar un traqueteo en la lámpara. Esto es normal.
Vous entendrez peut-être un bruit à l’intérieur de la douille de la lampe.
C’est tout à fait normal.
Q300
WWW.WEBER.COM®
19
ASSEMBLY, ENSAMBLAJE, ASSEMBLAGE
17 Q320
Requires three “AAA” alkaline batteries (not included).
Use alkaline batteries only. Do not mix old and new batteries or different
types of batteries (standard, alkaline or rechargeable). If you do not plan to
use the Grill Out® Handle Light for a month or more, remove the batteries.
Requiere tres pilas alcalinas “AAA” (no están incluidas).
Use solamente pilas alcalinas. No mezcle baterías nuevas con viejas o
diferentes tipos de baterías entre sí (normales, alcalinas o recargables).
Si no piensa utilizar la Lámpara de Asa Grill Out® durante un mes o más,
sáquele las pilas.
Nécessite trois piles alcalines “AAA” (non fournies).
Utilisez des piles alcalines uniquement. Ne mélangez pas des piles
usagées et des piles neuves ou différents types de piles (standards,
alcalines ou rechargeables). Si vous ne prévoyez pas d’utiliser l’Eclairage
de Poignée Grill Out® pendant un mois ou plus, retirez les piles.
1
The Grill Out® Handle Light has a “tilt sensor”:
Lid up - ON / Lid Closed - OFF. The power button activates or
deactivates the “tilt sensor.” For daytime use, deactivate the sensor by
pressing power button .
La Lámpara de Asa Grill Out® cuenta con un “sensor de inclinación.” Tapa
abierta - ENCENDIDA / Tapa cerrada - APAGADA. El botón de encendido
activa o desactiva al “sensor de inclinación.” Para usarse durante el
día, desactive el sensor pulsando el botón de encendido.
L'Eclairage de Poignée Grill Out® est pourvue d’un “détecteur
d’inclinaison” : Couvercle levé - MARCHE / Couvercle fermé - ARRÊTE.
Le bouton de mise sous tension active ou désactive le “détecteur
d’inclinaison.” Pour une utilisation en pleine journée, désactivez le
détecteur en appuyant sur le bouton de mise sous tension.
20
ASSEMBLY, ENSAMBLAJE, ASSEMBLAGE
18 Q320
19 Q320
WWW.WEBER.COM®
21
WARRANTY
Weber-Stephen Products LLC (Weber®) hereby warrants to the ORIGINAL
PURCHASER of this Weber® gas grill that it will be free of defects in material and
workmanship from the date of purchase as follows:
Aluminum Castings
Thermoplastic/Thermoset Parts
5 years,
2 years paint excluding fading or discoloration
5 years excluding fading
Stationary Cart
2 years
All Remaining Parts
2 years
Weber may require reasonable proof of your date of purchase. THEREFORE, YOU
SHOULD RETAIN YOUR SALES RECEIPT OR INVOICE.
This Limited Warranty shall be limited to the repair or replacement of parts that prove
defective under normal use and service and which on examination shall indicate,
to Weber’s satisfaction, they are defective. Before returning any parts, contact the
Customer Service Representative in your region using the contact information sheet
provided with your manual. If Weber confirms the defect and approves the claim, Weber
will elect to replace such parts without charge. If you are required to return defective
parts, transportation charges must be prepaid. Weber will return parts to the purchaser,
freight or postage prepaid.
This Limited Warranty does not cover any failures or operating difficulties due to
accident, abuse, misuse, alteration, misapplication, vandalism, improper installation or
improper maintenance or service, or failure to perform normal and routine maintenance,
including but not limited to damage caused by insects within the burner tubes, as set out
in this Owner’s Guide.
Deterioration or damage due to severe weather conditions such as hail, hurricanes,
earthquakes or tornadoes, discoloration due to exposure to chemicals either directly or
in the atmosphere, is not covered by this Limited Warranty.
There are no other express warrants except as set forth herein and any applicable
implied warranties of merchantability and fitness are limited in duration to the period of
coverage of this express written Limited Warranty. Some regions do not allow limitation
on how long an implied warranty lasts, so this limitation may not apply to you.
Weber is not liable for any special, indirect or consequential damages. Some regions
do not allow the exclusion or limitation of incidental or consequential damages, so this
limitation or exclusion may not apply to you.
Weber does not authorize any person or company to assume for it any other obligation
or liability in connection with the sale, installation, use, removal, return, or replacement
of its equipment; and no such representations are binding on Weber®.
This Warranty applies only to products sold at retail.
8&#&345&1)&/130%6$54--$
$VTUPNFS4FSWJDF$FOUFS
3PTFMMF3PBE4VJUF
4DIBVNCVSH*-64"
*OPSEFSUPWBMJEBUFZPVSXBSSBOUZQMFBTFSFHJTUFSZPVSHSJMMPOMJOF
7JTJUXXXXFCFSDPN®X
GENERAL INSTRUCTIONS
Your Weber® gas barbecue is a portable outdoor cooking appliance. With the Weber®
gas barbecue you can grill, barbecue, roast and bake with results that are difficult to
duplicate with indoor kitchen appliances. The Weber® gas barbecue is portable so you
can easily change its location in your yard or on your patio. Portability means you can
take your Weber® gas barbecue with, if you move.
Liquid Propane (LP) gas supply is easy to use and gives you more cooking control than
charcoal fuel.
r 5IFTFJOTUSVDUJPOTXJMMHJWFZPVUIFNJOJNVNSFRVJSFNFOUTGPSBTTFNCMJOHZPVS
Weber® gas barbecue. Please read the instructions carefully before using your
Weber® gas barbecue. Improper assembly can be dangerous.
r /PUGPSVTFCZDIJMESFO
r *GUIFSFBSFMPDBMDPEFTUIBUBQQMZUPQPSUBCMFHBTHSJMMTZPVXJMMIBWFUPDPOGPSNUP
them. Installation must conform with local codes or, in the absence of local codes,
with either the National Fuel Gas Code, ANSI Z223.1/NFPA 54, Natural Gas and
Propane Installation Code, CSA B149.1, or Propane Storage and Handling Code,
B149.2, or the Standard for Recreational Vehicles, ANSI A 119.2/NFPA 1192, and
CSA Z240 RV Series, Recreational Vehicle Code, as applicable.
r 5IFQSFTTVSFSFHVMBUPSTVQQMJFEXJUIUIF8FCFS® gas barbecue must be used. This
regulator is set for 11 inches of water column (pressure).
r 5IJT8FCFS® gas barbecue is designed for use with liquid propane (LP) gas only. Do
not use with natural (piped in city) gas. The valves, orifices, hose and regulator are for
LP gas only.
r %POPUVTFXJUIDIBSDPBMGVFM
r $IFDLUIBUUIFBSFBVOEFSUIFDPPLCPYBOEUIFDBUDIQBOBSFGSFFGSPNEFCSJTUIBU
might obstruct the flow of combustion or ventilation air.
r 5IFBSFBTBSPVOEUIF-1DZMJOEFSNVTUCFGSFFBOEDMFBSGSPNEFCSJT
r 3FQMBDFNFOUQSFTTVSFSFHVMBUPSTBOEIPTFBTTFNCMJFTNVTUCFUIPTFTQFDJGJFECZ
Weber-Stephen Products LLC.
FOR INSTALLATION IN CANADA
These instructions, while generally acceptable, do not necessarily comply with the
Canadian Installation codes, particularly with piping above and below ground. In
Canada, the installation of this appliance must comply with local codes and/or Standard
CSA-B149.2 (Propane Storage and Handling Code). X
01&3"5*/(
8"3/*/(0OMZVTFUIJTCBSCFDVFPVUEPPSTJOBXFMM
WFOUJMBUFEBSFB%POPUVTFJOBHBSBHFCVJMEJOHCSFF[FXBZ
PSBOZPUIFSFODMPTFEBSFB
8"3/*/(,FFQWFOUJMBUJPOPQFOJOHTGPSDZMJOEFSFODMPTVSF
GSFFBOEDMFBSGSPNEFCSJT
8"3/*/(:PVS8FCFS®HBTCBSCFDVFTIBMMOPUCFVTFE
VOEFSPWFSIFBEDPNCVTUJCMFDPOTUSVDUJPO
8"3/*/(:PVS8FCFS®HBTCBSCFDVFJTOPUJOUFOEFEUPCF
JOTUBMMFEJOPSPOSFDSFBUJPOBMWFIJDMFTBOEPSCPBUT
22
8"3/*/(%POPUVTFUIFCBSCFDVFXJUIJOJODIFTPG
DPNCVTUJCMFNBUFSJBMT
8"3/*/(5IFFOUJSFDPPLCPYHFUTIPUXIFOJOVTF%POPU
MFBWFVOBUUFOEFE
8"3/*/(,FFQBOZFMFDUSJDBMTVQQMZDPSEBOEUIFGVFM
TVQQMZIPTFBXBZGSPNBOZIFBUFETVSGBDF
8"3/*/(,FFQUIFDPPLJOHBSFBDMFBSPGGMBNNBCMFWBQPST
BOEMJRVJETTVDIBTHBTPMJOFBMDPIPMFUDBOEDPNCVTUJCMF
NBUFSJBMT
8"3/*/(/FWFSTUPSFBOFYUSBTQBSF
-1DZMJOEFSVOEFSPS
OFBSUIF8FCFS®HBTCBSCFDVF
8"3/*/(5IF-1DZMJOEFSVTFEXJUIZPVSCBSCFDVFNVTU
CFXJUIBMJTUFE01%0WFSGJMMJOH1SFWFOUJPO%FWJDF
BOE
B2$$PS5ZQF$("
DZMJOEFSDPOOFDUJPO5IF
DZMJOEFSDPOOFDUJPONVTUCFDPNQBUJCMFXJUIUIFCBSCFDVF
DPOOFDUJPOX
4503"(&"/%03/0/64&
r 5IFHBTNVTUCFUVSOFEPGGBUUIFMJRVJEQSPQBOFDZMJOEFSXIFOUIF8FCFS® gas
barbecue is not in use.
r 8IFOUIF8FCFS® gas barbecue is stored indoors, the gas supply must be
DISCONNECTED and the LP cylinder stored outdoors in a well-ventilated space.
r -1DZMJOEFSNVTUCFTUPSFEPVUEPPSTJOBXFMMWFOUJMBUFEBSFBPVUPGSFBDIPGDIJMESFO
Disconnected LP cylinder must not be stored in a building, garage or any other
enclosed area.
r 8IFOUIF-1DZMJOEFSJTOPUEJTDPOOFDUFEGSPNUIF8FCFS® gas barbecue, the
appliance and LP tank must be kept outdoors in a well-ventilated space.
r 5IF8FCFS® gas barbecue should be checked for gas leaks and any obstructions in
the burner tubes before using. (Refer to “IGNITION” and “MAINTENANCE.”)
r $IFDLUIBUUIFBSFBTVOEFSUIFDPOUSPMQBOFMBOEUIFDBUDIQBOBSFGSFFGSPNEFCSJT
that might obstruct the flow of combustion or ventilation air.
r 5IFTQJEFSJOTFDUTDSFFOTTIPVMEBMTPCFDIFDLFEGPSBOZPCTUSVDUJPOT3FGFSUP
“MAINTENANCE.”) X
GAS INSTRUCTIONS
4"'&)"/%-*/(5*14'03-*26*%1301"/&("4$:-*/%&34
r -JRVJE1SPQBOF-1
HBTJTBQFUSPMFVNQSPEVDUBTBSFHBTPMJOFBOEOBUVSBMHBT-1
gas is a gas at regular temperatures and pressures. Under moderate pressure, inside
a cylinder, LP gas is a liquid. As the pressure is released, the liquid readily vaporizes
and becomes gas.
r -1HBTIBTBOPEPSTJNJMBSUPOBUVSBMHBT:PVTIPVMECFBXBSFPGUIJTPEPS
r -1HBTJTIFBWJFSUIBOBJS-FBLJOH-1HBTNBZDPMMFDUJOMPXBSFBTBOEQSFWFOU
dispersion.
r 5PGJMMUBLFUIF-1DZMJOEFSUPBHBTQSPQBOFEFBMFSPSMPPLVQiHBTQSPQBOFuJOUIF
phone book for other sources of LP gas.
8"3/*/(8FSFDPNNFOEUIBUZPVS-1DZMJOEFSCFGJMMFE
BUBOBVUIPSJ[FE-1HBTEFBMFSCZBRVBMJGJFEBUUFOEBOU
XIPGJMMTUIFUBOLCZXFJHIU*.1301&3'*--*/(*4
%"/(&3064
r "JSNVTUCFSFNPWFEGSPNBOFX-1DZMJOEFSCFGPSFUIFJOJUJBMGJMMJOH:PVS-1EFBMFSJT
equipped to do this.
r 5IF-1DZMJOEFSNVTUCFJOTUBMMFEUSBOTQPSUFEBOETUPSFEJOBOVQSJHIUQPTJUJPO-1
cylinders should not be dropped or handled roughly.
r /FWFSTUPSFPSUSBOTQPSUUIF-1DZMJOEFSXIFSFUFNQFSBUVSFTDBOSFBDI'UPP
hot to hold by hand. (For example: do not leave the LP cylinder in a car on a hot day.)
Note: A refill will last about 18–20 hours of cooking time at normal use. You do not have
to run out before you refill.
r 5SFBUiFNQUZu-1DZMJOEFSTXJUIUIFTBNFDBSFBTXIFOGVMM&WFOXIFOUIF-1UBOL
is empty of liquid, there still may be gas pressure in the cylinder. Always close the
cylinder valve before disconnecting.
$"65*0/1MBDFEVTUDBQPODZMJOEFSWBMWFPVUMFUXIFOFWFS
UIFDZMJOEFSJTOPUJOVTF0OMZJOTUBMMUIFUZQFPGEVTUDBQ
POUIFDZMJOEFSWBMWFPVUMFUUIBUJTQSPWJEFEXJUIUIFDZMJOEFS
WBMWF0UIFSUZQFTPGDBQTPSQMVHTNBZSFTVMUJOMFBLBHFPG
QSPQBOF
r %POPUVTFBEBNBHFE-1DZMJOEFS"EFOUFEPSSVTUZ-1DZMJOEFSPSBO-1DZMJOEFS
with a damaged valve may be hazardous and should be replaced with a new one
immediately.
-JRVJE1SPQBOF-1
$ZMJOEFST
r 5IFKPJOUXIFSFUIFIPTFDPOOFDUTUPUIF-1DZMJOEFSNVTUCFMFBLUFTUFEFBDIUJNF
the LP cylinder is reconnected. For example, test each time the LP cylinder is refilled.
r #FTVSFUIFSFHVMBUPSJTNPVOUFEXJUIUIFTNBMMWFOUIPMFQPJOUFEEPXOXBSETPUIBUJU
will not collect water. This vent should be free of dirt, grease, bugs, etc.
r 5IFHBTDPOOFDUJPOTTVQQMJFEXJUIZPVS8FCFS® gas barbecue have been designed
and tested to meet 100% CSA and ANSI requirements.
8"3/*/(3FQMBDFNFOU-1UBOLTNVTUNBUDIUIFSFHVMBUPS
DPOOFDUJPOTVQQMJFEXJUIUIJTCBSCFDVF
-JRVJE1SPQBOF$ZMJOEFS3FRVJSFNFOUT
r $IFDLUPCFTVSFUIBUDZMJOEFSTIBWFB%05DFSUJGJDBUJPO
, and that the date
tested is within five years. Your LP gas supplier can do this for you.
r "MM-1UBOLTVQQMZTZTUFNTNVTUJODMVEFBDPMMBSUPQSPUFDUUIFDZMJOEFSWBMWF
r 5IF-1DZMJOEFSNVTUCFBMCTJ[FBQQSPYJNBUFMZJODIFTIJHIBOEJODIFT
in diameter.
r 5IFDZMJOEFSTIPVMECFDPOTUSVDUFEBOENBSLFEJOBDDPSEBODFXJUIUIF4QFDJGJDBUJPOT
for LP - Gas Cylinders of the U.S. Department of Transportation (D.O.T.) or the
National Standard of Canada, CAN/CSA-B339, Cylinders, Spheres and Tubes or
Transportation of Dangerous Goods; and Commission, as applicable.
$BOBEJBO-JRVJE1SPQBOF$ZMJOEFS3FRVJSFNFOUT
Note: Your retailer can help you match a replacement tank to your barbecue.
r 5IF-1DZMJOEFSNVTUCFDPOTUSVDUFEBOENBSLFEJOBDDPSEBODFXJUIUIF
specifications for LP gas cylinders, T.C. X
WWW.WEBER.COM®
23
GAS INSTRUCTIONS
*.1035"/5-1$:-*/%&3*/'03."5*0/
8"3/*/('BJMVSFUPGPMMPXUIFTF%"/(&3TUBUFNFOUT
FYBDUMZNBZSFTVMUJOBGJSFDBVTJOHEFBUIPSTFSJPVTJOKVSZ
Weber recommends Manchester or Worthington cylinders with a 47.6 lb water capacity.
Other cylinders may be acceptable for use with the appliance provided they are
compatible with the appliance retention means.
%"/(&3
/&7&3TUPSFBTQBSF-1$ZMJOEFSVOEFSPSOFBSUIJT
CBSCFDVF
/&7&3GJMMUIFUBOLCFZPOEGVMM*GUIJTJTOPUGPMMPXFE
FYBDUMZBGJSFDBVTJOHEFBUIPSTFSJPVTJOKVSZNBZPDDVS
Your Weber® gas grill is equipped for a cylinder supply system designed for vapor
withdrawal.
8"3/*/(0OMZVTFUIJTHSJMMPVUEPPSTJOBXFMMWFOUJMBUFE
BSFB%POPUVTFJOBHBSBHFCVJMEJOHCSFF[FXBZPSBOZ
PUIFSFODMPTFEBSFB
The proper filling methods for the filling of your cylinder are by weight or volume, as
described in NFPA 58. Please make sure your filling station fills your LP cylinder by
weight or volume. Ask your filling station to read purging and filling instructions on the LP
cylinder before attempting to fill.
.PVOU5IF$ZMJOEFS
See illustration. X
24
GAS INSTRUCTIONS
-*26*%1301"/&$:-*/%&3$0//&$5*0/
8"3/*/(.BLFTVSFUIBUUIF-1DZMJOEFSWBMWFJTDMPTFE
$MPTFCZUVSOJOHWBMWFDMPDLXJTFX
)04&50$:-*/%&3$0//&$5*0/
8"3/*/(5IFIPTFNVTUCFTFDVSFEUPUIFDBSUMFHCZUIF
IPTFSFUFOUJPODMJQ
'BJMVSFUPEPTPDPVMEDBVTFEBNBHF
UPIPTFSFTVMUJOHJOBGJSFPSFYQMPTJPOXIJDIDBODBVTF
TFSJPVTCPEJMZJOKVSZPSEFBUIBOEEBNBHFUPQSPQFSUZ
A) Remove the plastic dust cover from the tank valve.
B) Screw the hose coupling onto the tank valve, turning clockwise, or to the right .
Hand-tighten only.
Note: This is a new type of connection. It tightens clockwise and will not allow gas to
flow unless the connection is tight. The connection requires tightening by hand only.
8"3/*/(%POPUVTFBXSFODIUPUJHIUFOUIFDPOOFDUJPO
6TJOHBXSFODIDPVMEEBNBHFUIFSFHVMBUPSDPVQMJOHBOE
DPVMEDBVTFBMFBLX
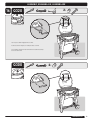
$)&$,'03("4-&",4
$IFDLUIBUUIF#VSOFS7BMWFTBSF0GG
To turn the burner valves off, push both control knobs in and turn clockwise. When knobs
cannot be turned further, confirm that they are both set to the OFF position. Proceed to
the next step.
1
8"3/*/(:PVTIPVMEDIFDLGPSHBTMFBLTFWFSZUJNFZPV
EJTDPOOFDUBOESFDPOOFDUBHBTGJUUJOH
8"3/*/(1FSGPSNUIFTFMFBLDIFDLTFWFOJGZPVSCBSCFDVF
XBTEFBMFSPSTUPSFBTTFNCMFE
8"3/*/(%POPUJHOJUFCVSOFSTXIFOMFBLDIFDLJOH
%"/(&3
%POPUVTFBOPQFOGMBNFUPDIFDLGPSHBTMFBLT#FTVSF
UIFSFBSFOPTQBSLTPSPQFOGMBNFTJOUIFBSFBXIJMFZPV
DIFDLGPSMFBLT4QBSLTPSPQFOGMBNFTXJMMSFTVMUJOBGJSFPS
FYQMPTJPOXIJDIDBODBVTFTFSJPVTCPEJMZJOKVSZPSEFBUI
BOEEBNBHFUPQSPQFSUZ
2
A) Mix soap and water.
B) Turn on the cylinder valve by turning cylinder valve handwheel counter-clockwise .
C) Check for leaks by wetting the fittings with the soap and water solution and watching
for bubbles. If bubbles form, or if a bubble grows, there is a leak.
8"3/*/(*GUIFSFJTBMFBLUVSOPGGUIFHBTBOEUJHIUFOUIF
GJUUJOHT5VSOUIFHBTCBDLPOBOESFDIFDLXJUIUIFTPBQBOE
XBUFSTPMVUJPO*GMFBLEPFTOPUTUPQ$POUBDUUIF$VTUPNFS
4FSWJDF3FQSFTFOUBUJWFJOZPVSBSFBVTJOHUIFDPOUBDU
JOGPSNBUJPOPOPVSXFCTJUF-PHPOUPXXXXFCFSDPN®
%POPUVTFUIFCBSCFDVF
3
WWW.WEBER.COM®
25
GAS INSTRUCTIONS
$IFDL
A) Valve to regulator hose connection .
B) Valve to outside burner gas line connection .
C) Valve to inside burner gas line connection .
2
8"3/*/(*GUIFSFJTBMFBLBUDPOOFDUJPOPS
UVSO
0''UIFHBT%0/0501&3"5&5)&(3*--$POUBDUUIF
$VTUPNFS4FSWJDF3FQSFTFOUBUJWFJOZPVSBSFBVTJOHUIF
DPOUBDUJOGPSNBUJPOPOPVSXFCTJUF-PHPOUP
XXXXFCFSDPN®
D) Hose to regulator connection .
E) Regulator to propane cylinder connection .
1
8"3/*/(*GUIFSFJTBMFBLBUDPOOFDUJPOPS
SFNPWF
QSPQBOFDZMJOEFS%POPUPQFSBUFHSJMM6TFBEJGGFSFOU
QSPQBOFDZMJOEFSBOESFDIFDLGPSMFBLTXJUITPBQBOEXBUFS
TPMVUJPO*GBMFBLQFSTJTUTBGUFSSFUJHIUFOJOHUIFQSPQBOF
DZMJOEFSUVSO0''UIFHBT%0/0501&3"5&5)&(3*--
$POUBDUUIF$VTUPNFS4FSWJDF3FQSFTFOUBUJWFJOZPVSBSFB
VTJOHUIFDPOUBDUJOGPSNBUJPOPOPVSXFCTJUF-PHPOUP
XXXXFCFSDPN®
3
F) When leak checking is complete, turn gas supply OFF at the source and rinse
connections with water.
Note: Since some leak test solutions, including soap and water, may be slightly
corrosive, all connections should be rinsed with water after checking for leaks. X
4
5
3&'*--*/(5)&-*26*%1301"/&$:-*/%&3
We recommend that you refill the LP cylinder before it is completely empty.
The proper filling methods for the filling of your cylinder are by weight or volume, as
described in NFPA 58. Please make sure your filling station fills your LP cylinder by
weight or volume. Ask your filling station to read purging and filling instructions on the LP
cylinder before attempting to fill.
3FNPWBMPGUIF-1$ZMJOEFS
A)
B)
C)
D)
Close cylinder valve (turn cylinder valve handwheel clockwise) .
Unscrew regulator by turning counterclockwise, by hand only .
Remove LP cylinder from tank bracket by rotating cylinder.
Lift cylinder off tank base.
To refill, take LP cylinder to a gas propane dealer.
8"3/*/(8FSFDPNNFOEUIBUZPVS-1DZMJOEFSCFGJMMFE
BUBOBVUIPSJ[FE-1HBTEFBMFSCZBRVBMJGJFEBUUFOEBOU
XIPGJMMTUIFDZMJOEFSCZXFJHIU*.1301&3'*--*/(*4
%"/(&3064
$"65*0/1MBDFEVTUDBQPODZMJOEFSWBMWFPVUMFUXIFOFWFS
UIFDZMJOEFSJTOPUJOVTF0OMZJOTUBMMUIFUZQFPGEVTUDBQ
POUIFDZMJOEFSWBMWFPVUMFUUIBUJTQSPWJEFEXJUIUIFDZMJOEFS
WBMWF0UIFSUZQFTPGDBQTPSQMVHTNBZSFTVMUJOMFBLBHFPG
QSPQBOFX
26
1
2
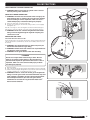
BEFORE USING THE GRILL
$"5$)1"/"/%%*4104"#-&%3*11"/
Your grill was built with a grease collection system. Check the catch pan and disposable
drip pan for grease build-up each time you use your grill.
Remove excess grease with a plastic spatula; see illustration. When necessary, wash
the catch pan and drip pan with a soap and water solution, and then rinse with clean
water. Replace the disposable drip pan as needed.
8"3/*/($IFDLUIFDBUDIQBOBOEEJTQPTBCMFESJQQBOGPS
HSFBTFCVJMEVQCFGPSFFBDIVTF3FNPWFFYDFTTHSFBTFUP
BWPJEBHSFBTFGJSF"HSFBTFGJSFDBODBVTFTFSJPVTCPEJMZ
JOKVSZPSEBNBHFUPQSPQFSUZ
$"65*0/%POPUMJOFUIFDPPLCPYXJUIBMVNJOVNGPJMX
*(/*5&3*/41&$5*0/'03.0%&-48*5)
&-&$530/*$*(/*5*0/
Verify that your AAA battery is in good condition and that it is installed correctly .
Some batteries have a plastic protective wrap around them. This plastic must be
removed. Do not confuse this plastic protective wrap with the battery label. X
1
)04&*/41&$5*0/
The hose should be inspected for any signs of cracking.
8"3/*/($IFDLIPTFCFGPSFFBDIVTFPGCBSCFDVFGPS
OJDLTDSBDLJOHBCSBTJPOTPSDVUT*GUIFIPTFJTGPVOEUP
CFEBNBHFEJOBOZXBZEPOPUVTFUIFCBSCFDVF3FQMBDF
VTJOHPOMZ8FCFS®BVUIPSJ[FESFQMBDFNFOUIPTF$POUBDU
UIF$VTUPNFS4FSWJDF3FQSFTFOUBUJWFJOZPVSBSFBVTJOHUIF
DPOUBDUJOGPSNBUJPOPOPVSXFCTJUF
-PHPOUPXXXXFCFSDPN®X
WWW.WEBER.COM®
27
IGNITION & USAGE
*(/*5*0/
Note: Summary ignition instructions are posted on the cart leg under the control knobs.
%"/(&3
'BJMVSFUPPQFOUIFMJEXIJMFJHOJUJOHUIFCBSCFDVFTCVSOFST
PSOPUXBJUJOHGJWFNJOVUFTUPBMMPXUIFHBTUPDMFBSJGUIF
CBSCFDVFEPFTOPUMJHIUNBZSFTVMUJOBOFYQMPTJWFGMBSFVQ
XIJDIDBODBVTFTFSJPVTCPEJMZJOKVSZPSEFBUI
5
1
7
6
Note : The ignition system ignites the burners with a spark from the igniter electrode
inside the ignition chamber. You generate the energy for the spark by pushing the
ignition button until it clicks.
5
6
A) Open the lid .
B) Make sure all burner control knobs are turned OFF . (Push each knob in and turn
clockwise to ensure it is in the OFF position.)
8"3/*/(5IFCVSOFSDPOUSPMLOPCTNVTUCFJOUIF0''
QPTJUJPOCFGPSFUVSOJOHPOUIFMJRVJEQSPQBOFDZMJOEFSWBMWF
*GUIFZBSFOPUJOUIF0''QPTJUJPOXIFOZPVUVSOPOUIF-1
DZMJOEFSWBMWFUIFiFYDFTTHBTGMPXDPOUSPMuGFBUVSFXJMM
BDUJWBUFMJNJUJOHUIFGMPXPGHBTGSPNUIF-1DZMJOEFS*GUIJT
TIPVMEPDDVSUVSO0''UIF-1UBOLWBMWFBOECVSOFSDPOUSPM
LOPCT4UBSUPWFS
33
4
%"/(&3
8
2
8IFOUIFiFYDFTTHBTGMPXDPOUSPMuGFBUVSFJTBDUJWBUFE
BTNBMMBNPVOUPGHBTJTTUJMMGMPXJOHUPUIFCVSOFST"GUFS
UVSOJOH0''UIFDZMJOEFSBOECVSOFSDPOUSPMLOPCTXBJUBU
MFBTUGJWFNJOVUFTGPSUIFHBTUPDMFBSCFGPSFBUUFNQUJOHUP
MJHIUUIFCBSCFDVF'BJMVSFUPEPTPNBZSFTVMUJOBOFYQMPTJWF
GMBNFVQXIJDIDBODBVTFTFSJPVTCPEJMZJOKVSZPSEFBUI
C) Turn the gas on by turning the cylinder valve counterclockwise .
8"3/*/(%POPUMFBOPWFSUIFPQFOCBSCFDVFXIFO
JHOJUJOHUIFCBSCFDVF
D) Push in the large control knob for the outside burner and turn it to START/HI .
E1) Q300 with push-button ignition: Push the ignition button, so that it clicks and ignites
the burner . Repeat if necessary.
OR
E2) Q320 with electronic ignition: Push the ignition button . You will hear it click
continually until burner ignites.
F) Check that the burner is lit by looking down through the cooking grate . You
should see a flame.
8"3/*/(*GUIFCVSOFSEPFTOPUMJHIUUVSOUIFCVSOFS
DPOUSPMLOPCUP0''BOEXBJUGJWFNJOVUFTUPMFUUIFHBT
DMFBSCFGPSFZPVUSZBHBJOPSUSZUPMJHIUXJUIBNBUDI
G) After the outside burner is lit, you can turn on the inside burner. Push in the small
control knob and turn it to START/HI . The inside burner will then be ignited by
the outside burner. X
50&95*/(6*4)
Push in and turn each burner control knob clockwise to the OFF position. Turn gas
supply OFF at the source. X
28
0''
45"35)*
.&%*6.
-08
IGNITION & USAGE
."/6"-*(/*5*0/
%"/(&3
'BJMVSFUPPQFOUIFMJEXIJMFJHOJUJOHUIFCBSCFDVFTCVSOFST
PSOPUXBJUJOHGJWFNJOVUFTUPBMMPXUIFHBTUPDMFBSJGUIF
CBSCFDVFEPFTOPUMJHIUNBZSFTVMUJOBOFYQMPTJWFGMBSFVQ
XIJDIDBODBVTFTFSJPVTCPEJMZJOKVSZPSEFBUI
A) Open the lid .
B) Make sure all burner control knobs are turned OFF . (Push each knob in and turn
it clockwise to ensure it is in the OFF position.)
8"3/*/(5IFCVSOFSDPOUSPMLOPCTNVTUCFJOUIF0''
QPTJUJPOCFGPSFUVSOJOHPOUIFMJRVJEQSPQBOFDZMJOEFSWBMWF
*GUIFZBSFOPUJOUIF0''QPTJUJPOXIFOZPVUVSOPOUIF-1
DZMJOEFSWBMWFUIFiFYDFTTHBTGMPXDPOUSPMuGFBUVSFXJMM
BDUJWBUFMJNJUJOHUIFGMPXPGHBTGSPNUIF-1DZMJOEFS*GUIJT
TIPVMEPDDVSUVSO0''UIF-1UBOLWBMWFBOECVSOFSDPOUSPM
LOPCT4UBSUPWFS
4
4
6
1
%"/(&3
8IFOUIFiFYDFTTHBTGMPXDPOUSPMuGFBUVSFJTBDUJWBUFE
BTNBMMBNPVOUPGHBTJTTUJMMGMPXJOHUPUIFCVSOFST"GUFS
UVSOJOH0''UIFDZMJOEFSBOECVSOFSDPOUSPMLOPCTXBJUBU
MFBTUGJWFNJOVUFTGPSUIFHBTUPDMFBSCFGPSFBUUFNQUJOHUP
MJHIUUIFCBSCFDVF'BJMVSFUPEPTPNBZSFTVMUJOBOFYQMPTJWF
GMBNFVQXIJDIDBODBVTFTFSJPVTCPEJMZJOKVSZPSEFBUI
3
C) Turn the gas on by turning the cylinder valve counterclockwise .
D) Strike a match and put the flame into the matchlight hole under the igniter .
8"3/*/(%POPUMFBOPWFSUIFPQFOCBSCFDVFXIFO
JHOJUJOHUIFCBSCFDVF
5
E) Push in the large control knob for the outside burner and turn it to START/HI .
F) Check that the burner is lit by looking down through the cooking grate . You
should see a flame.
7
2
8"3/*/(*GUIFCVSOFSEPFTOPUMJHIUUVSOUIFCVSOFS
DPOUSPMLOPCUP0''BOEXBJUGJWFNJOVUFTUPMFUUIFHBT
DMFBSCFGPSFZPVUSZBHBJO
G) After the outside burner is lit, you can turn on the inside burner. Push in the small
control knob and turn it to START/HI . The inside burner will then be ignited by
the outside burner. X
50&95*/(6*4)
Push in and turn each burner control knob clockwise to the OFF position. Turn gas
supply OFF at the source. X
0''
45"35)*
.&%*6.
-08
WWW.WEBER.COM®
29
GRILLING TIPS & HELPFUL HINTS
13&)&"5*/(5)&#"3#&$6&
Your Weber® gas barbecue is an energy-efficient appliance. It operates at an economical
low BTU rate. Preheating the grill before grilling is important. Light your gas grill
according to the instructions in this Owner’s Guide. To preheat: after lighting, turn all
burners to START/HI, close the lid, and heat until the temperature reaches between
BOE'BOE$
UIFSFDPNNFOEFECSPJMJOHUFNQFSBUVSF5IJTXJMM
take 10 to 15 minutes depending on conditions such as air temperature and wind.
COOKING METHOD
AND USES
INSIDE BURNER
CONTROL SETTING
OUTSIDE BURNER
CONTROL SETTING
)*
)*
-08
-08
)*
)*
-08
-08
0''
.&%*6.
PREHEAT
Note: For the first few uses of your grill, the temperature inside the cookbox may be
hotter than shown in your cookbook because the surfaces of the cookbox are still
reflective. Cooking conditions, such as wind and weather, may require the adjustment of
burner controls to obtain the correct cooking temperatures.
*GCVSOFSTHPPVUEVSJOHDPPLJOHPQFOUIFMJEUVSOPGGUIFCVSOFST
BOEXBJUGJWF
NJOVUFTCFGPSFSFMJHIUJOH
8"3/*/(%POPUNPWFUIF8FCFS®HBTCBSCFDVFXIFO
PQFSBUJOHPSXIJMFUIFCBSCFDVFJTIPUX
$00,*/(.&5)0%4
DIRECT LOW
Chicken pieces,
sausage
The most important thing to know about grilling is which cooking method to use for a
specific food, direct or indirect. The difference is simple. With the direct method, which
is similar to broiling, the food is cooked directly over the fire. With the indirect method,
fire is arranged on either side of the food. The indirect method is similar to roasting, but
with the added benefits of that grilled texture, flavor, and appearance you can't get from
DPPLJOHXJUIBOPWFO6TJOHUIFSJHIUNFUIPEJTUIFTIPSUFTUSPVUFUPHSFBUSFTVMUTBOE
the best way to ensure doneness safety.
SEARING
8JUIFBDINFUIPEZPVDBOBEKVTUUIFCVSOFSTBTEFTJSFE5IFDPOUSPMTFUUJOHT)*
.&%*6.-08PS0''BSFEFTDSJCFEJOUIFDIBSUUPUIFSJHIU'PSFYBNQMFUPTFBS
steaks, set both burners to HI, then to complete cooking, set both burners to LOW. For
more ideas, refer to the recipes in the grilling guide included with this barbecue.
Start by searing
thick steaks over
direct high heat...
Steak and items
that need searing
Note: Cooking conditions, such as wind and weather, may require the adjustment of
burner controls to obtain the correct cooking temperatures. X
(3*--*/(#"4*$4
A light coating of oil will help brown your food evenly and keep it from sticking to the
cooking grate. Always brush or spray oil onto your food, not directly onto the cooking
grate.
...finish by cooking over
direct low heat
We suggest that you barbecue with the lid down. Why? Because it reduces the chance
of flare-ups, and cooks your food faster and more evenly.
When using a marinade, sauce or glaze with a high sugar content, or other ingredients
that burn easily, only brush it onto the food during the last ten to fifteen minutes of
barbecuing.
INDIRECT
Small whole chicken
Don’t forget to regularly brush off your cooking grate and clean out the drip pan under
the barbecue.
'PSNPSFCBSCFDVJOHUJQTBOESFDJQFTWJTJUXXXXFCFSDPN®X
30
TROUBLESHOOTING
PROBLEM
CHECK
SOLUTION
#VSOFSTCVSOXJUIBZFMMPXPSPSBOHFGMBNFJO
DPOKVODUJPOXJUIUIFTNFMMPGHBT
Inspect spider / insect screens for possible obstructions
(blockage of holes).
Clean spider/insect screens. Refer to “ANNUAL
MAINTENANCE.”
4ZNQUPNT
The excess flow safety device, which is part of the
barbecue to cylinder connection, may have been
activated.
To reset the excess flow safety device, close the LP
tank valve and turn all burner control knobs to the OFF
position. Open the grill lid. Slowly turn the LP tank valve
until it is completely open. Wait at least one minute; then
ignite your grill. Refer to “IGNITION.”
#VSOFSTEPOPUJHOJUF03CVSOFSTIBWFBTNBMM
GMJDLFSJOHGMBNFJOUIF)*QPTJUJPO03CBSCFDVF
UFNQFSBUVSFPOMZSFBDIFTUPJOUIF)*
QPTJUJPO
#VSOFSEPFTOPUMJHIU03GMBNFJTMPXJO)*QPTJUJPO
Is LP fuel low or empty?
Refill LP cylinder.
Is fuel hose bent or kinked?
Straighten fuel hose.
Does the outside burner light with a match?
If you can light the outside burner with a match, then
check the ignition system.
Be sure that there is gas flow to the burners by
attempting to match light your burners. Refer to
“MANUAL IGNITION.”
If match lighting is successful, the problem lies in the
ignition system. Refer to “MAINTENANCE.”
Is there is a fresh battery installed?
Verify that the battery is in good condition and installed
correctly. Refer to “BEFORE USING THE BARBECUE.”
Are the wires connected properly to the ignition module?
Be sure that wires are correctly inserted into terminals on
ignition module. Refer to “MAINTENANCE.”
Is there plastic wrapping around the new battery?
Remove plastic wrapping.
Is burner tube positioned too far away from the igniter
electrode?
Check that the burner tube is positioned correctly to the
igniter electrode. Refer to “MAINTENANCE.”
&YQFSJFODJOHGMBSFVQT
Are you preheating barbecue in the prescribed manner?
All burners on HI for 10 to 15 minutes for preheating.
$"65*0/%POPUMJOFUIFDPPLCPY
XJUIBMVNJOVNGPJM
Are the cooking grates heavily coated with burned-on
grease?
Clean thoroughly. Refer to “CLEANING.”
Is the cookbox dirty and not allowing grease to flow into
catch pan?
Clean cookbox.
#VSOFSGMBNFQBUUFSOJTFSSBUJD03GMBNFJTMPXXIFO
CVSOFSJTPO)*03GMBNFTEPOPUSVOUIFXIPMF
MFOHUIPGUIFCVSOFSUVCF
Are burners clean?
Clean burners. Refer to “MAINTENANCE.”
*OTJEFPGMJEBQQFBSTUPCFiQFFMJOHuSFTFNCMFTQBJOU
QFFMJOH
The inside of the lid is cast aluminum and is not painted.
It cannot “peel.” What you are seeing is baked-on grease
that has turned to carbon and is flaking off.
Clean thoroughly. Refer to “CLEANING.”
#VSOFSEPFTOPUJHOJUFXIFOZPVQVTIUIFJHOJUJPO
CVUUPO
5)*4*4/05"%&'&$5
*GQSPCMFNTDBOOPUCFDPSSFDUFECZVTJOHUIFTFNFUIPETQMFBTFDPOUBDUUIF$VTUPNFS4FSWJDF3FQSFTFOUBUJWFJOZPVSBSFBVTJOHUIFDPOUBDUJOGPSNBUJPOPOPVS
XFCTJUF-PHPOUPXXXXFCFSDPN®
HANDLE LIGHT TROUBLESHOOTING (Q320)
PROBLEM
(SJMM0VU )BOEMF-JHIUEPFTOPUMJHIU
®
CHECK
SOLUTION
Are the batteries old?
Replace batteries.
Are the batteries installed correctly?
Refer to assembly illustration.
Is the lid in the up position with the power button ON?
Light will activate when lid is open.
Is the Grill Out® Handle Light activated?
Press the power button.
*GQSPCMFNTDBOOPUCFDPSSFDUFECZVTJOHUIFTFNFUIPETQMFBTFDPOUBDUUIF$VTUPNFS4FSWJDF3FQSFTFOUBUJWFJOZPVSBSFBVTJOHUIFDPOUBDUJOGPSNBUJPOPOPVS
XFCTJUF-PHPOUPXXXXFCFSDPN®
To replace batteries, remove lightpod by removing screw . Push tab and pull apart.
2
1
WWW.WEBER.COM®
31
MAINTENANCE
$-&"/*/(
8&#&3®41*%&3*/4&$54$3&&/4
8"3/*/(5VSOZPVS8FCFS®HBTCBSCFDVF0''BOEXBJUGPS
JUUPDPPMCFGPSFDMFBOJOH
Your Weber® gas grill, as well as any outdoor gas appliance, is a target for spiders and
other insects. They can nest in the venturi section of the burner tube. This blocks the
normal gas flow, and can cause the gas to flow back out of the air shutter. This could
result in a fire in and around the air shutter, causing serious damage to your grill.
0VUTJEFTVSGBDFT6TFBXBSNTPBQZXBUFSTPMVUJPOUPDMFBOUIFOSJOTFXJUIXBUFS
$"65*0/%POPUVTFPWFODMFBOFSBCSBTJWFDMFBOTFST
LJUDIFODMFBOTFST
DMFBOFSTUIBUDPOUBJODJUSVTQSPEVDUTPS
BCSBTJWFDMFBOJOHQBETPOCBSCFDVFPSDBSUTVSGBDFT
$PPLJOHHSBUFT$MFBOXJUIBTVJUBCMFTUBJOMFTTTUFFMCSJTUMFCSVTI"TOFFEFE
remove from grill and wash with warm soapy water, then rinse with water.
For availability of replacement cooking grates, contact the Customer Service
Representative in your region using the contact information on our web site.
Log onto www.weber.com®.
$BUDIQBO%JTQPTBCMFGPJMUSBZTBSFBWBJMBCMFPSZPVDBOMJOFUIFDBUDIQBOXJUI
aluminum foil. To clean the catch pan, wash with warm, soapy water; then rinse.
*OTJEFDPPLCPY#SVTIBOZEFCSJTPGGPGCVSOFSUVCFT%0/05&/-"3(?/&3
PORTS (OPENINGS). Wash inside of cookbox with warm, soapy water and a water
rinse.
*OTJEFMJE8IJMFMJEJTXBSNXJQFJOTJEFXJUIQBQFSUPXFMUPQSFWFOUHSFBTFCVJMEVQ
Flaking built-up grease resembles paint flakes.
The burner tube air shutter is fitted with a stainless steel screen to prevent spiders
and other insects access to the burner tube through the air shutter openings.
8FSFDPNNFOEUIBUZPVJOTQFDUUIFTQJEFSJOTFDUTDSFFOBUMFBTUPODFBZFBS
3FGFSUPi"//6"-."*/5&/"/$&u"MTPJOTQFDUBOEDMFBOUIFUIFTQJEFSJOTFDU
TDSFFOJGBOZPGUIFGPMMPXJOHTZNQUPNTTIPVMEFWFSPDDVS
A)
B)
C)
D)
Gas is smelled in conjunction with burner flames that appear yellow and lazy.
Grill does not reach temperature.
Grill heats unevenly.
Burner does not ignite.
%"/(&3
'BJMVSFUPDPSSFDUUIFBCPWFNFOUJPOFETZNQUPNTNBZSFTVMU
JOBGJSFXIJDIDBODBVTFTFSJPVTCPEJMZJOKVSZPSEFBUIBOE
DBVTFEBNBHFUPQSPQFSUZX
4XJOHVQXPSLUBCMFT8BTIXJUIBTPGUDMPUIBOEBTPBQBOEXBUFSTPMVUJPO%POPU
VTFDMFBOFSTUIBUDPOUBJOBDJENJOFSBMTQJSJUTPSYZMFOF3JOTFXFMMBGUFSDMFBOJOH
4XJOHVQXPSLUBCMFTBSFOPUUPCFVTFEBTDVUUJOHCPBSETX
1
2
1
2
32
MAINTENANCE
#63/&356#&$-&"/*/(033&1-"$&.&/5
You will need a flathead screwdriver.
A) Your Weber® gas barbecue must be OFF and cool.
B) Turn gas OFF at source.
C) Open lid and remove the cooking grates.
1
2
#VSOFS5VCF3FNPWBM
A) Remove the ¼-20 screw that holds the burner tube to the cookbox .
#
3PUBUFUIFPVUTJEFCVSOFS4MJEFBOEMJGUCVSOFSBXBZGSPNCVSOFSPSJGJDFBOE
remove from cookbox.
C) Repeat this procedure for the inside burner .
$"65*0/$BSFNVTUCFUBLFOXIFOSFNPWJOHPS
SFJOTUBMMJOHCVSOFSUVCFT%POPUGPSDFPSCFOEUIFHBTMJOFT
UIBUDPOOFDUUIFCVSOFSUVCFTUPUIFDPOUSPMWBMWFT
#VSOFS5VCF$MFBOJOH
A) Look inside each burner with a flashlight .
B) Clean the inside of the burners with a wire (a straightened-out coat hanger will
work) .
C) Check and clean the air shutter openings at the ends of the burners . Check and
clean the valve orifices at the base of the burner valves . Use a steel bristle brush
to clean outside of burners. These actions are to make sure all the burner ports are
fully open.
$"65*0/%POPUFOMBSHFUIFCVSOFSQPSUTXIFODMFBOJOH
D) Lightly tap each burner to get debris and dirt out of the burner tube. Once the
spider/insect screens and burners are clean, reinstall the burners.
#VSOFS5VCF3FJOTUBMMBUJPO
A) To reinstall the burner tubes, reverse steps for “Burner Tube Removal” as previously
described. Check for proper assembly before fastening burner tubes in place.
$"65*0/5IFCVSOFSPQFOJOHT
NVTUCFQPTJUJPOFE
QSPQFSMZPWFSUIFWBMWFPSJGJDFT
8"3/*/("GUFSSFJOTUBMMJOHUIFCVSOFSTUIFHBT
DPOOFDUJPOTTIPVMECFMFBLDIFDLFEXJUIBTPBQBOEXBUFS
TPMVUJPOCFGPSFVTJOHUIFCBSCFDVF3FGFSUPi$)&$,'03
("4-&",4uX
3
6
4
7
5
8
9
WWW.WEBER.COM®
33
MAINTENANCE
164)#6550/*(/*5*0/4:45&.01&3"5*0/42
If the push-button ignition system fails to ignite, be sure there is gas flow by attempting to
match light your burners. Refer to “MANUAL IGNITION.” If match lighting is successful,
the problem lies in the ignition system.
8"3/*/("MMHBTDPOUSPMTBOETVQQMZWBMWFTTIPVMECFJO
UIF0''QPTJUJPO
r $IFDLUIBUCPUIJHOJUJPOXJSFTBSFBUUBDIFEQSPQFSMZUPJHOJUFSFMFDUSPEFT
.
r 7FSJGZUIBUUIFJHOJUJPOCVUUPOQVTIFTJODMJDLTBOESFUVSOTUPUIFPVUQPTJUJPO
1
1
*GUIFJHOJUJPOTZTUFNTUJMMGBJMTUPMJHIUDPOUBDUUIF$VTUPNFS4FSWJDF
3FQSFTFOUBUJWFJOZPVSBSFBVTJOHUIFDPOUBDUJOGPSNBUJPOPOPVSXFCTJUF-PH
POUPXXXXFCFSDPN® X
&-&$530/*$*(/*5*0/4:45&.01&3"5*0/42
If the electronic ignition system fails to ignite, be sure there is gas flow by attempting to
match light your burners. Refer to “MANUAL IGNITION.” If match lighting is successful,
the problem lies in the electronic ignition system.
8"3/*/("MMHBTDPOUSPMTBOETVQQMZWBMWFTTIPVMECFJO
UIF0''QPTJUJPO
r $IFDLUIBUCPUIUIFCMBDL
and white wires are attached properly to the igniter
electrodes on the ignition module.
r 7FSJGZUIBUUIF"""CBUUFSZBMLBMJOFPOMZ
JTJOHPPEDPOEJUJPOBOEJOTUBMMFEDPSSFDUMZ
Some batteries have a plastic protective wrap around them. This plastic must be
removed. Do not confuse the plastic protective wrap with the battery label.
r .BLFTVSFUIFFMFDUSPOJDJHOJUJPOCVUUPOJTXPSLJOHCZMJTUFOJOHBOEMPPLJOHGPSTQBSLT
at burner.
*GUIFFMFDUSPOJDJHOJUJPOTZTUFNTUJMMGBJMTUPMJHIUDPOUBDUUIF$VTUPNFS4FSWJDF
3FQSFTFOUBUJWFJOZPVSBSFBVTJOHUIFDPOUBDUJOGPSNBUJPOPOPVSXFCTJUF-PH
POUPXXXXFCFSDPN® X
34
1
2
MAINTENANCE
"//6"-."*/5&/"/$&
*OTQFDUJPOBOE$MFBOJOHPGUIF4QJEFS*OTFDU4DSFFOT
To inspect the spider/insect screens, look under right swing-up work surface behind the
control knobs. If there is dust or dirt on the screens, remove the burners to clean the
screens.
Brush the spider/insect screens lightly with a soft bristle brush (i.e., an old toothbrush).
$"65*0/%POPUDMFBOUIFTQJEFSJOTFDUTDSFFOTXJUIIBSE
PSTIBSQUPPMT%POPUEJTMPEHFUIFTQJEFSJOTFDUTDSFFOTPS
FOMBSHFUIFTDSFFOPQFOJOHT
Lightly tap the burners to get debris and dirt out of the burner tubes. Once the spider/
insect screens and burners are clean, reinstall the burners.
If the spider/insect screens become damaged or cannot be cleaned, please contact the
Customer Service Representative in your area using the contact information on our web
site. Log onto www.weber.com®.
.BJO#VSOFS'MBNF1BUUFSO
The Weber® gas barbecue burner has been factory set for the correct air and gas
mixture. The correct flame pattern is shown.
A)
B)
C)
D)
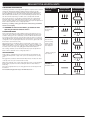
Burner tube Tips occasionally flicker yellow Light blue Dark blue If the flames do not appear to be uniform throughout the burner tube, follow the burner
cleaning procedures. X
1
2
3
4
WWW.WEBER.COM®
35
"55&/5*0/5IJTQSPEVDUIBTCFFOTBGFUZUFTUFEBOEJTPOMZDFSUJGJFEGPSVTFJOBTQFDJGJDDPVOUSZ3FGFSUPDPVOUSZ
EFTJHOBUJPOMPDBUFEPOPVUFSDBSUPO
These parts may be gas carrying or gas burning components. Please contact Weber-Stephen Products LLC, Customer Service
Department for genuine Weber-Stephen Products LLC replacement part(s) information.
8"3/*/(%POPUBUUFNQUUPNBLFBOZSFQBJSUPHBTDBSSZJOHHBTCVSOJOHJHOJUFSDPNQPOFOUTPSTUSVDUVSBM
DPNQPOFOUTXJUIPVUDPOUBDUJOH8FCFS4UFQIFO1SPEVDUT--$$VTUPNFS4FSWJDF%FQBSUNFOU:PVSBDUJPOTJGZPVGBJM
UPGPMMPXUIJT1SPEVDU8BSOJOHNBZDBVTFBGJSFBOFYQMPTJPOPSTUSVDUVSBMGBJMVSFSFTVMUJOHJOTFSJPVTQFSTPOBMJOKVSZ
PSEFBUIBTXFMMBTEBNBHFUPQSPQFSUZ
WEBER-STEPHEN PRODUCTS LLC
www.weber.com®
© 2011 Designed and engineered by Weber-Stephen Products LLC,
a Delaware limited liability company, located at 200 East Daniels Road, Palatine, Illinois 60067 U.S.A.
Printed in U.S.A.